
Lumix G 45175mm f45.6 powerzoom - Camera lens PANASONIC - Free user manual and instructions
Find the device manual for free Lumix G 45175mm f45.6 powerzoom PANASONIC in PDF.
| Product Type | Interchangeable lens for digital camera |
| Brand | Panasonic |
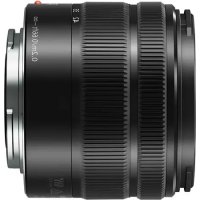
| Model | Lumix G X VARIO PZ 45-175 mm / F4.0-5.6 ASPH. / POWER O.I.S. |
| Mount | Micro Four Thirds |
| Focal length | 45 to 175 mm (35 mm equivalent: 90 to 350 mm) |
| Maximum aperture | F4.0 (wide-angle) to F5.6 (telephoto) |
| Minimum aperture | F22 |
| Optical construction | 14 elements in 10 groups (2 aspherical lenses, 2 ED lenses) |
| Nano coating | Yes |
| Image stabilizer | Optical (POWER O.I.S.), controlled from the body |
| Minimum focus | 0.9 m (from the reference line) |
| Maximum magnification | 0.2× (35 mm equivalent: 0.4×) |
| Filter diameter | 46 mm |
| Maximum diameter | Approx. 61.6 mm |
| Total length | Approx. 90.0 mm (from tip to mount base) |
| Weight | Approx. 210 g |
| Angle of view | 27° (wide-angle) to 7.1° (telephoto) |
| Included accessories | Storage bag, lens hood, lens cap, rear cap |
| Maintenance and cleaning | Wipe with a soft, dry cloth; do not use solvents; protect from sand and moisture |
| Precautions | Avoid magnetic fields, condensation (leave 2 h in a plastic bag), do not disassemble |
| Compatibility | Micro Four Thirds mount digital cameras; not compatible with Four Thirds |
| Repairability | Do not attempt self-repair; contact the manufacturer or an authorized service |
Frequently Asked Questions - Lumix G 45175mm f45.6 powerzoom PANASONIC
User questions about Lumix G 45175mm f45.6 powerzoom PANASONIC
0 question about this device. Answer the ones you know or ask your own.
Ask a new question about this device
Download the instructions for your Camera lens in PDF format for free! Find your manual Lumix G 45175mm f45.6 powerzoom - PANASONIC and take your electronic device back in hand. On this page are published all the documents necessary for the use of your device. Lumix G 45175mm f45.6 powerzoom by PANASONIC.
USER MANUAL Lumix G 45175mm f45.6 powerzoom PANASONIC
Operating Instructions
INTERCHANGEABLE LENS FOR DIGITAL CAMERA
Model No. H-PS45175
LUMIX
Before use, please read these instructions completely.


VQT3R90
Contents
Information for Your Safety. 2
Precautions 4
Supplied Accessories 5
Attaching/Detaching the Lens. 5
Names and Functions of Components 7
Cautions for Use. 9
Troubleshooting 10
Specifications. 11
Information for Your Safety
Keep the unit as far away as possible from electromagnetic equipment (such as microwave ovens, TVs, video games, radio transmitters, high-voltage lines etc.).
- Do not use the camera near cell phones because doing so may result in noise adversely affecting the pictures and sound.
- If the camera is adversely affected by electromagnetic equipment and stops functioning properly, turn the camera off and remove the battery and/or the connected AC adaptor. Then reinsert the battery and/or reconnect the AC adaptor and turn the camera on.
The lens can be used with a digital camera compatible with the lens mount standard for the "Micro Four Thirds™ System".
It cannot be mounted on the Four Third's mount specification camera.
- The digital camera illustrations in these operating instructions show DMC-G3 as an example.
- The appearance and specifications of products described in this manual may differ from the actual products you have purchased due to later enhancements.
- Micro Four Thirds™ and Micro Four Thirds Logo marks are trademarks or registered trademarks of Olympus Imaging Corporation, in Japan, the United States, the European Union and other countries.
- Four Thirds™ and Four Thirds Logo marks are trademarks or registered trademarks of Olympus Imaging Corporation, in Japan, the United States, the European Union and other countries.
G MICRO SYSTEM is a lens exchange type digital camera system of LUMIX based on a Micro Four Thirds System standard.
- Other names of systems and products mentioned in these instructions are usually the registered trademarks or trademarks of the manufacturers who developed the system or product concerned.
Information on Disposal for Users of Waste Electrical & Electronic Equipment (private households)

This symbol on the products and/or accompanying documents means that used electrical and electronic products should not be mixed with general household waste. For proper treatment, recovery and recycling, please take these products to designated collection points, where they will be accepted on a free of charge basis. Alternatively, in some countries you may be able to return your products to your local retailer upon the purchase of an equivalent new product.
Disposing of this product correctly will help to save valuable resources and prevent any potential negative effects on human health and the environment which could otherwise arise from inappropriate waste handling. Please contact your local authority for further details of your nearest designated collection point.
Penalties may be applicable for incorrect disposal of this waste, in accordance with national legislation.
For business users in the European Union
If you wish to discard electrical and electronic equipment, please contact your dealer or supplier for further information.
Information on Disposal in other Countries outside the European Union
This symbol is only valid in the European Union.
If you wish to discard this product, please contact your local authorities or dealer and ask for the correct method of disposal.
Precautions
Lens Care
- Sand and dust can damage the lens. Make sure that no sand or dust gets inside the lens or the terminals when using the lens on a beach, etc.
- This lens is not waterproof. If drops of water get onto the lens, wipe the lens with a dry cloth.
- Do not press the lens with excessive force.
- When there is dirt (water, oil, and fingerprints, etc.) on the surface of the lens, the picture may be affected. Lightly wipe the surface of the lens with a soft, dry cloth before and after taking pictures.
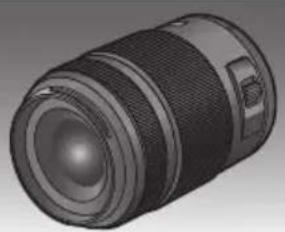
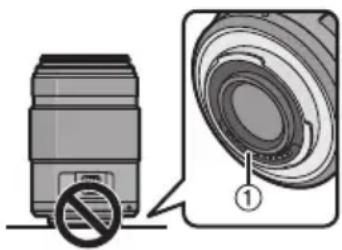
- Do not place the lens mount facing downwards.
Do not allow the lens contact points ① to become dirty.
About Condensation (Fogging of the Lens)
- Condensation occurs when there are differences in temperature and humidity as described below. Condensation can cause the lens to become dirty and lead to mold and malfunctioning, so exercise caution in the following situations:
- When the camera is brought indoors from outside during cold weather
- When the camera is brought into an air-conditioned car
- When cold air from an air conditioner is directly blown onto the lens
Inhumidplaces - Put the camera into a plastic bag to allow it to acclimatize to the surrounding temperature in order to prevent condensation. If condensation occurs, turn the power off and leave it for about two hours. Once the camera acclimatizes to the surrounding temperature the condensation will go away naturally.
Supplied Accessories
[Inspection to be performed when you unpack the unit]
When removing the unit from its packing box, check that the main unit and the supplied accessories are there and also check their external appearance and functions to verify that they have not sustained any damage during distribution and transportation. If you discover any trouble, contact your vendor before using the product.
Product numbers correct as of August 2011. These may be subject to change.
![PANASONIC Lumix G 45175mm f45.6 powerzoom - [Inspection to be performed when you unpack the unit] - 1](/content/2026/03/437346/images/6c2b59d018e6e62ff9e16cfc074f56ae99a64bec8742b0fdfde36bceb6c35ece.jpg)
1 Lens Storage Bag
2 Lens Hood
3 Lens Cap
4 Lens Rear Cap (The lens rear cap and lens cap are attached to the interchangeable lens at the time of purchase.)
Attaching/Detaching the Lens
Refer also to the camera's operating instructions for attaching and detaching the lens.
Attaching the Lens
- Check that the camera is turned off.
1 Turn the lens rear cap to detach it.
A: Lens Rear Cap
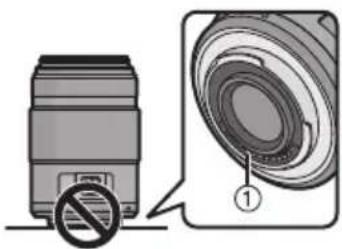
2 Align the lens fitting marks (red marks) on the camera body and the lens and then rotate the lens in the direction of the arrow until it clicks.
- Do not press the lens release button ⑤ when you attach a lens.
- Do not try to attach the lens when holding it at an angle to the camera body as the lens mount may get scratched.
- Check that the lens is attached correctly.
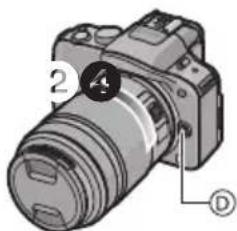
Detaching the Lens
- Check that the camera is turned off.
While pressing on the lens release button ① rotate the lens toward the arrow until it stops and then remove.
- Attach the lens rear cap so that the lens contact point does not get scratched.
- Attach the body cap to the camera so no dirt or dust will get inside the main unit.
Attaching and Detaching the Lens Cap
Pinch the lens cap as shown in the figure to attach or detach.
- Be careful not to lose the lens cap.

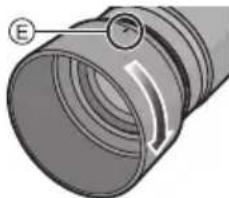
Attaching the Lens Hood (Supplied Accessory)
Insert the lens hood into the lens, and turn in the direction of the arrow until it stops.
E: Fit to the mark
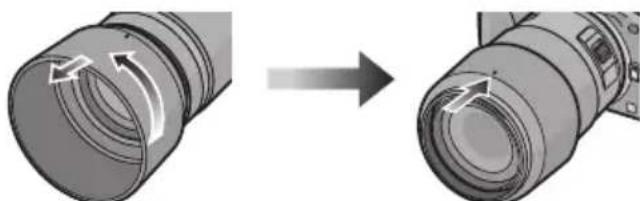
■ Temporarily Storing the Lens Hood
1 Turn the lens hood in the direction of the arrow to detach it.
2 Reverse the lens hood and then attach it in the same way as shown previously.
- When taking pictures with the flash with the lens hood attached, the lower portion of the screen may turn dark (vignetting effect) and the control of the flash may be disabled because the photo flash may be obscured by the lens hood. We recommend detaching the lens hood.
- When using the AF assist lamp in the dark, detach the lens hood.
Attaching Filters
- Vignetting may occur if using 2 or more MC protectors (optional: DMW-LMC46), PL filters (optional: DMW-LPL46) or ND filters (optional: DMW-LND46), or if using thick protectors and/or filters.
- The filter may become impossible to remove if excessively tightened, so please refrain from tightening it too strongly.
It is possible to attach the lens cap with the filter already attached. - You cannot attach a conversion lens or adaptor to this lens. A filter may be used, but attaching any other element may cause damage to the lens.
Names and Functions of Components
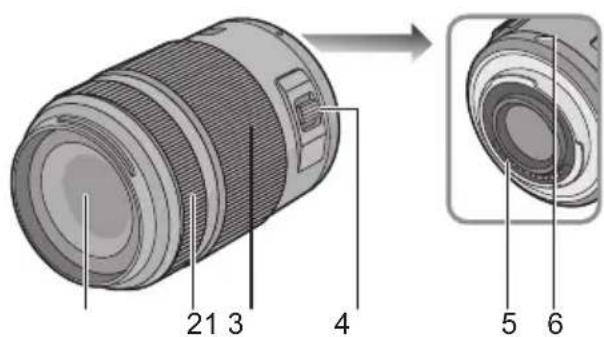
1 Lens surface
2 Focus ring Rotate to focus when taking pictures with manual focus.
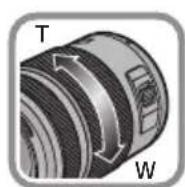
3 Zoom ring
Rotate the zoom ring to the [T]
(Tele side) or [W] (Wide side).
[T]: To make subjects appear closer use (Tele)
[W]: To make subjects appear further away use (Wide)
- The zoom speed varies depending on the speed to rotate the ring.
4 Zoom lever
Move the zoom lever to the [T]
(Tele side) or [W] (Wide side).
[T]: To make subjects appear closer use (Tele)
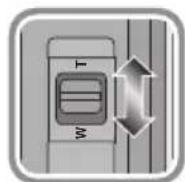
[W]: To make subjects appear further away use (Wide)
The zoom speed varies depending on the range over which the zoom lever is moved.
- If you take your finger off the zoom lever during zoom operation while recording a motion picture, the operation sound may be recorded. When returning the zoom lever to the original position, move it quietly.
5 Contact points
6 Lens fitting mark
8
VQT3R90

Note
- Zoom speed will be slower than normal when recording a motion picture.
- When flash recording with a close subject, the light of the flash will be blocked by the lens and part of the picture may be dark. Check the distance from the subject when recording.
- There is no indication of focal length on the lens. The focal length is displayed on the screen of the digital camera when attached to the compatible digital camera. Focal length is not displayed on the digital camera that is not compatible. For details on the digital camera used, refer to the website.
http://panasonic.jp/support/global/cs/dsc/
(This Site is English only.)
Cautions for Use
Take care not to drop or knock the lens. Also take care not to put a lot of pressure on the lens.
- Take care not to drop the bag that you inserted the lens in as it may strongly shock the lens. The camera may stop operating normally and pictures may no longer be recorded. Also, the lens may be damaged.
When using pesticides and other volatile substances around the camera make sure that they do not get onto the lens.
- If such substances get onto the lens they can damage the exterior case or cause the paint to peel.
Do not carry the unit when it is still attached to the camera body.
-
Under no circumstances should the unit be stored in any of the following locations since doing so may cause problems in operation or malfunctioning.
-
In direct sunlight or on a beach in summer
-
In locations with high temperatures and humidity levels or where the changes in temperature and humidity are acute
-
In locations with high concentrations of sand, dust or dirt
-Where there is fire - Near heaters, air conditioners or humidifiers
- Where water may make the unit wet
-Where there is vibration - Inside a vehicle
Refer also to the operating instructions of the digital camera. - When the unit is not going to be used for a prolonged period, we recommend storing with a desiccant (silica gel). Failure to do so may result in performance failure caused by mold, etc. It is recommended that you check the unit's operation prior to use.
- Do not leave the lens in contact with rubber or plastic products for extended periods of time.
- Do not touch the lens contact point. Doing so can cause failure of the unit.
- Do not disassemble or alter the unit.
Do not use benzine, thinner, alcohol or other similar cleaning agents to clean the lens glass or exterior cabinet.
- Using solvents can damage the lens or cause the paint to peel.
- Wipe off any dust or fingerprints with a soft, dry cloth.
- Use a dry, dust cloth to remove dirt and dust on the zoom ring and the focus ring.
- Do not use a household detergent or a chemically treated cloth.
Troubleshooting
A sound is heard when the camera is turned on or off.
- This is the sound of lens or aperture movement and is not a malfunction.
When this lens is attached to digital camera, stabilizer function cannot be turned off or stabilizer function does not work.
- The Optical Image Stabilizer function of this lens only works correctly with supported cameras.
When older Panasonic digital cameras (DMC-GF1, DMC-GH1, DMC-G1) are used, [STABILIZER] in the [REC] mode menu cannot be set to [OFF]. It is recommended to update the firmware of the digital camera at the following website. http://panasonic.jp/support/global/cs/dsc/download/
When using this lens with another make of digital cameras, the Optical Image Stabilizer function will not work. (As of August 2011) For details, contact the respective company.
Specifications
INTERCHANGEABLE LENS FOR DIGITAL CAMERA
"LUMIX G X VARIO PZ 45-175 mm/F4.0-5.6 ASPH./POWER O.I.S."
| Focal length f=45 mm to 175 mm | (35 mm film camera equivalent: 90 mm to 350 mm) |
| Aperture type 7 diaphragm blades/circular aperture diaphragm | |
| Aperture range F4.0 (Wide) to F5.6 (Tele) | |
| Minimum aperture value F22 | |
| Lens construction | 14 elements in 10 groups (2 aspherical lenses, 2 ED Lens) |
| Nano surface coating Yes | |
| In focus distance 0.9 m | to ∞ (from the focus distance reference line) |
| Maximum image magnification | 0.2× (35 mm film camera equivalent: 0.4×) |
| Optical image stabilizer Available | |
| [O.I.S.] switch None (Setting of the [STABILIZER] is done in [REC] mode menu by LUMIX digital cameras.) | |
| Mount "Micro Four Thirds Mount" | |
| Angle of view | 27° (Wide) to 7.1° (Tele) |
| Filter diameter | 46 mm |
| Max. diameter | Approx. 61.6 mm |
| Overall length | Approx. 90.0 mm (from the tip of the lens to the base side of the lens mount) |
| Mass | Approx. 210 g |
Inhalt
XpaHnTe npH6Op BdaJIOn OT nCTOuHnKOB 3NeKTPoMaHHTHO rN3JyUeHnRA (HaNPmep, MKNpOBoHOBbIX Neey, TeJeBn3OpOB, O6OpYDoBaHnA DnBnDeOuRr, paDnOnepeDaTChKOB, BBICOKOBbTHbIX JINHH N T.D.).
He noIb3yIteCb foTOkAmepoB 6bln3n COTOBbx TeJeFOHOB, TAK KaK TeJeFOHBI MOrYT Bbl3BaTb NOMEXN, OTPuCaTeJbHO Cka3bIBaHOUneCRA Ha KaueCTBe CHIMKOB n 3Byka.
- Ecni KaMepa noDbBepraetc HeratNBHOMy BnnaHIO 3JneKTPomarHHTHO n3IpyeHn I nepeCTae pa6OtaTb HopMaIbHO, BbIKIOuHTe KaMepy, n3BNeKeTe 6aTaapeIO n/nn NoDKNIOUeHHbI CEteBOI aAdanTep NepemEHoro TOka. 3aTeM CHOBA BCTaBBTe 6aTaapeIO n/nn CHOBa NOkNIQUHTe CeTEBOI aAdanTep NepemEHoro TOka IN BKIOUHTe KaMepy.
ObekTMB MoKET NcNoJb30BaTbC8 C uNΦpOBOI Kamepoi, CoBmecTUMo CO CTaHdApTOM KpePJIeHnroObekTUBOB "Micro Four ThirdsTM System".
He npedycmptepha ero yctahOBka Ha
fotokamepblo cneuukauuee KpePnEHHa Four ThirdsTM.
Ha nllnoctpaunx uqpoBOn kamepbI B daHbIX Hnctpykunx NO 3KcNpyatauIN B KaueCTBe npimepa noka3ah DMC-G3.
BHeuHn BnCnCneunKauin npOdyKTOB, ONcaHHbIe B DaHHOM pyKOBOdCTBe, MOryT OTJNaTbcr O T paKTnuecknx npNo6peTeHHbIX npOdyKTOB BBNDy 60nee No3dHx yJyUweHn.
- Micro Four Thirds™ и 3нakи Лоротina Micro Four Thirds явсяютая Варны IMN 3нakам Или ЗaperпстриpoВаHHыIMN Товарны IMN 3нakам Olympus Imaging Corporation в Рнои, Седионеньх Штатax,ЕрoneckomСоюз e Другх стразан.
Four Thirds™ 3NaKn norotuna Four Thirds ABNIAOTCA TOBAPHbIMN 3HaKaAMN ININ 3apeRNCPTPnpoBAHHbIMN TOBAPHbIMN 3HaKaAMN Olympus Imaging Corporation B JnoHN, CoedInHeHHbIX UtaTax, EBponeckom CoO3e IN DpyrNX CTpaHax.
G MICRO SYSTEM ABnIeTc nCTeMoOn 06beKtNBOB CMeHHoro TnPa IJRA UcΦpOBbIX kamep LUMIX, pa3pa6oTaHHo Ha OCHOb cTaNapTa Micro Four Thirds System.
-Дугп.e Ha3BaHnI CnCTeM I npOdyKTOB, ynomyHTbIe B DaHHoN IHCTpyKUIN NO 3KcIIyatauIN, O6bIuHO YBJIaHOTc3apeHnCTpnpOBaHHbIM TOBapHbIM 3HaKaMN INTOBapHbIM 3HaKaMN pOn13BOdnteNe, KOTOpbIe pa3pa60TaIIy NOMaHyTuO CnCTeMy INI npOdyKT.
Ppabnla 3kcnnyataun
YxOa 3a o6bEeKTHBOM
- Pecok n nbilb MoryT npnbEcTN K NOBpeXdeHnO obBeKtNbA. Pn NcNoIb3oBaHHN ObBeKtNbHa Ha nJxHe n T.n. y6eDntecb, YTO BHyTpN ObBeKtNbA n rHe3d HET necka n nbiIN.
-Данн布局бгNTВ HeЯВлгETCBAOHeHPOHuaeMbIM.EcHnHaObgKTHBNONaJIKNaJIINBObl, BbITpHTeObgKTHB cyXoTNKaHbIO. - HeNb3a CnIbHo HaxImaTb Ha 06BeKtNB.
B cnyuae nonaadaHna nobepxHOCTb oBeKTnBa rpa3n (BObl, Macna, OTneuATKOB naIbueB nT. d.) KaueCTBO CHIMKA MOKeY yXdUnTBcR. CJeDyET OCTOPOXHO BbITepeTb NOBepxHOCTb OBeKTnBA MmKoN cyXOIN KAHbIO nepeD cBeMKoN.
He CTaBbTe ObBeKTHB MOHTaXHOH NOBepxHOCTbIO BHN3. He DonyckaIte nonaDaHne 3arpy3HeHn Ha MOHTaXHbIe NOBepxHOCTN ① OBeKTHBa.
O KOHdEhcau (3aOnTeBaHm n obBeKtNbA)
- KoHdEhcaqnI npOncxOaIIT npi pa3Hnue B TemnepaTpe n BnaXHoCTn, KaK OnPcAHO HnKe. KoHdEhcaqnMoKet npuBecTu K 3aRpy3HeHnIO o6bekTnBa, NOBLeHnIO PnCeHN HeNCpabHocTei, N03ToMy Heo6xOJmO Co6nIoDaTb OCTopoxHoCTb BCNeDyUOux CNTyaCuaRx:
- npBHeCenKamepbIB NOMEeHne C yIuCbIB XOJODHyIO NOOy
- npBHeceHn KaMepb B cAnOH aBTOMo6nla, rpepa6oTaet KOHduuOHeP
-ecnI NOTOK XOLOHOrO BO3dyxa n3 KOHNIOHepa HAppaBneH npraMo Ha 06bekTNB -BO BJaXHBIX MecTax - ДяпедOTВрашени КОндЕнcaциnomeCTHTe KaMepy B Пл actIKOBbl naket,чTObI ee TempepaTpy cpaBnJIacb c TempepaTpyo8 OkpykaOSeRo BO3dYxa.Прв BO3HnKHOBeHnKOHdeHcaCIN BbIKNIOHTe KaMepy N OCTaBBTe ee npIMepHo Ha dBa Yaca.Korda TempepaTpy KaMepbI cpABHReTcR C TempepaTpyo OKpykaOSeRo BO3dYxa,3anOTeBaHne NCUe3HET ECTeCTBeHHbIM O6pa3OM.
CTapaIteCb He poHrTb I He ydapraTb o6BeKTHB.
TakKe cTaapaIteCb He noDBepratb o6BeKTHB
Upe3MepHomy daBnEHIO.
CneIte 3a TeM, YTO6bI He yPOHITb B CymKy, B KOTOpYIO Bbl NIOOXINIOObBeKTNB, NCKOJIbKY 3TO MOXET PnIBeCTN K NOBpeKDeHNIO ObBeKTNbA. KaMepa MoXET NepeCTaTb HOpMaJbHO pa6oTaTb, I DaJIbHeiHa 3aPiNCb CHIMKOB MOXET OKa3aTbcr HEBO3MOXHOH.
Pn nCnoB3OBAHnn neCTnUdoB n dpynx
IeTyuX BeuecTB B6n3n KamepbI y6eInTecb,
yTO OHn He nonaAHT Ha o6bekTNB.
Pursuant to at the directive 2004/108/EC, article 9(2)
Panasonic Testing Centre
Panasonic Marketing Europe GmbH
Winsberging 15, 22525 Hamburg, Germany

VQT3R90
F0811YS0
Panasonic Corporation
Web Site: http://panasonic.net
© Panasonic Corporation 2011


- Operating Instructions
- INTERCHANGEABLE LENS FOR DIGITAL CAMERA
- Model No. H-PS45175
- Contents
- Information for Your Safety
- Information on Disposal for Users of Waste Electrical & Electronic Equipment (private households)
- For business users in the European Union
- Information on Disposal in other Countries outside the European Union
- Precautions
- Lens Care
- About Condensation (Fogging of the Lens)
- Supplied Accessories
- [Inspection to be performed when you unpack the unit]
- Attaching/Detaching the Lens
- Attaching the Lens
- Turn the lens rear cap to detach it.
- Align the lens fitting marks (red marks) on the camera body and the lens and then rotate the lens in the direction of the arrow until it clicks.
- Detaching the Lens
- Attaching and Detaching the Lens Cap
- Attaching the Lens Hood (Supplied Accessory)
- ■ Temporarily Storing the Lens Hood
- Attaching Filters
- Names and Functions of Components
- Zoom ring
- Zoom lever
- Contact points
- Lens fitting mark
- Note
- Cautions for Use
- Take care not to drop or knock the lens. Also take care not to put a lot of pressure on the lens.
- When using pesticides and other volatile substances around the camera make sure that they do not get onto the lens.
- Do not carry the unit when it is still attached to the camera body.
- Do not use benzine, thinner, alcohol or other similar cleaning agents to clean the lens glass or exterior cabinet.
- Troubleshooting
- A sound is heard when the camera is turned on or off.
- When this lens is attached to digital camera, stabilizer function cannot be turned off or stabilizer function does not work.
- Specifications
- Inhalt
- Ppabnla 3kcnnyataun
- YxOa 3a o6bEeKTHBOM
- O KOHdEhcau (3aOnTeBaHm n obBeKtNbA)
Brand : PANASONIC
Model : Lumix G 45175mm f45.6 powerzoom
Category : Camera lens