
6911HDA - Screwdriver MAKITA - Free user manual and instructions
Find the device manual for free 6911HDA MAKITA in PDF.
| Feature | Details |
|---|---|
| Product type | Screwdriver |
| Power | Not specified |
| Voltage | Not specified |
| No-load speed | Not specified |
| Maximum torque | Not specified |
| Battery capacity | Not specified |
| Weight | Not specified |
| Recommended use | Furniture assembly, DIY work |
| Maintenance | Regular cleaning, checking wear parts |
| Safety | Use safety glasses, avoid wet surfaces |
| General information | Compatible with Makita accessories, manufacturer warranty |
Frequently Asked Questions - 6911HDA MAKITA
User questions about 6911HDA MAKITA
0 question about this device. Answer the ones you know or ask your own.
Ask a new question about this device
Download the instructions for your Screwdriver in PDF format for free! Find your manual 6911HDA - MAKITA and take your electronic device back in hand. On this page are published all the documents necessary for the use of your device. 6911HDA by MAKITA.
USER MANUAL 6911HDA MAKITA
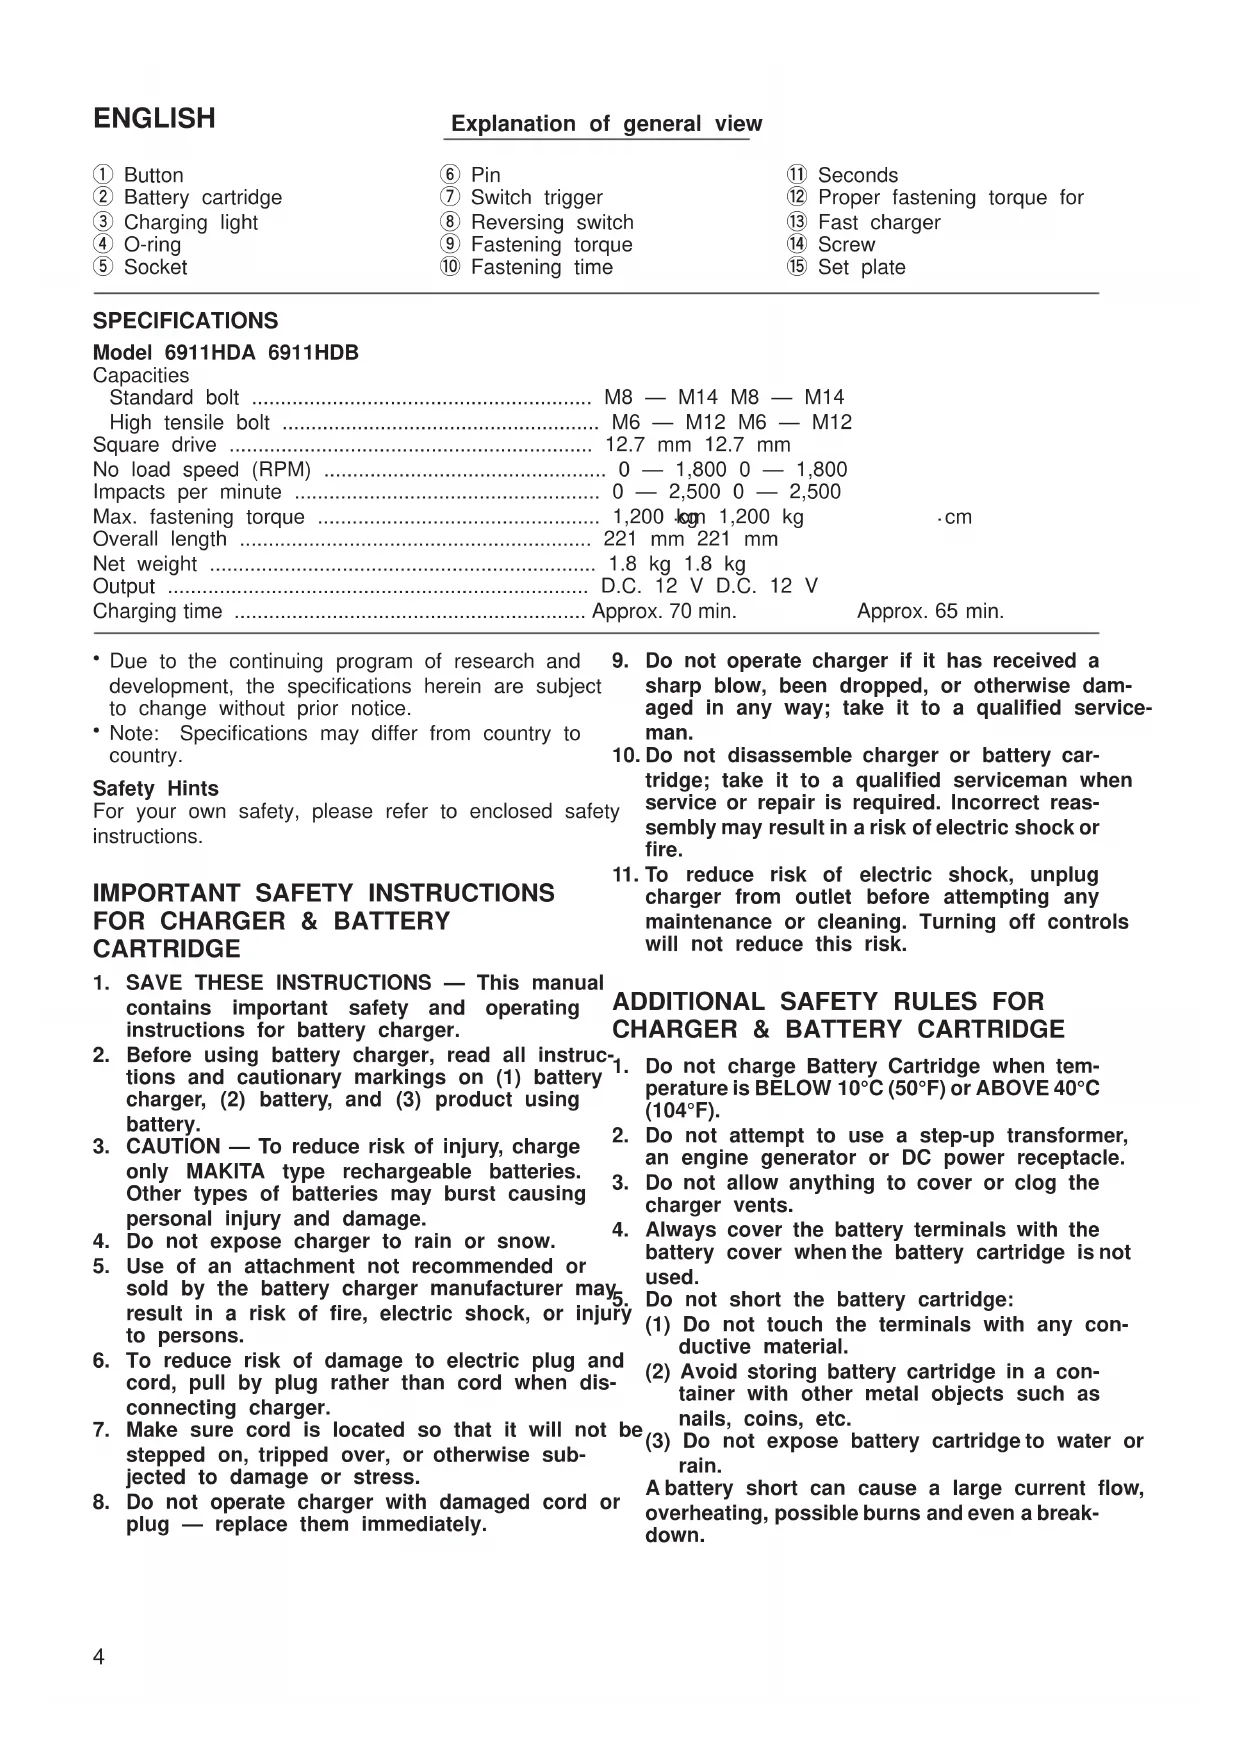
① Button
② Battery cartridge
③ Charging light
④ O-ring
⑤ Socket
⑥ Pin
⑦ Switch trigger
⑧ Reversing switch
⑨ Fastening torque
10 Fastening time
1 Seconds
② Proper fastening torque for
13 Fast charger
14 Screw
15 Set plate
SPECIFICATIONS
Model 6911HDA 6911HDB
Capacities
Standard bolt M8 - M14 M8 - M14
High tensile bolt M6 - M12 M6 - M12
Square drive 12.7 mm 12.7 mm
No load speed (RPM) 0 - 1,800 0 - 1,800
Impacts per minute 0 - 2,500 0 - 2,500
Max. fastening torque 1,200 kg 1,200 kg cm
Overall length 221 mm 221 mm
Net weight 1.8 kg 1.8 kg
Output D.C. 12 V D.C. 12 V
Charging time Approx. 70 min. Approx. 65 min.
- Due to the continuing program of research and development, the specifications herein are subject to change without prior notice.
- Note: Specifications may differ from country to country.
Safety Hints
For your own safety, please refer to enclosed safety instructions.
IMPORTANT SAFETY INSTRUCTIONS FOR CHARGER & BATTERY CARTRIDGE
- SAVE THESE INSTRUCTIONS - This manual contains important safety and operating instructions for battery charger.
- Before using battery charger, read all instructions and cautionary markings on (1) battery charger, (2) battery, and (3) product using battery.
- CAUTION - To reduce risk of injury, charge only MAKITA type rechargeable batteries. Other types of batteries may burst causing personal injury and damage.
- Do not expose charger to rain or snow.
- Use of an attachment not recommended or sold by the battery charger manufacturer may result in a risk of fire, electric shock, or injury to persons.
- To reduce risk of damage to electric plug and cord, pull by plug rather than cord when disconnecting charger.
- Make sure cord is located so that it will not be stepped on, tripped over, or otherwise subjected to damage or stress.
-
Do not operate charger with damaged cord or plug - replace them immediately.
-
Do not operate charger if it has received a sharp blow, been dropped, or otherwise damaged in any way; take it to a qualified serviceman.
- Do not disassemble charger or battery cartridge; take it to a qualified serviceman when service or repair is required. Incorrect reassembly may result in a risk of electric shock or fire.
- To reduce risk of electric shock, unplug charger from outlet before attempting any maintenance or cleaning. Turning off controls will not reduce this risk.
ADDITIONAL SAFETY RULES FOR CHARGER & BATTERY CARTRIDGE
- Do not charge Battery Cartridge when temperature is BELOW 10^ (50^) or ABOVE 40^ (104^) .
- Do not attempt to use a step-up transformer, an engine generator or DC power receptacle.
- Do not allow anything to cover or clog the charger vents.
- Always cover the battery terminals with the battery cover when the battery cartridge is not used.
Do not short the battery cartridge:
(1) Do not touch the terminals with any conductive material.
(2) Avoid storing battery cartridge in a container with other metal objects such as nails, coins, etc.
(3) Do not expose battery cartridge to water or rain.
A battery short can cause a large current flow, overheating, possible burns and even a breakdown.
- Do not store the machine and Battery Cartridge in locations where the temperature may reach or exceed 50^ (122^) .
- Do not incinerate the Battery Cartridge even if it is severely damaged or is completely worn out. The battery cartridge can explode in a fir
- Be careful not to drop, shake or strike battery
- Do not charge inside a box or container of an kind. The battery must be placed in a well ventilated area during charging.
ADDITIONAL SAFETY RULES FOR MACHINE
- Be aware that this machine is always in an operating condition, because it does not have to be plugged into an electrical outlet.
- Wear ear protectors.
- Check the socket carefully for wear, cracks or damage before installation.
- Hold the machine firmly.
- Always be sure you have a firm footing. Be sure no one is below when using the machine in high locations.
- The proper fastening torque may differ depending upon the kind or size of the bolt. Check the torque with a torque wrench.
- When driving into walls, floors or wherever "live"electrical wires may be encountered, DO NOT TOUCH ANY METAL PARTS OF THE TOOL! Hold the machine only by the insulated grasping surfaces to prevent electric shock if you drive into a "live" wire.
SAVE THESE INSTRUCTIONS.
OPERATING INSTRUCTIONS
Installing or removing battery cartridge (Fig. 1)
- Always switch off the machine before insertion or removal of the battery cartridge.
- To remove the battery cartridge, withdraw it from tool while pressing the buttons on both sides of the cartridge.
- To insert the battery cartridge, align the tongue of the battery cartridge with the groove in the housing and slip it into place. Always insert it all the way; it locks in place with a little click. If not, it may accidentally fall out of the tool, causing injury to you or someone around you.
- Do not use force when inserting the battery cartridge. If the cartridge does not slide in easily, it not being inserted correctly.
Charging
For 6911HDA (Fig. 2)
- Your new battery cartridge is not charged. You will need to charge it before use. Use the fast charger Model DC1201 to charge the battery cartridge.
Plug the fast charger into your power source. The charging light will flash in green color.
Insert the battery cartridge so that the plus and minus terminals on the battery cartridge are on the same sides as their respective markings on the fast
1) charger. Insert the cartridge fully into the port so that it rests on the charger port floor.
When the battery cartridge is inserted, the charging
light color will change from green to red and charge
hng will begin. The charging light will remain lit steadily during charging.
When charging is completed, the charging light color will change from red to green and a tone will sound steadily for about 5 seconds. The charging time is approximately one hour.
After charging, unplug the charger from the power source.
| Battery type | Capacity (mAh) | Number of cells |
| 1222 | 2,000 | 10 |
CAUTION:
The fast charger Model DC1201 is for charging a Makita battery cartridge. Never use it for other purposes or for other manufacturer's batteries.
When you charge a new battery cartridge or a battery cartridge which has not been used for a long period of time, it may not accept a full charge. This is a normal condition and does not indicate a problem. You can recharge the battery cartridge fully after discharging it completely and recharging a couple of times.
If you charge a battery cartridge from a just-operated machine or a battery cartridge which has been left in a location exposed to direct sunlight or heat for a long time, the charging light may flash in red color. If this occurs, wait for a while. Charging will begin after the battery cartridge cools. The battery cartridge will cool faster if you remove the battery cartridge from the fast charger.
If the charging light flashes alternately in green and red color and a tone sounds "beep, beep, beep, ..."
for about 20 seconds, a problem exists and charging is not possible. The terminals on the charger or battery cartridge are clogged with dust or the battery cartridge is worn out or damaged.
Forti6911HDB (Fig. 3)
- Your new battery cartridge is not charged. You will need to charge it before use. Use the fast charger Model DC1411 to charge the battery cartridge.
Plug the fast charger into your proper source. The charging light will flash in green color. - Insert the battery cartridge so that the plus and minus terminals on the battery cartridge are on the same sides as their respective markings on the fast charger. Insert the cartridge fully into the port so that it rests on the charger port floor.
When the battery cartridge is inserted, the charging light color will change from green to red and charging will begin. The charging light will remain lit steadily during charging.
- When the charging light color changes from red to Selecting correct socket green, the charging cycle is complete. The charging always use the correct size socket for bolts and nuts. Time is approximately 65 minutes. An incorrect size socket will result in inaccurate and
- If you leave the battery cartridge in the charger afferent consistent fastening torque and/or damage to the the charging cycle is complete, the charger will bolt or nut. switch into its "trickle charge (maintenance charge)" mode which will last approximately 24 hours. Installing or removing socket (Fig. 4)
- After charging, unplug the charger from the powerImportant: source. Always be
ngways use the correct size socket for bolts and nuts.
An incorrect size socket will result in inaccurate and
aithetonsistent fastening torque and/or damage to the bolt or nut.
| Battery type | Capacity (mAh) | Number of cells |
| 1233 2,200 | 10 |
CAUTION:
- The fast charger Model DC1411 is for charging Makita battery cartridge. Never use it for other purposes or for other manufacturer's batteries.
- When you charge a new battery cartridge or a battery cartridge which has not been used for a period of time, it may not accept a full charge. It is a normal condition and does not indicate a problem. You can recharge the battery cartridge fully after discharging it completely and recharging a couple of times.
- If you charge a battery cartridge from a just-operated tool or a battery cartridge which has been left in a location exposed to direct sunlight or heat for a long time, the charging light may flash in red color. If this occurs, wait for a while. Charging will begin after the battery cartridge cools. The battery cartridge will cool faster if you remove the battery cartridge from the fast charger.
- If the charging light flashes alternately in green and red color, a problem exists and charging is not possible. The terminals on the charger or battery cartridge are clogged with dust or the battery cartridge is worn out or damaged.
Trickle charge (Maintenance charge)
If you leave the battery cartridge in the charger to prevent spontaneous discharging after full charge, the charger will switch into its "trickle charge (maintenance charge)" mode and keep the battery cartridge fresh and fully charged.
Tips for maintaining maximum battery life
- Charge the battery cartridge before completely discharged.
Always stop machine operation and charge the battery cartridge when you notice less machine power.
- Never recharge a fully charged battery cartridge. NOTE:
Overcharging shortens the battery service life. - Charge the battery cartridge with room temperature at 10^ - 40^ (50^ - 104^)
Let a hot battery cartridge cool down before charging it.
Selecting correct socket
Installing or removing socket (Fig. 4)
Always be sure that the machine is switched off and the battery cartridge is removed before installing or removing the socket.
Move the O-ring out of the groove in the socket and remove the pin from the socket. Fit the socket onto the anvil of the machine so that the hole in the socket is aligned with the hole in the anvil. Insert the pin through the hole in the socket and anvil. Then return the O-ring to the original position in the socket groove to retain the pin. To remove the socket, follow the installation procedures in reverse.
Switch action (Fig. 5)
CAUTION:
Before inserting the battery cartridge into the machine, always check to see that the switch triggers actuates properly and returns to the "OFF" position when released.
To start the machine, simply pull the trigger. Machine speed is increased by increasing pressure on the trigger. Release the trigger to stop.
Reversing switch action (Fig. 6)
CAUTION:
- Always check the direction of rotation before operation.
- Use the reversing switch only after the machine comes to a complete stop. Changing the direction of rotation before the machine stops may damage the machine.
This machine has a reversing switch to change the direction of rotation. Slide the reversing switch to the left for clockwise rotation or to the right for counterclockwise rotation.
Operation (Fig. 7 & 8)
The proper fastening torque may differ depending upon the kind or size of the bolt. The relation between fastening torque and fastening time is shown in the figures.
Hold the machine firmly and place the socket over the bolt or nut. Turn the machine on and fasten for the proper fastening time.
- Hold the machine pointed straight at the bolt or nut without applying excessive pressure on the machine.
- Excessive fastening torque may damage the bolt or nut. Before starting your job, always perform a test operation to verify the adequate fastening speed and time for your bolt or nut.
The fastening torque is affected by a wide variety of factors including the following. After fastening, always check the torque with a torque wrench.
- When the battery cartridge is discharged almost completely, voltage will drop and the fastening torque will be reduced.
-
Socket
-
Failure to use the correct size socket will cause a reduction in the fastening torque.
- A worn socket (wear on the hex end or square end) will cause a reduction in the fastening torque.
Bolt
- Even though the torque coefficient and the class of bolt are the same, the proper fastening torque will differ according to the diameter of the bolt.
Even though the diameters of bolts are the same, the proper fastening torque will differ according to the torque coefficient, the class of bolt and the bolt length.
Use The use of the universal joint or the extension bar, somewhat reduces the fastening force of the impact wrench. Compensate by fastening for a longer period of time.
- Type of materials to be fastened, the manner of holding the machine and the machine speed will affect the torque.
Fastening performance
The following reference table indicates the approximate fastening capacity from a single battery charge. It differ under some conditions.
| Application Fastening time | Number of fastenings | |
| 6911HDA 6911HDB | ||
| High tensile bolt M12 3 seconds About 90 About 100 | ||
CAUTION:
If the machine is operated continuously until the battery cartridge has discharged, allow the machine to rest 15 minutes before proceeding with a fresh battery.
Installing set plate (Fig. 9)
Always install the set plate when using battery cartridges 1200, 1202 or 1202A. Install the set plate on the screw with the screw provided as shown in figure.
MAINTENANCE
CAUTION:
Always be sure that the machine is switched off. The battery cartridge is removed before carrying out any work on the machine.
To maintain product safety and reliability, repairs, maintenance or adjustment should be carried out Makita Authorized Service Center.
GUARANTEE
We guarantee Makita machines in accordance with statutory/country-specific regulations. Damage attributable to normal wear and tear, overload or improper handling will be excluded from the guarantee. In cases of complaint, please send the machine, undismantled, to with the enclosed GUARANTEE CERTIFICATE, to Your dealer or the Makita Service Center.
① Bouton
② Batterie
③ Temoin de recharge
④ Joint torque
⑤ Douille
① Knap
② Akku
③ Ladelampe
④ O-ring
⑤ Top
① Knapp
② Batteri
③ Ladelampe
④ O-ring
⑤ Muffe
⑥ Shift
⑦ Startbryter
⑧ Reversbryter
9 Tiltrekningsmoment
10 Tiltrekningstid
⑪ Sekunder
② Korrekt tiltrekningsmoment for
Hurtiglader
⑭ Skrue
15 Stilleplate
SPESIFIKASJONER
Modell 6911HDA 6911HDB
Kapasiteter
Standard bolt M8 - M14 M8 - M14
