
IDPF700 - Digital photo frame Ices - Free user manual and instructions
Find the device manual for free IDPF700 Ices in PDF.
| Product type | Digital photo frame |
| Brand | Ices |
| Model | IDPF700 |
| Screen resolution | 480 x 234 pixels |
| Compatible storage media | SD/MMC cards, USB flash drives |
| Supported image formats | JPEG |
| Image effects | Color, monochrome (black and white), sepia |
| Advanced functions | Zoom, image rotation, transition effects |
| Multiple display | 1, 3 or 4 images simultaneously |
| Calendar and clock | Built-in |
| Power supply | Included AC adapter (DC jack on side) |
| Internal memory | Limited capacity for a few photos |
| Care and cleaning | Use a soft, dry cloth; do not use abrasive products |
| Safety | Do not open the device; any modification voids the warranty |
| Customer service and support | http://icesupport.zendesk.com ; hotline: Germany 0900-1520530, Netherlands 0900-23553626, Belgium 02-6200115 (Mon-Fri 9am-6pm) |
| Repairability and spare parts | Contact the retailer; no direct returns to ICES |
Frequently Asked Questions - IDPF700 Ices
User questions about IDPF700 Ices
0 question about this device. Answer the ones you know or ask your own.
Ask a new question about this device
Download the instructions for your Digital photo frame in PDF format for free! Find your manual IDPF700 - Ices and take your electronic device back in hand. On this page are published all the documents necessary for the use of your device. IDPF700 by Ices.
USER MANUAL IDPF700 Ices
IDPF-700 USER MANUAL
Product Features:
- Display Resolution: 480x234 Pixels
Media Supported: SD/ MMC and USB flash drives - Picture format: JPEG
- Image effects: Colour, Mono, and Sepia
- Zoom and rotate images
Multiple Transition effects
Supports one, three or four images on screen.
Built-in Calendar and Clock
Operating Instructions:
Turning the Photo Frame on:
- Insert the power adapter plug into the side of the frame and the AC Adapter into the wall outlet.
- Press the Power button to turn the device on. To turn the frame off, also press the Power button.
The frame will enter the Slideshow Mode if you have photos loaded into the built-in memory or inserted a memory card or USB drive.
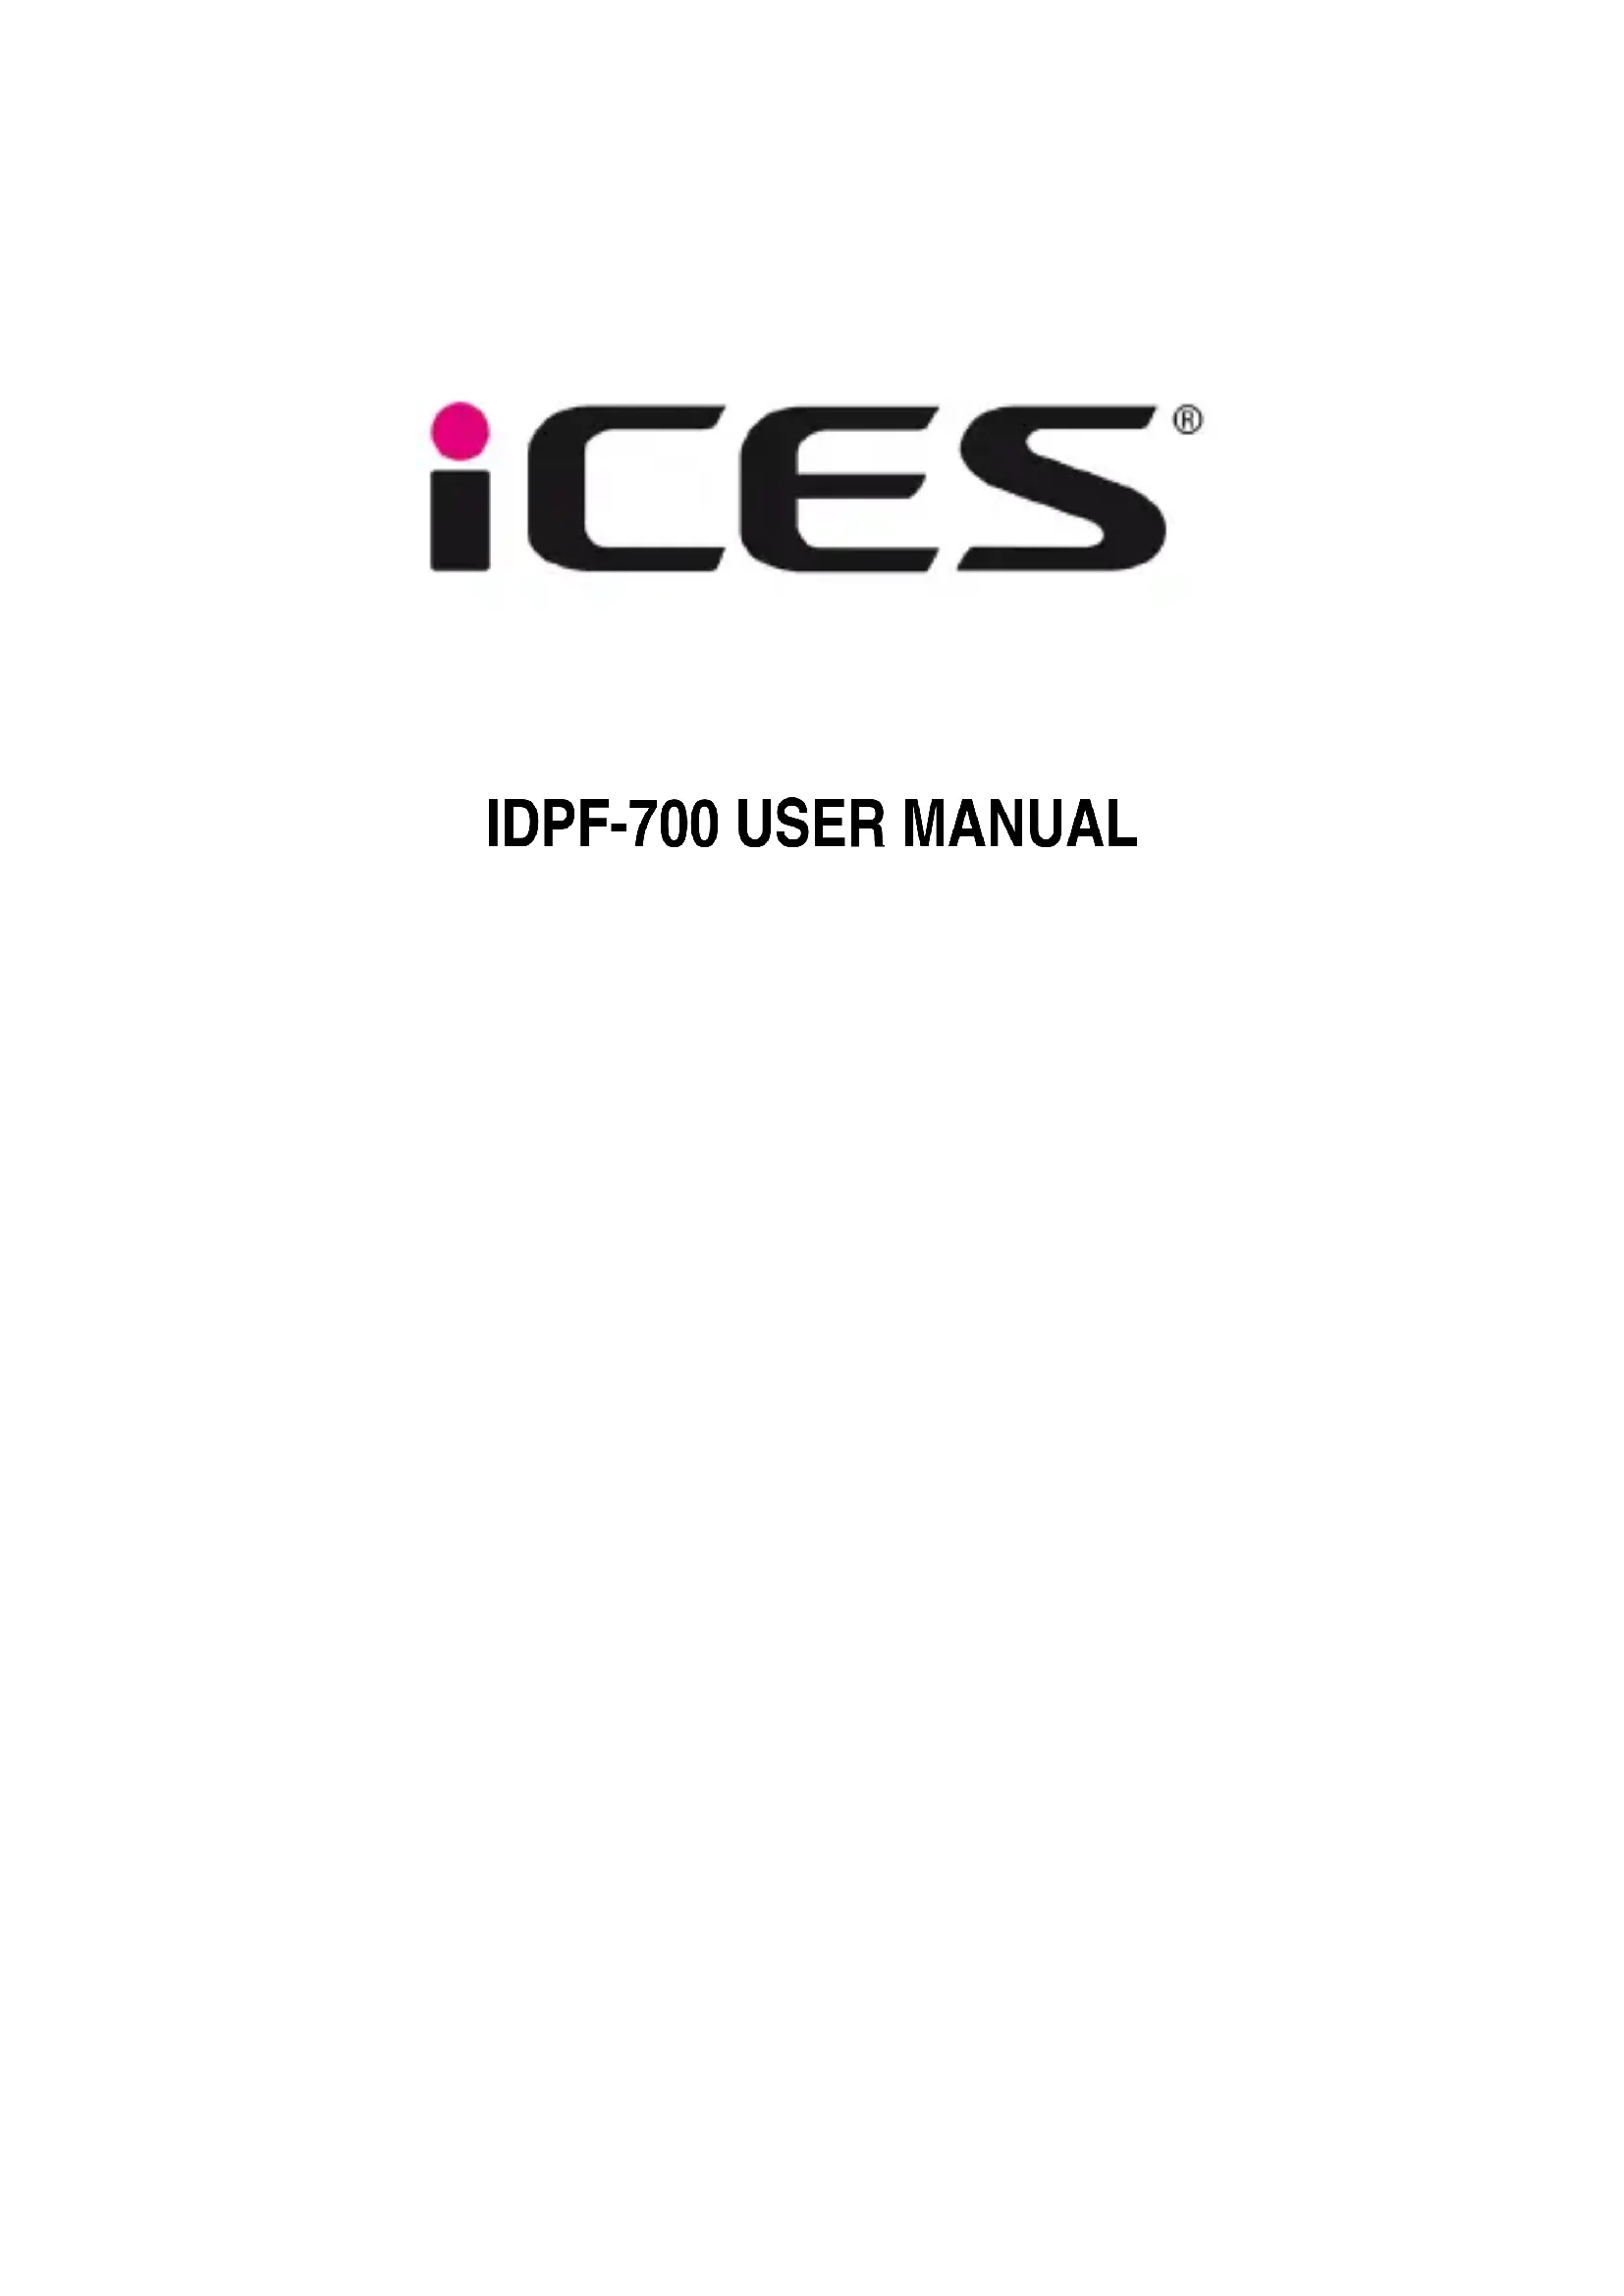
Selecting Media:
- Insert your memory card or USB Drive into the relevant slot in the frame.
- In the Initial Menu, select the built-in memory, memory card or USB drive.
Use the Left and Right buttons to choose between the built-in memory, memory card or USB drive. Press Enter (the middle button) to select.
Menu Outline:
| Initial Menu | Main Menu | Photo Menu | File Management Menu |
Main Menu:
From the Main Menu, you are able to access the following options.
- Browse photos
- Manage files in on your memory card or USB drive.
- Access the Calendar
- Access the Setup Menu
Use the Left and Right buttons to scroll between the options.
Press the Enter (the middle button) to select
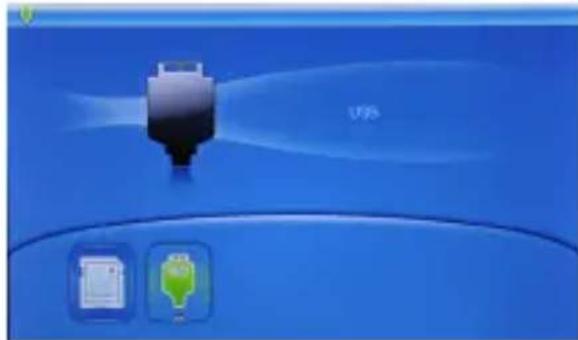
Photo Menu:
Select the photo menu in the main menu to preview photos.

Use the directional buttons to scroll through your photos. Press the Enter button to select your photo.

Use the Left and Right buttons to scroll through your photos.
To return to the preview screen press the Menu button.
File management:
Select the File Management option from the main menu to preview or delete photos.
Use the Up and Down buttons to preview a photo.
To delete a photo, press and hold the Menu button for 3 seconds then select Delete File.
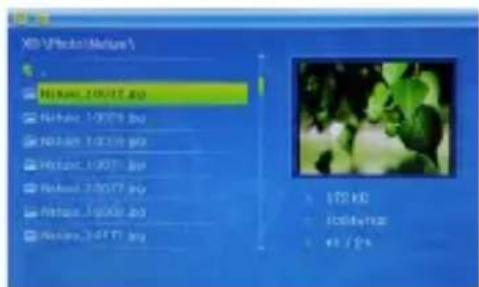
Calendar:
Select the Calendar option from the main menu.
This will bring up a calendar and clock with a window showcasing your photos.
Use the directional buttons to move between days and months.
Setup Menu:
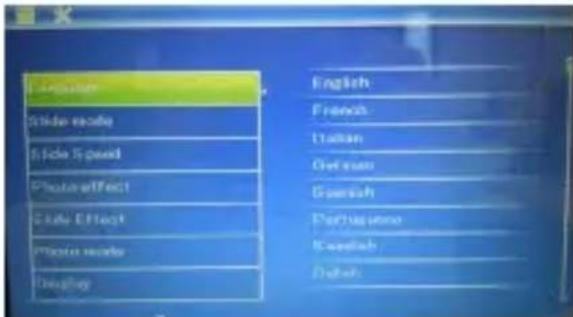
Select the Setup menu from the Main Menu.
- Language
Choose your preferred language.
- Slide Mode
Choose how many photos you want displayed on screen (Choose between 1, 3 or 4 photos).
- Slide Speed
Choose the length of time each photos stay on screen. (From 3 seconds to 1 hour)
- Photo Effect
Change the way your photo appears on screen (Choose between Colour, Mono or Sepia)
- Slide Effect
Choose the transition effect.
- Photo mode
Choose how the photo appears on the screen (Auto Fit, Optimal, or Full)
- Display
Adjust the Contrast, Brightness, Saturation and Tint.
- Set time/date
Set the time, day, month and year to enable you to use the calendar.
- Set time format
Choose between 12/24 hour to display the time.
- Format built-in memory
Delete the photos from the built-in memory.
- Reset setting
Restores the frame to the factory settings
-Exit
Return to the mail menu
Adding photos to the built-in memory:
To add photos to the built-in memory, press and hold the Menu button while viewing photos and select the Save Picture option.
There is limited space in the frame's built-in memory.
You will not be able to save photos to the built-in memory while in slideshow mode.
Slide Mode:
The frame has three slideshow options, Single window, Triple windows, and Four windows
- Press Enter to slideshow in Photo View Mode.
- Select Photo by pressing Enter button to view and press Enter again to start the slideshow.
Single window

Triple windows


Four windows

To exit the slideshow
In the four windows slideshow mode, the frame will display 2-4 different photos depending on their orientation.
Rotate and Zooming into Photos:
While viewing a photo press the and hold the Menu button for 2-3 seconds to rotate or to zoom into the photo
Rotate:
The Rotate option will rotate the photo clockwise 90 degrees.
Zoom:
Zoom into a photo to get closer to a subject or object.
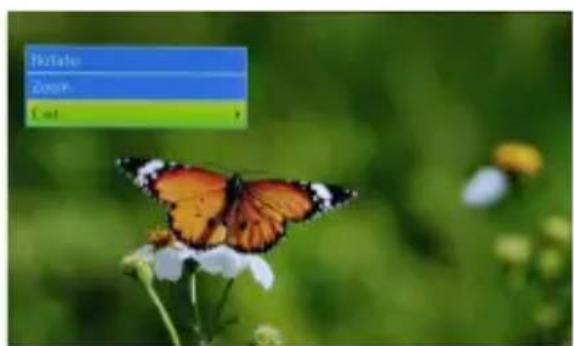

To exit this menu select the select Exit option or press the Menu button.
Press the directional buttons in Zoom Mode to adjust the photo.
Service and support
For information: http://www.ices-electronics.com/
For support: http://icesupport.zendesk.com
ICES helpdesk:
Germany 0900-1520530 (Local charges)
The Netherlands 0900-23553626 (Local charges + 1ct P/min)
Belgium 02-6200115 (Local charges)
France 0170480005 (Local charges)
The helpdesk is accessible from Monday to Friday from 9 AM till 6 PM.
In case your device needs repair, our helpdesk will redirect you to your local dealer.
ICES offers service and warranty in accordance to European law, which means that in case of repair (both during and after the warranty period), you should contact your local dealer.
Please note: It is not possible to send products directly to ICES for repair.
Important note: If this unit will be opened, or accessed in any way by a non-official service center, the warranty expires immediately.

This symbol indicates that the relevant electrical product or battery should not be disposed of as general household waste in Europe. To ensure the correct waste treatment of the product and battery, please dispose them in accordance to any applicable local laws of requirement for disposal of electrical equipment or batteries. In so doing, you will help to conserve natural resources and improve standards of environmental protection in treatment and disposal of electrical waste (Waste Electrical and Electronic Equipment Directive).
iCES
IDPF-700 BENUTZERHANDBUCH
Eigenschaften:
IDPF-700 HANDLEIDING
Kenmerken product:
- Format built-in memory
France 0170480005 (appeal local)


- Product Features:
- Operating Instructions:
- Turning the Photo Frame on:
- Selecting Media:
- Menu Outline:
- Main Menu:
- From the Main Menu, you are able to access the following options.
- Photo Menu:
- File management:
- Calendar:
- Setup Menu:
- Adding photos to the built-in memory:
- Slide Mode:
- Rotate and Zooming into Photos:
- Rotate:
- Zoom:
- Service and support
- ICES helpdesk:
- iCES
- IDPF-700 BENUTZERHANDBUCH
- Eigenschaften:
- Kenmerken product:
Brand : Ices
Model : IDPF700
Category : Digital photo frame