
ICRP-212 - Alarm Clock Ices - Free user manual and instructions
Find the device manual for free ICRP-212 Ices in PDF.


| Product Type | Alarm Clock Radio |
| Brand | Ices |
| Model | ICRP-212 |
| Dimensions (Approx.) | 15 × 8 × 5 cm (5.9 × 3.1 × 2.0 in) |
| Weight (Approx.) | 300 g (10.6 oz) |
| Power Source | AC adapter (included) or 2 × AAA batteries (backup) |
| Display Type | LED with adjustable brightness |
| Radio Bands | FM (87.5–108 MHz) |
| Alarm Modes | Radio alarm or buzzer |
| Snooze Function | Yes (9-minute snooze) |
| Sleep Timer | Yes (adjustable up to 90 minutes) |
| Clock Settings | Automatic time set via radio signal or manual |
| Buttons | Source, Alarm Set, Sleep, Snooze, Volume +/- |
| Preset Stations | 5 FM presets |
| Built-in Speaker | Mono speaker, 2W output |
| Headphone Jack | 3.5 mm |
| Battery Backup for Alarm | Maintains alarm and clock during power outage |
| Material | Plastic casing |
| Maintenance | Clean with a soft, dry cloth; avoid liquids |
| Safety Warnings | Do not expose to water or moisture; unplug during cleaning |
| Spare Parts & Repairability | Battery compartment accessible; no user-serviceable parts inside |
| Included Accessories | AC adapter, user manual |
| General Information | Ices ICRP-212 is a compact alarm clock radio with FM reception and dual alarm settings, designed for bedside use. |
Frequently Asked Questions - ICRP-212 Ices
User questions about ICRP-212 Ices
0 question about this device. Answer the ones you know or ask your own.
Ask a new question about this device
Download the instructions for your Alarm Clock in PDF format for free! Find your manual ICRP-212 - Ices and take your electronic device back in hand. On this page are published all the documents necessary for the use of your device. ICRP-212 by Ices.
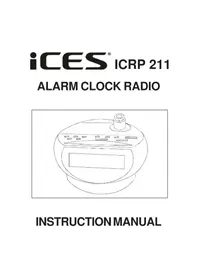
USER MANUAL ICRP-212 Ices
- ON/OFF/AUTO/ALARM
- LED DISPLAY
- AUTO INDICATOR
- SNOOZE / SLEEP OFF
- ALARM SET
- TIME SET
- SLEEP SET
- ALARM OFF
- HOUR SET
- MINUTE SET
- VOLUME CONTROL
- FOCUS
- TUNNING CONTROL
- BATTERY BACK-UP
- FM ANT. WIRE
- AC Cord
- POINTER
- PROJECTION ON/OFF
- PROJECTION HEAD
- TIME SET FOR PROJECTION
- HOUR SET FOR PROJECTION
22. MINUTE SET FOR PROJECTION
23. FM SWITCH
AC POWER OPERATION
Before connecting to the power supply ensure that the supply corresponds to the information on the rating label on the rear of the apparatus: (AC 230V 50Hz)
WARNING
Disconnect the mains plug from the supply socket when not in use. To avoid the risk of electric shock do not remove the cover of the apparatus. There are no user serviceable parts inside. To prevent fire or shock hazard do not expose the apparatus to rain or moisture.
The apparatus shall not be exposed to dripping or splashing and that no objects filled with liquids, such as vases, shall be placed on apparatus.
To be completely disconnect the power input, the mains plug of apparatus shall be disconnected from the mains.
The mains plug of apparatus should not be obstructed or should be easily accessed during intended use. The marking information is located at the rear of apparatus.
Minimum 10cm distances around the apparatus for sufficient ventilations.
Attention should be drawn to the environmental aspects of battery disposal.
Battery shall not be exposed to excessive heat such as sunshine, fire or the like.
CLOCK
- Set the ON/OFF/AUTO/ALARM switch (1) to "OFF". Connect the Mains Cord to the power supply. The clock display will flash on and off indicating a power interruption and that the display time is incorrect.
- To set the correct time, press the Time Set Button (6) and Minute Set Button (10), or Hour Set Button (9), together, until the correct time is displayed.
- Open the Clock Battery Compartment door and fit AA size battery 1.5V x 2. The purpose of this battery is to store the information relating to alarm time, and to keep the clock functioning in the event of disconnection from the mains supply or power interruption. Should this occur, the clock will continue to keep time, but will not display.
TIME SETTING FOR PROJECTION
- To preset the HOURS, press simultaneously the HOUR BUTTON and the TIME BUTTON. And keep them depressed until the hour digits to be preset are displayed.
- To preset the MINUTES, press simultaneously the MINUTE BUTTON and the TIME BUTTON, and keep them depressed until minute digits to be preset the displayed.
ALARM
- To set the Alarm time, press the Alarm Set Button (5) and Minutes Set Button (10), or Hour Set Button (9), together until the required alarm time is displayed.
- Set the ON/OFF/AUTO/ALARM switch (1) to Alarm, the Auto indicator (3) will illuminate. The Alarm is now set to activate at the required time.
- The alarm can be temporarily stopped for 9 minutes by pressing the Snooze/Sleep off Button (4). This can be repeated up to 5 times.
- The alarm will activate again after 24 hours unless the ON/OFF/AUTO/ALARM switch (1) is set to "OFF".
ALARM OFF
When the alarm works, just press the “ALARM OFF” button to end alarm working.
SLEEP
- Set the ON/OFF/AUTO/ALARM switch (1) to "OFF" or "AUTO".
- Press the Sleep Set Button (7) and Minute Set Button (10) together. The sleep time will be displayed and count down from 59 minutes to zero. Release the buttons when the required sleep time is displayed.
- The radio will now operate until the sleep time has elapsed or may be switched off by pressing the Snooze/Sleep Off Button (4).
RADIO
For best FM reception ensure that the FM cord antenna is completely unrolled and extended. Rear side of cabinet.
- Set the ON/OFF/AUTO/ALARM switch (1) to "ON" position.
- Adjust the Tuning Control (13) to select the desired station.
- Adjust the Volume Control (11) is required.
- To turn off the radio, set the ON/OFF/AUTO/ALARM switch (1) to "OFF". If the radio does not switch off this may be caused by inadvertent operation of Sleep Set Button (7). To cancel this press the Snooze/Sleep Off Button (4) once.
CLEANING
Clean the cabinet with a soft cloth moistened with water or mild detergent. Do not use solvents such as alcohol, benzene or thinners, as they may damage the cabinet finish. Make sure to disconnect the mains lead from the supply before cleaning.
Please retain these instructions for future reference.
NOTE : PROJECTION TIME IMAGE ON THE CEILING OR WALL OF A DARKENED ROOM. MAXIMUM PROJECTION DISTANCE IS 2M. THE LED DIGITAL CLOCK AND THE PROJECTION CLOCK MUST BE SET SEPERATEDLY.
NOTE : The socket outlet shall be installed near the apparatus and shall be easily accessible. The ventilation should not be impeded by covering the ventilation openings with items, Such as newspapers, table-cloths, curtains, etc.; No naked flame sources, such as lighted candles, should be placed on the apparatus. The use of apparatus in moderate climates.
NOTES
- The mains plug of apparatus should not be obstructed OR should be easily accessed during intended use.
- Battery shall not be exposed to excessive heat such as sunshine, fire or the like.
- Minimum distances 10cm around the apparatus for sufficient ventilations.
- The ventilation should not be impeded by covering the ventilation openings with items such as newspaper, table-cloths, curtains etc.
- No naked flame sources such as lighted candles should be placed on the apparatus.
- Attention should be drawn to the environmental aspects of battery disposal.
- The apparatus shall not be exposed to dripping or splashing and that no objects filled with liquids, such as vases, shall be placed on apparatus.
- To be completely disconnect the power input, the mains plug of apparatus shall be disconnected from the mains. As the disconnect devices is the mains plug of apparatus.
- Attention should be drawn to the environmental aspects of battery disposal.
- The use of apparatus in moderate climates.

Brand : Ices
Model : ICRP-212
Category : Alarm Clock