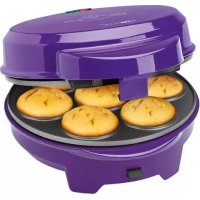
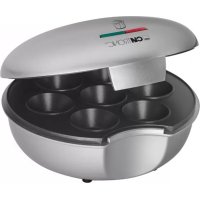
CPM 3529 - Cupcake maker CLATRONIC - Free user manual and instructions
Find the device manual for free CPM 3529 CLATRONIC in PDF.

| Product type | Cupcake maker (cake pop machine) |
| Brand | Clatronic |
| Model | CPM 3529 |
| Power supply | 220-240 V~, 50/60 Hz |
| Power consumption | 900 W |
| Net weight | 1.55 kg |
| Main material | Plastic and non-stick coating |
| Indicator lights | Red (on) and green (ready to bake) |
| Preheating | Yes, indicated by green light |
| Cooking plates | Non-stick, easy to clean |
| Included accessories | Cake pop sticks |
| Safety | Manual shut-off, do not immerse, hot surface |
| Cleaning | Damp cloth, no metal or abrasive utensils |
| Usage | Household use only |
| Included recipe | Yes, basic recipe and variations |
| Recommended batter type | Cake batter, marble batter, ready-made mixes |
| Possible decoration | Icing, sprinkles, sticks, etc. |
| Storage of iced cakes | Up to 3 days in the refrigerator |
Frequently Asked Questions - CPM 3529 CLATRONIC
User questions about CPM 3529 CLATRONIC
0 question about this device. Answer the ones you know or ask your own.
Ask a new question about this device
Download the instructions for your Cupcake maker in PDF format for free! Find your manual CPM 3529 - CLATRONIC and take your electronic device back in hand. On this page are published all the documents necessary for the use of your device. CPM 3529 by CLATRONIC.
USER MANUAL CPM 3529 CLATRONIC
Thank you for choosing our product. We hope you will enjoy using the appliance.
Symbols in these Instructions for Use
Important information for your safety is specially marked. It is essential to comply with these instructions in order to avoid accidents and prevent damage to the machine:
WARNING:
This warns you of dangers to your health and indicates possible injury risks.
CAUTION:
This refers to possible hazards to the machine or other objects.
NOTE : This highlights tips and information.
General Notes
Read the operating instructions carefully before putting the appliance into operation and keep the instructions including the warranty, the receipt and, if possible, the box with the internal packing. If you give this device to other people, please also pass on the operating instructions.
- The appliance is designed exclusively for private use and for the envisaged purpose. This appliance is not fit for commercial use.
- Do not use it outdoors. Keep it away from sources of heat, direct sunlight, humidity (never dip it into any liquid) and sharp edges. Do not use the appliance with wet hands. If the appliance is humid or wet, unplug it immediately.
- When cleaning or putting it away, switch off the appliance and always pull out the plug from the socket (pull the plug itself, not the lead) if the appliance is not being used and remove the attached accessories.
- Do not operate the machine without supervision. If you leave the room you should always turn the device off. Remove the plug from the socket.
- The device and the mains lead have to be checked regularly for signs of damage. If damage is found the device must not be used.
- Use only original spare parts.
- In order to ensure your children's safety, please keep all packaging (plastic bags, boxes, polystyrene etc.) out of their reach.
WARNING!
Caution! Do not allow small children to play with the foil as there is a danger of suffocation!
Special Safety Instructions for this Machine

WARNING: Hot surface! Risk of burns!
The temperature of the touchable surface may become very high during use.
- Do not touch the hot parts of the device. If necessary, you should use an oven cloth and hold the device only by the handle or the recessed grip.
CAUTION:
- Do not operate the device with an external timer or separate remote control system.

CAUTION:
- Place the unit on a flat and heat-resistant surface. In the case of sensitive surfaces please place a heat-resistant board under the device.
- In order to prevent heat from building up, do not put the unit directly underneath a cupboard. Ensure that there is enough space all around!
- Do not move the device when it is working.
- Beware of any steam coming out of the sides of the device during the baking process and when opening the baking surfaces. Danger of burns!
- Be cautious of heat escaping from the device! Do not use the device near or below curtains or other flammable materials!
- Please ensure that the mains lead does not come into contact with the hot sections of the device.
- Allow the device to cool down before cleaning it and putting it away.
-
This appliance is not intended to be immersed in water during cleaning. Please observe the instructions that we have included for you in the chapter "Cleaning".
-
Do not try to repair the appliance on your own. Always contact an authorized technician. To avoid the exposure to danger, always have a faulty cable be replaced only by the manufacturer, by our customer service or by a qualified person and with a cable of the same type.
- This appliance can be used by children aged from 8 years and above and persons with reduced physical, sensory or mental capabilities or lack of experience and knowledge if they have been given supervision or instruction concerning use of the appliance in a safe way and understand the hazards involved.
Children shall not play with the appliance.
- Cleaning and user maintenance shall not be made by children unless they are older 8 years and supervised.
- Keep the appliance and its cord out of reach of children less than 8 years.
Starting-up the unit
Instructions for Use
Before making the first cake pops for eating . . .
- Remove any packaging that is still present. Unwind the mains lead completely.
- Clean the housing and the baking surfaces with a damp cloth.
Non-stick coating
- Lightly grease the baking surfaces before the unit is used for the first time.
- Use the appliance for about 10 minutes with the toasting surfaces closed (see "Using the unit").
- Remove the mains plug from the socket and allow the device to cool down.
Test-bake the cake pops twice.
NOTE:
- Any smoke or smells produced during this procedure are normal. Please ensure sufficient ventilation.
-
Do not eat the first few cake pops.
-
After the device has cooled down, wipe the baking surfaces off with a paper towel.
Electrical connection
- Check whether the mains voltage that you want to use matches the one of the device. You will find the information about this on the type plate.
- Insert the plug in a duly installed protective contact socket. The red indicator lamp lights.
Using the unit
NOTE:
- Keep the baking surfaces closed while heating.
- When the warm up phase has ended, the green control lamp will light up.
-
The red control lamp remains on to show that the device is working.
-
Open the device. Add ca. 112 teaspoons of dough into each section of the lower baking surface. Please ensure that you measure in the quantity of dough correctly, as excess dough runs over the edges and soils the device.
-
Close the lid.
NOTE:
- The green control lamp switches on and off during baking in order to maintain the baking temperature. This does not give any indication that the baking process is finished.
-
The baking time depends on your individual taste. The longer the cake pops remain in the appliance, the greater the degree of browning. Please note the information contained in the recipe.
-
Open the appliance after ca. 8 minutes and check the result. If the cake pops have risen and if you have the right browning, they are done and can be removed.
- Unfold the lid completely and remove the mains plug from the socket.
- Take the cake pops carefully out of the pans. Please use a heat-resistant wooden or plastic spoon. Do not use pointed or sharp objects to avoid damaging the coating of the baking surfaces.
- Lightly grease the baking surfaces again as required after each baking process.
- The baking surfaces must always be kept closed during pauses in the baking.
Switching Off
If you would like to interrupt operation or switch the device off, remove the plug from the socket. The red control lamp goes off.
Cleaning
WARNING:
Always pull out the plug from the mains socket before cleaning and wait until the unit has cooled down.
- Do not immerse the device in water! It could result in an electric shock or fire.
CAUTION:
- Do not use any wire brush or other abrasive objects.
- Do not use any acidic or abrasive detergents.
Baking Surfaces
-
Remove any food residues while they are still warm with a damp cloth or paper towel.
-
Wash off the baking surfaces with a soft sponge and soapy water; then wipe with clean water and dry thoroughly with a soft cloth. After drying please apply a thin film of edible oil to the surface.
Housing
Clean the housing after use with a slightly damp cloth.
Recipe suggestions
Ingredients of a basic recipe:
150 g sugar, 3 eggs, 150 g butter, 150 g flour, 1 teaspoon baking powder
Optional: 1 tablespoon of cocoa, 60g chopped walnuts or 12 bottle of butter vanilla essence and 60g chocolate droplets
Preparation:
- Whisk the eggs, sugar, and soft butter until they become thick and creamy. Fold in the flour, baking powder, and powdered ingredients at your option. Lastly, add the coarse pieces such as nuts.
- Preheat the Cake Pop Maker.
- Fill the dough into the forms and bake for ca. 8 minutes. Tip: In order to fill the dough into the forms, you may also use a pastry bag.
Variations for the dough preparation:
- Add fillings, such as a nougat center, for example, into the center prior to baking. Once the cake pops have finished baking, the nougat center will be liquid.
- Ready baking mixes containing baking powder such as lemon, nut, or chocolate cake, for example, are also suitable. Prepare the dough according to the instructions on the packaging.
- If you use marble cake dough and add the white and brown dough into the Cake Pop Maker alternately, you will receive marbled balls.
Tips for the further processing
- You may let the ready baked cake pops cool down on a rack and then sprinkle them with powdered sugar.
- If you would like to glaze or decorate the cakes, you should do this directly after baking them.
- You can press the hot cakes onto sticks. In order for the cakes to sit really firmly on their sticks, dip the sticks ca. 1 cm deep into a melted glaze and then stick them into the cake right away.
-
Rotate the cakes on the sticks in the melted glaze, let the glaze dry only briefly and decorate them with brittle or colored sprinkles as desired. The decoration must be added to the cakes while the glaze is still moist. If the glaze has already dried, you may use a toothpick to add a drop of liquid glaze onto the cake as an adhesive and press the decoration onto it.
-
If you would like to turn the cake pops in coconut flakes, brush the cakes with some egg yolk immediately after baking. The coconut flakes will adhere better this way.
- After the decorating you may place the cakes on the sticks into glasses filled with sugar/ flour to let them cool down and dry. A Styrofoam sheet or a cardboard, which you have previously put small holes into with sufficient distance is also suitable.
- If the sticks contained in the scope of delivery have been used up, you may also use Mikado sticks. Or set one cake each into a small wafer cup.
Storing of the finished cake pops
- Glazed cakes can be kept in the refrigerator for 3 days without worry. Place the dried cakes into a large tin. Place kitchen paper on the bottom and between the cakes.
- Glazed cakes are not suitable for storing in the deep-freezer. The glaze would suffer during thawing.
You may find more tips and ideas for cakes on a stick on the internet, for example.
Technical Data
Model: CPM 3529
Power supply: 220-240 V\~, 50/60 Hz
Power consumption: 900 W
Protection class:
Net weight: approx. 1.55 kg
The right to make technical and design modifications in the course of continuous product development remains reserved.
This device has been tested according to all relevant current CE guidelines, such as electromagnetic compatibility and low voltage directives, and has been constructed in accordance with the latest safety regulations.
Disposal
Meaning of the "Dustbin" Symbol
Protect our environment: do not dispose of electrical equipment in the domestic waste.
Please return any electrical equipment that you will no longer use to the collection points provided for their disposal.
This helps avoid the potential effects of incorrect disposal on the environment and human health.
This will contribute to the recycling and other forms of reutilisation of electrical and electronic equipment.
Information concerning where the equipment can be disposed of can be obtained from your local authority.
Instrukcja obstugi
BapiaHTn npuroTybaHHaTicTa:
- DodaTe HaMHky, HapnPKnaH Hyry, BnKnabWn II no ceHTpy, neped BNnKaHHaM. KoIIN npRKKn 6ydyb roTOBI, hyraCTaHe pJdkoHO.
- FOTOBI cymiui Iyra BnikaiHHa, kI MICTb NopoOok dny BnikaiHHa, HapriKlnd, JIMMOHH, ropixOBu YN WOKoHaH Nn npir, TeK roAraTc. PnproTyte ticTo BiIOBIDHO do BkazibOK Ha naketi.
KIO Bn BnKOpNCTOByeTe TICTo DnI MaPMypOBOrO Nipora i Doaacte no cep3i 6Ine I KopuHHeBe TICTo, BN OTPMaTe MapMypoBi KJbKn.
Pikka3kn zo do no daJbWoro BnKOpncTahnn
JaTe roTOBnIM npiXkAM OxOIOHyTu Ha peuItui i nocnTte ix LyKpOM-nyIPOHO.
KIO Bu XOHTe DoaTn rna3yp Nn npNKpacNTn npixkni, poibt ce BiDpa3y nicra BNiKaHH.
- Tâpân iπρικκi MòxHa Hactpomntn Ha nαπučn. οιο6 nɪ-pixkni HàdiŋHo ciùn Ha nαπučn, 3aHypTe nαπučn npɪbI. Na 1 cm y po3tɒŋlèny rɪaʒyp, a ToDi Biɪpa3y BCTpOMɪt b y nɪpɪxok.
- O6kataTne npipiknHa nannKax y po30tonneHnIra3ypi, daTe Ira3ypi BnCOxHyTu kycb MNTb i npKpacbTe npipikn KOBbopoBOIO YHINHO IOOCNIOHO 3a 6aXaHHM. DeKOp-pyBaHHcNlDdoBaATn, NOKI rna3yp ue BOJORA. KaIO rna3yp Uke BnCOxNa, MOXHA cOKoPCTaTNCY 3bOCHcTKOHO, UO6 DoaTN KpanPiO pIKoI rna3pyi Do npipixKa JkNeKn 3ac6 i npITNCHTb Do ciE DIJIaHNKIOncNky.
KIO BxOHTe O6KaTaTN NpiipKKn y KOKOCOBx NnactTIB LIX, 3MaXTe NpiipKKn BiDpa3y Nicra BUNiKaHH RAHIM KOBTKOM. TAKIM YHHom KOKOCOBI NnactBci Kpaue npnnnHyTb.
Писяд ekopyванн пиікн ha naIMчх моКнha no-KnlaCTny CklnHKn 3 uKpOM/MykoI, zuob BOHn OxOJIoN i BnCOxN.ПiHOnJIaTcOBn apKyu nI KapTOH, y kOMy BN IponepdHbO 3po6nN OTBOPn Ha neBHi BIDCTaHI ODNH BiD ODHOrO, TAKoX NiIXoNDtB.
- RaIIO paIINKNI 3 KOMIIeKTy 3aKiHUNICr, MoXHa CkOpNCtATnCRA paIINKAMNI MkaIO. A6o NOKIadITb NpiIXKN KOKeH y MaIeHbky YaIky.
36epiraHHraTOBnH npiIXkIB
- Tna3ypoBaHi npipikk 6e3 npo6Ie MoXHa 36epiratn y xOIOINbHnky 3dHi. POKnAdITb BucyuIe Hnpipikkny BeNk Ky 6JNAHky. Ha dNo, a TaKoX MxK npipikkamn BnKnadITb KxyOHnI nnip.
Γa3ypoBaHi npixkHe nipxdoTb nI 36epiraHHy MOp03nblHi KaMepi. Pid yac po3mopoxeHHra3yp NCyETcbr.
Binbue nopad ta iedn Dnna npiKkiv Ha naunuCi YntaTe B Intepheti.
TexhiHni napametpn
MoeNB: CPM 3529
TOnaHHJXMBJIeHHJ: 220-240 B~, 50/60 T
Cnoxmba notyckhictb: 900BT
Tpyna enektpo6e3neuocti:
Yka3bIbaet Ha BO3MOKHyHO ONaCHOCTb IJIa N3dEINr IN dpyNX OKpyKaIOUcIX npeDMeTOB.

PIMMEUHRA:JaetcoBtIINHFOpmauuHO.
067a HOpMaun
IpeepHaayanom 3KcNpyaataun npi6opa BnHMaTeIbHo npo- yntaTe npilaraemyu INCTpykUIO NO 3KcNpyaTaUM N COxpaHNTe ee HnadeXHom MeCTe, BMeCTe C rapaHTnHBIM TaHOHOM, KACCOBbIM YekOM I, NO BO3MOXHOCTN, KAPTOHNO KOPo6KOICyNAKOBOUYbIM MaTePnaIOM. Ecn daete KOMy-Ni6O nOIONb- 3OBaTbCpnp6OpM, O6raTeIbHO daJIte BnpiDauY daHNHyIO INCTpykUIO NO 3KcNpyaTaUN.
ПользунТecь пиборм толькх acthbIMобра3OMи noHa3haeHIO.пибор Heп徳нэнчehДя commpeCKORO nCNoIb3OBAHIA.
He noIb3yItecb np6obom IOI OTKpbITbIM He6OM. IpeoxpaHnIe np6op OT Xapbl, npMbx COHnHbIX Lyuei, BnaXHOCTN (Hn B KOem cIyae He nOpykaTe erOB bOdy) uYapOB 6 ocTpbIe yrlbl. He npKacaiTeCb K np6opBy BnaXHbIMn pykam. Ecnn np6op ByBaXHnICa ININ HAMOK, TyT Xe BbIHbTE BNIKy IN3 po3ETKn.
- Pocne 3KcIpyatauM, MOHTaKe pInHaadJeKHOCTe, YnCTKe INI NIOLOMKe pN6Opa Bcerda BbIHMaTe BnIKy n3 PO3ETKn (TJHNTe 3a BNJIky, a He 3a Ka6eJIb).
HeocTaeBnIe BkHoueHHbIe 3neKTpnpnbOpbI 6ez npncMoTpa.BbIXoJrN3 NOMEueHnB CBeJa BbIKHOaHTe np6op.BbIHbTe WTeKepeN3 pO3eTKn.
-Пиббори Ka6eNB cTeBOrO nITaHnI Heo6xOIMMo peYIЯрнообспeДОВаТь Na HAIuNue CNeIOB NOBpeXKeHnI. Пи obHapUkeHn NOBpeXKeHnI nonb3OBAtbcra npi6oPOM 3aIpeSuaTcR.
- IcnoJb3yIte ToJIbKO opIMHaJIbHbIe 3aHactI.
- I3 coobpaekhen 6e3oanachocntn dny deTeH He octabIaIte IexKaTb yIpaKOBky (IInaCTIKOBbie MeuKN, KapTOH, NeHONlact T.D.) 6e3 npncMOtpa.

PENEYIPEXKDEHNE!
He n03BOJnIte DeTmIrpaTb C nOIN3TNHeHOBOn IJIeKo. OnachocTb ydyuBa!
CneuaJIbHbIe yka3aHnI IO 6e3OpaCHocTIN DЯ 3TOrO np6opa

IpeepBbIeNcKO npEBoK KeKcoB...
- YdaIte ynaKOBky, ecNI taKOBa NMeETc. POnHocTbpa3MOTaIte CeTeBOI shyp.
- PpOtpnTe KOpNyc n NekyUe neOnyΦopMb1 BnaXHoi TpIKNoI.
HenoIropaemnIOBepxHocTb
- Pn nepBOM NOJIb3OBAHm CMAKbTe NOBepXHOCTN NOIyΦoPm KINpOM.
BKNIOHHTe np6Op c 3akpbItbIMN IOOBHKAMn npm. Ha 10 MnHyT (CM. 3KcNpyataun/npaOK pa6Obl).
BbIbTe cTeBoi uTeKepe n3 po3eKn i daTe np6bopy OCTbITb. - PnpBapntbno npToctpyte np6op, npiroTOBnB KekcbI Dba pa3a He nIy yNtpe6JIeHnI.

ПРМЕЧАнЯ:
HnrpeDneHTbI dIa OCHOBHO peCenTa:
150 r caxapa, 3 riuca, 150 r macna, 150 r mykn, 1 yaihna lokkka npooska dny Bbineykn
XpaHeHnE rTOBbIX KEKCOB
- Ia3npoBaHHbIe KeKcbI MoXHO xpaHHTb B XOIOINbHnKe 3dHg6e3 OnaceHnra, YTO OHN NcnpTATc. POnOXnTe INx B 60nbUoe 6nIO, NoONknte 6ymary DnB bIneKn Ha dHo n Mekdy KeKcAmn.
-「Ia3npoBaHHbIe KeKcbl HeJIb3ry XpaHHTB MOpO3nIbHNKe. Ia3ypb nocTpaadet npi pa3MopaaHbAHN.
IOnHnTeBHyIO INOpMaUIO NpeuNTbI IJI KekCOB H aIIOHKe Bb MOKETe HAITN B INTEPHEtE.
TexHnueckne daHHbIe
MoeB: CPM 3529
3JektponmtanHe: 220-240 B\~,50/60 T
IopTe6JIeMaMA MoUHocTb: 900 BaTT KnaCC 3aunTbI:
Bec HeTTO: npMepHo. 1,55 K
CoxpaHEno npaBO Ha texHnueckne IN KOHCTpyKIOHOHBie n3-MeHeHnB pamkax npoDoJkaIoUeIcra pa3pa6OToN npOdykTa.
3To n3deneHne npoIIO BCE Heo6xOIMbIe I aKtYaJIbHbIe npOBepKn, npEiINcaHbIe dIpeKTHBOI CE, K npIIM. Ha 3NeKTPOMaHHTHyIO COBmecTImOCTb I COOTBeTCTBNE Tpe6OBAHnM K Hn3KOBoNbTHOH TEXHKe, OHO 6blIO TaKke COKHcTpynpOBAHO IN NOCTpoEOH C yETOM NocIeHNX Tpe6OBAHn I IO TexHnke 6e3OnacCHOCTn.
i 1
jglall lsl jz
ydl aol yll g aoy ayab bcll lsl kay.
yog . 0yS yiaa aie g aaiall kssg . qd j
ylln yag ayall g aeg yall
ylll yag ayajil yag yag ayag ayall kssll
yall no dsl j! dy axoall ayab ll ydi
yol yog o sl jc jlsy g yall n yjall kay
yall sle
aiee 1
CPM 3529.
60/50\~240-220.
900.
1. .
1.55
yabill jaiyaaay aayi ci yj! gaiy bai
C 10000000000000000000000000000000000000000000000000000
Lgai jy gao cag acl i gai yabj jai bai 1
s jy gai l ay acl i jai abai as gai gai ay
chail plall jj jalll pl
Cunll
i
a#u#s# 150 150 3 150
Jy 60 60 60
Cj 60, j j j j j j j j j j j j j j j j j j j j j j j j j j j j j j j j j j j j j j j j j j j j j j j j
: jiaiill
j 1
aiiall gaii i 1
aiial laii gaii i 1
aiial laii gaii i 1
aiial laii gaii i 1
aiial laii gaii i 1
aiial laii gaii i 1
aiial laii gaii i 1
aiial laii gaii i 1
aiial laii gaii i 1
aiial laii gaii ie 1
aiial laii gaii ie 1
aiial laii gaii ie 1
aiial laii gaii ie 1
aiial laii gaii ie 1
aiial laii gaii ie 1
aiial laii gaii ie 1
aiial laii gaii ie 1
aiial laii gaii ie 1
aiee
J 1 1 1 1 1 1 1 1 1 1 1 1 1 1 1 1 1 1 1 1 1 1 1 1 1 1 1 1 1 1 1 1 1 1 1 1 1 1 1 1 1 1 1 1 1 1 1 1 1 1 0
Aaiio aiai yaiy iaiy
Jauuuiu Ailalil jaii
jai) aikao jauoill baw, gai 10 sud jaiall
"aaaal"
j j j j j j j j j
.
jglg jglg aalil aayll lalai
!:
1

1 1 1 1 1 1 1 1 1 1 1 1 1 1 1 1 1 1 1 1 1 1 1
:
1234567890
2 1


GARANTIEKARTE
warranty card · garantiekaart · carte de garantie · scheda di garanzia · tarjeta de garantia · cartao de garantia · garantikort · karta gwarancyjna · zaru.cní list · karta jamstva · carte de garantie · fapaunonha Kapta · zaru.cný list · garancijski list · garanciajegy · rapaHTiHnΦOpMynp · fapaHTnHbI TaON ·
CPM 3529
24 Monate Garantie gemäß Garantieerklarung - 24 months warranty according to warranty declaration - 24 maanden garantie volgens garantieverklaring - 24 mois de garantie selon la déclaration de garantie - 24 mesi de garanzia seconde la dichiarazione di garanzia - 24 meses de garantie de acordo con la déclaration de garantia - 24 meses de garantia, de accordo com a déclaration de garantia - 24 manedors garanti i henhold til garantibeteingelsene - 24 misiace gwarancj na podstawie odwiadzenia gwarancjngo - zaruka 24 mesiou podle prohlasi en o zaruke - 24 mjesceno jamstvo u skladu s jamstvenom declaracionj - 24 luni garantie conform déclaratien de garantie - 24 meeca rapanuim b cbotbetctme c rapaunonhata deknapauir - 24-measa nza zaruka podla vyhlasenia o zaruke - 24-mesecna garancija, skladnoz garancjsko izavo - 24 honaparagria a garancifelteteleken lelrak szerint - rapaanr hna 24 micui BIDNOIOHO 33n npo rapaHTIO - rapaHTNCA 24 mecaa cornaccho 33raBENHMI RAPAHNTHM (npabHAM - ppaHbHbHbHbHbHbHbHbHbHbHbHbHbHbHbHbHbHbHbHbHbHbHbHbHbHbHbHbHbHbHbHbHbHbHbHbHbHbHbHbHbHbHbHbHbHbHbHbHbHbH
Kaufdatum, Handlsterpmel, Unterschied - date of purchase, daxier stamp, signature - aankoepdatum, dealerpmel, handtendenkeng - date d'achat, tempor du concessionaire, signature - data del acquisto, timor del rivendizoe, firme - fecha de compra, sello del distribuidor, firma - data del compra, carimdo do distribuidor, assinatura - kjaedpasta, forhandlstempmel, signatur - data zakupu, pieczek szercedawy, podpis - datum zakupenl, razlito prodejec, podpis - datum kupovine, 2ig trogova, potpis - data de achiljie, zampilla furnuzoril, seminitata - Data na noxinykara, Pienar na Ptopaosana, Tnognac - datum nikupu, pecliatia obchodnica/ predajecu, podpis - datum nakupa, 2ig trogova, potpis - vaskas lutamta, kereskedb beyegdjele, alatis - Data npnabnun, neknta npnabnun, mnpoc - Data npnobpctekan.1bnm npnojau. Tnognnc- cuguehucn.000000000000000000000000000000000000000000000000000

CiatRONIC
INTERNATIONAL GMBH
www.clatronic.com
CTC
Ciatronic
INTERNATIONAL GMBH
Internet: http://www.clatronic.de