
21PT4458 - TV PHILIPS - Free user manual and instructions
Find the device manual for free 21PT4458 PHILIPS in PDF.

| Product Type | 21-inch CRT TV |
| Brand | Philips |
| Model | 21PT4458 |
| Power Supply | 220-240 V, 50 Hz |
| Standby Consumption | Less than 3 W |
| Screen Type | CRT 4:3 or 16:9 depending on version |
| Picture Formats | 4:3, Zoom 14:9, Zoom 16:9, Subtitles, Super 4:3, Full Screen |
| Broadcast Systems | Europe, West Europe, East Europe, UK, France |
| Teletext Functions | Favorite pages, dual page, freeze, magnification |
| Sound | Stereo, Nicam, Surround, Mute |
| Connectors | Scart (1 or 2 depending on version), Front AV jacks, Headphone, Audio L/R output |
| Remote Control | With numeric keys, VCR, teletext |
| Picture Adjustments | Brightness, Contrast, Color, Sharpness, Rotation |
| Sound Adjustments | Balance, Volume, Sound Mode (Mono/Stereo/Dual) |
| Sleep Timer | 0 to 240 minutes (depending on version) |
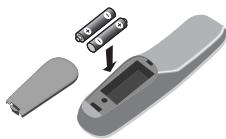
| Remote Batteries | 2 R6 (AA) batteries |
| Maintenance and Cleaning | Use a dry cloth, do not expose to water or heat |
| Safety | Do not repair yourself, contact customer service |
| Spare Parts and Repairability | Contact Philips after-sales service |
| Recycling | Batteries without mercury/cadmium, appliance recyclable |
Frequently Asked Questions - 21PT4458 PHILIPS
User questions about 21PT4458 PHILIPS
0 question about this device. Answer the ones you know or ask your own.
Ask a new question about this device
Download the instructions for your TV in PDF format for free! Find your manual 21PT4458 - PHILIPS and take your electronic device back in hand. On this page are published all the documents necessary for the use of your device. 21PT4458 by PHILIPS.
USER MANUAL 21PT4458 PHILIPS
Installing your television set
0
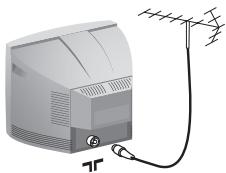
Insert the aerial plug into the socket at the rear of the set.

2
Insert the mains plug into a wall socket (220-240V / 50 Hz).
3
Insert the two R6-type batteries (supplied) making sure that they are the right way round.
4
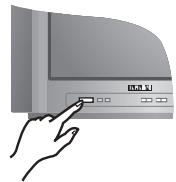
To switch on the set, press the on/off key. If the television remains in standby mode, press P on the remote control.
Quick installation
When you turn on the TV set for the first time, a menu is displayed on screen. This menu prompts you to select the country:
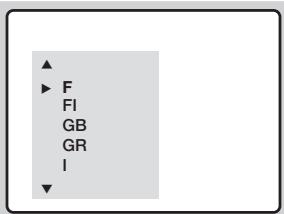
If the menu is not displayed, press and hold down the and + keys on the TV set for 5 seconds to display the menu.
Use the keys on the remote control to select your country and validate with. If your country does not appear in the list, select choice "...

The search starts automatically. All the available TV programmes will be stored. This operation takes a few minutes. The display shows the progress of the search and the number of programs found. At the end of the search, the menu disappears. To exit or interrupt the search, press (MEN). If no programme is found, see Tips chapter at the end of the instruction for use.
3 If the transmitter or cable network sends the automatic sort signal, the programs will be numbered correctly. In this case, the installation is complete.
4 If this is not the case, you need to use the Sort menu to number the programs correctly. Some transmitters or cable networks broadcast their own sort parameters (region, language, etc.). In this case, indicate your choice using the keys and validate with > .
Program sort
Press key (MENU). The Main menu is displayed on the screen.
2 With the key, select Manual Store and press .
Use the ①⑨ or -P^± keys to select the program you wish to renumber.
4 Then use the × key to select Program No and enter the new number with the × keys.
With the key, select Store and press
6 Repeat steps 3 to 5 for each program you wish to renumber.
7 To quit the menus, press
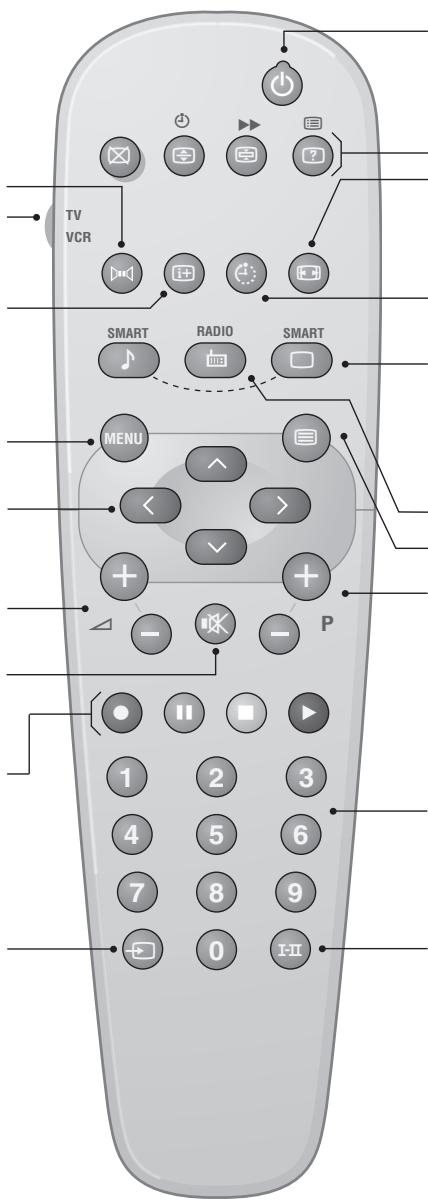
Surround Sound
To activate/deactivate the surround sound effect. In stereo, this gives the impression that the speakers are further apart.
VCR key*
Screen information / permanent no.
To display / clear the program number, name (if it exists) and audio mode. Press the key for 5 seconds to activate permanent display of the number.
Menu
To call up or exit the menus.
Cursor
These 4 keys are used to navigate through the menus.
Volume
To adjust the sound level
Mute
To mute or restore the sound.
Teletext keys (p.4) or VCR keys *
Selection of EXT socket (p.3)
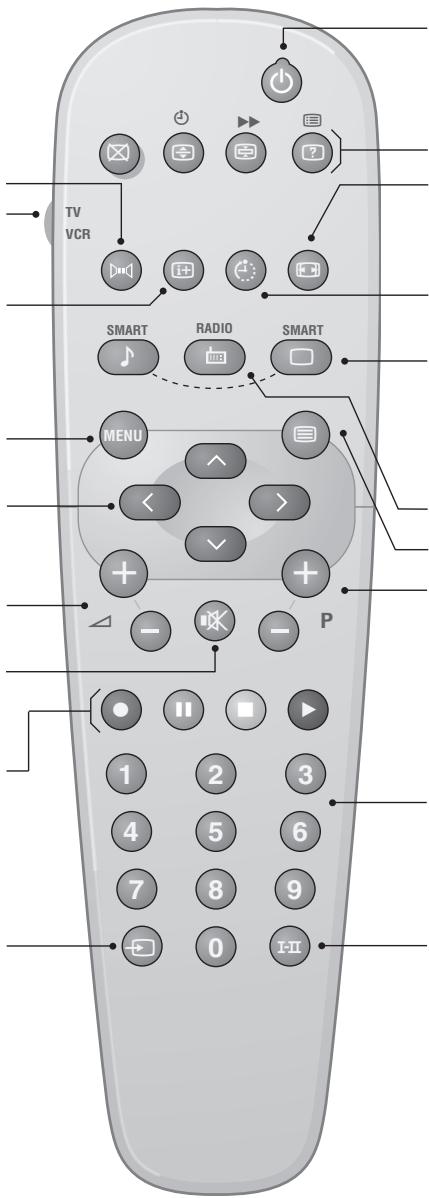
Standby
Lets you place the TV set on standby.To turn on the TV, press P-0,0 to 9.
Teletext keys (p. 4), and VCR keys
16:9 Format (p. 5).
Sleeptimer
(only available on certain versions) To select the length of time before the set automatically switches to standby (from 0 to 240 minutes)
Smart picture and sound Used to access a series of predefined picture and sound settings.
The personal position relates to settings selected from the menus. unused keys.
Teletext (p. 4)
Program selection
To access the next or previous programme. The number, (name) and sound mode are displayed for a few moments.
For some programs, the title of the program will be displayed at the bottom of the screen.
Digit keys
Direct access to the programmes. For a 2 digit programme, enter the 2nd digit before the dash disappears.
Sound mode
Used to force programmes in Stereo and Nicam Stereo to Mono or; for bilingual programmes, to choose between Dual I or Dual II.
The Mono indication is red when in forced position.
* VCR key
The remote control lets you control the main functions of the VCR.
Press and hold down the VCR key located on the side of the remote control, then press one of the keys to access
The remote control is compatible with all VCRs using the RC5 standard.
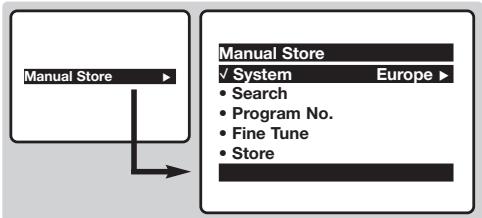
Manual store
This menu is used to store the programmes one at a time.
1 Press the (Menu) key.
2 With the key, select Manual Store and press . Use the , keys to select a setting and the keys to adjust.:
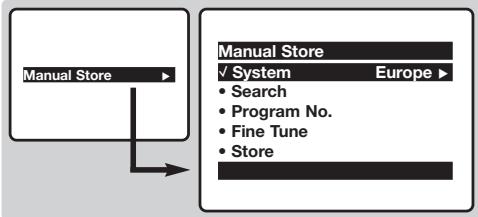
System: select Europe (automatic detection*) or West Europe (BG standard), East Europe (DK
standard), UK (I standard) or France (LL' standard). * Except for France (LL' standard), you must select choice France.
4 Search: press > . The search starts. Once a programme is found, the scanning stops. Go to the next step. If you know the frequency of the required programme, this can be entered directly using the 0 to 9 keys. If no programme is found, see Tips chapter at the end of the instruction for use.
Program No.: enter the required number with the or 0 to 9 keys.
6 Fine Tune: if the reception is not satisfactory, adjust using the ×× keys.
Store: press > . The program is stored.
8 Repeat steps 4 to 7 for each programme to store.
9 To quit the menus, press 10 .
Other settings in the menu
1 Press the (Menu) key.
Use the keys to select a setting and the keys to adjust.:
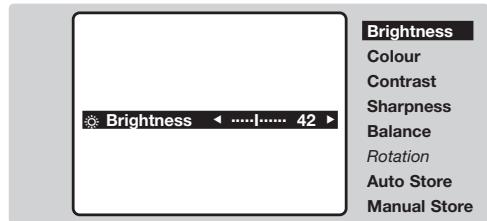
- Brightness: this changes picture brilliance.
Colour: this changes the intensity of the colour.
- Contrast: this changes the difference between the light and dark tones.
- Sharpness: this changes the picture definition.
Balance : this balances the sound on the left and right speakers.
- Rotation (if available): adjusts the angle of the picture.
- Auto Store: to start automatic search for all programmes available in your region. Then, you need to use the Manual Store menu to renumber the programmes (see p.1). To quit or interrupt the search, press (MEN).
3 To quit the menus, press 1 .
Other functions
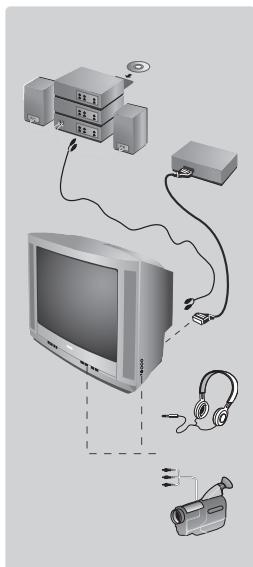
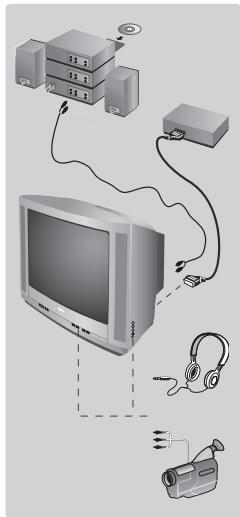
Connecting peripheral equipment
Use the euroconnector socket located at the back of the set or the front AV connections (when available). Certain versions are equipped with 2 euroconnectors EXT1 and EXT2. To select connected equipment, press several times the key.
Most equipment (decoder, VCR) carries out the switching itself.
Headphones socket (only available on certain versions)
When headphones are connected, the sound on the TV set will be cut.
The keys are used to adjust the volume level.
The headphone impedance must be between 32 and 600 Ohms.
Amplifier (only available on certain versions)
To connect to a hi-fi system, use an audio connection cable and connect the "L" and "R" outputs on the TV set to the "AUDIO IN" "L" and "R" input on your hi-fi amplifier.
The keys on the TV set
The TV set has 4 keys: VOLUME - + (- +) and PROGRAM - + (-P +) . To access or exit the menus, press simultaneously the - and + keys. Then use the -P + and - + keys to select and adjust.
Teletext
Teletext is an information system broadcast by certain channels which can be consulted like a newspaper. It also offers access to subtitles for viewers with hearing problems or who are not familiar with the transmission language (cable networks, satellite channels, etc.).
| Press: | You will obtain: This is used to call teletext, change to transparent mode and then exit. The summary appears with a list of items that can be accessed. Each item has a corresponding 3 digit page number. If the channel selected does not broadcast teletext, the indication 100 will be displayed and the screen will remain blank (in this case, exit teletext and select another channel). | |
| Teletext call | ||
| Selecting a page | Enter the number of the page required using the ① to ⑨ or - P + keys, -√. Example: page 120, enter ① ② ⑩. The number is displayed top left, the counter turns and then the page is displayed. Repeat this operation to view another page. If the counter continues to search, this means that the page is not transmitted. Select another number. | |
| Direct access to the items | Coloured areas are displayed at the bottom of the screen. The 4 coloured keys are used to access the items or corresponding pages. | |
| Contents | This returns you to the contents page (usually page 100). | |
| Temporary stop | This is used to temporarily disable or activate the teletext display. | |
| Enlarge a page | This allows you to display the top or bottom part of the page and then return to normal size. | |
| Stop sub-page acquisition | Certain pages contain sub-pages which are automatically displayed successively. This key is used to stop or resume sub-page acquisition. The indication ∥ appears top left. | |
| Hidden information | To display or hide the concealed information (games solutions). | |
| Favourite pages | For teletext programs 0 to 40, you can store 4 favourite pages which can then be accessed directly using the coloured keys (red, green, yellow, blue). 1 Press the (MEN) key to change to favourite pages mode. 2 Display the teletext page that you want to store. 3 Press the coloured key of your choice for 3 seconds. The page is now stored. 4 Repeat the operation with the other coloured keys. 5 You can now consult teletext and your favourite pages will appear in colour at the bottom of the screen. To retrieve the standard items, press (MEN). To clear everything, press (M) for 5 seconds. | |
| Double page teletext (only available on certain versions) | To activate or deactivate the double page teletext display mode. The active page is displayed on the left and the following page is displayed on the right. Press (M) if you want to hold a page (i.e. the contents page). The active page is then displayed on the right. To return to normal mode, press (M) | |
16:9 Formats
If your television is equipped with a 4:3 screen.

Press the key (or ) to select the different modes:
4:3
The picture is reproduced in 4:3 format.
Expand 4:3
The picture is enlarged vertically. This mode is used to cancell the black bands when watching a programme in letterbox format.
Compress 16:9
The picture is compressed vertically into 16:9 format.
If your television is equipped with a 16:9 screen.
Press the key (or ) to select the different modes:
This TV set is also equipped with automatic switching which will select the correct-screen format, provided the specific signals are transmitted with the programmes.
4:3
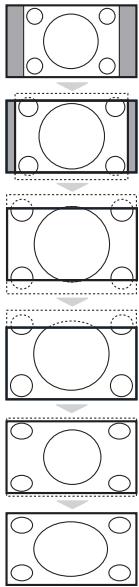
The picture is reproduced in 4:3 format and a black band is displayed on either side of the picture. The picture may be progressively enlarged using the keys.
Zoom 14:9
The picture is enlarged to 14:9 format, a thin black band remains on both sides of the picture. The keys allow you to compress and move the image vertically to view the top or bottom of the picture (subtitles).
Zoom 16:9
The picture is enlarged to 16:9 format. This mode is recommended when displaying pictures which have black bands at the top and bottom (letterbox format).
Use the keys if you wish to compress and move the image vertically to view the top or bottom of the picture.
Subtitle Zoom
This mode is used to display 4:3 pictures using the full surface of the screen leaving the sub-titles visible. Use the keys to increase or decrease the compression at the bottom of the screen.
Super Wide
This mode is used to display 4:3 pictures using the full surface of the screen by enlarging the sides of the picture. The keys allow you to scroll the image up or down the screen.
Widescreen
This mode restores the correct proportions of pictures transmitted in 16:9 using full screen display.
Tips
Positioning the television set
Place your TV on a solid, stable surface, leaving a space of at least 5 cm around the appliance. To avoid accidents, do not put anything on the set such as a cloth or cover, a container full of liquid (vase) or a heat source (lamp). The set must not be exposed to water.
Poor reception
The proximity of mountains or high buildings may be responsible for ghost pictures, echoing or shadows. In this case, modify the orientation of the aerial.
No picture or no sound
Have you connected the aerial socket properly? Have you chosen the right system? (p. 3).
Teletext
Are certain characters not displayed correctly? Press and hold down the and + keys on the TV set for 5
seconds to display the Country menu. Then use the keys to select your country and validate with
Standby
To save power, your set is fitted with components that give it a very low power consumption when in standby mode (less than 3 W).
Still no results?
If your TV set breaks down, never attempt to repair it yourself: contact your dealer's after-sales service.
Recycling directive
The batteries supplied with this appliance do not contain mercury or nickel cadmium. The materials used in your set are either reusable or can be recycled. To minimise environmental waste, specialist companies collect used appliances and dismantle them after retrieving any materials that can be used again (ask your dealer for further details).
For a stille inn lyden
Lydukobling
KhoNk TeneTeKCTa (ctp.4)
JINKHOPIKNBUNDEOMaHHTOPOHa*
BbI6Op BHeUHnx ycTpoiCTB EXT (BHELIH.) (cTp.3)
Pekim OxuaHn
Поьлгетпевodntb Теьиор рөхим охдани. Длг вкlioуенн.TеьирopaиЗ рөхима охдани нахмte Ha P-+,0-9.
KhoNk TeneTeKcta (cTp.8),
N KHOPIKIN BUNDEOMaHHTOPOHa*
Opmat 16:9 (cTp.5).
Taimep: (IMeETCA TOnbKO Ha HeKOTOpBx MOJeIAX) IINy BblOba pI INHbI IpeN0da O abTOMaTHueCKoYCTAHOBKn B deXyPHoe COCTOARHe (OT 0do 240 MIn.)
IpeyctahOBKn 3o6paXeHnN n 3Byka
06cneueHbAeTdoCTyN K HecKoNbKM
npedBaPntBbHbIM HaCTPOiKaM
n3O6paKeHn 3ByKOBOT
cOnpOBoxDeHn. PNYKT MeHIO
NepcoHAn. COOTBeTCTByET HAcTPOiKaM,
KOTOpIe BblIOJIHeHbIC NOMOJIbIO MeHIO.
3Ta KHONka HE INCNOJb3YETCR.
Bb3OB TeTeKcTa (Ctp. 4)
Bb6op kaHaoB
Cnyknt nIpepexoJa KnpdebIyUeMy
nIcneIcyuOeMy KaHany.
PnI 3TOM Ha 3KpaHe Ha HeckOJIbKO
MrHOBeHNI NOBReTCN HNDKaUH
Homepa (mEmeH) KAHaNA N pExkMa.
JnHEKOTOpbX KaHAnOB Ha3BaHHe
pepeaH NPOBJIteCTB H NxKHei
yactn 3KpaHa.
UnpobBie KhoNKn
O6cneuBaIOT npMoI DoCTyI K KaHaNAM.ДЯнKaHANA C dBY3aHbIM HOMePOM Heo6xOIMO DoabaNTB TOpTyU ΣФуDToTOKAKNcE3HeT cepTa.
PexkIM 3ByKOBORo cnpoBoXdHn
- Brightness: peRyInpOBkA npKocTn n3O6paXeHn.
Colour:perynipOBKa hacbIeHHoCTn CBeta.
- Contrast: peRyIIMPOBka KOHTpaCTHOtN 1306paXeHnA.
Sharpness:perynipOBka qetKoCTn 306paXeHna.
Balance: INCINb3yETcI INI peRynIOBKN 6baHcA rPOMKoCTN 3ByKa MExkD npaBIM IN JEBbIM DnHAMIKAMN.
Rotation: (ecn UMeTc) : I03BONETbIIOHATb peYunipOBky yrna HAKNoHa N3O6paKeHr.
- Auto Store: ПОЗВОЛЯТ БИПОЛНИТ b abTOMaTNUeCKOe COXpaHEnHe N B pAmrTn TELeBn3Opa BCex ПинимаembIX TelenBn3IOHnHbIX KaHaNoB. ПocNe 3TOrO Heo6xOДIMO BИПОЛHnTb ПpoUeDpyC OCPtIPOBKn KaHaNoB (CM. CTP. 1).
3ДЯВьIOda n3 MeHIO HαKMITE KHOKNIky
PpOuHeФyHKcHn
IopknioueHne BHeHne annpaTpybI
IcnoIb3yIte pa3bem InI NOKJIIOUeHINI DOONHIteBHOI aNnapaTpybl, paCNOJIOKeHHbI Ha 3aIHeN CTOpOHe TELEBn3Opa, INI rHEzda AV, paCNOJIOKeHHbe NapeIeHne IaHEnI TELEBn3Opa (ecNI OH eCTb). B HEKOTOpbIX MOeJIAX IMeETcBA Dba pa3bEma IINI NOKJIIOUeHINI K TELEBn3Opy IOnONHIteBbHO AnnapaTpyb (EXT1 n EXT2). Bb6op NOKIIIOUeHNOI aNnpaPATA OCyUeCTBnRETC NOMoUsbIO NocLeDobAteBbHbX HaxatNI KHNIK. BOLbIshNCTBO ANnpaTbOB CAMOCTOATEBHO BbIOnIHrIOT KOMMYTAuIO (BInDeOMaRHTNofoH,...).
IHe3do IJN NOKIOUOHeHAYUHIOB (IMeETCH He BO BCEX MOJIAX)
Ipn NOKIOUeHn HAYUHIOB DnHAMIK B TEJIeB3OpE aBTOMaTNUeCKN OTKIOUaETc. PeryUNIOvBa rPOMKOCTN 3ByKa BbIIOJIHReTc C NOMOuB KHOJOK 一 + .IOnHoe COpOTUBHeHne HAYUHIOB DOJXHO HaxoNTbC B npedax ot 32 do 600 OM.
YcINITeB (ToJIbKO Ha HeKOTOpBX MoJIAX) :IJa NOkIOUeHn CNCTeM HiFi, nCNoJIb3ObaT b CoEINHTeBHy Ishyp aydno n CoeINHTb pa3bEmbl "L" n R" TeJIeB3Opa co BxOamn "AUDIO IN" L" n R" ycINITeB.
Khoŋn Ka TeleBn3ope
Ha TeLeBn3ope ImeMeTc4 KhoNk: VOLUME-+(-+)I PROGRAM-M+(-P+.Дя OCUyecTBJIeHЯДоCTuJa K MeHIO HaXKMITE OJHOBpeMeHNO KhoNky -I +.3aTeM BbIOnHInTe peYIpOBky C NOMOJIbO KhoNOK-P+I-+
TeIeTeKCT
TeIeTeKCT npedctabniet coboi cnctemy pacnpoctpaehn HhOpmaun, nepedaBaemno HeKOtOpbIM KaHanaM, KOtopyIO MOxHO uHTaTB KAKra3ety. B 3TOI CNCTeME npedycmOTpeHa TaKKe cyHKUry Cy6TITPOB IINJIOEIN MHeIOxN DeOeKtBu CnyxA INI He 3HaIOxN Ra3bika, Ha KOtOPOM BeDeTcH npepaa (KaBeJIbHble CETN, KaHaNbl CNCTeMb CIyTHIKOBORO TEJIeBEuHaH N T.D.).
Chamada de teletexto (p. 4)
Selecao dos canais
Selecionar a opcao France.
\*PAnjktpo aayntookomnns
| CANAL FREQ (MHz) | CANAL FREQ (MHz) | CANAL FREQ (MHz) | |||
| E2 | .48.25 | S15 | .259.25 | 33 | .567.25 |
| E3 | .55.25 | S16 | .266.25 | 34 | .575.25 |
| E4 | .62.25 | S17 | .273.25 | 35 | .583.25 |
| E5 | .175.25 | S18 | .280.25 | 36 | .591.25 |
| E6 | .182.25 | S19 | .287.25 | 37 | .599.25 |
| E7 | .189.25 | S20 | .294.25 | 38 | .607.25 |
| E8 | .196.25 | H1 | .303.25 | 39 | .615.25 |
| E9 | .203.25 | H2 | .311.25 | 40 | .623.25 |
| E10 | .210.25 | H3 | .319.25 | 41 | .631.25 |
| E11 | .217.25 | H4 | .327.25 | 42 | .639.25 |
| E12 | .224.25 | H5 | .335.25 | 43 | .647.25 |
| R1 | .49.75 | H6 | .343.25 | 44 | .655.25 |
| R2 | .59.25 | H7 | .351.25 | 45 | .663.25 |
| R3 | .77.25 | H8 | .359.25 | 46 | .671.25 |
| R4 | .85.25 | H9 | .367.25 | 47 | .679.25 |
| R5 | .93.25 | H10 | .375.25 | 48 | .687.25 |
| R6 | .175.25 | H11 | .383.25 | 49 | .695.25 |
| R7 | .183.25 | H12 | .391.25 | 50 | .703.25 |
| R8 | .191.25 | H13 | .399.25 | 51 | .711.25 |
| R9 | .199.25 | H14 | .407.25 | 52 | .719.25 |
| R10 | .207.25 | H15 | .415.25 | 53 | .727.25 |
| R11 | .215.25 | H16 | .423.25 | 54 | .735.25 |
| R12 | .223.25 | H17 | .431.25 | 55 | .743.25 |
| S1 | .105.25 | H18 | .439.25 | 56 | .751.25 |
| S2 | .112.25 | H19 | .447.25 | 57 | .759.25 |
| S3 | .119.25 | 21 | .471.25 | 58 | .767.25 |
| S4 | .126.25 | 22 | .479.25 | 59 | .775.25 |
| S5 | .133.25 | 23 | .487.25 | 60 | .783.25 |
| S6 | .140.25 | 24 | .495.25 | 61 | .791.25 |
| S7 | .147.25 | 25 | .503.25 | 62 | .799.25 |
| S8 | .154.25 | 26 | .511.25 | 63 | .807.25 |
| S9 | .161.25 | 27 | .519.25 | 64 | .815.25 |
| S10 | .168.25 | 28 | .527.25 | 65 | .823.25 |
| S11 | .231.25 | 29 | .535.25 | 66 | .831.25 |
| S12 | .238.25 | 30 | .543.25 | 67 | .839.25 |
| S13 | .245.25 | 31 | .551.25 | 68 | .839.25 |
| S14 | .252.25 | 32 | .559.25 | 69 | .855.25 |
FRANCE
| CANAL | FREQ (MHz) |
| 2. | 55.75 |
| 3. | 60.50 |
| 4. | 63.75 |
| 5. | 176.0 |
| 6. | 184.0 |
| 7. | 192.0 |
| 8. | 200.0 |
| 9. | 208.0 |
| 10. | 216.0 |
| B. | 116.75 |
| C. | 128.75 |
| D. | 140.75 |
| E. | 159.75 |
| F. | 164.75 |
| G. | 176.75 |
| H. | 188.75 |
| I. | 200.75 |
| J. | 212.75 |
| K. | 224.75 |
| L. | 236.75 |
| M. | 248.75 |
| N. | 260.75 |
| O. | 272.75 |
| P. | 284.75 |
| Q. | 296.75 |
ITALY
| CANALE | FREQ (MHz) |
| A | 53.75 |
| B | 62.25 |
| C | 82.25 |
| D | 175.25 |
| E | 183.75 |
| F | 192.25 |
| G | 201.25 |
| H | 210.25 |
| H1 | 217.25 |
Information for users in the UK (not applicable outside the UK)
Positioning the TV
For the best results, choose a position where light does not fall directly on the screen, and at some distance away from radiators or other sources of heat. Leave a space of at least 5cm all around the TV for ventilation, making sure that curtains, cupboards etc. cannot obstruct the air flow through the ventilation apertures. The TV is intended for use in a domestic environment only and should never be operated or stored in excessively hot or humid atmospheres.
General Points
Please take note of the section entitled 'Tips' at the end of this booklet.
Interference
The Department of Trade and Industry operates a Radio Interference Investigation Service to help TV licence holders improve reception of BBC and IBA programmes where they are being spoilt by interference.
If your dealer cannot help, ask at a main Post Office for the booklet "How to Improve Television and Radio Reception".
Mains connection
Before connecting the TV to the mains, check that the mains supply voltage corresponds to the voltage printed on the type plate on the rear panel of the TV. If the mains voltage is different, consult your dealer.
Important
This apparatus is fitted with an approved moulded 13AMP plug. Should it become necessary to replace the mains fuse, this must be replaced with a fuse of the same value as indicated on the plug.
-
Remove fuse cover and fuse.
-
The replacement fuse must comply with BS 1362 and have the ASTA approval mark. If the fuse is lost, make contact with your retailer in order to verify the correct type.
-
Refit the fuse cover.
In order to maintain conformity to the EMC directive, the mains plug on this product must not be removed.
Connecting the aerial
The aerial should be connected to the socket marked at the back of the set. An inferior aerial is likely to result in a poor, perhaps unstable picture with ghost images and lack of contrast. Make-shift loft or set-top aerials are often inadequate. Your dealer will know from experience the most suitable type for your locality. Should you wish to use the set in conjunction with other equipment, which connects to the aerial socket such as TV games, or a video camera it is recommended that these be connected via a combiner unit to avoid repeated connection and disconnection of the aerial plug.
Fitting the stand (if provided)
Use only the stand provided with the set, making sure that the fixings are properly tightened. A diagram showing how to assemble the stand is packed with the stand. Never use a make-shift stand, or legs fixed with woodscrews.