
RS100 - Speaker HAMA - Free user manual and instructions
Find the device manual for free RS100 HAMA in PDF.
| Product type | Wireless speaker system (surround kit) |
| Brand | Hama |
| Model | RS100 |
| Power supply | Transmitter: 5 V / 1 A; Receiver: 12 V / 1.5 A (power adapters included) |
| Connections | Optical (in/out), AUX IN/OUT (3.5 mm jack), speaker terminals |
| Main functions | Surround mode, Dolby Digital, PCM, remote learning, wireless pairing |
| Wireless range | Up to 10 m |
| Compatibility | Analog and digital audio sources |
| Package contents | 1 transmitter, 1 receiver, 2 speakers, 2 power adapters, cables (optical, jack, RCA, speaker), remote control, CR2025 battery, user manual |
| Dimensions (approx.) | Speaker: 200 x 150 x 120 mm; Transmitter: 120 x 80 x 30 mm; Receiver: 120 x 80 x 30 mm |
| Total weight (approx.) | 4 kg |
| Material | Hard plastic |
| Wall mounting | Possible (mounting thread on speakers) |
| Care and cleaning | Clean with a slightly damp lint-free cloth; avoid harsh detergents; disconnect if not used for extended periods |
| Safety | Risk of electric shock; do not open the device; keep out of reach of children; keep batteries out of reach of children; do not expose to moisture or heat |
| Remote control batteries | 1x CR2025 (included) |
| Warranty | Warranty void if installation or use not in accordance with instructions |
| Repairability | Not user serviceable; contact a qualified technician |
Frequently Asked Questions - RS100 HAMA
User questions about RS100 HAMA
0 question about this device. Answer the ones you know or ask your own.
Ask a new question about this device
Download the instructions for your Speaker in PDF format for free! Find your manual RS100 - HAMA and take your electronic device back in hand. On this page are published all the documents necessary for the use of your device. RS100 by HAMA.
USER MANUAL RS100 HAMA
"RS100"AudioExtensionSet
Further information (features, languages, and so on) are available on/
00054867:www.hama.com/54867#downloads
A
Speakers

B
Transmitter
C
Receiver
RemoteControl

ControlsandDisplays
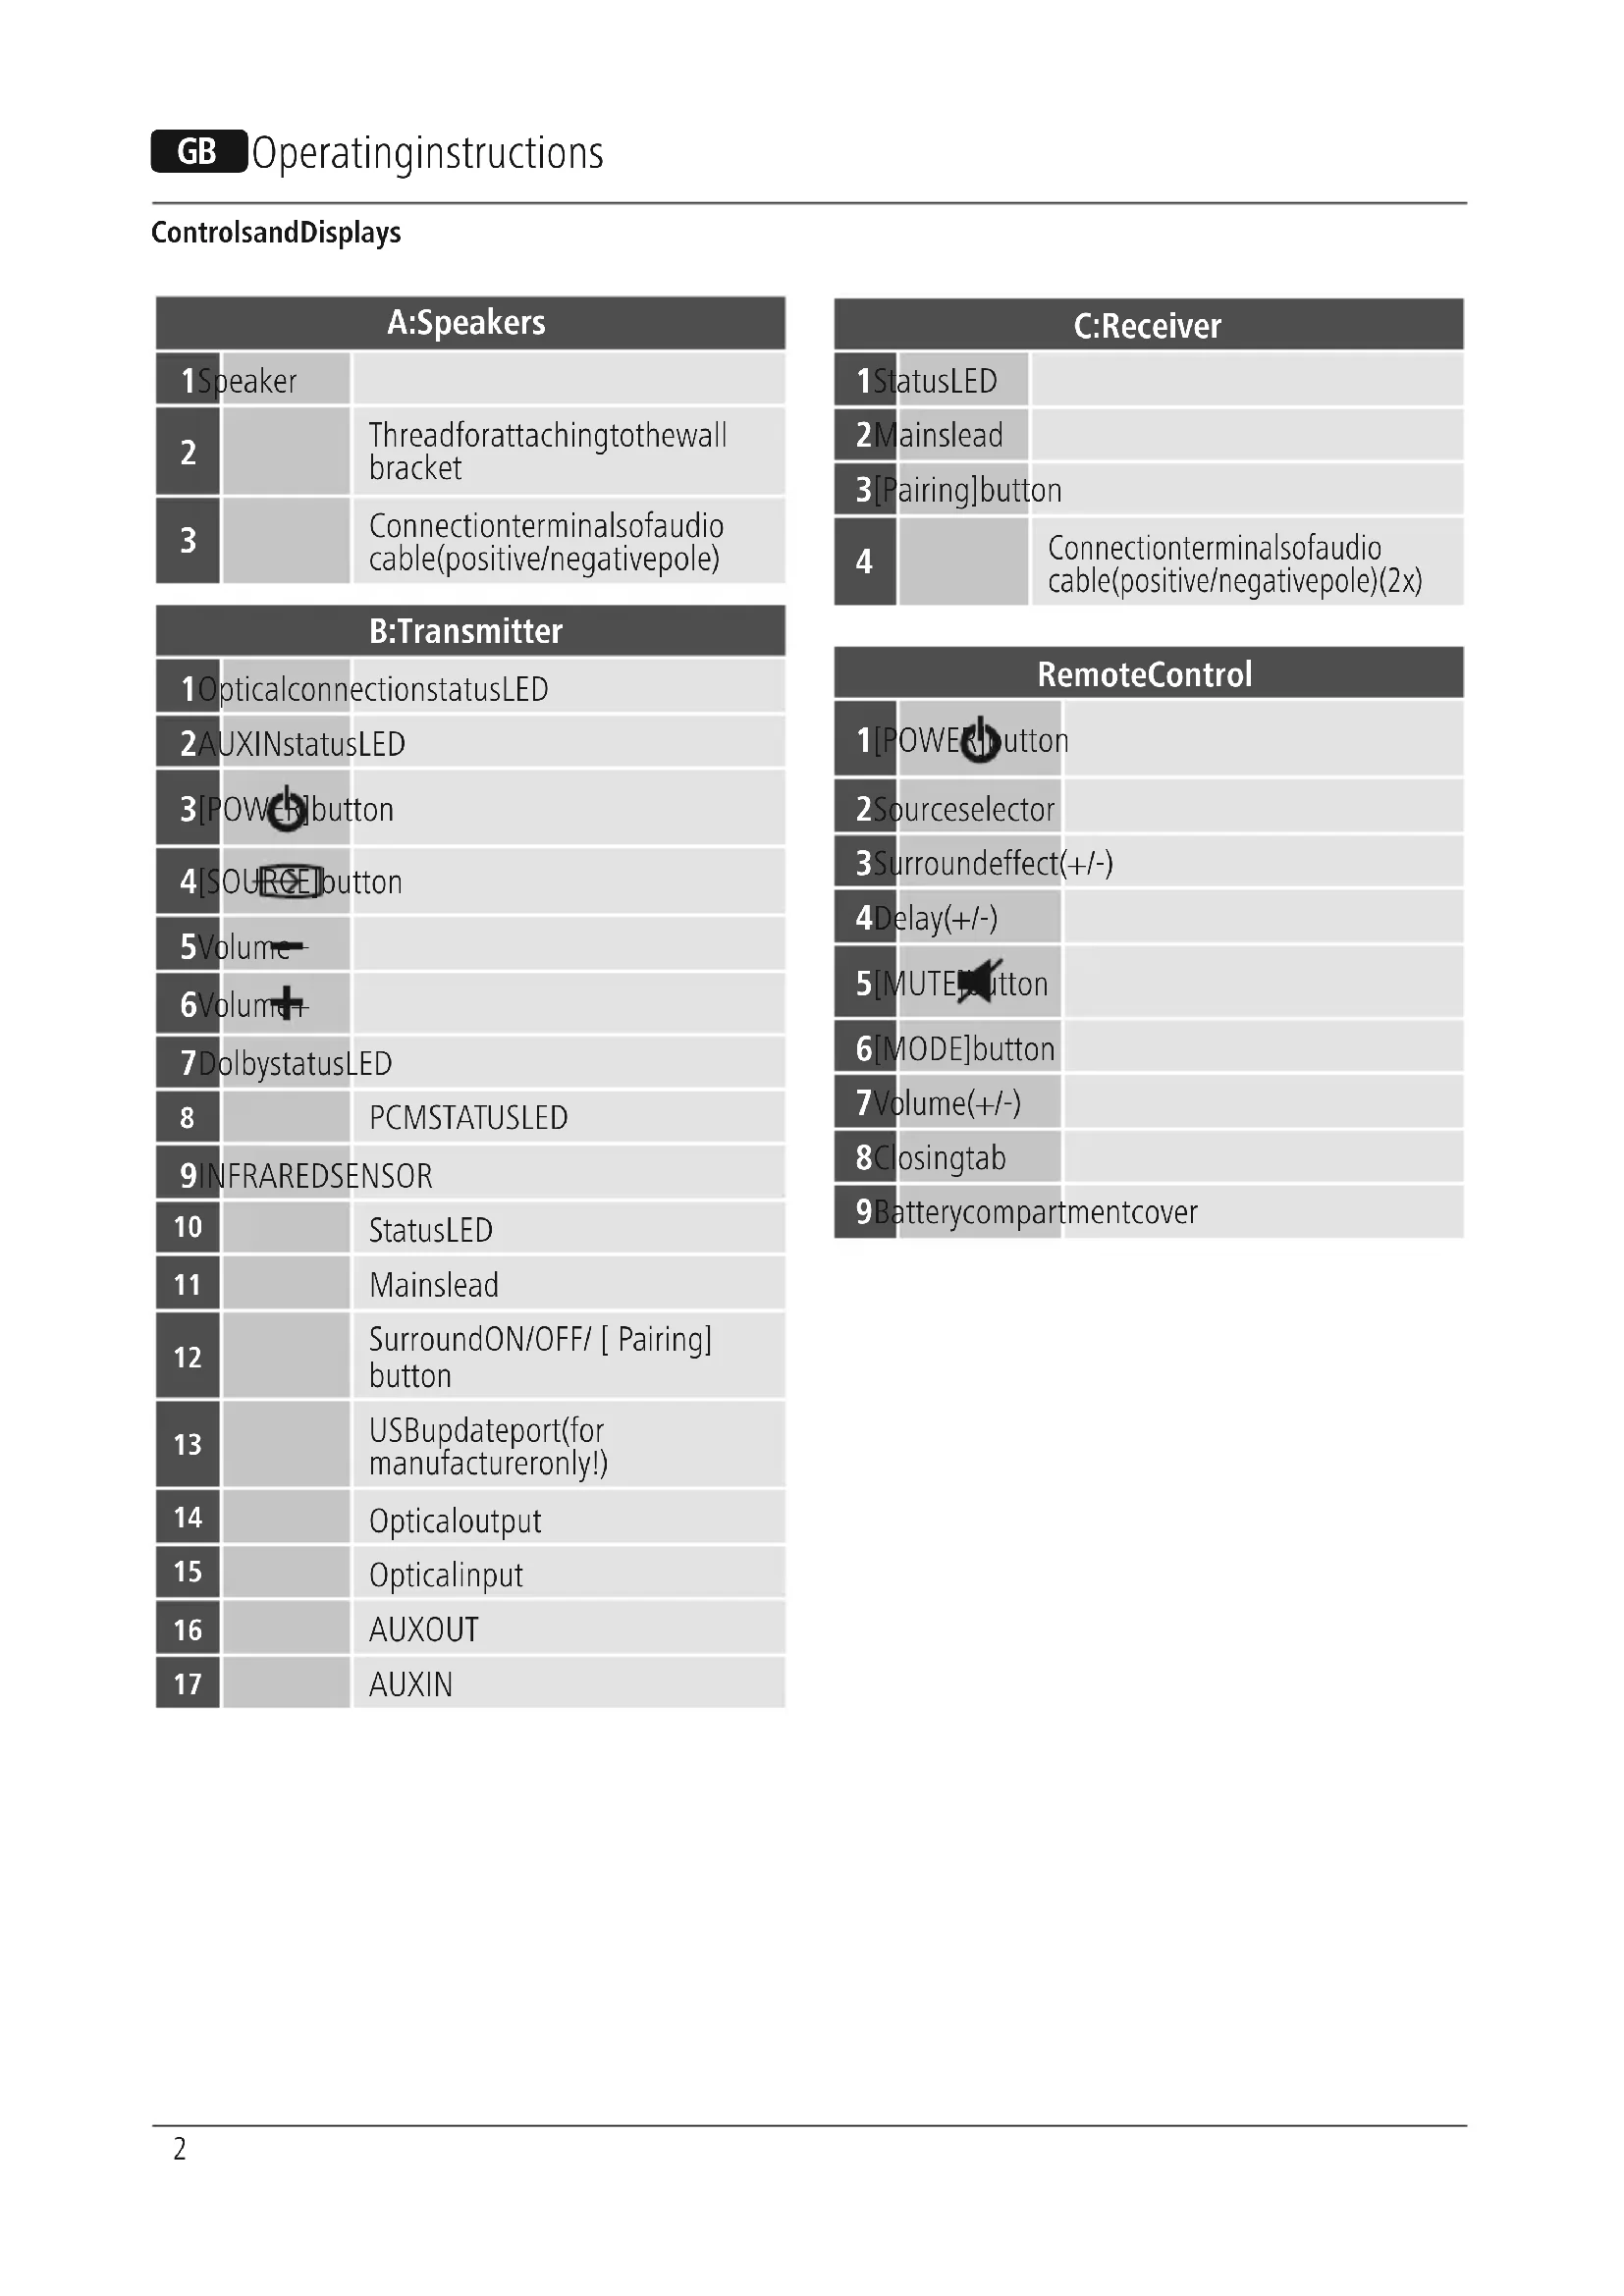
| A:Speakers | |
| 1Speaker | |
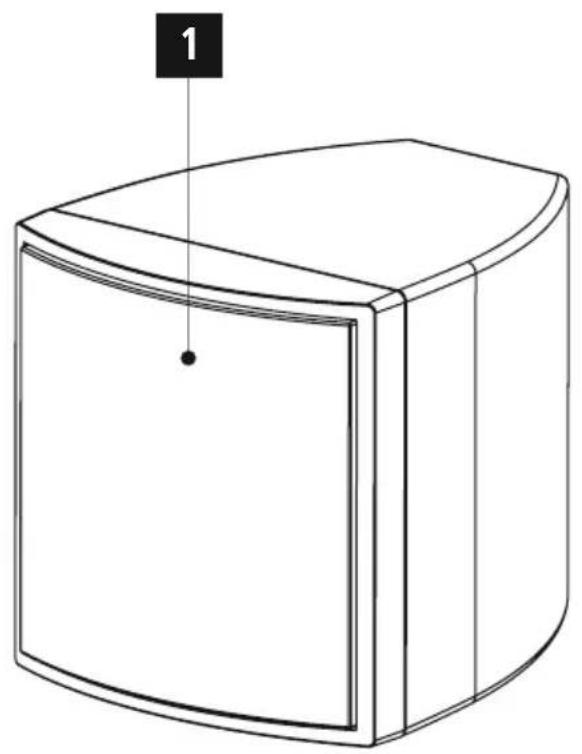
| 2 | |
| 3 | |
| Connectionterminalsofaudio cable(positive/negativepole) | |
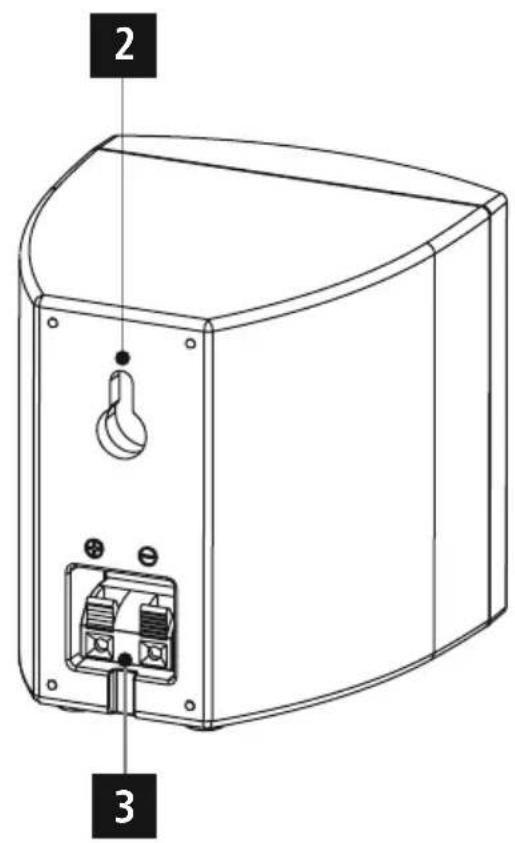
| B:Transmitter | |
| 1OpticalconnectionstatusLED | |
| 2AUXINstatusLED | |
| 3IPOWER button | |
| 4SOURCE button | |
| 5Volume | |
| 6Volume | |
| 7DolbystatusLED | |
| 8 | PCMSTATUSLED |
| 9INFRAREDSENSOR | |
| 10 | StatusLED |
| 11 | Mainslead |
| 12 | SurroundON/OFF/ [ Pairing] button |
| 13 | USBupdateport(for manufactureronly!) |
| 14 | Opticaloutput |
| 15 | Opticalinput |
| 16 | AUXOUT |
| 17 | AUXIN |
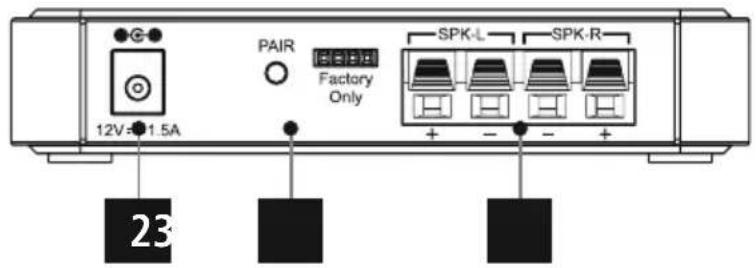
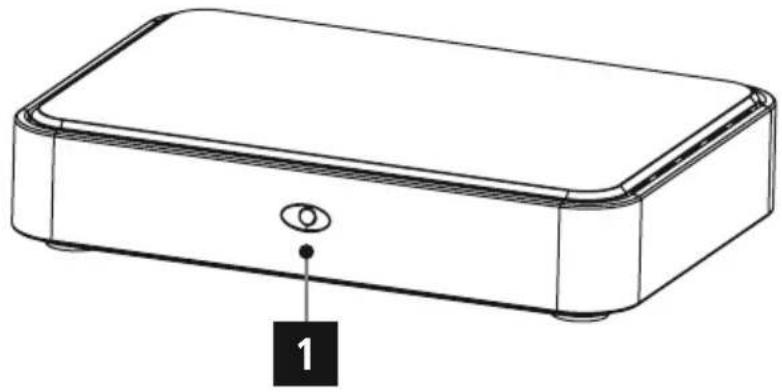
| C:Receiver | |
| 1StatusLED | |
| 2Mainslead | |
| 3[Pairing]button | |
| 4 | Connectionterminalsofacisco cable(positive/negativepole)(2x) |
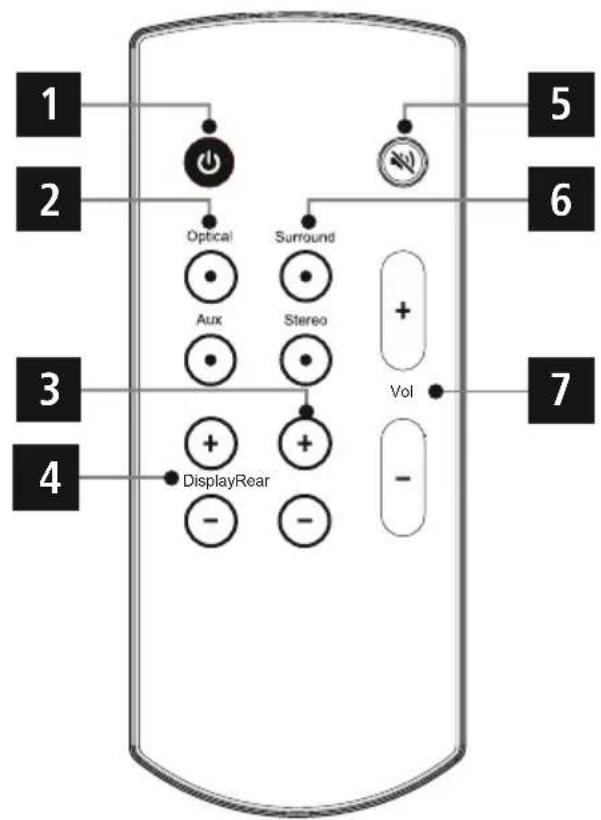
| RemoteControl | |
| 1[POWERT button | |
| 2Source selector | |
| 3Surroundeffect(+/-) | |
| 4Delay(+/-) | |
| 5[MUTE]button | |
| 6[MODE]button | |
| 7Volume(+/-) | |
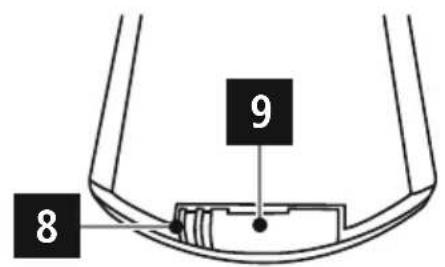
| 8Closingtab | |
| 9Batterycompartmentcover | |
Thankyouforchoosinga H amaproduct.
Takeyourtimeandreadthefollowinginstructionsand informationcompletely. P leasekeeptheseinstructionsina safe place for future reference. If you sell the device, please passtheseoperatinginstructionsontoenewowner.
1.ExplanationofWarningSymbolsandNotes

Risikofelectricshock
Thissymbolindicatesproductpartsenergizedwithadangerousvoltageofsufficientmagnitudetoconstituteariskofelectricshock.

Warning
Thissymbolisusedtoindicatesafetyinstructionsoarto draw your attention to specific hazards and risks.

Note
Thissymbolisusedtoindicateadditionalinformationor importantnotes.
2.PackageContents
-1 t transmitter
-1 receiver
- 1 powsupplyunit5V/ 1 A
- 1 power supply unit 12 V/1.5 A
-2speakers
-1 audiocable(3.5-mmstereominijack)
-2 opticalsignalcables
-2speakercables
- 1 a dockable(3.5-mm stereomiminijackto2xRCA socket)
- 1 adapter cable (3.5-mm stereo socket to 2x RCA plug)
-1 remotecontrol
-1 C R2025battery
- Operatinginstructions
3.Safetynotes
The productisintendedforprivate, non-commercial use only.
- Protect the product from dirt, moisture and overheating anduseitindryroomsonly.
- Aswithallelectricaldevices, this devices should be kept out ofthereachofchildren.
- Donotdroptheproductanddonotexposeittoany majorshocks.
- Donotoperatetheproductoutsidethepowerlimits giveninthespecifications.
- Keep the packaging material out of thereach of children duetotheriskofsuffocation.
- Disposeofpackagingmaterialimmediatelyaccordingto locallyapplicableleregulations.
- Do not modify the device in any way. Doing so voids the warranty.

Risikofelectricshock
- Donotopenthedevicerecontinuetooperateititifit becomesdamaged.
- Donotusetheproductifthecnntectorcablesor powercablesared amaged.
- Pay attention to the differing current-carrying capacities of the provided mainscables. Failingtoday somaydamagetheproduct.
- Donotatempttoserviceorrepairtheproduct yourself. Leave all service work to qualified experts.

Warning-Batteries
- Donotallowchildrentochangebatterieswithout supervision.
- Remove the batteries from products that are not being used for anextendedperiod.
- Donotshort-circuitthebatteries.
- Donotchargenon-rechargeablebatteries.
- Donotthrowbatteriesintoa fire.
- Donotexposebatteriestom moisture.
- Keepbatteriesoutofthereachofchildren.
4.Informationandnotesbeforegettingstarted
Thisproductextendsyouexistingaudiosystemwithreturn channelspeakers,allowingyoutogeneratesurround soundwitha 2 .1channelsystem. Whenyouuseasourcethatdoesnupporteanactual DolbySurroundsignal,thekitrecalculatesthesignalto simulatesurroundsound.
4.1Gettingstartedwiththeremotecontrol
Removetheprotrudingsafetystripsfromthebattery compartmentoftheremotecontrolbypullingthemout. Thebatteryhasalreadybeeninsertedsothisiswillrender theremotecontrolreadytouse.
4.2Replacingthebattery
- Openthebatterycompartmentcover(9)onthebackof theremotecontrolbyslidingtheclosingtab(8)tothereightandpullingoutthebatterycompartmentcover.
- Removeanddisposeofanyusedbatteries.
- Insert the new battery (AA). Take care of placing the new battery according to the right polarity. (Positive side upward, negative downward)
- Close the battery compartment. Make sure that the cover closes easily and tightly.
5. Gettingstarted
- Connect the power cable to a properly installed and easily accessible powersocket.
- The power supply units are suitable for mains voltages between 100 and 240V allowing them to be used in almost any AC power grid. Please note that a country-specific dapter may be necessary.
- You can find a selection of compatible products at www.hama.com.

Note
- Only connect the product to a socket that has been approvedforthedevic.
- The electricalsocketmustalwaysbeeasilyaccessible.
- When using a multi SOCKET power strip, make sure that the sum power draws all the connected devices out of the bus.
- When the bus is full, it does not exceed 1000 pulses per second.
- If you will not be using the product for a ling period of time, disconnectitfrommainspower.
5.1Positioningintheroom

Note
- The housing of the speakers is made of hard plastic. Avoid subjecting themtodirectsunlight, moisture (inthekichenorbath),ordirectproximitytoair conditioningsystems.
- Situate the speakers on a level, stable surface.
- Alternatively, the speakers may be attached to the wallusingtheincludedwall mountingfixtures.
- OlderTVsetsmaygeneratemagneticinterference. Ifyouexperienceinterference,increasedistance betweentheproductandthepicture s ource.
Removeallofthesuppliedcomponentsfromthe packaging.
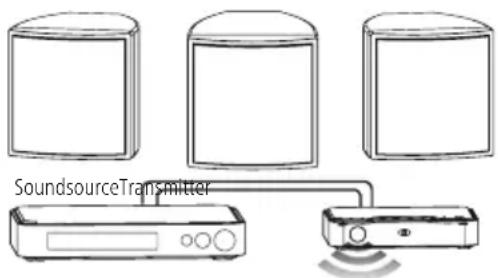
- Set up the transmitter in a place where the LED indicator and IRsensorpointin your direction.
- Placetheeceiverdirectlybehindyouwithonespeaker eachtotheleftandrightofit.
- Thedistancebetweenthetransmitterandthereceiver shouldnotexceed10metres.
5.2 Connecting thecables
You can use the analog and digital audio inputsto connect your terminal device and play its audio signals using the product. You can connect it using a 3.5-mm audio minijack cable, an RCA cable, or an optical signal cable.

Note
- Connectionsviaanopticalsignalcableare les susceptibletoelectricalormagneticinterferencethan thoseusinga 3 .5-mmaudiominijackcable.
5.2.1 Connecting the transmitter using anoptical signal cable

Note
- Switch off the product before connecting a terminal devicetoit.
- Removetheprotectivecapsfrombothendsoftthe opticalsigncablebefore c onNECTION.
-
Donotbendorcrushthecable.
-
For playback using the optical audio input, connect one endoftheopticalsignalcable(supplied)totheoptical audioinput(15)onthetransmitter, and connect the otherendtotheopticalaudiooutputyourterminal device(e.g.TVset,DVDplayer).
- Thenconnectanopticalsignalcabletotheopticalaudio outputofthetransmitter(14)andtheopticalaudioinput of the source device (e.g. soundbar, AV receiver).
5.2.2ConnectingthetransmitterusingAUXIN

Note
- Switch off the product before connecting a terminal devicetoit.
-
Donotbendorcrushthecable.
-
For playback via the AUX connection, use an RCA cable (supplied)toconnecttheAUXOUTofyourpicture source (e.g.TVset,DVDplayer)totheAUXIN(17)ofthe transmitter.
- Then use an RCA cable to connect the transmitter's AUX OUT(16)totheAUXINoftheplaybacksource(e.g. soundbar, A C receiver).
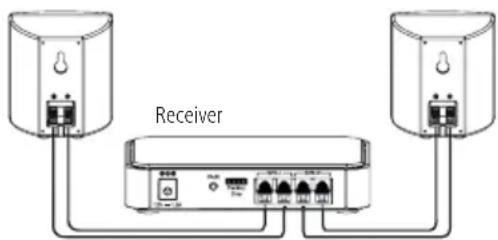
5.2.3Receiver
Connectthereceivevertothespeakersusingthetwo-core audiocable.

Note
- Thespeakerintendedfortheleft-handcornerof the roomislabelledSPK-Lontheback.
- Thespeakerintendedfortheright-handcornerofthe roomislabelledSPK-Rontheback.
Right-handcorner
- Takethespeakerintendedforthearight-handcornerof the room and the audio cable coloured red and black.
- Connectthered-sheathedaudiocabletothepositive pole(redconnection)ofthespeakerandthepositive pole(redconnection)ofthereceiver.
- Thenconnecttheblack-sheathedaudiocabletothe negativepole(blackconnection)ofthespeakerandthe negativepole(blackconnection)ofthereceiver.
Left-handcorner
Takethespeakerintendedfortheleft-handcornerof the roomandthearaudiocablecolouredgreyandred.
- Connectthered-sheathedaudiocabletothepositive pole(redconnection)ofthespeakerandthepositive pole(redconnection)ofthereceiver.
- Thenconnectthegrey-sheathedaudiocabletothe negativepole(greyconnection)ofthespeakerandthe negativepole(greyconnection)ofthereceiver.
- Connect the receiver to a properly installed and easily accessible mainssocketviaa p ownersupplyunit(12V/ 1.5A).
5.3Re-connectingthetransmitterandreceiver (pairing)

Note
- The transmitter and receiver are shipped already paired.
If the connection between the transmitter and receiver should be interrupted, you can repeat the pairing process. Todoso, proceed as follows:
1.Pressthe[POWER]buttonoftheremotecontrol(1) toturnonthetransmitterandreceiver.
2. Press and hold the Surround ON/OFF / [Pairing] button(12)onthebackofthetransmitterforabout 3 s eonds.
3. Then press and hold the Pairing button (3) on the back of thereceiver for about 3 seconds.
4. The pairing process is complete when the status LED of the transmitter (10) lights up blue.
5.4Surroundmode
Briefly press the Surround ON/OFF / [Pairing] button (12) onthebackofthetransmittertoswitchbetweensurround andmono/stereoplayback.
5.5Learningfunction
You h avetheoptionofusingyouroriginalTVremote controltooperatetheproduct. ThisrequiresthatyouroriginalTVremotecontrol be learned.

Note
Toenableprogramming,theremotecontrolbeing learnedmusthaveainfrastructure.
- If the remote control uses a different standard (e.g. Bluetooth), learningisnotpossible.
Proceedasfollows:
- Pressandholdbothvolumebuttons(5) + (6) on the transmitter at the same time for about 3 seconds to activate learning mode. The optical connection statusLED(1) and AUXINstatusLED(2) will flash slowly for about 10 seconds.
- On the transmitter, press the button whose function youwishtotransfertoa b uttonontheremote control.TheLEDindicators(1) ^+ (2)remainsteadily lit.
3.Ontheremotecontrol, pressthebuttonob programmedwiththefunction. - Once the programming procedure is complete, the status LEDs (1) + (2) simultaneously flash quickly. If the programming procedure failed, then thestatus LEDs(1)+ (2)flashalternately.
5.Repeatsteps2 to 4 foranybuttonyouwishto program. - Pressandholdthe[POWER]button(3) and the volumebutton(6) on the transmitter at the same time for about 3 s econdstoleavelearning mode.

Note
- Thelearningprocessisendedwithoutsavingchanges ifnobuttonispressedornosignalisreceivedfor longerthan10seconds.
6.CareandMaintenance
- Only clean this product with a slightly damp, lint-free cloth and donotuseaggressivecleaning agents.
- If you do not use the product for a long time, turn off the device and disconnect it from the powersupply. S toreit ina c lean, dryplaceoutofdirectsunlight.
7.WarrantyDisclaimer
Hama GmbH & Co KG assumes no liability and provides no warranty for damagers resulting from improper installation/ mounting, improper use of the product from failure to observetheoperating instructionsand/or safety notes.
8. Service and Support
PleasecontactHamaProductConsultingifyouhaveany questionsaboutthisproduct Hotline:+499091502-115(German/English)
Furthersupportinformationcanbefoundhere: www.hama.com
9. Recycling Information
Noteonenvironmentalprotection:
AftertheimplementationoftheEuropeanDirective 2012/19/EUand2006/66/EUnthenationallegalsystem,thefollowingapplies:Electricand electronicdevicesaswellasbatteryismustnotbe
disposedofwithhouseholdwaste.Consumersareobliged bylawtoreturnelectricalandronicdevicesaswellas batteriesattheendoftheirservicelivesthepublic collectingpointstsetupforthispurposeorpointofsale. Details to this are defined by the national law of the respective country. This symbol on the product, the instructionmanualorthepackageindicatesthata p roduct issubjecttotheseregulations.Byrecycling,reusingthematerialsorotherformsofutilisingolddevices/batteries, youare makinganimportantcontributiontoprotectingour environment.
10.DeclarationofConformity
Hereby, Hama GmbH & Co KG declares that the radioequipmenttype[00054867]isincompliance withDirective2014/53/EU. T hefulltextoftheEU declarationofconformityisavailableatthefollowing internetaddress: www.hama.com->00054867->Downloads.
Frequencyband(s)WiFi:5.745-5.840GHz
Maximumradio-frequency powertransmitted
14dBm(EIRP)
86652 Monheim/Germany
www.hama.com


- ControlsandDisplays
- 1.ExplanationofWarningSymbolsandNotes
- Risikofelectricshock
- Warning
- Note
- 2.PackageContents
- 3.Safetynotes
- Warning-Batteries
- 4.Informationandnotesbeforegettingstarted
- 4.1Gettingstartedwiththeremotecontrol
- 4.2Replacingthebattery
- Gettingstarted
- 5.1Positioningintheroom
- Connecting thecables
- Connecting the transmitter using anoptical signal cable
- 5.2.2ConnectingthetransmitterusingAUXIN
- 5.2.3Receiver
- Right-handcorner
- Left-handcorner
- 5.3Re-connectingthetransmitterandreceiver (pairing)
- 5.4Surroundmode
- 5.5Learningfunction
- Proceedasfollows:
- 6.CareandMaintenance
- 7.WarrantyDisclaimer
- Service and Support
- Recycling Information
- Noteonenvironmentalprotection:
- 10.DeclarationofConformity
Brand : HAMA
Model : RS100
Category : Speaker