PAC114 Design - Surveillance Camera Profile - Free user manual and instructions
Find the device manual for free PAC114 Design Profile in PDF.

| Product Type | Video phone with surveillance camera |
| Brand | Profile |
| Model | PAC114 Design |
| Screen | 7 inch LCD (480 × 3 (RGB) × 240 pixels) |
| Monitor dimensions | 200 (L) × 190 (W) × 20 (H) mm |
| Camera dimensions | 122 (L) × 73 (W) × 44 (H) mm |
| Power supply | 230 V AC / 15 V DC 1 A adapter |
| Monitor consumption | 420 - 620 mA |
| Camera consumption | 520 mA ± 300 mA |
| Video system | PAL / NTSC |
| Monitor operating temperature | -10 °C to 50 °C |
| Camera operating temperature | -20 °C to 50 °C |
| Maximum humidity | 85% |
| Maximum cable length | 25 m (cross-section 0.6 - 0.8 mm²) |
| Main functions | Hands-free conversation, visual control, automatic photo recording, multimedia player (photo, music, video), electric lock (optional) |
| Maintenance and cleaning | Clean with a damp cloth and mild soap. Do not use detergents. Do not pour water on the camera. |
| Safety | Respect polarity (red = +, black = -). Do not cut or extend power cables. Keep away from magnetic fields. |
| Spare parts and repairability | SD card not included. 10 m cable supplied. For repairs, contact customer service. |
Frequently Asked Questions - PAC114 Design Profile
User questions about PAC114 Design Profile
0 question about this device. Answer the ones you know or ask your own.
Ask a new question about this device
Download the instructions for your Surveillance Camera in PDF format for free! Find your manual PAC114 Design - Profile and take your electronic device back in hand. On this page are published all the documents necessary for the use of your device. PAC114 Design by Profile.
USER MANUAL PAC114 Design Profile
C. Film (type VOB, MPEG1,AVI,DIVA,XVID,DIVX4.x of DIVX5.x)
- Brightness adjustment
- Brightness adjustment
Raccordements techniques requis
- Brightness Adjustment
We thank you for the purchase of this Profile product. Note: It is important that you read this manual carefully before using the product. Then keep this manual in a safe place.
Introduction (fig. 1)
- LCD screen
- Up function key
- MENU key
- Left function key
- Door lock button
- Loudspeaker
- Play/Pause key
- Right function key
- Conversation/Monitor key
- Down function key
- SD card slot (SD card not included)
- Mini USB slot
Assembly instructions
1. If there is not yet any wiring :
The position of the monitor is determined as follows: the height amounts to approximately 165~cm and is to be max. 150~cm from a plug socket where the adapter will be plugged in. The connecting cable between monitor and outside camera must therefore come from the wall behind the monitor. Provide a tube so the cable can move freely. If possible also provide a tube with a sufficiently large diameter (20 - 25mm)
Determine the position of the camera outside at the door. The ideal installation height is 155 to 165~cm Shorter and taller persons then also remain in picture.
- Bring the camera cable to the monitor from outside to inside; the cable is moulded.
- Connect the wiring according to the diagram below. The power supply wiring may not be extended or cut through: this causes the appliance to work poorly and invalidates the guarantee.
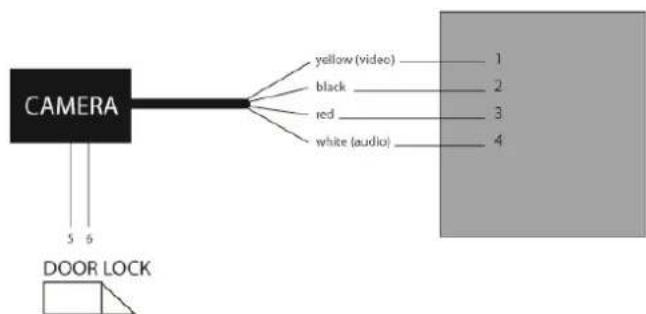
Note: respect the correct polarity. Red = +, Black = -
- Cut off the cables with 2 cores without door lock.
If a door lock is to be connected, its connection must be from the camera as shown in the diagram above. The lock may consume no more than 300mA and must have a memory function (the lock remains free until just before the door is pushed open). The 2 wires are already provided in a moulded cable (4m) .
- if there is already existing wiring (max. 25m):
The wire diameter must be between 0.6 and 0.8mm^2
- Shorten the moulded cables to the desired length and strip the wires approximately 1cm . If an electrical door lock is used: also strip the 2-core cable over a length of 1cm .
The door lock is connected from the camera with the moulded cable with two wires. The lock may consume no more than 300mA and must have a memory function (the lock remains in a free position as long as the door is not pushed open).
- Provide a recess behind the camera in the wall or door frames, connect the wiring using the connecting blocks and push this into the recess. If you cannot do this the wires must be twisted together and insulated with insulation tape.
Use of the doorbell and videophone functions
A. Having a normal conversation
- Ringing on the external unit
- The picture automatically appears on the monitor inside.
- Press the conversation key and speak to the visitor.
- The door lock can be operated with the key for that purpose.
- Press the conversation key again to end the conversation.
B. Making a visual check
- If the conversation key is pressed once without ringing you can make a visual check.
- You can stop the picture by pressing the conversation key again.
C. Changing functions
- Press the conversation key
- Press the menu key and using the left and right function keys set the ringing volume, brightness, contrast and the colour intensity
- Changing functions by again pressing the menu key.
Using the multimedia functions
- Insert your SD/MMC/MC card with photos, music, and/or film files in the slot for that purpose.
- Press the play/pause button to activate the menu.
- Select the desired folder using the function keys and confirm with the Play/Pause button.
A. Photo slideshow (JPG)
a. Select 'Photo' in the main menu
b. Click on Play/pause. A slideshow of your photos on the SD card automatically starts
c. Press Menu to go to the photo summary
d. Use the function keys (up and down) to browse through the photos.
e. Press play/pause again to start the slideshow at the selected photo.
f. Rotate the photos during the slideshow using the function keys (left and right)
g. Press Menu twice to go back to the main menu.
B. Music (MP3 or WMA)
a. Select 'Music' in the main menu.
b. Click on play/pause. The tracks on the SD card will automatically play one by one in the music summary.
c. Use the function keys (up and down) to browse through the music.
d. Press play/pause again to interrupt the music or play again.
e. Adjust the volume with the function keys (left and right).
f. Press Menu twice in music to go back to the main menu.
C. Film (VOB, MPEG1,AVI,DIVA,XVID,DIVX4.x of DIVX5.x files)
a. Select 'Movie' in the main menu
b. Click on play/pause. The film files on the SD card will play one by one.
c. Press Menu to go to the film summary.
d. Use the function keys (up and down) to browse through the film files.
e. Press play/pause again to interrupt the film or play again.
f. Adjust the volume using the function keys (left and right).
g. Press Menu twice in music to go back to the main menu.
D. All files
In the 'Files' folder in the main menu you see a summary of all the files above on the SD card.
E. Record function
Each time a visitor rings on the external unit a photo will automatically be taken. You can then easily check who has rung while you were away. The photos are saved in the external memory (e.g. SD card). To see the photos:
a. Select 'Monitor' in the main menu
b. Press play/pause
c. You can now browse through the photos using the function keys (up and down). The date and time is shown with each photo
d. To delete a photo:
1) Go to the photo.
2) Press the pause/play key
3) Select Yes or No using the right or left function keys
4) Confirm your choice using the play/pause button.
F. Connected devices
In this folder 'Device' you can check which file devices are connected.
G. Settings
a. Select 'Settings' in the main menu.
b. Press play/pause to make a selection.
c. The Menu key always takes you back to the previous screen.
- JPEG Autopoly
With this setting you can run your photoslideshow automatically or manually.
JPEG Interval
With this setting you choose how quickly the photos change in the photo slideshow: 5, 10 or 15 seconds.
Transition
This setting is for choosing different photo transitions
View Mode
Here you select how the photos will adapt to the screen size. (Original size, stretch, etc.)
- Brightness adjustment
Here you set the brightness of the LCD screen
- Contrast adjustment
Here you set the contrast of the LCD screen
Colour
Here you set the colour intensity of the LCD screen
Repeat
Here you select if the photos, music or film files automatically repeat when they have finished.
- Auto Overwrite
Enables you to automatically overwrite the SD card when it is full.
Time
Here you can set the current date and time.
- Use the up and down function keys to e.g. select the time.
Press play/pause to edit the time. - Use the function keys to set the time.
Press play/pause to confirm.
Calendar: Calendar function
Technical data Monitor
Supply voltage adapter: 230VAC/15VDC 1A
Working current: + / - 420 / 620mA
Working temperature: -10^ to 50^
Max relative humidity: 85%
- Pixels: 480 × 3( RGB) × 240 vertical
- Screen size: 7-inch (diagonal)
Video system: PAL/NTSC
Total dimensions: 200(L)× 190(B)× 20(H) mm
Technical data Camera
Working current: 520mA + / - 300mA
- Temperature for use: -20^ / +50^
- Type: pinhole camera
Focus/picture angle: 50^
total dimensions: 122(L)x73(B)x44(H)mm
Technical requirements for connections
- Use either the 10-metre cable supplied or wiring measuring 0.6 - 0.8mm^2 with a max. length of 25 metres.
- You need a plug socket that is max. 1.5m from the monitor.
Required wiring without door lock: 4
Required wiring with door lock: 6
Parts
Hands-free monitor
Camera
- Protective cover for external unit
- Mounting bracket for monitor
Fixing screws
- Connecting cable 10m
Safety instructions
- The monitor and camera may never be cleaned with detergents. Only use soap and a damp cloth.
- The power wiring may never be cut through nor extended; this renders the guarantee invalid!
Note: respect the correct polarity. Red = +, Black = - - The monitor may not be placed close to magnetic fields such as next to a TV or thick power cables.
Water may never be poured over the camera or monitor. The camera is only splashproof.
Guarantee conditions
The guarantee period for the PAC-114 amounts to 2 years and commences on the date of purchase. During this guarantee period Eltra NV will repair any defects attributable to material or production faults. Eltra NV may choose to either repair or replace a defective appliance.
ELTRA NV is not obliged to repair or replace appliances if they have become defective, inappropriate use, or modifications or adaptations made after the purchase date.
Take any defective appliance together with the original receipt back to the shop where the appliance was sold. Always add a note with a description of the problem.
Damage
Eltra nv can under no circumstances whatsoever be held responsible for damage of whatever nature if the appliance was not correctly installed according to the specified installation instructions, nor for damage as a result of unforeseen circumstances such as natural disasters, lightening strike, etc. All such resulting costs are consequently at the expense of the buyer and are not covered by the guarantee conditions.
www.profile.eu
- La sección de cable habitual deben ser de entre 0,6 y 0.8mm^2
- Corte los cables moldeados la longitud希望大家 can find a way to find the longest way to find the shortest way to find the shortest way to find the shortest way to find the shortest way to find the shortest way to find the shortest way to find the shortest way to find the shortest way to find the shortest way to find the shortest way to find the shortest way to find the shortest way to find the shortest way to find the shortest way to find the shortest way to find the shortest way to find the shortest way to find the shortest way to find the shortest way to find the shortest way to find the longest way to find the longest way to find the longest way to find the longest way to find the longest way to find the longest way to find the longest way to find the longest way to find the longest way to find the longest way to find the longest way to find the longest way to find the longest way to find the longest way to find the longest way to find the longest way to find the longest way to find the longest way to find the longest way to find the longest way to find the shortest way to find the shortest way to find the shortest way to find the shortest way to find the shortest way to find the shortest way to find the shortest way to find the shortest way to find the shortest way to find the shortest way to find the shortest way to find the shortest way to find the shortest way to find the shortest way to find the shortest way to find the shortest way to find the shortest way to find the shortest way to find the longest way to find the shortest way to find the shortest way to find the shortest way to find the shortest way to find the shortest way to find the shortest way to find the shortest way to find the shortest way to find the shortest way to find the shortest way to find the shortest way to find the shortest way to find the shortest way to find the shortest way to find the shortest way to find the shortest way to find the shortest way to find the shortest way to
- Brightness adjustment
F. Apparecchiature collegiate
- Brightness adjustment