
PerfectWall PW1000 - Outdoor blind DOMETIC - Free user manual and instructions
Find the device manual for free PerfectWall PW1000 DOMETIC in PDF.

| Product type | Outdoor awning for motorhome or caravan |
| Brand | Dometic |
| Model | PerfectWall PW1000 |
| Available width | 2.6 m / 3 m / 3.5 m / 4 m / 4.5 m |
| Extension (reach) | 2 m or 2.5 m depending on model |
| Weight (depending on width) | 18.6 kg to 30 kg |
| Opening mechanism | Manual crank |
| Fabric material | Waterproof fabric with anti-mold treatment |
| Mounting | Wall mounting on vehicle or ground mounting with poles |
| Usage | Only when stationary, do not unfold while driving |
| Maintenance | Clean with lukewarm water and mild detergent, no pressure washer |
| Lubrication | Joints with paraffin wax or Teflon/silicone oil |
| Safety | Never unfold in strong wind, rain or snow; check before departure |
| Optional accessories | LED lighting (Dometic Light LK120), tie-down kit (Tie Down Kit) |
| Warranty | Statutory; contact retailer or manufacturer |
| Repairability | Small holes repairable with vinyl repair liquid (ref. 9103104018) |
| Manual available in | French, English, German, etc. (free PDF download) |
Frequently Asked Questions - PerfectWall PW1000 DOMETIC
User questions about PerfectWall PW1000 DOMETIC
0 question about this device. Answer the ones you know or ask your own.
Ask a new question about this device
Download the instructions for your Outdoor blind in PDF format for free! Find your manual PerfectWall PW1000 - DOMETIC and take your electronic device back in hand. On this page are published all the documents necessary for the use of your device. PerfectWall PW1000 by DOMETIC.
USER MANUAL PerfectWall PW1000 DOMETIC
natural_image
Technical line drawing of a mechanical support structure with two vertical supports and a roller roller (no text or symbols)PerfectWall
PW1000, PW1500
natural_image
Technical line drawing of a mechanical assembly with a crane and roller, showing motion direction (no text or symbols)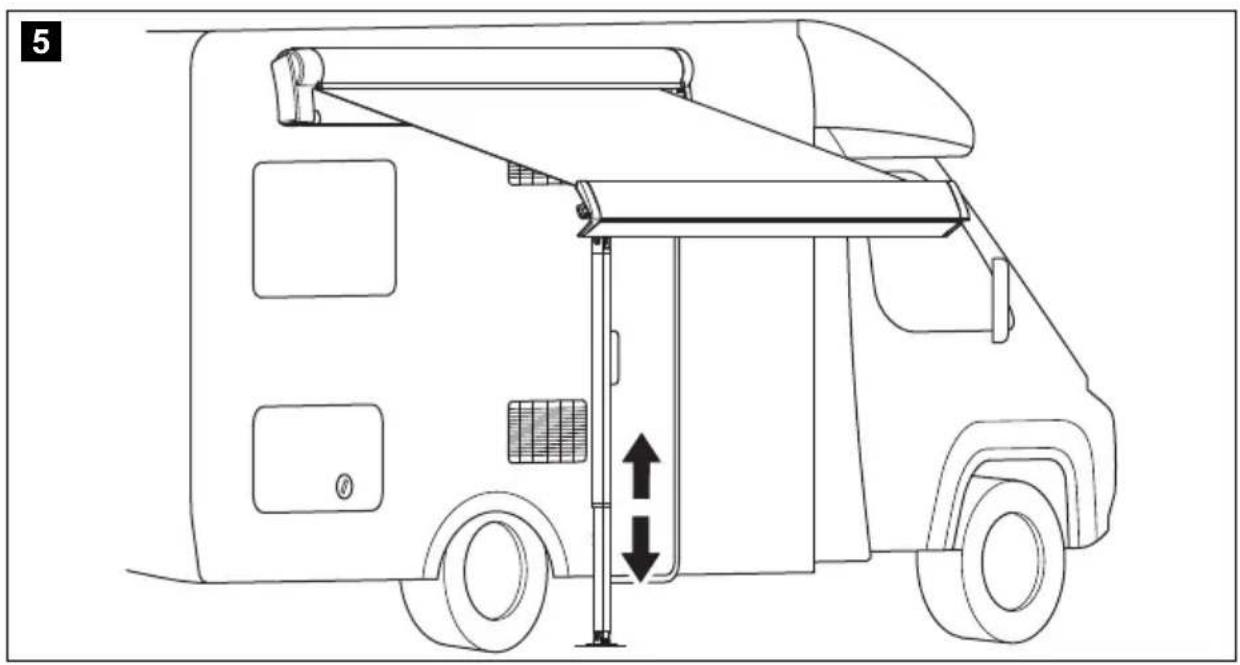
natural_image
Line drawing of a vehicle's front view showing the lift and seat, with no text or symbols present.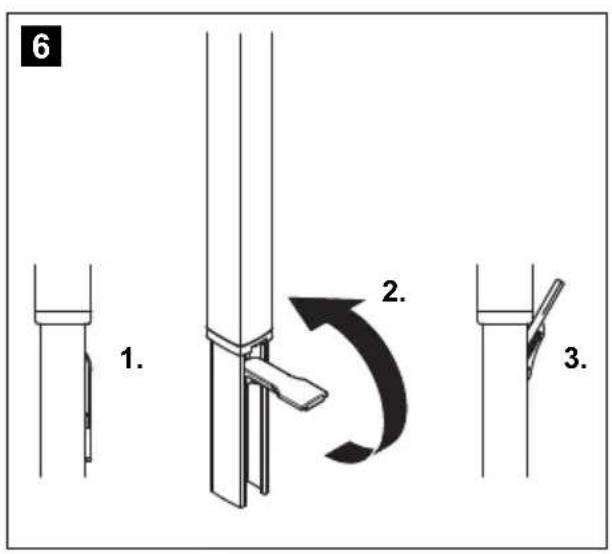
natural_image
Technical line drawing of a mechanical component with curved and straight ends (no text or symbols)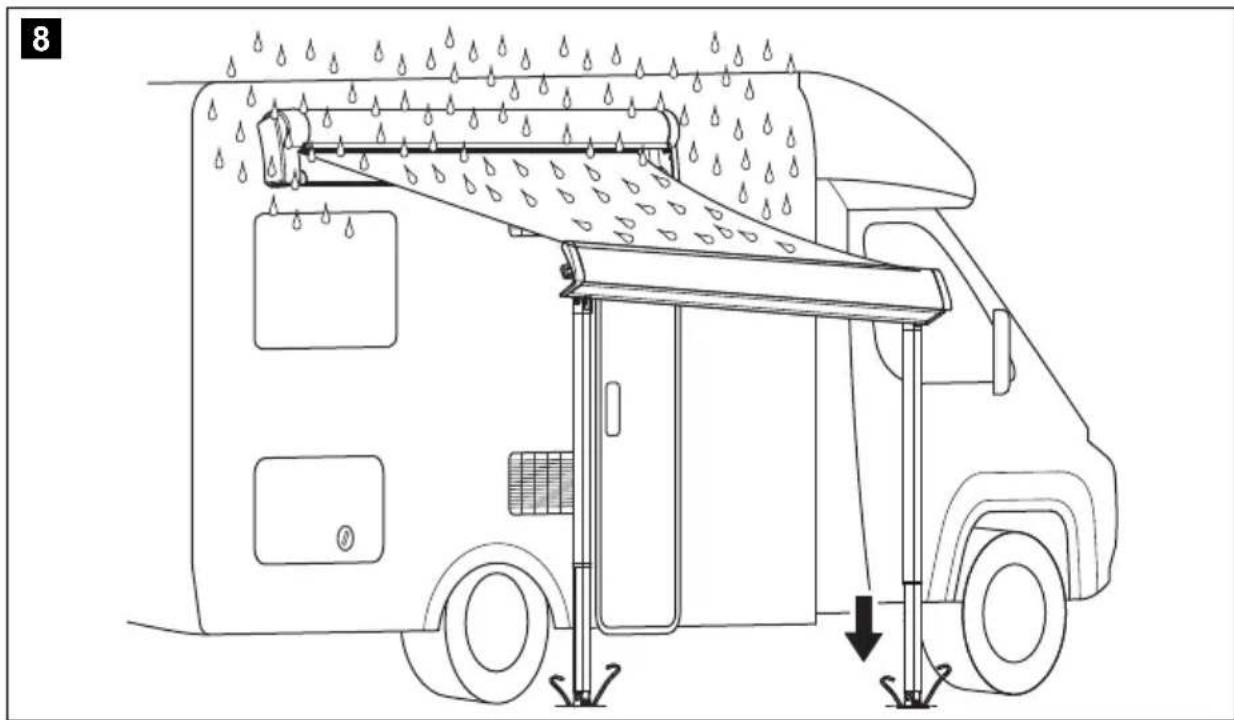
natural_image
Line drawing of a truck with raindrops spraying water, showing structural components and airflow direction (no text or symbols)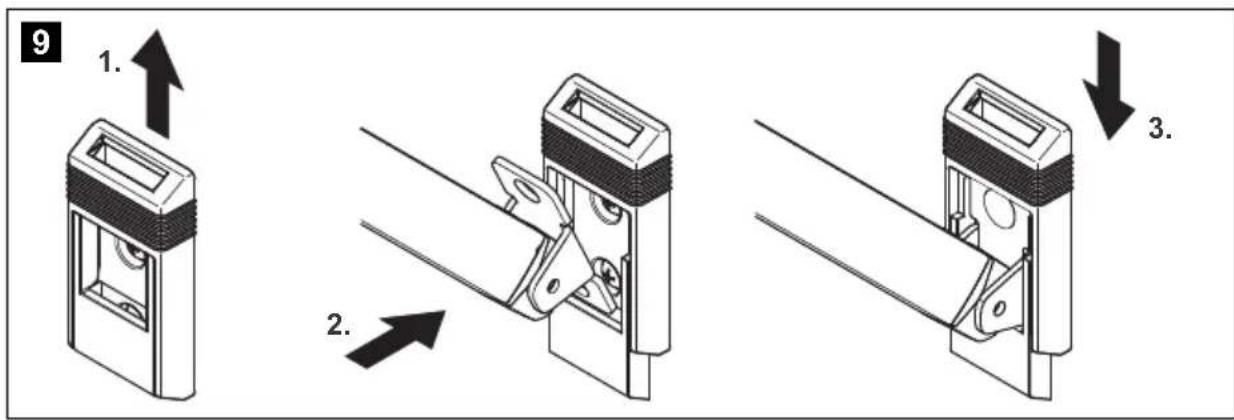
natural_image
Line drawing of a two-wheeled bus with visible door, wheels, and suspension arms (no text or symbols)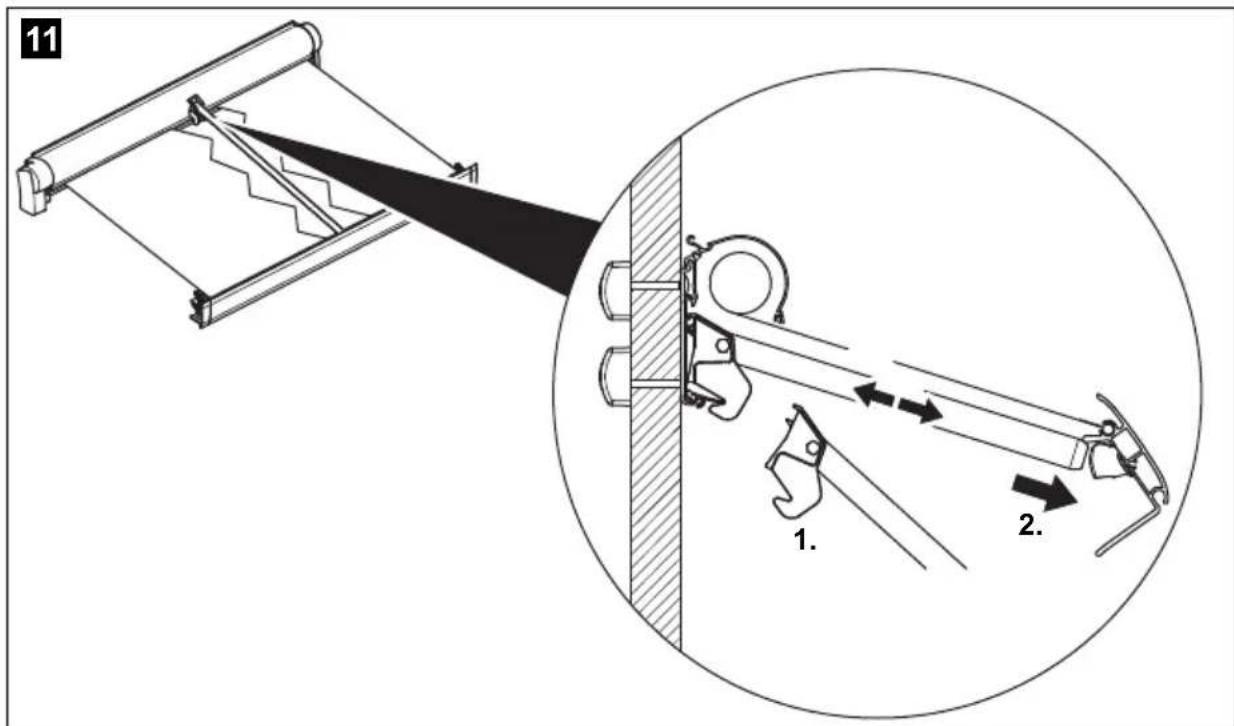

WARNING!
- This operating manual must be read and understood before the device is set up, operated, cleaned or serviced.
- This device must be installed by a specialist. Improper installation can lead to serious injury. Alterations to the device can be extremely dangerous and lead to serious injury or damage to the device.
- Keep this operating manual with the device. The owner must read it carefully.
Table of contents
1 Notes on using the operating manual 9
2 Safety instructions 9
3 Scope of delivery 12
4 Accessories 12
5 Intended use 12
6 Technical description ..... 12
7 Operating the awning....13
8 Cleaning and maintenance 16
9 Warranty 18
10 Disposal 18
11 Technical data .... 19
1 Notes on using the operating manual

WARNING!
Safety instruction: Failure to observe this instruction can cause fatal or serious injury.

NOTICE!
Failure to observe this instruction can cause material damage and impair the function of the product.
▶ Action: This symbol indicates that action is required on your part. The required action is described step-by-step.
√This symbol describes the result of an action.
Fig. 1 5, page 3: This refers to an element in an illustration. In this case, item 5 in figure 1 on page 3.
2 Safety instructions
Please observe the safety instructions and stipulations issued by the vehicle manufacturer and service workshops.
The manufacturer accepts no liability for damage in the following cases:
● Damage to the product resulting from mechanical influences and excess voltage
- Alterations to the product without express permission from the manufacturer
- Use for purposes other than those described in the operating manual
Please note the following warnings:
WARNING!
- Before starting your journey, check that the awning is fully retracted. Never move the vehicle when the awning is open.
- Never drive with the crank inserted. Remove the crank before starting your journey.
- Do not drive the vehicle if the fabric is damaged or torn, even if the awning has been properly retracted. The awning arms are held in place by the fabric. If the fabric rips while driving, the awning will suddenly shoot out. This can lead to serious injury.
Secure the awning so that it cannot extend suddenly and unexpectedly while driving.
- Do not open the awning while driving.
- Do not open the awning in strong winds or snowfall.
- Retract the awning if strong winds, heavy rain or snowfall are imminent.
● Make sure that water or snow does not accumulate on the fabric. Otherwise this could damage the awning or the awning arms could collapse and cause severe injury or fatality. -
Do not approach the awning
-
if it was left open during heavy winds
– if pools of water have formed on it - if snow has accumulated on it
- if any debris is on the awning fabric.
The awning may move unexpectedly, become unstable and bend or break.
- Do not leave the extended awning unattended. Retract the awning before leaving your location.
- Keep a safe distance away from the awning when having barbecues or open fires. The fabric can be damaged by heat or catch fire.
- This device can be used by children aged 8 years or over, as well as by persons with diminished physical, sensory or mental capacities or a lack of experience and knowledge, providing they are supervised, or have been taught how to use the device safely and are aware of the resulting risks.
● Children must be supervised to ensure that they do not play with the device.

NOTICE!
- Park the motorhome or caravan so that no debris (branches, leaves or similar) can get onto the fabric.
- The fabric of the awning should not hang down at the edges but must be taut at all times. If the fabric hangs down, it could rub on the arms and get damaged.
The fabric should not sag in the middle with long awnings. - Only retract the awning, when the fabric is free of debris (branches, leaves or similar). Otherwise the awning can be damaged when it is retracted.
- Keep the awning free of dirt to prevent abrasions, stains and mildew.
- Only retract the awning if it is wet for safety reasons. Extend it again as soon as possible. Otherwise, mildew or stains can form or the colour may fade.
- Never bend an awning arm or the cover down to drain water off the awning. This can bend the awning and impair its function.
- Do not hang any objects on the awning, on the front cover or the awning arms.
- Do not use any sprays (e.g. insect repellent, hairspray) near the awning. This will soil the fabric or the water-repellent effect of the fabric will be lost.
- If there is insufficient space above the door after the awning is mounted, the door must remain closed when retracting or extending to avoid the door making contact with the arms or the front panel.
The required space depends on the design of the door (door width, swing or sliding door) as well as the set awning angle of inclination.
3 Scope of delivery
| Quantity Designation |
| 1 Awning |
| 1 Operation manual |
| 1 Installation manual |
4 Accessories
Available as accessories (not included in the scope of delivery):
| Description Item number | |
| Dometic Light LK120 | 9106504018 |
| LED lighting with remote control for fitting on the awning arms | |
| Tie Down Kit | 9103104000 |
| Straps for anchoring the awning | |
5 Intended use
The awnings PerfectWall PW1000 and PW1500 are suitable for installing on motorhomes or caravans.
The awnings shall only be used when the vehicle is stationary.
6 Technical description
The PerfectWall PW1000 and PW1500 are awnings which can be extended and retracted using a hand crank. The awnings are secured on the side of the vehicle or on the ground with struts.
7 Operating the awning
Observe the safety instructions in chapter "Safety instructions" on page 9.
7.1 Note on the vehicle location

NOTICE!
- Park the vehicle so that no debris (branches, leaves or similar) gets on to the fabric.
- Keep the awning free of dirt to prevent abrasions, stains and mildew.
7.2 Extending the awning

WARNING! Beware of injury
Keep a sufficient distance from objects or other vehicles. Once it is retracted, it should be at least 40 cm away from other objects and vehicles.
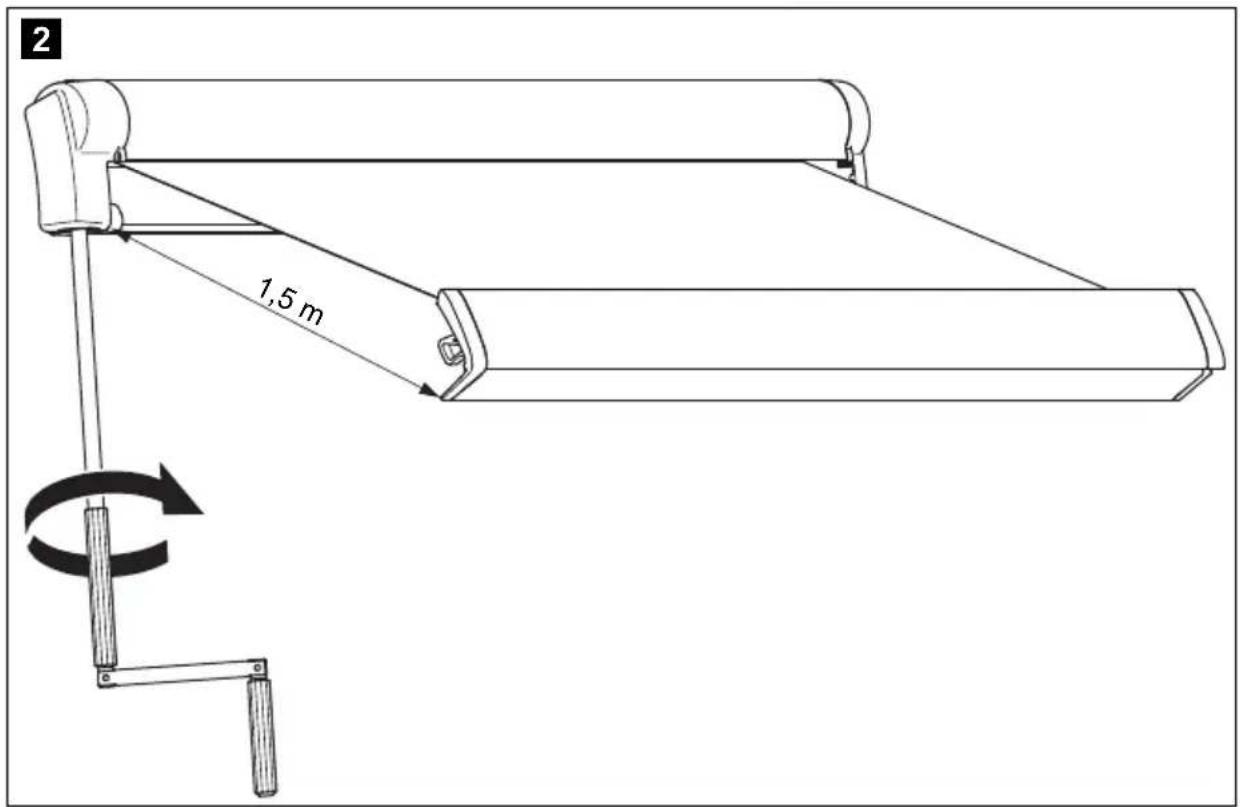
▶ Click the hand crank into the holder in the awning (fig. 1, page 3).
▶ Turn the hand crank until the awning is extended by about 1.5 m (fig. 2, page 3).
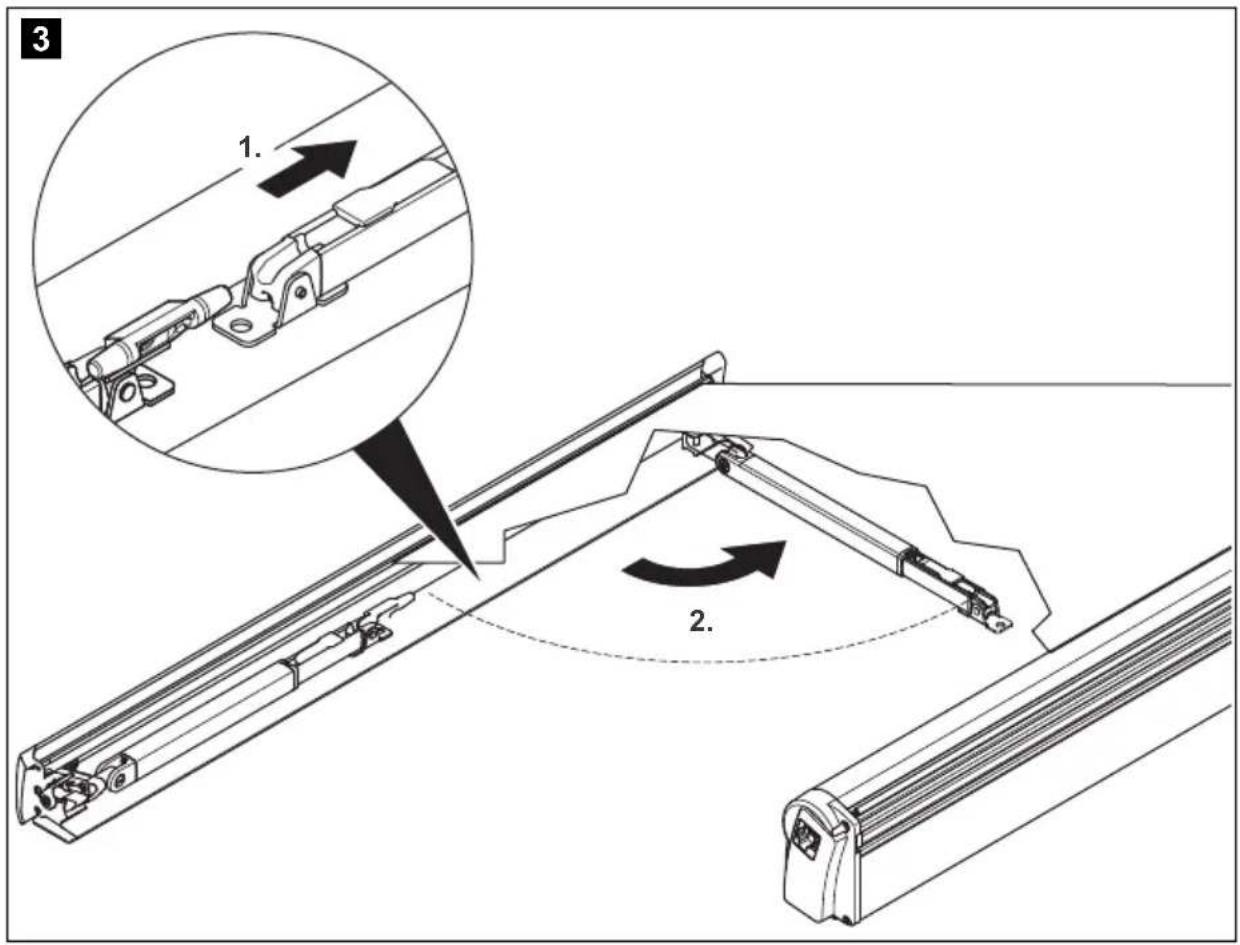
▶ Slide the right strut into the front cover completely together so that you can move them freely (fig. 3, page 4).
▶ Turn the right strut to the side (fig. 3, page 4).
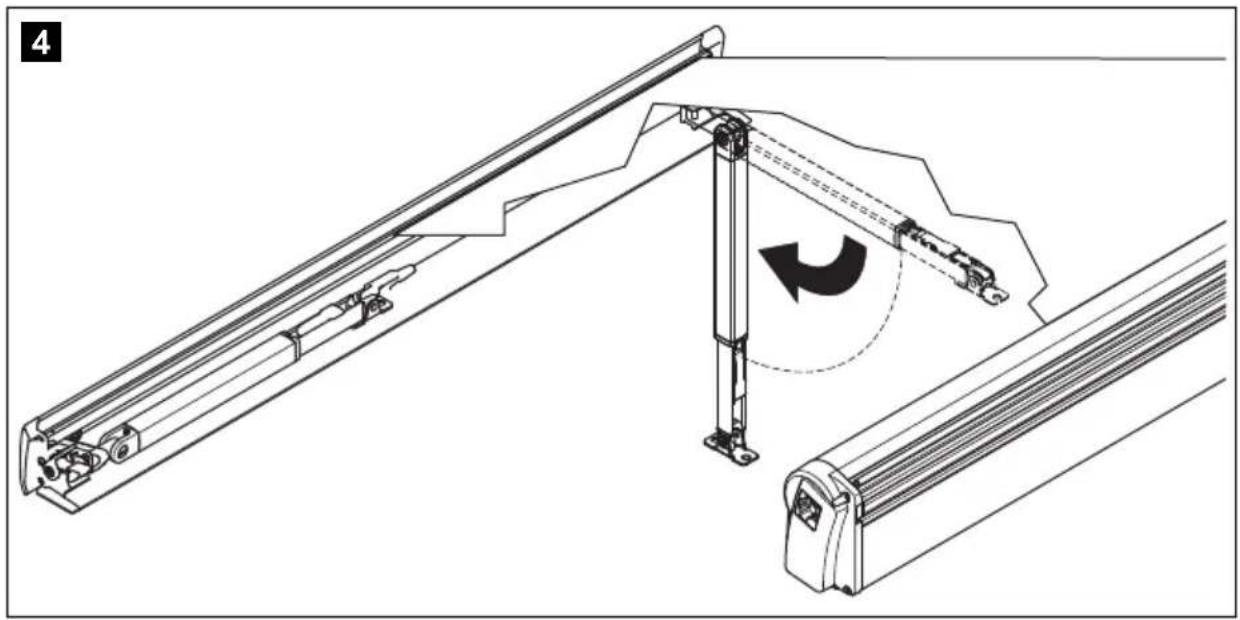
▶ Fold the right strut down and set it on the ground (fig. 4, page 4).
▶ Adjust the strut to the required height (fig. 5, page 5).
▶ Fold the lever of the strut up to secure the struts (fig. 6, page 5).
▶ Extend the other strut in the same way.
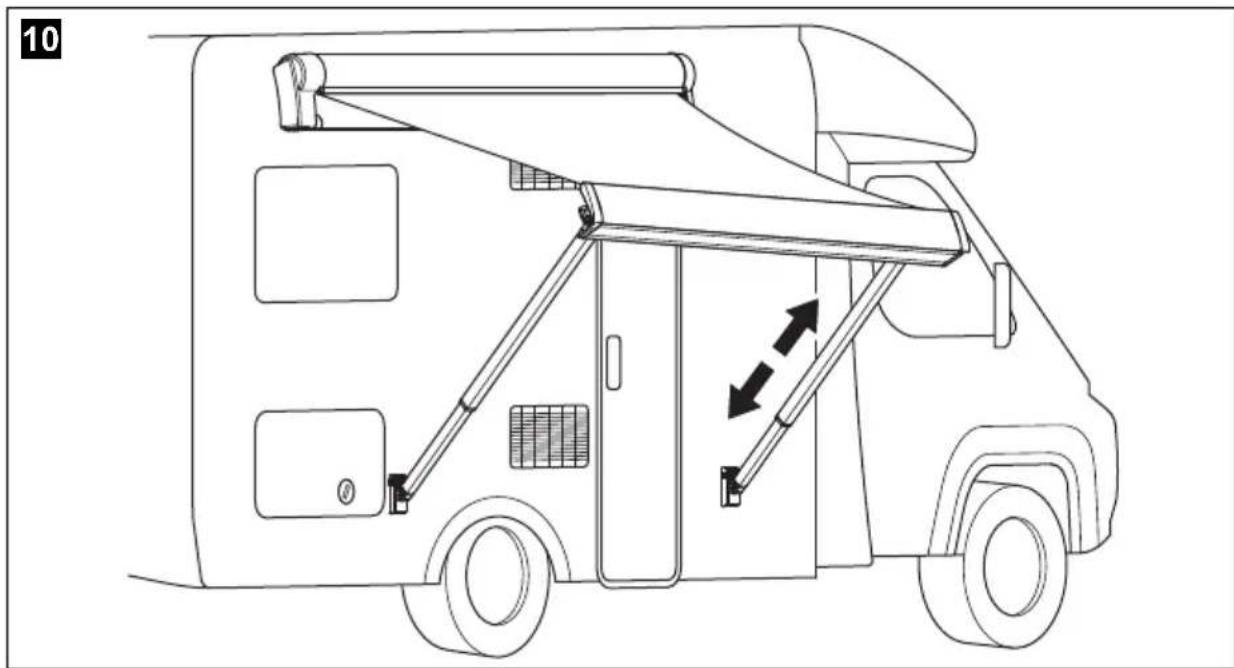
▶ Turn the hand crank until the awning is extended to the required position. Position the strut vertically under the front cover regularly so that the awning stays secured at all times.
▶Turn the hand crank approx. a quarter of the way back to tighten the fabric.

NOTICE! Risk of damage!
The fabric of the awning should not hang down at the edges but must be taut at all times. If the fabric hangs down, it could rub on the arms and get damaged.
The fabric should not sag in the middle with long awnings.
▶Remove the hand crank from the holder on the awning.
Positioning the struts on the ground

WARNING! Beware of injury
● Only position the struts on solid ground.
- Secure the struts from slipping.
▶Position the struts vertically underneath the front panel.
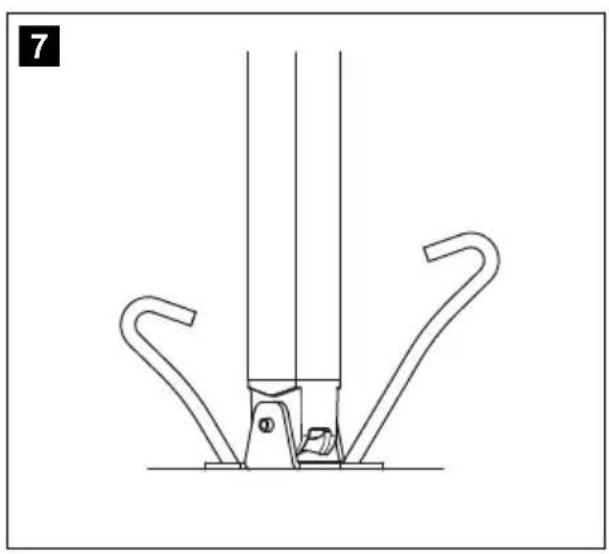
▶ Secure the struts with pegs (fig. 7, page 5).
▶ Position one of the struts slightly deeper so that the front panel hangs at an angle. This allows rain to run off easier (fig. 8, page 6).
Securing the struts on the vehicle
You can secure the awning on your vehicle directly if you have already mounted the latches for the struts.
▶ Slide the cover of the latch up (fig. 9, page 6).
▶ Fit the strut into the latch (fig. 9, page 6).
▶ Slide the cover of the latch down (fig. 9, page 6).
▶ Position one of the struts slightly deeper so that the front panel hangs at an angle. This allows rain to run off easier (fig. 10, page 6).
Mounting the tensioning arm
Awnings with a length of 4 m or more need to have a tensioning arm fitted in the middle of the awning. This prevents the awning from sagging.
▶ Slide in the tensioning rod (fig. 11, page 7).
▶ Fit the top end of the tensioning arm into the attachment on the housing (fig. 11, page 7).
▶Slide the other end of the tensioning arm into the attachment in the front panel (fig. 11, page 7).
7.3 Retracting the awning

NOTICE!
- Only retract the awning, when the fabric is free of debris (branches, leaves or similar). Otherwise, the awning can be damaged when it is retracted.
- Keep the awning free of dirt to prevent abrasions, stains and mildew.
- When retracting the awning, make sure that any branches or other objects are not trapped in it.
▶Remove any debris (branches, leaves or similar) lying on the fabric.
▶Loosen the struts from the fastenings (pegs or latches on the vehicle).
▶Click the top end of the hand crank into the holder in the awning.
▶ Turn the hand crank until the awning is extended by only about 1.5 m. Position the struts vertically under the front panel regularly so that the awning stays secured at all times.
▶Fold the lever of the right strut down to loosen the struts.
▶Slide the struts together completely.
▶Fold the right strut up.
▶Turn the right strut into the front panel.
▶Slide the bottom part of the right strut into the latch of the front panel.
▶ Extend the other strut in the same way.
▶Turn the hand crank until the awning is fully retracted.
▶ Double-check that the awning is fully retracted before starting your journey. The front panel should rest closely alongside the housing.
▶Remove the hand crank from the holder on the awning.

NOTICE! Risk of damage!
If the awning is retracted when wet, extend it again at the next opportunity and let the fabric dry out. If the wet fabric stays rolled up for a long time it becomes mildewed and can fade.
8 Cleaning and maintenance
8.1 Cleaning

NOTICE! Risk of damage!
● Never clean the awning with a high-pressure cleaner.
- Do not use abrasive cleaning agents or hard objects during cleaning, as these can damage the product.
Remove any debris (twigs, leaves or similar) lying on the awning fabric to prevent abrasions, stains and mildew. The awning can also get damaged when it is retracted.
▶Clean the awning fabric regularly to remove any dirt and dust:
- To do this, use water with 30 ml detergent and 30 ml bleach for 10 l of water.
— Soap down the fabric and leave the liquid to soak in for five minutes.
– Rinse thoroughly with clean water.
Make sure that the detergent with the bleach is completely washed off. Otherwise it can damage the fabric.
– Leave the fabric to dry.

NOTE
The manufacturer recommends:
- To clean the cloth, use the Dometic Clean&Care awning cleaner (item no. 9103501116, available from your service partner).
8.2 Lubricating
▶If required, lubricate the joints of the awning with paraffin wax, teflon oil or silicone oil.
8.3 Checking
WARNING!
Do not use the awning if any settings or maintenance work are required.
If you discover any damage, please contact the service partner in the respective country (see addresses on the back of the manual).
▶Check the awning regularly for any imbalance and wear, as well as damage to major parts.
▶Check the awning regularly:
– Is the fabric free of damage?
- Are the arms and front panel free of damage with no signs of wear?
– Does the awning close properly?
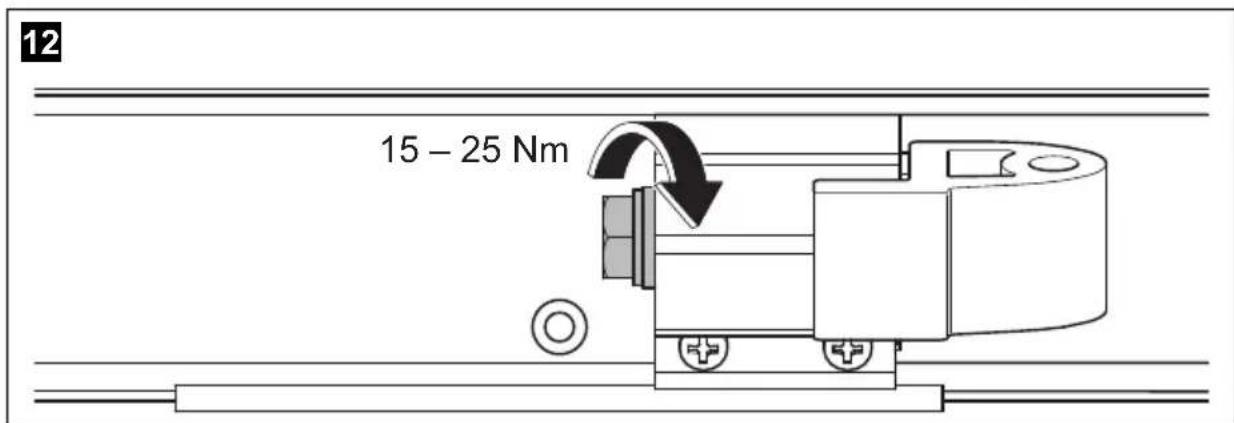
8.4 Tightening the screws on the hinges
The screws on the hinges must be tightened up after being used for the first time:
● after the first holiday using the awning
● after driving 20000 km or six months after the awning was mounted (whichever occurs first)
The screws on the hinge also need to be checked during the routine vehicle inspection.
Contact your service partner to tighten up the screws.
Instructions for servicing (fig. 12, page 7)

NOTICE!
The awning arms must not bear any load. This is to prevent the fastening torque of the screws from being distorted.
▶ Lift up the front panel slightly so that the hinge does not bear any load.
▶ Tighten the screws with 15 – 25 Nm.
8.5 Patching small holes in the fabric
You can patch any small holes in the fabric or parts where the coating has come off:
▶Use a cotton cloth to rub around the damaged area with a small amount of liquid vinyl plaster (item no. 9103104018, available from your service partner).
√ The liquid vinyl plaster dissolves the coating. The coating seals the hole when it dries.
▶Wait until the area is dry before you retract the awning again.
9 W a r r a n t y
The statutory warranty period applies. If the product is defective, please contact your retailer or the manufacturer's branch in your country (see the back of the instruction manual for the addresses).
For repair and guarantee processing, please include the following documents when you send in the device:
● A copy of the receipt with purchasing date
● A reason for the claim or description of the fault
10 Disposal
▶Place the packaging material in the appropriate recycling waste bins wherever possible.
If you wish to finally dispose of the product, ask your local recycling centre or specialist dealer for details about how to do this in accordance with the applicable disposal regulations.
11 Technical data
| PerfectWall PW1000 | |||||
| Width: 2.6 m 3 m 3. | 5 m 4 m 4 | .5 m | |||
| Extended: 2 m | 2.5 m | ||||
| Weight: 1 | 8.6 kg 21 | kg 24 kg | 27 kg | 30 kg | |
| PerfectWall PW1500 | ||||
| Width: | 1.5 m | 2.6 m | 3 m | 3.5 m |
| Extended: | 1 m | 2 m | 2.5 m | 2.5 m / 2.75 m |
| Weight: | 12 kg | 18 kg | 21 kg | 24 kg |
| PerfectWall PW1500 | ||||
| Width: | 4 m | 4.5 m | 5 m | 5.5 m |
| Extended: | 2.5 m / 2.75 m | |||
| Weight: | 27 kg | 30 kg | 33 kg | 36 kg |

WARNUNG!
6 Description technique
7.3 Kjøre inn markisen

PASS PÅ!
Pokyn pre servis (obr. 12, strane 7)

POZOR!
Dometic Australia Pty. Ltd.
1 John Duncan Court
Varsity Lakes QLD 4227
1800 212121
+61 7 55076001
Mail: sales@dometic-waeco.com.au
AUSTRIA
Dometic Austria GmbH
The Gateway · 25 Canton Road,
Tsim Sha Tsui · Kowloon
+852 24611386
+852 24665553
Mail: info@dometic-waeco.com.hk
HUNGARY
Dometic Plc. Sales Office
Kerékgyártó u. 5.
H-1147 Budapest
+36 1 468 4400
昌 +36 1 468 4401
Dometic Italy S.r.l.
Via Virgilio, 3
I-47100 Forli
+39 0543 754901
+39 0543 756631
Mail: info@dometic.it
NORWAY
Dometic Norway AS
Skolmar 24
N-3232 Sandefjord
+47 33428450
吕 +47 33428459
Mail: firmapost@waeco.no
POLAND
Dometic Poland Sp. z o.o.
Ul. Puławska 435A
02-801 Warszawa
+48 22 414 32 00
+48 22 414 32 01
Mail: info@dometic.pl
RUSSIA
Dometic RUS LLC
Komsomolskaya square 6-1
107140 Moscow
+7 495 780 79 39
+7 495 916 56 53
Mail: info@dometic.ru
SLOVAKIA
Dometic Slovakia Sales Office Bratislava
Nádražná 34/A
SK-900 28 Ivanka pri Dunaji
+421 2 45 529 680
Mail: bratislava@dometic.com
SPAIN
Dometic Spain S.L.
Avda. Sierra del Guadarrama, 16
E-28691 Villanueva de la Cañada
Madrid
+34 902 111 042
+34 900 100 245
Mail: info@dometic.es
SWEDEN
Dometic Scandinavia AB
Gustaf Melins gata 7
Dometic Switzerland AG
Riedackerstrasse 7a
CH-8153 Rümlang (Zürich)
+41 44 8187171
吕 +41 44 8187191
Mail: info@dometic-waeco.ch
TAIWAN
WAECO Impex Ltd.
Taipei Office
9F.-10, No. 1180, Zhongzheng Rd.,
Zhonghe Dist., New Taipei City 23586
+886 2 22237225
昌 +886 2 81926742
Mail: marketing@waeco.com.tw
UNITED KINGDOM
Dometic UK Ltd.
Dometic House · The Brewery
Blandford St. Mary
Dorset DT11 9LS
+44 844 626 0133
昌 +44 844 626 0143
Mail: sales@dometic.co.uk
UNITED ARAB EMIRATES
Dometic Middle East FZCO
P. O. Box 17860
S-D 6, Jebel Ali Freezone
Dubai
+971 4 883 3858
+971 4 883 3868
Mail: info@dometic.ae
UNITED STATES OF AMERICA
Dometic Marine Division
2000 N. Andrews Ave. Extension
Pompano Beach, FL 33069 USA
+1 954 973 2477
+1 954 979 4414
Mail: marinesales@dometicusa.com

- PerfectWall
- PW1000, PW1500
- WARNING!
- Table of contents
- Notes on using the operating manual
- NOTICE!
- Safety instructions
- Please note the following warnings:
- Scope of delivery
- Accessories
- Intended use
- Technical description
- Operating the awning
- Note on the vehicle location
- Extending the awning
- WARNING! Beware of injury
- NOTICE! Risk of damage!
- Positioning the struts on the ground
- Securing the struts on the vehicle
- Mounting the tensioning arm
- Retracting the awning
- Cleaning and maintenance
- Cleaning
- NOTE
- Lubricating
- Checking
- Tightening the screws on the hinges
- Instructions for servicing (fig. 12, page 7)
- Patching small holes in the fabric
- W a r r a n t y
- Disposal
- Technical data
- WARNUNG!
- Description technique
- Kjøre inn markisen
- PASS PÅ!
- Pokyn pre servis (obr. 12, strane 7)
- POZOR!
- Dometic Australia Pty. Ltd.
- AUSTRIA
- Dometic Austria GmbH
- HUNGARY
- Dometic Plc. Sales Office
- Dometic Italy S.r.l.
- NORWAY
- Dometic Norway AS
- POLAND
- Dometic Poland Sp. z o.o.
- RUSSIA
- Dometic RUS LLC
- SLOVAKIA
- Dometic Slovakia Sales Office Bratislava
- SPAIN
- Dometic Spain S.L.
- SWEDEN
- Dometic Scandinavia AB
- Dometic Switzerland AG
- TAIWAN
- WAECO Impex Ltd.
- UNITED KINGDOM
- Dometic UK Ltd.
- UNITED ARAB EMIRATES
- Dometic Middle East FZCO
- UNITED STATES OF AMERICA
- Dometic Marine Division
Brand : DOMETIC
Model : PerfectWall PW1000
Category : Outdoor blind