
PDS 120 A1 - Electric saw PARKSIDE - Free user manual and instructions
Find the device manual for free PDS 120 A1 PARKSIDE in PDF.
| Product Type | Scroll saw (electric saw) |
| Brand | Parkside |
| Model | PDS 120 A1 |
| Rated voltage | 220-240 V ~ 50 Hz |
| Power consumption | 80 W (S1) / 120 W (S6 30%) |
| Oscillation frequency | 500 - 1700 min⁻¹ |
| Stroke | 12 mm |
| Dimensions (L×W) | 630 × 295 mm |
| Table dimensions (L×W) | 415 × 255 mm |
| Table tilt | 0° to 45° to the left |
| Max cut height (90°) | 50 mm |
| Max cut height (45°) | 22 mm |
| Max cutting depth | 406 mm |
| Blade length | Approx. 134 mm |
| Weight | 12.7 kg |
| Protection class | IP 20 |
| Sound pressure level | 66.9 dB(A) |
| Sound power level | 79.9 dB(A) |
| Main functions | Blower, protective cover, variable speed control, work light, interior cuts, bevel cuts |
| Safety | Anti-restart safety switch, protective devices |
| Maintenance and cleaning | Regular cleaning, bearing lubrication every 25-30h, brush check |
| Spare parts and repairability | Saw blades, cover, etc. available via after-sales service |
| Warranty | 3 years |
Frequently Asked Questions - PDS 120 A1 PARKSIDE
User questions about PDS 120 A1 PARKSIDE
0 question about this device. Answer the ones you know or ask your own.
Ask a new question about this device
Download the instructions for your Electric saw in PDF format for free! Find your manual PDS 120 A1 - PARKSIDE and take your electronic device back in hand. On this page are published all the documents necessary for the use of your device. PDS 120 A1 by PARKSIDE.
USER MANUAL PDS 120 A1 PARKSIDE
Operating and Safety Instructions
Translation of Original Operating Manual
NBLBE
DECOUPEERZAAG PDS 120 A1
Service Adresse (DE):
Service Adresse (AT):
Table of contents: Page:
- Introduction 18
- Safety information 18
- Layout 20
- Supplied package 20
- Proper use 20
- Technical data 20
7.Before starting the machine 21 - Operation 22
- Electrical connection 23
- Cleaning, maintenance, storage and ordering of 23 spare parts
- Disposal and recycling 24
- Troubleshooting 24
- Warranty certificate 25
14.Declaration of conformity 78
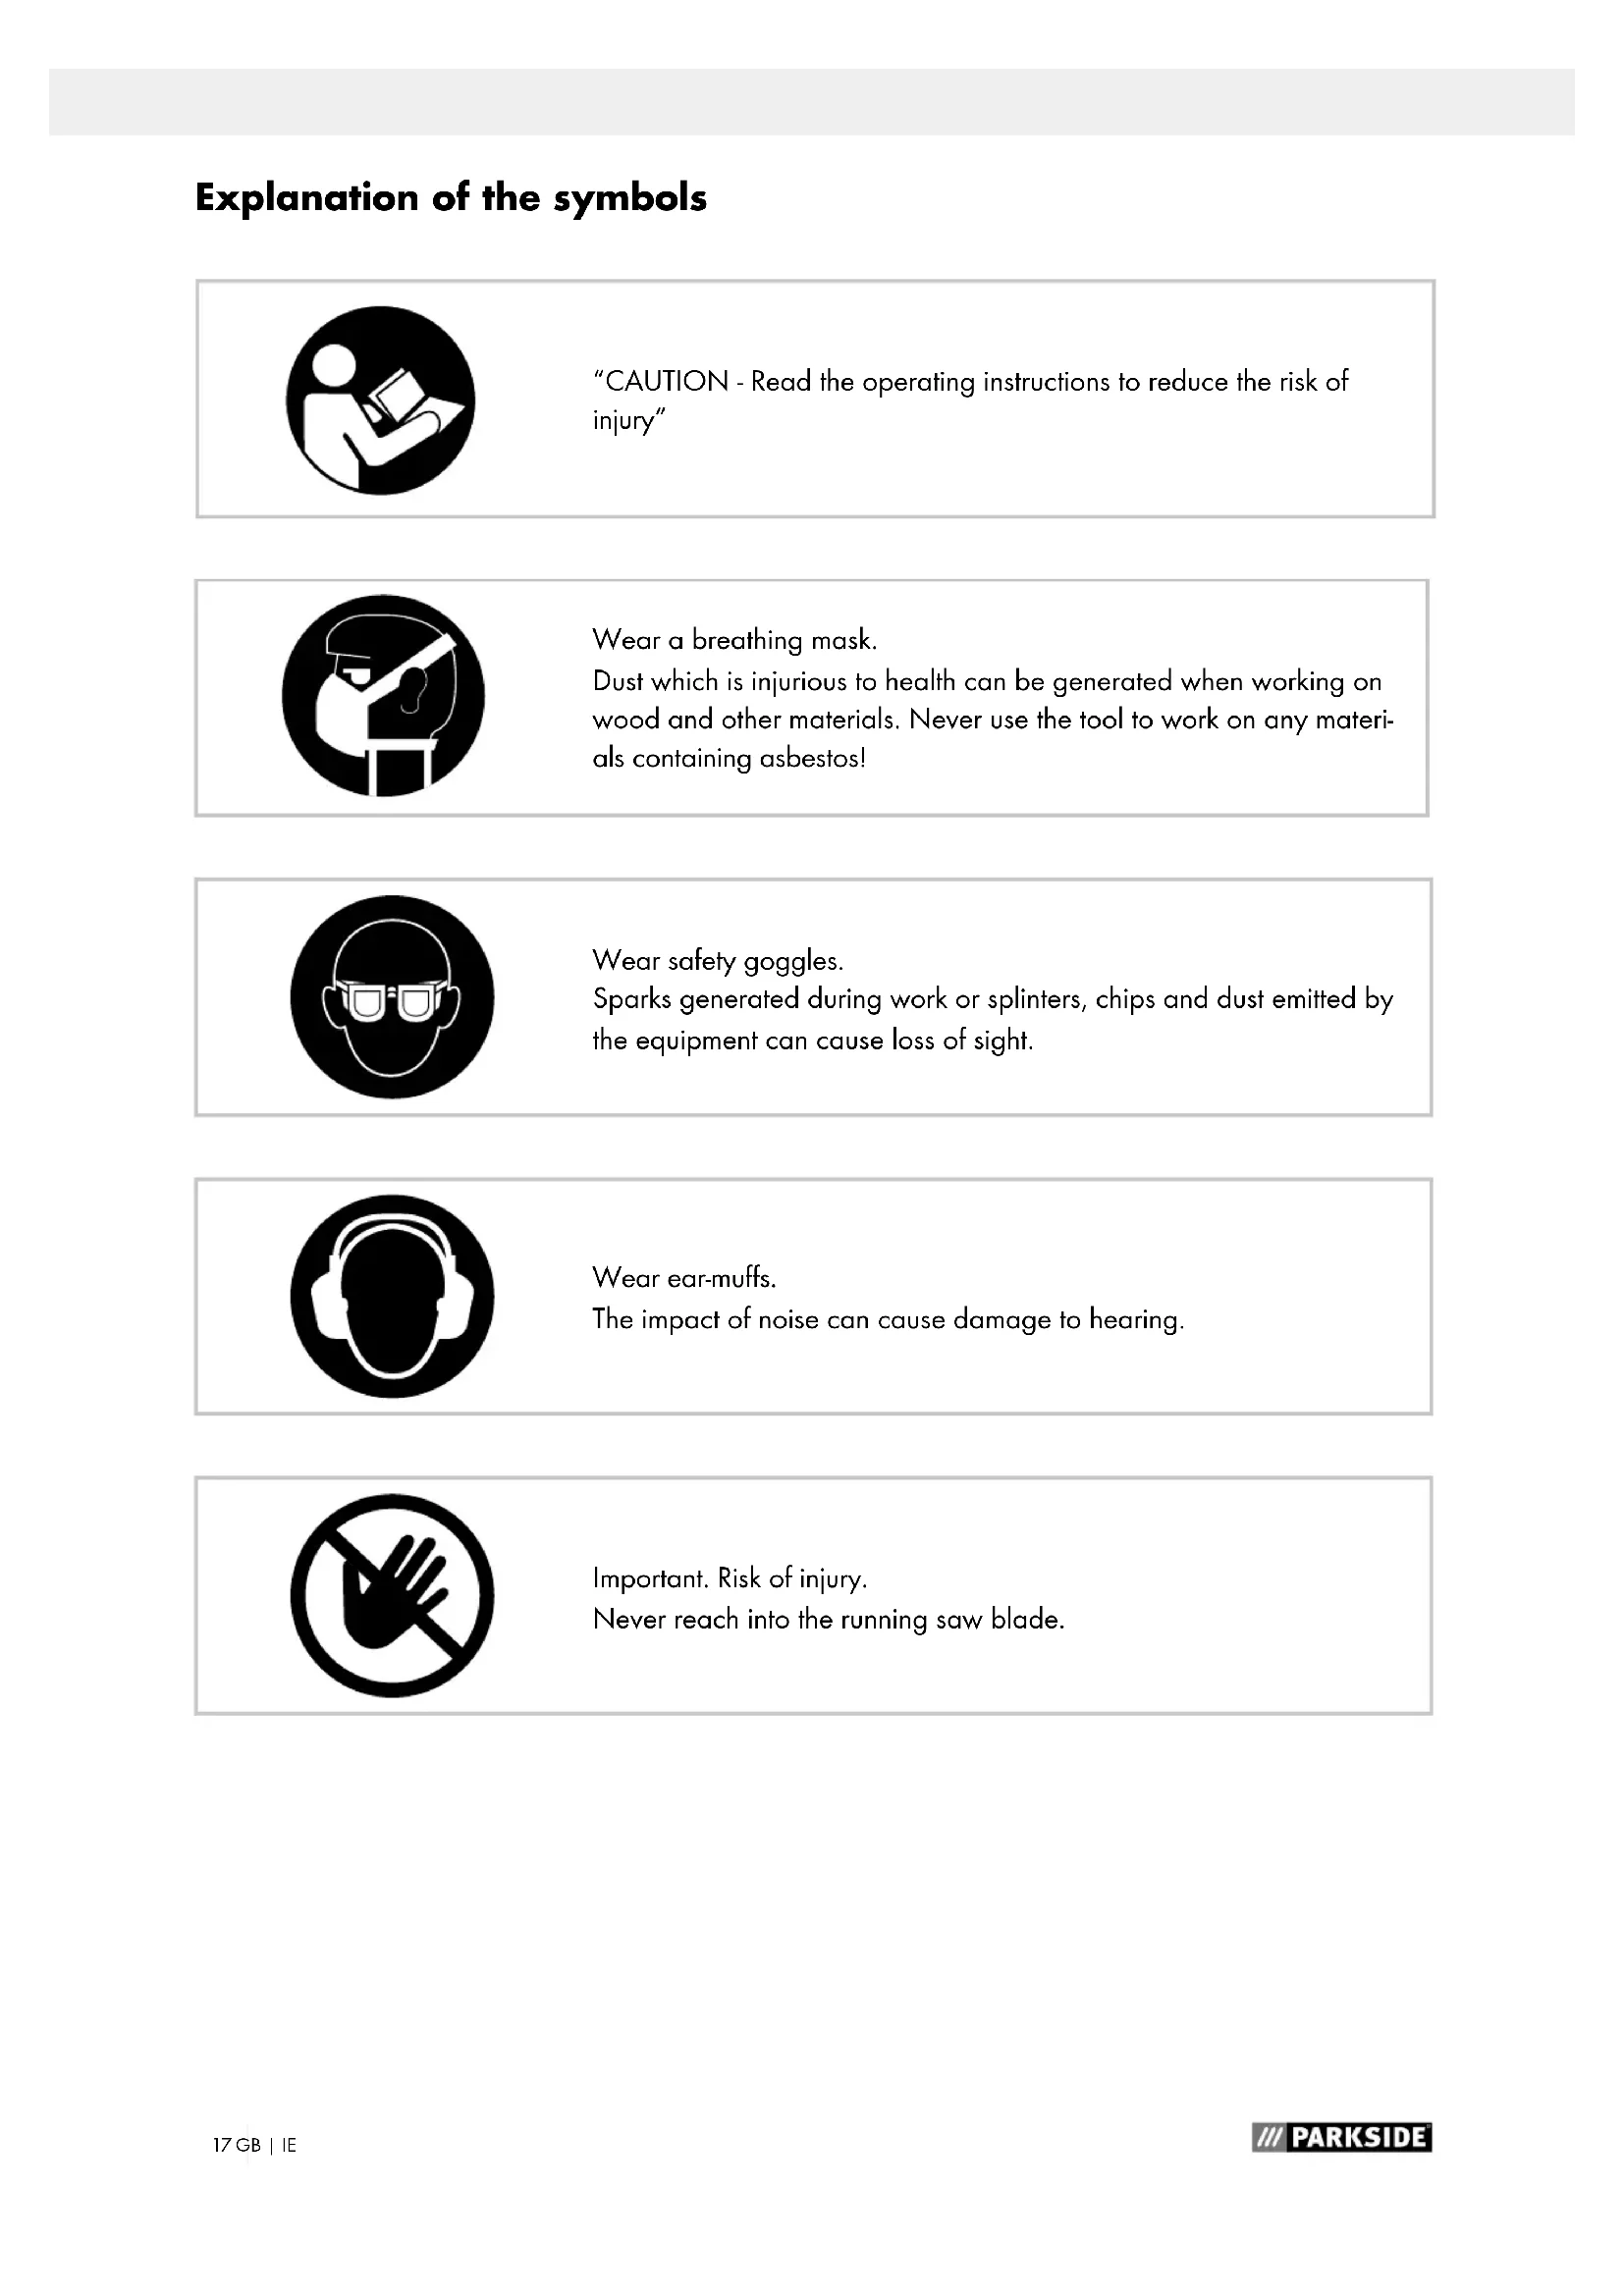
Explanation of the symbols

"CAUTION - Read the operating instructions to reduce the risk of injury"

Wear a breathing mask.
Dust which is injurious to health can be generated when working on wood and other materials. Never use the tool to work on any materials containing asbestos!

Wear safety goggles.
Sparks generated during work or splinters, chips and dust emitted by the equipment can cause loss of sight.

Wear ear-muffs.
The impact of noise can cause damage to hearing.

Important. Risk of injury.
Never reach into the running saw blade.
1. Introduction
Important.
When using the equipment, a few safety precautions must be observed to avoid injuries and damage. Please read the complete operating instructions and safety information with due care. Keep these operating instructions in a safe place so that the information is available at all times. If you give the equipment to any other person, hand over these operating instructions and the safety information as well. We cannot accept any liability for damage or accidents which arise due to a failure to follow these instructions and the safety information.
2. Safety information
CAUTION
Read all the safety information and instructions.
Any errors made in following the safety information and instructions may result in an electric shock, fire and/or serious injury.
Keep all safety information and instructions in a safe place for future use.
2.1 General safety information on electric power tools
Important. The following safety precautions must be taken when using electric power tools in order to protect the user from electric shocks and the risk of injury and fire. Read and follow these instructions before using the equipment.
1 Keep your work area tidy
Untidy work areas can result in accidents.
2 Check the ambient conditions
Do not expose electric tools to rain. Never use electric power tools in damp or wet locations. Provide good lighting. Do not use electric power tools near flammable liquids or gases.
3 Protect yourself against electric shocks
Avoid bodily contact with earthed parts, e.g. pipes, radiators, cookers and refrigerators.
4 Keep children away
Do not allow other persons to touch the tool or cable, keep them away from your work area.
5 Keep your electric power tools in a safe place
Unused tools must be stored in a dry, locked room out of children's reach.
6 Do not overload your tools
They will work better and more safely within their specified capacity range.
7 Use the right tools
Do not use tools or attachments which are too weak for heavy duty work. Never use tools on jobs for which they are not intended; for example, do not use a hand-held circular saw to fell trees or lop off branches.
8 Wear suitable work clothes
Never wear loose fittings clothes or jewelry. They may get caught in moving parts. Rubber gloves and non-slip shoes are recommended when working outdoors. Wear a hair net if you have long hair.
9 Use personal safety equipment.
Wear safety goggles. Use a dust mask when working on dusty jobs.
10 Do not use the cable for purposes other than that for which it is designed.
Do not carry the equipment by the cable and do not use the cable to pull the plug out of the socket. Protect the cable from heat, oil and sharp edges.
11 Secure the workpiece
Use clamps or a vise to secure the workpiece. This is safer than using your hand and also enables you to operate the machine with both hands.
12 Do not overstretch
Avoid abnormal working postures. Make sure you stand squarely and keep your balance at all times.
13 Take care of your tools
Keep your tools sharp and clean in order to work well and safely. Follow the maintenance information and the instructions for changing tools. Check the power plug and cable on a regular basis and have them replaced by an authorized specialist if they are damaged. Check the extension cable regularly and replace it if damaged. Keep handles dry and free from oil and grease.
14 Pull out the power plug
When tools are not in use, before starting any maintenance work or when changing attachments such as saw blades, drill bits and all kinds of mounted tools.
15 Always remove keys and wrenches after use
Always check that keys, wrenches and other adjusting tools have been removed before you switch on the equipment.
16 Avoid unintentional starting
Never carry a tool with your finger on the switch button while the tool is connected to the power supply. Make sure that the switch is turned off when connecting the tool to the power supply.
17 When using an extension cable outdoors
Check that it is approved for outdoor duty and is marked accordingly.
18 Be alert at all times
Watch what you are doing. Use common sense when working. Never use the tool when you are distracted.
19 Check your tool for damage
Before using the tool again, check the safety devices or any slightly damaged parts to ensure that they are in good working order. Check that the moving parts are working correctly, that they do not jam, and that no parts are damaged. Make sure that all parts are fitted correctly to ensure that the equipment remains safe to use. Unless otherwise stated in the operating instructions, damaged guards and parts have to be repaired or replaced by a customer service workshop. Damaged switches have to be replaced by a customer service workshop. Never use an electric power tool with a switch that cannot be turned on and off.
20 Important.
For your own safety you must only use the accessories and additional units listed in the operating instructions or recommended or specified by the manufacturer. The use of mounted tools or accessories other than those recommended in the operating instructions or catalog may place your personal safety at risk.
21 Repairs may only be carried out by a qualified electrician
This electric power tool complies with the pertinent safety information. Repair work must only be carried out by a trained electrician, otherwise the equipment may cause accidents.
22 Connect up the dust extraction system
If there are provisions for connecting up a dust extraction system, make sure that such a system is fitted and in use.
Additional safety instructions
- Switch the machine off immediately and pull the power plug in an emergency.
- Follow all these safety instructions before and while working with the saw.
- Do not use this saw to cut fire wood.
- Do not use this saw to cross-cut roundwood without a suitable holding device.
- The machine is equipped with a safety switch to prevent it from being switched on again accidentally after a power failure.
If you need to use an extension cable, make sure its conductor cross-section is big enough for the saw's power consumption. Minimum cross-section 1mm^2 - If you use a cable reel, the complete cable must be pulled off the reel.
- Persons working on the machine should not be distracted.
After you have switched off the motor, never slow down the saw blade by applying pressure to its side.
Only fit blades which are well sharpened and have no cracks or deformations. - Faulty saw blades must be replaced immediately.
- Never use saw blades which do not comply with the data specified in this manual.
It is imperative to make sure that all devices which cover the saw blade are in good working order. - Never dismantle the machine's safety devices or render them inoperative.
- Damaged or faulty safety devices have to be replaced immediately. Never cut workpieces which are too small to hold securely in your hand.
- Never load the machine so much that it cuts out.
Always press the workpiece firmly against the saw table. - Never remove loose splinters, chips or jammed pieces of wood when the saw blade is running.
- Switch the machine off to rectify faults at the blocked plug-in tool. - Pull the power plug. Remove the blockage. Important! Risk of injury from saw blade! Wear gloves. Carry out a trial run without a workpiece. Ensure that no unusual noise or vibration occurs. Should this be the case, switch the unit off and contact the manufacturer.
- Carry out retooling work, adjustments, measurements and cleaning jobs only when the motor is switched off. - Pull the power plug.
- Before switching on, make sure that all keys and wrenches have been removed from the tool.
- Switch off the motor and pull the power plug before you leave the workplace.
- Electrical installation work, repairs and maintenance may only be carried out by persons who have been specially trained.
- Refit all guards and safety devices immediately after you
have completed any repairs or maintenance work.
- Be sure to observe the safety information and operating and maintenance instructions issued by the manufacturer, as well as the dimensions listed in the Technical Data.
- It is imperative to observe the accident prevention regulations in force in your area as well as all other generally recognized rules of safety.
Note the information published by your professional associations (VBG 7j). - The saw is intended to be used indoors only.
- Workpieces that are smaller than the saw blade guard can cause injuries to the hands or fingers. Use suitable aids!
- Avoid cramped hand positions when guiding in the workpiece and avoid positions in which slipping could lead to your hand making direct contact with the saw blade.
Always fit the saw blade with the teeth facing in the direction of the sawing table.
Always set the correct blade tension to prevent the saw blades from jerking. - Be especially careful when cutting material with irregular cut profiles.
Exercise particular caution when cutting round objects such as rods and pipes. These can roll down into the saw blade and cause the teeth to catch. Use a wedge to brace such workpieces. - The teeth can become caught in the kerf when the workpiece is pulled back, especially if sawings have filled in (blocked) the kerf. In this case, you should switch the saw off, pull the power plug, clear the kerf with a wedge, and remove the workpiece.
- Never leave the work area without having already switched the saw off. Wait until the saw stops moving completely.
- Do not position, join, or construct any parts on the work table while the saw is running.
- Only switch the saw on after you have removed any remaining material and tools from the work table. Leave only the workpiece to be machined and any aids (e.g. wedges) on the work table.
Always wear safety goggles! - Keep your fingers at a safe distance from the saw blade.
- Carefully guide the workpiece and keep it steady at all times.
- Never leave the work area without having already switched the saw off.
- Do not let your familiarity with the saw allow you to be careless. Carelessness can lead to severe injuries within a fraction of a second.
Safe work
- When transporting the electric tool, only use the transport devices (Abb.1 Pos.10).
- Never use the protective devices for handling or transport.
- Make sure that the lower part of the saw blade is covered during transport, e.g. by the protective device.
- Working position is always laterally of the saw blade.
Do not lose this safety information.
3. Layout (Figs. 1-12)
1 Blow-off device
2 Mounting
3 Knurled screw
4 Holder
5 Saw blade guard
6 Saw table
7 Cover, left
8 Bearings
9 Tightening lever
10 Arm
11 Graduated scale
12 Locking lever
13 Extractor connection
14 ON/OFF switch
15 Speed regulator
16 Assembly points
17 Sawblade
18 Retaining device
19 Upper saw blade clamping screw
20 Allen key, 3 mm
21 Angle (Not supplied)
22 Storage box for saw blades
23 Lower saw blade clamping screw
24 Saw blade holder, top
25 Saw blade holder, bottom
26 Table insert
27 Pointer
28 Screw
29 Bracket
30 Worklamp
31 ON/OFF switch work lamp
4. Supplied package
- Open the packaging and take out the equipment with care.
- Remove the packaging material and any packaging and/or transportation braces (if available).
- Check to see if all items are supplied.
- Inspect the equipment and accessories for transport damage.
- If possible, please keep the packaging until the end of the guarantee period.
IMPORTANT
The equipment and packaging material are not toys. Do not let children play with plastic bags, foils or small parts. There is a danger of swallowing or suffocating!
Fretsw
- Saw blade guard
- Blow-off device
- Spare saw blade (2x) (for wood and plastics)
Allen key, 3 mm
- Original operating instructions
5. Proper use
The fretsaw was designed to cut square-edged timber or other workpieces such as Plexiglas, glass fiber reinforced plastic, foam, rubber, leather, and cork. Do not use this saw to cut round materials. Round materials can easily become jammed. Risk of injury! Parts can be catapulted!
The equipment may only be used for the tasks it is designed to handle. Any other use is deemed to be a case of misuse. The user/operator and not the manufacturer will be liable for any damage or injuries of any kind caused as a result of this. Please note that our equipment has not been designed for use in commercial, trade or industrial applications. Our warranty will be voided if the equipment is used in commercial, trade or industrial businesses or for equivalent purposes.
- The equipment is to be operated only with suitable saw blades. It is prohibited to use any type of cutting-off wheel.
- To use the equipment properly you must also observe the safety information, the assembly instructions and the operating instructions to be found in this manual.
- All persons who use and service the equipment have to be acquainted with these operating instructions and must be informed about the equipment's potential hazards.
- It is also imperative to observe the accident prevention regulations in force in your area.
- The same applies for the general rules of health and safety at work.
- The manufacturer will not be liable for any changes made to the equipment nor for any damage resulting from such changes.
Residual risks
Even if you use this electric power tool in accordance to instructions, certain residual risks cannot be eliminated. The following hazards may arise in connection with the equipment's construction and layout:
- Lung damage if no suitable protective dust mask is applied
- Damage to hearing if no suitable ear protection is applied
- Contact with the blade in the uncovered cutting zone
- Injuries (cuts) when changing the blade
- Crushed fingers
- Kickback
- Tilting of the workpiece due to inadequate support
- Touching the blade
- Catapulting of pieces of timber and workpieces
6. Technical data
Mains voltage: 220-240 V /50Hz Power input: 80 W (S1)
120 W (S6 30%)
Stroke rate: 500 - 1,700 rpm
Protection type: IP 20
Stroke: 12 mm
Base area: 630 × 295 ~mm
Tilting range of table: 0^ to 45^ to the left
Table size: 415 × 255 mm
Length of saw blade approx.: 134 mm
Reach: 406 mm
Max. cutting height at 90^ .. 50 mm
Max. cutting height at 45^ 22 mm
minimum size work piece wxh: 100 × 22 ~mm
maximum size work piece wxh: 400 × 50 mm
Weight: 12.7
Operating mode S6 30%
Continuous operation with idling (cycle time 10 minutes). To ensure that the motor does not become excessively hot, it may only be operated for 30% of the cycle at the specified rating and must then be allowed to idle for 70% of the cycle.
Noise emission values
Sound
Sound values were measured in accordance with EN 61029.
Wear ear-muffs.
The impact of noise can cause damage to hearing.
Sound pressure level L_pA : 66.9 dB(A)
Uncertainty K_DA 3 dB(A)
The quoted values are emission values and not necessarily reliable workplace values. Although there is a correlation between emission and immission levels it is impossible to draw any certain conclusions as to the need for additional precautions. Factors with a potential influence on the actual immission level at the workplace include the duration of impact, the type of room, and other sources of noise etc., e.g. the number of machines and other neighboring operations. Reliable workplace values may also vary from country to country. With this information the user should at least be able to make a better assessment of the dangers and risks involved.
Reduce noise generation and vibration to a minimum!
- Use only equipment that is in perfect condition.
- Maintain and clean the equipment regularly.
- Adopt your way of working to the equipment.
- Do not overload the equipment.
- Have the equipment checked if necessary.
- Switch off the equipment when not in use.
7. Before starting the machine
Important.
Always pull out the power plug before making adjustments to the equipment.
7.1 General information
- All covers and safety devices have to be properly fitted before the equipment is switched on.
- It must be possible for the blade to run freely.
- When working with wood that has been processed before, watch out for foreign bodies such as nails or screws, etc.
-
Before you actuate the On/Off switch, make sure that the saw blade is correctly fitted and that the equipment's moving parts run smoothly.
-
Check that the voltage on the rating plate is the same as your supply voltage before you connect the equipment to the power supply.
- Only ever connect the equipment to a properly installed kg shock-proof socket which is protected by a 10A fuse as a minimum.
7.2 Installing the fretsaw on a workbench (Fig. 3, 4)
The unit may only be installed by a professional.
Required for installing (not provided):
- Mó hex screw (4x)
- M6 hex nut (8x)
- Washer, 7 mm( 4x)
- Flat gasket, 7 mm( 4x)
Rubber base: 410 × 255 × 13 ~mm
The length of the screws to be used varies, depending on the thickness of the table top.
Install the fretsaw on a work table made from solid wood. This will avoid excessive noise caused by vibrations.
- Mark the drill holes. Use the fretsaw as a template for this purpose.
- Drill 4 holes with a diameter of 9mm into the work table and the rubber base.
- Screw the fret saw to the table using the mounting points (Fig. 3 Item 16) and in the following sequence (Fig. 4):
A) Fretsaw
B) Rubber base
C] Work table
D) Flat gasket
E) Washer
F) Hex nut
G] Hex nut
H) Hex screw
- Tighten the hex nut (F) and secure it with a second hex nut (G).
7.3 Assembly
Important! Always pull out the power plug before carrying out any maintenance or conversion work on the fretsaw.
7.3.1 Mounting the saw blade guard and the sawdust blower facility (Fig. 6/7/8)
- Attention: Prior to the installation of the retaining device (18), the pre-assembled saw blade (17) must be dismantled as described in article 7.3.2.
- Secure the retaining device (29) to the machine by using the knurled screw (3). Attach the retaining device (18) to the bracket (29), as shown in the figure.
- Secure the saw blade guard (5) with the nut and bolt.
- Mount the blow-off device (1) as shown in Figure 8.
7.3.2 Changing the saw blade (Fig. 1/9/10)
Important
To avoid injuries attributed to inadvertent startup: Always move the switch to the "0" position and pull the power plug out of the socket outlet before removing or changing the saw blade.
Removing the saw blade without pins (optional)
To remove the saw blade (17), lift the table insert (26) upwards.
- First release the tension by lifting the clamping lever (9) upwards. If required, further reduce the tension by turning it anti-clockwise.
- Slightly push down the outrigger (10).
- Then loosen the upper saw blade clamping lever (19), followed by the lower saw blade clamping lever (23) using the Allen key (20).
Inserting the saw blade without pins (optional)
The teeth of the saw blade must always point downwards.
- First, secure the saw blade (17) in the lower saw blade mounting (25). To secure the saw blade (17), tighten the lower saw blade clamping screw (23) using the Allen key (20).
- Slightly push the outrigger (10) downwards and secure the other end of the saw blade (17) in the upper saw blade mounting (24) (see Fig. 9).
Fix the saw blade (17) with the upper blade clamping screw (19) (see Fig. 10). - Tighten the saw blade (17) with the clamping lever (9) by pressing it down again. Check the tension of the saw blade (17). If the tension is insufficient, it can be increased by turning the lever clockwise. First release the clamping lever (9).
- Put the table insert (26) back.
Removing the saw blade with pins
- To remove the saw blade (17), lift the table insert (26) upwards.
- First release the tension by lifting the clamping lever (9) upwards. If required, further reduce the tension by turning it anti-clockwise.
- Then loosen the upper saw blade clamping lever (19), followed by the lower saw blade clamping lever (23) using the Allen key (20).
- Slightly push down the outrigger (10) (see Fig. 9).
- Pull the saw blade from the upper and lower saw blade mounting (24/25)
Inserting the saw blade with pins
The teeth of the saw blade must always point downwards.
- Push one end of the saw blade (17) through the hole in the table, and guide the pins of the saw blade (17) into the corresponding slots in the upper and lower saw blade mounting (24/25).
- First insert the saw blade (17), in the lower blade holder (25).
Fixing the blade (17) with the lower blade clamping screw (23).
- Slightly push down the outrigger (10).
- Check the position of the saw blade pins in the saw blade mountings (24/25).
Fix the blade (17) with the upper blade clamping screw (19) (see Fig. 10).
- Tighten the saw blade (17) with the clamping lever (9) by pressing it down again. Check the tension of the saw blade (17). If the tension is insufficient, it can be increased by turning the lever clockwise. First release the clamping lever (9).
- Put the table insert (26) back.
7.3.3 Calibrating the angle scale
Important: Check the adjustment of the angular scale before you start working with the unit. The angle scale is already properly set when delivered. Align the saw table using a 90^ stop angle (21) (Not supplied) on the table and at the saw blade(Fig. 11). Slacken the screw (28) and turn the pointer (27) to the 90^ mark.
Carry out a test run for precise machining: Test the angle set by making a sample cut and checking the respective number of degrees on the workpiece using an angle gage. Readjust the pointer (27) if necessary.
8. Operation
8.1 Note:
- The saw does not cut wood automatically. Rather, the operator must push and guide the wood toward the moving saw blade.
- The teeth only cut the wood on the downstroke.
- The wood must be slowly pushed and guided toward the saw blade, since the teeth of the blade are very small.
- Those who want to use the saw must go through the process of learning how to do so. During this time, a few blades will invariably break.
- When cutting thicker wood, special attention must be paid not to bend or twist the saw blade.
- Handling the saw blade properly increases its service life.
8.2 ON/OFF switch (Fig. 2/Item 14)
- Press the "l" button to switch on.
- Press the "0" button to switch off.
Important: The machine is equipped with a safety switch to prevent it from being switched on again accidentally after a power failure.
If the mains power supply is interrupted when the fretsaw is switched on, the saw will switch off and remain in this state, even after the power is restored. Press the "l" switch again to switch the saw back on.
8.3 Operating working lamp
- Turn off the machine as described under 8.2
- Now the work lamp (30) can turn ON or OFF by using the switch (31).
8.4 Speed regulator (Fig. 2/Item 15)
The speed regulator (15) allows you to set the blade speed appropriate to the material to be cut. We recommend high speeds for soft material and low speeds for hard material. Turning the speed regulator (15) to the right increases rotational speed.
8.5 Inside cutting
One of the features of this fretsaw is that it can make cuts inside a panel without damaging the outside or edges. To cut inside a panel:
- Remove the saw blade as described in section 7.3.2.
- Drill a hole in the panel in question.
- Lay the panel with the hole over the access hole in the saw table.
- Insert the saw blade through the hole in the panel and set the blade tension.
- When you have finished cutting, remove the saw blade from the blade holders (as described in section 7.3.2) and lift the panel off the table.
8.6 Miter cutting
To carry out miter cuts adjust the distance of the blade guard for worktable accordingly. Swivel the saw table by loosening the locking lever (12) and tilting the table to the desired position (Fig. 12). Tighten the locking lever.
Important.
Be especially careful when making miter cuts. The angle of the saw table makes it easier for the workpiece to slip. Risk of injury.
9. Electrical connection
The electrical motor installed is connected and ready for operation. The connection complies with the applicable VDE and DIN provisions.
The customer's mains connection as well as the extension cable used must also comply with these regulations. Damaged electrical connection cable
The insulation on electrical connection cables is often damaged.
This may have the following causes:
Passage points, where connection cables are passed through windows or doors.
- Kinks where the connection cable has been improperly fastened or routed.
- Places where the connection cables have been cut due to being driven over.
Insulation damage due to being ripped out of the wall outlet.
- Cracks due to the insulation ageing.
Such damaged electrical connection cables must not be used and are life-threatening due to the insulation damage. Check the electrical connection cables for damage regularly. Make
sure that the connection cable does not hang on the power network during the inspection. Electrical connection cables must comply with the applicable VDE and DIN provisions. Only use connection cables with the marking H 05 VV-F, 3× 1.0mm^2
The printing of the type designation on the connection cable is mandatory.
AC motor
The mains voltage must be 220 - 240V
- Extension cables up to 25m long must have a cross-section of 1.5mm^2
Connections and repairs of electrical equipment may only be carried out by an electrician. Please provide the following information in the event of any enquiries:
- Type of current for the motor
Machine data - type plate
Machine data - type plate
10. Cleaning, maintenance, storage and ordering of spare parts
Important.
Always pull out the power plug before starting any cleaning work.
10.1 Cleaning
- Keep all safety devices, air vents and the motor housing free of dirt and dust as far as possible.
We recommend that you clean the equipment immediately after you use it. - Wipe the equipment with a clean cloth or blow it down with compressed air at low pressure.
- Clean the equipment regularly with a damp cloth and some soft soap. Do not use cleaning agents or solvents; these may be aggressive to the plastic parts in the equipment. Ensure that no water can get into the interior of the equipment.
10.2 Servicing
There are no parts inside the equipment which require additional maintenance.
10.2.1 Bearing(s) (Fig. 1/Item 8)
Periodically lubricate the bearings (8) of the guide rollers with high-grade machine grease, at the latest however after 25 to 30 hours of operation.
10.2.2 Carbon brushes
In case of excessive sparking, have the carbon brushes checked only by a qualified electrician. Important: The carbon brushes should not be replaced by anyone but a qualified electrician.
10.3 Storage
Store the equipment and accessories out of children's reach in a dark and dry place at above freezing temperature. The ideal storage temperature is between 5 and 30^ . Store the electric tool in its original packaging.
10.4 Ordering replacement parts
The following information must be provided on all orders for spare parts:
- Model/type of the equipment
- Article number of the equipment
11. Disposal and recycling
The equipment is supplied in packaging to prevent it from being damaged in transit. The raw materials in this packaging can be reused or recycled. The equipment and its accessories are made of various types of material, such as metal and plastic. Defective components must be disposed of as special waste. Ask your dealer or your local council.
12. Troubleshooting
| Problem Possible Cause | Help | |
| Saw blade gets loose after turning off the motor | Fastening nut tightened insufficiently Tighten fastening nut, M20 left-handed thread | |
| Motor does not start a) Failure mains fuseb) Extension cable defectc) Connections on the motor or switch defectd) Motor or switch defect | a) Check the mains fuse.b) Change extension cablec) Have it checked by an electricand) Have it checked by an electrician | |
13. Warranty certificate
All of our products undergo strict quality checks to ensure that they reach you in perfect condition. In the unlikely event that your device develops a fault, please contact our service department at the address shown on this guarantee card. Of course, if you would prefer to call us then we are also happy to offer our assistance under the service number printed below. Please note the following terms under which guarantee claims can be made:
These guarantee terms cover additional guarantee rights and do not affect your statutory warranty rights. We do not charge you for this guarantee.
- Our guarantee only covers problems caused by material or manufacturing defects, and it is restricted to the rectification of these defects or replacement of the device. Please note that our devices have not been designed for use in commercial, trade or industrial applications. Consequently, the guarantee is invalidated if the equipment is used in commercial, trade or industrial applications or for other equivalent activities. The following are also excluded from our guarantee: compensation for transport damage, damage caused by failure to comply with the installation/assembly instructions or damage caused by unprofessional installation, failure to comply with the operating instructions (e.g. connection to the wrong mains voltage or current type), misuse or inappropriate use (such as overloading of the device or use of non-approved tools or accessories), failure to comply with the maintenance and safety regulations, ingress of foreign bodies into the device (e.g. sand, stones or dust), effects of force or external influences (e.g. damage caused by the device being dropped) and normal wear resulting from proper operation of the device.
The guarantee is rendered null and void if any attempt is made to tamper with the device.
The guarantee is valid for a period of 3 years starting from the purchase date of the device. Guarantee claims should be submitted before the end of the guarantee period within two weeks of the defect being noticed. No guarantee claims will be accepted after the end of the guarantee period. The original guarantee period remains applicable to the device even if repairs are carried out or parts are replaced. In such cases, the work performed or parts fitted will not result in an extension of the guarantee period, and no new guarantee will become active for the work performed or parts fitted. This also applies when an on-site service is used.
In order to assert your guarantee claim, please send your defective device postage-free to the address shown below. Please enclose either the original or a copy of your sales receipt or another dated proof of purchase. Please keep your sales receipt in a safe place, as it is your proof of purchase. It would help us if you could describe the nature of the problem in as much detail as possible. If the defect is covered by our guarantee then your device will either be repaired immediately and returned to you, or we will send you a new device. Of course, we are also happy offer a chargeable repair service for any defects which are not covered by the scope of this guarantee or for units which are no longer covered. To take advantage of this service, please send the device to our service address.
Service-Hotline:
+80040034003
(0,00 €/Min.)
Service-Email (GB):
lidl.service.GB@scheppach.com
Service-Email (IE):
lidl.service.IE@scheppach.com
Service Address (GB | IE):
GreatStar Europe
Unit 55 Romsey Industrial Estate, Romsey
Hampshire SO51 0HR
Table des matieres: Page:
Chere cliente, cher client,
Serviceadres (NL | BE):
Ticco Maagdenberg
Voorstraat 27
NL-4797BD Willemstad NB
Índice de Contents: Págrina:
| GB | |
| Only for EU countries. Do not dispose of electric tools together with household waste materials! In observance of European directive 2012/19/EU on wasted electrical and electronic equipment and its implementation in accordance with national law, electric tools that have reached the end of their life must be collected separately and returned to an environmentally compatible recycling facility. | |
Update:07/2015-Ident.-No.:271265_3901404982


- DECOUPEERZAAG PDS 120 A1
- Service Adresse (DE):
- Service Adresse (AT):
- Table of contents: Page:
- Explanation of the symbols
- Introduction
- Important.
- Safety information
- CAUTION
- General safety information on electric power tools
- Repairs may only be carried out by a qualified electrician
- Connect up the dust extraction system
- Additional safety instructions
- Safe work
- Do not lose this safety information.
- Layout (Figs. 1-12)
- Supplied package
- IMPORTANT
- Proper use
- Residual risks
- Technical data
- Noise emission values
- Sound
- Wear ear-muffs.
- Reduce noise generation and vibration to a minimum!
- Before starting the machine
- General information
- Installing the fretsaw on a workbench (Fig. 3, 4)
- Assembly
- Mounting the saw blade guard and the sawdust blower facility (Fig. 6/7/8)
- Changing the saw blade (Fig. 1/9/10)
- Removing the saw blade without pins (optional)
- Inserting the saw blade without pins (optional)
- Removing the saw blade with pins
- Inserting the saw blade with pins
- Calibrating the angle scale
- Operation
- Note:
- ON/OFF switch (Fig. 2/Item 14)
- Operating working lamp
- Speed regulator (Fig. 2/Item 15)
- Inside cutting
- Miter cutting
- Electrical connection
- AC motor
- Cleaning, maintenance, storage and ordering of spare parts
- Cleaning
- Servicing
- Bearing(s) (Fig. 1/Item 8)
- Carbon brushes
- Storage
- Ordering replacement parts
- Disposal and recycling
- Troubleshooting
- Warranty certificate
- Service-Hotline:
- Service-Email (GB):
- Service-Email (IE):
- Service Address (GB | IE):
- Table des matieres: Page:
- Chere cliente, cher client,
- Serviceadres (NL | BE):
- Índice de Contents: Págrina:
Brand : PARKSIDE
Model : PDS 120 A1
Category : Electric saw