
RXA3070 - Home cinema amp YAMAHA - Free user manual and instructions
Find the device manual for free RXA3070 YAMAHA in PDF.
| Product Type | Home Theater Amplifier |
| Brand | YAMAHA |
| Model | RXA3070 |
| Number of Channels | 7.1.2 channels (configuration up to 7.1.2 channels) |
| Power Supply | AC 110-120/220-240 V, 50/60 Hz (depending on model) |
| Main Features | YPAO (acoustic optimization), MusicCast multiroom, Internet streaming, Internet radio, Bluetooth, USB playback, FM/AM/DAB radio (depending on model) |
| Network Connectivity | Ethernet (RJ-45), built-in Wi-Fi, Bluetooth |
| Audio/Video Inputs | HDMI (multiple), USB, network, FM/AM/DAB antenna, Bluetooth |
| Audio Outputs | Speakers (7.1.2), subwoofer pre-out, headphone, HDMI ARC |
| Supplied Accessories | Remote control, YPAO microphone with stand, FM/AM or DAB/FM antennas (depending on region), power cord, microphone base |
| Maintenance and Cleaning | Use a dry, clean cloth; do not use chemical solvents |
| Safety | Automatic standby function, short-circuit protection (Check SP Wires detection), cooling fan |
| Repairability | Leave any repairs to a Yamaha authorized service; do not open the casing |
| General Information | Manual available in multiple languages, compatible with AV SETUP GUIDE and MusicCast CONTROLLER apps |
Frequently Asked Questions - RXA3070 YAMAHA
User questions about RXA3070 YAMAHA
0 question about this device. Answer the ones you know or ask your own.
Ask a new question about this device
Download the instructions for your Home cinema amp in PDF format for free! Find your manual RXA3070 - YAMAHA and take your electronic device back in hand. On this page are published all the documents necessary for the use of your device. RXA3070 by YAMAHA.
USER MANUAL RXA3070 YAMAHA
AV Receiver Ampli-tuner audio-video
RX-A3070 RX-A2070
Safety Instructions 2
Connections 5
Basic operations 16
English
Turns on the power of this unit or sets it to the standby mode.
This product is for ordinary homes. Do not use for applications requiring high reliability, such as managing lives, health care or high-value assets.
CAUTION: READ THIS BEFORE OPERATING YOUR UNIT.
1 To assure the finest performance, please read this manual carefully. Keep it in a safe place for future reference.
2 Install this sound system in a well ventilated, cool, dry, clean place - away from direct sunlight, heat sources, vibration, dust, moisture, and/or cold. For proper ventilation, allow the following minimum clearances. Top: 30~cm Rear: 20~cm Sidcs: 20~cm
3. Locate this unit away from other electrical appliances, motors, or transformers to avoid humming sounds.
4 Do not cxpose this unit to sudden temperature changes from cold to hot, and do not locate this unit in an environment with high humidity (i.e. a room with a humidifier) to prevent condensation inside this unit, which may cause an electrical shock, fire, damage to this unit, and/or personal injury.
5 Avoid installing this unit where foreign object may fall onto this unit and/or this unit may be exposed to liquid dripping or splashing. On the top of this unit, do not place: Other components, as they may cause damage and/or discoloration on the surface of this unit. - Burning objects (i.e. candles), as they may cause fire, damage to this unit, and/or personal injury. - Containers with liquid in them, as they may fall and liquid may cause electrical shock to the user and/or damage to this unit.
6 Do not cover this unit with a newspaper, tablecloth, curtain, etc. in order not to obstruct heat radiation. If the temperature inside this unit rises, it may cause fire, damage to this unit, and/or personal injury.
7 Do not plug in this unit to a wall outlet until all connections are complete.
8 Do not operate this unit upside-down. It may overheat, possibly causing damage.
9 Do not use force on switches, knobs and/or cords.
10 When disconnecting the power cable from the wall outlet, grasp the plug; do not pull the cable.
11 Do not clean this unit with chemical solvents; this might damage the finish. Use a clean, dry cloth.
12 Only voltage specified on this unit must be used. Using this unit with a higher voltage than specified is dangerous and may cause fire, damage to this unit, and/or personal injury. Yamaha will not be held responsible for any damage resulting from use of this unit with a voltage other than specified.
13 To prevent damage by lightning, keep the power cable and outdoor anticnass disconnected from a wall outlet or this unit during a lightning storm.
14 Do not attempt to modify or fix this unit. Contact qualified Yamaha service personnel when any service is needed. The cabinet should never be opened for any reasons.
15 When not planning to use this unit for long periods of time (i.e. vacation), disconnect the AC power plug from the wall outlet.
16 Be sure to refer to the "Troubleshooting" section of the Owner's Manual on the CD-ROM for common operating errors before concluding that this unit is faulty.
17 Before moving this unit, press to set it to standby mode and disconnect the AC power plug from the wall outlet.
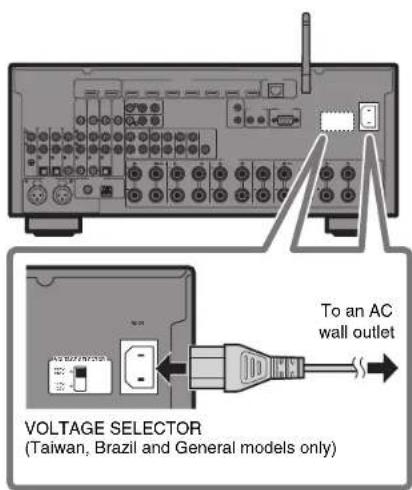
18 VOLTAGE SELECTOR (Taiwan, Brazil and General models) The VOLTAGE SELECTOR on the rear panel of this unit must be set for your local main voltage BEFORE plugging into the AC wall outlet. Voltages are: AC 110-120/220-240 V, 50/60 Hz
19 Condensation will form when the surrounding temperature changes suddenly. Disconnect the power cable from the outlet, then kave this unit alone.
20 When using this unit for a long time, this unit may become warm. Turn the power off, then leave this unit alone for cooling.
21 Install this unit near the AC outlet and where the AC power plug can be reached easily.
22 Excessive sound pressure from earphones and headphones can cause hearing loss.
This unit is not disconnected from the AC power source as long as it is connected to the wall outlet, even if this unit itself is turned off by . This state is called the standby mode. In this state, this unit is designed to consume a very small quantity of power.
WARNING
TO REDUCE THE RISK OF FIRE OR ELECTRIC SHOCK, DO NOT EXPOSE THIS UNIT TO RAIN OR MOISTURE.
Notes on remote controls and batteries
- Do not spill water or other liquids on the remote control.
- Do not drop the remote control.
- Do not leave or store the remote control in the following conditions:
- places of high humidity, such as near a bath
- places of high temperatures, such as near a heater or stove
- places of extremely low temperatures
- dusty places
- Insert the battery according to the polarity markings (+ and -).
- Change all batteries if you notice the following conditions: the operation range of the remote control narrows - the transmit indicator does not flash or is dim
- If the batteries run out, immediately remove them from the remote control to prevent an explosion or acid leak.
- If you find leaking batteries, discard the batteries immediately, taking care not to touch the leaked material. If the leaked material comes into contact with your skin or gets into your eyes or mouth, rinse it away immediately and consult a doctor. Clean the battery compartment thoroughly before installing new batteries.
- Do not use old batteries together with new ones. This may shorten the life of the new batteries or cause old batteries to leak.
- Do not use different types of batteries (such as alkaline and manganese batteries) together. Specification of batteries may be different even though they look the same.
- Before inserting new batteries, wipe the compartment clean.
- If the remote control is without batteries for more than 2 minutes, or if exhausted batteries remain in the remote control, the contents of the memory may be cleared. In such a case, install new batteries and set the remote control code.
- Disposc of batters according to your regional regulations.
- Keep batteries away from children. If a battery is accidentally swallowed, contact your doctor immediately.
- When not planning to use the remote control for long periods of time, remove the batteries from the remote control.
- Do not charge or disassemble the supplied batteries.
The batteries shall not be exposed to excessive heat such as sunshine, fire or like.
Information for Users on Collection and Disposal of Old Equipment and Used Batteries These symbols on the products, packaging, and/or accompanying documents mean that used electrical and electronic products and batteries should not be mixed with general household waste. For proper treatment, recovery and recycling of old products and used batteries, please take them to applicable collection points, in accordance with your national legislation and the Directives 2002/96/FC and 2006/66/FC.
By disposing of these products and batteries correctly, you will help to save valuable resources and prevent any potential negative effects on human health and the environment which could otherwise arise from inappropriate waste handling.
For more information about collection and recycling of old products and batteries, please contact your local municipality, your waste disposal service or the point of sale where you purchased the items.

Pb
[Information on Disposal In other Countries outside the European Union] These symbols are only valid in the European Union. If you wish to discard these items, please contact your local authorities or dealer and ask for the correct method of disposal.
Note for the battery symbol (bottom two symbol examples): This symbol might be used in combination with a chemical symbol. In this case it complies with the requirement set by the Directive for the chemical involved.
For more detailed information, refer to the Owner's Manual on the CD-ROM.
Caution: Do not attempt to play this CD-ROM in an audio player.
To view the Owner's Manual, click on "English" in the screen displayed automatically when you insert the CD-ROM into your PC, or click on the model name if the scercn to select models is displayed, and then click on "English" in the next screen. Then, follow the onscreen instructions. If the screen is not displayed automatically, open the "index.html" in the CD-ROM. The Owner's Manual contained in the CD-ROM can be downloaded from the following website: URL : http://download.yamaha.com/
Do not use this unit within 22cm (9 inches) of persons with a heart pacemaker implant or defibrillator implant.

Caution
Do not touch the surface marked with this label.
The surface may become hot during operation.
This document explains 7.1-channel system setup, 7.1.2-channel system setup using the front presence speakers, and unit configuration, followed by step-by-step instructions. Basic operations, such as playing Blu-ray Discs, DVDs, and radio content, are also explained.
In this document, the RX-A3070 is used for illustration purposes. Some parts or components, such as jacks or remote control keys, may vary by specific model. Such differences are indicated as required.
The unit is equipped with a number of other functions not described in this booklet. For more information about this product, refer to the Owner's Manual included on the supplied CD-ROM. The latest Owner's Manual can be downloaded from the following website.
http://download.yamaha.com/
The Owner's Manual in HTML format can be viewed on your smartphone, tablet, or PC. Visit the following website.
RX-A3070/RX-A2070

http://avpro.global.yamaha.com/manual/avr/rxa3070/
[For U.S. customers only]
Visit the following website for additional information, FAQ's, downloads such as "Owner's Manual" and product updates.
http://usa.yamaha.com/support/
![YAMAHA RXA3070 - [For U.S. customers only] - 1](/content/2026/03/431372/images/88e928fe7c4d1839117160569c1d997449e3747d344e53c7510536a7a4b7a3b9.jpg)
AV SETUP GUIDE
AV SETUP GUIDE is an app that guides you through the process of connecting a TV or playback device, such as a BD/DVD or CD player, and speakers to the AV receiver. Search "AV SETUP GUIDE" on the App Store or Google Play for details.
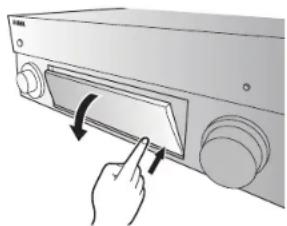
Opening and closing the front panel door
Press the bottom of the door gently to open it when using controls or jacks behind the front panel door. Keep the door closed when controls or jacks behind the front panel door are not in use. (Be careful not to trap your fingers.)
1
Preparation

Confirming package contents
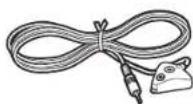
Remote control

AM antenna
(except for U.K., Europe, Australia and Russia models)
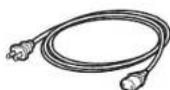
Power cable
The supplied power cable varies depending on the region of purchase.

FM antenna
(except for U.K., Europe, Australia and Russia models)
One of the above is supplied depending on the region of purchase.

DAB/FM antenna
(U.K., Europe, Australia and Russia models)
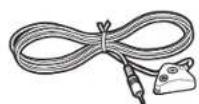
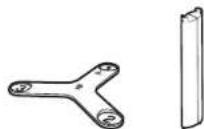
YPAO microphone
Microphone base
Use to measure angle/height during YPAO.
CD-ROM (Owner's Manual)
Quick Start Guide (this booklet)
Preparing cables
The following cables (not supplied) are required to build the system described in this document.
- Speaker cables (depending on the number of speakers)
Audio pin cable (x1)
HDMI cables (x3)
Network cable (x1) (when connecting to a router via a network cable)
2
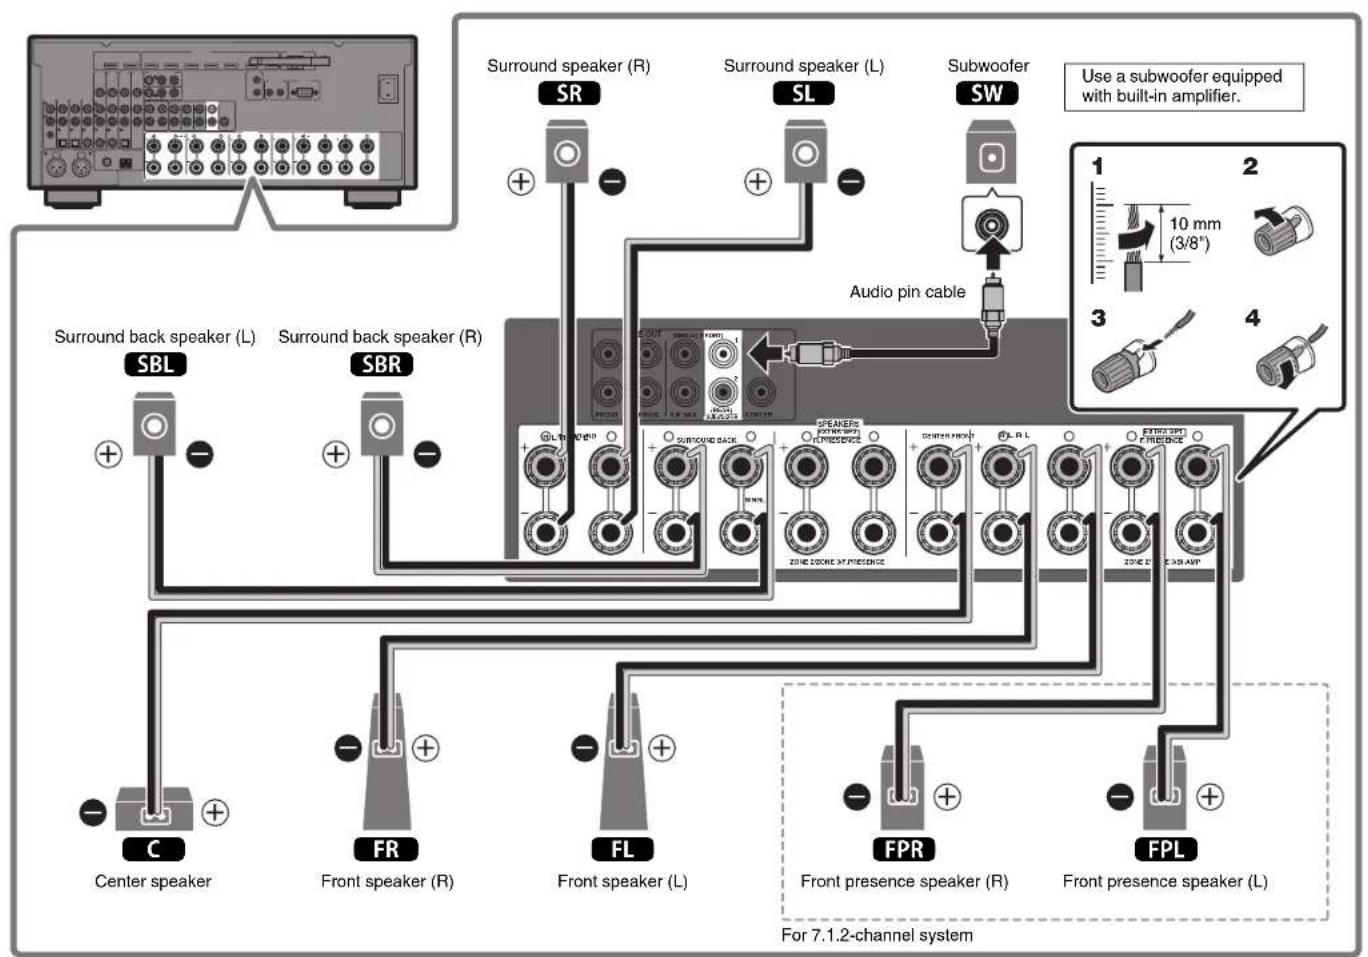
Connecting speakers/subwoofer
Positioning speakers
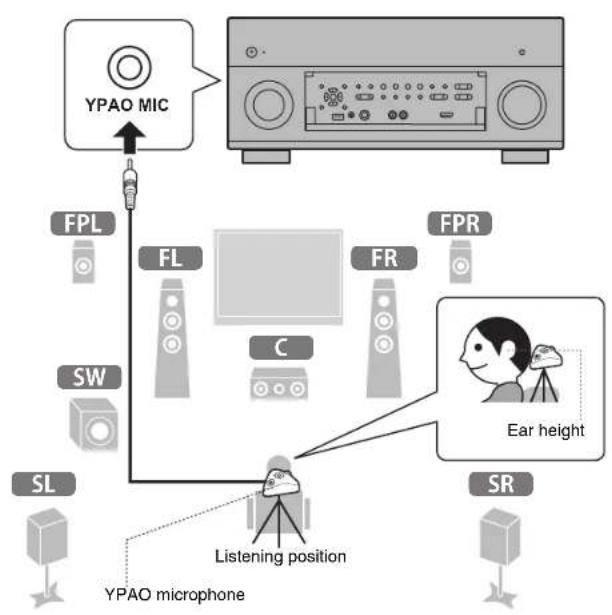
Use the diagram as a reference for positioning speakers.
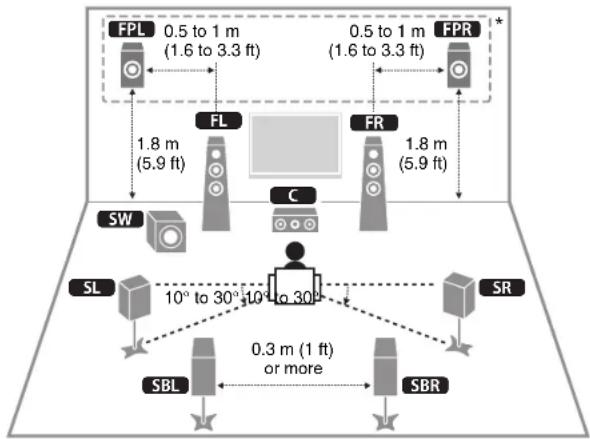
FL Front speaker (L)
FR Front speaker (R)
C Center speaker
SL Surround speaker (L)
SR Surround speaker (R)
SBL Surround back speaker (L)
SBR Surround back speaker (R)
FPL Front presence speaker (L)^
FPR Front presence speaker (R)
SW Subwoofer
For 7.1.2-channel system
When connecting 6-ohm speakers
Set the unit's speaker impedance to "6 Ω MIN". For details, see "Setting the speaker impedance" in the Owner's Manual.
Precautions for connecting speaker cables
- Be sure that the unit and subwoofer are turned off.
- Prepare speaker cables in a place away from the unit, to avoid accidentally dropping wire strands into the unit's interior which could result in a short circuit or malfunction of the unit.
-
Improper connection of speaker cables could cause a short circuit resulting in damage to, or malfunctioning of, the unit or speakers.
-
Carefully remove approximately 10mm (3/8^ ) of insulation from the speakerconnection ends of the cables, and twist the bare wires of each speaker cable together firmly.
- Do not allow the bare wires of separate speaker cables to come into contact with one another.
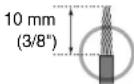

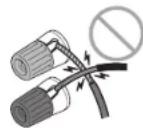
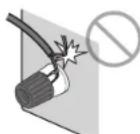
- Do not allow speaker cable bare wires to come into contact with metal parts on the unit (rear panel and screws).
If "Check SP Wires" is shown on the front display when the unit is turned on, turn off the unit and be sure that speaker cables have not caused a short circuit.
3
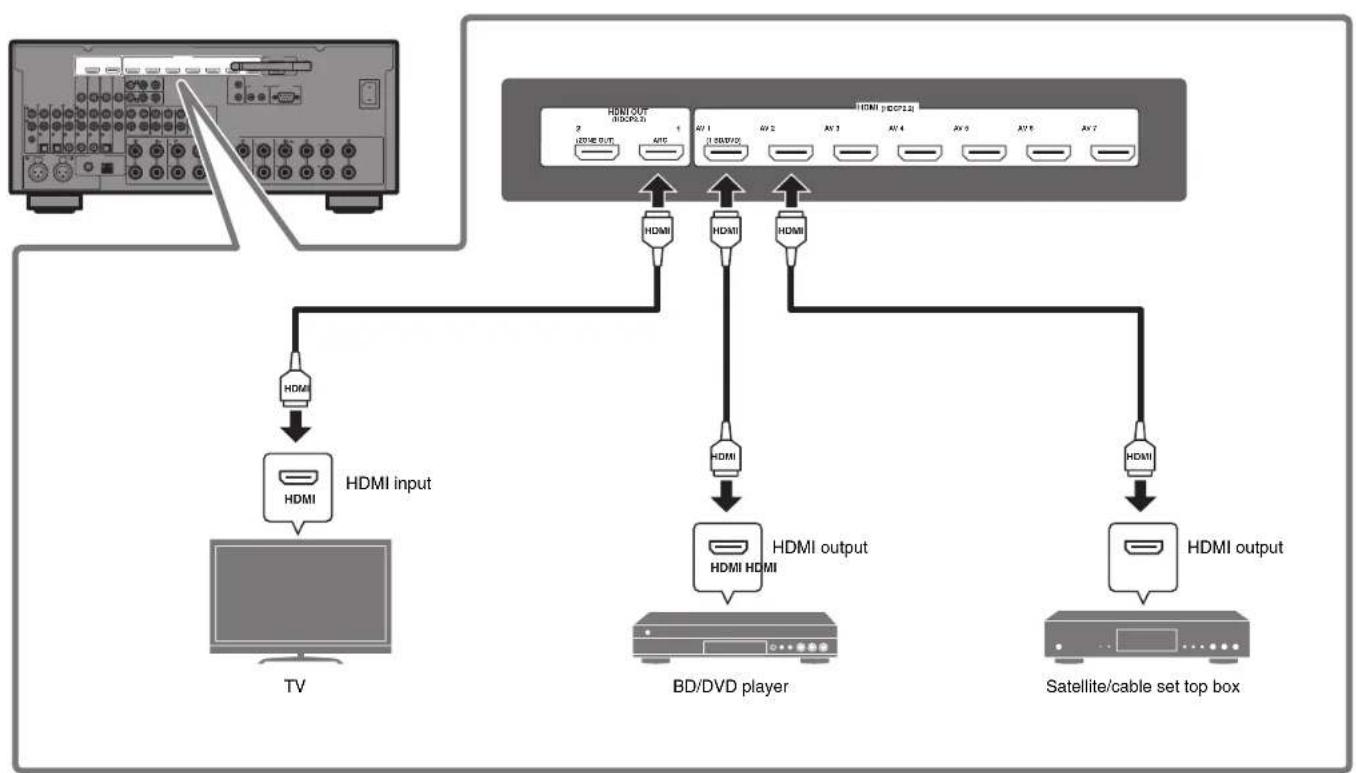
Connecting external devices
4
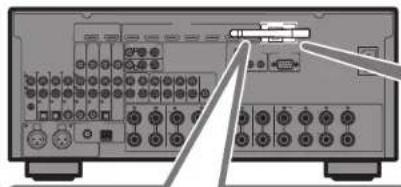
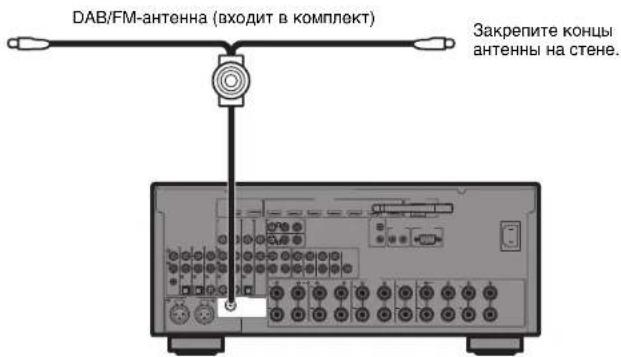
Connecting the radio antennas
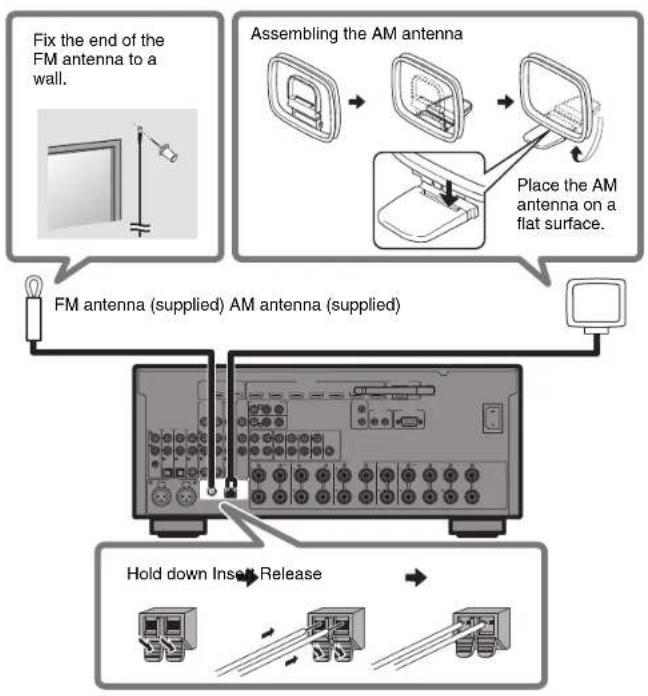
FM/AM antennas (except for U.K., Europe, Australia and Russia models)
DAB/FM antenna (U.K., Europe, Australia and Russia models)
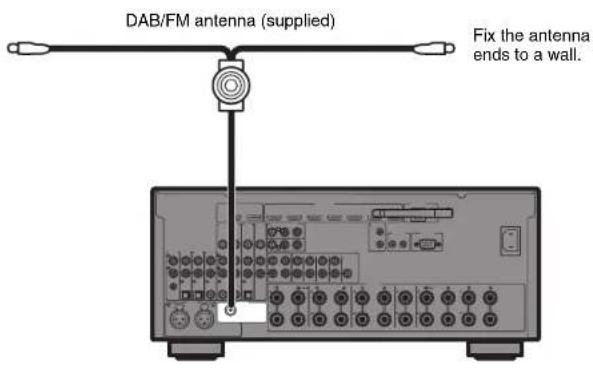
5
Preparing a network connection
Prepare a wired or wireless network connection in accordance with your network environment.
Note
The wireless antenna must be raised if the unit will be connected to a Bluetooth device.
Wireless network connection
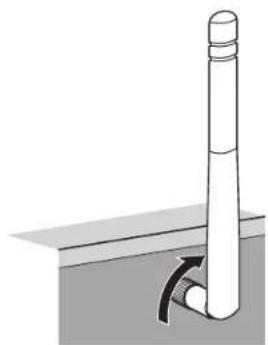
Raise the wireless
antenna so that it is
standing up straight.
(Procedures for
connecting the unit to a
wireless router are
described in step 7.)
Notice
Do not apply excessive force
on the antenna. Doing so
may damage it.
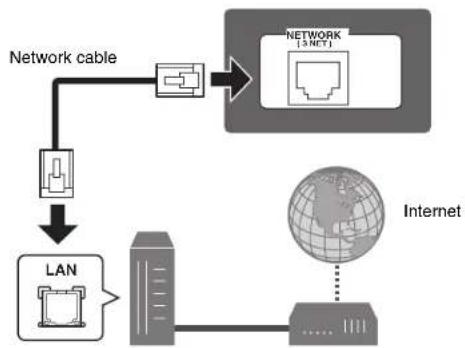
Wired network connection
Router Modem
6
Connecting the power cable to an AC wall outlet, and turning on the unit
Before connecting the power cable (Taiwan, Brazil and General models only) Set the switch position of VOLTAGE SELECTOR according to your local voltage. Voltages are AC 110-120/220-240 V, 50/60 Hz.
1 Plug the power cable into an AC wall outlet.
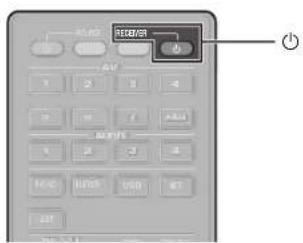
2 Press RECEIVER to turn on the unit.
3Turn on the TV and switch the TV input to display video from the unit (HDMI OUT jack).
The Network Setup screen shown below will be displayed on the TV when the unit is turned on for the first time after purchase. It may take several tens of seconds for the screen to be displayed (WAC: Wireless Accessory Configuration).
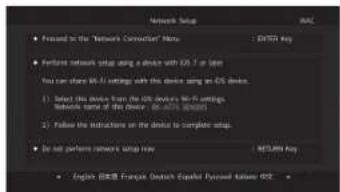

See "Sharing the iOS device setting" under "Connecting the unit to a wireless network" in the Owner's Manual when using this function to connect the unit to a network. This document explains wireless connection using methods other than this function. Follow the procedure described under "Connecting the unit to a network" on the next page.
Note
This screen will not be displayed if the unit is connected to a router via its NETWORK jack (wired connection).
7
Connecting the unit to a network
Connecting the unit to a wireless network
- The unit can be connected to a wireless network using the MusicCast CONTROLLER app* installed on your smartphone or other mobile device. Follow procedure [A].
- If a mobile device will not be used, follow procedure to connect the unit to a wireless router (access point) that supports WPS. Refer to the Owner's Manual for details on other wireless connection methods.
Connecting the unit to a router via a network cable
- Follow procedure [A] to use the MusicCast CONTROLLER app* installed on your smartphone or other mobile device to connect to the MusicCast network to play music over a network.
- If a mobile device will not be used, skip this step and proceed to step 8.
- MusicCast CONTROLLER, an app for mobile devices, can be used to easily configure network settings for not only this unit, but also for other MusicCast-enabled devices. This app allows you to listen to music stored on your smartphone or other mobile device, or on servers, and to listen to Internet radio stations. It also allows you to play this rich variety of music content on all devices in the MusicCast network at the same time. Visit the following website for details.
http://www.yamaha.com/musiccast/
A Connecting with the MusicCast CONTROLLER app
Connect the unit to a network and register it as a MusicCast-enabled device.
Note
- Confirm that your mobile device is connected to your home router before beginning.
- You will need the router's SSID and security key to connect the unit to a wireless network.
- The MusicCast CONTROLLER app screens in this section show the English interface. The screen appearance may vary depending on the app version.
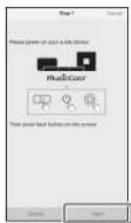
1Install the MusicCast CONTROLLER app your mobile device, and open the app.

Search for "MusicCast CONTROLLER" on the App Store or Google Play.
2Tap "Setup".

3 Confirm that the unit is turned on, and tap "Next".
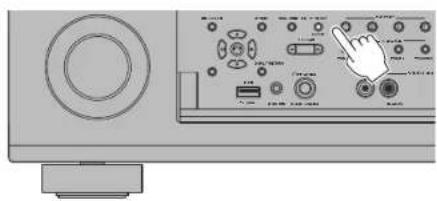
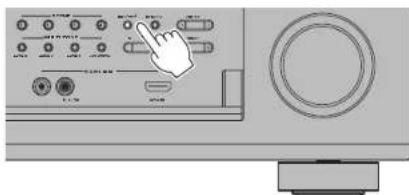
4Press and hold the CONNECT button on the front panel of the unit for 5 seconds, as instructed by the app.
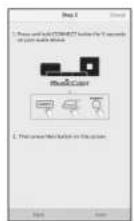
5Follow the app's on-screen instructions to configure network settings.
When a connection has been established, "Completed" will be displayed in the front display of the unit.
Network connection with the MusicCast CONTROLLER app is now complete, and the unit has been registered as a MusicCast-enabled device.
B Using WPS push-button configuration
Wireless connection can be configured with one push of the WPS button on the wireless router (access point).
1 Press and hold INFO (WPS) on the unit's front panel for more than 3 seconds.
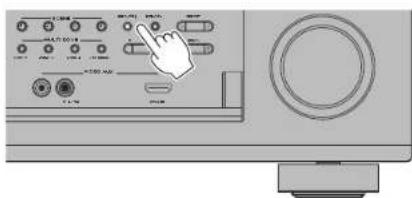
"Press WPS button on Access Point" will be displayed in the front display.
2Push the WPS button on the wireless router.
When a connection has been established, "Completed" will be displayed in the front display.
Note
If "Not connected" is displayed, repeat the process from step 1 or try another connection method.
8
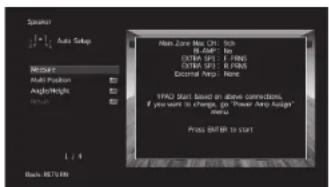
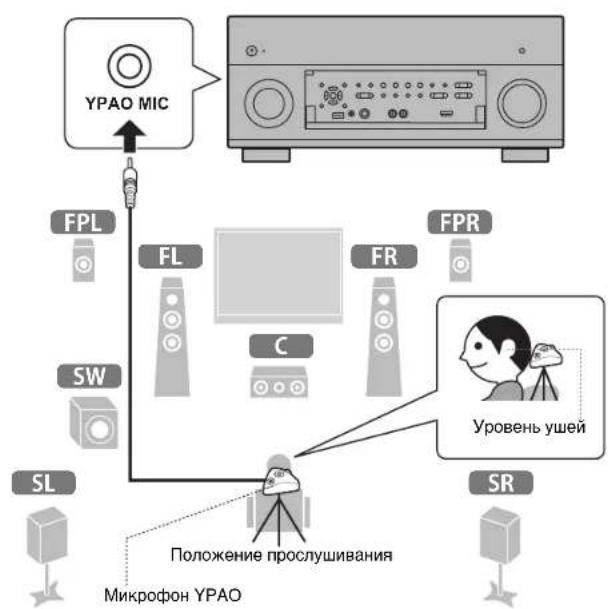
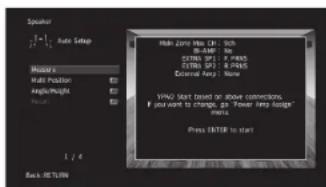
Optimizing the speaker settings automatically (YPAO)
The Yama h t t, and then automatically optimizes the speaker settings, such as volume balance and acoustic parameters, to suit your room.
Note the following regarding YPAO measurement
Test tones are output at high volume and may surprise or frighten small children.
Test tone volume cannot be adjusted.
- Keep the room as quiet as possible.
- Stay in a corner of the room behind the listening position so that you do not become an obstacle between speakers and the YPAO microphone.
- Do not connect headphones.
1Turn on the subwoofer and set the volume to half.
If the crossover frequency is adjustable, set it to maximum.

2Place the YPAO microphone at your listening position and connect it to the YPAO MIC jack on the front panel.
The screen below appears on the TV.
Note
Place the YPAO microphone at your listening position (same height as your ears). We recommend the use of a tripod as a microphone stand. You can use the tripod screws to stabilize the microphone.
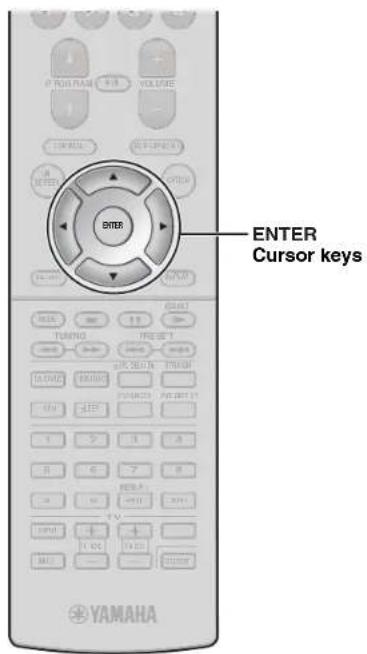
3Use the cursor keys to select "Measure" and press ENTER.
The measurement will start in 10 seconds.
It takes about 3 minutes to measure.
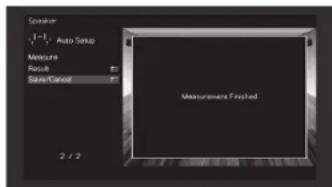
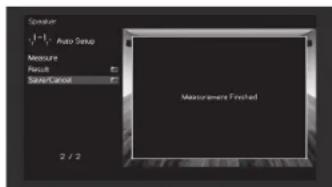
The screen below appears on the TV when the measurement finishes.
Note
If an error message (such as E-1) or warning message (such as W-2) appears, see "Error messages" or "Warning messages" under "Optimizing the speaker settings automatically (YPAO)" in the Owner's Manual.
4Use the cursor keys to select "Save/Cancel" and press ENTER.
5Use the cursor keys to select "SAVE" and press ENTER.
6Use the cursor keys to select "YES" to enable YPAO Volume and press ENTER.
7Disconnect the YPAO microphone from the unit.
This completes optimization of the speaker settings.
Basic operations
This section describes basic operations such as playing Blu-ray Discs and DVDs, and tuning into radio stations. Most operations can be performed using the remote control.
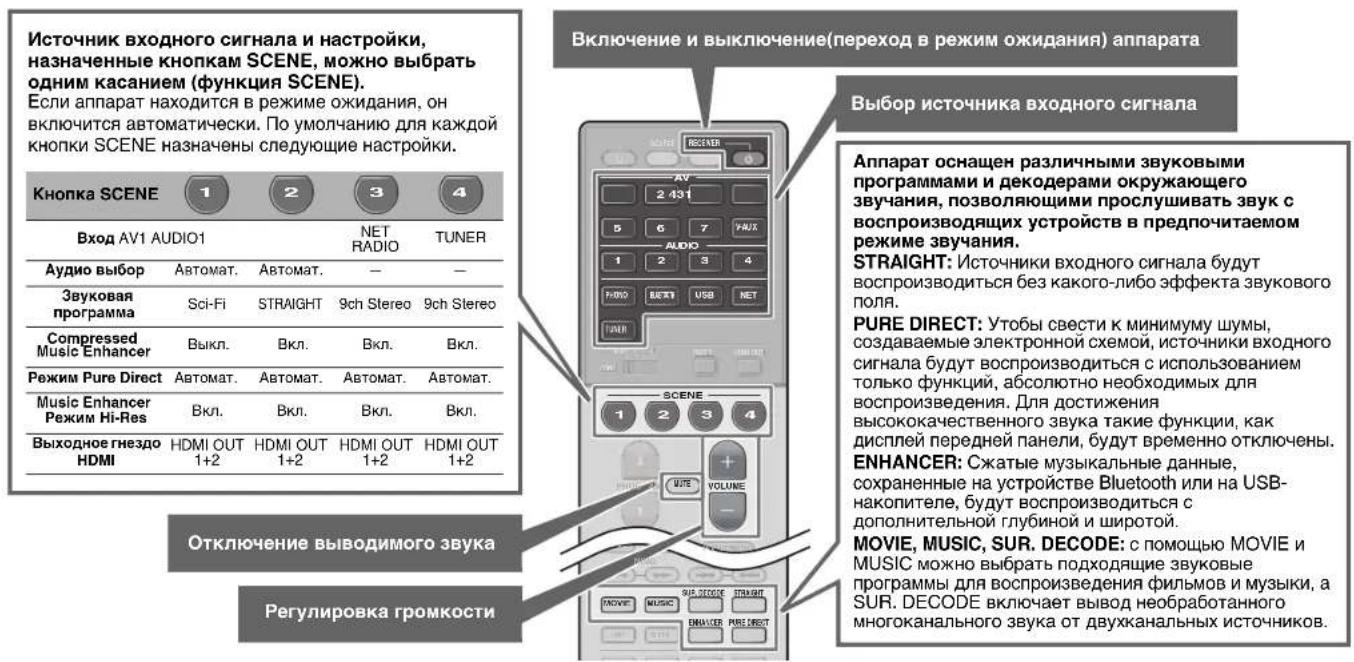
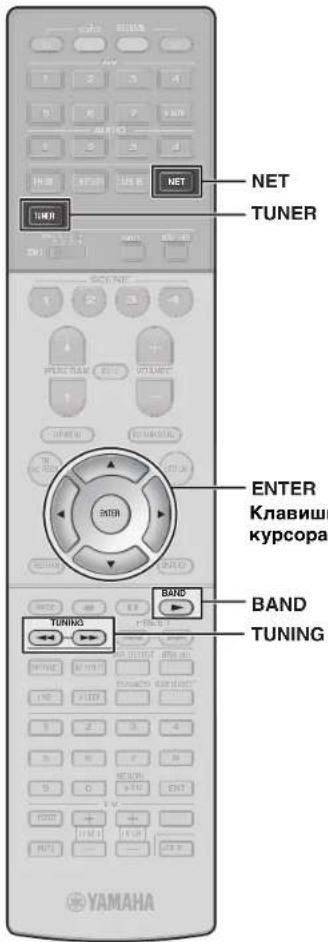
Operating the remote control
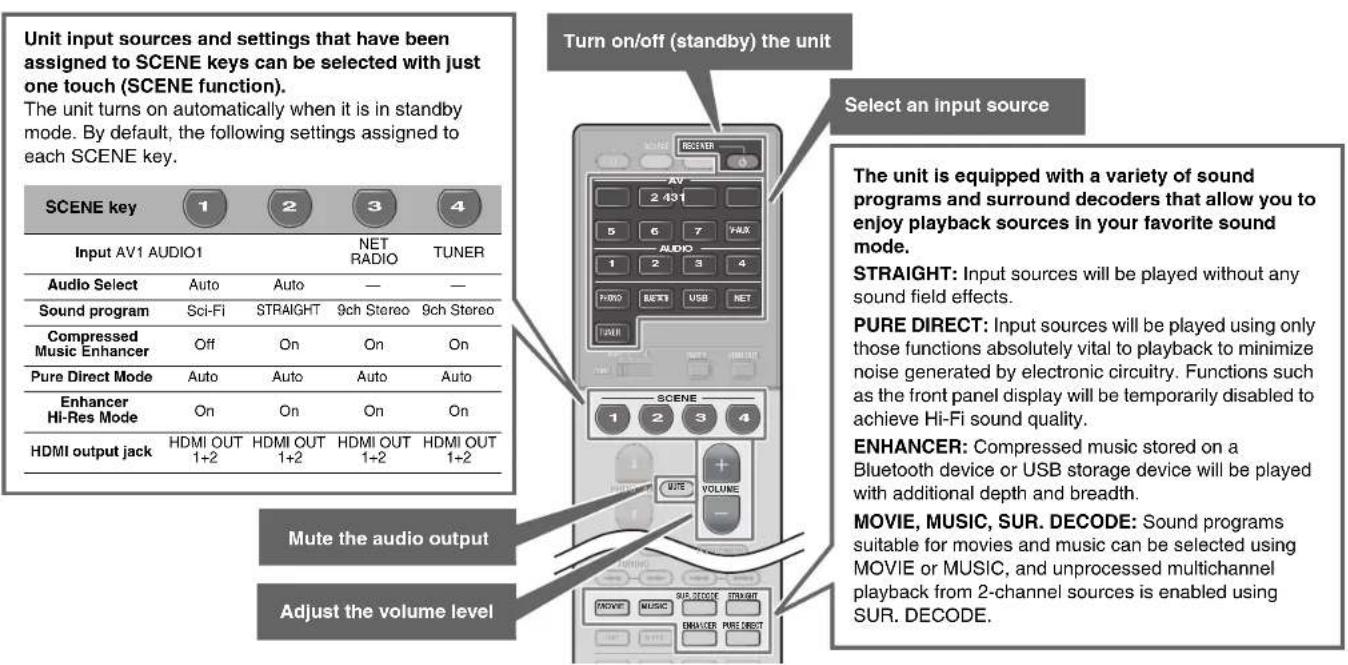
Playing a BD/DVD
We recommend playing back multichannel audio (5.1-channel or more) to feel surround sound produced by the unit.
1Turn on the BD/DVD player.
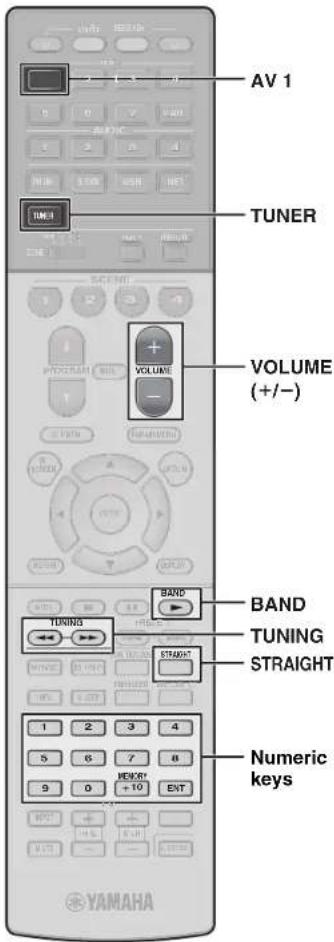
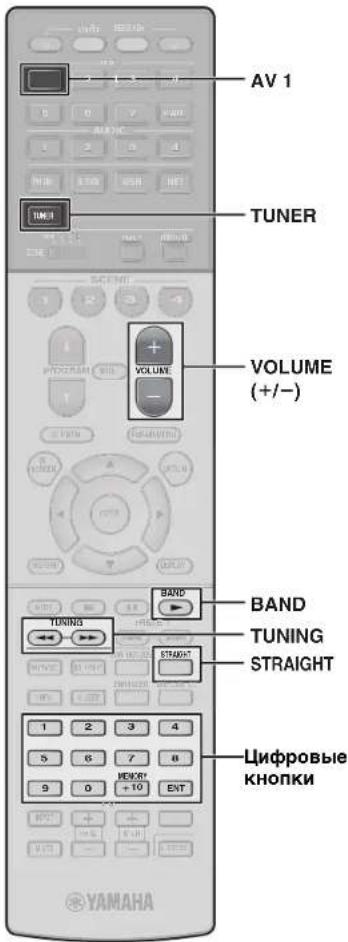
2Press AV 1.
The name of the connected device such as "BD player" may be displayed.

Input source Device name
3Start playback on the BD/DVD player.
4Press STRAIGHT to select "STRAIGHT".
Note
When "STRAIGHT" (straight decode) is enabled, each speaker produces each channel audio signal directly (without sound field processing).
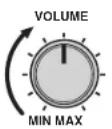
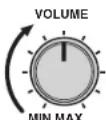
5Press VOLUME to adjust the volume.
Note
When sound is not heard, or no sound is output from a specific speaker, see "Troubleshooting" in the Owner's Manual.
Listening to FM/AM radio (except for U.K., Europe, Australia and Russia models)
1 Press TUNER to select "TUNER" as the input source.
2Press BAND to select FM or AM.
3Use the following keys to set a frequency.
TUNING: Increase/decrease the frequency. Hold down the key for about a second to search stations automatically.
Numeric keys: Enter a frequency directly. For example, to select 98.50 MHz, press "9", "8", "5" and "0" (or ENT).

"TUNED" lights up when the unit is receiving an FM/AM radio station signal.
"STEREO" lights up when the unit is receiving a stereo FM radio signal.
Setting the frequency steps (Asia and General models only)
At the factory, the frequency step setting is set to 50kHz for FM and 9kHz for AM.
Depending on your country or region, set the frequency steps to 100kHz for FM and 10kHz for AM.
1 Set the unit to standby mode.
2 Hold down STRAIGHT on the front panel and press MAIN ZONE ①.
3 Press PROGRAM on the front panel repeatedly to select "TUNER FRQ STEP".
TUNER FRQ STEP FNS8/AN9
4 Press STRAIGHT on the front panel to select "FM100/AM10".
5 Press MAIN ZONE to set the unit to standby mode and turn it on again.
Listening to DAB radio (U.K., Europe, Australia and Russia models)
1Press TUNER to select "TUNER" as the input source.
2Press BAND to select the DAB band.
The following message appears on the front panel if you have not performed an initial scan yet.
Init Scan 30 Press [ENTER]
3Press ENTER to start an initial scan.

When the initial scan finishes, the unit automatically tunes into the first DAB radio station as stored in station order.

4Press TUNING repeatedly to select a DAB radio station.
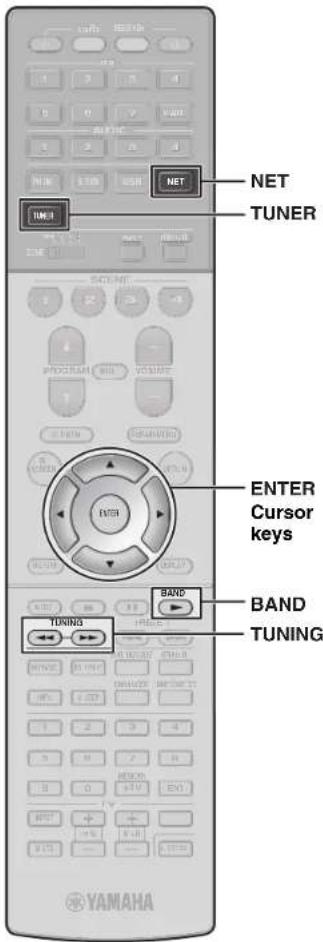
Listening to Internet radio
1Press NET repeatedly to select "NET RADIO" as the input source.
The browse screen is displayed on the TV.
2Use the cursor keys to select an item and press ENTER.
When an Internet radio station is selected, playback starts and the playback screen is displayed.
Note
Internet radio stations can also be selected using the MusicCast CONTROLLER app installed on your mobile device.
The MusicCast CONTROLLER app installed on your mobile device can be used to play music from streaming services. Refer to documentation included on the supplied CD-ROM for more information.
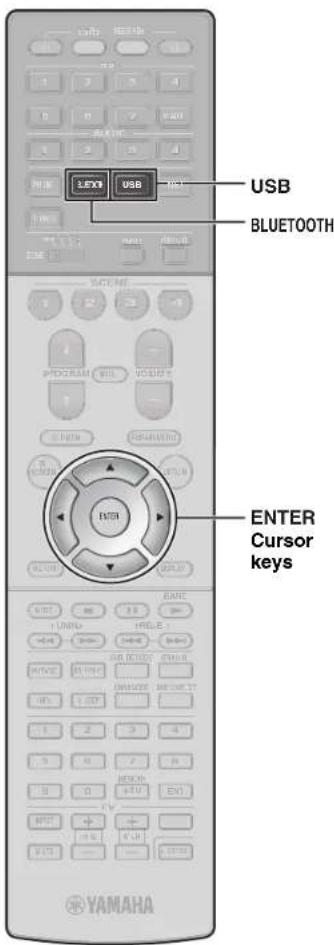
Playing music stored on a Bluetooth® device
1Press BLUETOOTH to select "Bluetooth" as the input source.
2Select the unit (network name of the unit) from the available device list on the Bluetooth device.
If the pass key is required, enter the number "0000". When the connection is established, the indicator will glow in the front display.
3Select a song and start playback on the Bluetooth device.
Note
Audio playing on the unit can be transmitted to Bluetooth wireless speakers or headphones (except when Bluetooth is selected as the unit's input source). See "Enjoying audio using Bluetooth speakers/headphones" in the Owner's Manual for more information.
Playing music stored on a USB flash drive
1 Connect the USB flash drive to the USB jack.
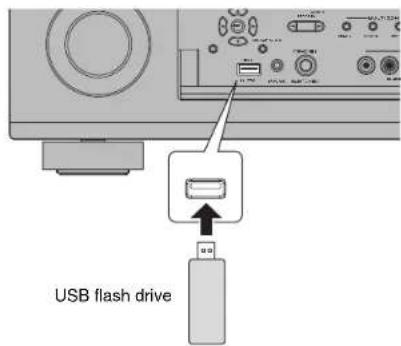
Note
Connect the USB flash drive directly to the USB jack. Do not use an extension cable.
2Press USB to select "USB" as the input source.
The browse screen is displayed on the TV.
3Use the cursor keys to select an item and press ENTER.
When a song is selected, playback starts and the playback screen is displayed.
Français
Touche (alimentation)
http://www.yamaha.com/musiccast/
http://www.yamaha.com/musiccast/
Init Scan 30% >>-36%
http://www.yamaha.com/musiccast/
1Ligue o BD/DVD player.
2Pressione AV 1.
B3abuCHMOCTOn DT perNoHa nokynKn, noCTaBnAETcN ODA h NOKa3AHbIX BbIe AHTHOH.

DAB/FM-aHTeHHa
(Moenni en Bemikopobitannin, Eboonbi, Abctpannnu n Pocinn)
MnKpopon YPAO
IOCTABKa DnM KPODHa CToKaH NcNoB3yIOr dNn H3MepeHn yrna N BbICOTbY cTahOBKn BO BPmepnoeUpby YPAO.
CD-ROM (IMCCTpykun no ekcnnyatauun) KpaTkoe pykoBDcTBo no haany pa60tbi (daHnaB 6poWopa)
Ioprotobka ka6eJe
IpeuueeHHe Iaee KaBn (He BxOaT B KOMnEeK T NoCTabKn) Heo6xoDmbl nN NOCTpoEH CNTEmbl, ONCAHHOB DaHHOM DOkyMeHTe.
KaBennnKoHOHOK (NX KOnNueCTBO 3aBNCNT OT KOINHeCTBa KOIOHOK)
- WTekehny aynokabe (1 wT.)
Ka6eHnHDMI (3 wT.)
Cetebo Ka6enb (1 wT.) (DnnoKIOHcHm K mappyTHaTOpypepeceTeB0Ka6enb)

2
AHTehHa DAB/FM (MoJeHn dJa BeNko6pTuHaHH, EbpOnbI, AbcTaJIHH u PocCnn)

5
HacTpoIka c NOMOuKHOKN WPS
BecnpoBOHNOe NOkNIOUHeHMe MOKHO HAcPTb ODNHM HaKaTHEM KONKN WPS HA BcnpoBOHOM MapuTy3aTope (TOyKe DocTyna).
1HaxMnte n ydepxnBaayte 6oJee 3cekynd KhoNky INFO (WPS) Ha IInCeBOI naHeII annapaTa.
Ha dincnee liueboi nahei noaBntca ykaaHne "Press WPS button on Access Point".
2HaxMnte KhoNky WPS Ha 6ecnpoBODHom MapuTy3aTope.
Iocne yctaHOBEnH NoKIOUeHNHa dncnnee nepeHne naHeJI NOBHTc coo6eHne "Completed".
PpmeuHne
Ecn otobpaaxaetra Not connected", nobtopnt npoeuyp c wara 1 nnnnonpooyte pyroto meto noKnlohenra.

8
ABTOMATNUECKA ONTNMn3aunHaCTpoek KOJohok (YPAO)
Yama h Aotm t n o n n n n n n n n n n n n n n n n n n n n n n n n n n n n n n n n n n n n n n n n n n n n n n n n n n .

PpMMTE BO BHMaHHe CNeDyUOuNE 3aMeHaHHN OTHOCHTbHO N3MpeHnYPAO
TectOBe CnHAnbl BbBOADTC C BbICOKOIN POMKoCTbMOrMYTcTaB HEOXKaHaHHbIMNHNanyrtaMbAneHbKxDeteN.
POMKoCTb TcTeOBbix CnHAnOB He perynmpyETCA.
BoBpMaN3MpeHnA coXpaHnTe B KOMHaTe MAKCNMAJbHYO TUHINY.
BoBpMaH3MepeHnCneDyET HaxOuTbCB R yIyNOMeEHnIO3aINIOLOKeHnIPOcnyuBaHn,HTo6bI HeCO3dAbTbPepaTCTBmMEXdyKoONOHAMNI MKNpOFOHOM YPAO.
He noKnHouaTe K annapaTy hauWNKn.
1BkIIOHTe ca6ByΦep n yCTaHObIte erO rPOMKOCTb Ha NOJOBHy.
YcTaHOBIne MaKcImaJIbHyIO qACTO TY KpocCOBepa (ecn OHa perynpyetca).
2yctaHOBNTe Mnkpofoh YPAO B noLoXeHne npocnyuBaHHN NOkNoHTe ero K rHe3dy YPAO MIC Ha NueBoi naHei.
Ha 3kahe TeneBn3opa nOBnTc nOKa3aHHoe Hnke N3o6paKeHne.
PpmeHne
YCTAHOBITE MINKPOOHO YPAO B NOLOXKHe NPOClyuMBAHn (Ha ypoBHe ywei) B KaueCTBe NOCTABKn dna MINKPOOHOpeKoMeHdyETc HcNlONb30aBt tATNTB.
MnKpOPOH MoXHO 3aKpeNtB BHTAMn WtTaNba.
3KhoNkAmu Kypcopa BbI6epHte "Measure" n HaxMnte ENTER.
I3mepenHe naHcTcpe3 10 ckyHn.
I3MepenHe npoOJkaeTc npmepHo 3 MnHyTbI.
IIOOKOHuaHIMN3MpeHnHa 3KpaHe TELEBUN3Opa NOBUTCnOKa3AHn HnKe INHDPmaJn.
PpmeaHne
Ecnn noBnTcKaKae-Ni6o 0o6eHHe 06 oW6ke (HanpImep, E-1) nIn npEynpeKJdHnO (HanPmep, W-2), cm. "Coo6eHnO 06 oW6kax" nIn "PpeynpeKJdHnO" B p3aDe nE "AToMaTuHcKaON tOnMmHaZmaN hAcTpoek KOJHOOK (YPAO)" NtHcTpkyuON no 3cknnyatauIN.
4C nOmoaBIO KJIaBmH Kypcopa BbIbepnTe "Save/ Cancel" n HaxMnTe ENTER.
5C NOMOusbIO KJIaBnK Kypcopa BbI6epnte "SAVE" n HaXMITE ENTER.
6C NOMOUI KJIABNI Kypcopa Bbl6epnte "YES", YTO6BI BKJIOHTb napameTp YPAO Volume, n Haxmnte ENTER.
7OTKJIOHTe MKNPOOY YPAO ot annapata.
Ha 3TOM ONTMM3aMn HAcTpoE KONOHOK 3aBepSeHa.

Ochobhble onepaun
B 3TOM pa3dene onncbtaeTc8 oOcbHbe Oepaun, taKne KAK Bocnpon3BeDeHne DnckOB Blu-ray, DVD-dnckOB n HactpoKa Ha paNocTaHm. BoIbUnHCTBO onepaun MoKHO BInONHtB c NOMoCbIO nyIbTa DY.
IcnoJb3ObaHne nyIbTa Dv
Bocnpon3BeJeHne BD/DVD-dncka
Tc06bI B NOHOM MEpe OuyTNb 06bEmhB 3ByK, BbIaBaembI annpaTOM, peKOMeHdyTeC8 BOCpONBDOHTMHOROKaHaJIbHbIE 3ByKO3aIncs (5.1 KaHANOB IIN6OJIbue).
1 BkIouHe BD/DVD-nponrpbBaTeJIb.
2HaXMMTe KhoNky AV 1.
Moxet OTo6paxaTbca Ha3BaHne NoDKIOUOeHHoro yctpoCTBa, Hapmep "BD player".

VCTOCHIK BXODHORCnTHana
Ha3BaHme yCtpoCTBa
3HaunHe BocpOn3BeDeHne Ha BD/DVD-nponrpbIbATEne.
4Haxmnte KhoNky STRAIGHT, yTo6bI Bbl6paTb "STRAIGHT".
PpmeaHne
KorDa BkIOHeH pexHM "STRAIGHT" (npmaoe
deKOIOpOBAHn), KAKdAN KOONKA BoCpOn3BOuNT
ayDIOoHN KaJDOrO KAHA HAnpMyO (6e3
06paOToKN 3EyKOBoR ONoI.
5HaXMMTe KHOKNy VOLUME dnerpeYnnpOBKn rPOMKocTn.
Приимechанинe
EcnHne CnbluB 38N INH ne BbIOBNTCR 38KYN3 KAKONIbO KOHOKN, CM. paZdEN "PiOnck uYctpaHeneHE HEMcnpaBOHcTeN NHTCPyKun no 3KnCnnyatauN.
PpocnyuBaanHe FM/AMpaNO (Kpome MoJeIeN dJIy BeNKo6pTuHn, EbpOnbl, ABcTpaNN u Poccn)
1HaXMMTE TUNER,HTO6bI BbI6paTbB KaueCTBe NcTOUHKA BXoDHOROCnTHana "TUNER".
2HaXMMTe BAND, yTo6bI BBi6paTb FM nn AM.
3BbI6epnte YactOTy c NOMOu bIO CneDyUoX KHONoK.
TUNING: YBENHENH NIN yMEHBWENHE qACTOTbl. Haxmnte u depkunbaite 3ty kONky np6nntenbHo cekyHy dny aBtOMaTHueckoro nonka CTAHN.
LHpObIe KhoNKn: BBoJ aCToBb BpyHyIO. HanPmep, YTO6bl Bb6paTb yAcToTy 98,50 MfU, HaxMnTe "9", "8", "5" n "0" (nn ENT).

Pn npneMe annapatom cnHana paAnocTaHm FM/AM 3aropaaetc HhOpmaa "TUNED".
Pn npne Me annapaTOM ctepeoohueckoro FMpaoNocnHana 3aropaetra "STEREO".

YctaHObKa Wara HactpOKNu cactotbl (ToIbKO moDenB dA3nn N o6uaa MoDenb)
3aBODKMMYCTAHOBKAMN DIAA YACTOTb ABINOTCA 3aHcHnB 50 Kf DN FM N 9 Kf DN AM. B3aNMCMOCTO tCTpaHb Uy PERHOA MOXHO YCTAOHBIT bWt HACTPOKNI CACTBO T100 Kf DN FM N 10 Kf DN AM. I PpepeDte annapat B pekm OxkDaHN.
2.Дуржьага конky STRAIGHT Napejdne Nahehi, HAKMITE KHONKY MAIN ZONE ①.
3 Heckonko pa3 haxmte KhoKy PROGRAM ha nepedne naeHn, T06bblb6pab "TUNER FRQ STEP".
TUNER FRO STEP EN50/AM9
H4XMMte KONkBy STRAIGHT Ha nepdne Hnanei, TOb6bBbOpaTf"FM100/AM10".
5 HAKMITE KONKY MAIN ZONE ,YTObI nepeBECTa annapat B pekmOxHdHa, a 3aTeM BKIOHTe ero CHOB.
Important Notice: Guarantee Information for customers in EEA* and Switzerland
English
For detailed guarantee information about this Yamaha product, and Pan-LEA* and Switzerland warranty service, please either visit the website address below (Printable file is available at our website) or contact the Yamaha representative office for your country. * LEA: European Economic Area
Manual Development Group
© 2017 Yamaha Corporation
Published 04/2017 KS-A0
Printed in Malaysia
ZX14300


