IP 365 - Media player Trevi - Free user manual and instructions
Find the device manual for free IP 365 Trevi in PDF.

| Product type | Media player |
| Brand | Trevi |
| Model | IP 365 |
| Operating system | Android |
| Video outputs | HDMI (port 6), Composite AV CVBS (480i/576i) |
| Audio outputs | HDMI, Digital Optical, Analog L/R Audio |
| Network connectivity | Wi-Fi 802.11 b/g/n, Ethernet 10/100 (RJ45 port) |
| Connections | 2 USB 2.0 ports, MicroSD card reader |
| Bluetooth | Yes, unspecified version |
| Miracast | Yes, compatible with Android 4.2.2+ |
| DLNA | Yes (DMP and DMR) |
| Power supply | 5V DC adapter (included) |
| Remote control | Infrared, programmable TV, AAA batteries (not included) |
| Other functions | Google TV Remote (app), CEC, AirPlayer |
| Safety | Do not expose to water or humidity; use only the supplied adapter; do not block openings. |
| Maintenance | Clean with a soft dry cloth |
| Repairability | No user-serviceable parts; contact a qualified technician. |
Frequently Asked Questions - IP 365 Trevi
User questions about IP 365 Trevi
0 question about this device. Answer the ones you know or ask your own.
Ask a new question about this device
Download the instructions for your Media player in PDF format for free! Find your manual IP 365 - Trevi and take your electronic device back in hand. On this page are published all the documents necessary for the use of your device. IP 365 by Trevi.
USER MANUAL IP 365 Trevi
CPU AMLOGIC S805M, Quad core, ARM Cortex A5
FREQUENZA PROCESSORE 1.5GHz
RAM 1GB
SISTEMA OPERativo Android 4.4
MEMORIA INTERNA 8 GB
INTERFACCIA USB(x2), Slot Micro SD Card, Rj45, HDMI, Optical
ALIMENTAZIONE 5V DC
IMPORTANT SAFETY INSTRUCTIONS
- Please read and keep this Instructions
- To reduce the risk of electric shock, do not remove the cover or back. There are no user-serviceable parts inside. Refer servicing to qualified personnel.
- To prevent fire or electric shock hazard, do not expose the unit to rain or moisture.
- Do not expose to water (dripping or splashing) and no objects filled with liquids, such as vases, should be placed on the unit.
- Keep the product away from direct sunlight and heat source such as radiators or stoves.
- Do not block the ventilation openings. Slots and openings on the unit are provided for ventilation. The openings should never be blocked by placing your product on a cushion, sofa or other similar surface.
- Do not place the product on unstable cart, stand, tripod, bracket or table. The unit may fall, resulting in possible damage or injury.
- Only use the AC adapter included with product. Using any other adapter will void your warranty.
- Unplug the power from the outlet when the unit is not in use.
- Attention should be drawn to the environmental aspects of battery disposal.
- WARNING: The battery (battery or batteries or battery pack) shall not be exposed to excessive heat such as sunshine, fire or the like.
- WARNING: Only use attachments/accessories specified provided by the manufacturer, the product is supplied by AC adapter, the AC adapter is used as disconnect device, the disconnect device shall remain readily operable.

The symbol indicates that dangerous voltages constituting a risk of electric shock are present within this unit
The symbol indicates that there are important operating and maintenance instructions in the literature accompanying this unit.

CAUTION:
When the apparatus was in electrostatic circumstance, it may be malfunction and need to reset by user.
ENGLISH

This marking indicates that this product should not be disposed with other household wastes throughout the EU. To prevent possible harm to the environment or human health from uncontrolled waste disposal, recycle it responsibly to promote the sustainable reuse of material resources. To return your used device, please use the return and collection systems or contact the retailer where the product was purchased. They can take this product for environmental safe recycling.
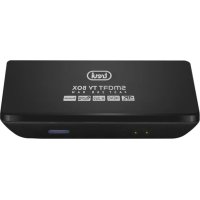
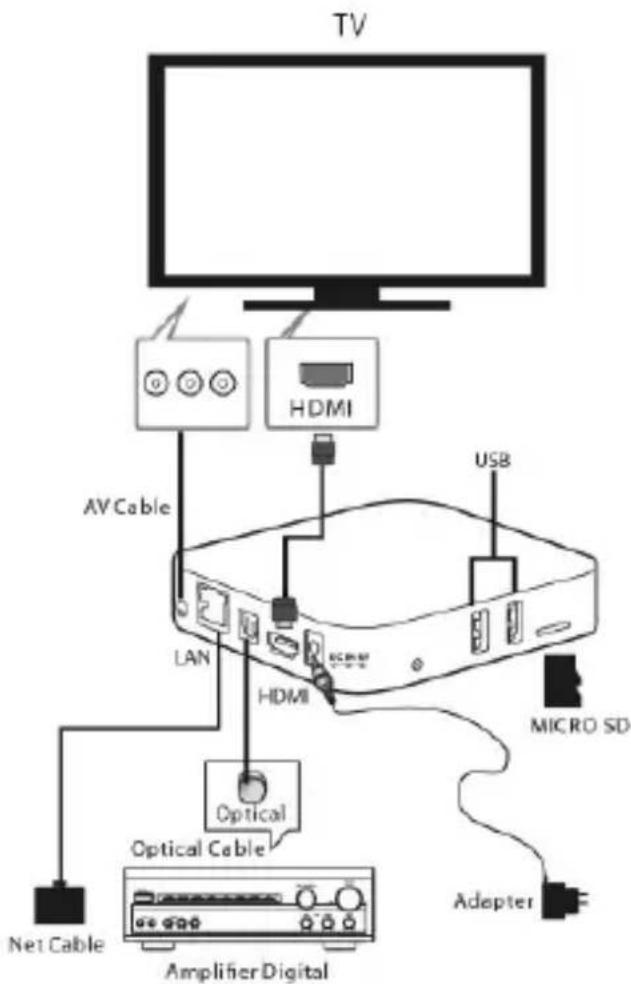
FRONT AND REAR PANEL


- Remote Control Sensor: Used to receive the signal from the remote controller.
- Stand-by button: Switch between standby and operation mode.
- AV Output: Outputs composite video signal(CVBS) and analog audio L/R signal, only available when set Video Output mode to 480i or 576i.
- Ethernet LAN RJ45: 10/100M Ethernet interface for local network connection.
- Optical: Connects to a optical socket on your surround sound system.
- HDMI Output: Connects to HDTV for HD video input.
- DC IN 5V: Connects to external +5V power supply adapter.
- Reset function.
- USB Jack: Connects to external USB devices such as USB flash drive, mobile HDD digital audio/video players,mobile phone,mouse,keyboard etc.
10.Card Reader Slot: Micro SD card slot.
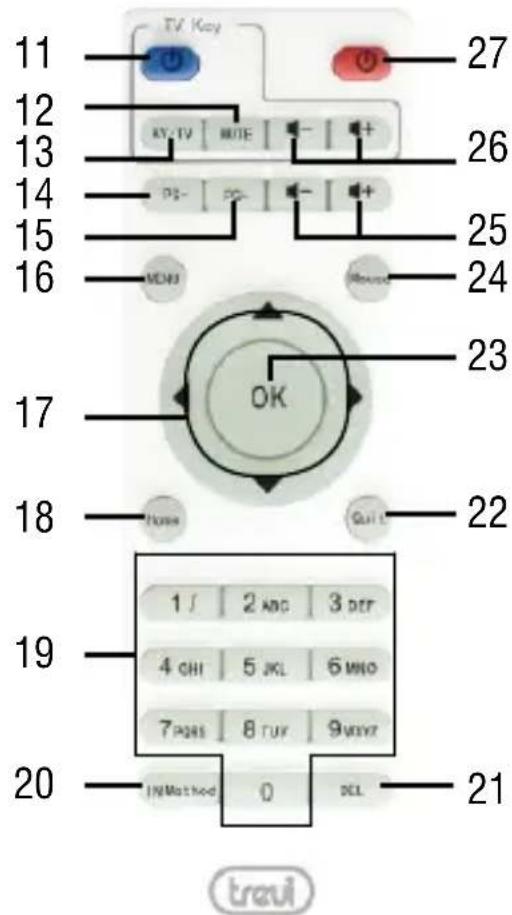
REMOTE CONTROL
- : Power Switch/ power key.
- MUTE: Turn off volume rapidly.
- AV/TV: TV Video input.
- PAGE DOWN: Fast Switch page.
-
PAGE UP: Fast Switch page.
-
MENU: Unload any software.
- NAVIGATION KEYS: Move highlight.
- HOME: For any page, press Menu key to enter main page.
- 0-9: Enter value in on-screen menu.
- INPUT METHOD: Fast Enter setting page.
- DEL: Delete Input error information.
- QUIT: Return to previous step/Exit.
- OK: to confirm and Activate the highlighted menu item.
- MOUSE: To enable moving fast by arrow (using the navigation keys), press again to enable the displacement step.
- Vol+/Vol-: Increase/decrease volume IP 365.
- Vol+/Vol-: Increase/decrease volume TV.
- : Power Switch/ power key IP 365.
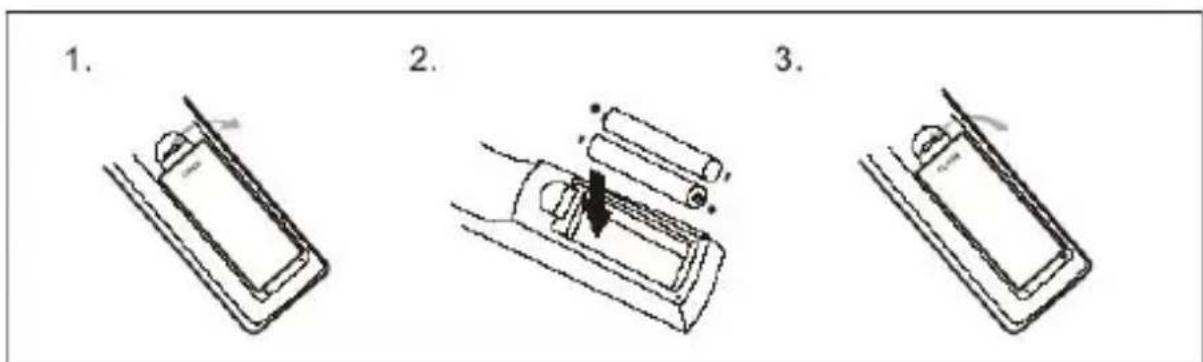
Installing the Batteries
Remove the battery cover from the Remote Control and put 2xAAA size batteries inside the compartment. The diagram inside the Battery Compartment shows the correct way to install the batteries.
LEARN REMOTE CONTROL LEARNING METHODS
- Long press “ ”of remote control’ TV keypad for 5 seconds until red indicating light of remote control turn into keeps on, showing learning state;
- Press the learning key, red indicating light blinking, showing learning receive state;
- Hold studied remote control, point at remote control of Set Top Box, and press studied key with about 3-5 mm distance;
- Red indicating light keeps on after three times flashing rapidly when having a successful
learning, press key for other studies;
- Red indicating light flashes five times rapidly along with learning failure and then return to learning state
CONNECTIONS
Installation
- To turn on the device, connect the supplied power adapter to the power of the IP 365 Power (27) and the other end to the wall outlet.
- Connect one end of the HDMI cable to 'IP 365 via the socket (6), connect the other end to the HDMI socket of your TV.
- Press the On/Standby (27) on the remote control; the indicator LED color Red (2) will turn solid blue. Turn on the TV.
- Wait a few seconds for the device loads the operating system.
WARNING: The unit is factory set with video output on HDMI, if you want to use the composite AV output (cable not included), first connect the unit to a TV via HDMI and then from the menu "Settings"/"Display"/"Output mode", select the video resolution to 480i or 576i.
Shutdown:
- Turn off your device, press the power button/Stand-by (27) on remote, wait a few seconds and the Blue LED will become red.
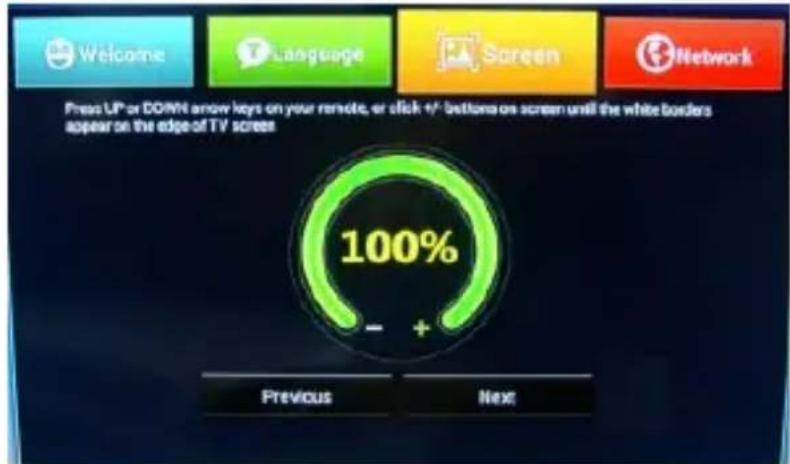
Regulation framework:
At first power you will be asked to set some parameters such as language, the connection to the network and regulation of the framework.
Adjust the image according to your TV; to adjust the picture, select “-” to tighten, select “+” to enlarge.
USER OPERATIONS
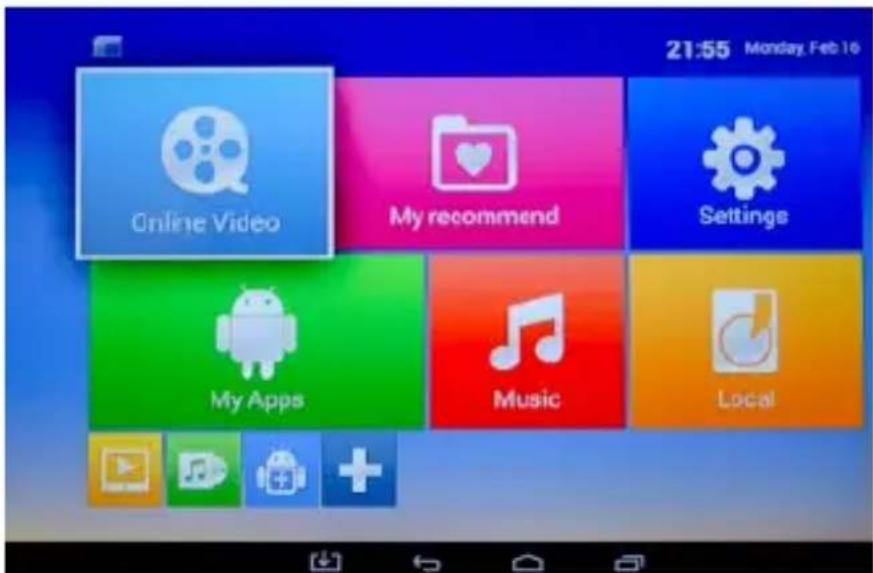
HOME menu
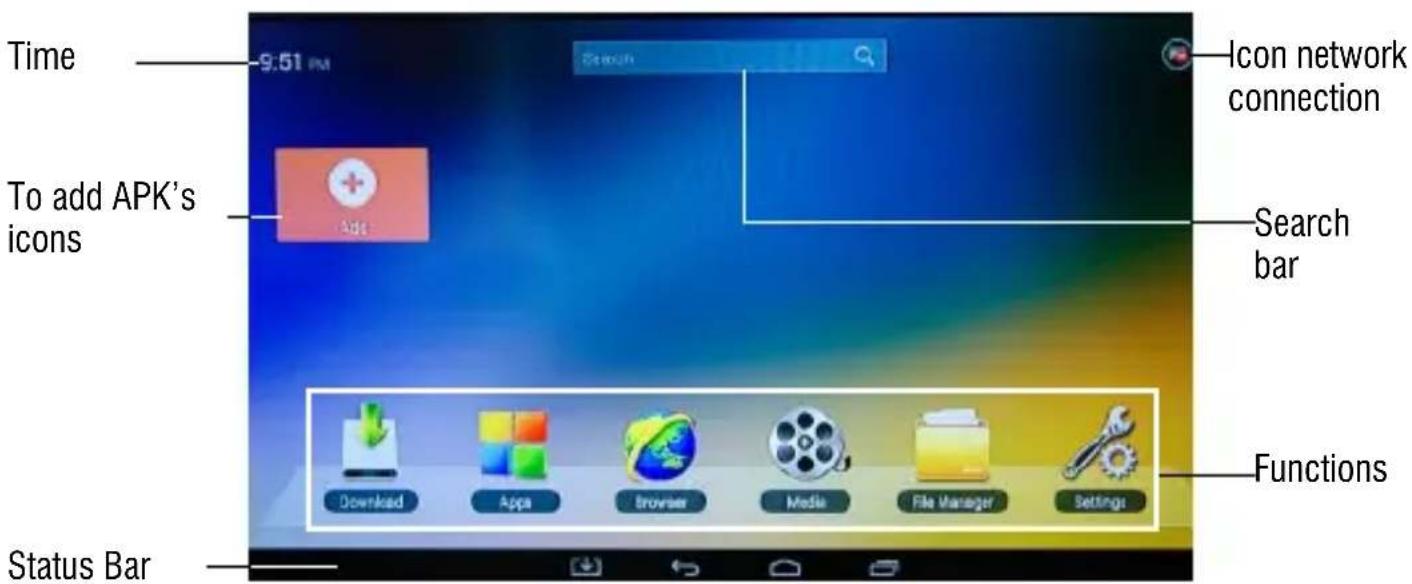
Note: The user can select the applications with the navigation keys (17) and open them with the OK button, or by pressing the mouse (24), an arrow will appear which you can move quickly using the navigation keys (17) and confirming with OK (23).
You can also set a User interface main much easier and faster in the selections.
How to change the graphical interface to the main screen:
- Select the "Settings".
- Select "Other" and then "More Settings".
- Select "Home" and put the blue dot is present on the left box, the item "MediaBox launcher"
- Select the icon the status bar.
- The user interface will change as in the following image:
CONNECTION TO NETWORKS
Wireless & networks
To access the Internet, first of all, you must configure a network that can use a Wi-Fi Access Point (AP) or a wired cable via LAN socket. Choosing it accesses settings Wireless and Ethernet.
Connection via LAN socket:
- Connect the LAN cable coming from your modem router, the LAN socket (4) unit.
- Select the "Setting".
- Select Ethernet, you will see a check mark on the box to the left (LAN connection is enabled). After connecting, you will see the address IP network and you can naviagre make any further settings.
Search and connect to a Wi-Fi network:
To make a connection of this type must be in a Wi-Fi zone.
- Select "Setting".
Enabling/disabling Wi-Fi:
- Select "Wi-Fi", the square on the left will be marked with a tick green (the Wi-Fi is activated)
- To cancel, select "Wi-Fi", the square on the left will be taken away green check mark.
- Activating the "Wi-Fi", the 'IP 365 will automatically activate a search for Wi-Fi networks available and will show on TV.
- Select the network and confirm with OK (23), if protected, enter the password clicking the window surrounded by green and use the virtual keyboard. Using the Virtual Keyboard.
- Click on the "Connect Now" and wait until you see the message "Wi-Fi Connected".
- You can also manually set a network if you know the SSID of the network by simply clicking on the "Setting" - "Other" - "More settings" - "Wi-Fi" and selecting the "+" icon.
SPECIAL FUNCTIONS
This device is equipped with features like Bluetooth, MIRACAST and MEDIA CENTER for sending and receiving files without the use of cables.
BLUETOOTH:
IP 365 is equipped with a Bluetooth system for transmitting/receiving files between the device and other devices with this feature.
Bluetooth Activation:
- From the main page click "Settings" - "Other" - "More settings" and select the "Bluetooth" icon. Turn Bluetooth bringing ON the switch at the top right.
- To turn off the Bluetooth connection, turn the control to OFF.
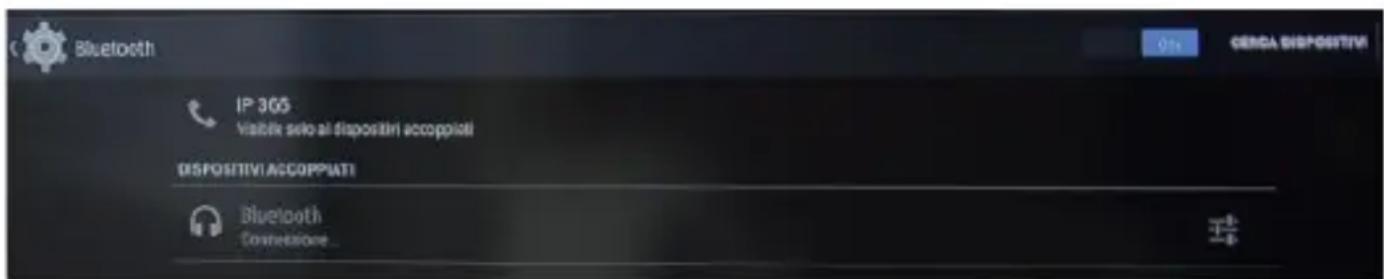
Search devices:
- Once activated Bluetooth, the device will automatically start a search of available devices. If you want to perform a new search, select "Search for Devices" at the top right.
- You will see a list of all devices available.
Pairing with devices:
- From the list displayed select the device to be coupled. After connection under the name of the device will display "Connected".
- If a PIN is required, this should be indicated in analyzer which you're trying to pair, if
not try "0000" or "1234".
- After mating is possible to transmit / receive files between IP 365 and other devices.
MIRACAST:
Miracast is a new standard for transmission of multimedia files (photos, video and music) without cable, which allows the user to connect via Wi-Fi Direct technology an Android device to the TV last generation. With Miracast your device will be closely connected to the TV screen and will need to keep the display on the smartphone or tablet to view its screen directly on TV.
CAUTION: TO OPERATE PROPERLY, SMARTPHONE OR TABLET MUST HAVE AS SYSTEM REQUIREMENTS OS ANDROID 4.2.2 OR HIGHER WITH WIRELESS DISPLAY SUPPORT.
Miracast Activation:
- Connect the IP 365 and the external device (smartphone or tablet) to the same Wi-Fi network
-
On your external device (smartphone or tablet), activate the function Miracast or "Wireless Display" or Mirroring Display ("refer to the instructions manual of your device for the correct name and the activation procedure).
-
On IP 365, from the main page click "Apps" and select the icon Miracast. The unit will search for devices.
- On external device (Smartphone or Tablet) appear Trevi IP 365, select it.
- The TV will show a confirmation screen, select OK and wait a few seconds for the connection. Now all the images on External device will appear on the TV.
Disabling Miracast:
- On the external device (smartphone or tablet) select Trevi IP 365 and then "Disconnect" on the next screen.
MEDIA CENTER:
This function allows you to view directly on your TV files on other devices (such as PC or console) connected by DLNA network.
Note:The connected devices must be turned on in order to choose and view files using IP 365
- From the main page click "Apps" icon and select Media Center, you will open the following screen:
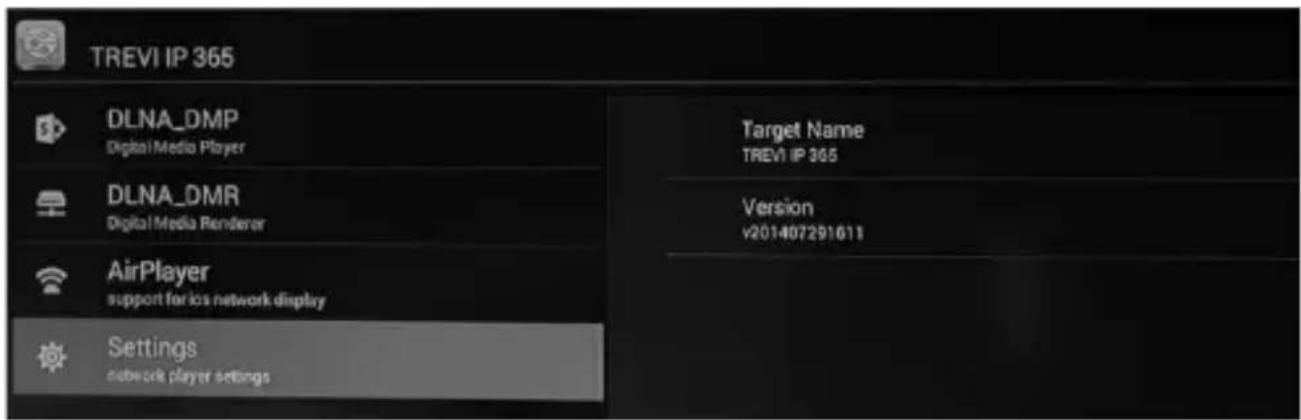
- Selecting DLNA_DMP (Digital Media Player) will display the list of devices networked, just select the one you want to display the file that contains and play them on TV.
- Selecting DLNA_DMR (Digital Media Rendered) you can set the DMR.
- Select AirPlayer if you have Apple devices. AirPlayer is an Apple 's application dedicated users. With AirPlayer you can play the video devices apple directly on TV. Adjust the settings.
MENU
The menu of the device will allow you to set and adjust some parameters.
- From the main page select the "Settings" to enter the Menu appliance.
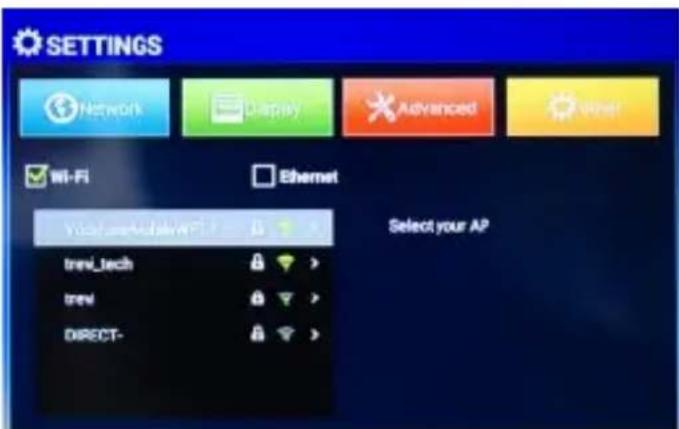
- Under NETWORK you can choose the type of Connection to the preferred network (Wi-Fi, Ethernet) and enter the password of the Wi-Fi network.
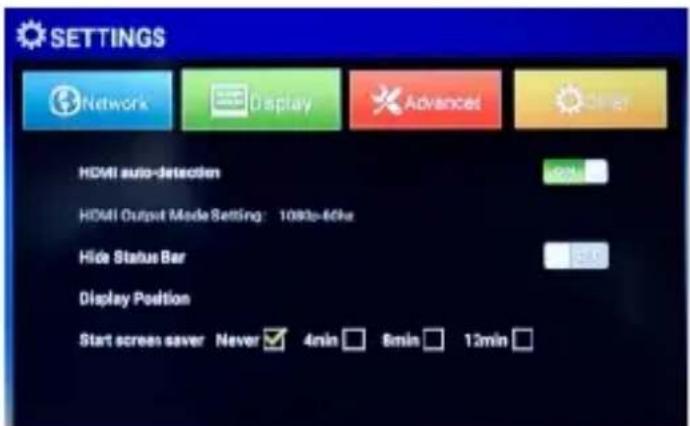
- Under DISPLAY you can set the HDMI output, or not to activate the display status bar, adjust the position of the display and set the time and activation screen saver.
H
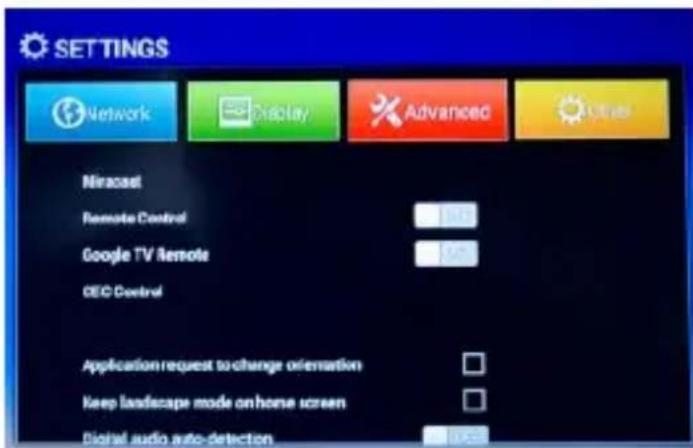
- Under ADVANCED you can enable/disable the following functions:
Miracast: activation function Miracast (same application).
Remote Control: displays the code to match a new remote control.
Google TV Remote: Enabling this feature you can use your Android device as a remote control, just install on your external device (smartphone or tablet) the APK "Google TV remote" on Play store. After launching the application, enter the code that will be shown on the IP 365, for instructions refer to the application downloaded.
CEC: Consumer Electronics Control. Allows communication of the control signals and control each component interconnected. In case all the components are connected through CEC of HDMI, is possible to transfer the commands to all components through a single control device. Commands include CEC Switch, One key Play, One key power off, change language automatically.
Application request to change orientation: Allows you to enable or disable some applications screen rotation if developed vertically instead of horizontally. It is advisable to keep the command disabled because the image vertically Fullscreen is more awkward to handle. Digital audio auto-detection: Enable/Disable the automatic sound detection.
Digital Audio Output: Adjustable only when "Digital Audio auto-detection" is set to OFF.
When not using the optical jack, set the audio output to "HDMI pass trough" otherwise you will not experience any sound from the TV.
SETTING
The Settings menu allows you to change the settings of your device from Android user interface.
- From main page click "Settings" - "Other" - "More settings". To return to the previous page or to cancel a command, press Quit (22) on the remote control.
Wi-Fi
To activate and search Wi-Fi networks. This will display a available Wi-Fi networks list, choose one and enter the password if required.
BLUETOOTH
To turn on and search Bluetooth devices. You will see a ldevices list, pair the IP 365 to a device and enter your PIN if requested.
ETHERNET
To enable and configure an Ethernet network.
DATA USAGE
The diagram showing the flow of used data and the applications list that have benefited the most.
OTHER
Possibility of using IP as 365 Portable hotspot or use a VPN.
HOME
Possibility to choose the user interface of Default main page (Launching ) and simplified ( Media Box Launcher ) for use without a mouse.
SOUND
To adjust the volumes, choose the ringtone notifications and activate the Touch sounds.
DISPLAY
To set the font size and activate the "Transmit screen."
STORAGE
You can control the space used and free ones in the internal memory of the device, those of any Micro SD card installed and perform safe removal or deletion of the Micro SD card. NOTE: The Pre-installed applications and the operating system Android OS occupy a considerable part of the capacity of the internal memory of the device, so it is normal to have a difference between "Free storage space" and "Total space".
APPS
You can manage the various applications on the device. To delete an application just select it and tap "Uninstall".
PERMISSION
you can activate/deactivate some permissions of different applications.
LOCATION
To allow or disallow the sending of your location data for Google search results and other Google services.
SECURITY
Settings to perform an encryption or set of security parameters.
LANGUAGE & INPUT
you can set the desired language, spelling, set some functions of the virtual keyboard and the pointer speed.
BACKUP & RESET
you can make a backup of your data or restore the device with the factory records.
DATE & TIME
you can set the date and time of the device, the time zone and format.
ACCESSIBILITY
you can set some parameters such as: Talk Back (which provides voice prompts to help users who are blind or visually impaired), Large Text, Auto Rotation, pronunciation of the password and Delay of touch.
ABOUTPHONE
Selecting this item, you can view all the information you need on the device.
PRECAUTION FOR CORRECT DISPOSAL OF THE PRODUCT

Precautions for correct disposal of the product.
The symbol shown on the equipment indicates that waste must be disposed of in "separate collection" and so the product must not be disposed of together with urban waste.
The user must take the product to special "separate waste collection centres" provided by local government, or deliver it to the retailer against the purchase of a new product. Separate collection of waste and subsequent treatment, recycling and disposal operations promotes the production of equipment with recycled materials and limits negative effects on the environment and on health caused by improper handling of waste. Illegal disposal of the product leads to the enforcement of administrative penalties.
TREVI pursues a policy of continuous research and development, the product may show different characteristics from those described.
TECHICAL SPECIFICATION
CPU AMLOGIC S805M, Quad core, ARM Cortex A5
FREQUENZA PROCESSORE 1.5GHz
RAM 1GB
INTERFACE USB(x2), Slot Micro SD Card, Rj45, HDMI, Optical
POWER DC 5V DC
CONSIGNES DE SECURITE'IMPORTANTES
Installation/Allumage:
CONSOMMATION DES DONNÉES
CPU AMLOGIC S805M, Quad core, ARM Cortex A5
FREQUENCY PROCESSEUR 1.5GHz
RAM 1GB
SYSTEME D'EXPLOITATION Android 4.4
STOCKAGE 8GB
INTERFACE USB(x2), Slot Micro SD Card, Rj45, HDMI, Optical
ALIMENTATION 5V DC
CPU AMLOGIC S805M, Quad core, ARM Cortex A5
FREQUENZPROZESSOR 1.5GHz
RAM 1GB
BETRIEBSSYSTEM Android 4.4
STOCKAGE 8GB
INTERFACE USB(x2), Slot Micro SD Card, Rj45, HDMI, Optical
STROM 5V DC
CPU AMLOGIC S805M, Quad core, ARM Cortex A5