
TW 7005 - Portable DVD Player Trevi - Free user manual and instructions
Find the device manual for free TW 7005 Trevi in PDF.


| Product type | Portable DVD player |
| Brand | Trevi |
| Model | TW 7005 |
| Dimensions (L x W x H) | 25 x 18 x 4 cm |
| Weight | 800 g |
| Power supply | Built-in rechargeable lithium-ion battery |
| Charging time | Approximately 3 hours |
| Battery life | 3 hours of continuous playback |
| Supported disc formats | DVD, DVD±R/RW, CD, CD-R/RW, MP3, JPEG |
| Screen | 7-inch (17.8 cm) TFT LCD screen, swivel |
| Screen resolution | 480 x 234 pixels |
| Outputs | 3.5 mm headphone jack, AV output (RCA) |
| Inputs | AV input (RCA) for external sources |
| Main functions | Playback of DVD, CD, MP3, JPEG; parental control; zoom; repeat; programming |
| Maintenance and cleaning | Clean with a soft, slightly damp cloth; do not use solvents |
| Safety | Do not expose to moisture; keep out of reach of children |
| Spare parts and repairability | Battery and power adapter available as options |
| General information | 1-year warranty; made in China |
Frequently Asked Questions - TW 7005 Trevi
User questions about TW 7005 Trevi
0 question about this device. Answer the ones you know or ask your own.
Ask a new question about this device
Download the instructions for your Portable DVD Player in PDF format for free! Find your manual TW 7005 - Trevi and take your electronic device back in hand. On this page are published all the documents necessary for the use of your device. TW 7005 by Trevi.
USER MANUAL TW 7005 Trevi
natural_image
Black triangular warning symbol with exclamation mark (no text or numbers)ATTENZIONE
NON ESPORRE A PIOGGIA E UMIDITÀ

natural_image
Black triangular warning symbol with exclamation mark (no text or numbers)ATTENZIONE: NON APRITE L'APPARECCHIO. ALL'INTERNO NON VI SONO COMANDI MANIPOLABILI DALL'UTENTE NE PARTI DI RICAMBIO. PER TUTTE LE OPERAZIONI DI SERVIZIO RIVOLGERSI AD UN CENTRO DI ASSISTENZA AUTORIZZATO TREVI

ATTENZIONE
natural_image
Illustration of a bookshelf with a black X symbol crossed out, no text or symbols present

natural_image
Technical line drawing of an internal device casing with labeled components (no text or symbols beyond numbers)natural_image
Pure electrical circuit lines without any symbols- PRESTARE MOLTA ATTENZIONE AI COLLEGAMENTI TRA UNITÀ PRINCIPALE E MONITOR.
- UN ERRATO CABLAGGIO DEI CAVI PUO' COMPROMETTERE IL FUNZIONAMENTO DEL DISPOSITIVO.
- EFFETTUARE IL CABLAGGIO SEMPRE CON LE UNITÀ SPENTE (INTERRUTTORI (2) E (I) SU OFF).
Thank you for choosing our portable DVD player.
The unit applies the latest state of art electronics and is designed for use at home, in hotels and in offices etc for relaxation. The compact size makes carrying easier. Please read the manual carefully prior to use and keep it well for later setup..
Package
DVD Player
Remote Control with battery
Audio/Video Cable
AC/DC Power Adapter
Cigarette Lighter Adapter
User Manual
Earphone
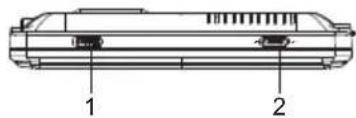
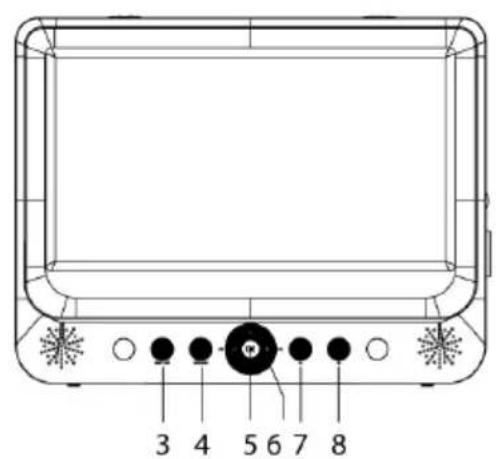
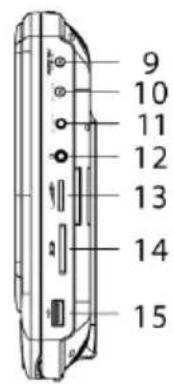
Main Unit Controls
natural_image
Technical line drawing of a device rear panel with labeled components (no text or symbols present)

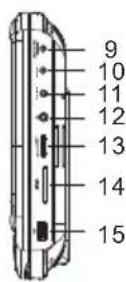
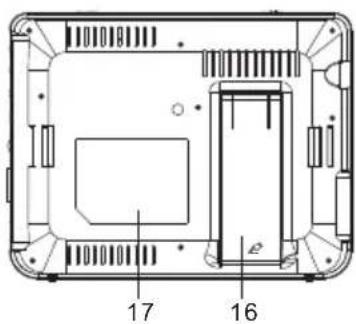
- Open knob
- Power ON/OFF switch
- SETUP button
- MODE button
- OK button
- ▲ (◀)/▼ (▶)/ (<)※ ▶)
- PLAY/PAUSE button
- STOP button
-
DC IN 9-12V
-
DC OUT
- AV OUT
- Earphone jack
- Volume knob
- SD card slot
- USB Port
- Bracket
- Rating label position
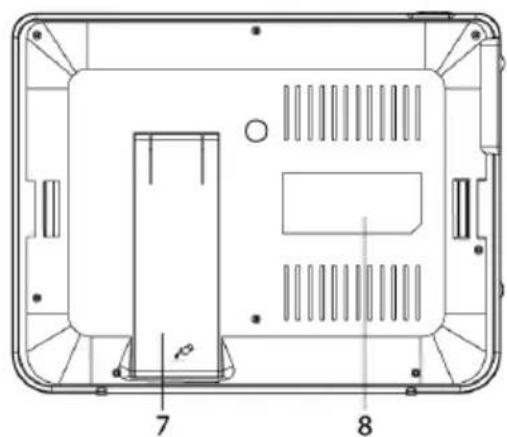
Monitor View
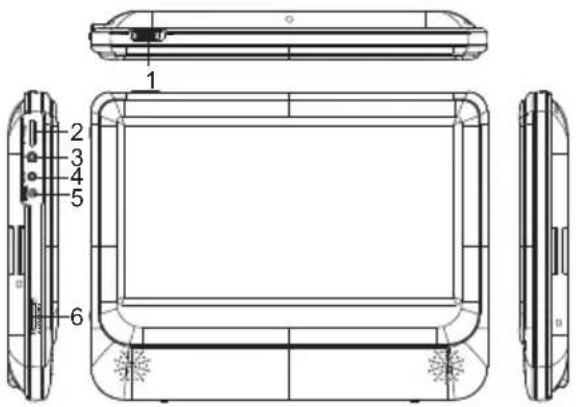
- Power ON/OFF
- Volume knob
- Earphone jack
- AVIN

- DC IN 9-12V
- Brightness knob
- Bracket
- Rating label position
System Connection
Powering and installation
Plug one end of the AC/DC power adaptor into the DC IN 9-12V jack on the right of the unit, then plug the other end into the AC power receptacle. Please refer to the following illustration.

If using car cigarette lighter adaptorto connect to the power: Plug one end of the cigarette lighter adaptor into the DC IN 9-12V jack on the unit, plug the other end into the car cigarette lighter socket. See illustration below.
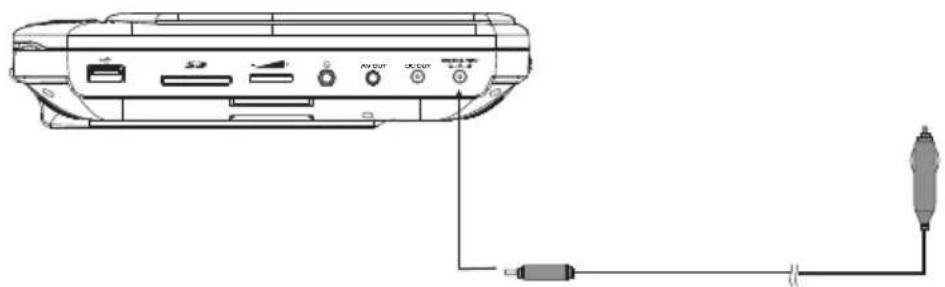
natural_image
Line drawing of a device rear panel with ports and connectors, connected to a cable (no text or symbols)Note:
- Car cigarette lighter adaptor is not recommended to recharge the battery.
2.Car cigarette light adaptor can only be used when the car power supply is 9-12V. - The mains plug is used as the disconnect device, the disconnect device should remain readily operable.
Connecting to monitor
The unit can also be connected to the external LCD monitor. Connect the unit to power by AC/DC adapter or cigarette lighter adapter. Then connect the unit DC OUTjack to DC IN 9-12V Jack of the LCD Monitor by a DC/AV cable. Also use this DC/AV cable to connect the AV OUT jack of the unit to AV IN jack of the Monitor. Please refer to the illustration below.
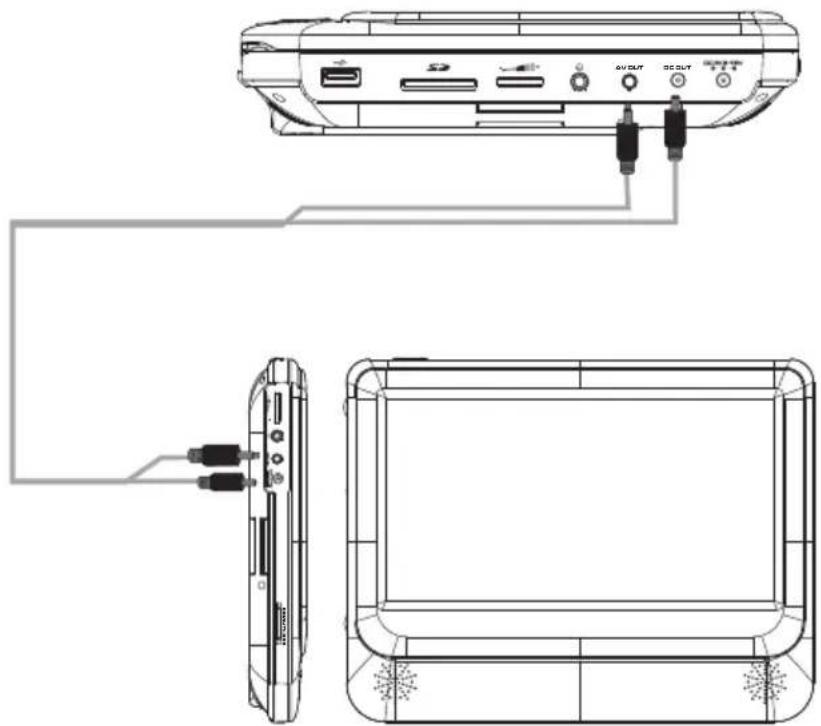
natural_image
Line drawing of a device rear panel connected to a screen, showing cable routing and ports (no text or symbols)Note:
You're advised to supply both units the power by the cigarette lighter adapteronly.
The AC/DC adapter is used to supply power of one unit only and as the charger to charge the main unit if it's with built-in battery.
CONNECTING TO A TV OR MONITOR
You can connect your DVD player to a TV or monitor via AV outso you can watch DVD on the TV or monitor.
Plug the end of the supplied AV cable that has one black connector into the AV OUT jack on your DVD player, the other end to connect to the connectors on an RCA cable (not included). Make sure colors on the connectors match. Plug the other end of the RCA cable into the AV jacks on the TV or monitor, making sure to match the colors on the connectors with the jacks. You may have to select the correct input on your TV or monitor.

In Car Installation
Preparation
- Remove the mounting kit and the DVD player from the seat when the DVD players are not in use.
- Take out all accessories including car mount kit from the car when the units are not in use.
To use the player in a car, attach the main unit and the second screen to the back of the front seat headrests.

A. DVD player fastening screw node
B. Viewing angle adjustment node
C. Buckle release button
D. Headrest mount bracket
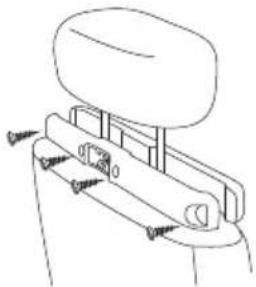
- Fix the headrest mount bracket on to the front seat headrest
natural_image
Technical line drawing of a mechanical assembly with mounting brackets and a cylindrical component (no text or symbols)A: Position the bracket on the bars of the headrest.
B: Faste n the screw t o fix the bracket firmly on the cars.
Note: There are 4 short screws for fixing the bracket on the 11mm metal bars, other 4 longer screws for 14mm metal bars.
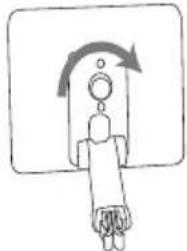
- Fix the DVD mount bracket to the portable DVD player.
natural_image
Simple line drawing of a hand holding a device with an arrow indicating rotation (no text or symbols)Note: there are three holes on the bracket. Use anyone as you like.
3.Aim the screw of the e brack et to the screw nut o n the back o f the DVD pl ayer. Screw tight the bracket onto the DVD player.
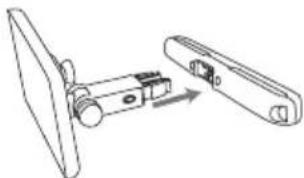
- Install the DVD player to the headrest.
natural_image
Technical line drawing of a mechanical assembly with no visible text or symbolsBuckle DVD bracket into the headrest mount bracket.
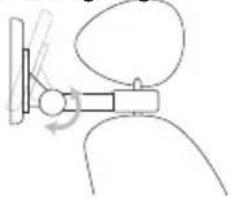
5. Adjust the viewing angle
natural_image
Simple line drawing of a human figure with a mechanical device and rotation arrow (no text or symbols)① Release the node.
② Adjust the viewing angle as desired.
③ Fasten the node.
- Press the release button to release the DVD player from headrest.

To attach the second screen, repeat the above steps.
The Remote Control
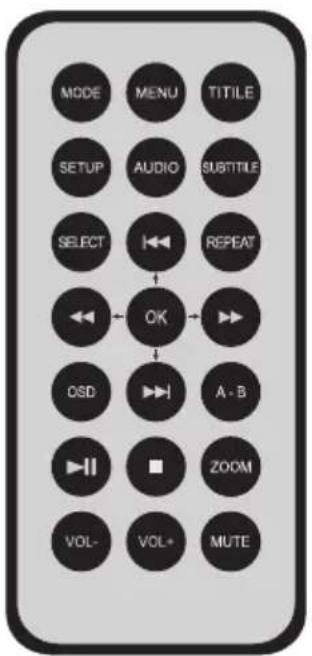
| MODE | To select the source |
| MENU | MENU Select once to open the main DVD menu. This option works only if the DVD has a main menu. |
| TITILE | Select to display the DVD title information. |
| SETUP | Press to open or close the Setup menu. |
| AUDIO | Select to select the DVD audio language. This option works only if the DVD has multiple audio languages. |
| SUBTITILE | Select to turn subtitles on and off, or select to select the subtitle language. This optionworks only if the DVD has subtitles. |
| SELECT | Select to search the chapter, title, or track. |
| REPEAT | Select to repeat the current title, chapter, or all. |
| In Menu mode, press to move up in a list or menu.In playback mode, press to go to the previous title, chapter, or track. | |
| In Menu mode, press to move down in a list or menu.In playback mode, press to go to the next title, chapter, or track. | |
| In Menu mode, press to move left.In playback mode, press to fast reverse the playback. | |
| In Menu mode, press to move right.In playback mode, press to fast forward the playback. | |
| OK | In menu mode, press to confirm a selection. |
| OSD | Select to display information about the disc, such as title, chapter number, tracknumber, and time. |
| A-B | Repeat a specific portion from point A to B, press it again to cancel repeat playing |
| Press to begin playback. Press again to pause playback. | |
| Press to stop disc playback. | |
| ZOOM | Select to enlarge the display image. |
| VOL-/VOL+/MUTE | To adjust the volume |
Basic Operation
Playing a DVD or CD
- Make sure that your player is connected to power.
- Slide the ON/OFF switch to the ON position.
- Press the OPEN button, the disc tray opens.
- Place a disc, label side up, then close the tray. The disc starts playing automatically.
Note:
Most DVDs and your DVD player have region codes that help control illegal distribution of DVDs.
You can only play DVDs with a region code of 1 or ALL. The region code for a DVD is printed on the DVD or the DVD packaging.
Setup menu operation
Your player has a Setup menu you can use to adjust settings.
To use the Setup menu:
- Press SETUP. The Setup Menu - Main page shows with General Setup Highlighted.
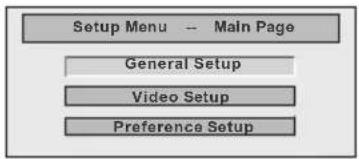
flowchart
graph TD
    A["Setup Menu -- Main Page"] --> B["General Setup"]
    B --> C["Video Setup"]
    C --> D["Preference Setup"]
- Press ◀ or ▶ to select the menu option you want, then press OK.
- Press ▲ or ▼ to select an option.
- Press or to change the setting, then press OK to confirm.
- Repeat Step 2 through Step 4 to change other menu options.
- Press SETUP to exit.
| Option | Sub-options |
| General Setup | TV Display:Selects the aspect ratio. You can select:Normal/PS :Select this option when the player is connected to a normal TV (4:3 aspect ratio). Wide-screen images are shown on the screen, but with some parts cropped automatically.Normal/LB:Select this when the player is connected to a normal TV (4:3 aspect ratio).Wide-screen images are shown on the screen with a black band on the top and bottom.Wide displays the video image full-screen when your player is connected to a widescreen TV (16:9 aspect ratio).Angle Mark:If this option is turned on and the DVD you are watching has multiple viewing angles, the icon appears in scenes that have multiple viewing angles.OSD Language:Selects the language for the Setup menu. You can select English, French, German,or Italian.Screen Saver:When this option is turned on, your player displays a screen saver when the same image stays on the screen for five minutes. |
| Video Setup | TV Type:Selects the TV type. Options are PAL (typically Europe) or NTSC (typically USA). The default is NTSC.Panel Quality:Select to adjust the following:Brightness:Increases the brightness to add more light to dark areas of the pict ure or decreases t he brightness to add more dark to light areas of the picture.Contrast:Increases the contrast level to adjust the white areas of the picture or decreases the contrast level to adjust the black areas of the picture.Hue:Increases the color level to add more green to skin tones or decreases the color level to add more purple to skin tones.Saturation:Adjusts the color saturation. |
| Preference | Audio:Selects the audio language. If the language you select is not recorded on the DVD, your player plays the default audio language.Subtitle:Select the subtitle language. If the language you select is not recorded on the DVD, your player displays the default subtitle language.Disc Menu:Selects the DVD menu language. If the language you select is not recorded on the DVD, your player displays the default language.Parental:Blocks DVD playback based on ratings. Select this option to set the parental control level. Options include: KID SAFE, G, PG,PG 13,PGR, R, Nc17, and ADULT. The default is ADULT.The password is pressing Stop(■)four times.Default:Reset all settings except the password and parental controls back to the factory default. |
Rechargeable Battery Use
The unit utilizes long-life Li polymer battery for portable power supply. The battery has no Memory Effect and thus can be recharged safely regardless of whether the battery is fully or partially discharged. It is enough to recharge no longer than 3H each time. Fully recharged battery can last about 2H with earphones on.
Note
The battery can not be charing when using, when turn off the light is red indicating charging, and the light turns yellow when fully charged.
Using And Maintaining Rechargeable Battery
- The normal working temperature is: 0^ € 40 ;
- Always unplug AC/DC power supply for the unit when not in use;
- It gets hot during playing, it's normal, while avoid long time playing and unattended;
- Avoid having the unit collide with any objects, and place away from all possible heat sources or damp areas.
Caution:
Danger of explosion if battery is incorrectly replaced. Replace only with the same or equivalent type and by professionals.
IMPORTANT SAFETY INSTRUCTIONS
- Read these instructions.
- Keep these instructions.
- Heed all warnings.
4 .Follow all instructions. - Do not use this apparatus near water.
- Clean only with a dry cloth.
- Do not block any ventilation openings. Install in accordance with the manufacturer's instructions.
- Do not install near any heat sources such as radiators, heat registers, stoves, or other apparatus (including amplifiers) that produce heat.
- Do not defeat the safety purpose of the polarized or grounding-type plug. The wide blade is provided for your safety. If the provided plug does not fit into your outlet, consult an electrician for replacement of the obsolete outlet.
10 .Protect the power cord from being walked on or pinched particularly at plugs, convenience receptacles, and the point where they exit from the apparatus. - Only use attachments/accessories specific by the manufacturer.
- Unplug this apparatus during lightning storms or when unused for long periods of time.
- Refer all servicing to qualified service personnel. Servicing is required when the apparatus has been damaged in any way, such as power supply cord or plug is damaged, liquid has been spilled or objects have fallen into the apparatus, the apparatus has been exposed to rain or moisture, does not operate normally, or has been dropped.
- To reduce the risk of fire or electric shock, do not expose this device to rain, moisture, dripping, or splashing, and no objects filled with liquids, such as vases, shall be placed on it.
- The wall plug is the disconnecting device. The plug must remain readily operable.

Warning: To reduce the risk of fire or electric shock, do not expose this apparatus to rain or moisture.
To avoid possible hearing damage, limit the time listening at high volumes
Troubleshooting
| PROBLEM | SOLUTION |
| No sound or distorted sound | Make sure the machine is connected properly.Make sure all cables are securely inserted into the appropriate jacks. |
| Can't advance through a movie | You can't advance through the opening credits and warning information that appears at the beginning of movies because the disc is programmed to prohibit that action. |
| The icon 🔒 appears on screen | The feature or action cannot be completed at this time because:1. The disc's software restricts it.2. The disc's software doesn't support the feature (e.g., angles)3. The feature is not available at the moment.4. You've requested a title or chapter number that is out of range. |
| Picture is distorted | The disc might be damaged. Try another disc;It is normal for some distortion to appear during forward or reverse scan. |
| No forward or reverse scan | Some discs have sections that prohibit rapid scanning or chapter skip;If you try to skip through the warning information and credits at the beginning of a movie, you won't be able to. This part of the movie is often programmed to prohibit skipping through it. |
SPECIFICATION
General
Power source: IN: 100-240V\~50/60Hz, 0.3A Max
OUT: 9V =-, IA
Car adaptor: 12V ---
Lithio Polymer battery 7.4V, 1100mAh
Power consumption:....10W
Frequency response: 20Hz a 20KHz
Video output: I Vp-p/75Ohm
Audio output: 1.4Vrms/10kOhm
Audio S/N: 80dB
Laser:......Semiconductor Laser, Wave Length:
650nm/795nm
Panel size: 9" - 22,4 cm
Operating temperature: ____da 0° a 40° centigradi
Dimensions DVD unit: 247x192x42 mm
Dimensions monitor unit: 246,5x191,6x30 mm
Weight DVD unit: 848gr
Weight monitor unit: 473gr
Video and Audio
Compatible video format: DVD, VCD,MPEG4
Compatible audio format: CD Audio, CDr, CDrw, MP3
Screen Ratio: 16:9

INFORMATION TO USERS
pursuant to Legislative Decree No. 49 of March 14, 2014
"Implementation of Directive 2012/19 / EU on Waste Electrical and Electronic Equipment (WEEE)"
This wheeled bin symbol on the product indicates that at the end of its life must be collected separately from other waste. The user must, therefore, take the remote control integrates the essential components that got to its life to the appropriate differentiated collection centers for electronic and electro-technical
waste, or return it to the dealer when purchasing a new appliance of equivalent type, in terms of one to one, or one to zero for equipment having longer side of less than 25 cm. Appropriate separate collection for the decommissioned equipment for recycling, processing and environmentally compatible disposal helps prevent negative impact on the environment and human health and promotes recycling of
the materials making up the product. Illegal dumping of the product by the user entails the application of administrative sanctions stated in Legislative Decree n. Legislative Decree No. 49 of March 14, 2014.
INFORMATION NOTE ON THE REMOVAL AND DISPOSAL OF BATTERIES
Warning: Only high-qualified personnel should perform this operation!
BATTERY REMOVAL
Warning: Danger of explosion if the battery is replaced incorrectly. Replace only with the same or equivalent type.
The appliance should not be plugged to the mains socket when performing this operation!
I. Remove the screws tightening the lower part of the appliance;
2. Select the battery shown by the arrow in the picture;
3. Disconnect and remove the battery.
Used batteries should not be disposed of with household waste or thrown into fire or water. Used batteries should be recycled or disposed of in separate waste collection centres.




natural_image
Technical line drawing of a device casing with internal compartments and mounting points (no text or symbols)

UTILISATION ET RECHARGEMENT DE LA BATTERIE


- ATTENZIONE
- NON ESPORRE A PIOGGIA E UMIDITÀ
- Package
- Main Unit Controls
- Monitor View
- System Connection
- Powering and installation
- Note:
- Connecting to monitor
- CONNECTING TO A TV OR MONITOR
- In Car Installation
- Preparation
- Adjust the viewing angle
- The Remote Control
- Basic Operation
- Playing a DVD or CD
- Setup menu operation
- Rechargeable Battery Use
- Note
- Using And Maintaining Rechargeable Battery
- IMPORTANT SAFETY INSTRUCTIONS
- To avoid possible hearing damage, limit the time listening at high volumes
- SPECIFICATION
- General
- Video and Audio
- INFORMATION TO USERS
- INFORMATION NOTE ON THE REMOVAL AND DISPOSAL OF BATTERIES
- BATTERY REMOVAL
- UTILISATION ET RECHARGEMENT DE LA BATTERIE
Brand : Trevi
Model : TW 7005
Category : Portable DVD Player