
IP 365 S8 - Media player Trevi - Free user manual and instructions
Find the device manual for free IP 365 S8 Trevi in PDF.
| Product type | Media player |
| Brand | Trevi |
| Model | IP 365 S8 |
| Power supply | 5V DC power adapter (included) |
| Dimensions (approx.) | 10 x 10 x 2 cm |
| Weight (approx.) | 150 g |
| Operating system | Android (version 4.2.2 or higher) |
| Video output | HDMI (up to 1080p), composite AV (480i/576i) |
| Audio output | HDMI, digital optical, AV (L/R) |
| Network connectivity | Wi-Fi 802.11 b/g/n, Ethernet 10/100, Bluetooth |
| USB ports | 2 USB ports (for keys, hard drives, wireless mouse/keyboard) |
| Memory card reader | Micro SD (dedicated slot) |
| Wireless functions | Miracast, AirPlay, DLNA Media Center |
| Remote control | Infrared, programmable to control TV (AAA batteries not included) |
| Remote control power | 2 AAA batteries (not supplied) |
| Power consumption | Low (5V adapter) |
| Operating temperature | 0°C to 40°C |
| Care and cleaning | Clean with a dry, soft cloth. Do not use chemicals. |
| Safety | Do not expose to water or moisture. Use the supplied adapter. Do not block ventilation openings. |
| Spare parts and repairability | Power adapter supplied. Remote control batteries available commercially. No user-serviceable internal parts. |
Frequently Asked Questions - IP 365 S8 Trevi
User questions about IP 365 S8 Trevi
0 question about this device. Answer the ones you know or ask your own.
Ask a new question about this device
Download the instructions for your Media player in PDF format for free! Find your manual IP 365 S8 - Trevi and take your electronic device back in hand. On this page are published all the documents necessary for the use of your device. IP 365 S8 by Trevi.
USER MANUAL IP 365 S8 Trevi
natural_image
Black computer mouse with glossy finish and white highlights (no text or symbols visible)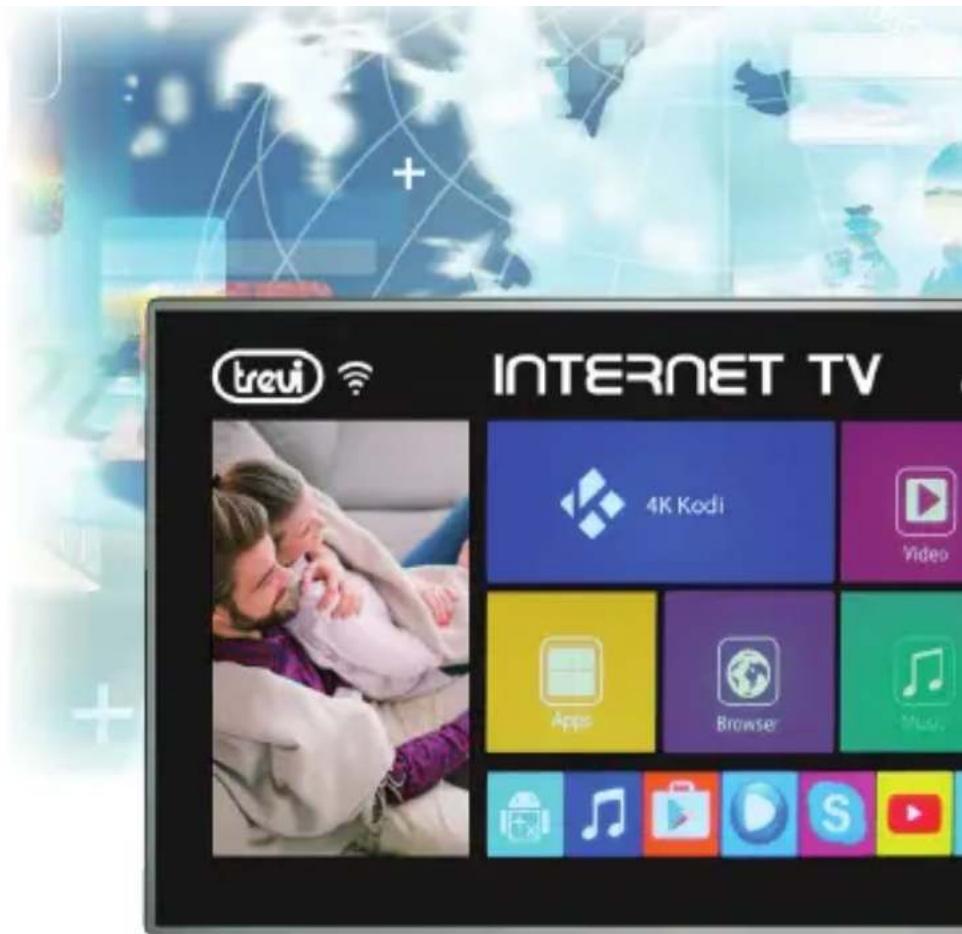
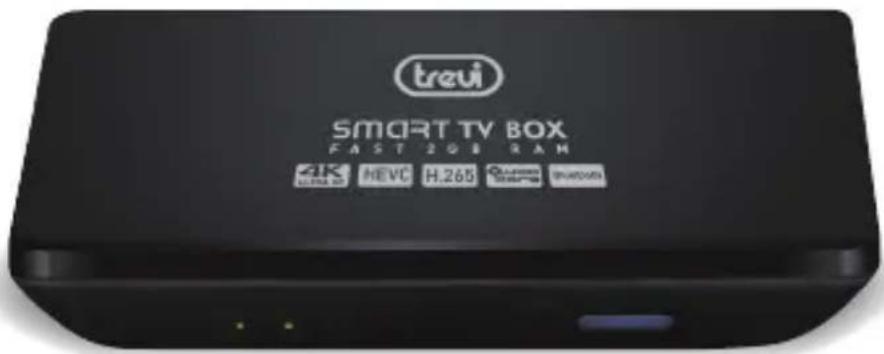
IP 365 S8
TV MULTIBOX
natural_image
Three technical line drawings showing a battery holder, a battery holder with a plug, and a battery holder with a plug (no text or symbols present)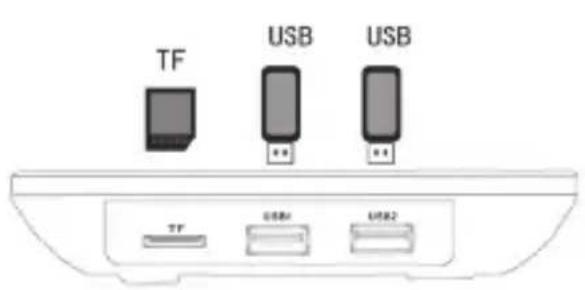
Video
natural_image
Grid of 16 colorful and nature-themed images including peacock, apple, candy, ladybug, flower, cherries, dog, and candy (no text or symbols)CPU......AMLOGIC S905X, Quad Core, ARM Cortex A53
FREQUENZA PROCESSORE....2GHz, 64bit
RAM 2GB
MEMORIA INTERNA....8GB
SISTEMA OPERATIVO ....Android 6.0
CLASSE DI POTENZA BLUETOOTH....2
POTENZA DI TRASMISSIONE BLUETOOTH .....1,9mW
POTENZA MAX DI TRASMISSIONE BLUETOOTH . 2,5mW
BANDA DI TRASMISSIONE BLUETOOTH....2,4GHz
WIFI STANDARD 802.11 b/g/n (2,4GHz)
FREQUENZE 2412-2472MHz (802.11b/g/n HT20)
2422-2462MHz (802.11n HT40)
RF OUTPUT POWER (EIRP)....11.78 dBm
MODULAZIONE ...... DSSS; OFDM
IMPORTANT SAFETY INSTRUCTIONS
- Please read and keep this Instructions
- To reduce the risk of electric shock, do not remove the cover or back. There are no user-serviceable parts inside. Refer servicing to qualified personnel.
• To prevent fire or electric shock hazard, do not expose the unit to rain or moisture. - Do not expose to water (dripping or splashing) and no objects filled with liquids, such as vases, should be placed on the unit.
- Keep the product away from direct sunlight and heat source such as radiators or stoves.
- Do not block the ventilation openings. Slots and openings on the unit are provided for ventilation. The openings should never be blocked by placing your product on a cushion, sofa or other similar surface.
- Do not place the product on unstable cart, stand, tripod, bracket or table. The unit may fall, resulting in possible damage or injury.
- Only use the AC adapter included with product. Using any other adapter will void your warranty.
- Unplug the power from the outlet when the unit is not in use.
- Attention should be drawn to the environmental aspects of battery disposal.
- WARNING: The battery shall not be exposed to excessive heat such as sunshine, fire or the like.
- WARNING: Only use attachments/accessories specified provided by the manufacturer, the product is supplied by AC adapter, the AC adapter is used as disconnect device, the disconnect device shall remain readily operable.


The symbol indicates that dangerous voltages constituting a risk of electric shock are present within this unit

The symbol indicates that there are important operating and maintenance instructions in the literature accompanying this unit.

CAUTION:
When the apparatus was in electrostatic circumstance, it may be malfunction and need to reset by user.
CONNECTIONS AND REMOTE CONTROL
-
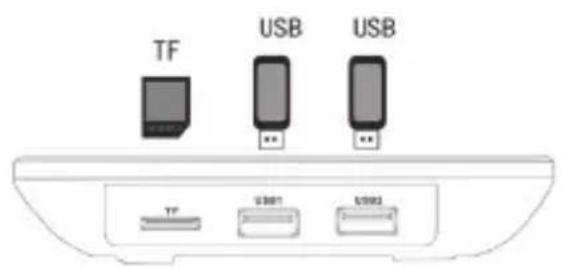
- USB Sockets: To connect external USB devices such as memory sticks, Hard External disk, wireless mouse, wireless keyboards, etc....
- Slot for Micro SD Cardi.
- AV Output: Composite video signal output (CVBS). cable not included.
- Power socket DC IN 5V: Connect the supplied power adapter.
- DIGITAL OPTICAL output socket: To connect your device Audio System surround.
- LAN RJ45 Ethernet: 10/100Mbps Ethernet interface for connection to the local network.
- HDMI: Video output for connection to HDTV.
REMOTE CONTROL
Installing the Batteries
Remove the battery cover from the Remote Control and put 2xAAA size batteries inside the compartment. The diagram inside the Battery Compartment shows the correct way to install the batteries.

natural_image
Three technical line drawings showing mechanical assembly steps (no text or symbols)- BUTTON: Power ON/OFF key.
- TV IN BUTTON: To select the TV inputs.
- SET BUTTON: To enter the TV settings.
- SETUP BUTTON: To go directly to the menu of the IP 365 S8 settings.
-
APP BUTTON: To enter directly into the application page.
-
BUTTON: To return to Main (Home) page.
- ▲▼◀▶ KEYS: Move highlight.
- BUTTON: To open the sub-menu folder in certain applications / functions.
- 0-9: Enter value in on-screen menu.
- 🙏 BUTTON: Resetting sound level.
- 📧 BUTTON: Delete Input error information.
- ⏻ MOUSE BUTTON: To enable moving fast by arrow (using the navigation keys), press again to enable the displacement step.
- OK BUTTON: to confirm and Activate the highlighted menu item.
- QUIT BUTTON: Return to previous step/Exit.
- VOL+/VOL-BUTTONS: Increase/decrease volume IP 365 S8.
-26. VOL+/VOL-BUTTONS: Increase/decrease volume TV. - ⏻ BUTTON: Power ON/OFF TV.
LEARN REMOTE CONTROL LEARNING METHODS
- Long press “” (27) of remote control’ TV keypad for 5 seconds until red indicating light of remote control turn into keeps on, showing learning state;
- Press “ ⏻ ” (27) the learning key, red indicating light blinking, showing learning receive state;
- Hold studied remote control, point at remote control of Set Top Box, and press studied key with about 3-5 mm distance;
- Press the button ⏻ on TV's remote control, the light emits three quick flashes and then remain fixed (coupled with the command executed correctly).
- Proceed by selecting the button (12) and then the corresponding function on the remote control the TV.
- Same procedure for the keys (26).
- Once all 5 coupled keys wait for the light to go out alone. Now with 5 programmed keys you can operate your TV with the functions that you have paired.
CONNECTIONS
Installation
- To turn on the device, connect the power adapter supplied to the power socket DC (5) of the IP 365 S8 (27) and the other end to the wall outlet.
- Connect one end of the HDMI cable to socket (8), connect the other end to the HDMI socket of your TV.
- Turn on the TV and press power On/Off button (11) on the remote control.
- Wait a few seconds for the device loads the operating system.
WARNING: The unit is factory set with video output on HDMI, if you want to use the composite AV output (cable not included), first connect the unit to a TV via HDMI and then from the menu “Settings”/“Display”/“Screen resolution”, select the video resolution to 480 or 576.
flowchart
graph TD
    A["Monitor"] --> B["Cavo Office Slot"]
    B --> C["Amplification"]
    B --> D["Camera Office Slot"]
    D --> E["LAN"]
    D --> F["AV"]
    D --> G["OPTICAL"]
    D --> H["HD"]
    D --> I["DE IN"]
    J["Audio System"] --> K["Display"]
    L["Adaptation System"] --> M["Switch"]
Shutdown:
- To completely switch off the device press and hold for a few seconds the on/standby button (11) on the remote control, select Shutdown with the navigation keys (17) and press OK (23) to confirm. Wait a few seconds the Green Led on the front panel becomes Red.
Regulation framework:
At first power you need to set some parameters such as language, the connection to the network and regulation of the framework.
Adjust the image according to your TV; to adjust the picture, select "Setting"- "Display"- "Screenposition". Select "Zoom out" to tighten, select "Zoom in" to enlarge.

USER OPERATIONS
HOME menu
Connection to the network indicator
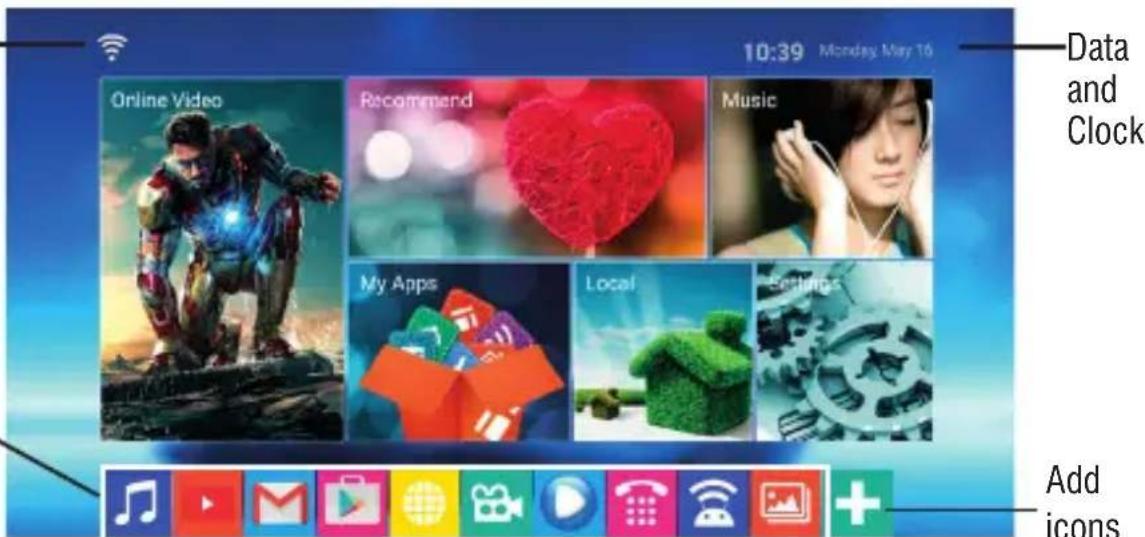
Application Icons
Note: The user can select the applications with the navigation keys (17) and open them -with the OK (23) button, or by pressing the mouse (22), an arrow will appear which you can move quickly using the navigation keys (17) and confirming with OK (23).
CONNECTION TO NETWORKS
Wireless & networks
To access the Internet, first of all, you must configure a network that can use a Wi-Fi Access Point (AP) or a wired cable via LAN socket. Choosing it accesses settings Wireless and Ethernet.
Connection via LAN socket:
- Connect the LAN cable coming from your modem router, the LAN socket (7) unit.
- Select the "Setting"- "Network".
- Select Ethernet and wait for the message “Connected” appears under the item “internet connection”.
Search and connect to a Wi-Fi network:
To make a connection of this type must be in a Wi-Fi zone.
- Select "Setting"- "Wi-Fi".
Enabling/disabling Wi-Fi:
- Select “Wi-Fi”, the unit will automatically activate a search of available Wifi networks and will show on the TV.
-
Select your favorite network and confirm with OK (23), if protected, enter the password using the virtual keyboard.
-
Click the Enter key on your keyboard and wait until you see the message “Connected successfully.”
- To disable the network: select the network connection and then the command “Delete network”.
SPECIAL FUNCTIONS
This device is equipped with features like BLUETOOTH, MIRACAST, AIRPLAY and MEDIA CENTER for sending and receiving files without the use of cables.
BLUETOOTH:
IP 365 S8 is equipped with a Bluetooth system for transmitting/receiving files between the device and other devices with this feature.
Bluetooth Activation:
- From the main page click “Settings” - “More settings” and select the “Bluetooth” icon. Turn Bluetooth bringing ON (turn green) the switch in the upper right.
- To turn off the Bluetooth connection, bring the command to OFF (becomes colored Grey).
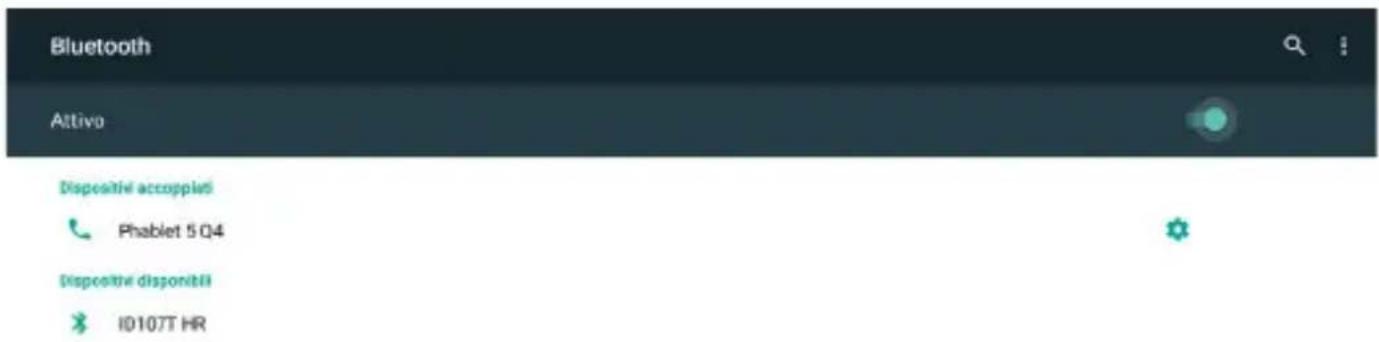
Search devices:
- Once activated Bluetooth, the device will automatically start a search of available devices. If you want to perform a new search, select command "Refresh" after you press the
Menu button (18) on the remote control.

- You will see a list of all devices available.
Pairing with devices:
- From the list displayed select the device to be coupled. After connection under the name of the device will display “Connected”.
- If a PIN is required, this should be indicated in analyzer which you're trying to pair, if not try "0000" or "1234".
• After mating is possible to transmit/receive files between IP 365 S8 and other devices.
MIRACAST:
Miracast is a new standard for transmission of multimedia files (photos, video and music) without cable, which allows the user to connect via Wi-Fi Direct technology an Android device to the TV last generation. With Miracast your device will be closely connected to the TV screen and will need to keep the display on the smartphone or tablet to view its screen directly on TV.
CAUTION: TO OPERATE PROPERLY, SMARTPHONE OR TABLET MUST HAVE AS SYSTEM REQUIREMENTS OS ANDROID 4.2.2 OR HIGHER WITH WIRELESS DISPLAY SUPPORT.
\_Miracast Activation:
- Connect the IP 365 S8 and the external device (smartphone or tablet) to the same Wi-Fi network.
- On your external device (smartphone or tablet), activate the function Miracast or “Wireless Display” or Mirroring Display“(refer to the instructions manual of your device for the correct name and the activation procedure).
- On IP 365 S8, from the main page click "Apps" and select the icon unit will search for devices.
- On external device (Smartphone or Tablet) appear Trevi IP 365 S8, select it.
- The TV will show a confirmation screen, select OK and wait a few second for the connection. Now all the images on External device will appear on the TV.
Disabling Miracast:
- On the external device (smartphone or tablet) select Trevi IP 365 S8 and select "Disconnect".
MEDIA CENTER:
This function allows you to view directly on your TV files on other devices (such as PC or console) connected by DLNA network or AIRPLAY (for Apple devices).
Note: The connected devices must be turned on in order to choose and view files using IP 365 S8.
- From the main page select “Apps” icon and select Media Center icon, you will open the following screen:
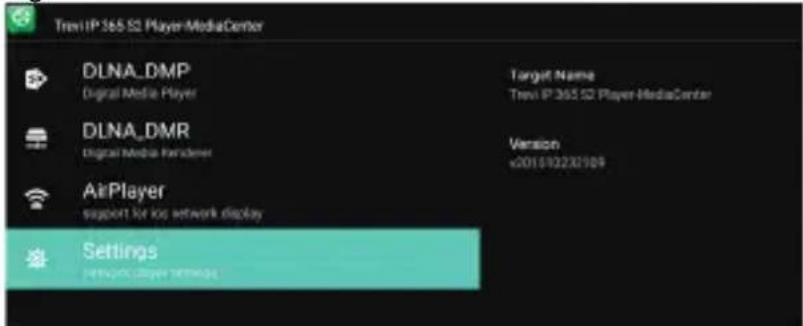
- Selecting DLNA_DMP (Digital Media Player) will display the list of devices networked, just select the one you want to display the file that contains and play them on TV.
- Selecting DLNA_DMR (Digital Media Rendered) you can set the DMR.
- Select AirPlayer if you have Apple devices. AirPlayer is an Apple's application dedicated users. With AirPlayer you can play the image and videos of your apple device directly on TV.
Note: The AirPlay function can be precluded due to continuous iOS software updates).
SETTING
The “Settings” menu allows you to configure or change the settings of your Android device.
- From main page select "Setting" - "More settings". To return to the previous page or to cancel a command, press ☑ Quit (24) on the remote control.
Wi-Fi
To activate and search Wi-Fi networks. This will display a available Wi-Fi networks list, choose one and enter the password if required.
BLUETOOTH
To turn on and search Bluetooth devices. You will see a Idevices list, pair the IP 365 S8 to a device and enter your PIN if requested.
DATA USAGE
The diagram showing the flow of used data and the applications list that have benefited the most.
MORE
Possibility of using IP 365 S8 as Portable hotspot or use a VPN net.
DISPLAY
To set the font size and activate the "Transmit screen."
To adjust the volumes, choose the ringtone notifications and activate the Touch sounds.
APPS
You can manage the various applications on the device. To delete an application just select it and tap "Uninstall".
STORAGE & USB
You can control the space used and free ones in the internal memory of the device, those of any Micro SD card installed and perform safe removal or deletion of the Micro SD card. NOTE: The Pre-installed applications and the operating system Android OS occupy a considerable part of the capacity of the internal memory of the device, so it is normal to have a difference between “Free storage space” and “Total space”.
MEMORY
Selecting this item you can view the status of your RAM memory and which apps are using the resources.
LOCATION
To allow or disallow the sending of your location data for Google search results and other Google services.
SECURITY
Settings to perform an encryption or set of security parameters.
ACCOUNT
Show how many and which accounts were registered on the device.
Show data related to the Google account registered on your device.
LANGUAGE & INPUT
you can set the desired language, spelling, set some functions of the virtual keyboard and the pointer speed.
BACKUP & RESET
you can make a backup of your data or restore the device with the factory records.
DATE & TIME
you can set the date and time of the device, the time zone and format.
ACCESSIBILITY
you can set some parameters such as: Large Text, Auto Rotation, pronunciation of the password and Delay of touch.
ABOUT PHONE
Selecting this item, you can view all the information you need on the device.
PRECAUTION FOR CORRECT DISPOSAL OF THE PRODUCT

Precautions for correct disposal of the product.
Thesymbolshownontheequipmentindicatesthatwastemustbedisposedofin
"separate collection" and so the product must not be disposed of together with urban waste. The user must take the product to special "separate waste collection centres" provided by local government, or deliver it to the retailer against the purchase of a new product. Separate collection of waste and subsequent treatment, recycling and disposal operations promotes the production of equipment with recycled materials and limits negative effects on the environment and on health caused by improper handling of waste.
Illegal disposal of the product leads to the enforcement of administrative penalties.
TREVI pursues a policy of continuous research and development, the product may show different characteristics from those described.
TECHICAL SPECIFICATION
CPU......AMLOGIC S905X, Quad Core, ARM Cortex A53
CPU FREQUENCY.....2GHz, 64bit
RAM 2GB
MEMORY 8GB
OPERATIV SYSTEM......Android 6.0
CLASS POWER BLUETOOTH....2
POWER TRANSMITION BLUETOOTH ....1,9mW
MAX POWER TRANSMITION BLUETOOTH....2,5mW
RF OUTPUT POWER (EIRP)....11.78 dBm
MODULATION ...... DSSS; OFDM
FUNCTION'S MODULATION .... DUPLEX
CLASS....CLASSE 1
CONNECTIVITY' WIRELESS MOUSE 2,4GHz
SENSOR OPTICAL MOUSE 800 - 1600 DPI
INTERFACE ...... USB(x2), Slot Micro SD Card, RJ45, HDMI, Optical
POWER....5V --- 2A
DIMENSIONS 120x120x23mm
WEIGHT 124
CONSIGNES DE SECURITE'IMPORTANTES
natural_image
Three technical line drawings showing mechanical assembly steps (no text or symbols)FONCTION APPRENTISSAGE TELECOMMANDE
Installation/Allumage:
CONSOMMATION DES DONNÉES
CPU......AMLOGIC S905X, Quad Core, ARM Cortex A53
CPU FRÉQUENCE....2GHz, 64bit
RAM 2GB
MÉMOIRE 8GB
OPERATIV SYSTEM......Android 6.0
CLASSE ÉNERGIE BLUETOOTH....2
PUISSANCE TRANSMITION BLUETOOTH......1,9mW
PUISSANCE MAX TRANSMITION BLUETOOTH....2,5mW
DIMENSIONS 120x120x23mm
POIDS....124g
natural_image
Three technical line drawings showing a battery holder, a hand holding a battery, and a final container with a handle (no text or symbols)CPU......AMLOGIC S905X, Quad Core, ARM Cortex A53
CPU FREQUENZ 2GHz, 64bit
RAM 2GB
ERINNERUNG 8GB
OPERATIV SYSTEM......Android 6.0
CLASS POWER BLUETOOTH....2
POWER TRANSMITION BLUETOOTH ....1,9mW
MAX POWER TRANSMITION BLUETOOTH...... 2,5mW
SENSOR OPTICAL MOUSE....800 - 1600 DPI
INTERFACE ...... USB(x2), Slot Micro SD Card, RJ45, HDMI, Optical
POWER....5V --- 2A
MASSE 120x120x23mm
WEIGHT....124g
natural_image
Three technical line drawings showing mechanical assembly steps (no text or symbols)flowchart
graph TD
    A["TV"] --> B["Amplification"]
    C["Cave Optical Split mode"] --> D["Amplification"]
    E["LAN"] --> F["AV"]
    E --> G["OPTICAL"]
    E --> H["HD"]
    E --> I["BU"]
    J["ACV bus bus"] --> K["ACV bus bus"]
    L["ACV bus bus"] --> M["ACV bus bus"]
CPU......AMLOGIC S905X, Quad Core, ARM Cortex A53
Simplified EU Declaration Of Conformity
Hereby TREVI S.p.a declares that the radio equipment model IP 365 S8 is in compliance with Directive 2014/53/EU. The full text of the EU declaration of conformity is available at the following internet address: www.trevi.it


natural_image
Black computer mouse with glossy finish and black outline (no text or symbols visible)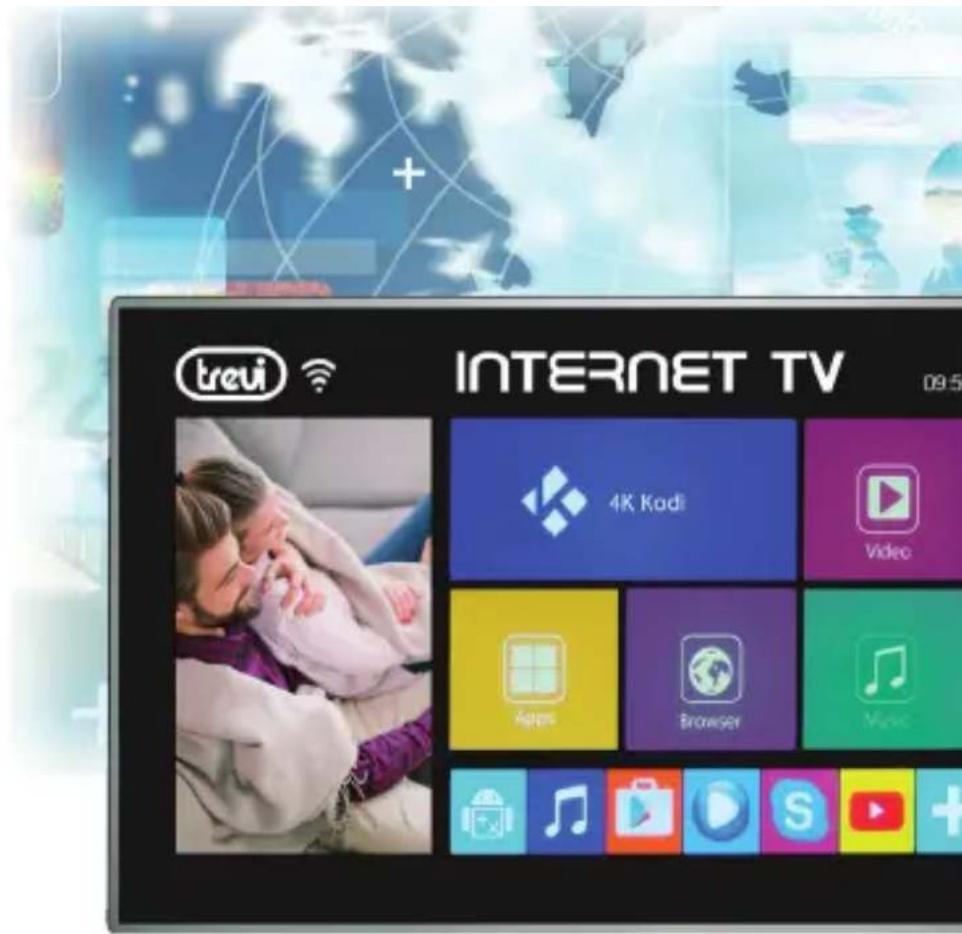
IP 365 S8
TV MULTIBOX

Trevi S.p.A.
Strada Consolare Rimini-San Marino, 62
47924 RIMINI (RN) Italy
Tel. 0541/756420 - Fax 0541/756430
www.trevi.it - E-mail: info@trevi.it
- IP 365 S8
- TV MULTIBOX
- Video
- IMPORTANT SAFETY INSTRUCTIONS
- CAUTION:
- CONNECTIONS AND REMOTE CONTROL
- REMOTE CONTROL
- Installing the Batteries
- LEARN REMOTE CONTROL LEARNING METHODS
- CONNECTIONS
- Installation
- Shutdown:
- Regulation framework:
- USER OPERATIONS
- HOME menu
- CONNECTION TO NETWORKS
- Wireless & networks
- Connection via LAN socket:
- Search and connect to a Wi-Fi network:
- Enabling/disabling Wi-Fi:
- SPECIAL FUNCTIONS
- BLUETOOTH:
- Bluetooth Activation:
- Search devices:
- Pairing with devices:
- MIRACAST:
- \_Miracast Activation:
- Disabling Miracast:
- MEDIA CENTER:
- SETTING
- Wi-Fi
- BLUETOOTH
- DATA USAGE
- MORE
- DISPLAY
- APPS
- STORAGE & USB
- MEMORY
- LOCATION
- SECURITY
- ACCOUNT
- LANGUAGE & INPUT
- BACKUP & RESET
- DATE & TIME
- ACCESSIBILITY
- ABOUT PHONE
- PRECAUTION FOR CORRECT DISPOSAL OF THE PRODUCT
- Precautions for correct disposal of the product.
- TECHICAL SPECIFICATION
- CONSIGNES DE SECURITE'IMPORTANTES
- FONCTION APPRENTISSAGE TELECOMMANDE
- Installation/Allumage:
- CONSOMMATION DES DONNÉES
- Simplified EU Declaration Of Conformity
Brand : Trevi
Model : IP 365 S8
Category : Media player