
PCLKMD1 - Other camera accessories SONY - Free user manual and instructions
Find the device manual for free PCLKMD1 SONY in PDF.
| Product Type | Control and editing software for Sony MD deck |
| Brand | Sony |
| Model | PCLKMD1 (MD Editor) |
| Category | Other camera accessories (software for MD deck) |
| Compatible operating systems | Microsoft Windows 95 |
| Minimum system requirements | IBM PC/AT compatible processor, 16 MB RAM, 5 MB hard disk space, RS-232C serial port, CD-ROM drive, VGA 256-color display |
| Connectivity | RS-232C serial port to CONTROL A1 jack of MD deck |
| Main functions | Disc and track titling, moving, dividing, combining, A-B erase, track erase, label printing, drag-and-drop recording from a CD player, CD playback programming |
| Compatible MD decks | Sony MDS-JA20ES, MDS-JB920 |
| Compatible CD players | Sony CDP-CE525, CDP-CA80ES, CDP-CX57, CDP-CX220, CDP-CX260 |
| Box contents | Software CD-ROM, RS-232C to mono mini jack connector, instruction manual |
| Dimensions (CD-ROM) | 120 mm diameter (standard) |
| Weight (CD-ROM) | Approximately 20 g |
| Power supply | None (powered by computer) |
| Maintenance and cleaning | Wipe the CD-ROM with a soft cloth; do not use solvents |
| Safety | Do not use a bidirectional LCD remote control during operation; do not turn off the MD deck while the software is running |
| Spare parts and repairability | Not applicable (software); replace the CD-ROM if lost |
| General information | Software licensed by Sony; use restricted to specified equipment |
Frequently Asked Questions - PCLKMD1 SONY
User questions about PCLKMD1 SONY
0 question about this device. Answer the ones you know or ask your own.
Ask a new question about this device
Download the instructions for your Other camera accessories in PDF format for free! Find your manual PCLKMD1 - SONY and take your electronic device back in hand. On this page are published all the documents necessary for the use of your device. PCLKMD1 by SONY.
USER MANUAL PCLKMD1 SONY
Operating Instructions EN
Mode d'emploi F
- Duplication of any or all of the contents of this software and instruction manual or lending of this software to third parties without the express permission of the copyright holder is strictly prohibited by copyright law.
- Sony cannot be held liable in any way for monetary losses, lost profits or claims from third parties arising from the use of this software.
- Should any manufacturing defects occur, Sony's responsibility shall be limited solely to replacing said defective merchandise.
- This software is approved for use only with the specified equipment.
- Sony reserves the right to change software specifications without prior notice.
Program © 1997-1998 Sony Corporation Documentation © 1998 Sony Corporation
© 1998 Sony Corporation All right reserved.
- Microsoft, MS-DOS and Windows are the registered trademarks of Microsoft Corporation.
- IBM and PC/AT are the registered trademarks of International Business Machines Corporation.
- Other companies and product names are the trademarks or the registered trademarks of each company.
Table of contents
Getting started
Overview 4
System requirements .... 5
Notes 6
Preparation
Checking the supplied items...... 7
Connections 8
Connecting an MD deck to your computer 8
Connecting a CD player to the MD deck....9
Installing the software ....10
Starting the software ....11
Operation
Names and functions of screen...... 12
MD operation screen......13
CD operation screen......15
Editing recorded MDs......17
Labeling recordings (NAME/TITLE function) ......17
Moving recorded tracks (MOVE function)....19
Dividing recorded tracks (DIVIDE function) ......20
Combining recorded tracks (COMBINE function)......21
Erasing a part of a track (A-B ERASE function) ......22
Erasing recordings (ERASE function) ......23
Printing MD labels......24
Assigning names to CDs (NAME function)....25
Recording from a CD to an MD......26
Programming the CD tracks .....27
Changing the disc icons ......29
Quitting the software ......29
Additional Information
Troubleshooting ....30
Index 31
Overview
When you connect a Sony MD deck* that includes a CONTROL A1 jack to your computer, you can use this software to operate the MD deck from the computer.
In addition to the normal MD playback operations, you can:
- Edit MDs while viewing the computer's display.
- Input disc names and track names using the computer's keyboard.
In addition, if you connect a Sony CD player** that includes a CONTROL A1 jack to the MD deck, you can also:
- Operate the CD player (playback) from the computer.
- Carry out drag and drop recording from a CD to an MD.
* Compatible models: MDS-JA20ES, MDS-JB920
** Compatible models: CDP-CE525, CDP-CA80ES, CDP-CX57, CDP-CX220, CDP-CX260
The CONTROL A1 jacks of the MD deck and CD player must be connected using the CONTROL A1 connection cord (monaural mini plug cord) supplied with the CD player (or sold separately).
To view the latest information concerning this software
The latest information about this software can be found in the "Readme.txt" file installed on the hard disc with the MD Editor software. Please be sure to read this file.
System requirements
The following hardware and software are necessary to use the MD Editor software.
IBM PC/AT or compatibles
Memory: 16 MB or more (32 MB or more is recommended.)
Video board and display driver:
VGA (640 · 480 pixels), 256 colors or more displayable.
Hard disk space: 5 MB or more.
CD-ROM drive
Serial port: 1 or more
OS: Microsoft Windows 95 (Microsoft Windows 3.1 and
- When using the timer to carry out recording and playback, please quit the MD Editor.
- When turning off the MD deck's power, please quit the MD Editor.
- Do not use a 2 way LCD remote commander while this software is activated.
- If you connect components other than an MD deck and CD player that support this software using a CONTROL A1 connection cord, do not operate these components other than to adjust the volume while this software is activated, as this may cause the software to misoperate.
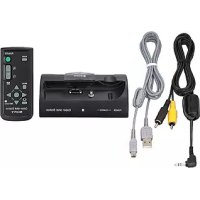
Checking the supplied items
Check to make sure that you have received the following supplied items with the MD Editor. If anything is missing, please contact the shop where you purchased this unit or your nearest Sony dealer.
natural_image
Simple line drawing of an electronic device with a VGA connector and a rectangular block (no text or symbols)• CONTROL A1 connection cord (monaural mini plug cord)

- CD-ROM (1)
- Operating instructions
Connections
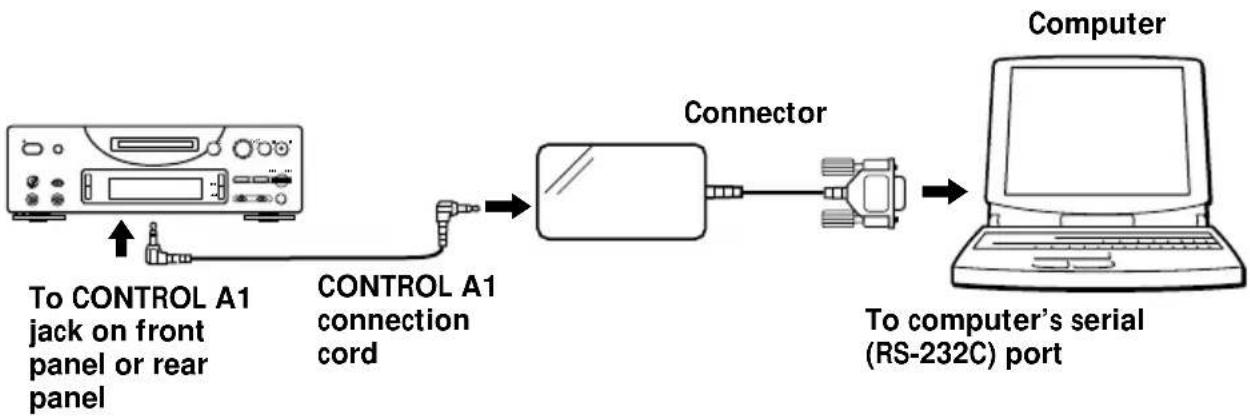
Connecting an MD deck to your computer
Connect a Sony MD deck that includes a CONTROL A1 jack to your computer using the provided connector and connection cord.
flowchart
graph LR
    A["To CONTROL A1 jack on front panel or rear panel"] --> B["CONTROL A1 connection cord"]
    B --> C["Connector"]
    C --> D["Computer"]
    D --> E["To computer's serial (RS-232C) port"]
Connect the computer's serial (RS-232C) port to the MD deck's CONTROL A1 jack.
When your computer and the MD deck are separated by distance
Please use a connection cord such as RK-G34 (optional) (3 meters).
Notes
- Please use the supplied connection cord and connector. Using a different type of connection cord or connector may result in damage.
- Please plug the cord in straight when connecting. Plugging the cord in at an angle may result in damage.
- Do not insert any metal objects into the connection jacks. Shorting may occur resulting in damage.
- Do not connect headphones to the CONTROL A1 jack. If connected, noise will be heard from the headphones and all CONTROL A1 functions will be inoperable.
Connecting a CD player to the MD deck
When you connect a Sony CD player (CDP-CE525, CDP-CA80ES, CDP-CX57, CDP-CX220, CDP-CX260) that includes a CONTROL A1 jack to the MD deck, you can control the CD player together with the MD deck.
Notes
- Be sure to follow the procedure below and connect the components correctly. If the connections are not correct, the CD operation screen will not appear.
- You can connect and operate only one CD player.
- When you connect a CD player, you cannot operate the computer's internal or an external CD-ROM drive, etc..
- When using this software to operate the CD player from a computer, be sure that the CD player's play mode is set to CONTINUE.
Connection method
For details of connection, please refer to the manual provided with each component.
1 Connect the CONTROL A1 jacks of the CD player and the MD deck using the CONTROL A1 connection cord supplied with the CD player (or an optional monaural mini plug cord).
2 Connect the digital (or analog) audio output jack on the CD player to the digital (or analog) audio input jack on the MD deck.
Note
When carrying out drag and drop recording referring to the procedure described in “Recording from a CD to an MD” on page 26, be sure to connect the digital audio jacks using an optical cable. If you carry out drag and drop recording with the analog audio jacks connected, the signal may not be recorded properly.
3 Set the CD player's command mode to "1".
Installing the software
Use this procedure to install the software onto your computer's hard disc. Set the computer to the operation mode before proceeding.
1 Insert the supplied CD-ROM into the computer.
2 Double-click on the CD-ROM's icon. The Setup icon appears.
3 Double-click on the Setup icon to start installation.
4 Carry out installation operation according to the messages that appear.
Eject the CD-ROM when installation is finished.
About the Database file
Installing the software creates a folder called the "Database" folder. Because this software uses this folder, please do not erase, move, or change the contents of this folder.
Uninstalling the software
1 Select "Start", "Settings", "Control Panel" menu to open the control panel, and double click on the "Add/Remove Program".
2 Select "Install/Uninstall" tag, select "MD Editor Ver 1.1" and press "Add/Remove..." button.
The dialog box appears.
3 Press "Yes" to uninstall the software.
Uninstaller starts and the software deletes automatically.
Starting the software
Use this procedure to start up this software.
Double click on the "MD Editor" icon.
This software is activated.
Registration of your name is only necessary the first time.
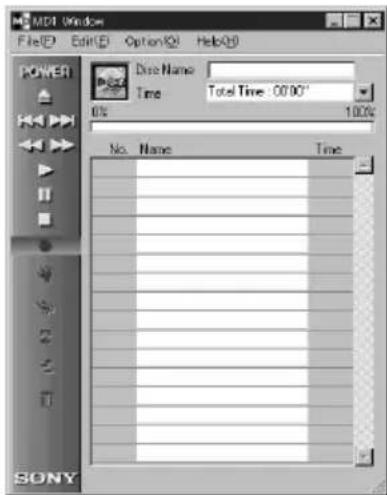
The following screen appears immediately after start up.
Setting up the serial port
Select "SerialSetup" from the option menu.
Select COM1, COM2, COM3, or COM4.
Notes
- When this software is started up, all playback or editing operations in progress on the MD deck will be stopped.
- After this software has been started up, MD deck operation will not be possible using the MD deck's controls or the remote's controls except for the I/⏻ switch. If you attempt to operate the MD deck, "REMOTE" appears in the MD deck's display. To use the MD deck's controls or the remote's controls, first quit this software and then turn the MD deck off and on.
- When this software is started up, the MD deck's PLAY MODE will be automatically set to CONTINUE, and the repeat mode will be canceled.
- When this software is started up, please do not turn the MD deck off.
Names and functions of screen
Screen examples
MD operation screen
CD operation screen
MD operation screen
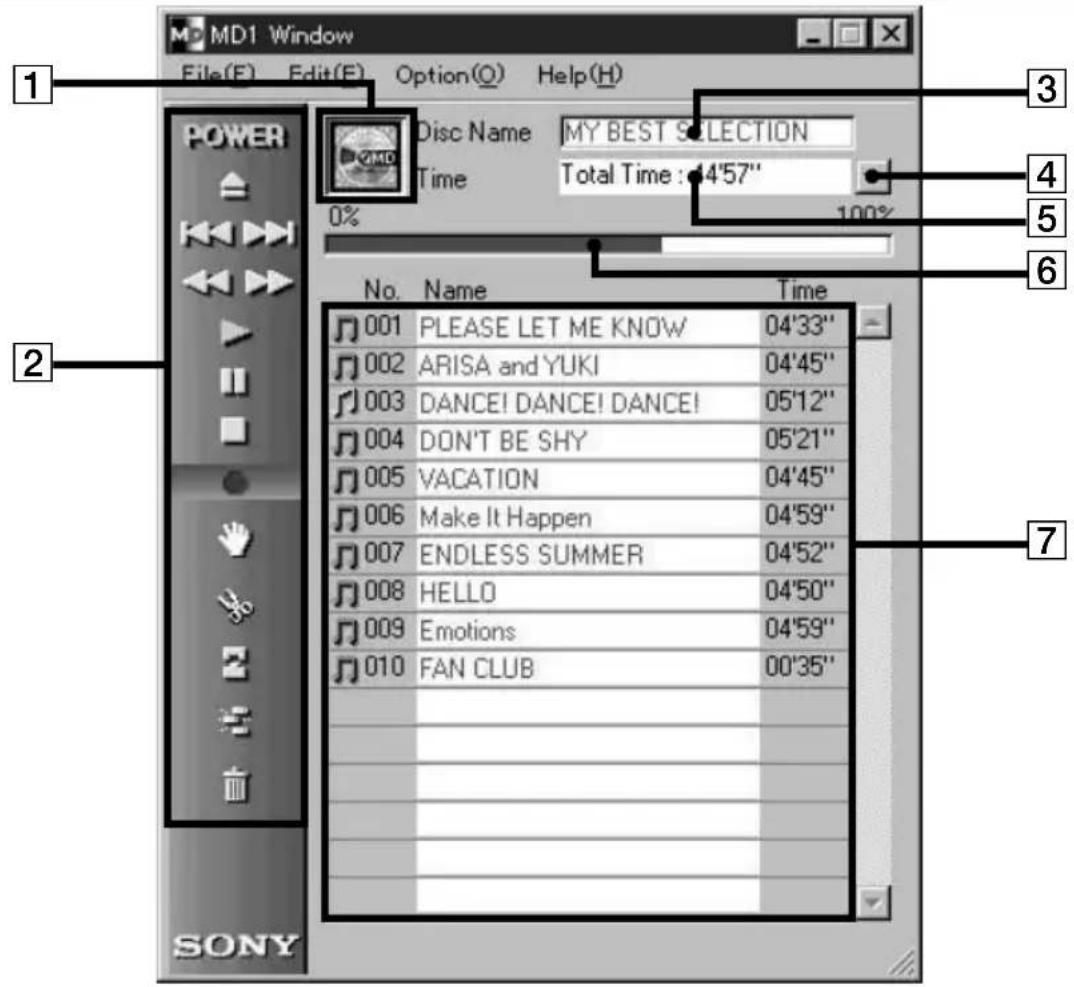
1 MD icon
Clicking on this icon selects all tracks on the disc. This function is convenient when you want to use the ERASE mode to erase all tracks (page 23).
2 MD operation panel
The input monitor mode and manual track marking mode can not be used.

: POWER switch
This lets you turn the MD deck on and off.

: MD eject button

: AMS *1 button

: Reverse/Fast forward button

: Play button
: Pause button
: Stop button
: Record button
*1 AMS = Automatic Music Sensor
This function searches for the beginning of tracks.
MD operation screen (continued)

: MOVE button
: DIVIDE button
: COMBINE button
: A-B ERASE button
: ERASE button
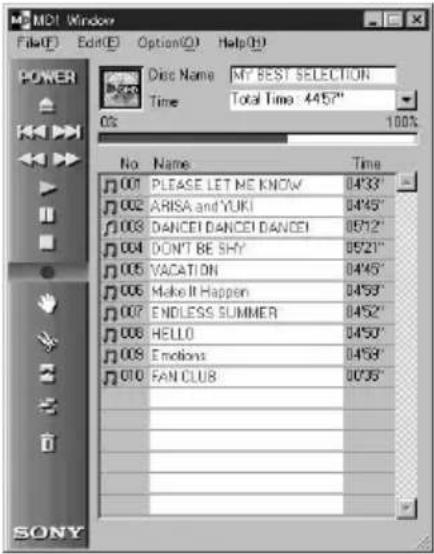
3 Disc Name display
4 Time display switching button
Used to switch between the Remain Time, Total Time, Track Elapsed and Track Remain displays.
5 Time display
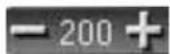
6 Disc capacity display
7 Track number, Track name, Time display
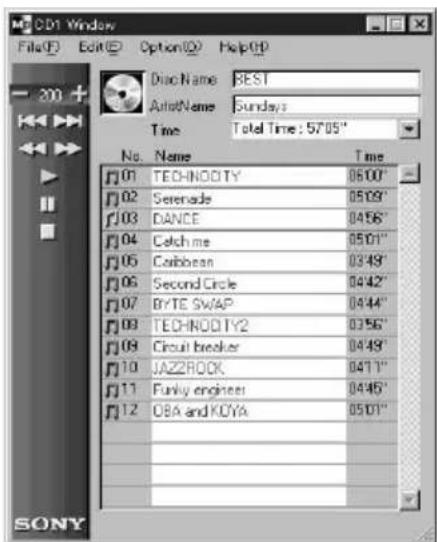
CD operation screen
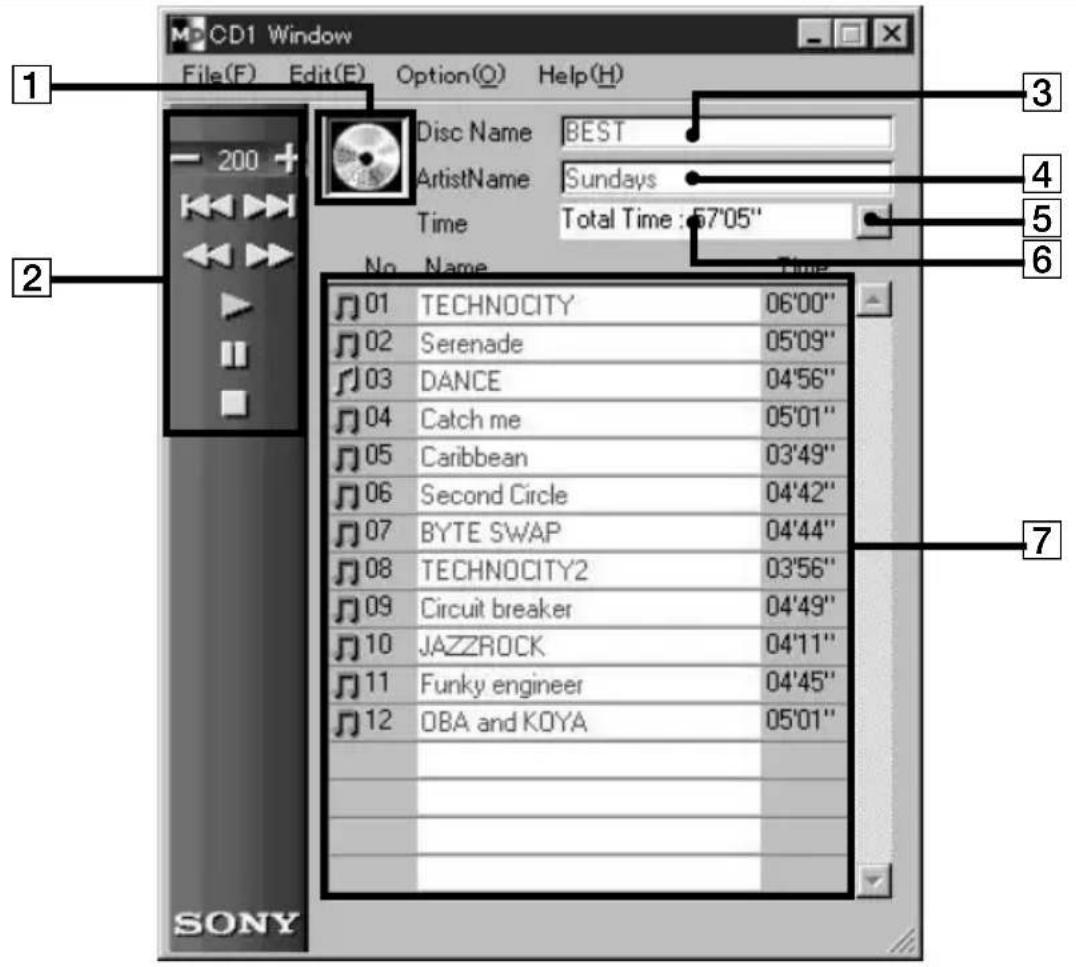
1 CD icon:
Clicking on this icon selects all tracks.
When recording onto an MD, dragging and dropping this icon onto the MD operation screen selects all tracks for recording.
② CD operation buttons
The input monitor mode and manual track marking mode cannot be used.
: DISC+/- buttons
(The number is the disc presently selected.)

: AMS *1 button
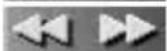
: Reverse/Fast forward button

: Play button

: Pause button

: Stop button
*1 AMS = Automatic Music Sensor
This function searches for the beginning of tracks.
CD operation screen (continued)
3 Disc Name display
4 Artist Name display
5 Time display switching button
Used to switch between the Remain Time, Total Time, Track Elapsed and Track Remain displays.
6 Time display
7 Track number, Track name, Time display
Editing recorded MDs
MD editing can easily be carried out using the computer.
For a detailed explanation of functions, please refer to the MD deck operating instructions.
Note
When this software is not used, and editing is carried out using the MD deck's controls, be sure to select and execute "Reload" on the option menu once you have finished editing. If not executed, the actual content of the MD may differ from its displayed content.
Labeling recordings (NAME/TITLE function)
1 On the MD operation screen, move the cursor to the disc name or track name display column and click on it.
2 Input the desired disc or track name.
To input the other names continuously, press the Enter key on the computer's keyboard after you once finish inputting the desired disc or track name.
Next title display changes edit mode automatically, and you can input the other names.
Notes
- You can only input the English alphabets, numbers and some symbols. If an MD encoded with the letters other than those above is played back, the correct letters will not be displayed.
- If the disc's write protect tab is set to protect, character input, recording, editing etc., will not be possible. Slide the record-protect tab so that recording is possible.
- Symbols that can be input are as follows.
Symbols other than these will not be displayed.
$$ !" # \% \& ^ {\prime} () ^ {*} +, -. /:; < = >? @ _ $$
(continued)
Labeling recordings (continued)
To input using the copy and paste function
You can input names by copying character strings which you have input and then pasting them in the desired location.
To use the text data input by other application (FLOW function)
If you input disc or track names beforehand using other text editing software, you can assign all names with one copy and paste operation.
1 Input the disc or track names by using other text editing softwares. Divide each name by pressing Enter key on the computer's keyboard.
(ex.)
disc name <enter>
track 1 name <enter>
track 2 name <enter>
:
track n name <enter>
2 Select all texts and copy it on the clipboard.
3 Click the disc name or 1st track name display to enter edit mode.
4 Select "Paste" from the edit menu.
The text is assigned in order from the point where edit mode was entered.
Moving recorded tracks (MOVE function)
1 On the MD operation screen, click on the track number of the track that you wish to move.
The track name's color you clicked changes. More than one track cannot be moved.
2 Click on on the operation panel.
The MOVE dialog box appears.

3 Input the track number of the location you are moving the track to.
4 Click "OK".
The selected track is moved to the designated location.
To cancel the MOVE function
Click "Cancel".
To move a track during playback
1 During playback of the track you wish to move, click on the operation panel.
2 Once the MOVE dialog box appears, carry out the operations in steps 3 and 4 above. If there is one other track selected during playback, that track will be moved.
To move a track by dragging
Drag and drop the track number of the track you want to move to the desired location.
Dividing recorded tracks (DIVIDE function)
1 During playback, click on on the operation panel at the point that you wish to divide the track.
Rehearsal playback starts from the point clicked on and the DIVIDE dialog box appears.
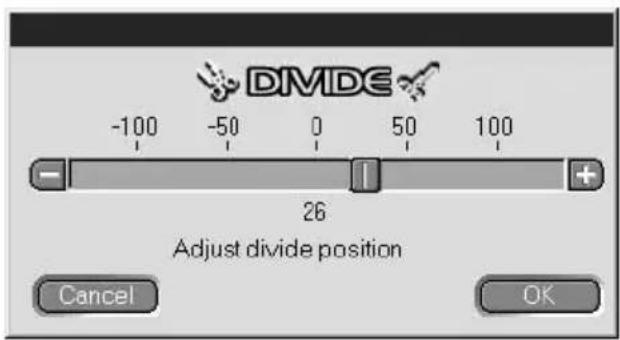
2 Click on / and shift slowly.
You can shift the divide point in 1 step = approximately 0.06 second increments.
Rehearsal playback begins from the shift point.
can also be dragged left or right for adjustment.
3 Click "OK" when the divide point plays back correctly. The track is divided.
To cancel the DIVIDE function
Click "Cancel".
Combining recorded tracks (COMBINE function)
1 On the MD operation screen, click on the track number of the tracks that you wish to combine.
When you click on a track, that track and the track immediately before it will be combined. For example, to combine tracks 2 and 3, click only on track 3. Note that since there are no tracks before the lead track, you cannot combine tracks simply by clicking on the lead track.
When tracks being joined are separated by distance, after clicking on the first track, click on the track to be joined while holding down the SHIFT key.
2 Click on on the operation panel.
The COMBINE dialog box appears, and rehearsal playback of the section where the tracks are joined begins.

Click on Rev to reverse the order of the tracks played back.
3 If the displayed tracks are correct, click "OK".
The selected tracks are joined.
To cancel the COMBINE function
Click "Cancel".
To combine the track playing back with the track immediately in front of it
1 During playback of the track you want to combine, click on on the operation panel.
2 Once the COMBINE dialog box appears, carry out the operations from step 2 of "Combining recorded tracks" on this page. If there are one or two other tracks selected during playback, those selected tracks will be combined.
(continued)
Combining recorded tracks (continued)
Notes
- You cannot combine tracks with this operation when the lead track is being played back.
- You can only combine the track playing back with the track immediately in front of it.
Erasing a part of a track (A-B ERASE function)
1 During playback, click on on the operation panel at the start point you wish to erase (point A).
Rehearsal playback up to the selected point begins and the A-B ERASE dialog box appears.
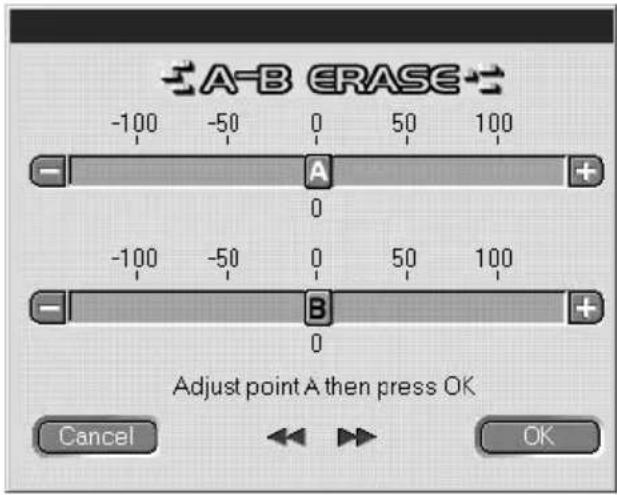
To adjust the position of point A, click on ☐/☐ of A.
A can also be dragged left or right for adjustment.
You can adjust the position in 1 step = approximately 0.06 second increments.
2 Click "OK" when the point A is playing back correctly.
3 Continue playback, or press the or button to go to the point where you want the erase to stop (point B), and click "OK". The point B is temporarily set. Rehearsal playback with points A and B connected begins.
To adjust the position of point B, click on / of B.
B can also be dragged left or right for adjustment.
You can adjust the position in 1 step = approximately 0.06 second increments.
4 Click "OK" when the point B is playing back correctly.
The specified A-B section is erased.
To cancel the A-B ERASE function
Click "Cancel".
Erasing recordings (ERASE function)
Note
Erased tracks can not be recalled.
1 On the MD operation screen, click on the track number of the track that you wish to erase.
When selecting more than one track, click on the numbers while holding down the SHIFT key.
When erasing all tracks, do one of the following:
- Click on all tracks after pressing SHIFT.
- Select "Select all" on the editing menu.
- Click on the MD disc icon

2 Click on on the operation panel.
The ERASE dialog box appears.
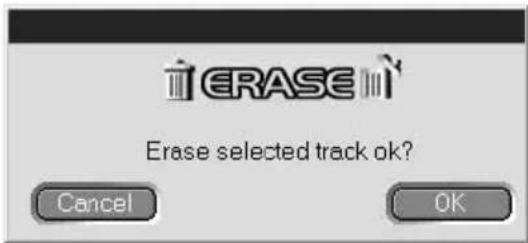
3 Click "OK" if it is ok to erase the track(s).
The selected track(s) is erased.
(continued)
Erasing recordings (continued)
To cancel the ERASE function
Click "Cancel".
To erase a track that is playing back
1 During playback of the track you want to erase, click on on the operation panel.
2 Once the ERASE dialog box appears, carry out the operation in step 3 on page 23.
If there are other tracks selected during playback, those selected tracks will be erased.
To erase by dragging to

Select the track you want to erase, and drag and drop it in the operation panel.

Erasing of one track at a time, more than one track, or all tracks is possible.
All tracks can be erased by selecting the MD disc icon dragging and dropping.

and then
Printing MD labels
Up to 20 names on the disc name and track name lists on the MD operation screen can be printed out as MD labels.
The track list for a disc with 10 tracks or less will be printed out as one column, and the list for a disc with 11 to 20 tracks will be printed out as 2 columns.
Before printing, make sure that a printer is connected to your computer.
Label for cartridge
MY BEST SELECTION
- PLEASE LET... 11. Make
- ARISA and YUKI 12. Lonely engineer
- DANCE! DANC... 13. Good
- DON'T BE SHY
- VACATION
- Make It Happen
- ENDLESS SUM...
- HELLO
- Emotions
- FAN CLUB
Label for disc's side
MY BEST SELECTION
MY BEST SELECTION
Label for disc
1 Load paper for label printing in the printer.
2 Select "Label Print" on the file menu. The printing dialog box appears.
3 Follow the procedure for printing.
Please use the procedure for regular printing.
Note
Printing is not possible on labels included with discs.
Assigning names to CDs (NAME function)
CD disc and track names can be input, and CD-TEXT information can be displayed using the computer's keyboard.
1 On the CD operation screen, move the cursor to the disc name or track name display column and click on it.
2 Input the desired name.
Notes
- Input names are stored in the “Database” folder on the computer’s hard disc. Names are not stored in or displayed on the CD player.
- If you assign a name to a disc with CD-TEXT information, the assigned name will be erased and the original CD-TEXT name will be restored when you execute “Reload” on the option menu for that disc.
- If the CD in the CD player is replaced, be sure to execute “Reload” on the option menu after replacement.
Recording from a CD to an MD
You can record on an MD simply by dragging the track from the CD operation screen and dropping it onto the MD operation screen.
When recording by this method, please connect the MD deck to the CD player using an optical cable.
Notes
- Correct recording is not possible from a CD-R disc.
- During drag and drop recording, you can only carry out operations on the MD operation screen.
1 Select "Open CD window" on the file menu to open the CD operation screen and display the track that you wish to record.
When a CD changer is connected:
- Click on and select the desired CD.
- Up to 5 CD operation screens can be opened.
2 Drag the track number of the track that you wish to record, and drop it onto the MD operation screen.
The selected track becomes the designated track for recording, and the recording pause mode is engaged.
Dragging the CD disc icon and dropping it onto the MD operation screen will set all tracks on that CD as designated recording tracks.
3 When there are more tracks that you wish to record, repeat step 2. A warning appears if the tracks don't fit onto 1 MD.
4 Click on or . II appears, "Now Rec" flashes, and recording begins.
To remove tracks from the designated track list
1 During recording pause, click on the track that you want to remove from the designated track list.
The clicked track changes to inverted display.
To remove more than one track at once, click on the tracks while holding down the SHIFT key.
2 Click on 📄 on the MD operation screen. The tracks selected in step 1 above are removed from the list.
Note
Tracks already recorded onto the MD cannot be erased by this method. To erase already recorded tracks, use the MD editing ERASE function.
To stop recording
Click on .
Programming the CD tracks
Tracks on a CD can be programmed to playback in the order that you like. This is done by simply dragging the track number from the CD operation menu and dropping it onto the PLAY LIST screen.
1 Select "Program window" from the CD operation screen's file menu. The PLAY LIST screen appears.
(continued)
Programming the CD tracks (continued)
2 Drag the track numbers from the CD operation screen and drop them onto the PLAY LIST screen in the order that you want to hear them.
The tracks are added to the program in the position that they are dropped.
The track order can also be changed by dragging and dropping within the PLAY LIST screen.
Dragging and dropping the CD disc icon onto the PLAY LIST screen will program all tracks on the CD.
3 Click on .
Playback starts.
To stop program playback
Click on .
To remove selected tracks from the program
1 In the stop mode, click on the track that you want to remove.
2 Click on on the operation panel.
The tracks selected in step 1 above are removed from the program. Removing many tracks at one time is also possible. When selecting more than one track, click on the tracks while holding down the SHIFT key.
To view details of the programmed tracks
Click on at the bottom left of the PLAY LIST screen.
To return to the original screen, click □ again.
Note
During program playback, operation of MD operation and CD operation screens is not possible.
Changing the disc icons
You can use pictures (BMP format) made using other applications as disc icons on the MD and CD operation screens.
1 Copy the picture you want to paste to the clipboard. Only BMP format is available.
2 Click the disc icon on the MD window to select it.
3 Select "Paste Jacket" from the edit menu.
The picture on the clipboard is displayed on the disc icon.
4 Click a place other than the disc icon to unselect it.
To turn back the original disc icon
1 Click the MD window's disc icon to select it.
2 Select "Cut Jacket" from the edit menu.
The icon is deleted and the original icon appears on the disc icon.
3 Click a place other than the disc icon to unselect it.
Quitting the software
Select "Quit" on the file menu.
Troubleshooting
If you experience any of the following difficulties while using this software, use this troubleshooting guide to remedy the problem. Should any problem persist, consult your nearest Sony dealer. Please also refer to your computer's manual, as well as the "Readme.txt" file installed on the hard disc with the MD Editor software.
Problem Cause/countermeasure
| “Communication port can not Another application may be using the serial port.be opened” message appears. ➔ Quit the other application. | |
| No screen response or screen The computer may be damaged.error. ➔ Start up another application often used and check if computer functions properly. ➔ After uninstalling (page 10), try re-installing. | |
| Character input, recording, The disc’s protect tab may be set for write protect.editing etc., can not be done. ➔ Slide the tab so that recording is possible. ➔ Character input, recording, editing, etc., are not possible on commercial playback MDs (prerecorded MDs). | |
| No MD deck response. Check that cables are connected properly (page 8). ➔ Check that “SerialSetup” has been done properly (page 11). ➔ Disconnect connection cables and then reconnect them. | |
| Displayed name of MD or ➔ Select “Reload” from CD does not match the disc’s Option menu and execute this mode.data. |
Index
A, B
A-B ERASE 22
Accessory items 7
AMS 13,15
Labeling recordings
(NAME/TITLE function)
(MD) 18
C
Cables
For audio connection ... 9
For optical
connection 9,26
CD operation screen .... 12, 15
CD-ROM 7,10
COMBINE function ...... 21
Connections
Computer 8
CD player 9
Connector....7,8
CONTROL A1 connection cord .... 7 to 9
D
Database folder ...... 10, 25
DIVIDE function ...... 20
E
Erasing tracks (ERASE function)
Erasing all tracks on an MD 23
Erasing a section within 1 track (A-B ERASE function) ...... 22
Erasing one track at a time 23
F, G, H, I, J, K, L
Installing software .....10
M
Moving tracks (MOVE
function) 19
N
NAME function (CD) .....25
O
Operating environment ..... 5
P
Printing labels ...... 24
Program playback (CD) .... 27
Q
Quitting 29
R
Recording (CD to MD) ..... 26
S
Screens
Examples ...... 12
CD operation
screen 12, 15
MD operation
screen 12, 13
Serial port...... 11
Serial (RS-232C) port ...... 8
Starting up software ..... 11
T
Troubleshooting...... 30
U, V, W, X, Y, Z
Uninstalling software...... 10
Documentation © 1998 Sony
Corporation
natural_image
Simple line drawing of an electronic device with a VGA connector and a rectangular block (no text or symbols)• Cordon de raccordement CONTROL A1 (cordon mini-fiche mono)
natural_image
Vertical toolbar with icons for zoom, zoom, lock, hand, and battery (no text or symbols)natural_image
Pure graphical icons representing media control symbols (no text or labels)*1 AMS = Automatic Music Sensor
© 1998 Sony Corporation
natural_image
Simple line drawing of an electronic device with a USB port and cable (no text or symbols)*1 AMS = Automatic Music Sensor
natural_image
Pure graphical icons representing media control buttons (no text or symbols): AMS-Taste *1
*1 AMS = Automatic Music Sensor
natural_image
Simple line drawing of an electronic device with a V1G port connected to a rectangular box (no text or symbols)- Cable conector CONTROL A1 (cable con miniclavija monoaural)

natural_image
Pure graphical icons representing media control symbols (no text or labels): Botón de parada
natural_image
Pure graphical icons of directional arrows and symbols without any text or labels: Botón AMS *1
- Table of contents
- Getting started
- Preparation
- Operation
- Additional Information
- Overview
- To view the latest information concerning this software
- System requirements
- IBM PC/AT or compatibles
- Checking the supplied items
- Connections
- Connecting an MD deck to your computer
- When your computer and the MD deck are separated by distance
- Notes
- Connecting a CD player to the MD deck
- Connection method
- Note
- Installing the software
- About the Database file
- Uninstalling the software
- Starting the software
- Setting up the serial port
- Names and functions of screen
- MD operation screen
- MD icon
- MD operation panel
- MD operation screen (continued)
- CD operation screen
- CD icon:
- ② CD operation buttons
- CD operation screen (continued)
- Editing recorded MDs
- Labeling recordings (NAME/TITLE function)
- Labeling recordings (continued)
- To input using the copy and paste function
- To use the text data input by other application (FLOW function)
- Moving recorded tracks (MOVE function)
- To cancel the MOVE function
- To move a track during playback
- To move a track by dragging
- Dividing recorded tracks (DIVIDE function)
- To cancel the DIVIDE function
- Combining recorded tracks (COMBINE function)
- To cancel the COMBINE function
- To combine the track playing back with the track immediately in front of it
- Combining recorded tracks (continued)
- Erasing a part of a track (A-B ERASE function)
- To cancel the A-B ERASE function
- Erasing recordings (ERASE function)
- When erasing all tracks, do one of the following:
- Erasing recordings (continued)
- To cancel the ERASE function
- To erase a track that is playing back
- To erase by dragging to
- Printing MD labels
- Label for cartridge
- MY BEST SELECTION
- Label for disc's side
- Assigning names to CDs (NAME function)
- Recording from a CD to an MD
- When a CD changer is connected:
- To remove tracks from the designated track list
- To stop recording
- Programming the CD tracks
- Programming the CD tracks (continued)
- Click on .
- To stop program playback
- Click on .
- To remove selected tracks from the program
- To view details of the programmed tracks
- Changing the disc icons
- To turn back the original disc icon
- Quitting the software
- Troubleshooting
- Index
- A, B
- C
- D
- E
- F, G, H, I, J, K, L
- M
- N
- O
- P
- Q
- R
- S
- T
- U, V, W, X, Y, Z
Brand : SONY
Model : PCLKMD1
Category : Other camera accessories