Apex XD38 - Thermal scope PULSAR - Free user manual and instructions
Find the device manual for free Apex XD38 PULSAR in PDF.
| Product type | Thermal imaging riflescope |
| Brand | PULSAR |
| Model | Apex XD38 |
| Microbolometer resolution | 384 x 288 pixels |
| Refresh rate | 50 Hz |
| Optical magnification | 2 - 4x |
| Lens | F50 mm, F/1.2 |
| Digital zoom | 2x |
| Angular field of view (HxV) | 11° x 8.2° (2x zoom: 5.5° x 4.1°) |
| Eye relief | 67 mm |
| Diopter adjustment | -4 to +3.5 dpt |
| Maximum detection range | 1250 m (object 1.7 x 0.5 m) |
| Minimum focusing distance | 5 m |
| Display | OLED, 640 x 480 pixels |
| Power supply | 2 CR123A batteries (or rechargeable 16340) |
| Battery life | 5 h (with a set of batteries) |
| Shock resistance | 6000 J |
| Protection rating | IPX7 (waterproof) |
| Operating temperature | -25 °C to +50 °C |
| Dimensions (L x W x H) | 343 x 80 x 75 mm |
| Weight (without batteries and mount) | 0.7 kg |
| Main functions | Rock, Forest, Recognition modes; manual/semi-auto/auto calibration; PiP (picture-in-picture); PAL/NTSC video output; wireless remote control; Weaver rail |
| Maintenance | Clean optical surfaces with a soft cloth; check contacts; store in a dry case; remove batteries for long-term storage |
| Safety | Do not point at the sun; do not disassemble under warranty; avoid battery overheating |
| Spare parts and repairability | CR123A batteries, remote control, video/power cable, mount, case; repair at a specialized workshop |
Frequently Asked Questions - Apex XD38 PULSAR
User questions about Apex XD38 PULSAR
0 question about this device. Answer the ones you know or ask your own.
Ask a new question about this device
Download the instructions for your Thermal scope in PDF format for free! Find your manual Apex XD38 - PULSAR and take your electronic device back in hand. On this page are published all the documents necessary for the use of your device. Apex XD38 by PULSAR.
USER MANUAL Apex XD38 PULSAR
Export of models 76415/76425/76475 with a refresh rate of 50Hz may have export limitations depending on the laws in your region.
Attention!
* Max. detection range of an object measuring 1.7× 0.5m ** Operation in power saving mode.

PACKAGE CONTENTS
Thermal imaging sightAPEX
- Carrying case
- Wireless remote control
- Mount (with screws and hex-nut key)***
Video cable / External power supply cable
- User manual
- Lens cleaning cloth
Warranty card
*** Mount may not be included for certain orders.

DESCRIPTION
Thermal imaging sights Apex are designed for the use on hunting rifles both in the nighttime and in the daylight in inclement weather conditions (fog, smog, rain) to see through obstacles hindering detection of targets (branches, tallgrass, thick bushes etc.). Unlike the image intensifier tube based night vision riflescopes, thermal imaging sights Apex do not require an external source of light and are not affected by bright light exposure. The Apex sights have a wide range application including night hunting, observation and terrain orientation, search and rescue operations.

FEATURES
Optics:
- Long eye relief (67 mm)
- Accurate Internal Focus Adjustment
Optical magnification from 1.5x to 3x - Wide field of view
Electronics:
384x288 pixels Microbolometer sensor
- 640x480 pixels quality OLED display
- 2x continuous digital zoom
- Function PiP («picture in picture»)
- Three calibration modes - manual, semiautomatic and automatic
- Three operation modes - "Rocks", "Forest", "Identification"
- Image inversion modes: "White hot" and "Black hot"
- Wide choice of selectable reticles in sight's memory
One shot zeroing and zeroing with FREEZE function
- Memorization of zero-in parameters for three types of weapon or distances
- Choice of reticle colour (white/black)
Extras:
- Power saving mode
- External power supply option
High shock resistance - IPX7 Degree of protection (fully waterproof)
Video output enabling recording
Defective pixel repair option
Extra Weaver rail for accessories
- Wireless remote control
- Wide range of display brightness and contrast adjustment with memorization of user settings
- Display off function - protects against decamouflage and quick power on for immediate use

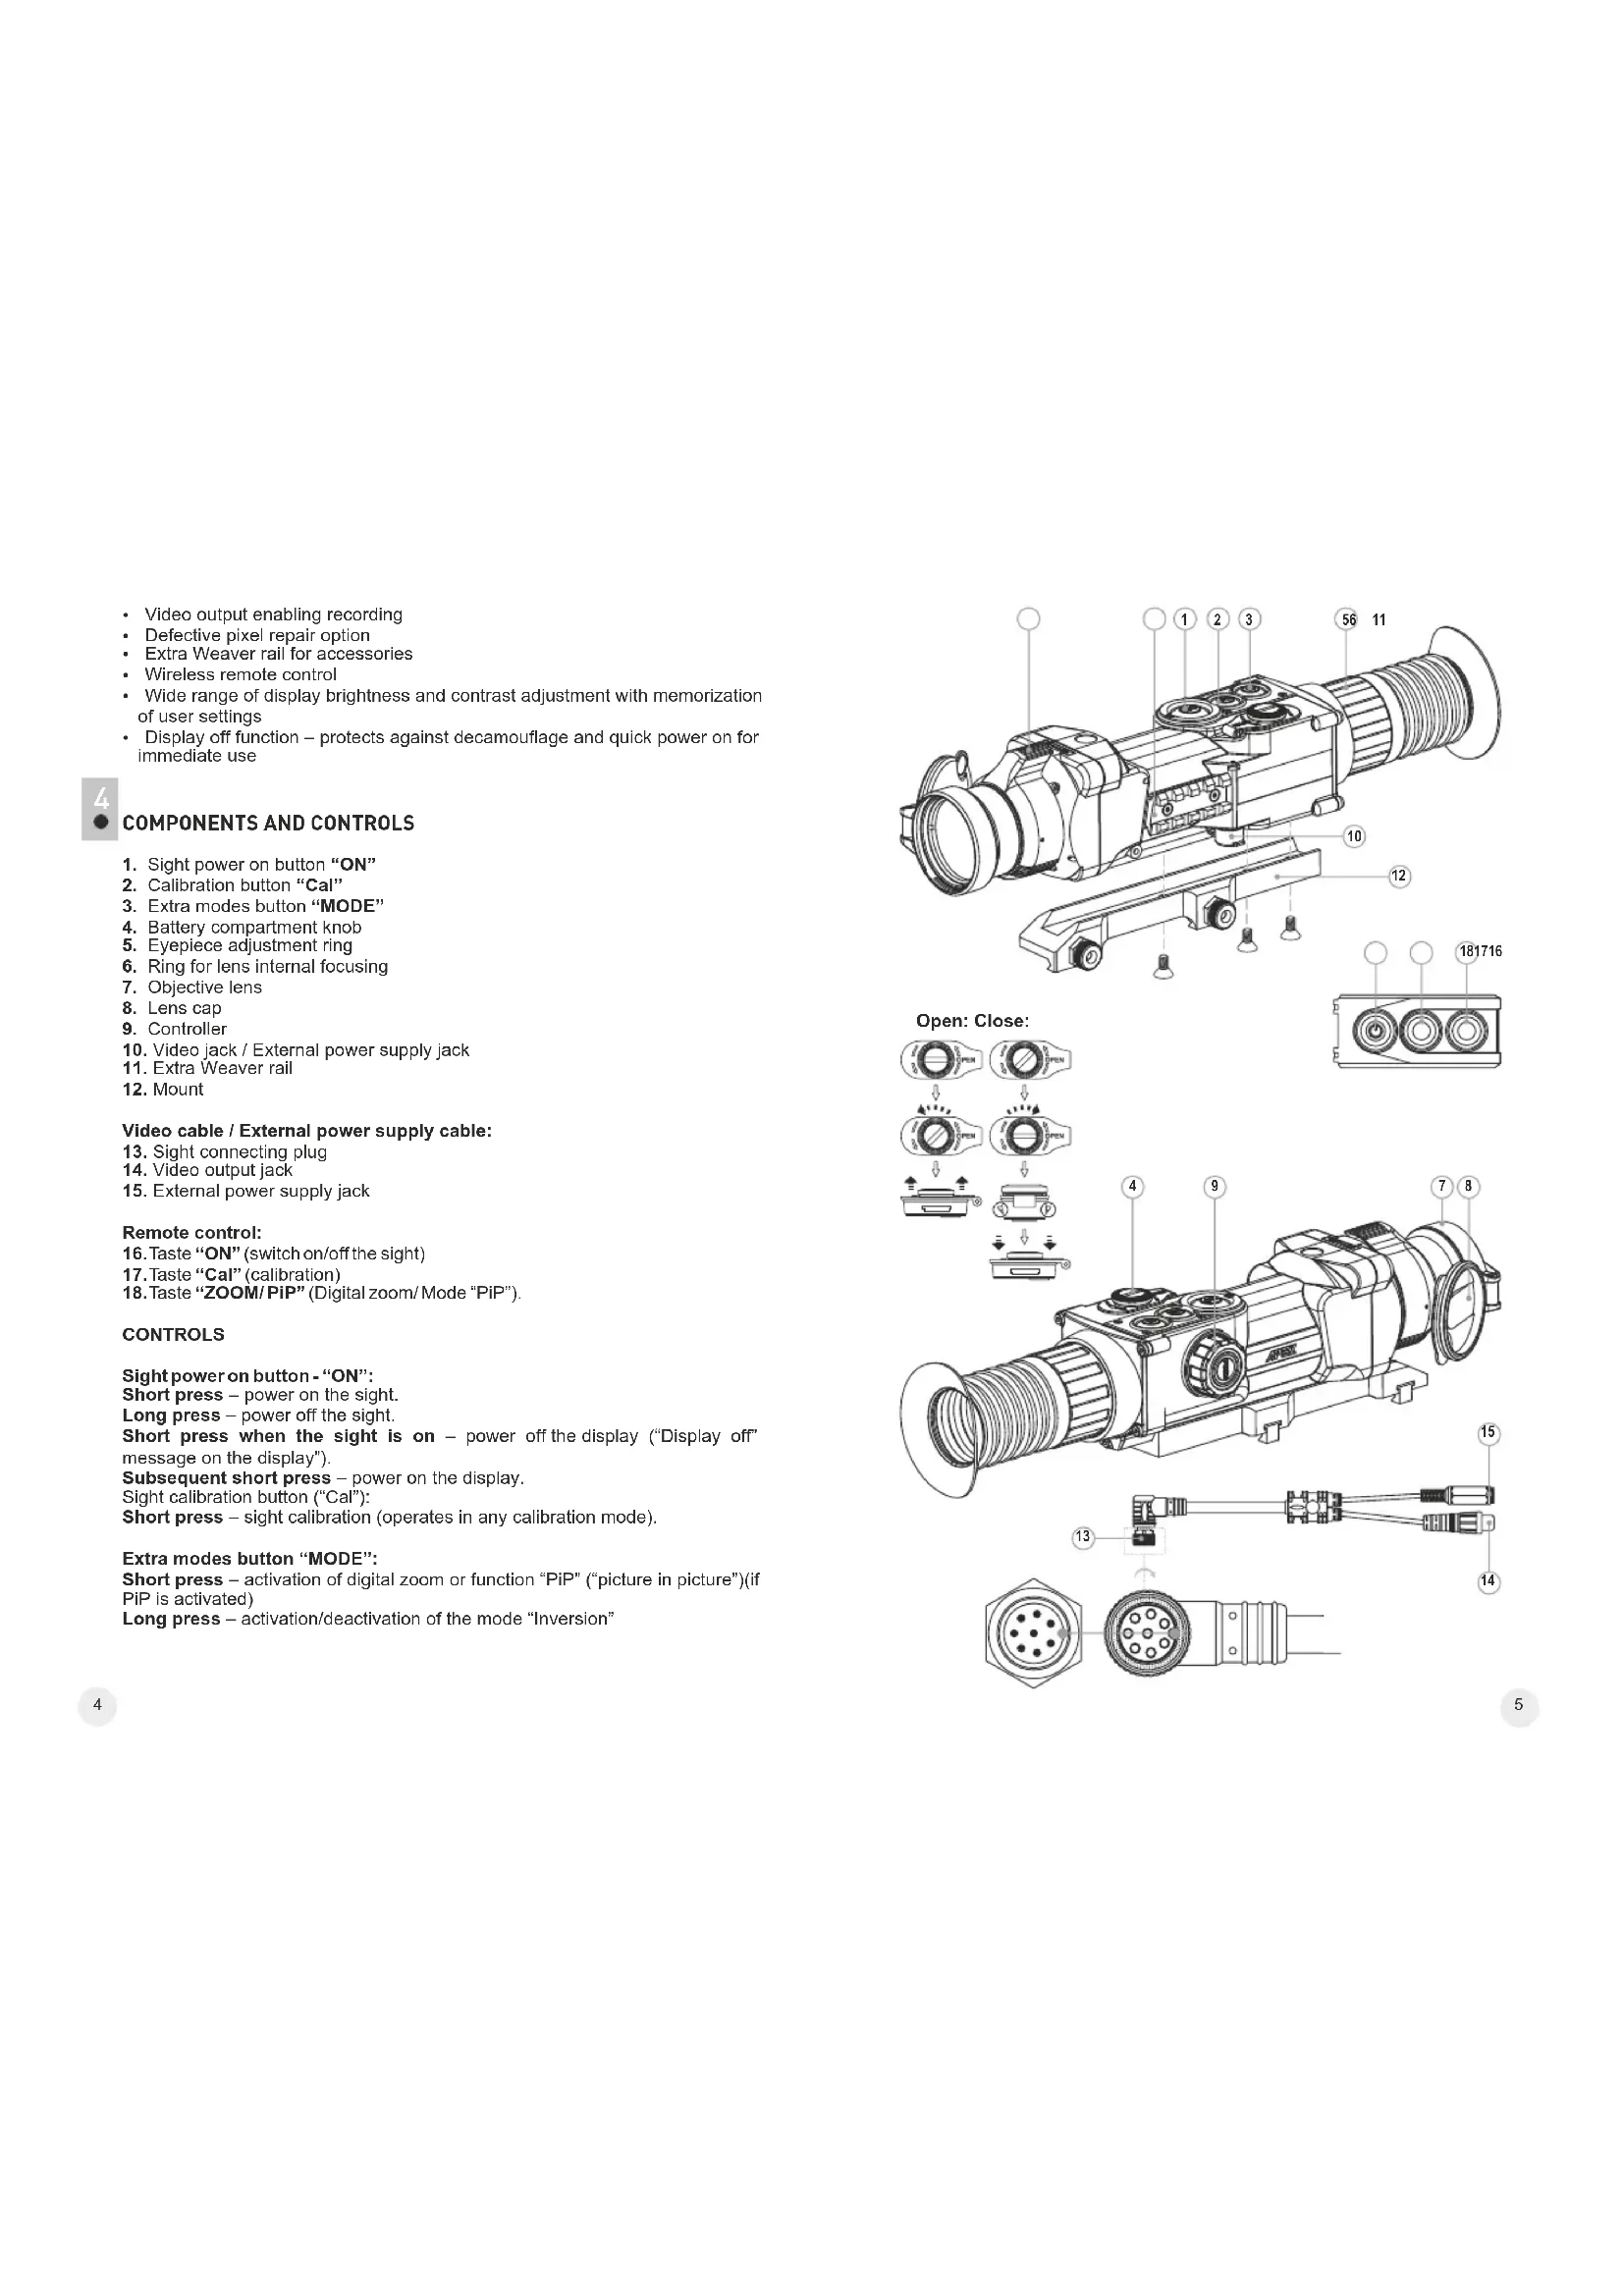
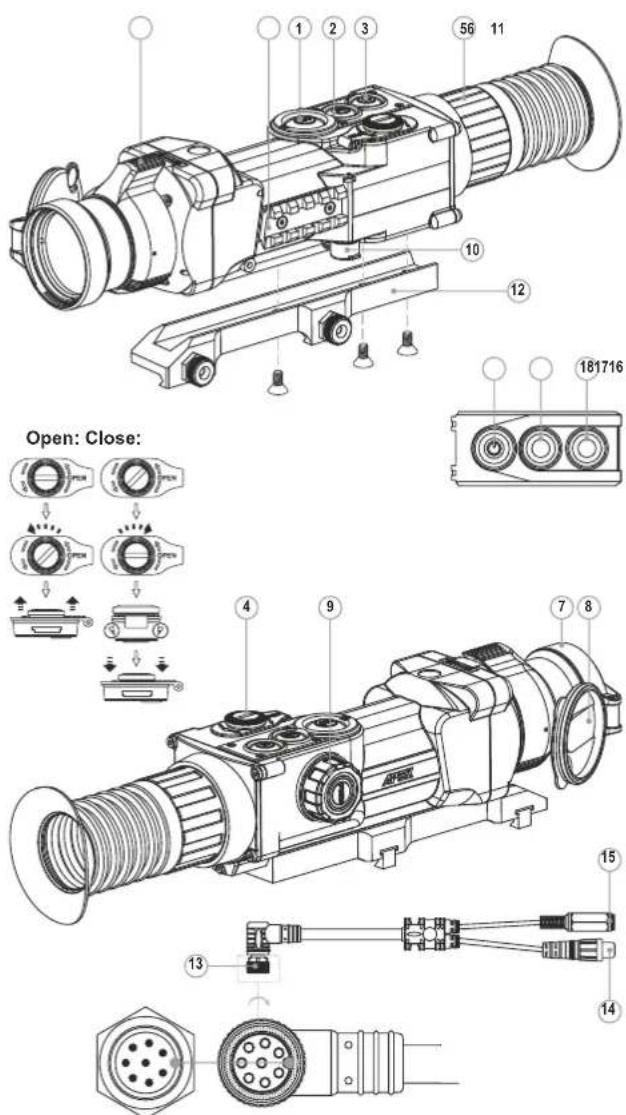
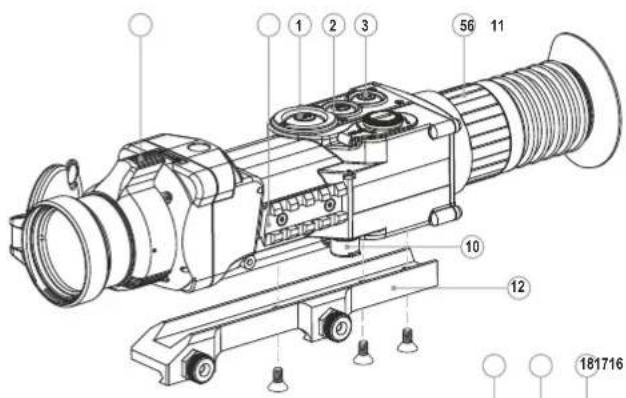
COMPONENTS AND CONTROLS
- Sight power on button "ON"
- Calibration button "Cal"
- Extra modes button "MODE"
- Battery compartment
- Eyepiece adjustment ring
- Ring for lens internal focusing
- Objective lens
- Lens cap
- Controller
- Video jack / External power supply jack
- Extra Weaver rail
- Mount
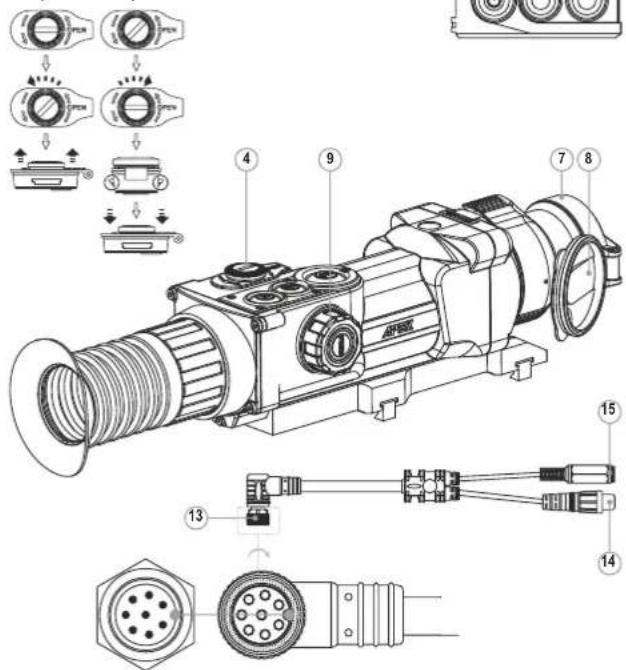
Video cable / External power supply cable:
- Sight connecting plug
- Video output jack
- External power supply jack
Remote control:
- Taste "ON" (switch on/off the sight)
- Taste "Cal" (calibration)
- Taste "ZOOM/ PiP" (Digital zoom/ Mode "PiP").
CONTROLS
Sight power on button - "ON":
Short press - power on the sight.
Long press - power off the sight.
Short press when the sight is on - power off the display ("Display off"
message on the display").
Subsequent short press - power on the display.
Sight calibration button ("Cal"):
Short press - sight calibration (operates in any calibration mode).
Extra modes button "MODE":
Short press - activation of digital zoom or function "PIP" ("picture in picture") (if PIP is activated)
Long press - activation/deactivation of the mode "Inversion"
Controller:
Rotation (by default) - display brightness adjustment
Short press - switching between brightness and contrast adjustment modes,
gradual digital zoom
Rotation (followed by a short press) - display contrast adjustment
Rotation (followed by a short press) - continuous digital zoom (from 1x to 2x
with 0.1x increment)
Long press - entering the menu.

MENUSTATUSBAR ICONS
C
DE
era
tio
n
no
00
e
Rc
A
C
DE
图2
tig
P
mg
“
Fc
C
DE
era
tio
n
no
00
M
M
ar
14
H
S
en
nia
ut
A
A
UTC
om
P
AL
//
TS
①
C
loc
遍
B
r.
hti
ne
X2
2
<
D
ef
×
C
ro
·
D
isp
回
In
na
C
B
at
L
DW
C
D6
Please refer to section 11 "Main menu" for other icons.

The sight has been designed for long-term use. To ensure sustainable performance, please adhere to the following:
-
Before use make sure that you have installed and fixed the mount according to the instructions of the section "Installation of mount" (section 9 "Operation").
-
Store with the lens cap on in the carrying case.
-
Switch off the scope after use.
-
Attempts to disassemble or repair the scope will void the warranty!
-
Clean the scope's optical surfaces only if necessary, and use caution. First, remove (by blowing with a blower brush or canned air) any dust or sand particles. Then proceed to clean by using camera/lens cleaning equipment approved for use with multicoated lenses. Do not pour the solution directly onto the lens!
-
The sight can be used in various operating temperatures. However, if it has been brought indoors from cold temperatures, do not turn it on for 2 to 3 hours. This will prevent external optical surfaces from fogging.
-
If the sight is unable to mount onto the rifle securely, or you have doubts about the mounting system, see a qualified gunsmith. Using the weapon with a poorly mounted scope can lead to inaccurate target shooting!
-
To ensure reliable performance, it is recommended to carry out regular technical inspections of the unit.
-
Do not leave batteries in the unit if it is not going to be used for an extended period.
-
Batteries shall not be exposed to excessive heat such as sunshine, fire or the like.
WARNING! Do not point the objective lens of the unit at bright sources of light such as the sun. This may disable electronic components of the unit.
The warranty does not cover damage caused by improper operation.

BATTERY INSTALLATION
- Turn the battery compartment knob (4) counterclockwise to the "Open" position and remove it.
- Install two CR123A batteries (or rechargeable batteries) according to the marking on the battery compartment cover and inside it.
- Turn the battery compartment knob (4) clockwise - the latch will pull out (see the drawing).
- Replace the battery cover and press it until its clicking position - the cover will close.
Battery charge level is displayed on the status bar - In case of complete battery discharge, icon is flashing on the status bar and in the centre of the display.
Note: to ensure long and reliable operation it is recommended that you use quality rechargeable batteries 16340 (CR123A) with a capacity of at least 800mAh . Please do not use batteries of different types or batteries with various charge levels.

EXTERNAL POWER SUPPLY
The sight can be powered with an external DC power supply (2.1mm pin) with stabilized voltage ranging from 8V to 15V or a 12V vehicle socket.
- Connect the plug (13) of the cable to the jack (10) of the sight by matching the notch in the plug connector and the protrusion of the jack (10) (see the scheme).
- Secure the cable by turning clockwise the locking ring of the plug (13).
- Connect the external power supply (AC/DC) or car adapter to the jack (15) of the cable.
Note: central pin of the power supply that you connect to the "power" jack of the sight, must have marking "+"
The power supply may have marking0-+
- Connection of an external power supply (icon on the status bar) automatically cuts off power supply from batteries.
- External power supply DOES NOT charge the batteries in the sight!
Attention! We suggest that you use battery packs EPS3 or EPS5 ensuring from 9 to 20 hours of continuous operation.

OPERATION
Installation of mount
Before using the sight you need to install the mount (12).
The sight can be used with various mount types such as Weaver, Europrism, Los, Side mount, MAK adapter etc. that allow the scope to be installed on different types of rifles.
The mounting holes in the base of the sight enable the mount to be installed in one of the multiple positions. The choice of the mounting position helps the user to ensure the correct eye relief depending on the rifle type.
- Attach the mount to the base of the sight using a hex-nut wrench and screws (see installation scheme).
Install the scope on the rifle and check if the position is suitable for you. -
If you are happy with its position, remove the scope, unscrew the screws halfway, apply some thread sealant onto the thread of the screws and tighten them fully (do not overtighten). Let the sealant dry for a while.
The sight is ready to be installed on a rifle and to be zeroed. -
After first installation of your sight on a rifle, please follow instructions in the section "Zeroing".
Note. Please check that your sight is duly zeroed after changing a mount.
Powering on and calibration
- Press briefly the "ON" (1) button to power on the sight. In case of low battery icon will start flashing.
- Do the calibration of image. Calibration levels background temperature of the microbolometer and eliminates image flaws.
- There are three calibration modes: manual (M), semiautomatic (H) and automatic (A).
Manual (silent) calibration mode
The lens cap (8) should be closed.
- Power on the sight with the "ON" (1) button, hold down the controller (9) for two seconds to enter the menu.
- Rotate the controller to select option Cal. Press the controller.
- Rotate the controller to select mode M. Press the controller to confirm. To exit the menu, press and hold the controller (9) for two seconds or wait 10 seconds for automatic exit.
- Press the CAL (2) button to calibrate. The image will freeze for 1-2 seconds. Then open the lens cap. Calibration is completed.
- In case you see image flaws (such as frozen image, vertical stripes etc.) re calibrate the unit with the lens cap closed.
Semiautomatic calibration mode
Power on the unit, open the lens cap.
- Hold down the controller (9) for two seconds to enter the menu.
- Rotate the controller to select option Cal. Press the controller.
- Rotate the controller to select mode H. Press the controller to confirm.
- Press the CAL (2) button to calibrate. The image will freeze for 1-2 seconds and you will hear the sound of the internal shutter. Calibration is completed.
Automatic calibration mode
With the automatic calibration mode the thermal imager calibrates by itself according to the software algorithm. The detector (microbolometer) is closed with the shutter automatically. User assisted calibration with the CAL (2) button is allowed in this mode.
Power on the unit, open the lens cap.
- Hold down the controller (9) for two seconds to enter the menu.
- Rotate the controller to select option Cal. Press the controller
- Rotate the controller to select mode A. Press the controller to confirm.
- At the moment of the automatic calibration the image will freeze for 1-2 seconds and you will hear the sound of the internal shutter.
- Time intervals between calibrations depend on the heat of the detector. The unit may require calibration more frequently on activation.
Focusing and image adjustment
- Open the lens cap (8)
- Adjust sharp image of the display icons by turning the eyepiece ring (5)
- To adjust display brightness, rotate the controller (9). Brightness level (from 0 to 20) will appear next to the brightness icon in the top right corner of the display.
- To adjust display contrast, press the controller (ic) appears) and rotate it. Contrast level (from 0 to 20) will appear next to the contrast icon in the top right corner of the display.
- Point the unit at a warm object located at a certain distance, 100 meters, for example.
- Adjust the focus by turning the ring for lens internal focusing (6).
-
After this adjustment no further dioptré adjustment should be required, regardless of distance or other factors. Adjust image quality only with the ring (6) for lens internal focusing.
-
Hold down the "MODE" (3) button to activate colour inversion mode (functions "White hot" and "Black hot"). When function "White hot" is used, warm objects are represented in shades of bright colour; "Black hot" renders objects in shades of dark colour.
ZEROING
The sight features two zeroing methods - "one shot" zeroing and using FREEZE function.
Zeroing should be done at operating temperatures, by following the order of these steps:
One shot zeroing
- Mount the rifle with the sight installed on a bench rest.
- Set a target at a distance of about 100m .
- Adjust the sight according to the instructions of Section 9 "OPERATION".
- Aim the firearm at the target using the mechanical sight.
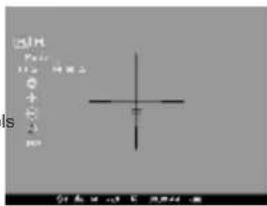
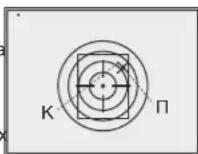
- Take a shot. If the point of impact does not match the aiming point, press the controller (9) to enter menu M2 and rotate the controller to select option "Zeroing" marked with icon.
Red auxiliary cross (C) appears in the centre of display. On the right of the icon appear horizontal arrows and coordinated of the auxiliary cross - Holding the reticle in the aiming point, by rotating the controller (9) move the auxiliary cross (C) horizontally or vertically relative to the reticle until the auxiliary cross matches the point of impact (P) (see pic.).
- To switch between movement direction push the controller (9) to hear a click. Vertical lines appear next to the icon:
Note: the auxiliary cross moves only within the limiting frame (see pic.) that defines its travel range: 200 clicks horizontally (+100/-100) and 200 clicks vertically (+100/-100).
- Exit submenu "Zeroing" with a long press of the controller button. Message OK confirms successful operation. The reticle will now move to the point of impact.
Attention! Do not turn off the sight before zeroing settings are saved, otherwise your settings will be lost.
Take another shot - the point of impact should now match the aiming point.
The sight should now be zeroed-in for the specified distance.
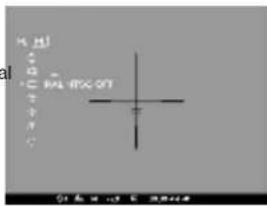
Zeroing with "Freeze" function
Before using this function, please take a shot.
- Select "Freeze" function in submenu M2.
- Sight will prompt you to press any button on the sight or wireless control within 30 seconds to freeze (memorize) the image. The status bar shows corresponding icon.
- Before pressing a button match the reticle of the sight with the aiming point (as a rule - target centre). After button is pressed, the image "freezes" and a limiting frame with an auxiliary cross appear. Rotating the controller, move
the auxiliary cross within the limiting frame until the cross matches the point of impact.
Note. After the image freezes, you do not need to keep your weapon pointed at the target.
- Pressing the controller button allows you to switch direction of auxiliary cross (horizontal or vertical). Long press of the controller button saves zeroing settings and exits the menu.
- Saving the settings is confirmed with "Ok" message displayed instead of the coordinates.
After exiting the menu, the image returns to normal.
Note: zeroing parameters (coordinates X ; Y ) are saved in the sight's memory as number 1 in the menu option "Weapon choice". If you want to zero in the sight using another weapon or another distance, select option 2 or 3 (details in the menu option "Weapon choice" section 12) and do the zeroing.

MENU
OPERATING THE MENU
Long press of the controller - entering the menu.
Rotating the controller - menu navigation
Short press of controller - entering menu option; selecting value in menu option, exiting menu option or moving to the next parameter (clock mode). Long press of controller - exiting menu option and menu (depending on the cursor actual position). Automatic exit the menu takes place after more than 10 seconds of inactivity (no navigation).
THE SIGHT HAS TWO MENUS
M1 - menu 1 (main menu);
M2 - menu 2 (additional menu):
Active submenu is highlighted with a frame. To switch to the other menu, rotate the controller and move the cursor (the frame will be flashing), press briefly the controller.
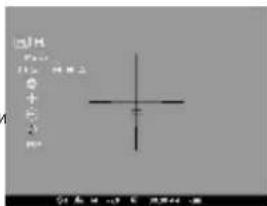
STATUS BAR
Status bar in the bottom part of the display shows information as follows:
1.Number of weapon choice (1,2,3)
2. Operation mode ("Rocks","Forest","Identification")
3. Calibration modes - manual, semiautomatic and automat
4.2x smooth digital zoom is on2.0
5. Image inversion is on
6. Running time:00:00 AM
7. Battery charge level or connected external battery


Menu M1 includes:
Selection of operation modMode
Selection of calibration modeCal
Weapon selection (1;2;3)
Selection of preloaded reticle
- Brightness control of onscreen symbols
(menu and status bar)
- Reticle colour selection
Function PiPpP
Menu M2 includes:
One shot zeroing
“Freeze” zeroing
Selection/disable of video output signal (PAL, NTSC)
Clock setup
Remote control activation
Defective pixel repair option
- Return to default settings
MENUM1
Operation modes
There are three automatic operating modes:
"Rocks" (enhanced contrast), "Forest" (low contrast) and "Identification" (improved detail rendering).
Each mode includes optimal combination of parameters (brightness, contrast, gain etc.) to deliver best possible image in specific viewing conditions.
To select an option, press and rotate the controller.
Short press of the controller to confirm your choice.
- Icon of the selected mode is shown in the status bar.
Weapon selection (1,2,3)
This menu option allows selection of three positions of the aiming point for various types of weapons or for various distances. Also this option allows you to save three types of reticle for each weapon.
To select option, press controller button and select number out of the list 123
- Confirm your choice by a short press of the controller button.
- Number of the selected variant of the weapon to use is shown in the status bar in the lower portion of the display.
Note. Originally the reticle for all the three variants is located in the display centre (coordinates X = 0;Y = 0 ). Further on, each type of weapon (distance) requires individual zeroing.
Selection of calibration mode
Please refer to section 9 "Operation".
Selection of preloaded reticle
This menu option allows selection of one of the 10 preloaded reticles. Menu option shows number of the reticle.
- To select option, press controller button and select reticle number out of the list. Corresponding reticle will be shown on the display.
- Confirm your choice by a short press of the controller.
- List and full description of the reticles can be found at www.pulsar-nv.com (Support => Download section).
Note: adequate operation of APEX reticles is supported for the basic magnification for each model (1.5x; 2x; 3x), and in the "PiP" mode ("Picture in Picture").
Brightness control of onscreen symbols
To select option, rotate and press the controller (9).
- Rotate the controller to select brightness level of icons - from 1 to 10.
- Confirm your choice by a short press of the controller.
Reticle colour selection
- To switch between two reticle colours (black or white), press and rotate the controller.
- Confirm your choice by a short press of the controller.
Function PiP
Function PiP ("picture in picture") allows you to enlarge central area of the reticle twice which facilitates aiming without narrowing the field of view.
- Select "Yes" to activate the mode. Select "No" to deactivate.
- Confirm your choice by a short press of the controller.
Note: digital zoom does not work when function PiP is activated.
MENUM2
One shot zeroing
Please refer to section 10 "ZEROING".
Zeroing with "Freeze" function
Please refer to section 10 "ZEROING".
Selection/disable of video output signal
- Press the controller button and rotate it to select output video signal - PAL or NTSC (video output is disabled by default).
- To disable the video output, select option "OFF". Disabled video output reduces power consumption.
- Confirm your choice by a short press of the controller button.
Clock setup
- Press and rotate the controller (9) to select time format: 24/AM/PM.
- Press the controller to proceed to hour setup. Set the hour value rotating the controller.
- Press the controller to proceed to minute setup. Set the minute value.
- To exit submenu, hold down the controller (9) for two seconds. Or wait ten seconds to exit automatically.
Remote control activation
Please refer to section 12.
Defective pixel repair
- When operating the thermal imager, there is a possibility of defective (dead) pixels (bright or dark dots with constant brightness) appearing on the detector which are visible on the image.
- Thermal sights Apex provide an opportunity to repair defective pixels on the detector using a software-based method.
- Press and hold the controller (9) for two seconds to enter the menu.
- Rotate the controller to select icon and press the controller.
- Select icon in the pop-up submenu and press the controller
- A cross appears in the centre of display, coordinates (X;Y) of the cross relative to the centre of display appear in the place of pop-up icons, icons disappear.
- Rotate the controller to align the cross with a defective pixel (if the alignment is correct, the defective pixel should go out).
- Switch direction of the cross from horizontal to vertical by a short press of the controller.
After the centre of the cross is aligned with a defective pixel, press the MODE (3) button to repair the pixel. - In case of success a short "OK" message appears in the place of the coordinates.
- Further on, move the cross to repair another defective pixel. When moving the cross to the coordinates area, the latter goes to the lower right portion of the display.
Return to default defective pixel pattern
- If you wish to return to the default defective pixel pattern (i.e. restore all defective pixels previously repaired), select icon in the pop-up submenu and press the controller.
- Options "Yes" and "No" appear on the right of the icon.
- Rotate the controller to select "Yes" and press the controller.
- If you choose not to return to default pixel pattern, select "No" and press the controller.
- To exit the main menu, keep the controller pressed for two seconds or wait 10 seconds to exit automatically.
Attention! One or two pixels in the form of bright white or black 1-2 pixels dots are allowed on the display of thermal imager. These pixels cannot be repaired and are not a defect.
The following settings will return to their original status before the changes: Operation mode - "Rocks";
Calibration mode - automatic;
Weapon selection
Selection of preloaded reticle - 1 (for all weapon types);
Reticle colour - black;
Brightness of onscreen symbols (menu and status bar) - 5; Video output - off;
Display brightness level - 12;
Display contrast level - 12;
Digital zoom - x1;
Image inversion - off;
Function "PiP" - off
To cancel return to default settings, select "No" and press controller button to confirm.
Note: zeroing coordinates do not return to default for all types of weapon.

VIDEO OUTPUT
Video output is designed to connect external recording devices and to transmit video signal to monitors, TV sets etc.
- Connect the plug (13) of the cable to the jack (10) of the sight by matching the notch in the plug connector and the protrusion of the jack (10) (see the scheme).
- Secure the cable by turning clockwise the locking ring of the plug (13).
- Connect the signal receiver to the jack (14) of the cable.
- Turn on the sight - image will appear on the external device. Please make sure the external device is in the AV mode.
To record video, you can use video recorders such as Yukon MPR (#27041) / CVR640 (#17044) and others.
Note: it is not recommended to attach the CVR640 on the sight because the video recorder is not designed for heavy shock resistance.

WIRELESS REMOTE CONTROL
The wireless remote control duplicates functions of the sight, calibration function and digital zoom/PiP function.
It has three buttons:
- Button "ON" (16) - turning the sight on/off (press for two seconds to deactivate).
- Button "CAL" (17) - image calibration.
- Button "ZOOM/PiP" (18) - digital zoom on/off or function "PiP" on/off.
To start using the wireless remote control you will need to activate it:
- Turn on the scope and select menu option "RC activation" (ieon ).
- Press controller button, a message "WAIT" will show up and countdown will start within which you need to press any button of the RC.
- If the activation is successful, a message "Complete" will show up next to icon. The RC is ready for use.
- If the RC does not work, replace the battery. To do this, unscrew the screws on the rear panel of the RC, remove the cover, pull out the old battery and insert a new CR2032 battery.

WEAYER RAIL 7/8"
With the help of the Weaver rail (11) you can attach accessories such as:
External power supply EPS3 (#79111).

TECHNICAL INSPECTION
It is recommended that you inspect the sight before every use. Make sure to check for the following:
- Visually inspect that the unit is free from any physical damage; cracks, dents or signs of corrosion which may disqualify it from proper use.
- Check the sturdiness and proper fit of the mounting system.
- Ensure that the objective lens and eyepiece are free of cracks, grease spots, dirt, water stains and other residue before use.
- Visually inspect the condition of the battery and the battery compartment; the battery should be free of electrolyte and oxidation residue, especially where the battery makes contact with metal.
- Verify the proper function of the following: selector switch, display brightness adjustment knob and other operation buttons.
- Verify the smoothness of the objective lens focus knob, dioptre focus knob.

TECHNICAL MAINTENANCE
Technical maintenance should be done at least twice a year, includes the following steps:
- Clean the outside metal and plastic surfaces from dust, dirt and moisture; wipe the scope with a soft lint free cloth.
- Clean the battery compartment's electric contact points using an oil-free solvent.
- Inspect the eyepiece lens and the objective lens and gently blow off any dust and sand, and clean using lens cleaner and a soft cloth; see section 6 "GUIDELINES FOR OPERATION".

STORAGE
Always store the unit in its carrying case in a dry, well-ventilated space. For prolonged storage, remove the batteries.

TROUBLESHOOTING
Listed below are some potential problems that may occur when using the scope. Carry out the recommended checks and troubleshooting steps in the order listed. Please note that the table does not list all of the possible problems. If the problem experienced with the scope is not listed, or if the suggested action meant to correct it does not resolve the problem, please contact the manufacturer.
| PROBLEM | POSSIBLE CAUSE | CORRECTIVE ACTION |
| The sight will not turn on. | Batteries have been incorrectly installed. | Reinstall the batteries observing poinly. |
| Oxidized contact points in the battery compartment due to 'leaky' batteries or contact points becoming exposed to a chemically reactive solution. | Clean the battery compartment, focusing on the contacts. | |
| The batteries are fully exhausted or one or several batteries are faulty. | Install fresh batteries. Use spare battery container. | |
| The image is blurry, with vertical stripes and uneven background. | Calibration is to be done. | Do the calibration according to section 9 "OPERATION". |
| The image is too dark. | The lowest brightness level is set. | Adjust brightness by rotating the controller (9). |
| The reticle is blurred and cannot be focused with the dioptre knob. | The dioptre cannot be adjusted to your eyesight. | If you wear prescription glasses with a range of +/- 4, keep glasses on when looking through the eyepiece. |
| With a crisp image of the reticle, the image of the observed target that is at least 30 m away is blurred. | Dust and condensate are covering the outside optical surfaces after the sight was brought in from the cold into a warm environment, for example. | Clean the lens surfaces with a blower and soft lens cloth. Let the sight dry by leaving it in a warm environment for 4 hours. |
| The objective lens is not focused. | Adjust the image by rotating the lens knob (6). | |
| The aiming point shifts after firing rounds. The sight will not focus. | The sight is not mounted securely or the mount was not fixed with thread sealant. | Check that the sight has been securely mounted, make sure that the same type and calibre bullets are being used as when the scope was initially zeroed; if your sight was zeroed during the summer, and is now being used in the winter (or the other way round), a small displacement of the aiming point is possible. |
| The sight will not focus. | Wrong settings. | Adjust the sight according to the instructions given in the Section 9 "OPERATION" and check the surfaces of the eyepiece and objective lenses and clean them if necessary from dust, condensation, frost, etc; to prevent fogging in cold weather, apply a special anti-fog solution. |
| The scope is used in day light at long working distance. | Check focusing of the scope in night conditions. | |
| The sight cannot be starled with wireless remote control. | Remote control is not activated. | Activate the remote according to instructions in section 13. |
| Low battery. | Install a new CR2032 battery. | |
| The unit does not operate on external power supply. | Make sure your power supply provides output voltage. Make sure the central pin of the external power supply (15) and plug contacts (13) are intact. |
FRANÇAIS
DONNÉES TECHNIQUES
Video cable / External power supply cable:
Régimes "White hot / Black hot"
TEXHMHOCKHEXAPAKTEPNCNUK
| SKU# | 76411 | 76415 | 76421 | 76425 | 76471 | 76475 |
| Modèle: APEX | LD38 | XD38 | LD50 | XD50 | LD75 | XD75 |
| Мин探测ометр | ||||||
| Тул | Heoxnaхдаимь | Heoxnaхдаимь | Heoxnaхдаимь | |||
| Раразшени, пankелей | 384x288 | 384x288 | 384x288 | |||
| Часта обиюлени Кадров. Г. | 50 9 | 50 9 | 50 9 | |||
| Спекталын діаналазон чустгеловосту, μm | 8-14 | 8-14 | 8-14 | |||
| Оttуоесные Харахтерстук | ||||||
| Уветшиени, крат | 1,5-3 | 2-4 | 3-6 | |||
| Оь实体经济 | F38 mm, F/1,2 | F50 mm, F/1,2 | F75 mm, F/1,4 | |||
| Цдrosов зум, крат | 2 | 2 | 2 | |||
| Удане въхоногу заразка, МM | 67 | 67 | 67 | |||
| Уtron поа sprenь (TXB), рад | 14,4 / 10,8 | 11 / 8,2 | 7,2 / 5,4 | |||
| 2x zoom: 7,2 / 5,4 | 2x zoom: 5,5 / 4,1 | 2x zoom: 3,6 / 2,7 | ||||
| Уtron поа sprenь, м на 100 M | 25 | 19,2 | 12,8 | |||
| 2x zoom: 12,6 | 2x zoom: 9,6 | 2x zoom: 6,4 | ||||
| Диамазон Фоксирobки okулар, дир | -4...+3,5 | -4...+3,5 | -4...+3,5 | |||
| Масималын діstанця обharужени, M* | 950 | 1250 | 1600 | |||
| Минималын діstанця фоксирobки, M | 5 | 5 | 5 | |||
| Прицелаяmetka | ||||||
| З�а Клика, ГВ, ММ@100M | 40/40 | 30/30 | 20/20 | |||
| Зэрасхая різцьйнійmetкі, ГВ, ММ@100M | 8000/8000 | 6000/6000 | 4000/4000 | |||
| Ди检пney | ||||||
| Тул | OLED | OLED | OLED | |||
| Полевhoe разшени, пankель | 640x480 | 640x480 | 640x480 | |||
| Зклоуаточьийхарахтерстук | ||||||
| Нарожени пітамя | 4 + 6 B | 4 + 6 B | 4 + 6 B | |||
| Тул батар | 2xCR123A | 2xCR123A | 2xCR123A | |||
| Вөлөөе пітамя | 8-15 B | 8-15 B | 8-15 B | |||
| Вөрma рâбтоbl ot кOMPліпкту батар** , u | 5 | 5 | 5 | |||
| Масу. удагая с低调осты на нарознор орухки, Дожунай | 6000 | 6000 | 6000 | |||
| Стени hyацшы, кол IP (IEC60529) | IPX7 | IPX7 | IPX7 | |||
| Рâбочая төнөретаура, °C | -25 ... +50 | -25 ... +50 | -25 ... +50 | |||
| Гарбашь (ДIXШБ), ММ | 335x80x75 | 343x80x75 | 381x80x75 | |||
| Масca (Бe3батари Крочтуна), кr | 0,6 | 0,7 | 0,77 | |||
MaKcMaaBHaHnCTaHnO6HApKyHnO6bKaTaP3MePoM 1,7x0,5M
Pa6oTaBpeXnMEaheproScbepeXeHHr.

KOMJIeKT NOCTABKN
- Pnueen APEX
- Hexon
BecnpobOHOIpy
KpoHHTeHH (CBNHTAMN WecTnRpaHHbIM KIOHOM)***
Bundeokaeb / Kaebb BHeuHero nTuHa
Hnctpykunno 3Kcnnyatau
CanpeTka Dnra YnCTKN ONTNK - RapaHTNHBn TaIOH
BmOeIbHbIX noCMAkX KPOHmueH e KOMnEKM MoKem He exOdbm.
IyuyuHnemopmeBumelckcxoeJcme u3denn e 0eKohcmpkyuOmyz hocumcby yceepuHmecHeoua

ONICAHNE
TeNIOB3HOHbIe npuEblApex npedHa3HaueHbI dIyNCIObOAHn HA OXOTNHbXpykBxKAK HObI, TAK N DHEM B CNOHXbX NPODbIX YCIOBAX (Tymah, CMOR, DOXkb), a TaIOe npu HauHmnpenrCTBn, 3aTyPDHIOUX6 OhapuyKeHne cIeIN (BetTK, BbICOK TaPra, RcyTO KyCTAPHHK nTI).B OTNIHcEOT npuEBOH Ha 6ae 3JNEKTPOHO-ONTHeCKN pnoOpBa3oBAteNe, TeNIOB3HOHbIe npuEbl Apex He HxkydaiOTcR BO BHeUHMecNTOCHYMe CBeta I He 6oRTCA "3acBeTOK". CpebpI npIMHeHn npuJeOB: HAbIODeHne I opneHTpOBAHBe B yCNOBIAx ORpaHUYHOB BIDIMOCtN, OXOTA, NOCK, CNACEHne.

OTJNUHTJEbHbIEOC06EHHOCTN
OnTnka:
Bolbwoe ydaneHne BbIXoHoro 3paKa (67 MM)
-Функци BAHyTpHHeH pOKyCnPoBKn 06bekTNBa
- ONTNueckoe yBENnueHHe ne 1,5do 3 kpaT
Bolbwoy yron nonra 3peHn
3neKtpoHnka:
Matpua 384x288 nKceen
- OLED dincnnei (640x480 nKceJe)
-Плавский Крпобов 3уm 1x-2x
Функия ПС(«КартннКВКартннKE»)
- TpnpekkmaKaJIINbpoBKn:pyHOn,ABTOMaTHueckn,NONyABTOMaTHueckm
- Tpupekma pa6oTbI -ckaJIbI,neC,pacno3HaBaHne
- Pexkmbi INHbepcnn m3o6paXeHnra "White hot" n "Black hot"
- WnpoKm Bb6op nepeKnUoyaeMbIX MeTOK B nAmrTn npuEJa
Функця"прстpenka OДнHM BbICTpeHOM"и cФункцeн"FREEZE"
ФункцяЗANOMMHaHnI npaMeTPOB pnpCTpeNkДЯ Tpex BINOb OpyKJ
NINDCTAHUN
- Bb6op qBeta npuuehno MeTK (6enbl/epHb)
DononHnteNbHbIe fynKnN:
Pekm3heproc6epekeHn
Bo3MOxHOCTb pa60TbI OT BHeUHero NHTAHNA
BbCOKaYdapHaCTOIKOCTb
CTeneHb3aunntbIPX7(nonna3auntaOTnpoHKnHOBeHHB0db)
BndeOBbIXoD - BO3MOXHOCTb BnDEO3aHNC Ha CTOpOHHe yCTPOIcTBA
-Фyнкuaу ydaJIeHnI DepeKTHbIX NIKceJIeN
- DononHntelbHa nHaNkWeaver dnyyctaHOKn akceccyapOB
BecnpoBOHOHnybT DnCTaHOnHHoro ynpabJeHnA
IUPOKNI DIIANA30H PEGYINPOBKN IKPCKTNI KOHTPACTCA 3AIONMHAHEM NOJIb3OBATeNTbCKNX HACTPOE
ФункиогOTKIOUeHINДИСПЕ-обспчВаET3aUNTYOT demacknpoBKN
N6bICTpoe BKNIOUeyHne Dnra daIbHeHWe rO nCNOJb3OBaHn.

3JEMEHTbI OPGAHbI YIPABJIENH
1.KhONKa BKNIOueHn npWJena"ON"
2. Khonka kanaibnboynk "Cal"
3. KhoNka BKNIOHHeHn DOONHHTeBbIXpeKHMOB“MODE"
4. KoHTeINHeP 6aTapei
5. Konbuto dnoontpnHoi noCTpoyn OkyIpa
6. PerynTOp BHyTppeHHen fokycnpOBKn oBeKTnBa
7.ObekTNB
8.KpbIkaObekTnBa
9.3Hkoep
10.Pa3bEm BnDeOBbIXOa/BHeuHero nTaNHa
11. DononHnTeBHaA nnHaKa Weaver
12.KpOHwTeHH
Bndeokabe / Kaebb BHeHero nHTaHn:
- WTeKepe noKnHueHnK npuJeNy
14.Pa3bem BnDeoBbIXOda
15.Pa3bEm BHeuHero NHTAHN
NytbTnctaHOnHHoro ynpabJeHHr:
16.Khonka"ON"(BkHoueHne/BbIKNIOueHne npuena)
17.Khonka"Cal"(kannibpoBka npuena)
18.Khonka“ZOOM/PiP"(unppoBo3ym/ФyHKcua"KapTNHkBAKapTNHke")
OPRAHbIyYPABJIeHHa:
KhONKa BKNIOHEnn npNcena"ON":
KopoTkoe HaxaTne -BKNIOUeHnE npuIeJa.
TEnbHoe HaxaTne -BbIKIOueHne npupeJa.
KopoTkoe HaxaTne npn BkIIOueHHOM npupeene-BbIKIOueHHe DcNner
(Ha dncnnee CBetntcH HAdnnCb "Display off").
CneDyIOoee KopoTkoe HaxaTne - BKnIOueHne DnCnner.
OTKpbITb:3aKpBITb:
KhoNka KaIIN6pOBknp6opa("Cal"):
Kopotkoe Haxatne - kalipobka npibopa (pa6otaet B IIO60 mekime kalipobkn).
KhONKa BKNIOUeHnI DOONHHTeBHBxpeXmOB ("MODE"):
Kopotkoe haxatne - akTnBaunu ynpoboro 3yma n6o pexima "PiP
("KapTnHKBA KapTHKe") (ecJIN pEXIM PiP BKIOHcB MeHO).
IInTeBHOe HaxaTne - BkHIOueHne/BbIKHOueHne pexIMa "INHBepcna".
3Hkoep:
BpaueHne (no ymoJuaHHIO) - peryInpOBka npKoCTn DcNpJe.
KopoTkoe HaxaThe -nepeKnHouHeMexdy peXmamn peryInpOBkN
RKOCTN, KOHTpacta H N3MeHHe UΦpOBOrO YBeJIuHHeHn ("NJaBbH" ZOOM).
BpaueHne (nocJe KopoTKoro HaxKaTHra) - peryInpOBka KOHTpacta
Dinncnna.
BpaueHne (nocne kopoTKoro Haxatna) - m3MeHeHne UppoBO
yBeIuHnO (OT 1x Do 2xC warom O,1x).
HNTeIbHOe HaxaTne -BXOdB MeHIO.

NIKTOPPAMMbI MEHIO/CTPOKNCTATYCA
Pexm pa60tobi"Ckabbl"
Pekimpa60Tobi"Jec
Pexm pa60Tobl "PaCnO3HaBaHne"
M PyuHou peXMM kaJIb6pOBKN
H NonyaTOMaTnueckn peKm KaN6pOBKn
A ABTomatnueckn peKm kann6pOBN
IpeeknueHne BbIXoHoro BndeocnHaJa PAL/NTSC
PexMM HAcTpOuKu YacOB
PerynupOBKa npKoCTn nKTOrpaMM MeHO
x2 LInppoBoe yBeneHne 2x
Pexm ydaenHn depeTHbIX nKceJe
Kpct dny ydaeneHn dephiKTbIX NIKCeIeN
O:PerynopBkA pKoCTN / KOHTpacta
PekIM INBepcnN N3o6paKeHn: "White hot"/"Black hot"
Bo3BpaT K 3aBOcko KapTe NkceNei
INHdkaTOp 3apda6atapen
HdNkAtop paObI O T BHeHHeRo HCToHHKa NtHaHn
OncnHHe OCTaJIbHbIX NIKTOrpaMM HaxoDITcB B pa3dene 11 "MeHIO".

OCO6EHHOCTN 3KCIJYATAUIN
Pnpen npedhaaehn dnnTeNbHOro nCnObn3oBaHH. Dnno 6oeCneHnepaoTocncO6HoCTN Heo6xOIMMo npDepkXNBatcbc CnDyUuNX peKoMeHN Daui:
- Pered nauanom 3cknnyataun npueta y6eintecb, YTO Bby cTahOBINn n 3aikncpobai n kpoHHTeH cornacho yka3aanm pa3deJa "YCTAHOBKa KPOHHTeHa".
XpaHHTe npuIeN c 3akpblToN kpbIikOIOBekTbNA B Yexne. - BbIKIOaHTe npuIe Iocne IcnoIb3OBAHn.
CamaoctoTaeBHO pemOHIOpOBaB mpa3bnpaR rapaHTnHb npriuZpeauaTaetc?
HApKyHyIOYCTKY ONTHeCkXN DetaneN PnO3BODInTe OeHb AkkypaTHO NToIbKO B Cnyae HeoBXoDMocTN. BhAane ocTopoxHO ydAnTE (CMAXHrTe INN CdyTIe) C ontTHeCKNOpeBEXHO nIbJIb N necK, nocNe OoucEeTBJAE YCHTK. POnb3yIMTeB cHtOIN XnOHaTObMyaxHoanCaIeTKO (BaTOn I nepeBAAHON NaOpKO). cneUaNbHMn CpeCTBAmN DnINH3 CMHOrOCFNoHBMn NOKpblTnMI. - Ppiue MoKeT 3KcNlnyaTnpoBaTbCBy B WnPOKOM DnAna3OHe TemnPepatyp. Ecnn npi6Op 3KcNlnyaTnpoBancra Ha XoIOne N 6bl BHeceH B Tenooe NOMeUHe, He BByHMaJIte erO n3 YexNa B TeYeHne He MeHee 2-3 Yacob, 3TO No3BOJNT ppeDToBpAITb NOBJeHne KOHeHcATA H BAHEHHX ONTHuecknx JEMeHTax.
- Ecni Bam He ydaIocb NERKO n HadeXHO (6e3NIOCTa, CTPOBO BDOJI NINH CTBOA) yctAHOBInb npuien ha pyKBe INY B AcB IMeHTcO COMEHnB INPabINbHocTN Kpenexa, OgbatNTecb B CNEUAMINHPOBAHHyO opyeKeHHo MaTcepCKyIO. CTePNb6a C henpaBIMbHO yCTAHOBnEHbIM npueiON CHIXKaET ToOHCTb NOJADHnB U CEJI!
IЯ obecneuehenia be3otka3Horo fHyKunOHIOBaaHn,npdynpejckednH nYCTaHHeHH npmHn,Bb3BaHOuNix npKDeBPeMeHHn H3HOC IN BxOJn I3 CTPOy3NOB n DeTaei,Heo6XnIMo CBOeBpeMeHHO npOBODtB TEXHneckc OCMOTp n OcbnykBaHnme npUeHa. - PpN DnITeHbOM xpaHEnn n3BneKeNTe 6aTapeu n3 npueJa.
Batapeh ne IohKnHbI noIepBaTcSBrCa 3e3mePCHOMY HARpey O TcIHeuHO rCBeta, ORHn IIN NoIOobHbIX NCTOHNKOB.
BHUMAHWE! 3anpeuaemn Hanpaenmb o6kme npuea ha rpke ucmohuku ceema, maek kac conHe. 3mo moKem bIeBcmu 3neKpmHbIe KOMIOHEMbI npuea u3 cpmo. Ha nopeKdHnur, bI3aehHbIe
HecobliodeHuem npaeun 3Kcnnyamaauu, zapaHmua He pacnpocmpaerncra.

YCTAHOBKA BATAPEI
Повернente руку Кршки Контейнера 6аразец (4) npotmb уасьоь CTpeKNB noNoKeHne "Open"и CHMNTe ee.
- YCTAHOBNTE DBE 6aTAPEN TUNA CR123A (NMM AKKYMnTOpA) B COOTBETCTBmC MapKpOBoKn Ha KpbIiKe KOHTeHepa 6aTape N BYTpN KOHTeHepa.
- NopbepnTe pyky KpbIuKoKoHTeHepa 6atapei no yacobO CTpeKe - BblBHyTc3aueKN (CM.Cxemy).
• YCTAHOBITE KbpiuKU KOHTHEHepa 6aTapei Ha MecTO i HADABINTe HA HEO du IeHNKA - KpbuHka 3akpoETc.
- YpOBeH3aPJaOTo6paXaETcBCTPOKe CTAtyda
PnnpnonHompa3pae6batapeBcTPOKe cTAtyCa Mrraet NIKTORpaMMI
Ppumuehue:pnobocneeyHnpoDOnkumebHO u CmaBnHO
pa6bmy np6opa peKoMeHdyemcNcNoB30aMbKaeccmEHHbe
AkkymnMopHb6amapeu 16340 (CR123A)EMKOCmbHe Me Hee 800
Ma. He cnloB3yUme pa3hOUMHbE 3nEmeHbI numAHur unu bamaepu c
pa3HbIMypoBhem3apra.

BHEWHEE NITAHNE
PnueMOKeTpaOtaBt BHEUHrero HcTOHHa NITAHIN (WTEKepe CTAndapTa 2,1 MM) INN OATABTOMO6bHOcTe. DmaNa3OH BXOHBIX HANpAKeHennOT8Bdo15B.
-Поdkнчite wtekep (13) ka6eЯ Ka pa3bemy (10) npuca, coBmecTNb na3 Wtkepe C bVcTynom pa3bema (10) (cm. cxemy).
3aФисИрУге Ka6eB, 3akpyTnB CTOnOpHoe KOBuO WTekepa (13) no. 7accoBoi CTpeKne.
IIOKIIOHTBEHUNNCTOCHNKNTAHNA(AC/DC)NNABTOMOBnHBn aanTep Kpa3bemy(15)ka6en.
Bhumahue! B wmekepe numahur, nooknouaemom K npubopy, uehmpanbHbui KOhm dOnken 6bimb “+”.
Bo3MOxHnA MapKnPOBkHa Ha WTeKepe NIN NCTOuHnke NNTAHmO-+
Пи ДКЛСУНЕМИ ВБLEHIО NGTOCHUNA NITANHIMВ CBTOPECTATCYA NaHEJI NOBINTC NIKTORPAMMA.NITANHIE O BTAPAE OTKNIQUHTC.
Bo BpempaobtboT BHeHero HToUHnKa NITaHn3apdka aKKyMnyTopoB He ocyuectbnreTcI
PekomeHcyemncnObTaB6IOKNI BHeHrero nTAnHepES3nIePS5, 0ecneueBaIOUmeOT9do2oacOB HnpepbHno pa6Ote npceJa.

3KcπΠyATAUIN
YcTaHOBka KpoHwTeHHa:
PnCTpeJIka MeToOM "ODHOro BbICTpeJa":
- YcTaHOBnTE opyKne C npuIeJOM Ha npuIeJIbHOM CTaHKe.
- YcTaHOBnTe MmUeHb Ha npucTpEnBaemyO daIbHoCTb, HApnPmep, 100 M.
HactpoTe npueI cornacho pekomeHaau pa3deJa 9 "Kcnnyatauaia
HaBeTeOpKHe HaIeHTP MmEHN No MExAHueCKOMy npuJeNy.
CdenaIe BbCTpe. Ecn ToKa nonaHnHa He coBnana CToKoN pniueNBAAHn, HnTeJIbHbIM HaxaTHeM KHONKn 3HKOepa BoJInTE BMeHO M2 npuena I BpaUeHm 3HKOepa BbIbepte NyHKT PnIcTePka (0603naeTaTcNtKTOrPAMMOΦ).
BueHTpe DnCnne NnoBNTc onOpHbI Kpct (K) Cnpaba OT NIKTORpaMMbl NOBRTc ROPN3OH-TaBHe BCTpeJKN I KOOPDInHaTb ONOpHOro Kpcta - UdepKINBAI npuuehHyo MeTKy B ToKe pnpUeHNBnH, BpaueHneM 3HKoepa NpepDraIte ONOpHB KPECT OTHOCHTeNbHO MEKN DO Tex NOP, POKA ONOpHB KPECT HE COBMECTTcC TOKKn nonaHaH (I) (CM. pnc.).
MnCMeHbHapBaBHeHn ABnKeHn MEKn C rOpN3OHTaBHO Ra BPTKAnbHoE KOPOTKO HA KHONKY 3HKoepa. PnTOM 803ne NIKTORPAMMbN NOBRTCBBPTKAnbHbIe HINHIN
Bhumaue! Onopbukpckm moeknepedeuaambcmonko npdenax oapauuumelbho pamku (cm. puc.), komopar onpeidenreem duanazoh ebeepok: 200 kknou no oopuzohmanu (+100/-100) u 200 knukoe no eepmukanu (+100/-100).
BbIINTE n3 MeHIO 《PnCTpeNka》DnITeNbHbIM HaxaTMEM KHOKNK 3HKoepa. POnBNTcR HADnncb OK, NOdTBePckDaOuay YcneuHoe COBepuHHe Onpaun. PpucelbHaR MetKa NepMeCtTcR B ToKy nonadAHy.
BHumaue! He ebknouaime npuen do mex nop, noka hacmpouku npucmpenku He coxpaHebl.
CenaiTe NOBTOHb BbCTpeI -Tenepb ToKa nonaHaNdoKHa COBnadaTb CToKoPiuEINBaHn.
PnpueI npncptpeHn BbippaHHyIO nctaHnIO.
PnncptepkacyHKneFREEZE
- Параобтс с даньим nyнков MeHIO сдени Te npncTeNoHbB BvCTPEN.
-BoiTe NyHKT "Freeze" B MeHIO M2.
3nepocnt Hkaatne hkoepa nnHIObo KNKnI PyB Teeyhne 3ckyndn 3amopaknaBHnA (zAnOMHaHn) N6OpaKeHH. B cTPOKE CTATyCA OTObPAaetc INHkauaNpAbaToB b DAHOM pEXKHe. - Ipeed Haxkntem KhONKn PnIeBHy MoTeKy npIeena Heo6xOIMo COMeTHTc TTOUY KnPUEINBAHmA (KAKPABINO - CEHTPOM MIIueHe) Tocne Haxnatna NIOBKn KHONKn 130bpaXeHne 3AmopakXBaETcN oNOBJIaTcR oparHnUteBHaH pAMKa C ONOPHbM KPECTOM.
PpumueaHue. Nocne 3amop03ku u06paXeHua ydepKueamb opyxue HabeEHbIM Ha MuuHe He mpeSyemc.
Bpaaia 3Hkoep, npeMeuaTte onopHbI kpcET B npedeJax orpAHmHTeBHO paMKn doTex nop, noka OH He COBMeCTNTc TToKo nonadaHn.
Kopotkoe Haxatne KhoNkn 3HKOdepa No3B0nIe nepeKIOuHaTb
hapanBaNEHne nepeMeEChnOOnpHOro KpcTa (no rpnIsOHTAni INn no BepTKaN).ДиTeJIbHOe Haxatne 3HKOdepa NOIITBeRJaDaET coXPAHeHne
nonPABOK N IO3B0nER BbIIN I3 DAHNHO rYHKTA MeHIO.
- CoxpanenHe KoopDHHat NOITBepKdaETcR COO6eHnEM "Ok" B MeCTe OTo6paxeHn KooPdHnat.
- PnBbIXOe I3 MeHIO BUNEOON6paxHeN BOCCTAHABINBAeTc.
Pumpeuahe:napaempbI npucmpenku (koopduhambX;Y)
3anucbeiaomc e nammb npueeta nol HoomepE 1 nyHKme "BbIob opyKuMehoM1.Ecnu BbX oomute npucmpenmb npueenHa dpyaom opyKuu unHa dpuyyio ducmahuo, bibepume Homep 2 unu 3 (nodp0bhee cm.nyHM"BbIob opyKu"paedena 11).

H0
PABOTAVCOCTABMEHIO
HnTeBHe HaxaTne 3HKoepa-BXOdB MeHIO.
BpaueHHe 3HKoepa-HABnraUNo MeHIO.
Kopotkoe Haxatne - BXoB BpyHKT MeHIO; BbIbOp 3aueHnry NyHKTa MeHIO, c OAnOBpeMeHHbIM BixOdom n3 Hero, IIN60 nepeXoDOM K CNeIkyOuEMy napamETy (Nacb).
Hae Haxatne -BixoN U3 NyKtMa MeHIO MHeHO (B 3aBcMOCTu OT NOXeHn KypCopa).
Takke BixoN 3 MeH0 OcyuCTBnETcNocne DecaTn cekyHd 6e3deCTBnR (He OcyuCTBnETc HABURA B MeHO).
MeetcDBeMa MeHIO:
M1-MEHIO1(OCHOBHOE MEHIO).
M2-MeHIO 2 (DOONIHHTENbHOE MeHIO).
IJIpeKJIIOeHnI Heo6xOIMOBbIbpaTbNHTMHeM01nnM2(pamKa HauHET MIRaTb) INpKaTO HAKAtbHa3HKoep.
CTPOKA CTATYCA
B ctpoke ctaTyca oTo6paKaetcCneDyIOuaa HnΦopMaunr:
1.Homep BbIbpaHHoro pyKb (1,2,3)
2. PeKIM pa6oTbI ("CkAnbl", "Lec", "Pacno3HaBaHne"):
3.PeknK kaHbpoBkn (pyHOn, NOyABTomATnueckn, ABTomATnuecknM
4.BKIOUeH UΦpOBoH 3ym x2x2.0
5.BKIOUeHa"INHBepcnaN3O6paXeHnA
6. Tekyuee Bpem:00:00 AM
7. Tekuzni 3apd 6atapei N6o NOknoeHMe BHeIhero MToCHNKA nHTAHn:

CocTab MeHIO M1:
Bb6oppeXmpaP0Mode
Bb6oppekma kann6pOBKa
Bb60pyk81,2
BbIbOpMeTknn3namrtnnpnbopa
- PerynloPbKRA pkoCTIN rpaФm(MeHIO nctpOKN cTATyCA)*
-13MeHHeHNE LBeTa MeTKn
PexnM Pip
CoCTaB MeHIO M2:
- PnncTpknka npuceJa ODHIM BbICtpenOM
- Pnnctpenka npuena c cyHKnei "Freeze"
- Bb6op cTaHdapTa BxOdHoro BnEOcRHaHa-PAL,NTSC INI ONKJIIOueHeBnEOBbXoDA
HactpoKa BpeMeHN
ABTOpN3aUNI
-yaJIeHneIepeKTHbIXNkCeIeN
Bo3BpaK HAcTpOuKaM no yMonuHaH
MEHIO M1:
Bb6oppeXma pa60Tbi
IMeetc Tprn ABToMaTHuecknx pexmpaaboTbTeNIOB3Opa - "Ckani"
(BbICOKK KOHTpACT), "Iec" (Hn3KoKOHpACT) n "Pacno3HaBaHne" (ynyuueHHa detanua).
KaKbIaHpeXIMOB BKNIOAHTB C6BnOTNIMABHOe COCTAHNEnapametpoR (pKoCTb, KOHTpact, yCUNIEH N.T.D.) nOBEcneHHAnHnyuero KaueCTBA 306paxehnE B KOHKPtehBx ycNOBHN HABNOHEN.
-ДяВьбopaВарнТаHAЖМЛТЕЗHKOДЕРИВрацайтerefo.
- PoiTBePdnte Bb6op KOpOTKm HaxaTneM 3HKoepa.
- NkTOrpamma pexmma oTo6paKaetcB cTpoke cTaTyca.
Bb6op pyxbsr (1,2,3)
DaHbIyNHTNo3BONJIeTb6pTaTPN NOIOKHeHH TOHINPnCTpeKN DnA p3HbXbTNOB pyKb(NHOpa3HOINCTaHUN),a TaICKe 3AnOMHaHHe TEPx BDAHTOB METNJ KAKDOI TNIpyDyKb.
Дага Вьбopa ВаранТа НжмITE Знковери ВьберпЕ Римета И спсіка (1,2.3).
- PoiTBePdTe Bb6p KopoTKm HaxKaTHeM 3Hkopepa.
HomeBb6paHHoro BapnHaTaNcNoNb3yEmoRpykBaOTobpaKaetcB CTpOKe cTaTyca.
P.S. B nepBOHaanbHOM COCTOHNm PnueenbHaar MTeKa dna BCex TpExBapmaHTB paonOnoKea HcTpe (X=0,Y=0). Danee dna KaKdoRBOpaHaHTa pykka ocUyecSTBnEraTc INHnIBuDyAnbHpaNpiCtpenka.
Bb6oppeKMaKaH6poBKn
CM.pa3d99"Kcnnyatauia
Bb6op MeKn n3 naMrtn np6opa
DAnHHn nyHKT no3BONrEt Bb6paTb OHy n10 npedyctaHOBBneHHbIX npuehbbix MeTOK. B nyHKe MeHIO oTo6pakaetc HOMep MetKn.
Pexm pa60tbi -CKaJIbI;
Peknkan6poBKn-ABTOMaTHueckn;
Bb6op opyxna-1;
Bb6op npueJIbHOI MetKn-1 (INRA BCEX BUNIOB opyxna);
UBetMeTK-Hehbl
Rpkoctb rpaqnn (MeHIO n CTpOKn cTaTyca)-5;
BnneOBbIXo-BblKJIIOH
yPOBHeH JPKOCTn DcNnner-12
YPOBHeHb KOHTpacta DnCnnne-12
UnpoBo3ym-x1;
HbBepn-BblKIOHeHa;
ФункиЯ"РiP"—BbIKNIOHeHa.
ДЯ OTKa3a OT BO3Bpata K 3aBODcKIM HAcTpoKam BbIbepTe "No".
BHumaue: koopduhambl npucmpenku dna ecex eudoe opyxur He
cbpaebiaomc

BnDEOBbIXOa
PnueoCCHaueH BnDEOBbXODOM nIe NOKJIIOUeHnBHeuHX BnDEO3aINcBbAHOxuYCTPOJCTB N BbBOdaN306paKeHHaMOH
-Поdkннчite wtekep(13)ka6eЯк pa3bemy(10)npuena(cm. cxemy),COBMECTN B na3 B wtekepe C bblctynom pa3bema(10)(cm. cxemy)
3aФИKcHpyTe Ka6bEn, 3aKpyTbB CTOnOpHoe KOnbIoo ITeKepa (13) no. yacboi CTpeJIke.
-ПОДКИЧТЕПрИЕМнIKВДЕОСИнHAlaK pa3bemy(14)ka6eЯ.
BKNIOHTPe pInuEN H Bb6epTe FOpMAt BbIXoHOro BnDeocnHana -Ha BHeUHEm YcTpoIcBe NOBITcN 1306paKeHne. BHeUHee yCtpoIcTBO DOnXHO 6bItb KINIOUeO H PexIMe AV (MOHITopA).
ДЯ BИDEO3aHcN 3IO6paKeHnBb MoKeTe NcNoJIb3oBaTb BInDEOpekOpdepbl Yukon MPR (#27041)/CVR640 (#17044) nIpyrme.
Bhumahue: He peKoMeHdyEmc ycmaHaenuAamb uedepeKopdep Ha npuue, m.k. uedepeKopdep He npedHa3nauH en dny ucnolb3oehua npu ydaPbHx Haayy3kax.

NYbT DnCTAHUHOHHO YNPABJEHNA
BecnpobodnH npbT nctaHNOHO npabNEHn Dy6npyet FHKnBn BKNUOeHn npBopa, KaNbPbKNu cNpboBOr 3yma/PiP. Ha npbTe NmEETc TPN KONKn:
-Khonika“ON”(16)-BkNooyehne/BbIKNooyehne npuena(nra BbIKnooyenrydepXNBaTB DBe cekyHdbI).
-Khonka“CAL"(17)-KanibpobKa.
-KhOnika“ZOOM/PiP"18)-BkJIIOueHHe/BbIKIIOueHHe cIΦpOBOrO 3yMa IIN ΦyHKUIN PiP.
Peped Hauanom paobtbc yero heoxdmoaknubpoBaT, nra 3TOrO:
BKnIOUHTe npuIeN BbIbepNTe NyHKT MeHIO “AKTNBaUNIaN Iy" (nIKTORpAMMa
HaxMMTEKODep, NOBHTC COO6eHHe "Wail" HauHETc8o4phtbIOnOTcET BPEMeHN, B TeChHne KOTOPORaHXMMTe ydepKnBaTBe TteHHeDByX CekYH, IIO6yio HONKYIpy.
Bcnyae ycnHnA kTNBaUN BO3Ne NKTOrpAMMb NOABNTc coo6uHHe "Complete".NylbT AKTNBnPoBaH n roTOB K paOte.
EcnI INy He pabotaet,3ameHnTe 6aTapeIO. Jnra 3TOrO OTKpyTIne BnHTbHa TblHoN nahEni INy, CnHMnTe 3aHIOIO KpbliuKy, N3BNeKeITe CTapyo I BCTABBe Hobyo 6aTapeIO CR2032.

JIJAHKA WEAVER 7/8"
C nomouhno nnahkn Weaver (11) Bbl mokeye yctaHOBTb Ha npuepn pa3HbIe akceccyapbl, TaKne KaK:
Bnok BHeUHero nHTaHnE PES3 (#79111).

TEXHNUECKNI OCMOTP
PnTexHnueckOMOCMOTpe,peKOMeHnyeMOMnepeIKaJbIMBbIe3dOMHa oxOty, npOBepbTe:
BHeuHn Bn npuea (TpeunHb, rny6okne BMrHb n CneBkoppoHn He donyckaOTc).
- Pnpabunbhoctb HnadexHoctb KpepeHna npueHa opykn (JIOCTb) KaTeropnueckn He donyckaHTcra.
CocToaHHe NnH3 ObbKeTHBa N OkyIpa (TpeuHbI, XkpObIe nTHa, rpa3b I npYMe HaneBtI He donyckaioTcA.
CooTaeHHe 3nEMeHToN HtAHHN 3neKTPueckHX KOHTaKToB 6aTaepHoro OTeKa (6aTaepKeHn He DoJnxHb 6bIb TaPpKeHb; cnebl 3neKTPoHnta, coene n OKCNehn He donyckaioTc).
HaedexHocTb cpaabaBnHnpekeKnioaTea pexmOB pa60bl, 3HKoepa,KHOOKynpabneHn.
- PnabHocTh xOa pyuKn fokcnpOBKn o6bekTbHa n KOnbua okynpa.

TEXHNUECKOE OBCJYKINBAHNE
Texnueckoe obcnykBaHne npoBOnTCHe peXe DByx pa3 B roD n 3aKnOaTeCnB bInONHeHHn N3NoKeHHbHX HNKe nyHKTOB:
OChntte HapyKbIe NOBepXHOCTn MeTaNIIueCKHX INaactMaccOBbIX detaneOT nbnn, rpr3n n Bnarn, npoTpne nx xNONaTO6ymaxHoJ canfetkO.
NIOCHHTE 3eKTPMueCHeckNOKHTaBtIbatapeHOrHO OTeCEKa, NOJIb3yrcb IIO6bIM HKeHHPbO rOpAraHecKm PACTBoPntENe.
- Ocmotpnte JINH3bI OKyJnpa n 06bekTnBa; OCTOPOKHO CMAxHnTe nbIb I neCOK,ecnn Heo6xoJIMO,NOYcHTne IN HApXHbI NOBepxHOCTN.

XPAHEHNE
XpaHNTe npuueB CERda ToIbKO B YexNe, B cyxOM, XopoIO BENTINHyEOM NOMeueHH. PnI dIITeBHOM XpaHeHH 6Ba3aTeBHO n3BNeKHTe 6aTapeH NtAHN.

BbIBJIeHNE HENCPABHOCTEIN
B Ta5nIe npvBeHnpeueHb np6bnm, KOToPbE MOryT Bo3NHKHyT npi 3Knpyataun np6oPa. POnmBeDnTe peKoMeHdyEmyIO npOBepKy nncpAbNeHme B nopJke, yka3aHHom B Ta5nIe. Pnp HauNHN DEpEKTob, He nepeCnHeHbIX B Ta5nIe, INn pnp HeBO3MOxHOCTn CaMOCTOReTbHO yctpaHtB DepeKt, np6Op cneJyET BePHyT dIra PEMoHTa.