W442 - Watch PULSAR - Free user manual and instructions
Find the device manual for free W442 PULSAR in PDF.

User questions about W442 PULSAR
0 question about this device. Answer the ones you know or ask your own.
Ask a new question about this device
Download the instructions for your Watch in PDF format for free! Find your manual W442 - PULSAR and take your electronic device back in hand. On this page are published all the documents necessary for the use of your device. W442 by PULSAR.
USER MANUAL W442 PULSAR
CAL. W442 DIGITAL QUARTZ
• Full-panel dot-matrix liquid crystal panel
• Time/calendar with world time function
- Regular alarm with target date timer function
- 10-hour stopwatch with memory recall function
- Countdown timer
with 10-channel preset and adjustable timer functions
- Button operation confirmation light
- Illuminating light (electroluminescent panel)
- Changeover between normal and enlarged displays
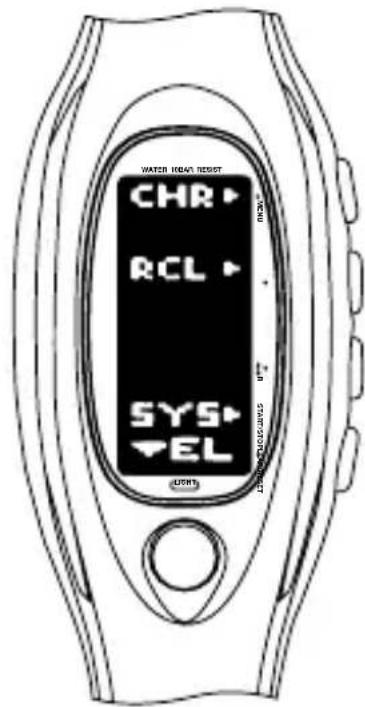
■ Outline of Operations & Functions ■

flowchart
graph TD
    A["START MODE SELECTION display"] --> B["A"]
    A --> C["B"]
    A --> D["C"]
    A --> E["D"]
    B --> F["TIME/CALENDAR mode"]
    C --> G["ALARM mode"]
    D --> H["STOPWATCH mode"]
    E --> I["TIMER mode"]
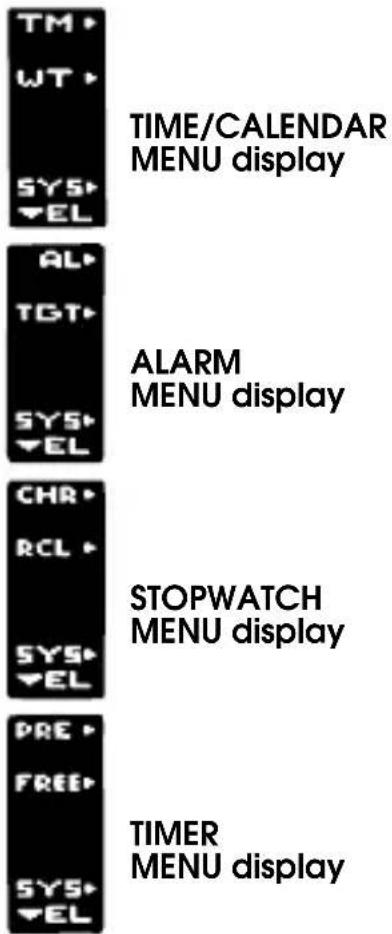
text_image
TM WT SYS EL TIME/CALENDAR MENU display AL TGT SYS EL ALARM MENU display CHR RCL SYS EL STOPWATCH MENU display PRE FREE SYS EL TIMER MENU displayTIME/CALENDAR MENU display
A → TIME/CALENDAR display
• Time/calendar setting
- Changeover between normal and enlarged displays
• Turning on/off of hourly time signal and confirmation sound
B → WORLD TIME display
- City selection
• Changeover between standard time and daylight saving time
C → DEMONSTRATION function
D → SYSTEM SETTING mode
ALARM MENU display
A → ALARM display
- Alarm time setting
- Changeover between normal and enlarged displays
• Alarm engagement/disengagement
B → TARGET DATE TIMER display
• Target date timer setting
- Changeover between normal and enlarged displays
D → SYSTEM SETTING mode
STOPWATCH MENU display


STOPWATCH display
- Stopwatch operation
- Changeover between lap time and split time displays


MEMORY RECALL display
- Recall of stored data
- Changeover between lap time and split time displays


SYSTEM SETTING mode
TIMER MENU display


PRESET TIMER display
- Selection of preset time
- Preset timer operation
- Changeover between normal and enlarged displays


ADJUSTABLE TIMER display
- Adjustable timer setting
- Adjustable timer operation
- Changeover between normal and enlarged displays


SYSTEM SETTING mode
SYSTEM SETTING mode


Return to MODE SELECTION display


DISPLAY ADJUSTMENT display
• Contrast adjustment
- Changeover between horizontal and vertical displays


ALARM SOUND SELECTION display
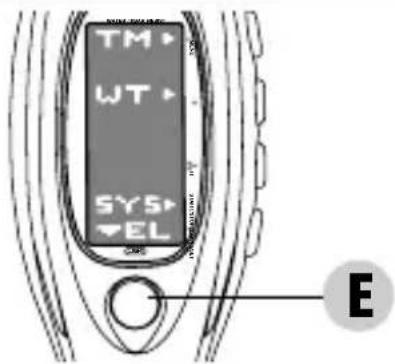
MODE SELECTION
- Selection of a desired mode can be made by pressing the corresponding button in the MODE SELECTION display.
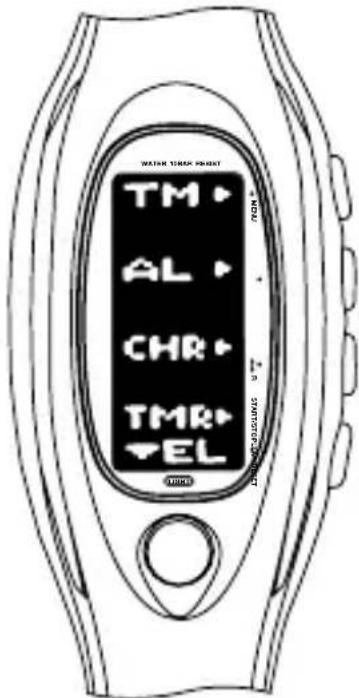
text_image
WATER TIMER KEYNET TM AL CHR TMR ELA → TIME/CALENDAR mode
B → ALARM mode
C → STOPWATCH mode
D → TIMER mode
- To change over a mode to another, press button A to return to the MODE SELECTION display, and then press the corresponding button to select the desired mode.
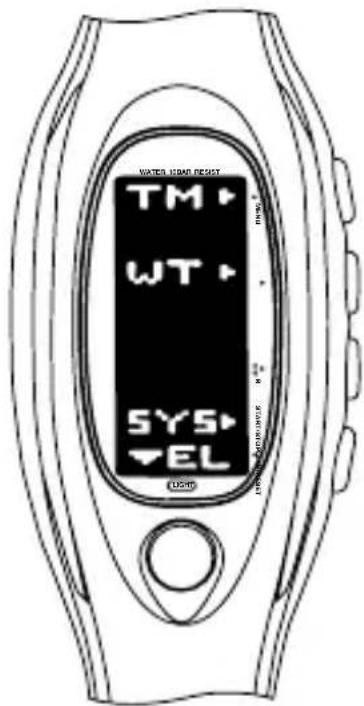
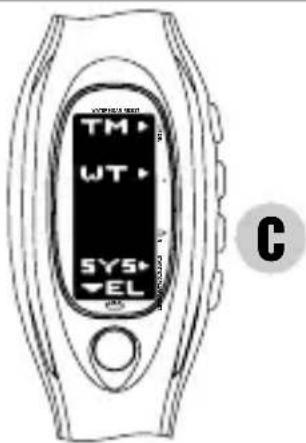
TIME/CALENDAR MODE
A Press in MODE SELECTION display to show TIME/CALENDAR mode. TIME/CALENDAR MENU display appears as shown below.
text_image
WATER LEVEL RESET TM WT SYS EL LPGA → Showing TIME/CALENDAR display
B → Showing WORLD TIME display
C → Activating DEMONSTRATION function
D → Changeover to SYSTEM SETTING mode

Press in TIME/CALENDAR MENU display to show TIME/CALENDAR display.
text_image
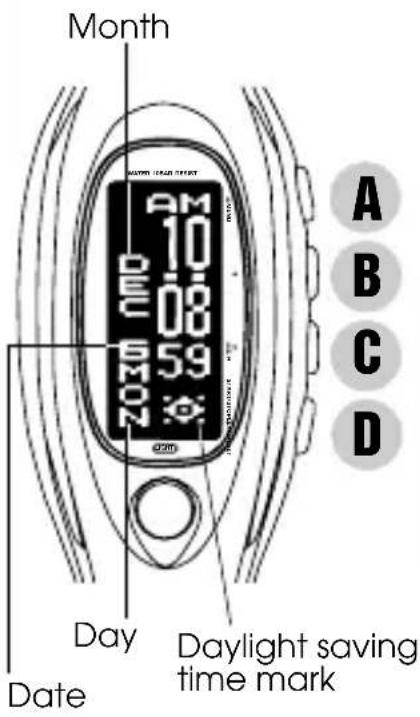
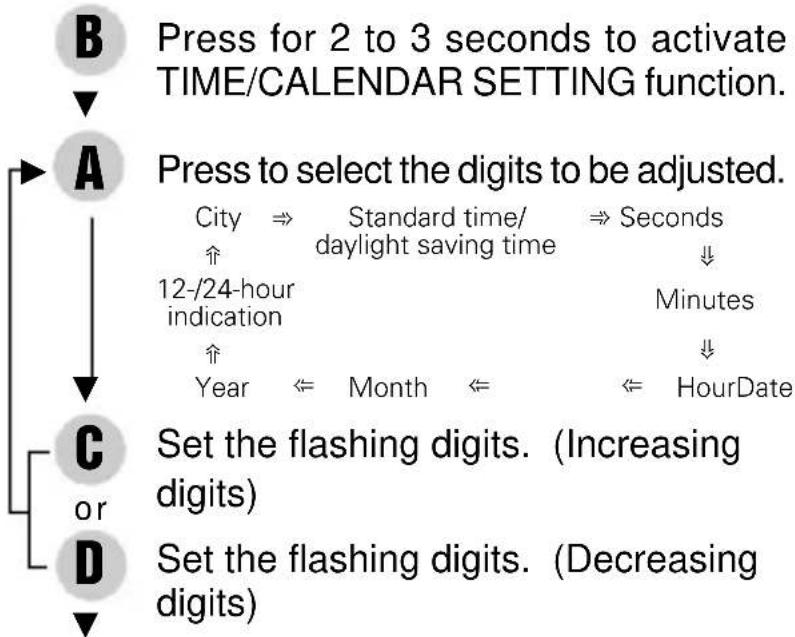
Month DAY Date Daylight saving time mark A B C DTIME/CALENDAR SETTING
flowchart
graph TD
    B["Press for 2 to 3 seconds to activate TIME/CALENDAR SETTING function."] --> A["Press to select the digits to be adjusted."]
    A --> C["Set the flashing digits. (Increasing digits)"]
    A --> D["Set the flashing digits. (Decreasing digits)"]
    C --> E["City ⇒ Standard time/daylight saving time ⇒ Seconds ↓↓"]
    C --> F["12-/24-hour indication ↑"]
    C --> G["Year ⇌ Month ⇌ HourDate ↓↓"]
• TIME/CALENDAR display •
B Return to TIME/CALENDAR display.
CHANGEOVER BETWEEN NORMAL AND ENLARGED DISPLAYS
C With each press, the normal and enlarged displays alternately appear.
flowchart
graph LR
    A["CHM"] --> B["OFF"]
    style A fill:#000,stroke:#000
    style B fill:#000,stroke:#000
    note right of A "D"
    note right of B "D"
[Turned on] [Turned off]

With each press, the hourly time signal and sound for button operation confirmation are alternately switched on and off.
B Press in TIME/CALENDAR MENU display to show WORLD TIME display.
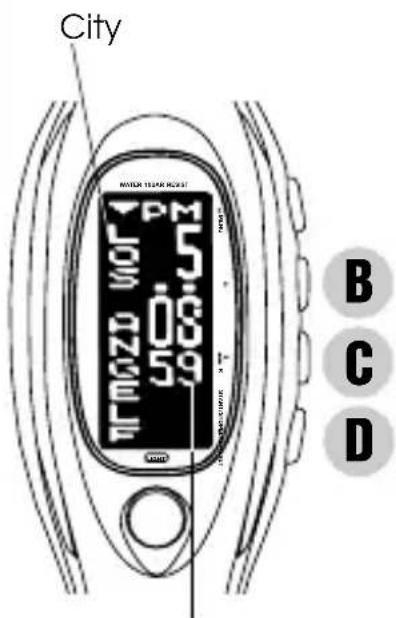
text_image
City MOTOR 100 100 5 3 0 8 9 5 9 1 B C DCurrent time of selected city
B or D Press to select a desired city.
* If the name of the selected city has more than 10 letters, it will scroll three times as the WORLD TIME display is shown and as a city is newly selected.
CHANGEOVER BETWEEN STANDARD TIME AND DAYLIGHT SAVING TIME
C If the daylight saving time is effective in the selected city, press to show the daylight saving time.
* With each press, the standard time and daylight saving time of the city are alternately shown.
TIME DIFFERENCES
- The watch can display the current time of 50 cities throughout the world instantly together with their respective names.
GMT = Greenwich Mean Time
(As of August 1998)
| GMT ± (hours) | City name | GMT ± (hours) | City name | GMT ± (hours) | City name |
| 0 | GREENWICH | + 3.5 | TEHRAN* | + 8 | BALI |
| 0 | LONDON* | + 4 | DUBAI | + 8 | BEIJING |
| + 1 | PARIS* | + 4 | MAURITIUS | + 8 | CEBU |
| + 1 | AMSTERDAM* | + 5 | KARACHI | + 9 | SEOUL |
| + 1 | GENEVA* | + 5 | MALDIVES | + 9 | TOKYO |
| + 1 | ROME* | + 5.5 | DELHI | + 9.5 | ADELAIDE* |
| + 1 | BERLIN* | + 6 | DHAKA | + 10 | GUAM |
| + 2 | ATHENS* | + 7 | BANGKOK | + 10 | SAIPAN |
| + 2 | ISTANBUL* | + 7 | JAKARTA | + 10 | SYDNEY* |
| + 2 | CAIRO* | + 8 | KUALA LUMPUR | + 10 | GOLD COAST* |
| + 3 | MOSCOW* | + 8 | SINGAPORE | + 11 | NOUMEA |
| + 3 | JEDDAH | + 8 | HONG KONG | + 12 | WELLINGTON* |
| -10 | HONOLULU | -7 | DENVER* | -4 | CARACAS |
| -10 | TAHITI | -6 | CHICAGO* | -3 | BUENOS AIRES |
| -9 | ANCHORAGE* | -5 | MIAMI* | -3 | RIO DE JANEIRO* |
| -8 | VANCOUVER* | -5 | NEW YORK* | -1 | AZORES IS. |
| -8 | LOS ANGELES* | -5 | MONTREAL* |
* The cities marked with “*” use daylight saving time (summer time).
• DEMONSTRATION function •
text_image
TM WT SYS EL CC Press for 3 seconds in TIME/CALENDAR MENU display to start the demonstration.
* The watch shows the displays in each mode repeatedly.
* To stop the demonstration, press button A, B, C or D.
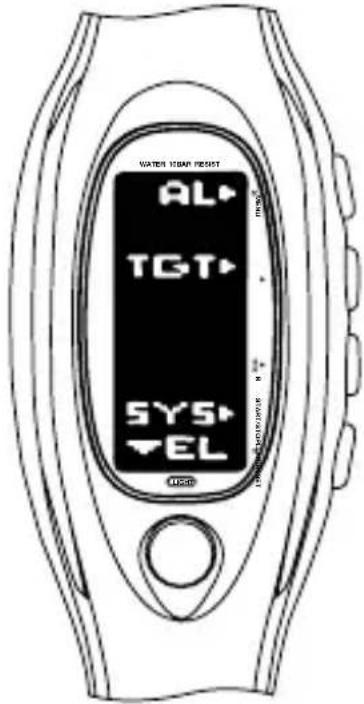
ALARM MODE
B Press in MODE SELECTION display to show ALARM mode. ALARM MENU display appears as shown below.
text_image
WATER ISAM RESIST AL TGT SYS EL USBA → Showing ALARM display
B → Showing TARGET DATE TIMER display
D → Changeover to SYSTEM SETTING mode
A Press in ALARM MENU display to show ALARM display.
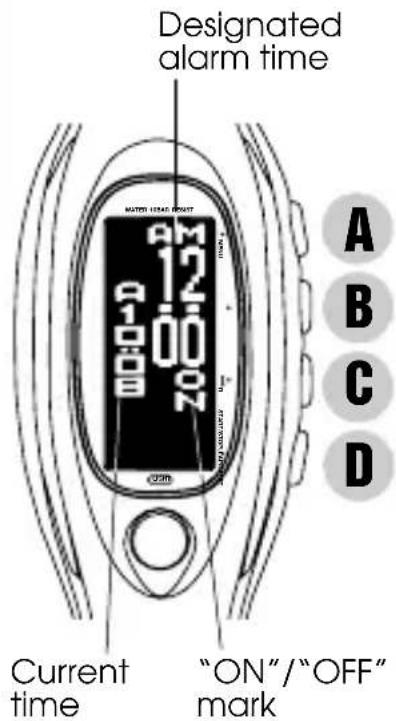
text_image
Designated alarm time AM 12 00 ON Current time "ON"/"OFF" mark A B C DALARM TIME SETTING
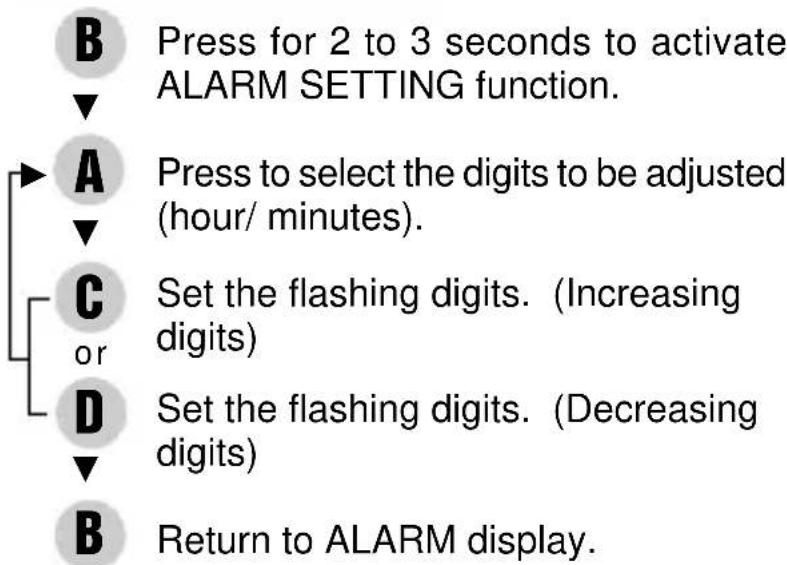
flowchart
graph TD
    B["Press for 2 to 3 seconds to activate ALARM SETTING function."] --> A["Press to select the digits to be adjusted (hour/ minutes)."]
    A --> C["Set the flashing digits. (Increasing digits)"]
    C --> D["Set the flashing digits. (Decreasing digits)"]
    D --> B["Return to ALARM display."]
* "ON" mark appears and the alarm is automatically engaged.
- ALARM display -
CHANGEOVER BETWEEN NORMAL AND ENLARGED DISPLAYS
C With each press, the normal and enlarged displays alternately appear.
ALARM ENGAGEMENT/DISENGAGEMENT

text_image
AM 6 A 1 B D 30 20 D [Engaged] [Disengaged] AM 6 A 1 B D 30 20 OFF DWith each press, the alarm is engaged and disengaged alternately.
* At the designated time, the alarm rings for 20 seconds. To stop it manually, press any of the buttons.
- SYSTEM SETTING mode
SELECTING ALARM SOUND
- The alarm sound can be selected from three different types of tones.
D Press in ALARM MENU display to show SYSTEM SETTING mode.
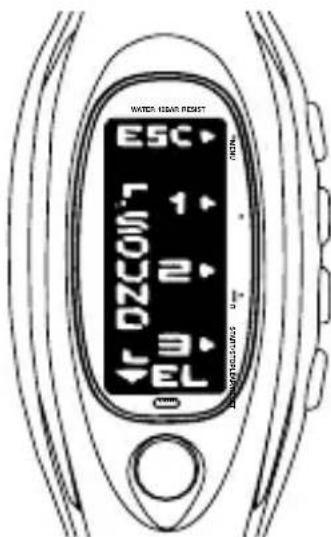
text_image
WATER HEAR RESET ESC 1+ 2+ 3- EL 0-B → Selecting Alarm sound 1
C → Selecting Alarm sound 2
D → Selecting Alarm sound 3
A Return to MODE SELECTION display.
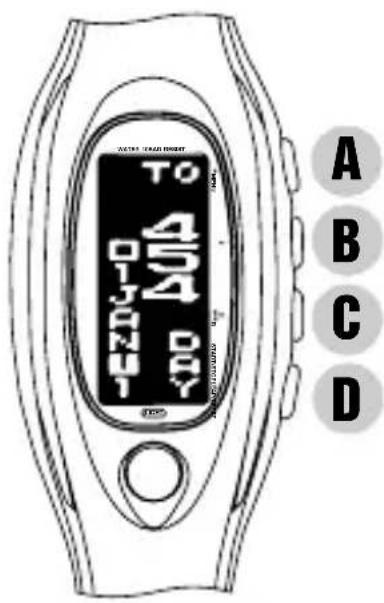
• TARGET DATE TIMER display •
B Press in ALARM MENU display to show TARGET DATE TIMER display.
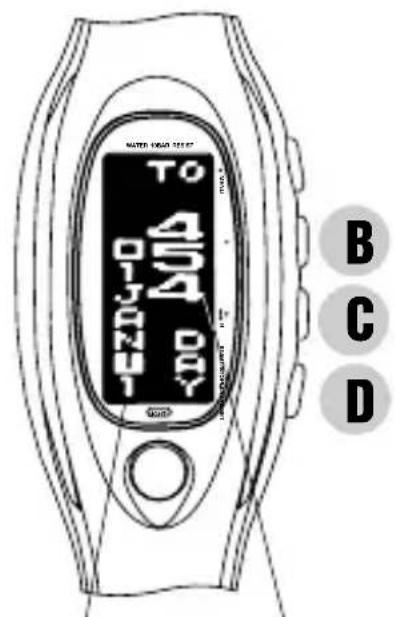
text_image
TO 454 B C DTarget date
Remaining
(elapsed) days
- The target date "January 1, 2001" has been preset for the timer.
- The timer counts down and displays the remaining days until the target date.
- On the day before the target date, the remaining hours are displayed.
- When the watch indicates "12:00 a.m., January 1, 2001", the messages meaning "A Happy New Century!" and written in 11 different languages scroll one by one, as the watch plays the melody of "Ode to Joy" in Beethoven's Ninth Symphony.
- As the target date has come, the timer counts up and displays the elapsed seconds, minutes, hours and then days up to 9,999 days.
D With each press, the remaining (or elapsed) years, days, hours, minutes and seconds are displayed in the following order:

flowchart
graph LR
    A["Hour (HOUR)"] --> B["⇒ Minutes (MIN)"]
    B --> C["⇒ Seconds (SEC)"]
    C --> D["⇒ Year (YEAR)"]
    D --> E["⇒ Date (DATE)"]
CHANGEOVER BETWEEN NORMAL AND ENLARGED DISPLAYS
C With each press, the normal and enlarged displays alternately appear.
TARGET DATE TIMER SETTING
- A desired target date can be set for the timer. By doing this, the preset target date is canceled.
- When the target date you have set has come, a message signaling the coming of the set date scrolls every 10 minutes in the TIME/CALENDAR display.
• TARGET DATE TIMER display •
text_image
TO 454 DAY A B C D
flowchart
graph TD
    A["A"] --> B["B"]
    C["C"] --> D["D"]
    B --> A
    C --> C
    D --> B
Press for 2 to 3 seconds to activate TARGET DATE TIMER SETTING function.
Press to select the digits to be adjusted.

Set the flashing digits. (Increasing digits)
Set the flashing digits. (Decreasing digits)
Return to TARGET DATE TIMER display.
* When the target date has come, a beeping sound rings for 5 seconds.
STOPWATCH MODE
C Press in MODE SELECTION display to show STOPWATCH mode. STOPWATCH MENU display appears as shown below.
text_image
WATER HOURS RESET CHR RCL SYS EL (UNITS)A → Showing STOPWATCH display
B → Showing MEMORY RECALL display
D → Changeover to SYSTEM SETTING mode
- STOPWATCH display
- The stopwatch measures up to 10 hours in 1/100 second increments.
A Press in STOPWATCH MENU display to show STOPWATCH display.
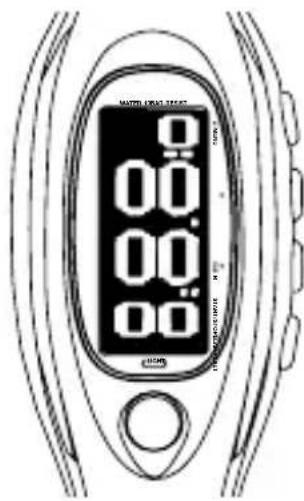
text_image
WATER CREAM TEST 0 0.00 0.00 0.00 0.00 12:00 12:00 12:00 12:00 12:00 12:00 12:00 12:00 12:00 12:00 12:00 12:00 12:00 12:00 12:00 12:00 12:00 TOMATO CHINESE TESTA B → Measure lap & split times / Reset C D → Start / Stop / Restart
C With each press, the measurement display changes between lap time and split time alternately.
- MEMORY RECALL display
- The first 100 lap and split times are automatically stored in memory.
- The stored data can be recalled either during or after the measurement.
B Press in STOPWATCH MENU display to show MEMORY RECALL display.
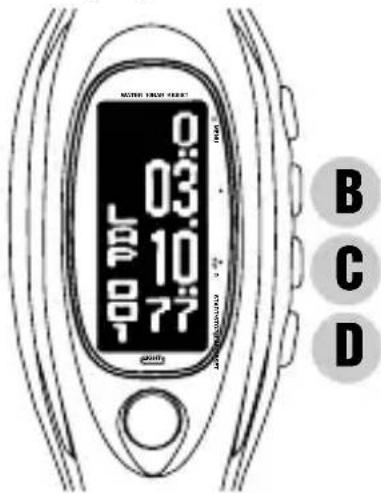
text_image
0 03 10 77 B C D
Recall the data from the oldest to the newest

Recall the data from the newest to the oldest
C With each press, the recall display changes between lap time and split time alternately.
TIMER MODE
D Press in MODE SELECTION display to show TIMER mode. TIMER MENU display appears as shown below.
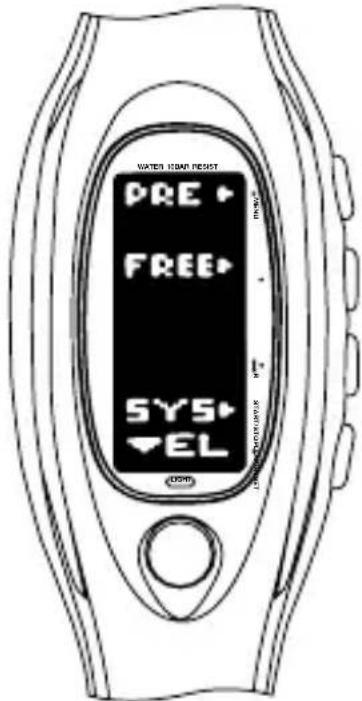
text_image
WATER ISAM RESET PRE FREE SYS ELA → Showing PRESET TIMER display
B → Showing ADJUSTABLE TIMER display
D → Changeover to SYSTEM SETTING mode
- PRESET TIMER display

Press in TIMER MENU display to show PRESET TIMER display.
Press to select the desired preset time.
1 minute 2 minutes 3 minutes 4 minutes 5 minutes
1 hour 45 minutes 30 minutes 15 minutes 10 minutes

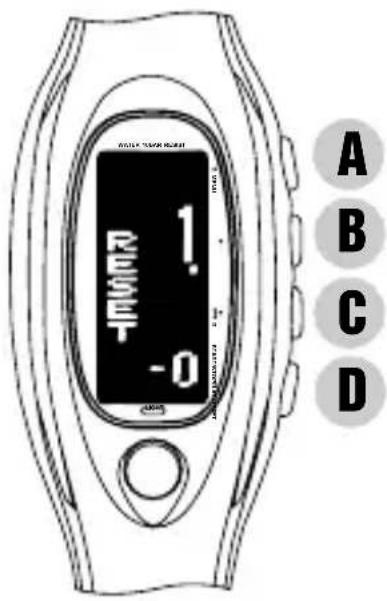
text_image
WATER LEVEL POINT 1. RESET -0A B → Reset Number of times the countdown is repeated D → Start / Stop / Restart
* When the set time is up, a warning sound beeps for 5 seconds. To stop it manually, press any of the buttons.
- ADJUSTABLE TIMER display
- The adjustable timer can be set up to 9 hours and 59 minutes in minute increments.
B Press in TIMER MENU display to show ADJUSTABLE TIMER display.
text_image
1. RESET -0 A B C DADJUSTABLE TIMER SETTING
B Press for 2 to 3 seconds to activate TIMER SETTING function.
Press to select the digits to be adjusted (hour/ minutes).
C or Set the flashing digits. (Increasing digits)
L D Set the flashing digits. (Decreasing digits)
- ADJUSTABLE TIMER display
B Return to ADJUSTABLE TIMER display.
* When the set time is up, a warning sound beeps for 5 seconds. To stop it manually, press any of the buttons.
- PRESET / ADJUSTABLE TIMER display
CHANGEOVER BETWEEN NORMAL AND ENLARGED DISPLAYS

With each press, the normal and enlarged displays alternately appear.
SYSTEM SETTING MODE
- The adjustment of the brightness of the display as well as the changeover between the horizontal and vertical displays can be made.
- The alarm sound can be selected from three different types of tones. (See "SELECTING ALARM SOUND" on page 15)
D Press in TIME/CALENDAR, ALARM, STOPWATCH or TIMER MENU display to show SYSTEM SETTING mode.
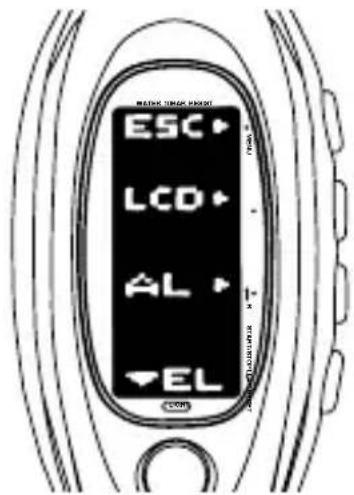
text_image
MACHINE LOCK PAPER ESC LCD AL ELA → Returning to MODE SELECTION display
B → Showing DISPLAY ADJUSTMENT display
C → Showing ALARM SOUND SELECTION display
• DISPLAY ADJUSTMENT display •
B Press in SYSTEM SETTING mode to show DISPLAY ADJUSTMENT display.
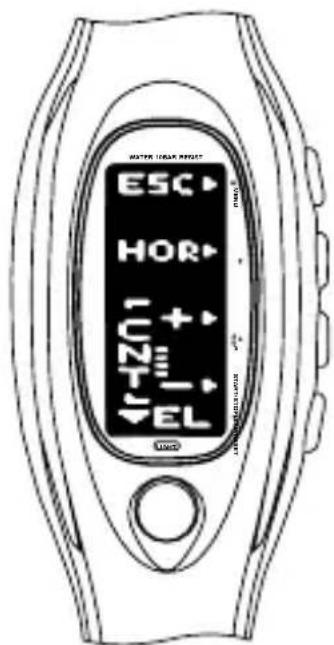
text_image
WATER HEAD KEY ESC HOR U2T EL + - -B C D
CHANGEOVER BETWEEN HORIZONTAL AND VERTICAL DISPLAYS
B With each press, the display changes between horizontal and vertical alternately.
ADJUSTING THE CONTRAST ON THE DISPLAY
C Press to increase the brightness level. or D Press to decrease the brightness level
ILLUMINATING LIGHT (Electroluminescent panel)
text_image
TM WT SYS EL EE Turn on the illuminating light.
* The display panel is evenly illuminated for 3 seconds.
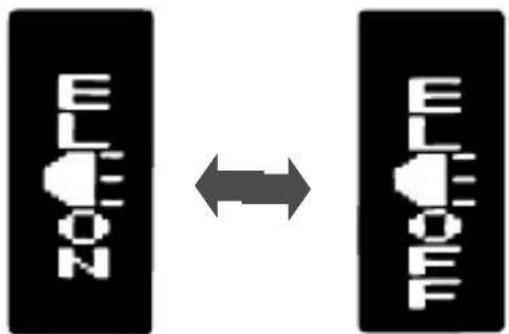
flowchart
graph LR
    A["ELEDON"] <--> B["ELEDOFF"]
E With each continuous press for 2 to 3 seconds, the button operation confirmation light is alternately turned on and off.

[Light is on]

[Light is off]
NOTES ON USING THE WATCH
TIME/CALENDAR MODE
- The calendar automatically adjusts for odd and even months including February of leap years from 1999 to 2048.
[TIME/CALENDAR SETTING]
- Once the year, month and date have been set, the day of the week is automatically set.
- If "GREENWICH" is selected for the city, the display to set daylight saving time will not be shown.
-
Setting the seconds:
-
With the second digits flashing, press button C or D in accordance with a time signal. The second digits are reset to "00".
-
When the seconds count any number from "30" to "59" and button C or D is pressed, one minute is added and the seconds are reset to "00".
-
The flashing digits except the seconds, standard time/daylight saving time and 12-/24-hour indication move quickly if button C or D is kept pressed.
- If the watch is left untouched with the TIME/CALENDAR SETTING function activated, it will automatically return to the TIME/CALENDAR display in 2 to 3 minutes.
- Note on unusual display:
While setting the time/calendar, all the segments of the display will light up if both buttons C and D are pressed at the same time. This is not a malfunction. Press any one of the buttons to return to the TIME/CALENDAR display, and then set the time/calendar again.
[TIME DIFFERENCES]
- The time differences and use of daylight saving time may change in some areas or countries when they are so decided by the countries concerned.
ALARM MODE
[ALARM TIME SETTING]
- The flashing digits move quickly if button C or D is kept pressed.
- If the watch is left untouched with the ALARM SETTING function activated, it will automatically return to the ALARM display in 2 to 3 minutes.
- When the time function is displayed in the 24-hour indication, the alarm is also displayed in the 24-hour indication.
- Alarm test: The alarm can be tested by keeping buttons C and D pressed in the TIME/CALENDAR display in the TIME/CALENDAR mode.
[SELECTING ALARM SOUND]
- The SYSTEM SETTING mode can also be displayed by pressing button D in the TIME/CALENDAR MENU, STOPWATCH MENU and TIMER MENU displays.
[TARGET DATE TIMER DISPLAY]
- If the remaining (or elapsed) time exceeds 50 years, or more than 10,000 hours, 10,000 minutes or 10,000 seconds, “----” is displayed.
![PULSAR W442 - [TARGET DATE TIMER DISPLAY] - 1](/content/2026/06/1188385/images/278ad7c8b8ceb4a8fcf34a920c29e4ff4dd9cdda72ddd99ffad2afec524f05a9.jpg)
text_image
TO RISKY 1000-1002-1![PULSAR W442 - [TARGET DATE TIMER DISPLAY] - 2](/content/2026/06/1188385/images/3cccb844e6fcfcd647d357d943b538bda88eec110608b69ea5ea95131ad4b906.jpg)
text_image
+1 —— —— —— —— 047 200-502 - 300-500[TARGET DATE TIMER SETTING]
- The target date can be set in one day increments from January 1, 1999 up to December 31, 2048.
- The flashing digits move quickly if button C or D is kept pressed.
- If the watch is left untouched with the TARGET DATE TIMER SETTING function activated, it will automatically return to the TARGET DATE TIMER display in 2 to 3 minutes.
- The types of messages differ depending on the time of the day. They include greetings and proverbs.
- On January 1 except in 2001 and on December 25, "A HAPPY NEW YEAR! JUST THE DAY!" and "MERRY XMAS! JUST THE DAY!" are displayed.
- If button A, B, C or D is pressed while the message is displayed, the message function will be deactivated and the display will return to the TIME/CALENDAR.
STOPWATCH MODE
[STOPWATCH DISPLAY]
- After 10 hours have been measured, the stopwatch continues measuring from "00". If it is left counting for more than 100 hours, it will automatically be stopped and reset to "00".
- Restart and stop of the stopwatch can be repeated by pressing button D.
- Measurement of the lap time and split time can be repeated by pressing button B.
- The lap number counts up to "999". After "999", the number is displayed in three digits such as "000" for 1000, "001" for 1001, and so on.
- When button B is pressed to measure a lap/split time, the lap/split number scrolls and then the lap/split time measured remain displayed for 10 seconds. After that, the display
automatically returns to the measurement in progress.
- Even if the STOPWATCH display/mode is changed to another while the measurement is in progress, it continues counting properly. The flashing “CHR” mark indicates that the stopwatch is measuring. After the stopwatch is used, however, be sure to reset it as the battery energy is consumed enormously to shorten the battery life.
- Even if the digits are reset to "00", the stored data is not erased and can be recalled unless a new measurement is started.
[MEMORY RECALL DISPLAY]
- When button B is pressed to show the MEMORY RECALL display after stopwatch measurement, the oldest data in memory is displayed first.
- When button B is pressed to show the MEMORY RECALL display during stopwatch measurement, the newest data in memory is displayed first.
TIMER MODE
- The timer counts down the set time repeatedly up to 10 times unless stopped.
- Restart and stop of the timer can be repeated by pressing button D.
[ADJUSTABLE TIMER SETTING]
- The flashing digits move quickly if button C or D is kept pressed.
- If the watch is left untouched with the ADJUSTABLE TIMER SETTING function activated, it will automatically return to the ADJUSTABLE TIMER display in 2 to 3 minutes.
- Once the time is set for the adjustable timer, it will be retained in memory and can be used repeatedly unless it is readjusted.
ILLUMINATING LIGHT (Electroluminescent panel)
- The electroluminescent panel loses its luminance as the battery voltage gets lowered. Also, its luminance level decreases gradually with use. After 120 hours of use, the level decreases by about half.
- When the illuminating light becomes dim, replace the battery with a new one. If the light remains dim after the battery is replaced, have the electroluminescent panel replaced with a new one by the retailer from whom the watch was purchased. It will be replaced at cost.
- While the illuminating light is used, the watch gives out a slight noise. However, this is not a malfunction.
[TURNING ON/OFF OF BUTTON OPERATION CONFIRMATION LIGHT]
- This function is deactivated automatically in 11 to 12 hours after it is activated.
BATTERY CHANGE
2 Years
Battery life : Approx. 2 years
Battery : SEIKO CR2025
- The battery life may be less than 2 years if the alarm is used for more than once a day and/or the illuminating light more than 3 times a day.
- As the battery is inserted at the factory to check the function and performance of the watch, its actual life once in your possession may be less than the specified period.
- When the battery expires, be sure to replace it as soon as possible to prevent any malfunction.
- We recommend that you contact an AUTHORIZED PULSAR DEALER for battery replacement.
- Battery life indicator
When all the digits start flashing in the TIME/CALENDAR mode, have the battery replaced with a new one as soon as possible.
- Necessary procedure after battery change
After the battery is replaced with a new one or if an abnormal display (broken digits, etc.) appears, follow the procedure below to reset the IC.
Press and hold buttons A, B, C and D at the same time for 2 to 3 seconds. The display will become blank, and the MODE SELECTION display will appear when the buttons are released. Then, press button A. The display shown at right appears.
* Before using the watch, set the time/calendar and then, the alarm.
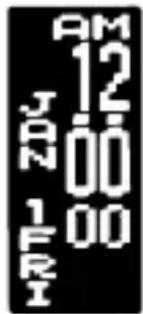
text_image
AM 12 JAN 00 1 FRI 00
WARNING
- Do not remove the battery from the watch.
- If it is necessary to take out the battery, keep it out of the reach of children. If a child swallows it, consult a doctor immediately.
- Never short-circuit, tamper with or heat the battery, and never expose it to fire. The battery may burst, become very hot or catch fire.

CAUTION
- The battery is not rechargeable. Never attempt to recharge it, as this may cause battery leakage or damage to the battery.
TO PRESERVE THE QUALITY OF YOUR WATCH
WATER RESISTANCE
• Non-water resistant
- If the watch becomes wet, have it checked by an AUTHORIZED PULSAR DEALER or SERVICE CENTER.
• Water resistant 5/10/15/20 bar

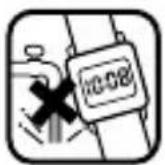
- Do not operate the buttons when the watch is wet or in water.
If used in sea water, rinse the watch in fresh water and dry it completely.
- When taking a shower with the water resistant 5 bar watch, or taking a bath with the water resistant 10, 15 or 20 bar watch, be sure to observe the following:
* Do not operate the buttons when the watch is wet with soapy water or shampoo.
* If the watch is left in warm water, a slight time loss or gain may be caused. This condition, however, will be corrected when the watch returns to normal temperature.
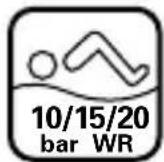
* Pressure in bar is a test pressure and should not be considered as corresponding to actual diving depth since swimming movement tends to increase the pressure at a given depth. Care should also be taken on diving into water.
** We recommend that you wear a PULSAR Diver's Watch for scuba diving.
TEMPERATURES
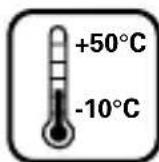
Your watch works with stable accuracy within a temperature range of 5°C and 35°C (41°F and 95°F).
Temperatures over 50°C (122°F) or below -10°C (+14°F) may cause a slight time loss or gain or battery leakage or shorten the battery life.
However, the above conditions will be corrected when the watch returns to normal temperature.
MAGNETISM

Your watch will not be affected by magnetism.
CARE OF CASE AND BRACELET

To prevent possible rusting of the case and bracelet caused by dust, moisture and perspiration, wipe them periodically with a soft dry cloth.
SHOCKS & VIBRATION

Light activities will not affect your watch, but be careful not to drop your watch or hit it against hard surfaces, as this may cause damage.
CHEMICALS

Be careful not to expose the watch to solvents, mercury, cosmetic spray, detergents, adhesives or paints. Otherwise, the case, bracelet, etc. may become discolored, deteriorated or damaged.
PERIODIC CHECK

It is recommended that the watch be checked once every 2 to 3 years. Have your watch checked by an AUTHORIZED PULSAR DEALER or SERVICE CENTER to ensure that the case, buttons, gasket and crystal seal remain intact.
PRECAUTION REGARDING CASE BACK PROTECTIVE FILM

If your watch has a protective film and/or a sticker on the case back, be sure to peel them off before using your watch.
STATIC ELECTRICITY

The IC (Integrated Circuit) used in your watch will be affected by static electricity which may disturb the display. Keep the watch away from close contact with objects such as TV screens which emit strong static electricity.
LIQUID CRYSTAL PANEL

The normal life expectancy for the liquid crystal panel of the watch is approximately 5 years. After that it may decrease in contrast, becoming difficult to read. Please contact your AUTHORIZED PULSAR DEALER or SERVICE CENTER if you wish to have a new panel fitted (guaranteed one year).