FP 202 - Single disc machine Kärcher - Free user manual and instructions
Find the device manual for free FP 202 Kärcher in PDF.

| Product type | Single-brush machine |
| Brand | Kärcher |
| Model | FP 202 |
| Dimensions | 350 x 350 x 1000 mm |
| Weight | 8.3 kg |
| Supply voltage | 230 V |
| Frequency | 50/60 Hz |
| Power consumption | 350 W |
| Rotation speed (felt pads) | 700 rpm |
| Protection class | II |
| Intended use | Polishing of parquet, stone floors and linoleum without cleaning products; suction of polishing debris |
| Included accessories | Handle, hoses, textile bag, felt pads, brush discs (optional) |
| Optional accessories | Filter bag (ref. 6.904-128), felt pads (6.959-033), brush discs (6.959-032) |
| Maintenance | Clean with detergent and brush; do not use foaming or multi-purpose products; do not immerse in water |
| Safety | Disconnect before maintenance; do not use outdoors or in damp environments; keep children away |
| Warranty | According to retailer's conditions; contact after-sales service with the purchase receipt |
| Disposal | Recycle packaging; the used appliance must be returned to a recycling system |
Frequently Asked Questions - FP 202 Kärcher
User questions about FP 202 Kärcher
0 question about this device. Answer the ones you know or ask your own.
Ask a new question about this device
Download the instructions for your Single disc machine in PDF format for free! Find your manual FP 202 - Kärcher and take your electronic device back in hand. On this page are published all the documents necessary for the use of your device. FP 202 by Kärcher.
USER MANUAL FP 202 Kärcher
Please read and comply with these instructions prior to the initial operation of your appli
ance. Retain these operating instructions for future reference or for subsequent possessors.
Proper use
This appliance has been designed for use in private households and is not intended for commercial use.
This appliance can be used for polishing parquet, stone floors and linoleum without using any cleaning agents.
The appliance is only meant for sucking polishing dust.
The appliance is not a vacuum cleaner! Do not use to suck in dry dust!
The appliance should not be used or stored in the open or under wet conditions.
The appliance may only be used with original filter bags, original spare parts, accessories or special accessories.
The manufacturer is not responsible for any damages that may occur on account of improper use or wrong operations.
Environmental protection

The packaging material can be recycled. Please do not place the packaging into the ordinary refuse for disposal, but arrange for the proper recycling.
Old appliances contain valuable materials that can be recycled. Please arrange for the proper recycling of old appliances. Batteries, oil, and similar substances must not enter the environment. Please dispose of your old appliances using appropriate collection systems.
Warranty
The terms of the guarantee applicable in each country have been published by our respective national distributors. We will fix possible faults on your unit free of charge within the warranty period, insofar as the faults are caused by material defects or defective workmanship. Guarantee claims should be addressed to your dealer or the nearest authorized customer service centre, and supported by documentary evidence of purchase.
Safety instructions
Power connection
Always commission and use the appliance according to the type plate.
- Never touch the mains plug with wet hands.
To separate the machine from the mains, pull the plug and not the power cord.
- Do not damage the power cord or the extension cable by running over, pinching, dragging or similar. Protect the cable from heat, oil, and sharp edges.
- Protect the appliance against external weather, humidity and heat sources.
Switch off the appliance when not in use.
Application
The operator must use the appliance properly. The person must consider the local conditions and must pay attention to third parties, in particular children, when working with the appliance.
The operator must ensure that no objects that can be sucked in or thrown away by the rotating disc are present in the working area.
The appliance may not be operated by children or young persons (risk of accidents on account of improper use).
Transport
The engine is to be brought to a standstill and the appliance is to be fastened properly during transportation.
Maintenance
First pull out the plug from the mains before carrying out any tasks on the machine.
To avoid risks, all repairs and replacement of spare parts in the machine may only be carried out by the authorised customer service personnel.
Disposal
- Do not use worn out appliance; first put it out of use; then arrange for its proper disposal as scrap.
Commissioning and operation
Before Commissioning
Remove the transport locks before using the appliance. Pull out the plastic strip carefully from the lower side of the appliance.
Attach the handle.
Figure 1 Join the two pipes to the handle. Ensure that they lock in properly.
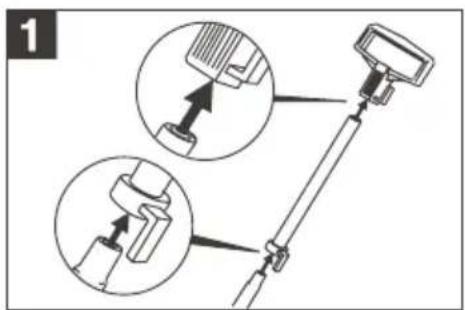
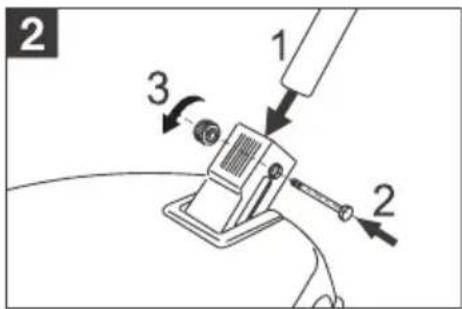
Figure 2
Insert the lower end of the pipe (with winding) in the basic body of the appliance. You will know that the installation is correct when the grooves on the handle point towards the front. Secure the pipe by inserting the screw and fastening it with a nut.
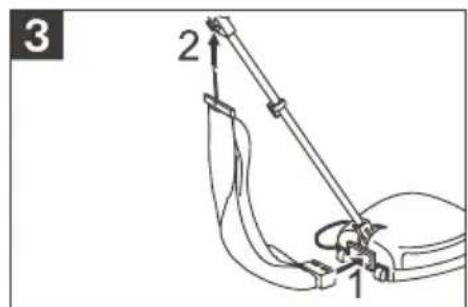
Inserting the cloth bag
Figure 3
Press the supports of the lower part of the cloth bag into the corresponding rectangular opening on the rear side of the appliance. The locking nose must point upwards and lock in. The hang the spring at the top of the handle.
Insert felt discs
Figure 4 Tilt the appliance backward until the pipe and the handle lie on the floor. Insert the discs. Ensure that the noses of the disc lock in well in the intake.
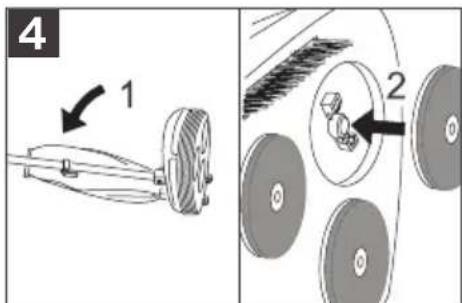
To remove the discs, just pull them.
Start up
Caution
Before inserting the mains plug ensure that the handle is located in a vertical position. The appliance is switched off in this position.
Figure 5
Move the appliance by pressing the handle in a lose position downwards and then pulling it towards you.
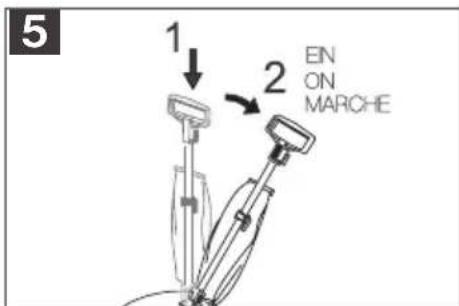
To stop the appliance, bring the handle back to the vertical position.
You will get best polishing results by moving the appliance in straight strokes. Do not move the appliance in circles.
Finish operation
Bring the handle back to a vertical position. The appliance is switched off.
Figure 6
Remove the mains plug and wind it around the hook provided at the handle.
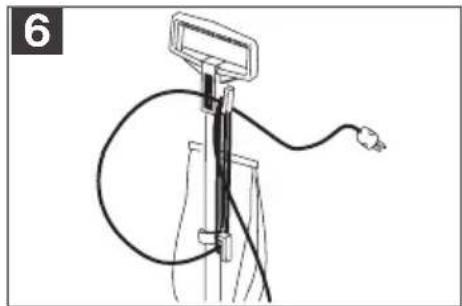
Figure 7
Ensure that the appliance moves on the rear wheels while transporting it from one room to another or moving it to its storage location. Tilt the handle backwards but do not apply any pressure.

Maintenance and Care
Risk of injury
Turn off the appliance and remove the mains plug prior to any care and maintenance works.
Cleaning the appliance and accessories
Caution
Do not use abrasives, glass or universal cleaners! Never immerse the appliance in water.
After the job, remove the felt discs and tap off the polishing dust that has remained stuck.
If required, clean the felt discs with soap water solution and brush. Then wipe the felt discs with a moist cloth and then allow it to dry on an even surface.
Inserting a filter bag
Change the filter bag at regular intervals.
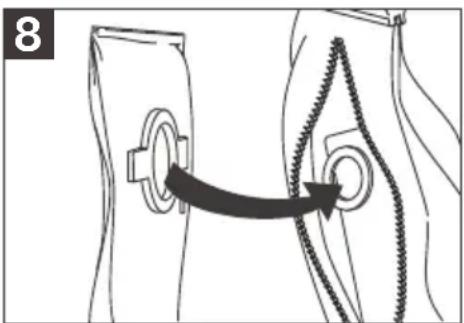
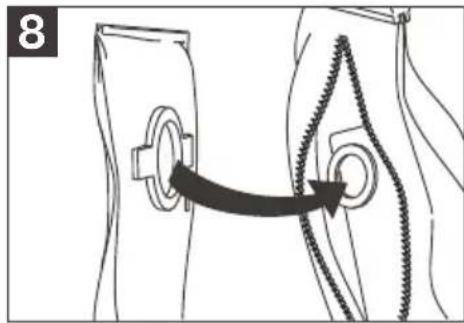
Figure 8
Open the zip of the cloth bag. Insert the filter bag and move the carton with the opening over the support. Then check the seat of the filter bag and then close the cloth bag using the zip.
Changing felt discs
Check the state of the felt discs at regular intervals; replace them if they are worn out.
The procedure for changing discs has been described in the chapter "Insert felt discs".
Special accessories
You can subsequently buy the following accessories for this appliance.
Piece Order No.
Filter bag 3 6.904-128
Felt discs 3 6.959-033
Circular brushes 3 6.959-032
Working with special accessories
Cleaning the floor and making it shining
Apply cleaning agent:
Check the floor before applying the cleaning agent. Remove dirt first with a slightly moist cloth. Apply the cleaning agent evenly (follow the application instructions of the manufacturer), and distribute the same evenly over the floor using the circular brushes.
Polishing:
Allow the cleaning agent that has been applied to dry completely and polish the floor using the felt discs.
Specifications
Voltage 230 V
Current type 1~50/60 Hz
Protective class II
Connection output 350 W
Speed, felt discs 700 rpm
Weight 8,3
Dimensions 350x350x1000 mm
Subject to technical modifications!
Cher client,
Dischi in feltro 3 6.959-033
Dischi a spazzola 3 6.959-032
Sette inn filterpose.
Shift filterpose med jevne mellomrom.
Figur 8
Apne glidelåsen på tekstilposen. Legginn filterposen og skyv pappdelen medapningen over stussen. Undersok at filterposen sitter godt, og lukk glidelåsen på toyposen.
Skifte filtskiver
Matt 350x350x1000 mm
Med reservation for tekiska andringar!
Arvoisa asiakas,

Vymena plstench kotouc
Mult stimate client,

Tubas ripas 3 6.959-033
Diskveida sukas 3 6.959-032
Darbs ar specialajiem pigeoniumi
Unit 10, 17/F., APEC Plaza
49 Hoi Yuen Road,
Kwun Tong, Kowloon
(02)357-5863
1
Karcher S.p.A.
Via A. Vespucci 19
21013 Gallarate (VA)
848-998877
IRL
Karcher Limited (Ireland)
12 Willow Business Park
Nangor Road
Clondalkin
Dublin 12
(01) 4097777
KOR
Karcher Co. Ltd. (South Korea)
5F, Wooree Venture Town Bldg.
684-2, Deungchon3-dong
Gangseo-Gu
Seoul 157-033
(02) 3665-4181
MAL
Karcher Cleaning Systems Sdn. Bhd.
No. 8, Jalan Serindit 2
Bandar Puchong Jaya
47100 Puchong, Selangor
(03) 5882 1148
MEX
Karcher Mexico, SA de CV
East Tamaki, Auckland
(09) 274-4603
P
Neoparts Com. e Ind. Automóvel, Lda.
Largo Vitorino Damasio. 10
1200 Lisboa
(21) 3950040
PL
Karcher Poland Ltd. Sp. z 0.o.
UI. Stawowa 140
31-346 Krakow
(012)6397-222
PRC
Kaercher Cleaning Systems Co., Ltd.
Part B, Building 30,
No.390 Ai Du Road
Shanghai Waigaoquiao 200131
(021) 5046-3579
RUS
Karcher Ltd.
Vienna House
Strastnoi Blv. 16
107031 Moscow
095-9338743
S
Kärcher AB
Tagenevagen 31
42502 Hisings-Karra
(031)577-300
SGP
Karcher Asia Pacific Pte Ltd
5 Toh Guan Road East
01-00 Freight Links Express Distripark
Singapore 608831
6897-1811
TR
Karcher Servis Ticaret A.S.
9 Eylül Mahallesı
307 Sokak No. 6
Gaziemir / Izmir
(0232) 252-0708
TWN
Karcher Taiwan Limited
5F/6.No.7
Wu-Chuan 1st Rd
Wu-Ku Industrial Zone
Taipei County
(02) 2299-9626
UAE
Karcher FZE
Jebel Ali Free Zone
RA 8, XB 1, Jebel Ali, Dubai
(04) 8836-776
ZA
Kärcher (Pty) Limited
144 Kuschke Street
Meadowdale, Edenvale
1614
(011)/574-5360
07/05

KARCHER
www.kaercher.com