SS2800 - Wireless sound alarm smanos - Free user manual and instructions
Find the device manual for free SS2800 smanos in PDF.
| Brand | smanos |
| Model | SS2800 |
| Product type | Wireless sound alarm |
| Power supply | 12 V DC 500 mA (with backup lithium-ion 18650 3.7 V 1800 mAh battery) |
| Maximum consumption during alarm | < 350 mA |
| Static consumption | < 15 mA |
| Wireless range | < 80 m (in open area) |
| Radio frequency | 868 MHz |
| Maximum sound volume | 105 dB |
| Dimensions (L × W × H) | 245.2 × 227.5 × 72.4 mm |
| Housing material | PC+ABS anti-UV |
| Protection rating | IP54 |
| Operating conditions | -10 °C to +55 °C, relative humidity < 80 % |
| Backup battery | Rechargeable lithium-ion 18650, 3.7 V, 1800 mAh |
| Standby battery life | < 7 days |
| Main functions | Wireless outdoor strobe siren, standalone or connected to a control panel, adjustable volume and alarm duration, tamper contact, installation mode |
| Connections | Wireless 868 MHz, wired terminals for 12 V DC power and sensors (normal zone and 24h) |
| Light indicators | Status indicator: flashing when armed/home mode, off when disarmed, rapid flashing after alarm |
| Installation | Wall mounting with template and bubble level included, installation mode to avoid accidental triggering |
| Package contents | SS2800 siren, installation template, bubble level, screws, user manual |
Frequently Asked Questions - SS2800 smanos
User questions about SS2800 smanos
0 question about this device. Answer the ones you know or ask your own.
Ask a new question about this device
Download the instructions for your Wireless sound alarm in PDF format for free! Find your manual SS2800 - smanos and take your electronic device back in hand. On this page are published all the documents necessary for the use of your device. SS2800 by smanos.
USER MANUAL SS2800 smanos
Wireless Outdoor Strobe Siren
ENEN
Introduction
Wireless outdoor strobe siren is to deter the intruders through hooting once it receives wireless signal from connected control panel or sensors. More wireless strobe sirens could be connected to the same control panel to strengthen the deterring effect. When the siren is connected to control panel as an accessory, it will hoot and its LED lights will flash once the system is triggered. When the siren is connected to accessories like remote control, door/window contact, and PIR motion detector, etc. as a standalone alarm control panel, it will hoot and its LED lights flash once any sensor is triggered.
Product Overview
Front View
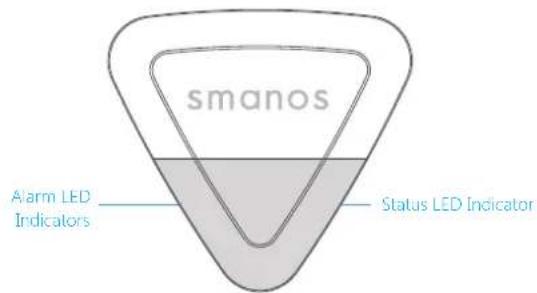
text_image
smanos Alarm LED Indicators Status LED IndicatorStatus LED Indication
| Status LED | |
| Arm/Home Mode Flash | once every 5 seconds |
| Disarm No light indication | |
| No disarm operation after alarm | Flash once every 2 seconds for 2 hours |
Rear View

text_image
Mounting Holes Back Cover Tamper Switch BracketENEN
PCB Layout
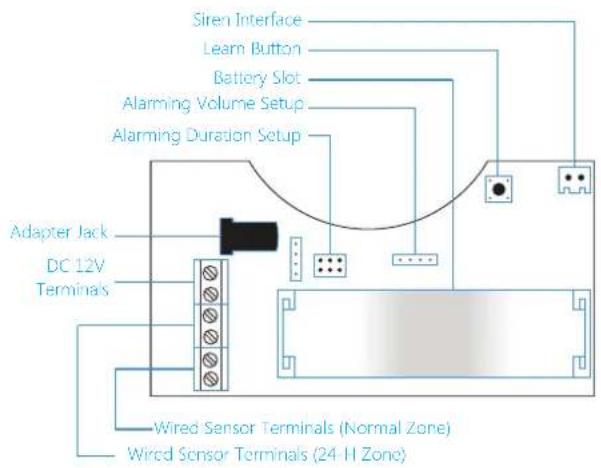
text_image
Siren Interface Learn Button Battery Slot Alarming Volume Setup Alarming Duration Setup Adapter Jack DC 12V Terminals Wired Sensor Terminals (Normal Zone) Wired Sensor Terminals (24-H Zone)Jumper Setup
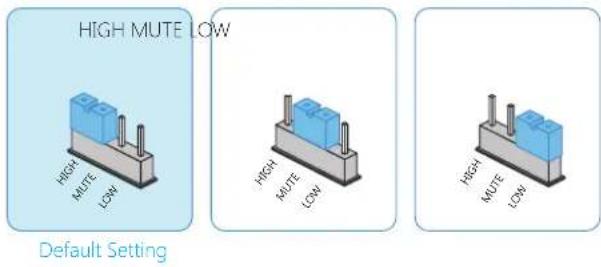
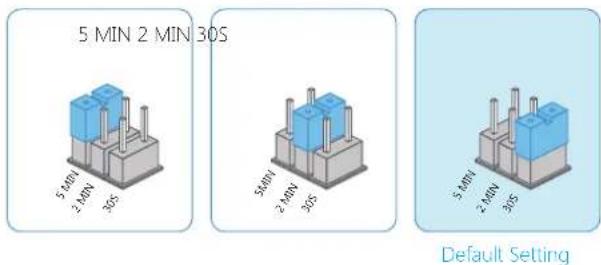
Please setup alarming volume and alarming duration time on the PCB board accordingly.
Alarming Volume Setup
text_image
HIGH MUTE LOW HIGH MUTE LOW HIGH MUTE LOW HIGH MUTE LOW High MUTE LOW High MUTE LOW Default SettingNote: When the siren is connected to control panel, it will hoot at the pre-set volume even if the control panel is set to mute alarm. This is to alert the neighbors and avoid the intrusion. When the control panel is set to mute disarm/arm, the siren will be disarmed/ armed mutely. When the siren is set to mute mode, there are still tones for arming and disarming.
Alarming Duration Setup
text_image
5 MIN 2 MIN 30S 5 MIN 2 MIN 30S 5 MIN 2 MIN 30S 5 MIN 2 MIN 30S Default SettingENEN
Work as Wireless Siren
When it works as a wireless siren, it should be connected with wireless control panel in advance. When the control panel is alarming, it hoots and the strobe light flashes to deter illegal intruders.
Connect to Control Panel
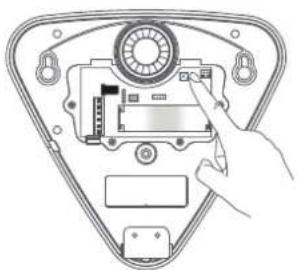
Press the Learn Button for 0.5 second, siren beeps once and enter connection status. Press [SOS] or [Arm 3] button on the panel (or press Arm on App if the panel does not have a button), the wireless siren and control panel are connected successfully after one beep is heard from siren.
natural_image
Diagram of a device inside a triangular frame with a hand pointing to a component (no text or symbols visible)Note: Once the siren is in connection status, please press Learn Button again to exit. One beep will be heard from siren.
When connecting to control panel, please don't trigger any other sensors to avoid interference.
Disconnection
Hold the learn button till 2 beeps are heard to disconnect the siren and control panel.
Work as Standalone Alarm Panel
When it works as a standalone alarm panel, it should be connected with wireless sensors or wired sensors in advance, when the intrusion is detected, it hoots and the strobe light flashes to deter illegal intruders.
Connect with accessory: press the learn button on the siren and trigger the accessory once, the connection is successful after one beep is heard from siren.
Wired Terminals
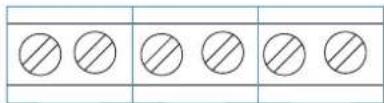
The siren has terminals for power supply and wired sensors. Just connect the power line or wired sensors to this wired terminals. Please make sure the positive and negative are distinguished.
text_image
Image showing six circles arranged in two rows, each with a diagonal line above it, likely for counting or matching exercise.ZONE (normal zone mode). After a wired sensor is connected with "ZONE" terminal, means it will work as a normal zone sensor, once it is triggered in Arm or Home Arm state, alarm panel will alarm immediately.
ENEN
24-ZONE (24-hour zone mode): After a wired sensor is connected with "24-ZONE" terminal, means it will work as a 24-hour zone sensor, siren will alarm immediately once it is triggered.
Installation Mode
Installation Mode is designed for users to dismount or remount the siren without triggering a tamper alarm. Thus not to disturb other people.
① Press [Disarm 4] button on the remote control continuously for 3 times, then the siren comes to installation mode after a long beep is heard. Any sensor or tamper triggered during installation mode will not result in siren hooting but 3 beeps will be heard instead.
② Press [Arm 4] button, the siren will exit from installation mode after a long beep is heard. Or the siren will exit from connection status when no operation is carried out within 10 minutes.
Note: Also you can press the tamper switch 7 times to enter installation mode.
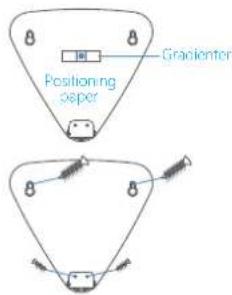
Installation
Please finish all the system setup on the PCB and enter into installation mode before installation.
① Hold the positioning paper in right place, stick the gradienter on the positioning paper to check and adjust the position.
② Install two screws into the top screw holes.
③ Mount the bracket into the bottom screw holes and tighten with screws.
④ Tear off the positioning paper.
⑤ Mount the siren to the wall, tighten the screw and make sure the siren is well positioned.
text_image
Positioning paper Gracienter
text_image
smanos D1 D2Enter Connection Status Through Remote Control
This function is designed for users to connect newly-purchased accessories without dismounting the siren from the wall.
When the siren is in installation mode, press [Home Arm] on the remote control continuously for 3 times, then the siren comes to connection status after a long beep is heard, and then trigger the new accessory once to complete the pairing.
The siren will exit from connection status when no operation is carried out in 15 seconds.
Specifications
Power Supply: DC 12 V 500 mA
Backup Battery:
18650 3.7 V 1800 mAh rechargeable lithium battery
Maximum Alarm Current: <350 mA
Static Current: <15 mA
Wireless Receiving Distance: <80 m (in open area)
Operating Condition:
Temperature: -10 °C\~+55 °C
Relative Humidity: <80% (Non-condensing)
Maximum Siren Volume: 105 dB
Battery Standby Time: <7 days
Radio Frequency: 868 MHz
Housing Material: PC+ABS, ANTI-UV
IP Rating: IP64
Dimensions (L×W×H): 245.2 × 227.5 × 72.4 mm
DEEN
Einleitung
natural_image
Diagram of a device component with a hand interacting with it, showing internal components and a circular dial (no text or symbols)text_image
Image showing five circles with diagonal hatching patterns, likely for counting or matching exercise.natural_image
Diagram of a hand inserting a device into a triangular frame (no text or symbols visible)text_image
Image showing five identical circles with diagonal hatching, arranged horizontally within a larger rectangular frame.-12 V CC+ ZONE 24H ZONE
natural_image
Diagram of a device interior with a hand interacting with a circular component (no text or symbols visible)text_image
Image showing five identical circles with diagonal hatching, arranged horizontally within a rectangular frame.-DC12V + 24-ZONE ZONE
Voeding: DC 12V ingang
text_image
5 MIN 2 MIN 30 S 5 MIN 2 MIN 30 S 5 MIN 2 MIN 30 S 5 MIN 2 MIN 30 SConfiguración predeterminada
natural_image
Diagram of a device inside a triangular frame with a hand pointing to a component (no text or symbols visible)text_image
Image showing five identical circles with diagonal hatching, arranged horizontally within a rectangular frame.- 12 V CC + ZONA 24 ZONA
natural_image
Diagram of a device inside a triangular frame with a hand pointing to a component (no text or symbols visible)text_image
smanos Cr Crtext_image
ALTO ALTO DIATE BASSO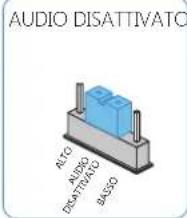
text_image
AUDIO DISATTIVATO ALCO AUDIO DISATTIVATO BASSO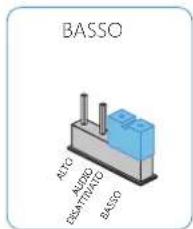
text_image
BASSO ALTO AURDO DRAVITIVO BASSOnatural_image
Diagram of a device inside a triangular frame with a hand pointing to a component (no text or symbols visible)text_image
Image showing five circles arranged in two rows, each with a diagonal line above it, likely for counting or matching exercise.- 12 V CC + ZONA 24 ZONA