MD2300 PIR - Motion detector smanos - Free user manual and instructions
Find the device manual for free MD2300 PIR smanos in PDF.

| Product type | Passive infrared (PIR) motion detector |
| Brand | Smanos |
| Model | MD2300 PIR |
| Detector dimensions (L x W x H) | 101.5 x 59 x 37.5 mm |
| Bracket dimensions (L x W x H) | 60 x 29 x 27 mm |
| Power supply | 2 AA 1.5 V batteries |
| Detection range | 8 m / 110° angle |
| Radio frequency | 868 MHz |
| Transmission distance | < 80 m (open space) |
| Standby current | < 50 μA |
| Alarm current | < 11 mA |
| Housing material | ABS plastic |
| Operating temperature | -10 °C to +55 °C |
| Relative humidity | < 80 % (non-condensing) |
| Main functions | Infrared detection, automatic temperature compensation, resistance to air interference, SMS alert for low battery, tamper contact, self-diagnosis, test and energy-saving modes |
| LED indicator | Flashing: continuous = self-diagnosis; 1 flash = intrusion; 2 flashes = end of test mode; 1 flash every 3 seconds = low battery |
| Recommended installation height | 2 m to 2.5 m from the ground |
| Maintenance and cleaning | Clean the surface of the infrared sensor with a soft dry cloth. Do not touch the lens directly. |
| Safety advice | Avoid installation in front of windows, heat sources, moving objects, or high-traffic areas. |
| Package contents | Detector, mounting bracket, double-sided adhesive, screws, user manual |
Frequently Asked Questions - MD2300 PIR smanos
User questions about MD2300 PIR smanos
0 question about this device. Answer the ones you know or ask your own.
Ask a new question about this device
Download the instructions for your Motion detector in PDF format for free! Find your manual MD2300 PIR - smanos and take your electronic device back in hand. On this page are published all the documents necessary for the use of your device. MD2300 PIR by smanos.
USER MANUAL MD2300 PIR smanos
natural_image
Simple line drawing of a rounded rectangular shape with a small icon above it, no text or symbols present.MD2300
PIR Motion Detector
ENEN
Introduction
With digital dual-core fuzzy logic control processing technology and intelligent analysis algorithm, the detector can detect infrared rays released from human body. Featuring automatic temperature compensation and resistance to airflow technology, it can identify interfering signals and human movement signals, thus preventing false alarm. Being able to detect human movement within 8-meter cone space, it is suitable for applications in halls, hallways, etc. Its low power feedback function enables users to get the SMS alert about low battery when it is connected to GSM alarm system.
Overview

text_image
Detection Lens LCD Indicator Test Button Double-sided Tape Slick Place Bracket SlotLED Indication
Flash continuously: Self-testing.
Flash once: Intrusion is detected.
Flash twice: 3 minutes testing mode is finished, enters into power saving mode.
Flash once per 3 seconds: Low battery indication. Users will receive SMS notification if detector was connected with panel. Please change the batteries immediately.
PCB Layout
text_image
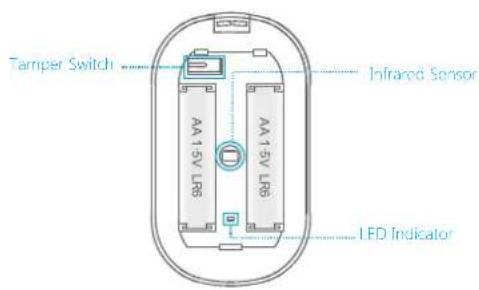
Tamper Switch AA 15V LR6 AA 15V LR6 Infrared Sensor LED IndicatorInfrared sensor: It detects the infrared rays released by human body motion. Please do not touch the surface and always keep it clean.
Tamper switch: Once the case is opened in work mode, the tamper switch is triggered and then generates an alarm signal.
ENEN
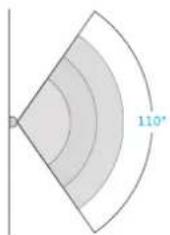
Detection Range
text_image
110°Top View Side View
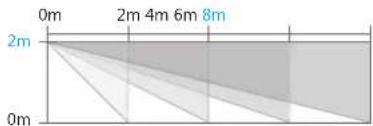
text_image
0m 2m 4m 6m 8m 2m 0mConnect the PIR Motion Detector
Connecting PIR motion detector is to build a wireless connection between the detector and the control panel.
- Control panel enters into the connecting state (For details, please refer to the relative user manual).
- Press the test button on the back of the detector twice, and the control panel beeps once, indicating a successful connection.
natural_image
Illustration showing a blood glucose meter device and its corresponding step-by-step instructions for inserting a plug into a device (no text or symbols present)Note: If the control panel beeps twice when the above operation is done, it means the detector has been connected before.
Working Mode
Testing Mode
After self-testing, press the test button, the detector enters into the testing mode and detects once every 10 seconds. After 3 minutes, the LED indicator flashes twice, and the detector switches to power saving mode.
ENEN
Power Saving Mode
The product features power-saving design. If the detector detects human movement twice in 3 minutes, it will switch to the sleeping state to save power. At this time, the LED will not flash and no alarm. After no movement within the next 3 minutes, the detector switches back to the working state automatically.
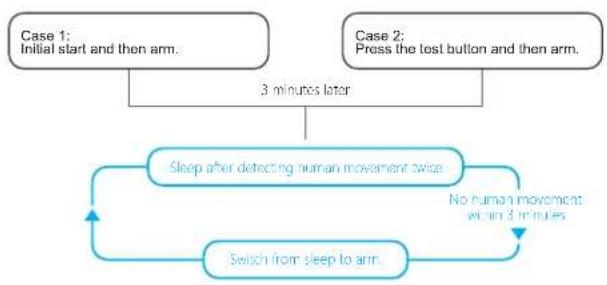
flowchart
graph TD
    A["Case 1: Initial start and then arm."] --> B["3 minutes later"]
    C["Case 2: Press the test button and then arm."] --> B
    B --> D["Sleep after detecting human movement twice"]
    D --> E["No human movement within 3 minutes"]
    E --> F["Switch from sleep to arm"]
    F --> D
Note: Alter the detector is in the sleeping state, ensure no human movement within 3 minutes; otherwise, the detector remains sleeping. In the sleeping state, it is recommended that you leave the room after arming the system. Ensure no human movement in 3 minutes. Then, go into the room, the system alarms immediately.
Installation
After making sure the detector works normally, do as follows:
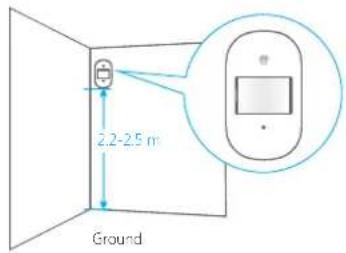
1. Choose a suitable installation location
Choose a suitable installation location. It is recommended to mount it at the height of 2 m from the ground.
text_image
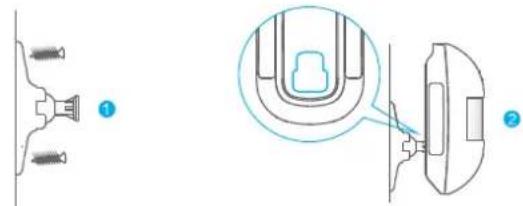
2.2-2.5 m Ground2. Fix the detector
Fix the bracket on the wall with screws and attach the detector to the bracket. Or user can stick it at the corner with double-sided tapes.
natural_image
Technical diagram showing two views of a U-shaped component with connectors and a close-up inset (no text or symbols)ENEN
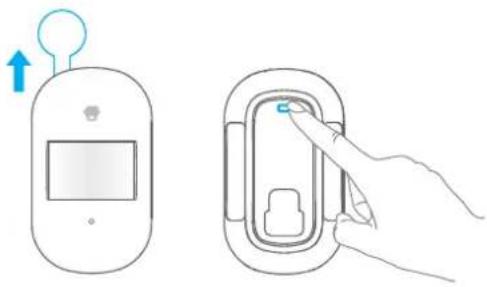
3. Test the PIR motion detector
Press the test button at the back. It switches to the testing mode and sustains for 3 minutes. Walk in the detection scope and observe the LED. When body movement is detected, the LED flashes once.

natural_image
Diagram showing light rays reflecting off a human silhouette, with a device and control panel nearby (no text or symbols)4. Adjust the angle
Adjust the bracket angle to achieve the best detection effect.
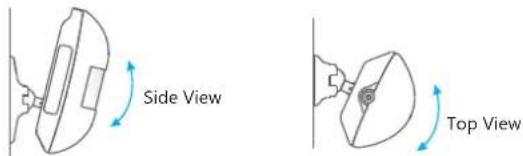
text_image
Side View Top ViewInstallation Notices
Pay attention to the following during installation:
1. Mount the detector to a location close to the entry or exit
The detector aims at preventing intrusion. Detecting human movement at the entry or exit is critical for security.
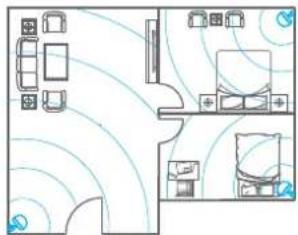
natural_image
Floor plan diagram with furniture layout and ceiling-mounted sensors (no text or labels)2. Mount the detector in a proper angle
The installation angle affects sensitivity directly. The sensitivity is optimal when the walk direction is vertical to the infrared direction. Choose the best location and angle according to the actual situation and detection scope diagram.
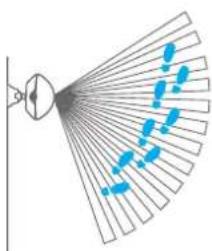
natural_image
Diagram of a fan with blue dots and lines, no text or symbols presentENEN
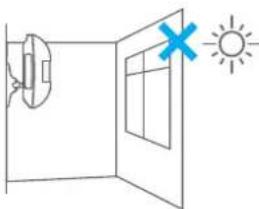
- Avoid facing to glass windows or doors
Strong light interferes with detection sensitivity. In addition, complicated situations, such as traffic flow, stream of people, also should be avoided.
- Avoid facing to or positioning close to heat sources
Heat and cold sources, such as heat extraction units, heaters, air conditioner, microwave oven, refrigerator which may cause false alarm, should be avoided.
- Avoid facing to swinging objects
Swinging objects may also trigger false alarm. Besides, if there are two detectors covering the same scope, adjust the locations to prevent cross-interference.
natural_image
Simple line drawing of a door with a window and a sun icon, no text or symbols present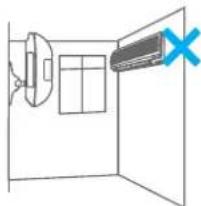
natural_image
Simple line drawing of a room with a speaker and a door, no text or symbols present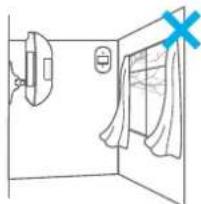
natural_image
Simple line drawing of a room with a door, curtain, and window (no text or symbols)Specifications
Power Supply: DC 3 V (AA 1.5 V alkaline battery x 2)
Standby Current: < 50 uA
Alarm Current: < 11 mA
Detection Range: 8m/110°
Transmitting Distance: < 80 m (Open area/no interference)
Radio Frequency: 868 MHz or 915 MHz
Housing Material: ABS plastic
Operation Condition:
Temperature: -10 °C \~ +55 °C
Relative Humidity: < 80% (non-condensing)
Detector Dimensions (L x W x H): 101.5 x 59 x 37.5 mm
Bracket Dimensions (L x W x H): 60 x 29 x 27 mm
DEDE
Einleitung
natural_image
Illustration showing two steps of a blood glucose meter: one with an upward arrow and the other with a hand inserting a plug into a device (no text or symbols present)natural_image
Technical diagram showing two views of a mechanical component with no visible text or symbolsDEDE
natural_image
Diagram showing light rays reflecting off a human figure, with a digital display and control panel nearby (no text or symbols)4. Winkel anpassen
natural_image
Floor plan diagram showing room layout with furniture and lighting fixtures (no text or labels)natural_image
Diagram of a fan with blue motion lines indicating airflow or movement (no text or symbols)DEDE
natural_image
Simple line drawing of a door with a lamp and a cross symbol, next to a sun (no text or labels)natural_image
Simple line drawing of a room with a wall-mounted device and a monitor, no text or symbols presentnatural_image
Simple line drawing of a room with a door, window, and curtain (no text or symbols)Technische Daten
Stromversorgung: DC 3 V (AA 1,5 V Alkaline-Batterie x 2)
Ruhestrom: < 50 uA
Alarmstrom: < 11 mA
natural_image
Illustration showing a blood glucose meter device and its corresponding catheter device with a finger inserted (no text or symbols present)natural_image
Technical diagram showing two views of a mechanical component with no visible text or symbolsFRFR
natural_image
Diagram showing light rays reflecting off a human silhouette, with a device and control panel nearby (no text or symbols)4. Régler l'angle
natural_image
Floor plan diagram with room layouts and ceiling-mounted fixtures (no text or labels)natural_image
Diagram of a fan-shaped structure with blue dotted lines indicating motion or movement, no text or symbols present.FRFR
natural_image
Simple line drawing of a door with a lamp and a cross symbol, next to a sun (no text or labels)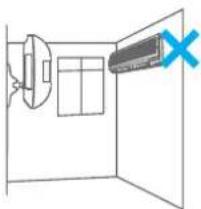
natural_image
Simple line drawing of a room with a speaker and a wall-mounted device, no text or symbols present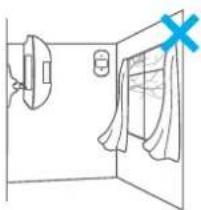
natural_image
Simple line drawing of a room with a door, window, and hanging door (no text or symbols)Spécifications
Alimentation : 3 V CC (2 piles alcalines de type AA 1,5 V)