MA1040 - Door chime smanos - Free user manual and instructions
Find the device manual for free MA1040 smanos in PDF.

User questions about MA1040 smanos
0 question about this device. Answer the ones you know or ask your own.
Ask a new question about this device
Download the instructions for your Door chime in PDF format for free! Find your manual MA1040 - smanos and take your electronic device back in hand. On this page are published all the documents necessary for the use of your device. MA1040 by smanos.
USER MANUAL MA1040 smanos
text_image
Smart Video Command Samanos I am your delivery to home when you needSmart Video Doorbell
Instruction Manual
Welcome to the Smart Home Family!
Thank you for choosing "Smart Video Doorbell". This product integrates motion detection and video recording into your doorbell system. Please take your time to unpack and familiarize yourself with the included parts and this instruction manual to learn how to to setup the "Smart Video Doorbell".
Disclaimer
This instruction manual has been reviewed thoroughly and has been designed to ensure that your product setup will be quick and easy with our easy to follow guide. All statements, technical information and recommendations in this manual are believed to be reliable, but the accuracy and completeness thereof are not guaranteed or warranted.
The specifications and information regarding the products in this document are subject to change without further notice.
Photocopy, copy, reproduction, translation to any language, modification, storage in a retrieval system or retransmission, in any form or by any means, electronic, mechanical or otherwise, is strictly prohibited without written permission.
In no event we are liable for any indirect, special, incidental or consequential damages, including, without limitation, monetary loss or loss or damage to data arising out of the use or inability to use this document, even if the product has been advised of the possibility of such damages.
Contents
Things to Note before Getting Started----1
WiFi Internet Connection----1
WiFi Network and Password----1
Operating System Requirements 1
In the Box 2
Getting to Know Your Smart Video Doorbell----3\~4
Overview----3
LED Indicators 4
Getting Started----5\~7
Operating Requirement 5
Connecting to the Existing Doorbell 5
Download the App 6
Signing Up/In 7
Installation----7
Adding Device 7
Setting Up Your Doorbell 8\~10
App Operation 11\~24
Main Page 11
Live Video 12
Answering Your Door 13
History 14
Album 15
Settings 16\~21
Account Management 22\~24
Specifications 25
FAQs 26\~30
Things to Note before Getting Started
WiFi Internet Connection
- One critical factor affecting the performance of your doorbell is the relative positions of your home WiFi router and doorbell. Place your doorbell in an open area (DO NOT place it directly on the floor); the closer the doorbell is to the router, the stronger the WiFi signal will be, resulting in optimum performance and satisfaction.
- A slow network speed will also affect the performance of your doorbell. It is recommended that you have an upload speed of at least 2Mbps or faster.
To test your networks upload speed we recommend www.speedtest.net or the speedtest App by Ookla it is FREE and very informative about your network's TRUE performance.
WiFi Network and Password
- Have your WiFi network name and password handy. The WiFi network name is normally referred to as the SSID. The password or security ID is normally the next line or two down from the WiFi/SSID network name.
These can be easily found on your WiFi router if you did not change them when you first installed your WiFi router, for example:
- WiFi/SSID Network Name: XXXX
- WiFi/SSID Network Password/Security Key: XXXXX
Operating Requirements
- iOS 8.0 or above with iPhone 5 or newer;
- Android 5.0 or newer;
- Connect to the existing doorbell with a voltage of 8\~24VAC
In the Box
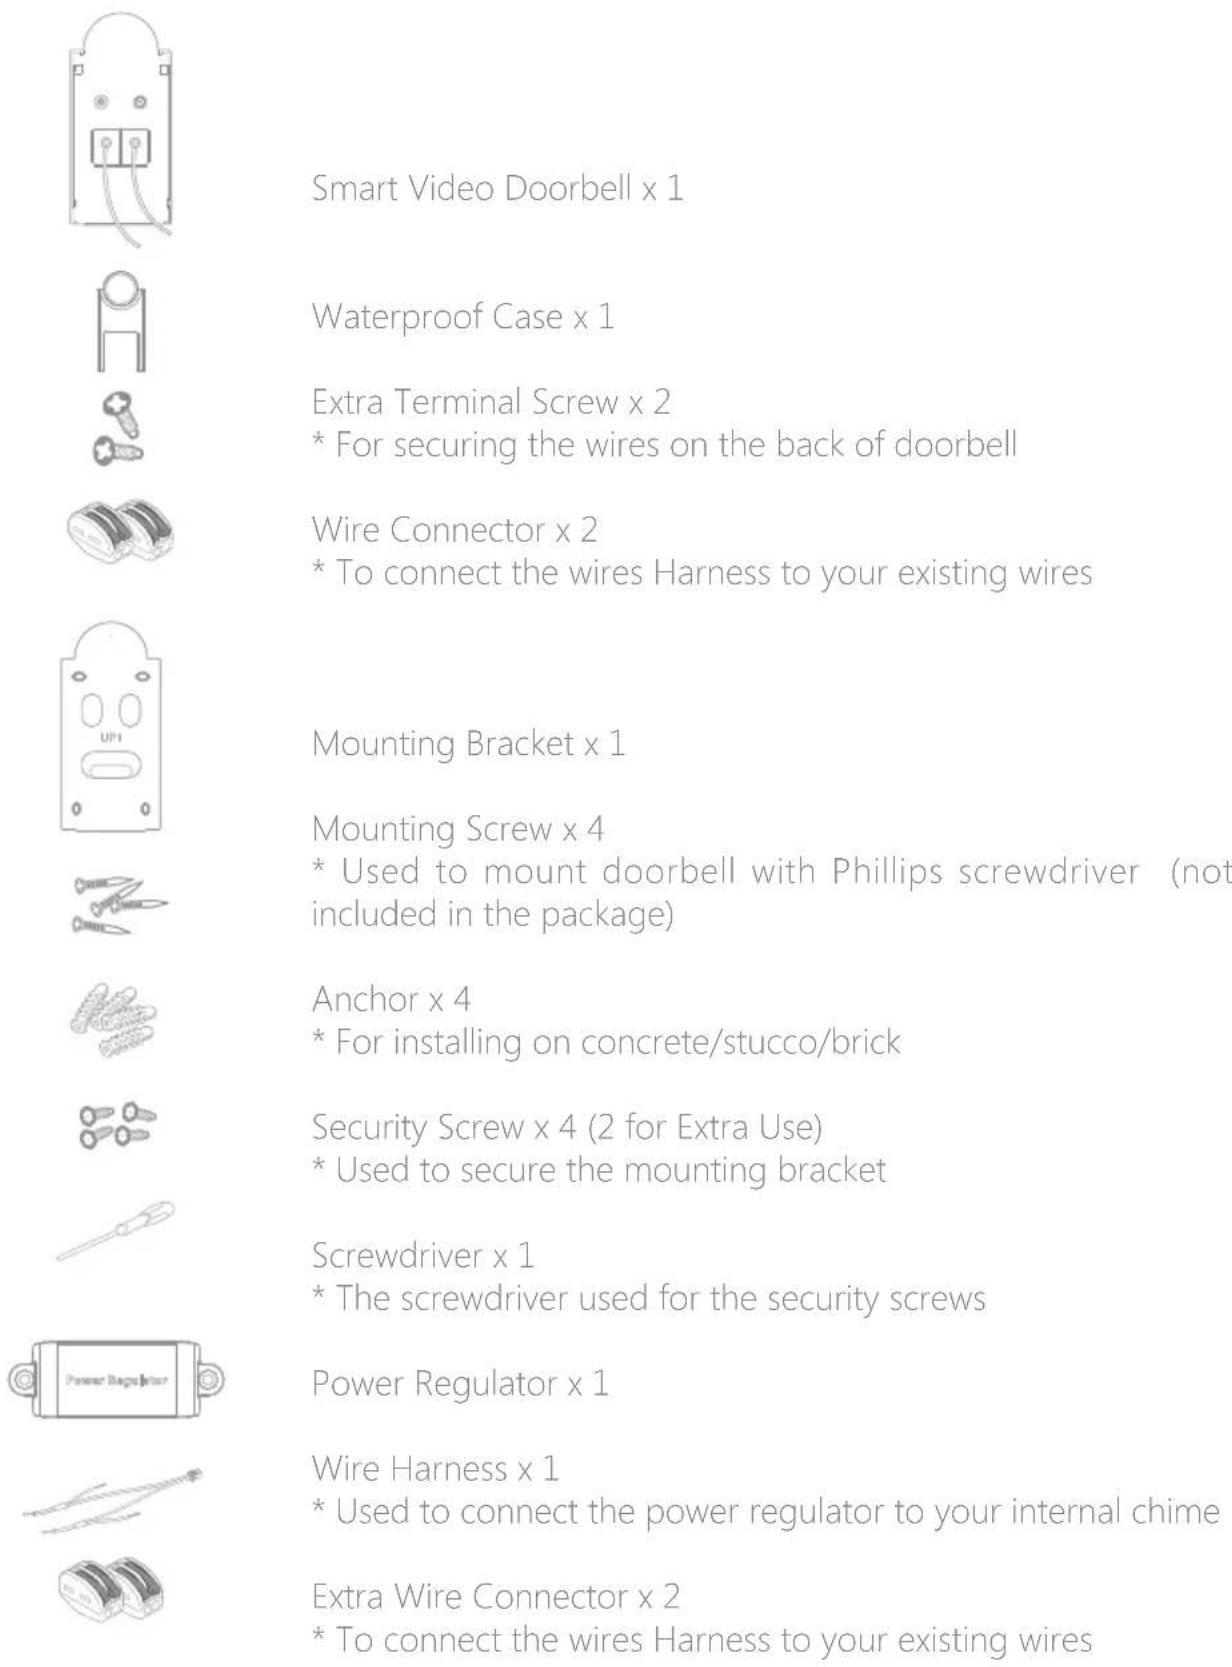
text_image
Smart Video Doorbell x 1 Waterproof Case x 1 Extra Terminal Screw x 2 * For securing the wires on the back of doorbell Wire Connector x 2 * To connect the wires Harness to your existing wires Mounting Bracket x 1 Mounting Screw x 4 * Used to mount doorbell with Phillips screwdriver (not included in the package) Anchor x 4 * For installing on concrete/stucco/brick Security Screw x 4 (2 for Extra Use) * Used to secure the mounting bracket Screwdriver x 1 * The screwdriver used for the security screws Power Regulator x 1 Wire Harness x 1 * Used to connect the power regulator to your internal chime Extra Wire Connector x 2 * To connect the wires Harness to your existing wiresGetting to Know Your Smart Video Doorbell
Overview
Front View

text_image
IR LEDs Camera Microphone smanos PIR Sensor RingerRear View
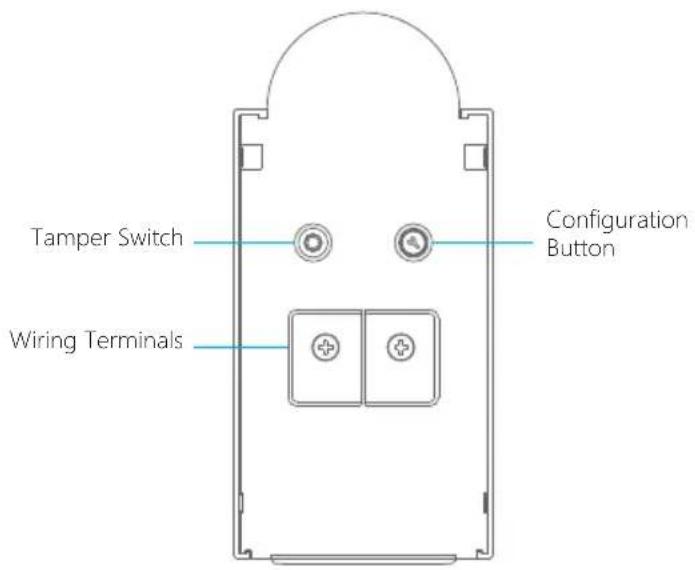
text_image
Tamper Switch Configuration Button Wiring Terminals
natural_image
Line drawing of a device with two oval cutouts and a central button labeled 'UP ↑', no text or symbols present.LED Indicators
The LED indicators on the doorbell give you an idea of the device's current status. Here is a list of light indicators and the corresponding status it refers to.
| Light indicator Status | |
| Solid red light lasts for 30 seconds and then off Powering on | |
| Green light flashes fast (once every 0.2s) WiFi signal searching | |
| Green and red light flash alternatively WiFi configuration mode | |
| OFF WiFi connected | |
| Green light flashes slowly (once every second) Doorbell ringing | |
| Solid green light Live streaming | |
| Red lights flashes fast (with warning beeps) Tampering alarm | |
| Red light flashes once Motion detected | |
| Red light flashes slowly (once every 3s) Low battery | |
Getting Started
Operating Requirement
This video doorbell is only available to connect to a low voltage 8\~24VAC transformer or an existing traditional doorbell with a voltage of 8\~24VAC. In general, your traditional doorbell consists a ringer to be installed outdoor, and an indoor chime with a transformer. When the ringer is pressed by visitor, a ringtone of "ding dong" will remind the family there has a visitor.
If you don't get a detailed information about your existing doorbell, please consult your local agency or installer.
To ensure a good performance of the smart doorbell, please check the things below:
(1) Please do not install the smart doorbell on the mental.
(2) Mount your smart doorbell at a proper height. It is highly recommended to mount it at the height of 1.2\~1.3m from the ground.
(3) One critical factor affecting the performance of this video doorbell is the WiFi quality it connecting with, It is recommended to close your door and do a WiFi speed test via speedtest app (for example) in the location where you want it to be installed on to make sure that you have an upload speed of at least 2Mbps.
(4) The app of this video doorbell is available to run at iOS 8.0 or above with iPhone 5 or newer, Android 5.0 or newer.
Connecting to the Existing Doorbell
This part is recommended to be done by qualified electrician.
Step 1: For your safety, please shut off the power source of your existing doorbell system.
Step 2: Remove the cover of your internal chime and you can see 4 wires, two of them are connected with its transformer, and two of them are connected with the outdoor ringer.
Step 3: Disconnect the wire on the "front" terminal (outdoor ringer) and the wire on the "transformer" terminal.
Step 4: Attach the newly disconnected wires into the provided Power Regulator. Push down the orange fasteners to secure the wires in place.
Step 5: Then attach the other end of wires from the Power Regulator in parallel back to the "front" and "transformer" terminals of internal chime. Tighten the screws on top to secure the wires in place.
Step 6: Fix the Power Regulator inside the chime with double-sided tape, if it does not fit inside, you can attach it to the wall next to your chime. Place the cover back onto the chime.
Step 7: Remove the wires attached to the outdoor ringer. You can disconnect the wires by loosening the screws on top of the wires.
Step 8: Attach the newly disconnected wires into the doorbell in any pairing. Push down the orange fastener to secure the wires in place.
Step 9: Restore the power back to the doorbell system. The ringer LED will be red on boot.
Step 10: The initial boot takes about 30 seconds. There will be an audio indication when the boot is completed. The ringer LED will also change to green.
Downloading the App
text_image
smanos home | smanos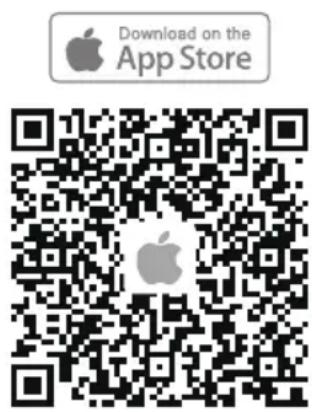
text_image
Download on the App Store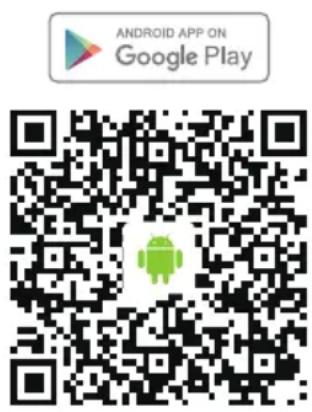
text_image
ANDROID APP ON Google PlaySpecial Tips
Tap "Allow" to allow receiving notifications from App. Forbidden to receive notifications may result in an application running failure, please allow it to send notifications to your phone in case of alarm.
Signing Up/In
If you have not registered an account with us, please press "Sign up" just below the "Sign in" icon on the App, and follow the instructions to create your account first.
* If you do not receive an account verification code in your email inbox during the registration process, please remember to check your spam/junk folder and make sure the notice has not been blocked by your service provider.
Once you have an account with us, please select the "Sign in" icon and enter your email address and password to log in.Once you have an account with us, please select the "Sign In" icon and enter your email address and password to log in.
Installation
The voltage of the doorbell is 8-24 VAC. To see how to connect the power, please scan the QR code below to watch the video.
Adding Device
Press the [+] button on the Device List page.

text_image
09:29 Press "a" to add a button Close the limit you would like to add Close the limit you would like to add Close the limit you would like to addTap on [Smart Video Doorbell], and then follow the configuration steps to set up your doorbell with your home WiFi.
Setting Up Your Doorbell
Powering On
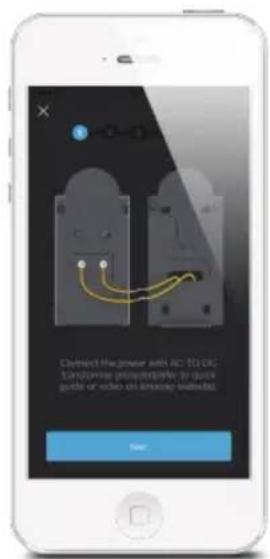
text_image
Cliffsed the power with AC TO DC Transformer provides a quick guide or video on interface.Putting the Doorbell into WiFi Configuration Mode
Press and hold the Configuration Button on the back until the doorbell beeps once (about 3 seconds), and then the indicator would flash red and green alternately, indicating that the doorbell has been switched into the WiFi configuration mode.

text_image
Press the Setup button for 3 on an electrical device will be pressed. Play Next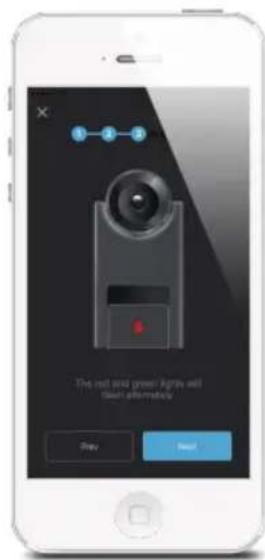
text_image
The red and green Airgo will turn alternately Play NextConnecting the Doorbell to Your Smartphone
NOTE: Android users may need to disable cellular (mobile) data before proceeding to this step. This setting is normally found in your smartphone's settings under Data Usage, or Mobile Networks.
If you're unable to find the setting location, we suggest searching on Google with the following syntax: Disable (Phone Model) cellular data.
Go to your smartphone's WiFi settings, and select "smanos doorbell" to connect to the doorbell. Now, your smartphone is the control center of your doorbell.
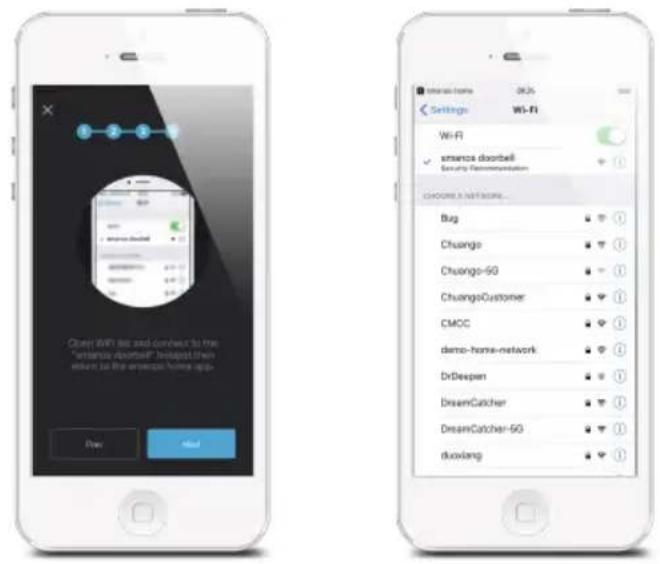
text_image
Cheng WiFi to add contact to the "emans doorbell" headset then start to the email home app Back Add Settings Wi-Fi Wi-Fi emans doorbell Security Recommendation Choose a network... Bug Chuangfa Chuangfa-5G ChuangfaCustomer CMCC demo-home-network DrDespen DreamCatcher DreamCatcher-5G duovangEntering WiFi Details for the Doorbell
Pick your home WiFi network from the drop down box listed on the app, and enter the WiFi network's password. The doorbell will connect to the selected WiFi network. This binding process should take about three minutes.
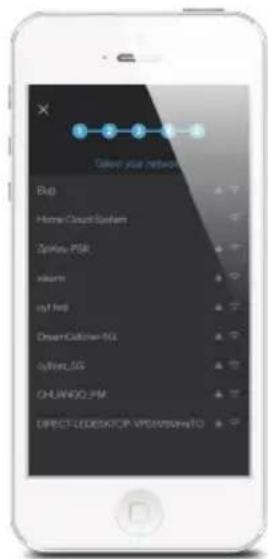
text_image
Close-up network Bus Home Court System Ziplex-PSR loadm nF Nell DreamCaliber-5G Cybera-5G CHUNGO-PM DIRECTLENDER FOR VPS/PSM/TOThe doorbell indicator light will be off when a successful connection has been established.
Starting to Use
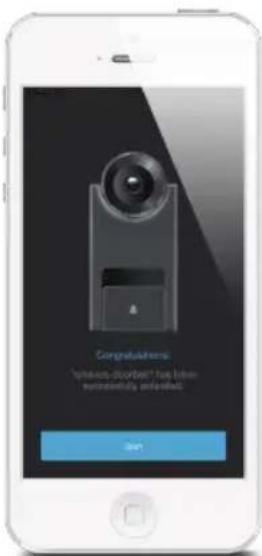
text_image
Congratulations: "please-discomfort" has been naturally enabled! StartNow, your doorbell is ready for a spin!
App Operation
Main Page
Checking device status after setting up
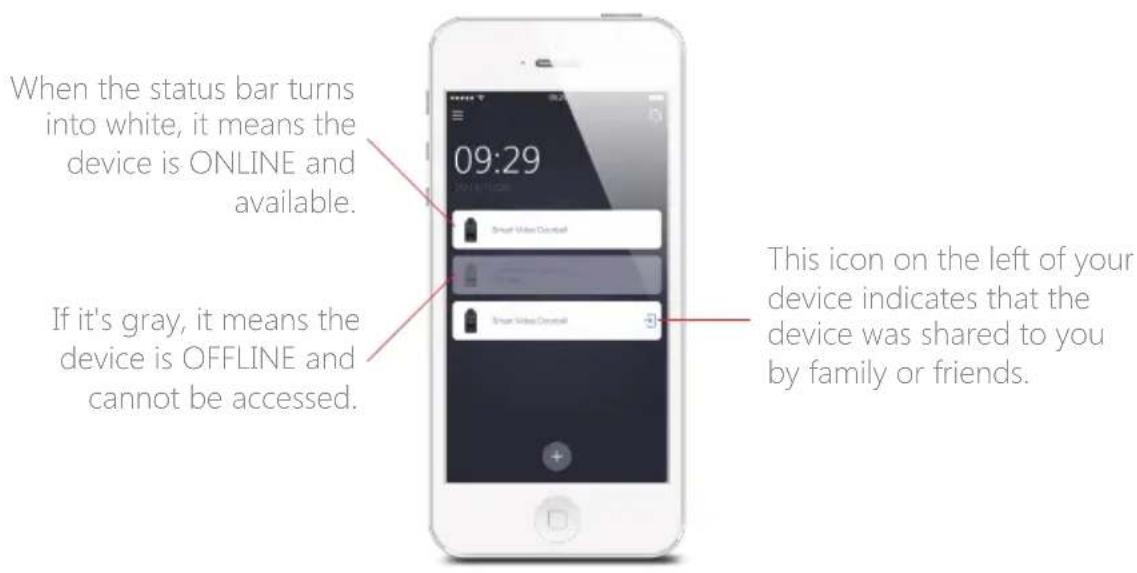
text_image
When the status bar turns into white, it means the device is ONLINE and available. If it's gray, it means the device is OFFLINE and cannot be accessed. 09:29 Smart Video Control This icon on the left of your device indicates that the device was shared to you by family or friends.Editing your device(s) as you wish
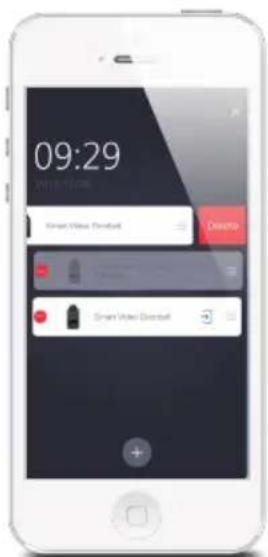
text_image
09:29 Sinan Video Download DavidaDeleting Device
Tap on the Edit Button [ ] and press the Delete Button [ ]
Sorting
Tap on the Edit Button [☑], press and hold the Sort Button [☐], drag it up or down to the position where you want it to be located.
Live Video
Please tap on the "Smart Video Doorbell" icon from the main page and enter the live video page.
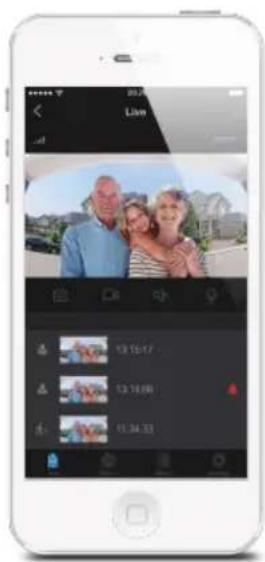
text_image
Mobile phone screenshot showing a photo editing interface with a family photo and a list of photo thumbnails below.1. Signal Strength
Indicate the signal strength between the WiFi network and the connected devices.
Note: Another critical factor affecting video quality is the upload speed of your selected home WiFi network.
2. Video Quality
Tap on the video quality icon at the top right of the Live Page, there are 3 different levels of video quality you can choose: 1080p, 720p, 360p; please choose video quality according to your need and network situation.
If the level of 1080p is selected, the upload rate for the network that the device is connected should be not less than 200KB/S, and the download rate for the network that the mobile phone is connected should not be less than 200KB/S.
If the level of 720p is selected, the upload rate for the network that the device is
connected should be not less than 120KB/S, and the download rate for the network that the mobile phone is connected should not be less than 120KB/S.
If the level of 360p is selected, the upload rate for the network that the device is connected should be not less than 30KB/S, and the download rate for the network that the mobile phone is connected should not be less than 30KB/S.
3. Snapshot (left) / Record (right)
Real-time screenshots and video clips can be recorded directly onto your phone. Tap on "Album" to view them.
4. Listen (left) / Speak (right)
Press the microphone button to speak and press it again when you finish. Anyone in the vicinity of your doorbell will hear you.
If you want to listen in on the surrounding area of your doorbell, all you need to do is tap on the Listen In button.
5. Latest Alerts
The latest three alerts will appear on this area. And the corresponding 15-second videos can be played directly ONLY if you have purchased a smanos cloud plan.
Answering Your Door
When someone is infront your door and ring the doorbell, it will show on your App:
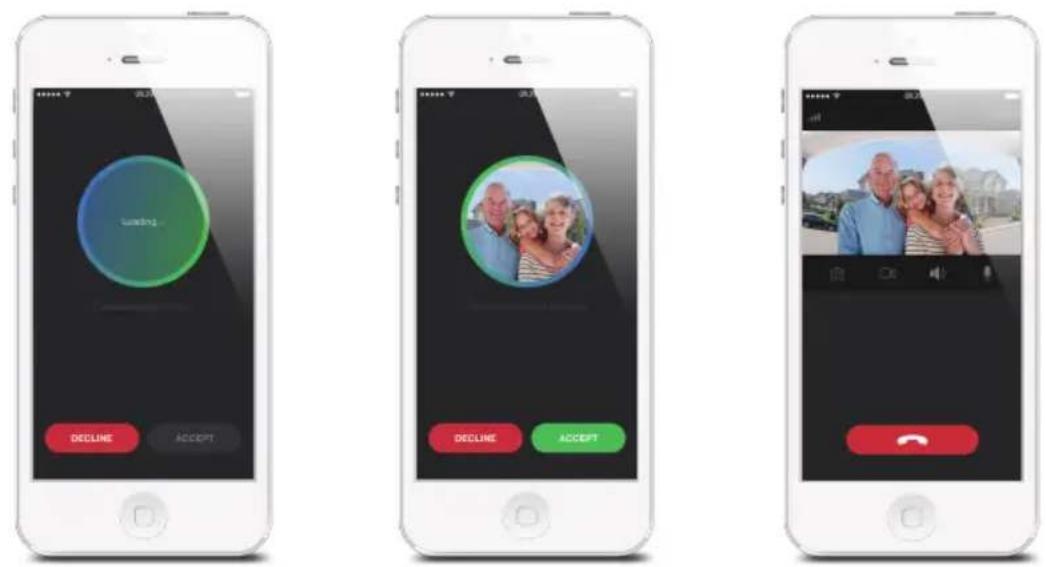
After loading successfully, it will show the image of the outdoor situation. Press "Accept" button to speak to the ringer directly or just tap on "decline" to finish the conversation.
History
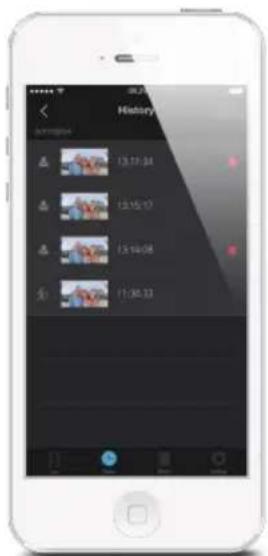
text_image
History 13:17:24 13:15:17 13:14:08 11:30:33If you already have had our smanos cloud service, motion-triggered alerts, accepted or missed ring logs can be reviewed from this History page directly and the corresponding 15-second videos can be played.
Tap on [RE] to pick a specific day and search for an alert.
Tap on the edit icon [ ] and then press the shown [ ] to delete the selected 15-second videos.
Tap on the edit icon [☑], and then press the shown [☐] to share the selected 15-second videos.
Album
You can find all your manually saved video clips and snapshots on this page. Any video or snapshot found here is stored on your phone and can be edited and shared as you wish.
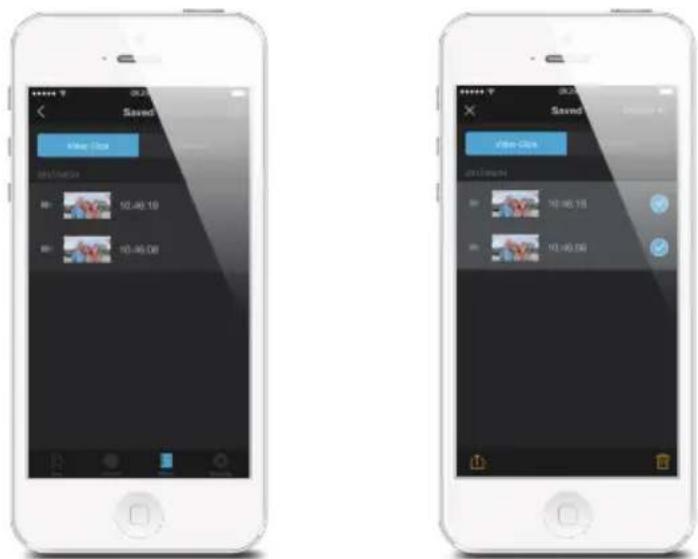
text_image
Saved File Copy 10:46:19 10:46:08 Saved File Copy 10:46:19 10:46:08Deleting Video(s) or Snapshot(s)
Tap on edit icon [ ] and then press the shown [ ] to delete video clip(s) or snapshot(s).
Sharing Video(s) or Snapshot(s)
Tap on edit icon [☑], and then press the shown [☑] to share the video clips or snapshots of interest.
Settings
General
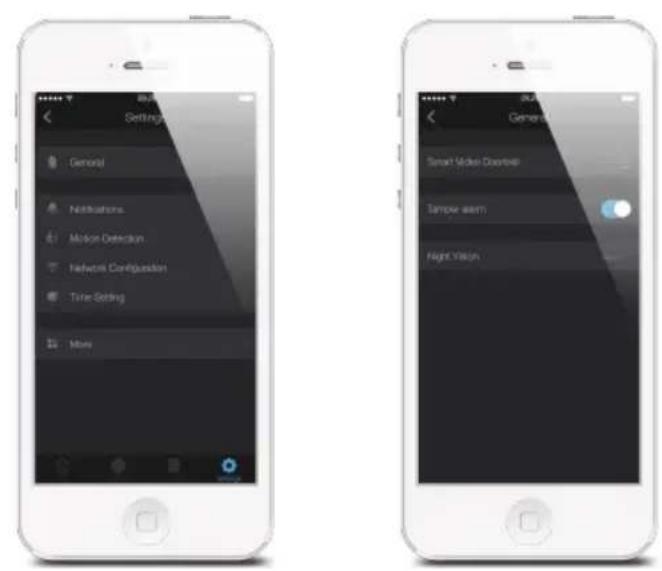
Device Name
This setting enables you to rename your doorbell, and the new name will be shown on the Device List on Main Page.
Tampering Alarm
This setting enables you to switch on/off the tampering function on your doorbell.
Notifications
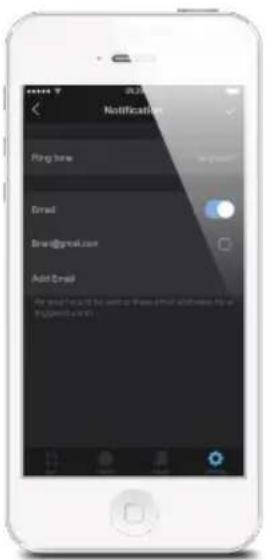
text_image
Notification Ring time Email Email@gmail.com Add Email For your email to the next three email addresses (or Registration check)This setting enables you to:
- Change the alert tone of the push notifications.
Note: The notification for motion alerts will be sent to you without any ring tone.
- If you want to receive an email notification whenever the motion is detected, you can turn on the "Email" function and input the receiving email addresses.
Motion Detection
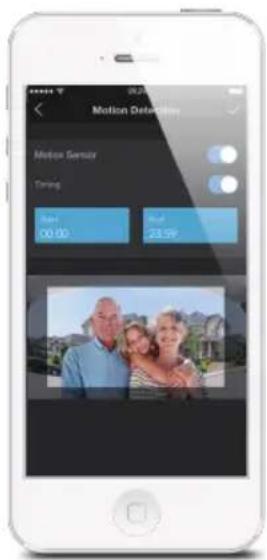
text_image
Motion Defending Motion Sensor Timing Size: 00.00 Rial: 23.99On/Off
When the motion sensor is turned on, you will receive a push notification whenever motion is detected.
Timing
This is useful if you installed the doorbell in a busy area in your home where foot traffic is frequent. Define a time frame during which you wish to receive motion alerts.
Network Configuration
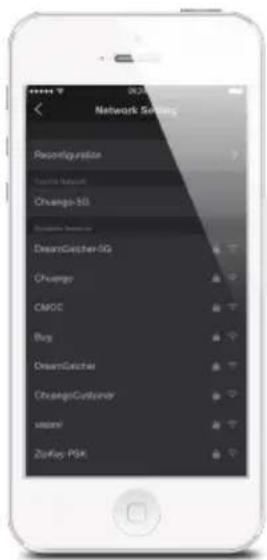
text_image
Network Setting Reconfiguration Chango-3G DreamG Petier-3G Chango CACC Buy DreamG Petier ChangoCustomer usnet ZurKey PSKChange WiFi (Switching between Networks)
This setting enables you to connect your doorbell with another nearby WiFi network, without repeating the configuration process.
Reconfiguration
This setting enables you to reconfigure your doorbell when a network issue has arisen. All settings and records will NOT be cleared.
Time Setting
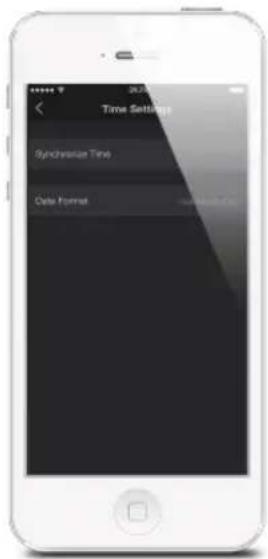
text_image
Time Settings Synchronous Time Date FormatSynchronize Time
This setting enables you to choose the time zone for your doorbell, to make sure the time stamp on the recorded video is correct.
When motion is detected, you will receive a push notification: (for example) Activity detected by [Smart Video Doorbell name] at 08:20:00 GMT+2 Or Activity detected by [Smart Video Doorbell name] at 07:20:00 GMT+1 DST during Daylight Saving Time.
Date Format
This setting enables you to change the format of the date shown on your app.
More
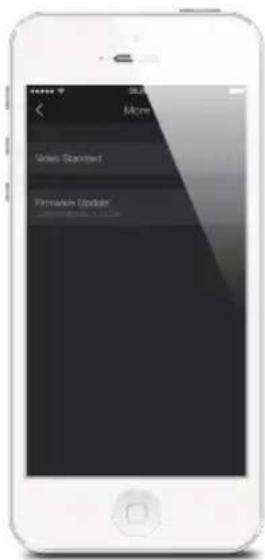
text_image
More Sales Standard Firmable UpdateFirmware Update
This setting enables you to update your doorbell to the latest firmware if necessary. WHEN AN UPDATE IS TAKING PLACE, FORCED TERMINATION WILL CAUSE SERIOUS DAMAGE TO YOUR Smart Video Doorbell. It is highly recommended that you keep your doorbell plugged in at all times, and DO NOT SWITCH THE DEVICE OFF BEFORE AN UPDATE IS COMPLETED.
Account Management
Editing Account
Tap on [ ] on the main page to enter the account management.
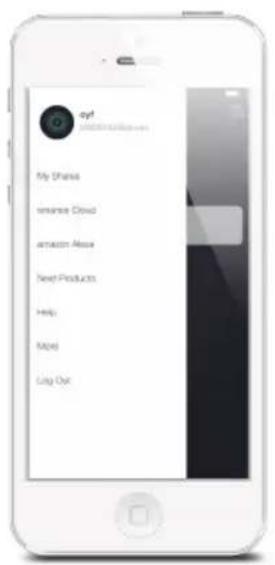
text_image
My Share romance Cloud amazon Access New Products Help Maps Log Out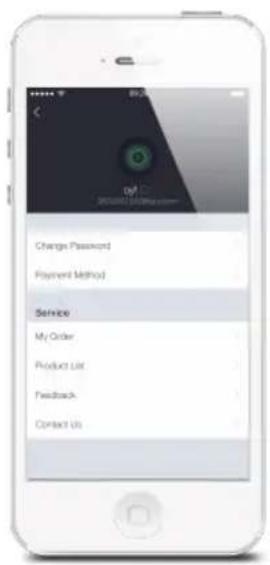
text_image
Change Password Payment Method Service My Order Product List Feedback Contact UsTap on the picture, and you can add or replace your account image by taking a picture or choosing a picture from your phone's album.
If you want to change your account name, just tap on the [ ] button and enter a new name.
Changing your password can also be done on this page.
My Shares
Sharing device(s) with family or friends
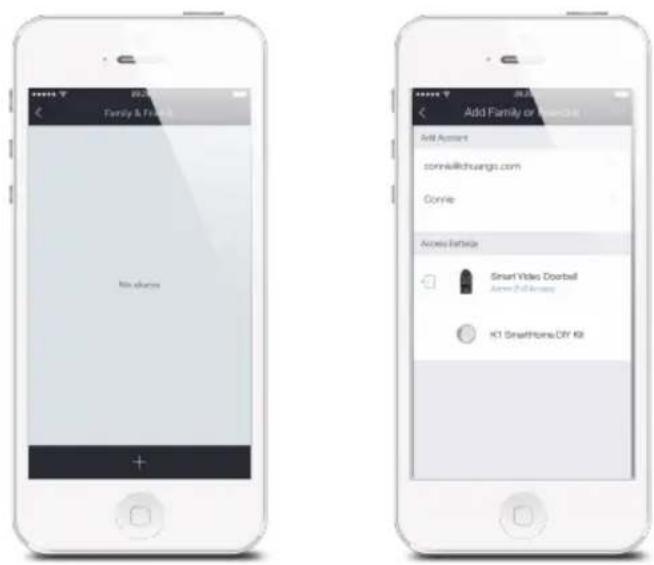
text_image
Family & Friends No shares Add Family or Close Add Account sonmail@chuangs.com Conne Access Article Smart Video Doorbell Access Full Access K1 SmartHome.CYK KitBy choosing "My shares" on the menu and pressing the [+] Add Button, you can share access to your device(s) with other registered accounts.
Enter the email address and nickname of the account you want to share with, and then select the device(s) after setting access limit.
Access Setting
There are two types of sharing way with some key differences: the Administrator and the User who has been invited to the devices.
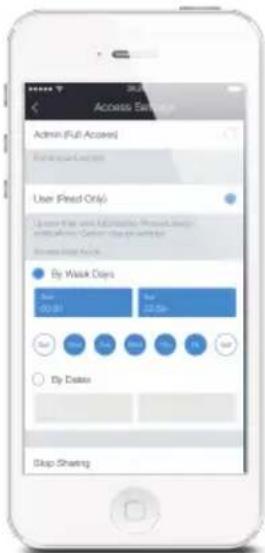
text_image
Access Settings Admin (Full Access) Formal Service Location User (Read Only) License that will be installed. Please change your access to the user. Access Date Account By Week Days 20:30 22:50- By Dates Stop SharingAdmin (Full Access)
With Admin (Full Access), the shared user in this group will be able to do almost everything as the Owner can to the devices you're shared, with few exceptions, like re-sharing to others.
Important:
Because people in Admin group with access to a device can do so much, you should only invite people you really trust.
User (Read Only)
With User (Read Only), the shared user in this group will only be able to edit the name of the device(s) and receive alerts; re-sharing the device(s) to other users or changing the settings are not permitted.
(1) By week days
Select the day(s) and each day's routine you want the device(s) to be accessible to the account you share with.
(2) By dates
The family and/or friend(s) you share with would have access to your device(s) during the entire chosen time period.
Stop Sharing
If you would like to limit access to the device you have shared, tap stop sharing, then tap "√" on the top right to save.
Specifications
Model No DB-20
Camera Full HD 1080p
Angle of view horizontal 170°, vertical 90°
Video compression H.264
Night vision Automatic IR-cut filter
WiFi 802.11b/g/n/ac with WEP/WPA/WPA2 encryption
$$ 2. 4 \mathrm{GHz} + 5 \mathrm{GHz} $$
Power supply AC 8-24V
Operating conditions temperature -20\~+50°C (4\~122°F, humidity < 95%
RH (non-condensing)
Dimensions (LxWxH) 131.7 x 62.2 x 36.2mm
Dimensions 117 x 118.5 x 40.5 mm (L x W x H)
FAQs
\* WiFi and Network:
1. I have a poor WiFi signal, what can I do?
Please check the WIFI connection strength from live video page or test your network's speed from www.speedtest.net or from the speedtest app.
If it shows the connection is weak, you should re-attempt the setup procedure, and try moving your router closer to your doorbell, or exploring possible sources of WIFI interference such as large appliances, or other wireless products that may affect the signal.
You may also need to extend the range of your WiFi network with a WiFi repeater.
2. How do I locate my WiFi password?
The WiFi network's name is normally referred to as the SSID. The password or security ID is normally the next line or two down from the WiFi/SSID network name.
These can be easily found on your router if you did not change from the default name and password that was shipped with from the factory. For example:
- WiFi/SSID Network Name: XXXX
- WiFi/SSID Network Password/Security Key: XXXX
3. Why did my smart doorbell go offline and how do I fix it?
There may be a time when your smart doorbell loses its network connection. If you open the app and notice the status bar is gray, this is one of those times. There are a few possible causes of this occurrence:
- A power surge causes a problem with your Internet router.
- You temporarily lose power.
- A wire in your router setup temporarily comes loose.
- You changed your Wi-Fi network password.
- Your device is suffering from low power due to a discharged battery.
In most cases, the device will automatically be reconnected to the network when the circumstances causing the disconnection clear up. Please check the following troubleshooting routine to find the possible reasons if it fails to reconnect automatically.
Check that all of your wires are properly plugged in and that all the lights on the front of the router are green.
Check to see whether another Wi-Fi device is having a problem connecting to the network.
Unplug your router for 30 seconds and then plug it back in. See if your doorbell
automatically reconnects.
Press the configuration button on the back of your device to put the device in Setup mode. Wait 10 seconds, then press it again and see if the device automatically reconnects.
Check to make sure your device's battery to make sure it's properly charged.
\* Motion alerts:
4. Why am I receiving false alerts?
An infrared sensor is used for motion detection meaning it could be triggered from a moving object which produces heat.
Cars as well as other objects that may give off large heat signatures will trigger unwanted motion alerts as they pass by. As the doorbell is featured with a wide-angle lens, some undesired objects in the motion zone may trigger the alerts.
Proper location, height and angle of the device are important.
It is suggested the height for installation is 1.2-1.3m (4.0-4.3ft) from the ground.
Please make sure it does not cover the areas that may trigger unwanted motion alerts (e.g. a public sidewalk or street). If there is an adjacent wall by your front door, try to mount the device on the wall not facing the street.
5. What to do if no motion alert is received?
Please make sure you've enabled the motion detection function on your App by setting the motion sensor slider to the blue "on" position.
6. Why am I not receiving any motion alerts?
This is most likely caused by a poor WiFi connection. An upload speed of two mbps or higher is recommended for optimal streaming performance. If your bandwidth doesn't meet this requirement, you may need to relocate your router, or purchase a WiFi extender to strengthen the connection.
7. How do I set up a schedule to turn on motion alerts?
Go to the "Settings" page, and select "Motion Detection". Move the "Motion Detection" and "Timing" slider to the blue "on" position, and then set the time period that you would like to receive motion alerts.
If you do not want to receive motion alerts, turn the "motion sensor" slider to gray "off" position.
\* Notifications
- My device is not sending me notifications, how can I fix this?
Notifications will be sent to your mobile phone once the bell is rung or any motion is detected by the doorbell (if this function is enabled).
Be sure your device is online and your phone is allowed to receive notifications from smanos home(for iPhone only).
You may check from the front page to see the status of the device. When the status bar turns into teal, it means the device is ONLINE and available. When the status bar turns into gray, it means the device is OFFLINE.
If the device flashes in green light fast (once every 0.5s), it means the device is searching for signals and is OFFLINE.
And if you are an iPhone user, you may check the notifications setting on settings section in your phone.
\* Video
- My video quality is poor, how can I fix this?
Bring your router near the doorbell, and press the Live View utton, or trigger a motion event to see video.
If you get good video quality near the router, you need to extend your wifi signal. If you video quality is poor still near the router, test your network from www.speedtest.net or get the speedtest app.
There are 3 different levels of video quality you can select: 1080p, 720p, 360p. You may select higher level to improve the video quality.
If 1080p is selected, the upload rate for the network that the device is connected to should be not less than 200KB/S, and the download rate for the network that the mobile phone is connected should not be less than 200KB/S.
If 720p is selected, the upload rate for the network that the device is connected to should be not less than 120KB/S, and the download rate for the network that the mobile phone is connected should not be less than 120KB/S.
If 360p is selected, the upload rate for the network that the device is connected to should be not less than 30KB/S, and the download rate for the network that the mobile phone is connected should not be less than 30KB/S.
- How can I access my doorbell's live view?
The "live view" feature lets you access a live video feed from your smart doorbell at any time. Tap the "live view" button to watch a live video from your app. The green light will be on when you watch the live video. Press the microphone button to speak and press it again when you finish. Anyone in the vicinity of your doorbell will hear you. If you want to listen in on the surrounding area, all you need to do is tap on the Listen In button.
\* Battery
- Does the smart doorbell operate on battery power?
The smart doorbell can be connected to your doorbell wiring. It is recommended to connect to AC power (voltage of 8\~24VAC) as the battery is intended to be a backup.
- If the smart doorbell is hardwired to the existing doorbell, does the battery still need to be charged?
No, if the doorbell is hardwired to power then it will be charged by your home's electricity.
\* Sharing
- Can the doorbell be controlled by multiple devices? How can I share my device with others?
If you plan to use multiple devices to control your doorbell, use the in app "My Shares" feature. You can access this feature by tapping on "My Shares" and pressing the + button.
Note: Additional users will need to register for an account.
Enter the email address and nickname, then select which device(s) you wish to share.
There are two types of sharing way with some key differences: the Administrator and the User who has been invited to the devices.
With Admin (Full Access), the shared user in this group will be able to do almost everything as the Owner can to the devices you're shared, with few exceptions, like re-sharing to others.
With User (Read Only), the shared user in this group will only be able to edit the name of the device(s) and receive alerts; re-sharing the device(s) to other users or changing the settings are not permitted.
\*smanos Cloud Plan
- How long is the free trial?
7 days. If you purchase a paid subscription during the time, it will activate automatically at the end of the trial period.
- If I sign up after my free 7-day trial, will I still be able to retrieve my videos?
If you don't subscribe before your trial has ended, your videos won't be lost. If you purchase a subscription during the free trial, your paid subscription will go into effect as soon as your trial has ended.
- If I don't have a smanos cloud service, will I still receive alerts?
Yes. You will still get alerts when visitors press your Doorbell or trigger the motion sensors.
Tap smanos Cloud in the account management page for more information.
Technical Support:
Website: http://www.smanos.com
You may send emails to:
support@smanos.us (North America)
support@smanos.com (Rest of the World)
Thank you for choosing "Smart Vide Doorbell". It is a product that integrates motion detection and video recording into a doorbell. The doorbell will provide you a safe, easy and cost-effective solution to protect your home & loved ones 24/7/365. Please take the time to unpack and familiarize yourself with the included parts and this instruction manual to learn the easy steps required to setup your "Smart Video Doorbell".