Evo 2in1 2765 - Vacuum Cleaner ARIETE - Free user manual and instructions
Find the device manual for free Evo 2in1 2765 ARIETE in PDF.

Frequently Asked Questions - Evo 2in1 2765 ARIETE
User questions about Evo 2in1 2765 ARIETE
0 question about this device. Answer the ones you know or ask your own.
Ask a new question about this device
Download the instructions for your Vacuum Cleaner in PDF format for free! Find your manual Evo 2in1 2765 - ARIETE and take your electronic device back in hand. On this page are published all the documents necessary for the use of your device. Evo 2in1 2765 by ARIETE.
USER MANUAL Evo 2in1 2765 ARIETE
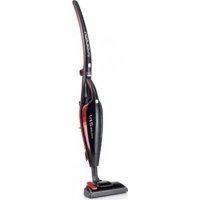
Bagless rechargeable vacuum cleaner
Balai electrique sans sac
3NeKtpoBeHn6e3 nbinecbopHnKa cNo3aepaek
5 24
C∈ER2765
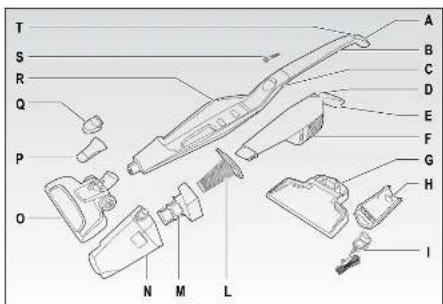
Fig.1
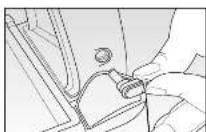
Fig.6 Fig.7
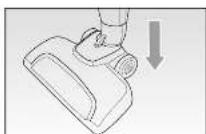
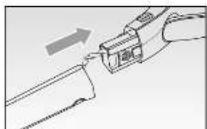
Fig.2 Fig.3

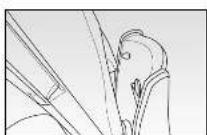
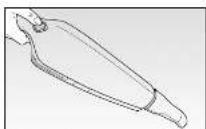
Fig.10 Fig.11
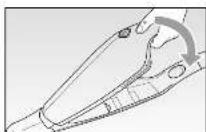
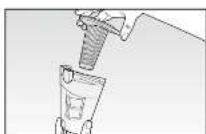
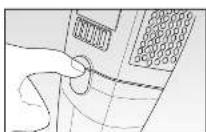
Fig.4 Fig.5
Fig. 12 Fig. 13
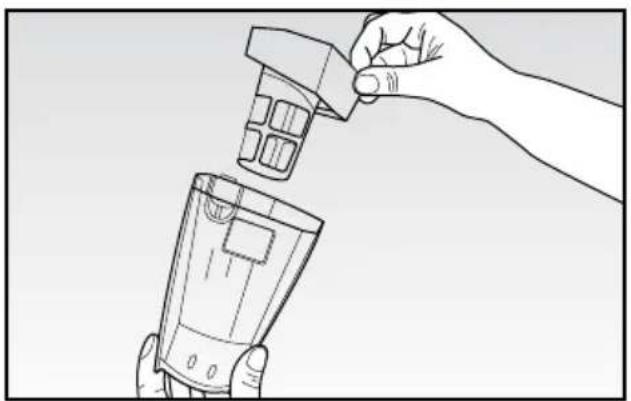
Fig. 14 Fig. 15
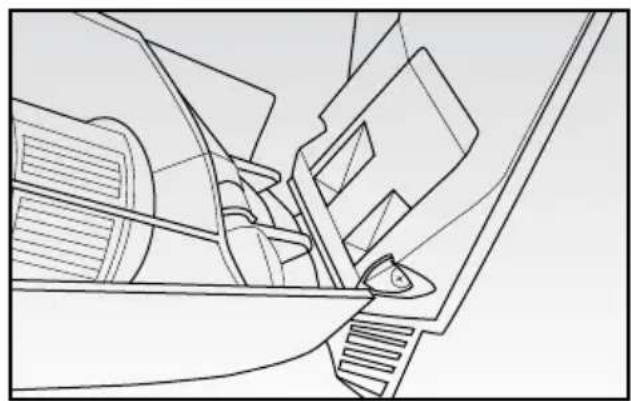
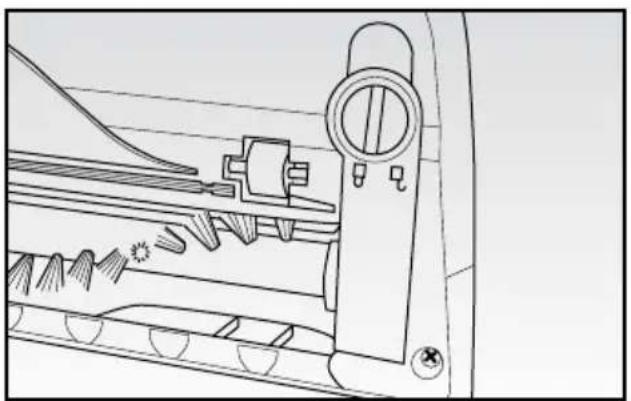
Fig. 16 Fig. 17
AVVERTENZE IMPORTANTI
LEGGERE QUESTE ISTRUZIONI PRIMA DELL'USO.
The necessary precautions must be taken when using electrical appliances, and these include the following:
1 Never place the appliance on or close to sources of heat.
2 Never use the appliance in proximity to people or lift to eye level, ear level, etc... as there is a serious risk of accident.
3 Never leave the appliance exposed to the elements (rain, sun, etc....).
4 Make sure that the power cord does not come into contact with hot surfaces.
5 This appliance is not intended for use by persons (including children) with reduced physical, sensory or mental capabilities, or lack of experience and knowledge, unless they have been given supervision or instruction concerning use of the appliance by a person responsible for their safety.
6 Children should be supervised to ensure that they do not play with the appliance.
7 Never insert any items in the openings of the appliance and do not allow items to obstruct air flow.
8 Keep openings free from dust, fluff, hair, etc.
9 Never use the appliance without the filter.
10 Do not use to clean up hot items or any items that are giving off smoke or which are burning, such as cigarettes, matches or hot ash.
11 Never pick up flammable or combustible materials (volatile fluids, petrol, kerosene, etc.) or use where there are large amounts of water.
12 Never use the appliance in closed environments or where there might be fumes from oil-based paints and varnishes or solvents, waterproofing treatments, flammable powders or other toxic or explosive fumes.
13 Never pick up toxic materials (bleach, ammonia, drain cleaners, petrol, etc.).
14 NEVER IMMERSE THE APPLIANCE BODY, THE RECHARGING BASE, THE PLUG AND THE POWER CORD IN WATER OR OTHER LIQUIDS, USE A DAMP CLOTH FOR CLEANING.
15 SWITCH OFF THE APPLIANCE AFTER USE AND BEFORE FITTING OR REMOING SINGLE PARTS AND BEFORE CLEANING.
16 Always make sure that your hands are thoroughly dry before using or adjusting the switches on the appliance, or before touching the power plug or power connections.
17 REMOVE THE APPLIANCE FROM THE RECHARGING BASE WHEN USED.
18 In case or replacement and/or maintenance of the charger or the power cord, contact an authorized Service Centre or skilled personnel to prevent any risk.
19 In case of battery leakage, do not use the appliance; take it to your nearest authorized Assistance Centre for battery replacement.
20 The appliance works with rechargeable NiMH batteries, therefore it shall not be disposed with normal waste at the end of its life. Take it to appropriate differentiated waste collection centres of the local administrations or to dealers providing this service. Disposing an appliance separately means avoiding possible negative consequences both to the environment and people's health arising from unsuitable disposal and allows to reuse the material it is made of thus saving energy and resources. The obligation to dispose of appliances separately is indicated on the appliance with the symbol representing the crossed out wheeled bin. Never throw accumulators into fire.
21 To unplug the appliance, grip the plug and remove it directly from the power socket. Never pull the power cord to unplug the appliance.
22 Never use the appliance if the power cord or plug are damaged or if the appliance itself is faulty; in this case, take it to your nearest Authorised Assistance Centre.
23 To prevent any risks, if the power cord is damaged, it must be replaced by the manufacturer, its Technical Assistance Service or a similarly qualified person.
24 This appliance is designed for HOME USE ONLY and may not be used for commercial or industrial purposes.
25 Any changes to this product that have not been expressly authorised by the manufacturer may lead to the user's guarantee being rendered null and void.
26 In the event that you decide to dispose of the appliance, we advise you to make it inoperative by cutting off the power cord. We also recommend that any parts that could be dangerous be rendered harmless, especially for children, who may play with the appliance or its parts.
27 Packaging must never be left within the reach of children since it is potentially dangerous.
To dispose of product correctly according to European Directive 2012/19/EU, please refer to and read the provided leaflet enclosed with the product.
DO NOT THROW AWAY THESE INSTRUCTIONS
APPLIANCE DESCRIPTION (Fig. 1)
A Grip
B Upper handle
C Unlocking buttons of removable body
D ON/OFF button of removable body / Recharge light
E Removable body grip
F Removable body / handheld vacuum cleaner
G Recharging base
H Recharging base upper side
I Charging adapter
L Filter
M Filter support
N Dust container
O Brush for floors / carpets
P Crevice nozzle
Q Vacuum cleaner with brush
R Appliance body
S Locking screw upper handle
T ON/OFF button
The product works in two modes:
1 as a standard electric broom through the brush for floors (O) and, by tilting the appliance body (R) backwards, in the normal position for use
2 as handheld vacuum cleaner, by taking off the removable part (C), suitable for cleaning surfaces and working tables through the vacuum cleaner with the brush (Q) or the crevice nozzle (P) in case of narrow spaces.
APPLIANCE ASSEMBLY
Before use, assemble the upper handle (B) on the appliance body (R), proceeding as follows:
- assemble the upper handle (B) to the appliance body (R), by slightly pressing it until it stops, making sure the wire is properly inserted into the appliance body (Fig. 2)
- insert the supplied screw (S) into the apposite hole on the handle (B) and, by means of a screwdriver, tighten it (Fig. 3).
ATTENTION:
Be careful when using the screwdriver to avoid injury.
Make sure the appliance is properly installed before use.
BATTERY CHARGING
- Assemble the recharging base (G) by positioning the upper side (H) (Fig. 4).
- Position the assembled appliance on the recharging base (G), making sure it properly locks on the hook on the upper side (H) of the recharging base (G) (Fig. 5).
- Insert the the charging adapter (I) into a mains power socket and the plug into the corresponding jack situated on the recharging base (G) (Fig. 6).
The recharge light (D) situated on the removable body (F) will start flashing slowly, signalling the appliance is being charged.
When the light (D) is steady, the recharge is complete and the broom is ready for use.
ATTENTION:
Fully recharge the battery before any use.
Do not start the appliance during recharge.
Fully discharge the battery before a new recharge.
The recharge light (D) starting blinking quickly signals a failure on the recharge circuit. Contact an authorized Service Centre Ariete.
The adapter (I) and the base upper part (H) may warm up during recharge; this is normal.
Avoid to recharge at a temperature below 5^ (40^) or above 40^ (105^) to prevent damages of batteries.
If the appliance does not work, check it is properly inserted in its recharging base (G), is powered and correctly plugged in.
ATTACHMENTS
Brush for floors / carpets (O)
Suitable for cleaning any kind of surfaces, including carpets.
-
Insert the brush into the appliance body (R), by slightly pressing is until it locks in place (Fig. 7).
-
Take the brush outwards to remove it.
Vacuum cleaner with brush (Q) - for handheld vacuum cleaner only
Suitable for cleaning surfaces and working tables, as well as couches and fabrics.
Crevice nozzle (P) - for handheld vacuum cleaner only
Suitable for cleaning corners, crevices or areas hard to reach.
HOW TO OPERATE
- Before using the appliance, make sure the battery is fully charged.
- With the handheld part (F) properly assembled in the appliance body (R), press the switching on button (T) and tilt the handle backwards in the standard position of use.
- Clean the wide surfaces by pushing with the brush (O) forwards.
This allows the vacuum cleaner to collect the fragments and the dirt on the floor.
- For cleaning the corners and small surfaces, rotate the broom in the opposite direction. The fragments and dirt can be moved to be collected.
ATTENTION: switch the broom off immediately when something remains stuck inside the brush, as some fabric, carpet fringes, etc.
- After cleaning, switch the broom off by pressing the switching off button (T) once more.
Handheld vacuum cleaner
- By holding the handle of the appliance body (R), simultaneously press the unlocking buttons (C) and remove the handheld vacuum cleaner (F) - Fig. 8.
- At the end of the dust container (F), apply the required attachment (Fig. 9); press the switching on button (D) to start the appliance by means of the apposite handle (E) - Fig. 10.
- For positioning the handheld vacuum cleaner back into the appliance body (R), remove the
installed attachment first, by removing it outward, position the end in the lower side of the apposite housing in the appliance body (R) and slightly push backward the handheld vacuum cleaner until it clicks into place (Fig. 11).
WARNING:
Make sure the handheld vacuum cleaner is properly installed before proceeding with a new use.
CLEANING
- Clean the appliance body (R) and the removable body (F) by using only a damp cloth with mild detergent, if necessary.
Proceed with care to prevent any kind of liquid from getting into the appliance.
Never use strong cleaning agents (stain removers, solvents) that may corrode the plastic.
How to empty the dust container (N)
WARNING: Clean the dust container (N) and the filter (L) in due time. The suction power is reduced when the container is full or the filter is obstructed.
- From the back of the appliance, check whether the dust container (N) is full.
- Remove the handheld vacuum cleaner as previously described.
- Press the unlocking button and remove the complete container (Fig. 12).
- Remove the filter (L) outwards (Fig. 13) and the related support (M) (fig. 14) to clean them.
WARNING: Wash the filter (L) only with fresh water without using soap or detergents.
- Empty the dust container (N) into an apposite plastic bag and wash it with water, if necessary.
- Let the components dry and reassemble.
WARNING: Properly assemble the support (M), the filter (L), and the dust container (N) before starting the appliance.
- Mount the complete container back on the removable body (F) by inserting the notches on the container on the apposite slots on the removable body and pushing it until it clicks into place (Fig. 15).
How to clean the floor brush (O)
WARNING: Clean the floor brush (O) only after having removed it from the appliance.
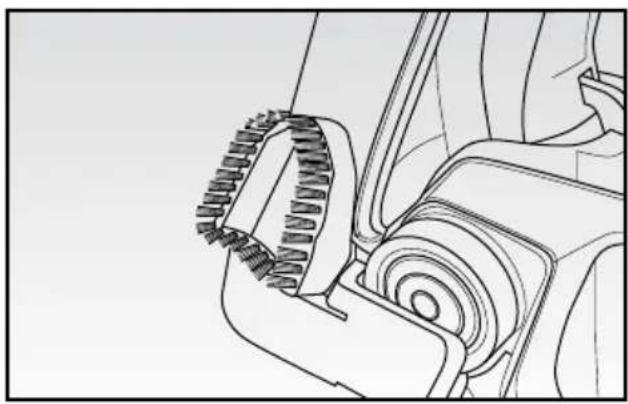
- Rotate the plastic screw towards the sign " and remove the lid (Fig. 16).
- Remove the rotating brush, proceed with cleaning and mount it properly.
-
Reassemble the lid and rotate the plastic screw towards the sign “ ”
-
After cleaning and maintenance, store the complete appliance on the recharging base (G), unplugged from power mains, and insert the attachments into the appropriate side slots on the base itself (Fig. 17).
INSTRUCTIONS IMPORTANTES
LIRE CES INSTRUCTIONS AVANT L'EMPLOI
BESCHRIJVING VAN HET APPARAAT (Fig. 1)
Kak ouucmumb nbinec6bopHK (N)
BHIMAHNE: CBoeBpeMeHNO ouuauTe nbIeSc6OpHnK (N) nΦnIbTp (L); MOUHOCTb BCaCbIBaHn CHIXKaETc, ecnn KOHTeHep 3anONHeH nn ΦnIbTp 3acopeH.
Ha 3aDHeJ uactn np6opa npOBepbTe ypoBeHb 3aONHeHnIbIe6OpHnka (N).
- BbIhTe nOpTaTnBHyB BeHTnJIaTOp, KAK ONnCaHO BblHe.
- Haxmnte KhoNky cnYcKa n 3BneKeTe BeCb KOHeHep (pnc. 12).
- BbInbTe,NotaHb HapyKy,ΦnIbTp (L) (pnc.13),a 3aTeM depXaTeMb (M) (pnc.14) n npunctynte K YNCTKe.
BHIMAHNE:ПомоTeФиьTp(L)TOЛьКВчИСТОВODE6e3ИСПОЛБ3OBaHЯMbIaИМΟΥX CpeДСТВ.
- Onopoxhnte nbIe6bOpHnK (N) B cneuaJIbHbI nnactIKOBbl naket n, npn Heo6xOIMocTn, npomTe erO BOIo.
BbicyuHTe BCE KOMHOHeTbI IN npunctynte K c6opke.
CoOTBcTByeT Tpe6oBaHnA M
TP TC 004/2011 «O 6e3oNaChocTn Hn3KOBJbTHOrO o6OpydoBaHna, yTBepxdeN Peue
Komussn TamoxeHHoro coo3a N768 ot 16 abycta 2011 roda
J 15000000000000000000000000000000000000000000
(R) jj
(1)(20 1
a1 + a2 + a_3 = 6
Jilw g bdi jilg aiey (F) 1jLl lal wR) jll
1
aikoll jilglln ggi y plall
1 1
(N)
124 aikol 0e k Jg w g (L) jilgl (N) yjy
15g 15
.(N)
.
(1)(204
AR
$$ \begin{array}{c} \dot {g} \text {i d} (1 2 J K) (M) \text {i f} \text {s a l l} J _ {\text {l a l l}} (\text {i r} (1 ^ {\prime} J K)) \text {j i t} (L) \text {j i t} (L) \text {j i t} (L) - \ \text {l a g o j b i j} \end{array} $$
$$ \begin{array}{l} \therefore \text {l a b i a l} \quad \text {i} \quad \text {l a b i a l} \quad \text {i} \quad \text {l a b i a l} \quad \text {i} \quad \text {l a b i a l} \quad \text {i} \quad \text {l a b i a l} \quad \text {i} \quad \text {l a b i a l} \quad \text {i} \quad \text {l} \quad \text {l} \quad \text {l} \quad \text {l} \quad \text {l} \quad \text {l} \quad \text {l} \quad \text {l} \quad \text {l} \ \cdot \operatorname {r a n} \left[ \int_ {0} ^ {1} \frac {\mathrm {d} x}{x - 1} \right] = \int_ {0} ^ {1} \frac {\mathrm {d} x}{x - 1} = \int_ {0} ^ {1} \frac {\mathrm {d} x}{x - 1} = \int_ {0} ^ {1} \frac {\mathrm {d} x}{x - 1} = \int_ {0} ^ {1} \frac {\mathrm {d} x}{x - 1} = \int_ {0} ^ {1} \frac {\mathrm {d} x}{x - 1}. \ l _ {i j k} \leqslant \sum_ {j} d _ {i j k} \leqslant \sum_ {j} d _ {i j k} = 1 \ \begin{array}{l} \text {j l a g l l} \ \text {j l a g l l} \ \text {j l a g l l} \ \text {j l a g l l} \ \text {j l a g l l} \ \text {j l a g l l} \ \text {j l a g l l} \ \text {j l a g l l} \ \text {j l a g l l} \ \text {j l a g l l} \ \ (1 0 \mathrm {J} \mathrm {s i l l}) \mathrm {z} \dots \dots \dots \ \end{array} $$
(O)
$$ \begin{array}{l} \begin{array}{l} \text {J l e l l j} \text {j} \text {b a g (O)} \text {c l} \text {s} \text {r} \text {i} \text {a l} \text {s} \text {f} \text {c l} \text {a l} \text {i} \text {p} \text {a l} \text {i} \ \text {J k i l l) c l b a l l j b p} \text {” j o r l} \text {j o r l} \text {j o r l} \text {j o r l} \text {j o r l} \text {j o r l} \text {j o r l} \text {j o r l} \text {j o r l} \text {j o r l} \text {j o r l} \text {j o r l} \text {j o r l} \text {j o r l}. \end{array} \ \cdot \text {J} _ {\mathrm {i}} \text {J} _ {\mathrm {j}} \text {J} _ {\mathrm {k}} \text {J} _ {\mathrm {l}} \text {J} _ {\mathrm {m}} \text {J} _ {\mathrm {n}} \text {J} _ {\mathrm {o}} \text {J} _ {\mathrm {p}} \text {J} _ {\mathrm {q}} \text {J} _ {\mathrm {r}} \text {J} _ {\mathrm {s}} \text {J} _ {\mathrm {t}} \text {J} _ {\mathrm {u}} \text {J} _ {\mathrm {v}} \text {J} _ {\mathrm {w}} \text {J} _ {\mathrm {x}} \text {J} _ {\mathrm {y}} \text {J} _ {\mathrm {z}} - \ \left. \right.\left. \right.\left. \right.\left.\left.\left.\left.\left.\left.\left.\left.\left.\left.\left.\left.\left.\left.\left.\left.\left.\left.\left.\left.\left.\left.\left.\left.\left.\left.\left.\left.\left.\left.\left.\right.\right.\right.\right.\right.\right.\right.\right.\right.\right.\right.\right.\right.\right.\right.\right.\right.\right.\right.\right.\right.\right.\right.\right.\right.\right.\right.\right.\right.\right.\right. \ \end{array} $$
$$ \begin{array}{l} \text {j a l y s u p p l i n g (G)} \text {j a l y s u p p l i n g (G)} \text {j a l y s u p p l i n g (G)} \text {j a l y s u p p l i n g (G)} \text {j a l y s u p p l i n g (G)} \text {j a l y s u p p l i n g (G)} \text {j a l y s u t i o n (G)} \text {j a l y s u t i o n (G)} \text {j a l y s u t i o n (G)} \text {j a l y s u t i o n (G)} \text {j a l y s u t i o n (G)} \text {j a l y s u t i o n (G)} \text {j a l y s u t i o n (G)} \ \text {j a l y s u p p l i n g (G)} \text {j a l y s u p p l i n g (G)} \text {j a l y s u p p l i n g (G)} \text {j a l y s u p p l i n g (G)} \text {j a l y s u p p l i n g (G)} \text {j a l y s u s u r e m e n t (G)} \text {j a l y s u r e m e n t (G)} \text {j a l y s u r e m e n t (G)} \text {j a l y s u r e m e n t (G)} \end{array} $$