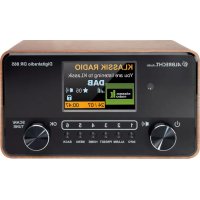
DR 56+ - Radio ALBRECHT - Free user manual and instructions
Find the device manual for free DR 56+ ALBRECHT in PDF.
Frequently Asked Questions - DR 56+ ALBRECHT
Download the instructions for your Radio in PDF format for free! Find your manual DR 56+ - ALBRECHT and take your electronic device back in hand. On this page are published all the documents necessary for the use of your device. DR 56+ by ALBRECHT.
USER MANUAL DR 56+ ALBRECHT
Aux in Audio-In-Buchse
4. Connecting the DR56+ to the car radio .............................................28
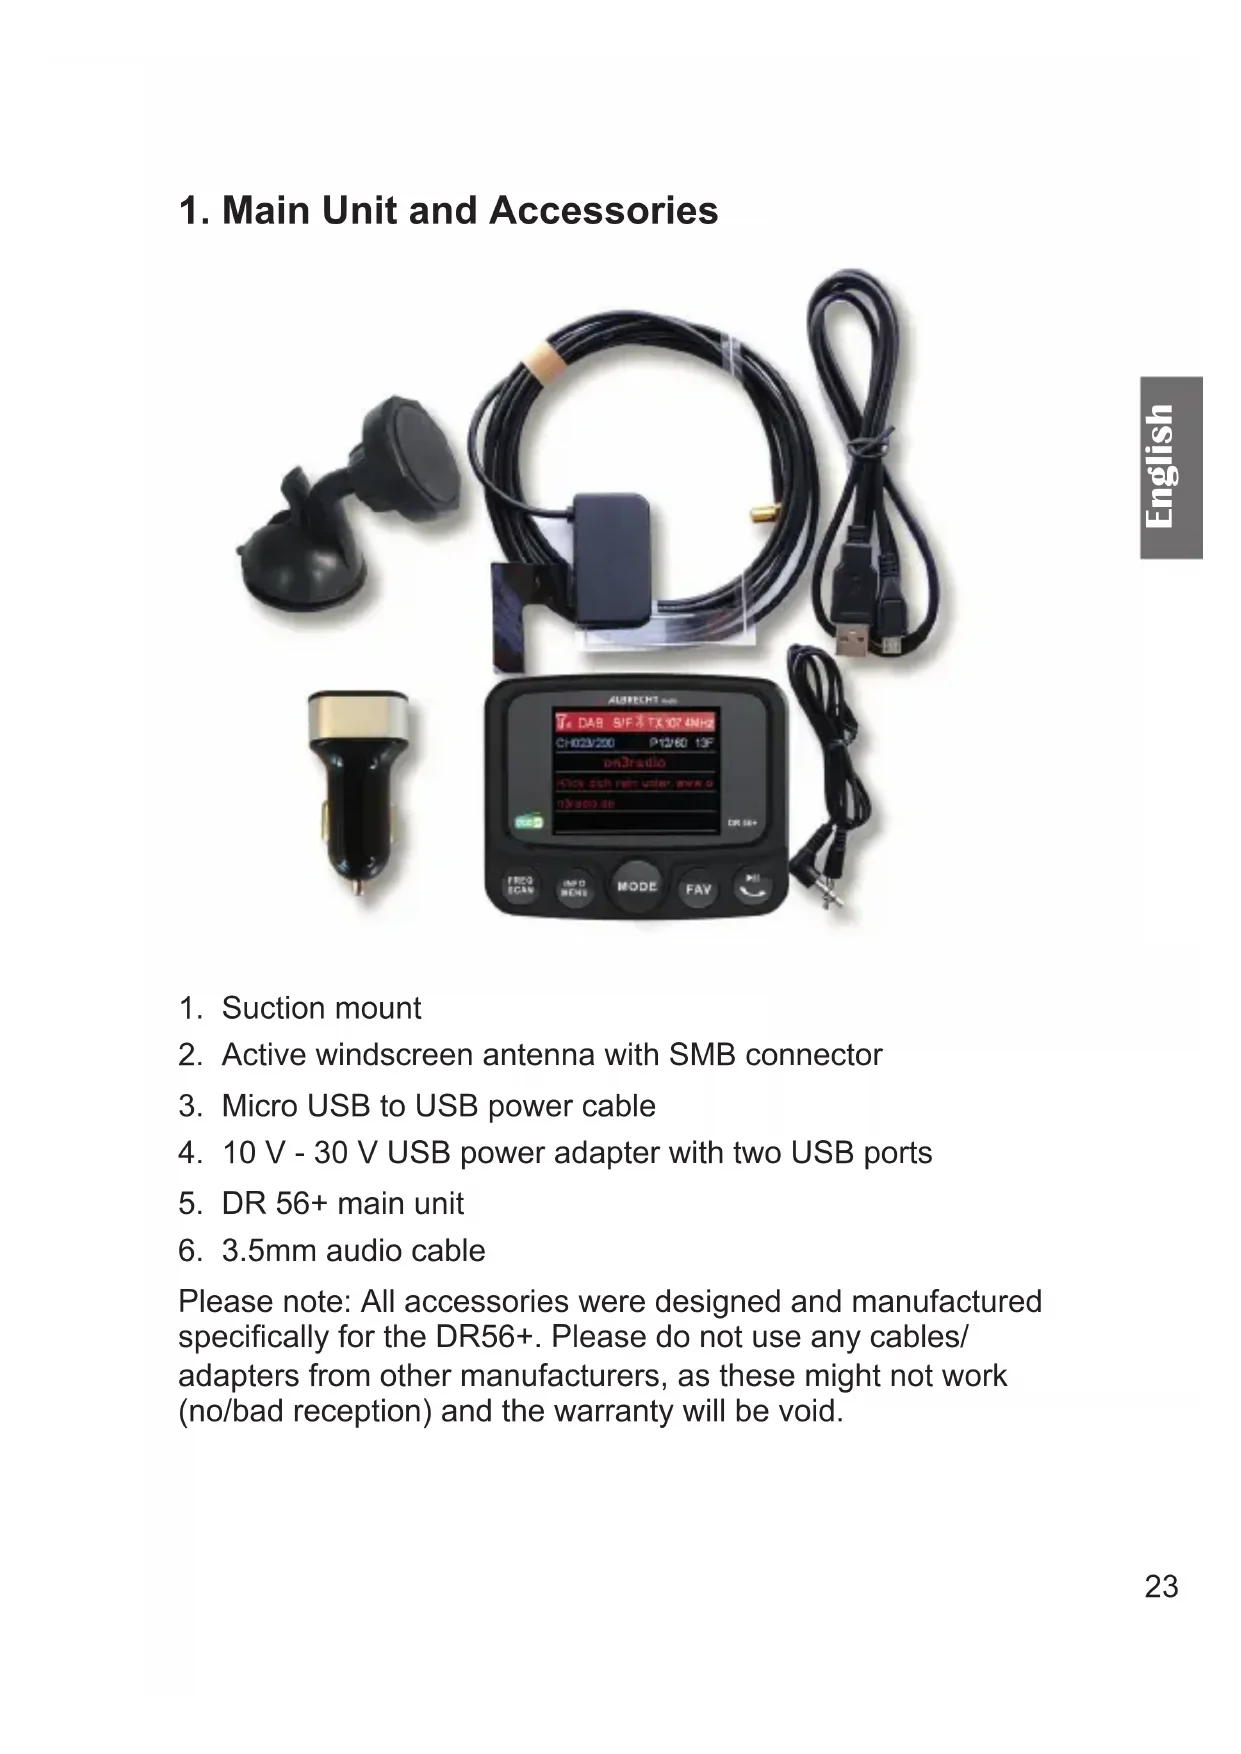
1. Main Unit and Accessories
2. Active windscreen antenna with SMB connector
3. Micro USB to USB power cable
4. 10 V - 30 V USB power adapter with two USB ports
Please note: All accessories were designed and manufactured specically for the DR56+. Please do not use any cables/ adapters from other manufacturers, as these might not work (no/bad reception) and the warranty will be void.24 English
2. Controls and connections25
English Description Function
Press to switch ON Long press to switch to Standby
Antenna SMB socket for the DAB/DAB+ antenna
Aux in Audio in socket
Micro USB Micro USB port for power supply
Magnetic mounting plate
FREQ SCAN FM transmission frequency setting Long press to perform a DAB+ scan
INFO MENU Press to view the DAB+ station list Long press to enter the menu
MODE Volume Rotate to navigate Rotate, next/previous station Rotate, next/previous song (SD-Player) Press to con rm the selection Press to change the mode Long press to adjust the volume Rotate to adjust the volume
FAV Press to open the favourites list Long press to save a favourite
Mic Built-in microphone for hands-free operation
Micro SD SD player slot for Micro SD card26 English
1. Attach the DR 56+ car radio adapter to the windscreen
using the suction mount included in the product contents.
2. Connect one end of the USB power cable to the Micro
USB port on the right side of the DR 56+ and the other end to the USB power adapter. Plug the USB power supply into the cigarette lighter of your car.
3. Connect the supplied antenna to the antenna input on the
right side of the DR 56+.
4. Switch on the device by pressing the On/Standby button
on top of the device, and the Albrecht logo appears in the display. When used for the rst time, the device automatically searches for available DAB/DAB+ stations and stores them in the device's station memory until another DAB station scan is performed. During the DAB Autoscan, a bar indicates the progress of the scan.
5. If the Full Scan is not started automatically, long press the
Menu button and select DAB Autoscan from the menu.
6. As soon as the station scan is completed, you can select
any of the stored DAB/DAB+ radio stations by turning the ◄► knob.27 English 3.1. Installing the DAB+ antenna
1. Use a damp cloth to clean the windscreen.
2. Stick the black L-shaped copper lm to the A-pillar (without
trim) of the vehicle. Attention: Do not remove the A-pillar if it has an Airbag!
3. Remove the adhesive protective lm of the antenna amplier
and stick it to the intended position on the windscreen.
4. Now stick on the lm antenna. Remove air bubbles by
applying light pressure to the edge.
5. The antenna should be mounted vertically and not
6. Route the antenna cable along the A-pillar up to where the
DR 56+ is to be installed.
7. Do not attach the DAB antenna over heating wires, at a
location where the driver's view is impaired, or in a place where the windscreen is metallized (sun protection). This could adversely affect the reception.28 English
4. Connecting the DR56+ to the car radio
You can either send the audio signal via FM transmitter or transmit it directly with the 3.5mm audio cable via the Aux out (audio out) output to your car radio. 4.1. Setting the FM transmitter frequency
- Press the FREQ button and then rotate the ◄► knob until you nd the desired free frequency.
- The transmission frequency is displayed at the bottom of the screen as TX frequency (e.g. 107.0Mhz) during the setup, and constantly at the top right of the display.
- The DAB+ station name will be transmitted via RDS to your car radio (if supported by your radio) Please note: "Free frequency" means that no FM station and no interference signals are transmitted on the selected frequency. 4.2. Connecting to the car radio via audio cable
- Plug the supplied 3.5mm audio cable into the AUX OUT socket of the DR 56+ and into the line-in socket of your car radio. Please note: As soon as a plug is inserted in the AUX OUT socket, transmission via FM transmitter is switched off! 4.3. Adjusting the volume Press and hold the volume knob. A volume bar appears on the display. You can now adjust the volume.29 English
5.1. Search and select DAB/DAB+ stations: If you are not in DAB+ mode, press the MODE knob until the "DAB+ Radio" mode is selected. Rotate the ◄► knob to select the desired DAB/DAB+ station. You can also press the INFO button to go to the station list. There you can select the desired DAB+ station by rotating the ◄► knob and conrm by pressing OK. By pressing and holding the MENU button, you can also select the DAB Autoscan menu item in the menu by rotating the ◄► knob. This will allow you to restart the automatic station scan if you want to update the list of DAB+ radio stations. Please note: During normal use, you do not have to perform the DAB scan again every time you use DAB+ radio. Only perform a new scan if you are driving to a different area (for example during travelling) where there are new/different DAB+ stations.30 English 5.2. Station information: DAB+ mode The station information is displayed as a moving text during transmission. While listening to DAB+ radio, the display will show the following information, if available
- S/F (Service Following) alternative frequency status (AF)
- Bluetooth connection status
- FM transmitter frequency
- Moving text (DLS) 5.3. Service Following (SF) The SF function automatically changes the reception frequency when leaving the reception range of a known station.
5.3.1. Switching the Service Following on/off
Press and hold the MENU button in "DAB mode" to go to the menu. Select Service Following with ◄► and conrm with OK. Select Yes to switch on or No to switch off and conrm again with OK. A white "S/F" icon appears in the centre of the header of the display. When the colour of the "S/F" icon changes and ashes, it means that the DAB station supports the Service Following and the device has detected this. However, the station has not yet been switched. As soon as it switches over to the new frequency of another region, the "S/F" icon will appear in white again. Please note: If you permanently drive within a broadcasting area, we recommend that you switch off the SF function.31 English Otherwise the DR56+ will automatically search for an alternative frequency at weaker reception and interrupt the current transmission. 5.4. Choosing the menu font colour: The colour of the menu font and the background can be set in four different combinations: White/Black White font on black background Blue/Black Blue font on black background Orange/Black Orange font on black background Black/White Black font on white background To set the colour, proceed as follows: Press and hold the MENU button, rotate the ◄► knob, and select Colour Setting. Select the desired colour and con rm your selection with OK. 5.5. Dimming the LCD display When driving at night, you can reduce the brightness of the LCD display. Press and hold the button to dim the display. Press and hold the key again to return to normal brightness. 5.6. Illumination of the station memory buttons Press and hold "MENU" to access the menu. Use ◄► to select the Button Light menu item. You can now select On or Off. Con rm your selection with OK. 5.7. Selecting a language: Press and hold "MENU" to access the menu. Rotate ◄► to go to Language. Select the desired language and con rm your selection with OK.32 English 5.8. Restoring factory settings Please note that all station memories, settings and congurations will be lost when restoring the factory settings. Press and hold "MENU" to access the menu. Rotate the ◄► knob to go to Factory Reset. Now select Yes or No and conrm your selection with OK. The adapter will perform an automatic Full Scan after the factory reset. 5.9. Software version Press and hold "MENU" to access the menu. Rotate the ◄► knob to go to Software Version and conrm your selection with OK. You will now see the current software version of the device. Press OK again to exit the menu.
6. Favourites (station memory)
6.1. Saving favourites There are a total of 60 memory locations available: Select a DAB+ station. Press and hold the FAV button to go to the Store Preset Stations menu. Rotate the ◄► knob to select the preset memory number to which you would like to save your favourite. Conrm your selection with OK. The "Stored Successfully" message appears. 6.2. Recall favourites In DAB mode, press the FAV button to display Select Preset Stations. Select the desired favourite station and conrm your selection with OK.33 English 6.3. Switching between stations and favourites list If you have selected a station from the favourites list, you can use the ◄► knob to access the next or previous station from the favourites list. Press the INFO button to return to the station list. When you rst press the INFO or FAV button, you change the list; the second time you press the same button, you open the list; and the third time you press the same button, you close the list. The list you are currently viewing is indicated by the colour of the station list number/favourite list number on the display. 6.4. Deleting saved stations To delete all saved DAB+ favourites, press and hold the MENU button and rotate the ◄► knob until Delete All Presets and conrm with OK. Select either Yes or No and conrm your selection with OK. Pressing YES deletes all 60 station memories, and "Deleted Successfully" appears on the display. Individual stations cannot be deleted, but you can overwrite them with a new favourite at any time.34 English
To connect a phone with Bluetooth to the DR 56+, both devices must be paired with each other. This operation only needs to be performed on the rst connection. As soon as both devices are paired, they connect automatically once they are within range. Up to eight devices can be paired with the DR 56+. If there is more than one device within the Bluetooth range of the DR 56+, the adapter connects to the last connected device. If you want to connect another phone, you must manually turn off Bluetooth on the currently connected phone. 7.1. Turning Bluetooth on/off Press and hold MENU to access the menu. Rotate the ◄►knob to go to Bluetooth setting and conrm with OK. Now turn Bluetooth On or Off. The Bluetooth icon at the top of the display indicates whether Bluetooth is on or off.
- Bluetooth icon not present: Bluetooth off
- Bluetooth icon ashing: Bluetooth on but not connected
- Bluetooth icon continuously lit: Bluetooth on and connected 7.2. Pairing a phone
1. Turn on Bluetooth at the DR 56+as described above.
2. Turn on Bluetooth on your smartphone and search for
3. Select DR56+ from the list.
4. As soon as the connection is established, the name of the
connected phone is displayed at the bottom of the DR 56+ display and the Bluetooth icon is continuously lit at the top of the display.35 English 7.3. Phone calls When a phone call comes in, a ringtone is heard and an arrow appears on the display that points to a telephone handset. The caller's phone number is displayed.
- To accept a call: Press once while ringing
- To reject a call: Press twice while ringing
- To end a call: Press during the call The talk time is shown on the display during the call. For outgoing calls, the arrow points away from the handset. 7.4. Bluetooth music playback Bluetooth-enabled smartphones connected to the device can play music via the DR 56+ (Please refer to the manual of your smartphone for more information). Press to play or pause the music playback. Rotate the ◄► knob to select the next or previous song.
To connect an external audio device, such as smartphones/ tablets/iPods/MP3 players and the like, proceed as follows: Press MODE until AUX IN is displayed. Connect the external audio source to the „AUX IN“ socket on the right side of the DR 56+ via the supplied 3.5mm audio cable.36 English
Insert a Micro SD card with the contacts facing forward and upward into the SD player card slot on the bottom of the DR56+. The device automatically starts playing the songs. By pressing the FAV button, you can choose between different playback options:
Endless loop: All songs are played in an endless loop.
Random: The songs are played randomly.
Single item: The selected song is played in an endless loop. You can select SD player at a later time by pressing the MODE button. Press to play or pause the music playback. Rotate the ◄► knob to select the next or previous song. The SD player will resume your music or audio book at the same spot you stopped the last time listening. Please note: The SD player menu item can only be selected when a Micro SD card is inserted. You can remove the Micro SD card by applying light pressure on the card in the direction of insertion.
10. Charging USB devices
Connect the USB cable of your mobile phone to the lower USB port of the USB power adapter. (5 V/2.1 A)37 English
Supported radio format: DAB/DAB+, FM transmitter and DAB to DAB alternative frequency
FM transmission frequency: 87.6-107.9 MHz
Charging power: 5 V/2.1 A (charging smartphones/tablets/iPods/MP3 players, etc.)
Net weight: approx. 78g The information in this manual is subject to change without notice.38 English
Poor DAB reception on some roads, part 1. Since the DAB network has not yet been fully developed, this can lead to poor reception, especially in rural areas that have not yet been fully developed. Therefore, test the DR 56+ adapter in a better-developed area before sending the device for repair due to poor reception. Problem: Poor DAB reception, part 2. Commercially available USB adapters without interference suppression are suitable for many purposes, but not for strong DAB receivers. Therefore, for the best possible reception, you should use the USB cable and the USB power supply supplied in the product contents and specically designed for the DR56+ adapter. Problem: Poor DAB reception, part 3. Please check if the supplied DAB antenna has been installed exactly as described in the assembly instructions. Also check if the antenna is properly grounded. Other electronic devices that have no interference suppression (such as low-cost dashcams) can cause interference in the DAB reception, especially inside the vehicle.
13. Safety instructions
- Clean the device only with a dry cloth.
- Do not block any ventilation openings.
- Use only the accessories supplied by the manufacturer.
- Do not expose this radio to rain or moisture.
- Do not expose the radio to excessive heat.39 English
14. Warranty and information on recycling
We are legally obligated to enclose for each device information on disposal and warranty, as well as an EU declaration of conformity with the instructions for use in different countries. You will nd this information on the following pages. 2-year warranty from the date of purchase The manufacturer/dealer provides a two-year warranty from the date of purchase for this product. This warranty covers all failures due to defective components or faulty functions within the warranty period, except for wear and tear such as empty batteries, scratches on the display, defective housing, defective antenna and defects due to external inuences such as corrosion, overvoltage due to improper external power supply or the use of unsuitable accessories. Defects caused by improper use are also excluded from the warranty. In the event of a warranty claim, please contact your dealer. The dealer will repair or replace the device or pass it on to an authorised service centre. You can also contact our service partner directly. Please enclose your proof of purchase with the device and describe the malfunction as accurately as possible.
15. CE declaration of conformity
Standards and directives Alan Electronics GmbH hereby declares that the radio device model DR 56+ is in accordance with Regulation 2014/53/EU. The full text of the EU declaration of conformity can be found at the following Internet address: http://service.alan-electronics.de/CE-Papiere/40 English 15.1. EEAG and Recycling European laws prohibit the disposal of old or defective electrical or electronic equipment via household waste. To dispose of the device, return it to a collection point in your municipality for recycling. This system is nanced by the industry and ensures environmentally friendly disposal and recycling of valuable raw materials.