
29661 - Radio ALBRECHT - Free user manual and instructions
Find the device manual for free 29661 ALBRECHT in PDF.
| Product type | PMR446 two-way radio (walkie-talkie) |
| Brand | Albrecht |
| Model | 29661 |
| Dimensions (without antenna or clip) | 135 mm x 62 mm x 37 mm |
| Weight | 205 g |
| Power supply | Integrated rechargeable lithium-ion battery, 3.7 V, 950 mAh |
| Protection | IPX7 (waterproof up to 1 meter for 30 minutes, only if headset jack is closed) |
| Frequency range | 446.00625 to 446.09375 MHz (PMR446 channels) |
| Number of channels | 8 main channels |
| CTCSS codes | 38 tone codes (sub-channels) |
| Transmit power | 0.5 W (HI) / Low (LO) adjustable |
| Voice activation (VOX) | Yes, with 5 sensitivity levels |
| Channel scan | Yes, automatic increasing/decreasing |
| Dual watch | Yes, simultaneous monitoring of 2 channels |
| Key lock | Yes, long press on LOCK |
| Screen backlight | Yes, via MONITOR button |
| Built-in timer | Yes, programmable up to 1 hour |
| End-of-transmission beep | Yes, can be enabled |
| Box contents | Radio, lithium-ion battery, desktop charger, power adapter, belt clip, headset adapter |
| Warranty | 2 years (excluding normal wear such as battery, antenna) |
Frequently Asked Questions - 29661 ALBRECHT
User questions about 29661 ALBRECHT
0 question about this device. Answer the ones you know or ask your own.
Ask a new question about this device
Download the instructions for your Radio in PDF format for free! Find your manual 29661 - ALBRECHT and take your electronic device back in hand. On this page are published all the documents necessary for the use of your device. 29661 by ALBRECHT.
USER MANUAL 29661 ALBRECHT
Time-out-Timer (TOT)
PST professional support technologies GmbH Breitscheider Weg 117a 40885 Ratingen
Caution 19
Scope of Delivery 20
Installation 21
Controls and Indicators 22
LC Display 23
Operation 24
Additional Functions 25
Troubleshooting 29
Warranty and Recycling Information 31
Technical Specifications 32
Caution
IMPORTANT - READ ALL INSTRUCTIONS carefully and completely before operating your radio and retain this manual for future reference.
NEVER connect the radio to a power source other than the supplied battery pack. This may damage your product.
NEVER operate your radio with the antenna less than 5 cm from exposed parts of the body.
NEVER use the radio in or near a mining facility or other area which uses remotely triggered explosives or an area labeled "Blasting Area".
NEVER use or charge your radio in a potentially explosive atmosphere.
DO NOT place your radio in front of a vehicle airbag.
DO NOT operate your radio on board of an aircraft.
DO NOT use your radio with a damaged antenna.
DO NOT attempt to modify your radio in any way.
ALWAYS charge your radio at normal room temperature.
ALWAYS switch off your radio where notices restrict the use of two-way radio or mobile telephones.
ALWAYS replace the accessory jack cover when the jack is not in use.
ONLY use ALBRECHT approved rechargeable batteries with the supplied charger.
AVOID charging your radio or battery pack while is it wet.
AVOID storing or charging your radio in direct sunlight.
AVOID storing or using your radio where temperatures are below -20^ or above +60^
Please observe the country information on the gift box and on our internet server service.alan-electronics.de.
Scope of Delivery
- Tectalk Float Radio with Antenna
- Li-lon battery pack
Desktop charger
Power adaptor - Belt Clip
- Adapter for ALBRECHT headsets
Installation
1 Removing the belt clip
a. Pull the belt clip latch away from the unit
b. While pulling the belt clip latch, push up the belt clip as shown in Figure 1
2 Installing the belt clip
a. Slide the belt clip into the slot as shown in Figure 2
b. A "click" indicates the belt clip Is locked into position

Figure1

Figure2
3 Installing the supplied Li-ion rechargeable battery
a. Unscrew the screw and then remove the battery door.
b. Insert the battery connector into the socket located inside the battery compartment and install the battery pack.
c. Re-install the battery door and tighten the screw
4. Charging the rechargeable battery pack
It is recommended to turning OFF the unit while charging.
Charge the Battery pack 10-14 hrs. prior to initial use.

When the battery capacity is low, the bA Lo indication and the battery status icon will flash on the LC Display. Recharge the battery pack at this time, please refer to the following item "BATTERY CHARGING".
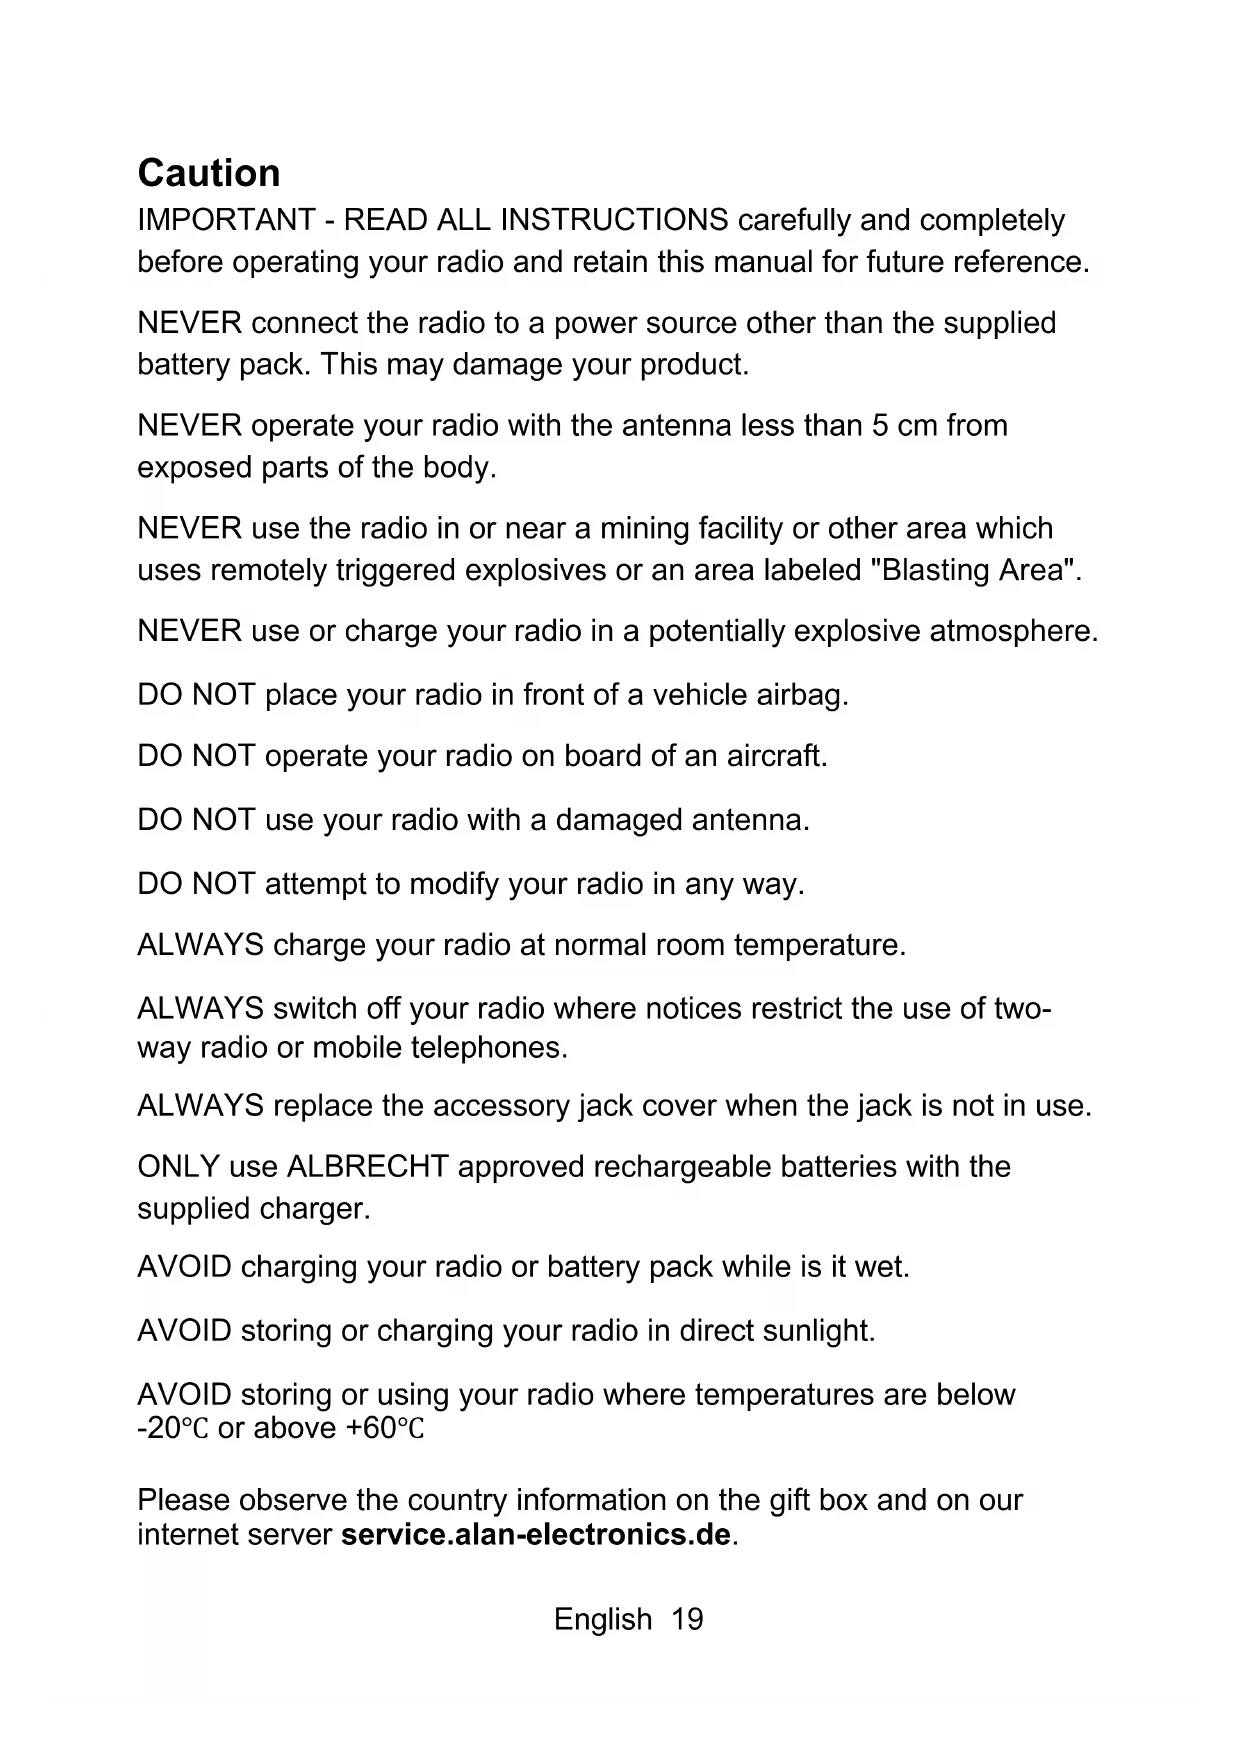
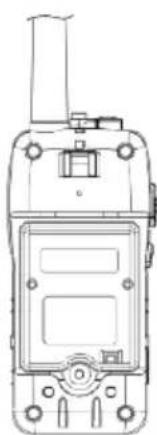
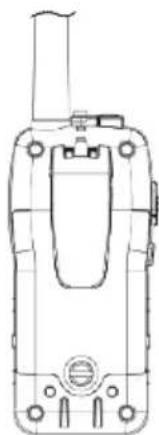
Controls and Indicators
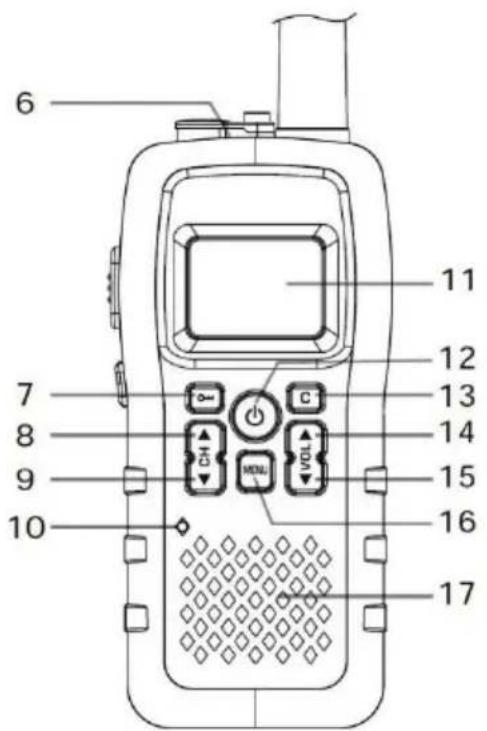
- High efficiency antenna
- Belt Clip
- Battery door
- PTT (Push-To-Talk) PTT button
- Lamp/Monitor MON button
- External earset-microphone jack
- Key Lock button
- Channel UP button
- Channel DOWN button
- Built-in Microphone
- Backlighted LC Display
- ON-OFF button
- Call Tone c button
- Volume UP button
- Volume DOWN button
- Menu button
- Built-in Speaker
22 English
LC Display
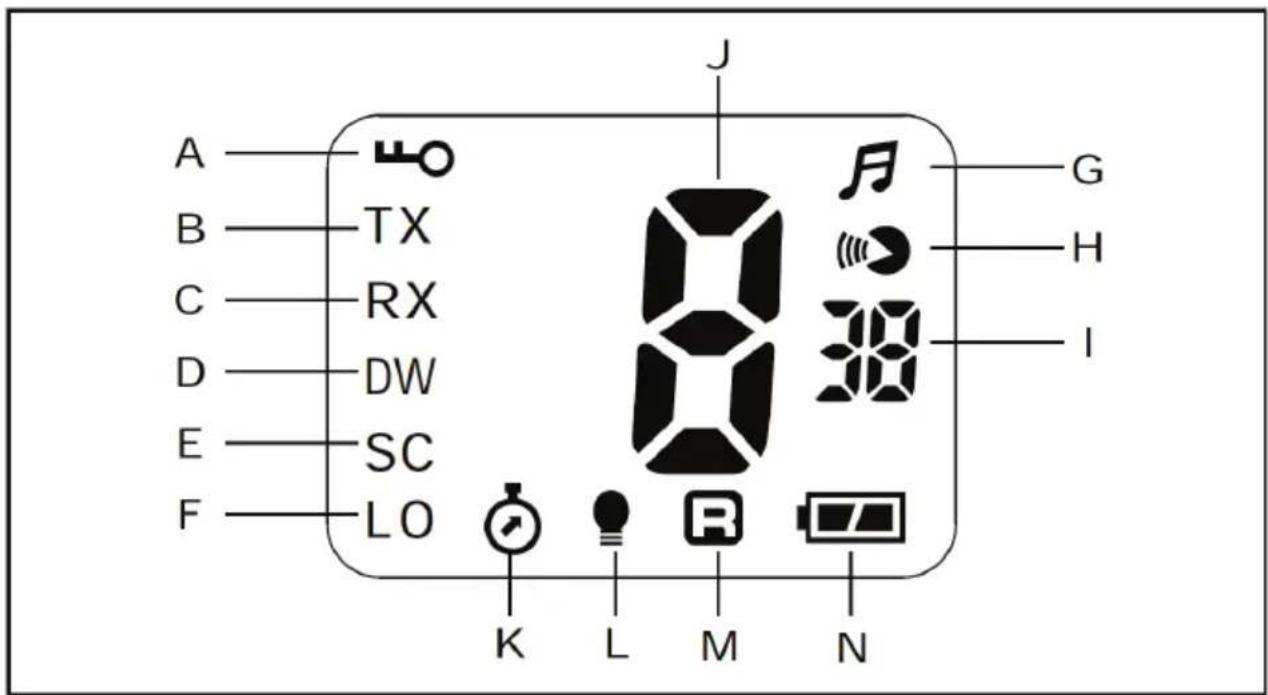
A. Keypad LOCK icon - is lighted when buttons are locked.
B. TX icon - is lighted on when the radio is in transmit mode.
C. RX icon - is lighted on when the radio is in receive mode.
D. DW icon - Dual Watch function
E. Scan icon - Automatic channels or CTCSS code scanning
F. LO icon - Transmitter Low Power icon
G. Keypad Beep Tone icon
H. VOX (hands-free use) icon
I. CTCSS Code number(1-38)
J. Selected Channel Indication (1-8)
K. Stop Watch function icon
L. Power save function icon
M. Roger Beep function icon
N. Battery Status Indicator
Operation
Power ON-OFF
- To turn on the unit, press and hold the ON-OFF button, the LC Display will show the channel number and the CTCSS code number.
- To turn off the unit, press and hold again the ON-OFF button.
Using the radio
The unit has 8 main channels and 38 CTCSS codes for each channel. You can communicate with any other radios that are using the same main channel & CTCSS code.
Speaking to other radios
- Press and hold the PTT button, the TX icon will be shown in the LC Display.
- Hold the unit in a vertical position with the microphone at 5-8 cm from the mouth and then speak.
- When you have finished speaking, release the PTT button.
- Now you are ready to receive incoming signals. Adjust the volume to the desired level if necessary.
Time-out Timer (TOT)
The Time-out Timer disables transmitting after 3 minutes maximum transmission period. Transmitting can only be reactivated by releasing and pressing the PTT button again.
Using a Headset
- Connect the headset to the jack on top of the device.
(to connect accessory with a 2.5mm stereo plug use the supplied adapter)
- Press the PTT button on the earphone to speak and release it to listen.
- Adjust the volume if necessary.
Please note that the degree of protection IPX7 only applies if the headset jack is sealed with the rubber stopper.
Channel Selection
Press the CH UP or CH DOWN to select the desired channel (1-8). The factory default start up channel is channel 1 and sub-channel 00. Before selecting a channel for communication, always listen on it to ensure it is not already being used. Always avoid selecting a busy channel when the unit keeps on receiving signal from unknown parties. Volume selection (8 Levels)
- Press the VOL UP to increase the volume.
- Press the VOL DOWN to decrease the volume.
The LE icon and the selected volume level (01-08) will appear on the LC Display.
Additional Functions
Menu Operation
Press MENU button to successively select these functions.
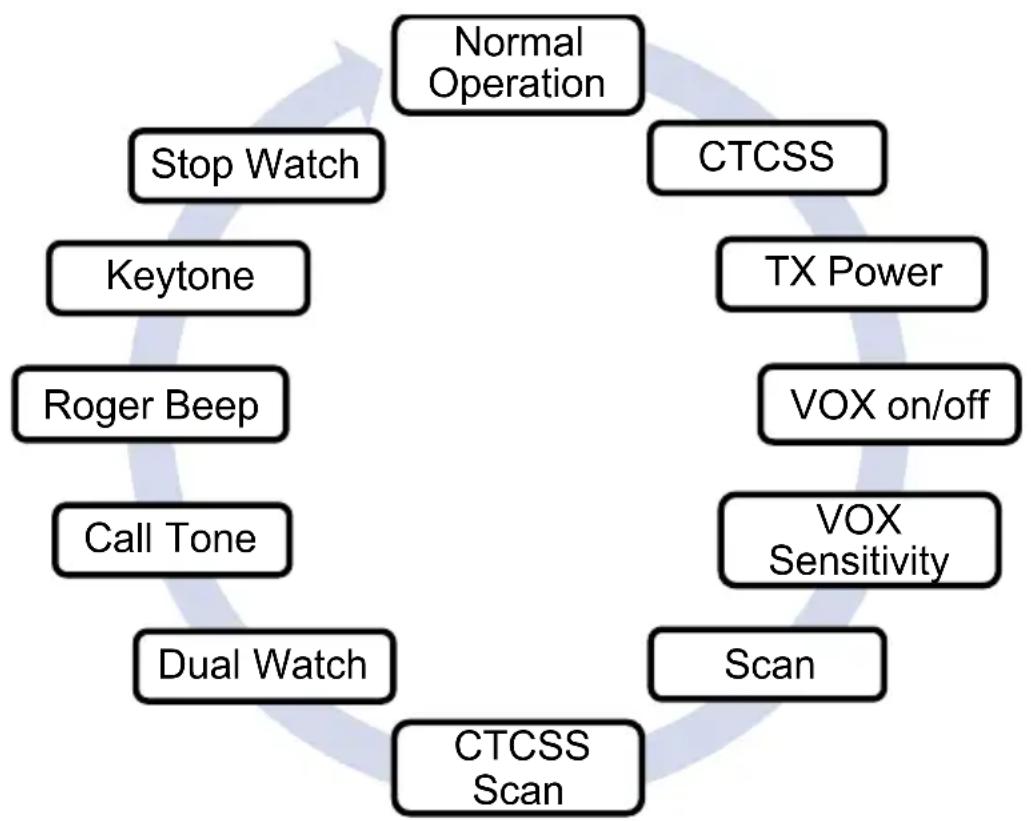
Press the CH UP or CH DOWN buttons to select the desired setting for the selected menu item. If you press and hold the CH UP or CH DOWN buttons, the selection will move quicker.
To confirm the selection and exit the Menu mode, press the LOCK button or MENU button to move to the next function.
CTCSS Code Selection
The radio has 38 CTCSS private codes available. Different CTCSS tones may be associated to different channels. Selecting a CTCSS code of 00 will disable the CTCSS feature. To communicate between two or more radios, both the channel and CTCSS code selections must be the same. To communicate with other models and brands of radios, the actual radio frequency and CTCSS frequency must be matched. The frequency chart and CTCSS code chart are included to help with this selection.
Transmitter RF Power Setting
Your radio has a HI/LO Power selection function. This function is very convenient to reduce the current drain and extend battery life when communicating within short distance.
VOX Function
Your radio is equipped with a user selectable Voice Operated Transmitter function (VOX), that is used for automatic voice transmission (hands-free use or baby room monitor use). In this mode, transmission is automatically initiated by speaking into the microphone and there is no need to push the PTT button (hands-free use or baby room monitor use). You can plug in the earset-microphone for hands-free talking and listening. When VOX feature is on, the VOX icon will appear on the LC Display.
VOX Sensitivity Level Selection
The sensitivity, at which speech level the device begins to transmit is adjustable in five steps. The VOX level 05 indicates the highest VOX sensitivity.
Channel Scanning
The direction of scanning can be determined by pressing the CH UP or CH DOWN buttons. If you press the PTT or LOCK button during the SCAN operation, SCAN will stop automatically and radio will 26 English
set the last used channel. When SCAN feature is on, the SC icon will appear on the LC Display and the Channel number is flashing.
CTCSS tone Scanning
This function allows CTCSS tone scanning on the selected channel. Select the desired channel number and activate the CTCSS tone scanning. If you press the PTT or LOCK buttons during the SCAN operation, SCAN will stop and the radio will return to the last used channel. When the CTCSS-Scan feature is on, the SC icon will appear on the LC Display and the CTCSS Code is flashing.
Dual Watch Function
The radio is equipped with a Dual Watch function that allows to monitor 2 different channels without the CTCSS code. To set the Dual Watch function, please proceed as follows:
- Select the first channel to be monitored.
- Press the MENU button seven times, until the DW icon is displayed and the selected channel will blink on the LC Display.
- Press the CH UP or CH DOWN buttons to select the second channel to be monitored.
- Now the radio will start monitoring the two channels and will stop when a signal is received on one of the two stored channels.
- To disable the Dual Watch function and return to Stand-by mode, press the LOCK button.
When the DW feature is on, the DW icon will appear on the LC Display and the channel number is alternating between the first and the second selected channel.
Call Tone Setting
The radio is equipped with 5 user selectable Call tone Melodies. Press the Call button to transmit the Call Tone Melody.
Roger Beep Tone Setting
The radio is equipped with a user selectable Roger Beep Tone feature, which enables you to send a Beep Tone at the end of each transmission after every release of the PTT button.
This will prompt any receiving unit that your transmission has ended. When the Roger Beep tone is enabled, the tone icon appears on the LC Display.
Keypad Program Tone Setting
When a key is pressed, a beep tone is heard to confirm your command. The user may enable or disable this keypad program tone. When the Keypad tone is enabled, the tone icon appears on the LC Display.
Stop Watch function
This function will enable a one hour timer function.
- Press the MENU button eleven times, until the Stop Watch icon and the 00:00 indication will blink on the LC Display.
- Press the CH UP button to start counting and press the CH DOWN button to stop the function. The radio can still operate in this mode.
- Press the CH UP button again to re-start.
- To reset the timer press the CH DOWN button two times.
- To exit to Stand-by mode press the LOCK button.
Keypad Lock
To avoid entering unwanted command, press and hold the LOCK button for about 2 seconds. The Lock icon will appear on the LC Display. When the keypad is locked, only the PTT, CALL and Monitor buttons are enabled. To unlock the keypad press and hold the LOCK button for about 2 seconds.
LCD Backlight
Shortly press the MONITOR button to backlight the LC Display. Press this button again to turn OFF the LCD backlight.
Monitor Function
Press and hold the MONITOR button for about 4 seconds to activate the Monitor function. Press MONITOR button once to return.
If require to listen to weak signal with background noise temporarily, press and hold MONITOR button for about 2 seconds. You will hear
background noise and possible weak signal from the unit. Release MONITOR button within 2 seconds to return.
Automatic Power Save
The radio has an Automatic Power Save circuit designed to extend battery life. If it senses no signal within 10 seconds, it automatically switches to the Power Save mode. The Power Save icon will appear on the LC Display.
The radio can still receive transmission in this mode.
Troubleshooting
No power.
Check battery. Ensure that the battery is installed properly. The battery may be weak. Charge the supplied battery.
Reception is weak.
Press the VOL UP button to increase Volume.
The receiving signal may be weak and/or out of range. If this happens, press the MONITOR button.
Cannot Change Channels
To change channels, press the MENU button until the channel number flashes on the LC Display. Press the CH UP or DOWN buttons to change channels. Battery may be weak. Keypad Lock must be deactivated.
Range is limited.
The battery may be weak.
Charge the battery if the Battery Level indicator is low. The maximum range will vary depending on terrain and environment.
Open fields provide the maximum range, while steel/ concrete structures, heavy foliage and use in buildings and in vehicles may limit the range significantly.
Wearing the radio close to the body, such as in a pocket or on a belt, will decrease range; change the location of the radio.
Sound Distortion problems.
- If you are transmitting, speak in a normal tone of voice, 2 to 3 inches away from the microphone.
If you are receiving, lower the volume to a comfortable level. - Radios must be at least 5 feet apart, otherwise you have to increase the distance between the radios
- Radios too far apart. Obstacles interfere with transmission. Talk range is up to 10Km in clear unobstructed conditions.
- Check the manual and radio display to ensure that a function (such as VOX or Lock) has not been activated by accident.
In case of further difficulty please consult your dealer or visit our web site service.alan-electronics.de
Warranty and Recycling Information
We are legally obliged to include disposal and warranty information as well as EU declaration of conformity with the use instructions in different countries for every unit. Please find this information on the following pages.
2-Year warranty from date of purchase
The manufacturer/retailer guarantees this product for two years from date of purchase. This warranty includes all malfunctions caused by defective components or incorrect functions within the warranty period excluding wear and tear, such as exhausted batteries, scratches on the display, defective casing, broken antenna and defects due to external effects such as corrosion, over voltage through improper external power supply or the use of unsuitable accessories. Defects due to unintended use are also excluded from the warranty.
Please contact your local dealer for warranty claims. The dealer will repair or exchange the product or forward it to an authorized service center.
You can also contact our service partner directly. Please include your proof of purchase with the product and describe the malfunction as clearly as possible.
Service Address and Technical Hotline (for units sold in Germany)
PST professional support technologies GmbH
Contact our service hotline by phone +492102-1459546
or e-mail at alan-service@ps-tech.de.
WEEE and Recycling

The European laws do not allow any more the disposal of old or defective electric or electronic devices with the household waste. Return your product to a municipal collection point for recycling to dispose of it. This system is financed by the industry and ensures environmentally responsible disposal
and the recycling of valuable raw materials.
Technical Specifications
General
| Frequency Range | 446,00625~446,09375 MHz |
| Frequency Tolerance | 2,5 PPM (bei 25 °C) |
| Operation Temperature | 0 °C to +55 °C |
| Antenna | Integral Antenna |
| Microphone | Integral Built-in Electret type |
| Display | Liquid Crystal Display |
| Speaker | 1 Watt, 8 Ω |
| Power Source | Rechargeable Li-ion Battery pack 3.7V 950mAh |
| Dimensions | 135 mm x 62 mm x 37 mm (without antenna and belt clip) |
| Weight | 205 g |
| Protection | IPX7(only if the headset jack is |
Sender
| Power Output | 0,5 W |
| Spurious Emissions | < 1 μW |
| Current Drain | 500 mA (0,5 W TX Power) |
Receiver
| Receiver Type | Double Conversion Super Heterodyne | |
| Sensitivity (20dB SINAD) | -3 dBμV (EMF) | |
| Audio Output Power | 0.5W @ 10% THD | |
| Current Drain | Squelched | 40 mA |
| Max. Audio | 350 mA |
More information and the CE Declaration can be found in the tables at the end of this manual.
© 2014 Alan Electronics GmbH

ALBRECHT®
Tectalk Float
Guide d'utilisateur
Français
Sommaire
446.00625~446.09375 MHz
2.5PPM (a 25^ )
0^ C a + 55^ C
Antena integral
Tipo Electret integrado
Time-out Timer (TOT)
| Channel | Frequency (MHz) | Channel | Frequency (MHz) |
| 1 446.00 | 625 5 446.05625 | ||
| 2 446.01 | 875 6 446.06875 | ||
| 3 446.03 | 125 7 446.08125 | ||
| 4 446.04 | 375 8 446.09375 |
CTCSS Frequencies
| CTCS -Code | Frequency (Hz) | CTCS -Code | Frequency (Hz) | CTCS -Code | Frequency (Hz) |
| 1 | 67,0 | 14 | 107,2 | 27 | 167,9 |
| 2 | 71,9 | 15 | 110,9 | 28 | 173,8 |
| 3 | 74,4 | 16 | 114,8 | 29 | 179,9 |
| 4 | 77,0 | 17 | 118,8 | 30 | 186,2 |
| 5 | 79,7 | 18 | 123,0 | 31 | 192,8 |
| 6 | 82,5 | 19 | 127,3 | 32 | 203,5 |
| 7 | 85,4 | 20 | 131,8 | 33 | 210,7 |
| 8 | 88,5 | 21 | 136,5 | 34 | 218,1 |
| 9 | 91,5 | 22 | 141,3 | 35 | 225,7 |
| 10 | 94,8 | 23 | 146,2 | 36 | 233,6 |
| 11 | 97,4 | 24 | 151,4 | 37 | 241,8 |
| 12 | 100,0 | 25 | 156,7 | 38 | 250,3 |
| 13 | 103,5 | 26 | 162,2 |
Declaration of Conformity

Herewith we declare that our product:
PMR 446 Transceiver "Tectalk Float"
corresponds to our Technical Construction Files and Test Reports and is conform to all relevant essential requirements of the R&TTE-Directive 1999/5/EC, issued March 9, 1999. According to Annex III of the R&TTE Directive the following harmonized standards and essential radio test suites, published in the "Official Journal" of the European communities, have been used to demonstrate the conformity of the product:
| Title | Standard |
| Radio and Spectrum engineering parameters | EN 300 296-2 V1.3.1 |
| Electromagnetic Compatibility EMC | EN 301 489-1 V1.9.2, EN 301 489-5 V1.3.1 |
| Electrical safety (without application of voltage limits according to Art. 3 1) (a) of R&TTE Directive) | EN 60 950-1 : 2006 + A11:2009 + A1:2010 + A12:2011 |
Company, placing the product on the market:
Name: ALAN Electronics GmbH
Address: Daimlerstr. 1 k, D-63303 Dreieich
Contact Dipl.-Ing. Norbert Dau
person:

Signature
Notizen/Notes: