
GCH 981NA2TS - Tumble drier CANDY - Free user manual and instructions
Find the device manual for free GCH 981NA2TS CANDY in PDF.
| Product type | Tumble dryer |
| Brand | Candy |
| Model | GCH 981NA2TS |
| Maximum drying capacity | 8 kg |
| Drum volume | 115 liters |
| Energy efficiency class | A++ |
| Dimensions (H x W x D) | 85 x 60 x 60 cm |
| Power supply | 220-240 V / 50 Hz |
| Minimum circuit current | 6 A |
| Drying programs | Perfect Home, Dry, Ready to Store, Ready to Iron, Anti-Crease, Wool, Mix&Dry, Shirts, Quick 40', Time, Jeans |
| Special functions | Delayed start (1-24h), Anti-crease, Delicate drying (Acrylics/Synthetics), Humidity sensor (Sensor Dry) |
| Safety | Automatic stop at end of cycle, overheating protection |
| Condensation system | Condenser with removable water tank (approx. 4 kg) or permanent drainage via optional kit |
| Cleaning | Removable lint filter to clean after each cycle; condenser to clean regularly |
| Indicators | Filter maintenance light, water tank drain light |
| Stackable | Yes, with specific stacking kit (models available depending on washing machine depth) |
| Adjustable feet | Yes, for leveling |
| Spare parts | Available through GIAS service (original parts) |
| Repairability | Technical assistance by phone or authorized technician intervention |
| Warranty | Warranty card provided, standard duration according to legislation |
Frequently Asked Questions - GCH 981NA2TS CANDY
User questions about GCH 981NA2TS CANDY
0 question about this device. Answer the ones you know or ask your own.
Ask a new question about this device
Download the instructions for your Tumble drier in PDF format for free! Find your manual GCH 981NA2TS - CANDY and take your electronic device back in hand. On this page are published all the documents necessary for the use of your device. GCH 981NA2TS by CANDY.
USER MANUAL GCH 981NA2TS CANDY
Heat Pump Tumble Dryer
Grand O
8KG
A+
English 2
Deutsch 16
Slovensko 30
Eλληικα 44
Polish 58
Suomi 72
Dansk 86
Norsk 100
Svenska 114
Български 128
Français 142
Italiano 156
Introduction 3
Delivery Information 3
Safety Reminders 3
Use 4
Installation 5
The Laundry 5
Ventilation 6
Environmental Issues 7
Gias Service 7
Electrical Requirements 7
Adjusting the Feet 7
Drain Hose Kit: Fitting Instructions 8
Preparing the Load 9
Clothes Preparation 9
Do Not Tumble Dry 9
Energy Saving 9
Sorting the Load 9
Drying Guide 9
Controls and Indicators 10
Selecting the Programme 11
Door and Filter 12
Opening the Door 12
Filter 12
Filter Care Indicator 12
To Clean the Condenser Filter 12
Water Container 13
To Remove the Container 13
Operation 13
Delay Start Function 14
Cancelling and Resetting the Programme 14
14 Cleaning and Routine Maintenance 14
Cleaning the Dryer 14
Technical Specifications 14
Troubleshooting 15
Customer Service 15
Spares 15
Gias Service 15
Please read and follow these instructions carefully and operate the machine accordingly. This booklet provides important guidelines for safe use, installation, maintenance and some useful advice for best results when using your machine.
Keep all documentation in a safe place for future reference or for any future owners.
Delivery Information
Please check that the following items are delivered with the appliance:
Check that no damage has occurred to the machine during transit. If it has, call for service by GIAS.
- Instruction manual
- Guarantee card
- Energy label
Failure to comply with the above can compromise the safety of the appliance. You may be charged for a service call if a problem with your machine is caused by misuse.
SAFETY REMINDERS
Use
- This appliance can be used by children aged from 8 years and above and persons with reduced physical, sensory or mental capabilities or lack of experience and knowledge if they have been given supervision or instruction concerning use of the appliance in a safe way and understand the hazards involved.
Children shall not play with the appliance. Cleaning and user maintenance shall not be made by children without supervision.
- This appliances is intended to be used in household and similar applications such as:
- Staff kitchen areas in shops, offices and other working environments;
-Farm houses; - By clients in hotels, motels and other residential type environments;
- Bed and breakfast type environments.
A different use of this appliance from household environment or from typical housekeeping functions, as commercial use by expert or trained users, is excluded even in the above applications. If the appliance is used in a manner inconsistent with this it may reduce the life of the appliance and may void the manufacturer's warranty. Any damage to the appliance or other damage or loss arising through use that is not consistent with domestic or household use (even if located in a domestic or household environment) shall not be accepted by the manufacturer to the fullest extent permitted by law.
- WARNING Misuse of a tumble dryer may create a fire hazard.
- This machine is solely for domestic use, i.e. to dry household textiles and garments.
SAFETY REMINDERS
Use
- This machine should only be used for its intended purpose as described in this manual. Ensure that the instructions for installation and use are fully understood before operating the appliance.
- Do not touch the appliance when hands or feet are damp or wet.
- Do not lean on the door when loading the machine or use the door to lift or move the machine.
- Do not allow children to play with the machine or its controls.
- WARNING Do not use the product if the fluff filter is not in position or is damaged; fluff could be ignited.
- WARNING Where the hot surface symbol is located the temperature rise during operation of the tumble dryer may be in excess of 60 degrees C.
- Remove the plug from the electricity supply. Always remove the plug before cleaning the appliance.
- Do not continue to use this machine if it appears to be faulty.
- Lint and fluff must not be allowed to collect on the floor around the outside of the machine.
- The drum inside may be very hot. Always allow the dryer to complete the cool down period before removing the laundry.
- The final part of a tumble dryer cycle occurs without heat (cool down cycle) to ensure that the items are left at a temperature that ensures that the items will not be damaged.
Maximum load drying weight: refer to energy label 8kg - The tumble dryer is not to be used if industrial chemicals have been used for cleaning.
- WARNING: Never stop a tumble dryer before the end of the drying cycle unless all items are quickly removed and spread out so that the heat is dissipated.
INTRODUCTION
SAFETY REMINDERS
Installation
- Check that the product has no visible signs of damage before use. If damaged do not use and please call GIAS Service.
- Do not use adapters, multiple connectors and/or extensions.
- Never install the dryer against curtains and be sure to prevent items from falling or collecting behind the dryer.
- The appliance must not be installed behind a lockable door, a sliding door or a door with a hinge on the opposite side to that of the tumble dryer.
The Laundry
- Do not dry unwashed items in the tumble dryer.
-
WARNING Do not tumble dry fabrics treated with dry cleaning fluids.
WARNING Foam rubber materials can, under certain circumstances, when heated become ignited by spontaneous combustion. Items such as foam rubber (latex foam), shower caps, waterproof textiles, rubber backed articles and clothes or pillows fitted with foam rubber pads MUST NOT be dried in the tumble dryer.
Always refer to the laundry care labels for directions on suitability for drying. -
Clothes should be spin dried or thoroughly wrung before they are put into the tumble dryer. Clothes that are dripping wet should not be put into the dryer.
- Lighters and matches must not be left in pockets and NEVER use flammable liquids near the machine.
- Glass fibre curtains should NEVER be put in this machine. Skin irritation may occur if other garments are contaminated with the glass fibres.
- Items that have been soiled with substances such as cooking oil, acetone, alcohol, petrol, kerosene, spot removers, turpentine, waxes and wax removers should be washed in hot water with an extra amount of detergent before being dried in the tumble dryer.
- Fabric softeners, or similar products, should be used as specified by the fabric softener instructions.
SAFETY REMINDERS
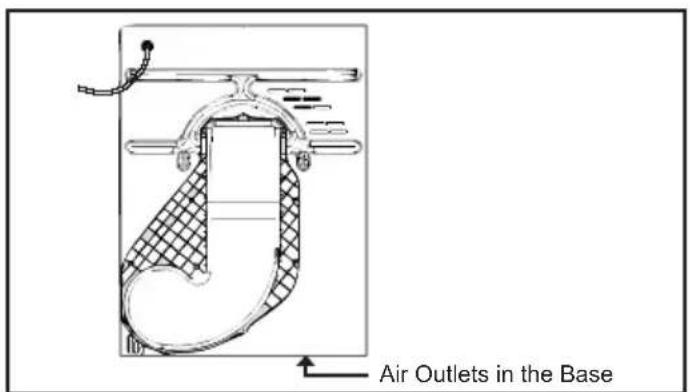
VENTILATION
Adequate ventilation must be provided in the room where the tumble dryer is located to prevent gases from appliances burning other fuels, including open fires, being drawn into the room during operation of the tumble dryer.
-
Installing the rear of the appliance close to a wall or vertical surface.
-
There should be a gap of at least 12mm between the machine and any obstructions. The inlet and outlet should be kept clear of obstruction. To ensure adequate ventilation the space between the bottom of the machine and the floor must not be obstructed.
-
Exhaust air must not be discharged into a flue which is used for exhausting fumes from appliances burning gas or other fuels.
-
Check regularly that the air flowing through the dryer is not restricted.
-
Check frequently the fluff filter after use, and clean, if necessary.
-
Check the fluff filter after use, and clean, if necessary.
-
Prevent items from falling or collecting behind the dryer as these may obstruct the air inlet and outlet.
-
NEVER install the dryer up against curtains.
-
In cases where the dryer is installed on top of a washing machine, a suitable stacking kit must be used, according to the follow configuration.
- Stacking kit Mod 35100019: for minimum washing machine depth = 49cm
- Stacking kit Mod 35900120: for minimum washing machine depth = 51 ~cm
- The stacking kit shall be one of that above, obtainable from ourspare service. The instructions for installation and any fixing attachments, are provided with the staking kit.
Important: During transport ensure that the dryer is in an upright position, if it's necessary you can only flip in the side shown;
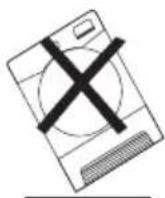
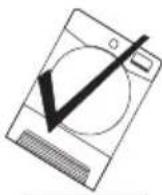
Caution: If the product is in different side, wait at least 4 hours before switching on so that the oil can flow back into the compressor. Failure to do this could result in damage to the compressor.
Ambiente
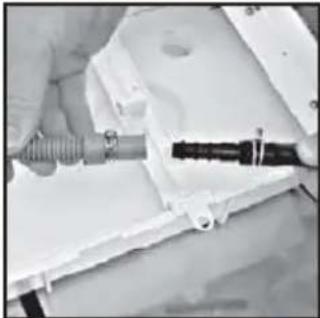
To avoid having to empty the water container after each drying cycle, the water normally collected during the drying cycle can be discharged directly to a waste water drain pipe (the same drainage system as household sinks). Water Bye-Laws prohibit connection to a surface water drain. The waste water drain pipe system should be located adjacent to the tumble dryer.
The kit is composed: 1 hose, 1 straight hose connector, 1 pipe clip and 1 plastic tie.
WARNING! Switch off and remove the tumble dryer plug from the electricity supply before carrying out any work.
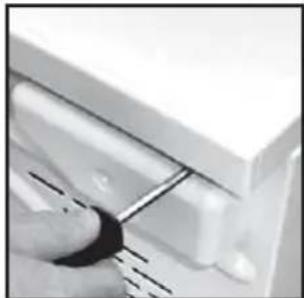
Fit the Kit as Follows:
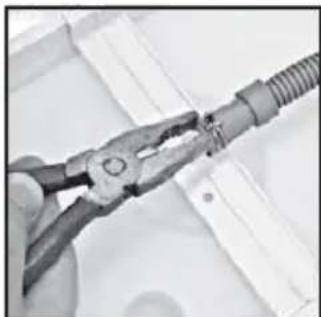
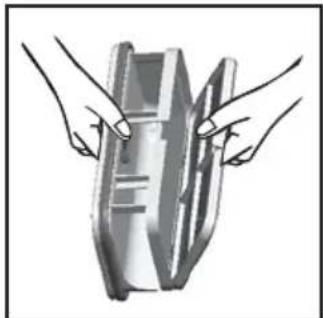
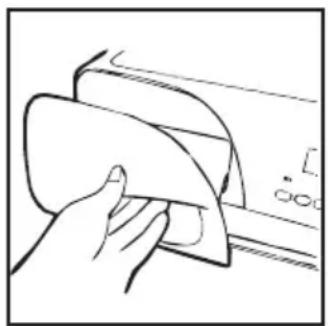
1.Unscrew and remove the 3 screws, at the rear of the machine, retaining the worktop trim.
2. Remove the rear worktop trim and the worktop surface by carefully sliding it towards the rear of the machine.
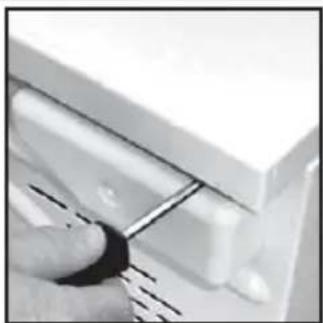
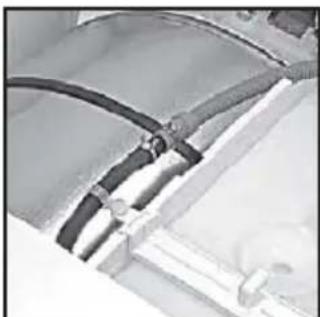
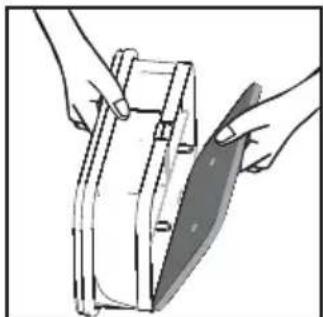
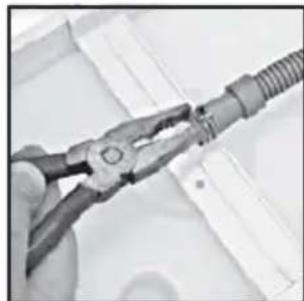
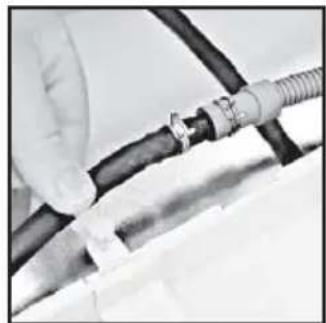
3. The waste water container is situated at the right-hand side of the machine (viewed from the rear). A grey hose connects to the bridge above the water container. Using pliers, remove the pipe retaining clip from the bridge.
4. Pull the hose off the bridge connection.
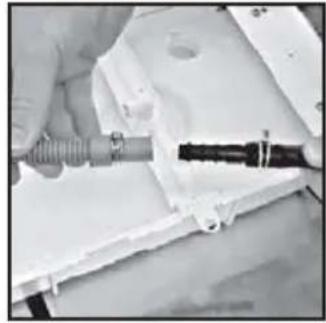
5. Attach the hose from the kit, using the connector and pipe clips supplied, to the hose removed from the bridge connection.
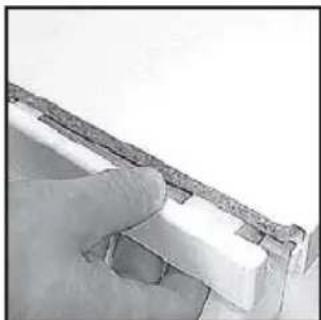
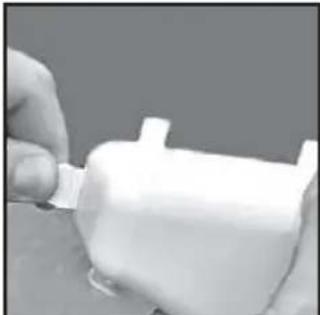
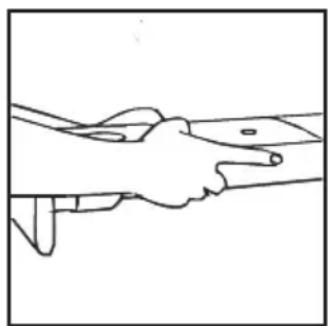
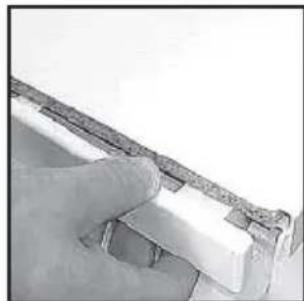
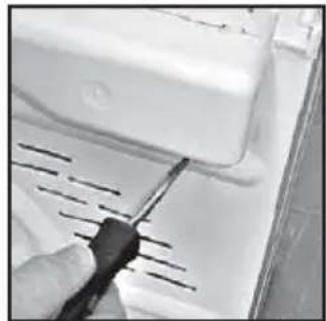
- Take off the water container cover from the rear of the machine by removing the two screws and unclipping the cover.
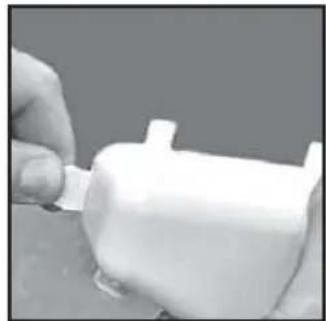
- Break off the tab on the side of the cover and replace the cover on the machine, refit the screws. You should now have revealed a hole in the back of the cabinet next to the Cover.
- Feed the drain hose through the hole in the cabinet.
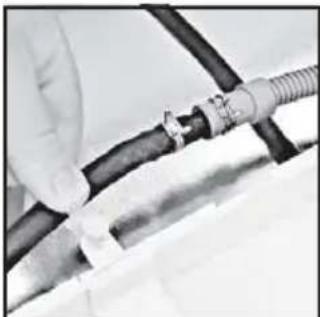
- Locate the grey pipe in the cutout of the tray and secure the pipe assembly to the bridge with the plastic tie.
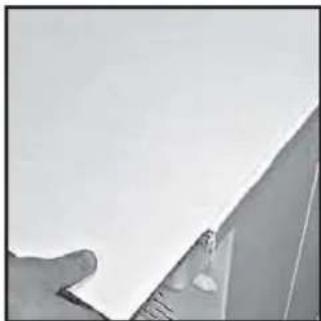
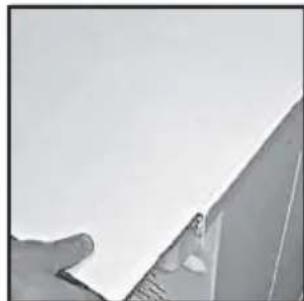
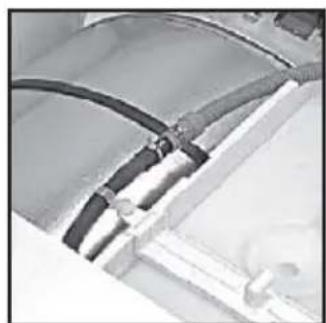
- Carefully slide the worktop back into position ensuring that the hose is not trapped and replace the worktop rear trim with the 3 screws.
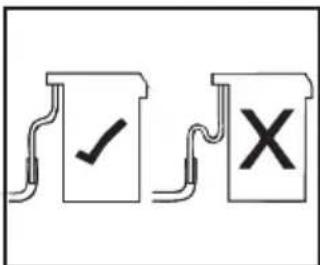
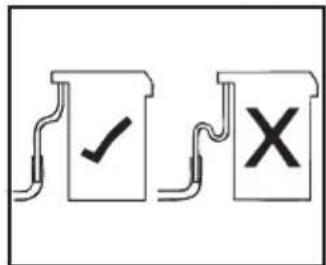
- Connect the new drain hose to the waste water pipe. Make sure that the new hose does not kink when pushing the tumble dryer into position. Ensure that the guidelines, as shown, are followed when routing the new external hose.
- Connect to the mains electricity supply.
- After emptying the waste water container switch the machine ON (and press the 'START' button on electronic models) to commence with the drying program.
Before using the tumble dryer for the first time:
- Please read this instruction book thoroughly.
- Remove all items packed inside drum.
- Wipe the inside of the drum and door with a damp cloth to remove any dust which may have settled in transit.
Clothes Preparation
Make sure that the laundry you are going to dry is suitable for drying in a tumble dryer, as shown by the care symbols on each item.
Check that all fastenings are closed and that pockets are empty. Turn the articles inside out. Place clothes loosely in the drum to make sure that they don't get tangled.
Do Not Tumble Dry:
Woollens, silk, delicate fabrics, nylon stockings, delicate embroidery, fabrics with metallic decorations, garments with PVC or leather trimmings, training shoes, bulky items such as sleeping bags, etc.

IMPORTANT: Do not dry articles which have been treated with a dry cleaning fluid or other clothes (danger of fire or explosion).
During the last 15 minutes (roughly) the load is always tumbled in cool air

Do not overload the drum, large items when can exceed the maximum admissible clothes (for example: sleeping bags, duvets).
Energy Saving
Only put into the tumble dryer laundry which has been thoroughly wrung or spin-dried. The drier the laundry the shorter the drying time thus saving electricity.
ALWAYS
- Try to dry the maximum weight of laundry, this will save time and electricity.
- Check that the filter is clean before every drying cycle.
NEVER
- Exceed the maximum weight, this will waste time and electricity.
- Put dripping wet items into the tumble dryer, this may damage the appliance.
Maximum Drying Weight
Cottons
Max. 8 kg
Synthetics
Max. 4 kg
Sort the Load as Follows
- By care symbols
These can be found on the collar or inside seam:

Suitable for tumble drying.

Tumble drying at high temperature.

Tumble drying at low temperature only.

Do not tumble dry.
If the item does not have a care label it must be assumed that it is not suitable for tumble drying.
- By amount and thickness
Whenever the load is bigger than the d capacity, separate clothes according to thickness (e.g. towels from thin underwear).
- By type of fabric
Cottons/linen: Towels, cotton jersey, bed ar table linen.
Synthetics: Blouses, shirts, overalls, etc. made of polyester or polyamid, as well as for cotton/synthetic mixes.
- By drying level
Sort into: iron dry, cupboard dry, etc. For delicate articles press the button to select low drying temperature.
Drying Guide
The standard cycle HANG DRY ( ) is the most energy efficient and best suited for drying normal wet cotton laundry.
The table below shows the approximate time and energy consumption of the main drying programmes.
| CYCLE | LOAD | ENERGY | TIME |
| (kWh) | (Min) | ||
| Perfect Home | FULL | 2,50 | 280 |
| Store Dry | FULL | 2,20 | 250 |
| Hand Dry | FULL | 1,95 | 225 |
| Hang Dry | HALF | 1,08 | 133 |
| Iron Dry | FULL | 1,55 | 180 |
| Power consumption of "left on-mode" | 0,75 W | ||
| Power consumption of "off-mode" | 0,2 W | ||
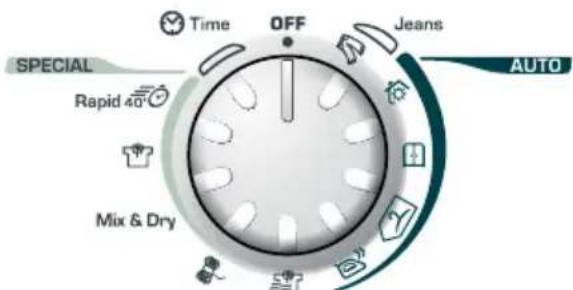
CONTROLS AND INDICATORS
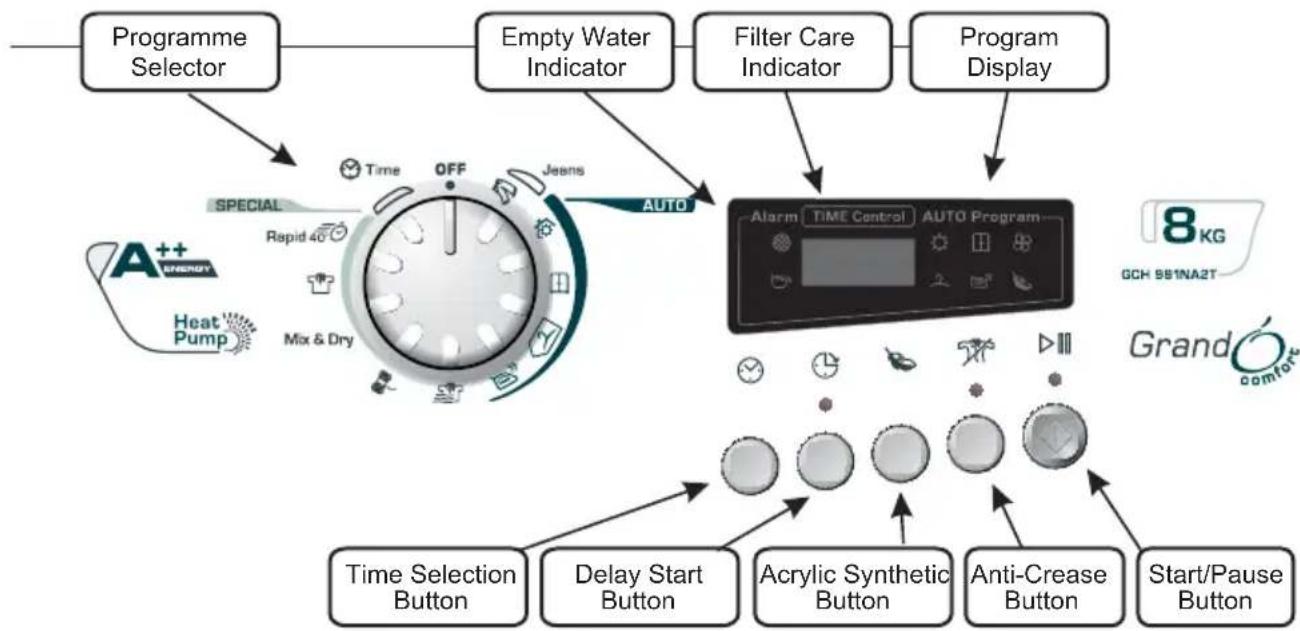
Control Panel and Indicator Lights
Knob: You can turn it in both directions to choose the required programme.
Time selection :To modify the drying timing of required programme; it works only with certain programmes.
Delay start: To delay the start of the drying cycle and to dry your laundry when electricity costs less (please see dedicated section)
Delicate fabrics : When pulled, this indicator 🏻 turns off and this new one 🍵 turns on; with this special function, the drying temperature is lower to better protect your delicate clothes.
Anti- Crease Button - Select the anti-crease function at the end of drying cycle. The drum keeps moving at regular phases to refresh the laundry.
Cool down : This indicator turns on during the final cool phase of the cycle.
Start/Pause : To start the programme required or to pause the cycle.
Automatic programmes: Depending on desired programme, specific indicators turn on (please see "programme list"); ECO indicators turns on when you select a low consumption programme.
Filter care : When on, please clean the filters.
Full water tank : When on, please empty the water tank.
SELECTING THE PROGRAMME

This machine has a special Sensor Dry to help you choose your preferred programme simply by selecting the level of dryness wanted.
For small loads and pre-dried clothes, please use a Timing programme and select "Delicate fabrics" button to lower the temperature inside the drum.
If the Sensor does not detect any item, this Dryer will work for only 10 minutes before starting the Cool down phase.
If the load is too big or too wet, this Dryer will automatically work for 3 hours and then start the Cool down phase.
At the end of each programme, there is always the Cool Down phase: it is a cool-air refresh phase of around 15 minutes.
SELECTING THE PROGRAMME
| PROGRAMME | IDEAL FOR |
| Perfect Home | Clothes you want completely dryed, e.g. towels, bathrobes, table clothes or sheet. Time: around 3h. |
| Store Dry | Clothes you want to fold and store without ironing, e.g. shirts in mixed fabrics, socks, baby clothes. Time: around 2h and 45 min. |
| Hang Dry | Clothes you don't need to iron, but just hang after the drying cycle. Time: around 2h and 30 min. |
| Iron Dry | Leave clothes slightly damp to allow easier ironing. Time: around 1h and 50 min. |
| No Crease | Clothes you just need to refresh. Good for items of clothing which have been left prior to ironing or if they have been dried outside or on radiators. This programme has a specific Anti-Crease function that relaxes fibres and makes easier ironing. Time: 9 min + 3 min cool down. |
| Wool | To soften your woollen clothes or to simply refresh them after a long time in the wardrobe. Time: 12 min. |
| Mix & Dry | To dry mixed cotton and synthetic clothes: save time and no need to separate the washing and dry them in different cycles. Time: around 2h (max 4 kg). |
| Shirts | To dry shirts both cotton and synthetic fabrics. Time: 1h for 2kg of synthetic shirts (around 10 shirts); 1h and 20 min for 3 kg of cotton shirts (around 10 shirts). |
| Rapid 40 Min. | For dry, refreshed and ready to dress clothes in onyl 40 minutes. Sensor system keeps under control the temperature to have always the best result. Max 2 kg. |
| Time | If you want to choose drying times, from 30 to 180 minutes. By selecting "20 min" you choose a "cool programme", ideal to refresh clothes and to remove eventual smells. |
| Jeans | To dry up to 4 kg of Jeans (around 5 pairs). The programme works for around 2h, but timing can change according to the load and washing spin speed. Jeans programme can only be used for 100% cotton items, please do not mix colours nor dry jeans with embroideries or accessories. |
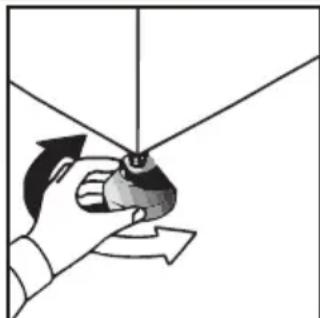
Opening the Door
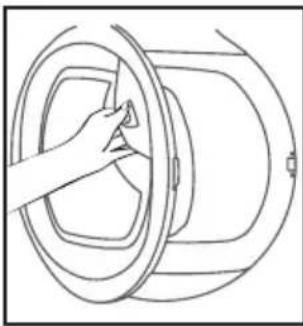
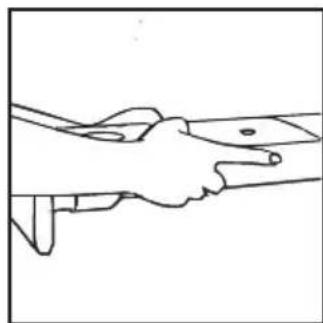
Pull on handle to open the door.
To restart the dryer, close the door and press

WARNING! When the tumble dryer is in the drum and door may be VERY HOT, stop a tumble dryer before the end of the ring cycle unless all items are quickly moved and spread out so that the heat isipated.
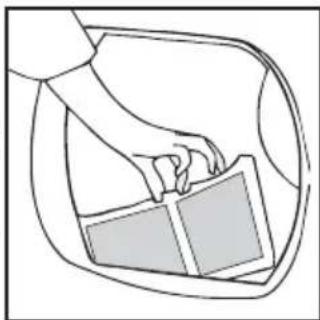
Filter
IMPORTANT: To maintain the efficiency of the dryer check that the fluff filter is clean before each drying cycle.
Do not operate the dryer without the filters. Clogged filters can increase the drying time and cause damage which may result in expensive repair costs.
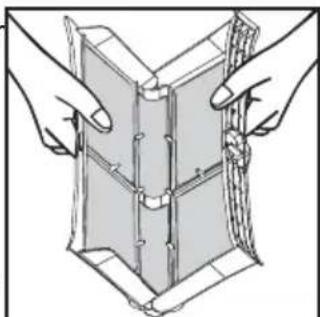
1.Pull the filter upwards.
2. Open filter as shown.
3.Gently remove lint using a soft brush or your fingertips.
4.Snap the filter together and push back into place.
Filter Care Indicator
Lights when the filter needs cleaning.
Check and clean the main filter in the door and the condenser filters allocated in the bottom of the dryer,If the laundry is not drying check that the filter is not clogged.
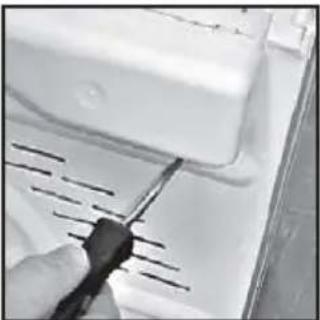
To Clean the Condenser Filter
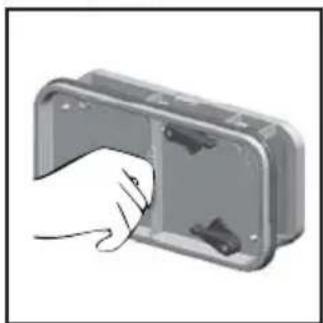
- Remove the kickplate.
- Turn the two locking levers anti-clockwise and pull out the front cover.
- Gently remove the filter frame and clean any dust or fluff with a cloth from the filter. Do not use water to clean the filter.
- Remove the sponge gently from its place and then wash the sponge by holding it under a running tap turning it so to remove any dust or fluff.
- Refit the front cover ensuring it is in the correct way (as indicated by the arrow) and pushed firmly into place. Lock the two levers by turning them clockwise.
- Refit the kickplate.
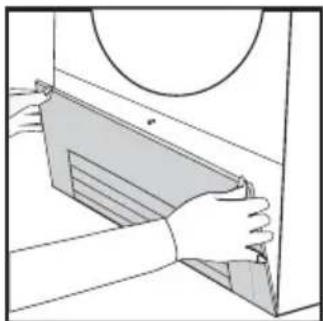

DO NOT USE WATER TO CLEAN THE FILTER.
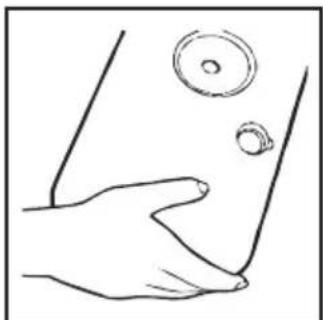
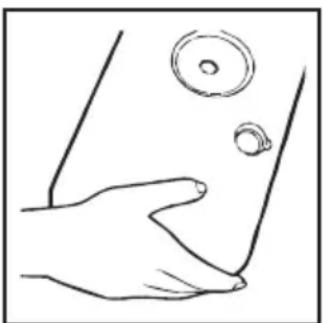
WATER CONTAINER
The water removed from the laundry during the drying cycle is collected in a container inside the door of the dryer. When the container is full the indicator on the control panel will light, and the container MUST be emptied. However, we recommend that the container is emptied after each drying cycle. NOTE: Very little water will collect during the first few cycles of a new machine as an internal reservoir is filled first.
To Remove the Container
- Gently pull out the tray until it is completely removed. Support the tray with both hands. When it is full the water container will weigh about 4kg

- Tilt the water container to empty the water out through the rear hole.
When emptyslide the water container back into position. PUSH FIRMLY INTO PLACE.
- Press to restart the cycle.
NOTE: If you have the option of drainage near the dryer it is possible to use the discharge kit to provide a permanent drain for the water collected by the dryer. This will remove the need to empty the water tray. All the information for assembly of the kit is contained in the kit envelope.
OPERATION
-
Open the door and load the drum with laundry. Ensure that garments do not hinder closure of the door.
-
Gently close the door pushing it slowly until you hear the door 'click' shut.
-
Turn the Programme Selector dial to select the required drying programme (see Programme Guide).
-
If drying synthetics, acrylics or delicate items, press the button to reduce the heat level. The indicator will light up when the machine is in low heat setting. To deselect in the first few minutes of the programme, press the button, after this time reset the machine to change the setting.
-
Press the button. The dryer will start automatically and the indicator above the button will be continuously lit.
-
If the door is opened during the programme to check the laundry, it is necessary to press to recommence drying after the door has been closed.
-
When the cycle is nearing completion the machine will enter the cool down phase, the clothes will be tumbled in cool air allowing the load to cool down.
-
Following the completion of the cycle the drum will rotate intermittently to minimize creasing. This will continue until the machine is switched OFF or the door is opened.
Do not open the door during the automatic programs in order to obtain a proper drying.
Delay Start Function
The Delay Start Function allows the user to delay the start of the drying cycle by 1 to 24 hours.
When the function is first selected the display will show a delay of 1 hour, subsequent presses of the button will increase the delay with 1 hour steps.
To commence the programme press and the appliance will complete the drying cycle at the end of this time. The indicator light will flash to indicate that the start delay is in progress.
Cancelling and Resetting the Programme
To cancel a programme press the button for 3 seconds. In the TIME CONTROL display 0:00 Light will flash to indicate that it has been reset.
CLEANING AND ROUTINE MAINTENANCE
Cleaning the Dryer
- Clean the filter and empty the water container after every drying cycle.
- Regularly clean the filters.
After each period of use, wipe the inside of the drum and leave the door open for a while to allow circulation of air to dry it. - Wipe the outside of the machine and the door with a soft cloth.
DO NOT use abrasive pads or cleaning agents. - To prevent the door sticking or the build up of fluff clean the inner door and gasket with a damp cloth after every drying cycle.

WARNING! The Drum, door and load may be very hot.
Technical Specifications
Drum capacity 115 litres
Maximum load 8 kg
Height 85 cm
Width 60 cm
Depth 60 cm
Energy Label Band A ++
Information for Test Laboratory
EN 61121 Programme
-DRY COTTON
-HANGDRY
-IRON DRY COTTON
-IRON DRY
-EASY-CARE TEXTILE
-HANG DRY + SYNTHETIC
Note: Install and use the drain hose to discharge the condensing water.

IMPORTANT Always switch off and move the plug from the electricity supply before cleaning this appliance.

For electrical data refer to the rating label in the front of the dryer cabinet (with the door open).
What Might be the Cause of...
Defects you can remedy yourself
Before calling GIAS Service for technical advice please run through the following checklist. A charge will be made if the machine is found to be working or has been installed incorrectly or used incorrectly.
If the problem persists after completing the recommended checks, please call GIAS Service, they may be able to assist you over the telephone.
Time display to end could change during drying cycle. The time to end is continuously checked during the drying cycle and the time is adjusted to give the best estimation time. The displayed time may increase or decrease during the cycle and this is normal.
Drying time is too long/clothes are not dry enough...
- Have you selected the correct drying time/programme?
- Were the clothes too wet? Were the clothes thoroughly wrung or spindried?
- Does the filter need cleaning?
Is the dryer overloaded? - Has the option been selected from a previous cycle?
The dryer does not operate...
- Is there a working electricity supply to the dryer? Check using another appliance such as a table lamp.
- Is the plug properly connected to the mains supply?
Is there a power failure? - Has the fuse blown?
Is the door fully closed? - Is the dryer switched on, both at the mains supply and at the machine?
- Has the drying time or the programme been selected?
- Has the machine been switched on again after opening the door?
The dryer is noisy...
- Switch off the dryer and contact GIAS Service for advice.
The Indicator is on... - Does the filter need cleaning?
The Indicator is on... - Does the water container need emptying?
CUSTOMER SERVICE
Should there still be a problem with your dryer after completing all the recommended checks, please call GIAS Service for advice.
They may be able to assist you over the telephone or arrange for a suitable appointment for an engineer to call under the terms of your guarantee. However, a charge may be made if any of the following applies to your machine:
Is found to be in working order.
- Has not been installed in accordance with the installation instructions.
- Has been used incorrectly.
Spares
Always use genuine spares, available direct from GIAS Service.
GIAS Service
For service and repairs call your local GIAS Service engineer.
The manufacturer declines all responsibility in the event of any printing mistakes in this booklet. The manufacturer also reserves the right to make appropriate modifications to its products without changing the essential characteristics.
Einführung 17
Information for Test Laboratory
Program EN 61121
-Bombaž, Suho
-Bombaž, za likanje
-Um. tkanine
Ustrezni program
-Suho brez likanja
-Za likanje
-Suho brez likanja
+Sintetika

POMEMBNO: Preden začnete stroj Čistiti, odvednougasnite in izvlecite elektricki vtic izime.

| Power consumption of "left on-mode" | 0,75 W |
| Power consumption of "off-mode" | 0,2 W |
To Remove the Container
- Gently pull out the tray until it is completely removed. Support the tray with both hands. When it is full the water container will weigh about 4kg
- Tilt the water container to empty the water out through the rear hole.
When emptyslide the water container back into position. PUSH FIRMLY INTO PLACE.
3. Press to restart the cycle.
NOTE: If you have the option of drainage near the dryer it is possible to use the discharge kit to provide a permanent drain for the water collected by the dryer. This will remove the need to empty the water tray. All the information for assembly of the kit is contained in the kit envelope.
DZIAŁANIE
Affald af elektrisk og elektronisk udstyr (WEEE)并不代表 the general availability of the WEEE. The WEEE is a member of the WEEE, which includes the following:
Indicator for filteredlikehold 110
Vannbeholder 111
SIKKERHETSPÄMINNELSER
Bruk
SIKKERHETSPÄMINNELSER
Bruk
Enhver skade på produitet aller annen skade eller tap oppstätt ut fra bruk som ikke er i samsvar med hjemlig aller husholdningsmessig bruk (sylv ved plassering i et hjemlig aller husholdningsmessig miljø) skal ikke aksepteres av produsenten i den utstrekning det er tillatt ved lov.
SIKKERHETSPÄMINNELSER
Installasjon
SIKKERHETSPÄMINNELSER
VENTILASJON
SIKKERHETSPÄMINNELSER
Miljømssige hensyn
Information for Test Laboratory
EN 61121 Program Program att anvanda
-Torr Bomull -Torrt, ej strykning
-Torr Bomull Jarn -Stryktorrt
-Ömtäliga Tyger -Torrt, ej strykning + Syntet

N3nCKBaHm 3a eNeKTpnuecko CBbp3BaHe
Bapabahnnte cyuHnHc eoCTaBt 3a pa6ota npn HApexeHne ot 220-240V, 50 Hz eHnofoa3Ho. PpOBepTe daIeKtpueckata Bepura e c HApexeHne ot haN-MaIko 6A.
EJIeKTPnueCTBOTO MOKe Da e N3KNIOuHTeJIHO
Ho onacHo. To3n ypeEd Tp86Ba da 6bJe 3a3eMeH.
KoHTaKTbT uIeNceIbT Ha ypeDa Tpra6Ba da 6bDaTOTeEDHH CbUIN BnD.
He n3noJ3BaIte pa3KIOHnteJIu /nJIu yDbJXHTeHHKa6eJI.
UencenbT Tp6Ba Da e JecHo DocTbneH 3a N3KJIIOuBaHe CNeI MOHTaxHa hypeDa.
YpeDnTe CE OTROBapT Ha Ebponeckata DnpeKtNbA 2004/108/EC, 2006/95/EC n Ha NocJeDbAunTe n3MeHeHn.
MoKeJa 6bTe TaKcYBaHn 3a cepBn3Ho
ObaKaDaHe, aKO npo6JIeMbT C MaunHaTa Bn Ce
DbJxHa HEnpaBnJeH MOtax.
Ako 3axpaHbAsnT Ka6eHa ypeHa e NOBpeDen, Toi Tp8Ba Da 6bDe 3aMeHen CbC cneuaen Ka6e, KOITo MoKeTe Da nOlyuHTe CAMO ot cepBn3a 3a pe3epBn qactn. Toi Tp8Ba Da 6bDe MOHTnpaH OT KOMPeTeHTHO Niue.
He noctabrayte 旬ceJa B KOHTaTn He BKIOUbaIte MaunHaTa, DOKaTO MOHTaKbT He npNKIOU. 3a Ba7a 6e3oNaCHOCT, Ta3u cyuINH Tp8Ba Da 6bJe npabUNHO MOHTIPAHa. Ako mATE HRAKaBO CbMHeHne OT HOCHO MOHTaKa, ObaTe ce Ha cepBn3a 3a CbBET.
Ako ypeIbT He pa6oTn npabuHNO nnn ce IOBpeN, n3KnIOyeTe rO n N3BaJeTe UeNceJa oT KOHTa. KoHcyItnpaaiTe ce c OTOpN3npaHnT cepBN3 3a eBeHTyaJIeH peMOHT.
PerynnpaHe Na KpaueTata
Cnei KaTo MaunHaTa e Ha MrcTo, Kpaetata Tp6Ba Da 6bDaT perylnpaHn, 3a Da rapaHTnpate BOOpabHoto NIOJoxHe.
MAPkyu 3A n3TOUBAHE: uHCTPYKcIM 3A IIOCTABrHE
MAPKy3A N3TOUBAHE: HNCTPYKUN 3A NOCTABRHE
3a da n36eHHeTe n3npa3BaHe Ha KOHTeHepa 3a BODa CLeD BCEKN ZIKbN Ha cyUWeHe, MOKeTe Da n3npa3HITe BODaTa DnpeKTHO B Tpb6aTa 3a n3TOuBaHe Ha OTna DHNTE BOi (CbIaTa KaHaJIIN3auNOHHa MpeXa KaTO H aDOMAKINHCKNTe MNBKN).MecTHnte 3akOHn 3a BODaT a 3a6paHBArCBp3BaHETo KbM NOBbpxHOCTHO N3TN UaHe Ha BOdTa. Tpb6aTa 3a n3TOUBAHe Ha OTnADHn BODn Tp8BaDa e pa3noJoxHeHa HeNoCpeIcTBeHO Do 6 apabahHaTa cyuInn. KomPNeKTbT ce cbCTOnOT 1 Mapkyu 1 kpaH.
I PEPENPEXDEHNE! N 3KIOUeTe n H3BaTe Te Uencena Ha cyuINHraTa OT eN.KoHTaKT, IpeNi Da u3BypwBaTe KaKBnTo N da 6bNo peMOTHNe DeHOCtN.
MOnTpaIte KOMJIeKTo nO cNeHnHaunH:
1.Pa3BnIeNn3BaIeTe 3-Te BnHTa B 3aHaTa Yact Ha MaunHaTa, KOINTO 3akpenT TpMa HAnlota.
2.ИЗВадete 3аДнЯТрим Ha pa6OTHЯ ПNotи NOBbpxHOCCTTa HaПLOTA NocpeDCTBOMBHIMaTeNHO NNb3raHeKbM 3aДHATA CTpaHaHaMaUHATA.
- KoHTeHepbT 3a OTnadHn BOnCe HAMpaB DAnchata YactHa MaunHaTa (aKO rneDaTe OT 3aHaTa cTpHa).KbM
MOCTa HaI KOHTeHepa 3a B0da e Cbbp3aH CNB Mapky. N3BaTepeCKo6ata OT MOCTa C NOMOuTaHaKJIeU.
4.ИЗдьрпайтЕ МаркуаOTMOCTA.
- Kato n3noJ3BaTe O octaBeHnTe CbeHNHTeN CKo6a, 3akpenete Mapkya OT KOMJIeKTA KbM n3BaJeHnOT MoCTa Mapkyu.
-
CbaIeTe kanaKa Ha KOHTeHepa 3a Boda OT 3aHaTAtcpaHa Ha MaunHaTa, KaTo N3BaInTe DbTa BNHTa N OTkaUHe Kanaka.
-
OTePahete pa3eJa OTCTpAHn Ha Kanaka N BbPHeTe 6paTHo Kanaka KbMaunHata, CNei KoETO OTHOBO 3aBnTE BnHTobete.OT 3aHaTcPaHa Ha KytnrTa n Do Kanaka Beue Tp8Ba Da ce e OTKpNl OTBOP.
8.пoctabeteДрehaxнmaKyuВOTBopaHa KyTnTa.
- HamepeTe CNBaTa Tpb6a B OTP3bKa Ha TaBnKata N 3aTeHete Bpb3kata Ha Tpb6ata K b M MoCTa C nactMacobata Kopda.
10.BHmataeHnno nIb3heTe pa6oTHna nnot o6patoHa MxCTOTO My, KaTO ce yBepnte,ye He
ce 3akneuNn 3akpenete 3aHnTpIM Ha pa6oTHnI pNot c 3-Te BnHTa.
- Cbpxte HOBnA DpeHaxeH Mapkyu KbM Tpb6ata 3a OTnaHn BOHN.
BnHmabaiTe da He nperebheTe Mapkyua, OOKato NOCTABaTe cyuINHraTa Ha MxCTO. 3aDblnxIteIeHcneDbaiTe HAcOKnte npn PpekapBaHe Ha HOBnA BbHsEHMapKyU.
- CbpxKeTe KbM enektpo3axpaHbaHeto.
13.CneI KaTo n3npa3nTe KOHTeHepa 3a OTnadH BODn, BKIOUcETE MaunHaT a (n HATNCHEte 6yTOHa START npn eJeKtpoHn MoJeN), 3a Da 3anOHe nporpaMaTa 3a cyWeHe.
Ppei Da n3no13BaTe cbwnHraTa 3a npbPNbT.
MolnapuTeTe BHIMaTeJHo Te3n HHTpyKcUN.
OTCTpaHeTe BCnUKN nepdMeTN, onaKOBaBbTpe B 6apa6aHa.
- Почисте Вьтешнata част Ha 6apabHaCoptпаite npaHTo, KaKTo cneBa BpaTata C BnaJHa Kbpna, 3a Да npMaxHeTe.
- NamyK MaKc. 8 Kr
- CnHTeTnKa MaKc. 4 Kr
npaxTa, KOrTO ce e HATpbnaJa npn npeBO3BaHTo.
Iodrotobka Ha dpexnte
YBepete ce, ye npaHTo, KoTo ue noDcyuBaTe e noDxOJaTo 3a cyWeHe B 6apabHa CuynInnK, KaKTo e NOKa3aHO Ha CNMBoJIne 3a rPnKa HbCraKApexa.
PpOBepTe DaJIIN BCNUK CUNOBe Ca BUNHATN IN BCNUKN Dxko6oBe npa3HN. O6bpHeTe dpexuTE Ha o6paTHo. NocTabete dpexuTE CBO6oJHO B 6apa6aHa, 3a da ce yBepnte, ye HmaDa ce 3anJeTat.
He cywete B 6apa6aHa:
BbJIHa, KOpriHeHa, DeIHKaTHa TbKaH, HauNoHOBN YOpaN, DeIHKaTHn 6pOepu, TbKaHN C MeTaHn DeKopaun, oBLeKn a PVC uJn KoKeHN rapHtypn, MpaToHKn, OBeMnCTn npEmdetn KaTO cJaHn CyBaJIH N.T.H.
BAXHO:He cyuete dpexn, konTo ca 6n nn TpeTnpaHn Cbc Cyxa nouchTbaaTeuHOCT nnn rymeHn dpexn (onacHOCT OT NOXAPnneKcnno3n).
IbpeMaHIOcneHHTe15MnHyTu (rpy6o) npaHeTo BnHaN ce cyuN B bapa6aHa Ha XpaAeH Bb3dYx.
He npetobapbaTe 6apa6aHa, roJeMeTepdmetn, KOrato 6bDat HAMOKpeHnHaBnwaBat DOnyCTMOTO HaTOBapBaHe Cdpexn (Hanpimep: cnaHn UyBaN, IopraHn).
KkoHOMHa eHepnra
IocTbAaTe B 6apabHnTa cyuHnHa cAmO npaHe, KoTo e 6nlo Do6pe n3eJeHO n cyuHo Ha zentpOpyra. KojKTo no-cyxo e npaHTo, TOnKOba No-KpaTKo 6bDe BpeMeTO 3a cyuHe, KoTo neCTn eJekTpuecTBO BNHAn
OnntBaIte Da cyuHTe MaKcHMaJIHo TeTIO npaHe, Taka ige cncTe BpeMe n eJekTpueCTBO.
- Пюверетадамфпгьт e чст педи BCEKN UKbl Ha cyше He.
HNKORA
He HauBnuaBaTe MaKcImaHTo TerIIO, Taka ige ry6nte BpeMe n eJeKtpnueCTBO.
- Пoctabянeto Ha n3knIOuHTeJIH0 MOKpnДрени BCyUnHЯТа мОже Да NOВpeДуpeDA.
MakcimamHo terNo Ha cyuhe
HaCoptnpaTe npaHeTo, KaKTo cJeDbA
KoHTpOJIeH IaHeI N HdNkAToPn IaMnn
CeIeKTop Ha nporpamn: n3bnpate xenahata nporpama.
Bytoh 3a OTnoxeh cTapT :3a da npomeHnte BpeMeTo 3a cyuhe Ha Heo6xoImMaTa nporpama; Tpa6OTn cAmO c onpeJeHn nporpamn.
Bytoh 3a n36op Ha BpeMe :Da OTIOxHauaIOTO Ha cKbHa Ha cyweHe i Da n3cbXHe npaHeTo KOrato eNeKTpueCTBOTo CtpyBa No-MaNKo (MOJ, BIXTe cneuaJeH pa3dien)
DeNkathn Tbkahn: KoraTo cnpra, To3n Noka3aTeJ Ce H3KIOUyBa N Ta3N HOBa Ce BKIOUBA; C Ta3N CneuaJIHa 0yHKuIy, Tempepatypata Ha cyWeHe e NO-HNcKa, 3a Da 3aunTt NO-dO6pe BaWNTe DeNkathn Dpexn.
BytoH npotnb Hamaukbahe -N36epTe aHTn-1bHKn 0yHKuB KpaHa cyweHe cKbI. BapabHbT npoDbJxaba Da ce DnKn Ha peOBn 0a3n, 3a da o6HOBnte npaHeTo
OxnaJaHe : To3n INndkaTOp Ce BkIIOvBa No BpeMe Ha cHHaJIHnXlaIHO pa3a Ha cIKbJa. ByToH "Ctapt/Nay3a 3a Da CTAptInpate nporpaMaTa nn Da HAnpaBNTe Nay3a B cIKbJa.
ABTOMaTHNn nporpam: B 3aBncmocT OT XeJHaHata nporpama, cneuФnHn noka3aTeJIbKIOUHTe (MOJIa, BIXTe "Cnscbk nporpama"); INdikatop ECce BKIOUBya, KOrato n36peTe nporpama C HnCKa KOHCyMaun.
Фнлтbpгик: Korato CBETHE MONЯ NOUcTeTe Фнлтрnte
Ibnepe3epBoap 3a Boda: KoraTo CBeTHe, MoJn 3npa3Hn pe3epBoapa 3a Boda.
N3BnPAHE HA NPOrPAMN
Ta3n MaunHa pa3noIara cbc cneuaJIeH CeH3Op 3a cyWeHe, 3a da Bn NOMorHe da n36epTe npedNoHTaHaTa nporpama npocTo KaTO n36epTe XeJaHOTo HIBO Ha cyWeHe.
3a MaKo 6emn paH e n peBapnteNoIocyuweH npexn, MoJr N3non3BaIte nporpama 3a BpeMe I36peTe 6yToHa 3a "DJIHKaTHN dpexn", 3a Da HamaInTe TemnpaTypaTbTpE Bapabaha.
Ako c eH3OpbT H e O TKpne H IKaKBr d pexN, C yuINHraTa H
CyuHnHaTa He pa6OTn...
- IMa JI NOdaBaHe Ha eJNEKtpnueCTBO KbM cyuHnHa? PpOBepTe C NOMoTa Ha npyVpeKaTo HAcToJIHa Maca.
- Κεncelbπ npaBnHо Jn e Cbbp3aH KbM enektpnuyeckata Mpeka?
- Има Ли спраHe Ha Toka?
- Има ли изrogenл р dedпаstryн?
BpaTataHnblno3aTBOpeHaJin e? - Bключен Ли eурдт КakTO кьм МpeжаТа, Takaи Кьм Maшиннata?
- ɪnʒpɑːn Jɪn cTe BpeMe 3a cyʌsHe nʌn npɒpɑːmə?
MaunHata 6eue JN BKNIOyeHa OTHOBOCneOTBapReHo Ha BpaTata?
CywnHraTa e WymHa...
- N3KIIIOUeTe CyuINHraTa n Ce CbbpXeTe COTOpN3nPaHnT CEPBn3a CbBet.
HdNkATOpbT CBETn...
- ΦιπTBpBTιMΑΙΝΗχДΑΟΤΟΥΝΥCTBAHΕ? ένδικΑΤΟΡБΤ CBETN...
- KoHTeINHePbT 3a BODa NMa Jn HUxJa OTo N3npa3BaHe?
OBCLNYKBAHE HA KJINEHTN
Ako BCE OSe NMa npo6nem C BaShaTa cyuHnHcNeI npKJIIOUBaHe Ha BCNUKn IpeOpbuaHINpOBePK, MoJr oBaTe Ce Ha OTOpN3nPaHnCEPBn3 3a CbBET.
TeMOrat Da Bn NOMORHaT NO TeNeΦoHa NJI Da opraHn3nPaT NOxOJaUa CpeUa C nHKeHep, KOITo Da Ce CBpJce C Bac No CnlaTa Ha ycNoBnA Ta Ha BaWata rapaHcNIA. BbnpEkn TOBa, MoKe Da 6bDeTe TAcCyBaHn, aKO HrKoN OT CneHNte HeUa Ce OTHacrT 3a MaunHaTa Bn:
Ako pa60Tu HOpMaJHo.
He e MOHTupaHa, B CbOTBETCTBNE cMHCTPVKUNTE 3a MOHTaX
-Изпоглвае Heнравино
Pe3epBn qactn
BnHaHn n3noJ3BaIte opnHnHaJIHn pe3epBn HacTn,HaJIuHN dIpuEeKTHo OT GIAS Service.
GIAS Service
OTHOCHO cepBn3Hn npemOHTHn DeHOCTN,
ObaTe ce Ha Baunr MeCTeH INXKeHep Ha
GIAS Service.
Ipon3BODHT He noema HnKaKBa OTROBOPHOCT B CnyaH Ha KaKBTO N da e neuathn rpeWN B Ta3N KHNKKA. Ipon3BODHTeTc bso Taka cn 3ana3Ba npabOTO Da n3BbPwBa cBoTBTHN IpomeHn Ha npodykTa 6e3 Da npomeHn OCHOBHnTe xapakTepcNTKN.
Introduction 143
Specifications Techniques

- Heat Pump Tumble Dryer
- Delivery Information
- SAFETY REMINDERS
- Use
- INTRODUCTION
- Installation
- The Laundry
- VENTILATION
- Ambiente
- Fit the Kit as Follows:
- Clothes Preparation
- Do Not Tumble Dry:
- Energy Saving
- ALWAYS
- NEVER
- Maximum Drying Weight
- Sort the Load as Follows
- - By care symbols
- - By amount and thickness
- - By type of fabric
- - By drying level
- Drying Guide
- CONTROLS AND INDICATORS
- Control Panel and Indicator Lights
- SELECTING THE PROGRAMME
- Opening the Door
- Filter
- Filter Care Indicator
- To Clean the Condenser Filter
- WATER CONTAINER
- To Remove the Container
- OPERATION
- Delay Start Function
- Cancelling and Resetting the Programme
- CLEANING AND ROUTINE MAINTENANCE
- Cleaning the Dryer
- Technical Specifications
- Information for Test Laboratory
- EN 61121 Programme
- What Might be the Cause of...
- Defects you can remedy yourself
- The dryer does not operate...
- CUSTOMER SERVICE
- Spares
- GIAS Service
- Program EN 61121
- Ustrezni program
- DZIAŁANIE
- SIKKERHETSPÄMINNELSER
- Bruk
- Installasjon
- VENTILASJON
- Miljømssige hensyn
- EN 61121 Program Program att anvanda
- N3nCKBaHm 3a eNeKTpnuecko CBbp3BaHe
- PerynnpaHe Na KpaueTata
- MAPkyu 3A n3TOUBAHE: uHCTPYKcIM 3A IIOCTABrHE
- MAPKy3A N3TOUBAHE: HNCTPYKUN 3A NOCTABRHE
- MOnTpaIte KOMJIeKTo nO cNeHnHaunH:
- Iodrotobka Ha dpexnte
- He cywete B 6apa6aHa:
- KkoHOMHa eHepnra
- HNKORA
- MakcimamHo terNo Ha cyuhe
- HaCoptnpaTe npaHeTo, KaKTo cJeDbA
- KoHTpOJIeH IaHeI N HdNkAToPn IaMnn
- N3BnPAHE HA NPOrPAMN
- CywnHraTa e WymHa...
- HdNkATOpbT CBETn...
- OBCLNYKBAHE HA KJINEHTN
- Pe3epBn qactn
- Specifications Techniques
Brand : CANDY
Model : GCH 981NA2TS
Category : Tumble drier