LISETTE 120 - Fridge Saro - Free user manual and instructions
Find the device manual for free LISETTE 120 Saro in PDF.
| Brand | Saro |
| Model | LISETTE 120 |
| Product type | Refrigerated display case |
| Capacity | 115 liters |
| Dimensions (H x W x D) | 695 x 580 x 670 mm |
| Power supply | 230 V / 50 Hz, 160 W |
| Temperature range | 2 °C to 8 °C |
| Refrigerant | R600a (60 g) |
| Number of shelves | 2 |
| Control panel | Digital with display and SET buttons |
| Functions | Temperature adjustment, manual defrost, interior lighting |
| Installation | Flat and stable surface, 20 cm clearance around for ventilation |
| Cleaning | Soapy water, do not use abrasive products, door gasket with clear water |
| Maintenance | Regular cleaning of the condenser by a qualified technician |
| Safety | Do not use high-pressure cleaners, do not store electrical appliances inside, mandatory grounding |
| Weight | Approximately 60 kg (estimate) |
Frequently Asked Questions - LISETTE 120 Saro
User questions about LISETTE 120 Saro
0 question about this device. Answer the ones you know or ask your own.
Ask a new question about this device
Download the instructions for your Fridge in PDF format for free! Find your manual LISETTE 120 - Saro and take your electronic device back in hand. On this page are published all the documents necessary for the use of your device. LISETTE 120 by Saro.
USER MANUAL LISETTE 120 Saro
OPERATING INSTRUCTIONS FOR CIRCULATING AIR DISPLAY CASE
LISETTE 100, LISETTE 120, LISETTE 160, SC 78, SC 280
General information. 4
Product description 4
Pack contents. 4
installation. 4
operation 5
Table of control parameters. 5
Cleaning, care and maintenance. 6
Trouble shooting. 6
Technical specifications 7
Electrical wiring. 7
Packaging disposal. 7
Device disposal 7
Compliance. 7
INHALT DE
Specifications techniques 19
Cablage electrique 19
Elimination des emballages 19
- Position on a flat, stable surface
- A service agent/qualified technician should carry out installation and any repairs if required. Do not remove any components or service panels on this product
-
Consult Local and National standards to comply with the following:
-
Health and safety at work legislation
- BS EN Codes of practice
- Fire Precautions
- IEE wiring regulations
DO NOT use jet/pressure washers to clean the appliance
DO NOT use the appliance outside
- DO NOT use the appliance to store medical supplies
- DO NOT use electrical appliances inside the appliance (e.g. heaters, ice-cream makers etc)
DO NOT allow oil or fat to come into contact with the plastic components or door seal. Clean immediately if contact occurs
- DO NOT store products on top of the appliance
- Bottles that contain a high percentage of alcohol must be sealed and placed vertically in the refrigerator
- Always carry, store and handle the appliance in a vertical position and move by holding the base of the appliance
- Always switch off and disconnect the power supply to the unit before cleaning
- Keep all packaging away from children. Dispos of the packaging in accordance with the regulations of local authorities
If the power cord is damaged, it must be replaced by a agent or a recommended qualified technician in order to avoid a hazard
- This appliance is not intended for use by persons (including children) with reduced physical, sensory or mental capabilities, or lack of experience or knowledge, unless they have been given supervision or instruction concerning the use of the appliance by a person responsible for their safety
Children should be supervised to ensure that they do not play with the appliance
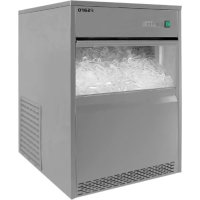
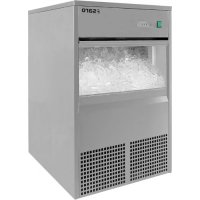
PRODUCT DESCRIPTION
Lisette 100 Refrigerated Display 85 litres
Lisette 120 Refrigerated Display 118 litres
Lisette 160 Refrigerated Display 146 litres
SC 78 Refrigerated Display 77 litres
SC 280 Refrigerated Display 217 litres
PACK CONTENTS
Lisette 100, 120, 160 2 adjustable shelves
SC78 3adjustable shelves
SC 280 4 adjustable shelves
Should you find any damaged as a result of transit, please contact your dealer immediately
INSTALLATION

NOTE: If the unit has been moved or not stored in an upright position, let it stand upright for approximately 12 hours before operation. If in doubt, allow the appliance to stand.
- Remove the appliance from the packaging. Make sure that all protective plastic film and coatings are thoroughly removed from all surfaces
- Maintain a distance of 20cm (7 inches) between the unit and walls or other objects for ventilation. Increase the distance if the obstacle is a heat source

NOTE: Before using the appliance for the first time, clean the shelves and interior with soapy water and rinse thoroughly.
OPERATION
CONTROL PANEL
The control panel is located below the doors on the rear of the appliance.
TURN ON
- Close the doors of the appliance
- Connect the appliance to a mains power supply
- Press the button to turn the light On or Off as required
SETTING THE OPERATING TEMPERATURE
- Press the SET button. The display will flash
- Press the or buttons to display the required temperature
- Press the SET button to store the temperature
TABLE OF CONTROLLER PARAMETERS
The operating parameters of this appliance have been preset for optimum performance and to maximise the life of the appliance.
| DISPLAY PARAMETER PRESET VALUE RANGE | |||
| E1 Lower set temperature 0 °C -20 °C to 2 °C | |||
| E2 Upper set temperature 12 °C 2 °C to 45 °C | |||
| E3 Tempe | ature buffer 4 °C 1 °C to 10 °C | ||
| E4 Tempe | ature buffer time delay 3 minutes 0 to 10 minutes | ||
| E5 | Fixed parameter | 0 | DO NOT CHANGE |
| E6 | Fixed parameter | 00 | DO NOT CHANGE |
| F1 | Defrost period 25 minutes | 1 to 60 minutes | |
| F2 | Defrost interval | 6 hours | 1 to 24 hours |
| F3 | Defrost temperature | 20 °C | 0 °C to 22 °C |
| F4 | Centigrade/Fahrenheit | 0 °C | °C /°F |
SETTING THE OPERATING TEMPERATURE
- Press and hold the SET button for 6 seconds. The „E1“ parameter is displayed.
- Press the or buttons until the required value is displayed.
- Press the SET button to store the new value and cycle to next parameter.

NOTE: The controller times out after 10 seconds if no buttons are pressed
MANUAL DEFROST
Press and hold the button for 6 seconds to begin automatic defrost. The defrost light illuminates.
CLEANING, CARE & MAINTENANCE
- Switch off and disconnect from the power supply before cleaning
- The doors can be removed for ease of cleaning
- Clean the interior of the appliance as often as possible
- Do not use abrasive cleaning agents. These can leave harmful residues
- Clean the door seal with water only
- Always wipe dry after cleaning
- Do not allow water used in cleaning to run through the drain hole into the evaporation pan
REPLACING THE INTERIOR LAMP
Call your dealer or a qualified electrician, the Lamp Assembly is available to purchase as a spare part.
CLEANING THE CONDenser
Periodic cleaning of the Condenser can extend the life of the appliance, recommend that a agent.
TROUBLESHOOTING
If your appliance develops a fault, please check the following table before making a call to the helpline.
| FAULTPROBABLE | CAUSE ACTION REQUIRED | |
| The appliance is not working | The unit is not switched on | Check the unit is plugged in correctly and switched on |
| Plug and lead are damaged Call or qualified technician | ||
| Fuse in the plug has blown Replace the fuse | ||
| Power supply Check power supply | ||
| Internal wiring fault Call or qualified technician | ||
| The appliance turns on, but the temperature is too high/low | Too much ice on the condenser Defrost the appliance | |
| Condenser blocked with dust Call or qualified technician | ||
| Doors are not shut properly | Check doors are shut and seals are not damaged | |
| Appliance is located near a heat source, in the direct sunlight or air flow to the condenser is being interrupted | Move the refrigerator to a more suitable location | |
| Ambient temperature is too high | Increase ventilation or move appliance to a cooler position | |
| Unsuitable foodstuffs are being stored in the appliance | Remove any excessive hot foodstuffs or blockages to fan | |
| Appliance is overloaded | Reduce the amount of food stored in the appliance | |
| Factory default parameters adjusted Call or qualified technician | ||
| The appliance is leaking water | The appliance is not properly levelled | Adjust the screw feet to level the appliance (if applicable) |
| The appliance is unusually loud | Loose screw/nut Check and tighten all nuts and screws | |
| The appliance has not been installed in a level or stable position | Check installation position and change if necessary | |
| The display lamp does not illuminate | Lamp needs replacing Call or qualified technician | |
| Light not turned On | Ensure Light button has been pressed properly | |
| Door does not shut Dirt/oBSTacle in runners | Clean runners | |
TECHNICAL SPECIFICATIONS
| Model Voltage Power Range litres Refrigerant H x W x D (mm) kg | |||||||
| Lisette 100 23 | 0 V / 50 Hz 160 | W 2 °C to 8 °C | 85 R600a / 45g | 695 x 46 | 2 x 670 57 | ||
| Lisette 120 | 230 V / 50 Hz | 160 W | 2 °C to 8 °C | 115 | R600a / 60g | 695 x 580x 670 | 70 |
| Lisette 160 | 230 V / 50 Hz | 200 W | 2 °C to 8 °C | 146 | R600a / 60g | 873 x 580 x 670 | 75 |
| SC 78 | 230 V / 50 Hz | 160 W | 3 °C to 8 °C | 77 | R600a / 41g | 428 x 386 x 1000 | 36 |
| SC 280 | 230 V / 50 Hz | 280 W | 3 °C to 8 °C | 217 | R600a / 110g | 515 x 485 x 1842 | 107 |
ELECTRICAL WIRING
This appliance is supplied with a 3 pin, moulded, BS1363 plug and lead, with a 13 amp fuse as standard
The plug is to be connected to a suitable mains socket
The appliance is wired as follows:
Live wire (coloured brown) to terminal marked L
Neutral wire (coloured blue) to terminal marked N
Earth wire (coloured green/yellow) to terminal marked E
Electrical isolation points must be kept clear of any obstructions. In the event of any emergency disconnection being required they must be readily accessible.
PACKAGING DISPOSAL

Please separate the packaging materials accordingly and return them to the responsible collection points for recycling and environmental housing.
DEVICE DISPOSAL
Once the appliance has been used up, dispose of it properly at a collection point for electrical appliances. Electrical appliances do not belong in household waste.
Your responsible administration will inform you about the addresses and opening hours of collection points. This is the only way to ensure that old appliances are properly disposed of and recycled. Thank you very much!
COMPLIANCE
Parts have undergone strict product testing in order to comply with regulatory standards and specifications set by international, independent and federal authorities. Products have been approved to carry the following symbol: