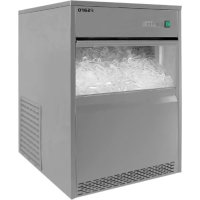
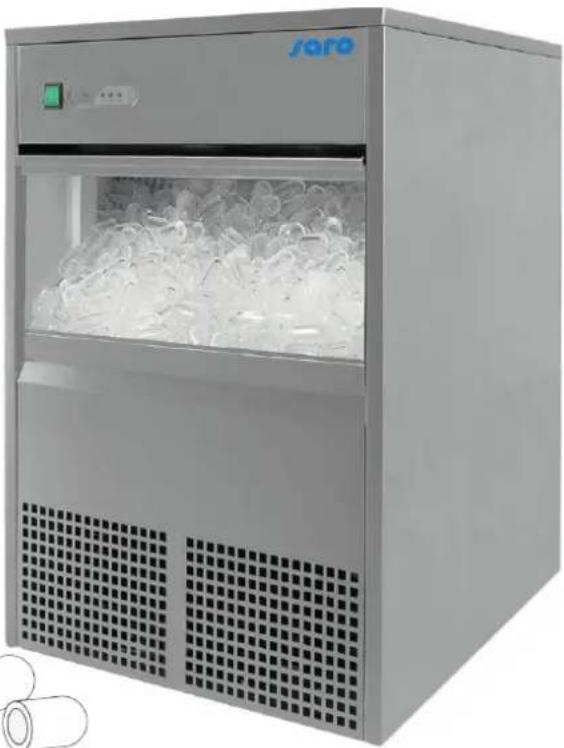
EB 40 - Ice Maker Saro - Free user manual and instructions
Find the device manual for free EB 40 Saro in PDF.
User questions about EB 40 Saro
0 question about this device. Answer the ones you know or ask your own.
Ask a new question about this device
Download the instructions for your Ice Maker in PDF format for free! Find your manual EB 40 - Saro and take your electronic device back in hand. On this page are published all the documents necessary for the use of your device. EB 40 by Saro.
USER MANUAL EB 40 Saro
natural_image
Exterior view of a modern stainless steel laboratory appliance with glass doors and ventilation grilles (no visible text or symbols)EB 26
natural_image
Exterior view of a modern stainless steel laboratory appliance with glass doors and ventilation grilles (no visible text or symbols)EB 40
English Translation of the original
Deutsch - Original
INHALT / LANGUAGE / LANGUE
Instruction manual Ice cube maker english 17
WARNUNG: GEFAHR DURCH ELEKTRISCHEN STROM!
WARNUNG: GEFAHR DURCH ELEKTRISCHEN STROM!
text_image
Technical diagram of a laboratory oven with numbered components and internal structure, likely for engineering or laboratory purposes.text_image
Exploded view diagram of a refrigerator with numbered parts for identificationWARNUNG: GEFAHR DURCH ELEKTRISCHEN STROM!
thank you for choosing our ice cube maker. We hope you will enjoy our advanced product.
The ice cube makers of the „EB“ series have features that support you in your daily work routine and at the same time protect the environment.
The use of our new innovative technology guarantees a long service life and significantly reduces the noise level.
The hollow cones produced promise a great advantage, as these hollow ice cones can be used in mixers without overloading the knives. In addition, all ice cube makers have a water recycling system that saves up to 80% water compared to other appliances without a recycling system.
An insulated reservoir ensures that the hollow cones are retained for a long time. This reduces energy consumption. Any condensation that occurs is automatically removed.
Due to the compact design and the retractable removal flaps, the units can also be installed in a small space and the high-quality stainless steel housing enables easy cleaning.
In all ice cube makers we use the refrigerant R 600a or R 290, which makes them environmentally friendly and HFC-free.
The ice cube makers are used for commercial use in hotels, restaurants, canteens, bars, etc.
Saro does not warrant that the equipment will be used for any purpose other than that for which it is intended.
We hope you enjoy your new SARO ice cube maker!
CONTENT
Introduction....19
Delivery Package 19
Standards and directives ...... 19
Model overview / Technical data 20
Important notice 20
Explanation of symbols 20
Safety notices....21
Safety notices....22
General information 23
Installation, start-up and operation....24
Warning 25
Unpacking....26
Structure 26
Affiliation....26
Circuit diagrams 27
Device parts 28
Exploded drawing 29
Exploded drawing with legend 30
Cleaning....31
Troubleshooting and solutions 32
Packaging Disposal 33
Disposal 33
INTRODUCTION
Before commissioning this device, read these operating instructions carefully and carefully and observe the information given therein.
This manual contains information on the structure, installation, operation, maintenance, cleaning and possible disposal of this unit.
This instruction manual is an integral part of the unit and should be kept in the vicinity of the unit at all times, accessible to all persons involved in the installation, operation, cleaning or maintenance of this unit.
If the device is passed on to third parties, these operating instructions must be included.
Illustrations in this manual may differ from the original article. We reserve the right to make technical changes to the device.
If these operating instructions are not observed, the safety of the device is no longer guaranteed. The manufacturer/dealer cannot be held responsible for damage caused by the manufacturer/dealer. Failure to observe these operating instructions will result.
Attention! This ice cube maker was developed and built for commercial use. It is only intended to produce the ice-cream body.
DELIVERY PACKAGE
• 1 Professional ice cube maker
• 1 instruction manual
• 1 Hose for fixed water connection (3/4 Zoll)
• 1 Drain hose (1/2 Zoll)
STANDARDS AND DIRECTIVES
The device complies with current EU standards and directives.
If necessary, we will send you the corresponding declaration of conformity.
MODEL OVERVIEW / TECHNICAL DATA
| MODELL EB 26 EB 40 | ||
| Order No. 325-1005 325-1010 | ||
| Dimension B 420 x T 528 x H 655 B | 496 x T 610 x H 792 | |
| Connection (V / Hz / kW) 230 / 1 / 0,16 220 / 1 / 0,26 | ||
| Weight 32 kg 45 kg | ||
| Refrigerant R 600a | R 290 | |
| Air cooling | yes | yes |
| Ice production | 26 kg / 24 h | 40 - 50 kg / 24 h |
| Reservoir | 6 kg | 10 kg |
| Drain hose | 1/2 Zoll | 1/2 Zoll |
| Fixed water connection | 3/4 Zoll | 3/4 Zoll |
| Ice cone size (ø ; mm) | ca. ø 28 x H 40 mm | ca. ø 28 x H 40 mm |
| Ice cone sizes adjustable | no | no |
| Noise emission | ca. 55 db | ca. 55 db |
| Circulation system | yes | yes |
| Body | stainless steel | stainless steel |
| 4 height-adjustable feet | yes | yes |
IMPORTANT NOTICE
The safety instructions in this instruction manual are marked with appropriate symbols. These indicate possible dangers. The accompanying information must be read and observed!
EXPLANATION OF SYMBOLS

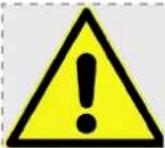
WARNING!
This symbol indicates dangers that may cause injury.
It is imperative that you strictly adhere to the information on occupational safety and be particularly careful in these cases.
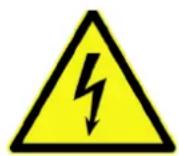
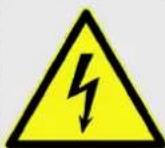
WARNING: DANGER FROM ELECTRICAL CURRENT!
This symbol draws attention to dangerous situations caused by electrical current. Failure to observe the safety instructions may result in injury or death!
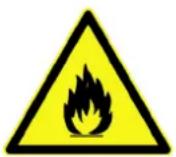
WARNING: FIRE HAZARDOUS MATERIALS - DANGER OF BURNING!
This symbol indicates that there are dangers due to flammable substances for the life and health of persons. Risk of burns in case of Disregard!!
SAFETY NOTICES
- Before the first start-up, read these operating instructions carefully and observe the information given therein.
- Incorrect operation and improper handling can lead to malfunctions on the device and injury to the user.
- Observe the accident prevention regulations applicable to the area of application and the general safety regulations.
- Ensure a safe stand on a dry, non-slip surface that is adequate to the weight of the equipment. If the ground is not stable enough, the unit may tip over and cause injury.
- Do not place the device on a hot surface and keep away from any heat source and direct sunlight.
• The ice cube maker may only be transported upright. - Do not tilt the unit by more than 45 degrees.
- Do not move the device during use.
• Before moving the unit, unplug the power cord.
• Make sure that the device does not tip when moving. This could lead to injuries - Keep packaging materials (plastic film) out of the reach of children.
- The unit may only be connected to a properly installed power outlet.
- Do not plug any other device into the same outlet. Make sure that the wall socket is plugged in.
- is generally accessible so that the device can be disconnected from the power supply in an emergency.
- Do not use ice cubes produced in the first 2 hours.
• After longer transport, the unit should not be put back into operation until after 24 hours. - Do not let the power cord hang over sharp edges and keep it away from hot spots, objects and open flames.
- When unplugging the power cord, always pull the plug housing and never the cable. Turn off the device before starting.
- Make sure that unintentional pulling on the cable or tripping over it is not possible.
- Do not damage or modify the power cord, pull, strain, bend or squeeze it, twist or roll it up.
- Do not clean the unit with an open water jet.
- The unit must not be immersed in water or other liquids or wetted with liquids.
- Do not place heavy objects or objects filled with liquids on the unit. Things could fall down and cause injury. Liquids could be spilled, in the inside of the device and transmit electricity.
- Only use the original parts provided for this purpose when operating the unit.
- Never touch the device, cable or plug with wet hands.
SAFETY NOTICES
- No operation of the equipment by children or persons with impaired physical, sensory or mental abilities; or lack of experience and/or knowledge. These persons are not able to recognize the dangers of using electrical appliances and/or devices that generate heat and may cause accidents, fire or damage to property.
- Disconnect the plug from the power outlet before cleaning, or disconnect the unit from the power supply; this also applies if the unit is not used for a longer period of time.
- In the event of a fault or malfunction, turn off the unit and unplug the power cord. Notify your dealer. He will carry out the repair with original spare parts.
- Refrigeration maintenance may only be carried out by qualified personnel.
- Never hang yourself from the door of the device and never climb onto it. The unit may tip over and be damaged or cause injury.
- The amount of refrigerant contained in this unit is given in grams; it is also indicated on the type plate of the unit.
- After a possible power failure or a short disconnection, switch off the device for a short time, wait 5 minutes, plug the plug in again and start the device.
- A damaged device must not be used!

Do not use any corrosive or abrasive cleaning agents! Do not use alcohol or alkaline detergents, thinners or benzene. This could damage the plastic parts or painted surfaces!
Never use hot water to clean the unit!
After delivery or transport of the device, do not connect it until the device has been idle for at least 24 hours. This is absolutely necessary so that the coolant can collect in the compressor.

After a power failure or if the device has been disconnected from the power supply, wait at least 5 minutes before reconnecting and starting up the device!
If the unit is restarted immediately after it has been switched off, the fuse may trip and interrupt the current flow. In addition, the compressor may be overloaded and damaged.
GENERAL INFORMATION
- Before the first start-up, read these operating instructions carefully and observe the information given therein.
- Keep these operating instructions within easy reach, near the device.
- The manufacturer/dealer cannot be held responsible for damage caused by non-observance of these operating instructions.
- If these operating instructions are not observed, the safety of the device is no longer guaranteed. If the device is passed on to third parties, these operating instructions must be supplied with the device.
- This equipment must not be operated by children or persons with reduced physical, sensory or mental abilities, as they cannot recognize the dangers of using electrical appliances and/or refrigerators and as accidents, fires, explosions or damage to property may occur.
- Do not use the device outdoors in rain or in wet rooms.
• After unpacking the device, make sure that everything is in perfect condition. If you discover any damage, do not connect the device but contact your dealer. - Check that all components listed in the scope of delivery are present. If this is not the case, contact your dealer.
- Keep the unit's packaging. The device can only be transported safely in its original packaging.
- Please note that all components of the packaging (plastic bags, cardboard, polystyrene parts, etc.) may endanger children and must therefore not be stored near them.
- If it is not possible to store the packaging, separate the various packaging materials and return them to the nearest collection point for proper disposal.
- Place the unit in a dry and adequately ventilated place.
- Ensure a distance of at least 15 cm between the back of the ice cube maker and the wall. Otherwise, the desired cooling capacity can no longer be guaranteed.
- Do not place the unit near heat sources such as heating, stove, oven or open fire or in direct sunlight as the desired cooling capacity can no longer be guaranteed.
• The ventilation slots must always be kept clear and must not be covered or closed. - Before connecting the device to the power supply and putting it into operation, clean the device thoroughly.
- Do not drill or pierce holes in the inside or outside of the unit. The cooling circuit could be damaged.
• The ice cube container is foamed in and thus well insulated. This reduces melting of the ice cubes. - The device is neither suitable nor intended for the storage of medicines or highly inflammable, flammable or explosive substances.
- Subject to technical modifications and errors excepted.
INSTALLATION, START-UP AND OPERATION
- Unpack the package and take out the attached documents and spare parts such as the water inlet and outlet tubes, ice shovel etc.
- The ice cube machine should be positioned in a well ventilated area on a horizontal and stable ground.
- Make sure that the appliance is positioned not near to gas or electricity ovens or other sources of warmth and it must not come into contact with splash-water.
- Always leave at least 150 mm space on each side, so that the air can circulate well. Do not block the ventilation slots.
- Please adjust the feet, so that the ice cube machine stands absolutely level.
- It has to be a downward gradient from the appliance to the discharge, because the ice cube machine has no sewage pump. Therefore the drain hose should run below the appliance-lower-edge, so that the water can run out without any problem.
- Connect one end of the flexible plastic tube (included in the supply) with the water drain on the back side of the machine. The other tube end should be put into a tank (not included) for surplus water or into sewer.
- Connect one end of the inlet hose with the tap and the other end with the machine. In any case use at both connections the attached seals.
- Put the plug into a grounded plug socket and switch on the machine with the switch. In the first 3 minutes an automatic test run is done. Afterwards the machine starts the actual cool and production procedure. All production steps (water supply, ice preparing, ice cube production and keeping ice available) are continuously tested. If the ice storage container is full, the control lamp "ICE FULL" lights up and the ice cube production will be stopped automatically.
WARNING

WARNING: DANGER OF INJURY!
- Never try to place your fingers, chopsticks, screwdrivers or other thin objects between the bars of the cold air blower. Behind the protective grille, a fan rotates at high speed. There is a risk of injury, electric shock and damage to or malfunction of the unit.
WARNING: DANGER FROM ELECTRICAL CURRENT!
- Before connecting the device to the mains, check that the type of current and the mains voltage comply with the information on the nameplate of the device.
- Make sure that the power cord is free of damage, a damaged cord must be replaced by a qualified professional.
- EA damaged device must not be used! In this case, disconnect the device from the power supply and contact your dealer
- Do not use adapters or extension cables
- The device is under power as long as it is connected to the mains.
- The unit does not have a power switch. Before the unit can be cleaned, the mains plug must first be disconnected!
- The device is intended for indoor use. Use outdoors, in rain, can lead to short circuits, leakage current or electric shocks.
- If the unit has become wet, unplug it from the mains immediately and have it checked by a specialist before the next start-up. Danger of electric shock!
- Never attempt to open or repair the device yourself. Danger of electric shock!
WARNING: INJURY DANGER!
- Packaging materials such as foils, polystyrene or small parts of the transport safety device can be dangerous for children! There is a risk of injury or suffocation!
- Keep packaging material away from children at all times.
UNPACKING
Make sure that the packaging is undamaged. The device as well as the accessories are protected and / or fixed for transport. After opening the packaging, remove the packaging material and any transport securing devices in the form of adhesive tapes or cable ties.
Then check that the delivery is complete and make sure that neither the unit nor the accessories are damaged.
Keep the unit's packaging. The device can only be transported safely in its original packaging. If it is not possible to store the packaging, separate the various packaging materials and return them to the nearest collection point for proper disposal.
Although the device has been cleaned from the inside before it was shipped, it is still necessary to clean the interior before filling it with merchandise.
STRUCTURE
Place the unit in a dry and adequately ventilated room. Ensure that you stand securely on a dry and non-slip surface.
Place the unit with the rear side at least 10 cm away from the wall to ensure sufficient air circulation at all times. There should be at least 30 cm of space above the unit; 2 cm to the sides.
Performance and power consumption may be affected by ambient temperature or direct sunlight. Do not expose the unit to direct sunlight and do not place it near a stove, radiator or other heat source.
Ensure that the mains plug is always freely accessible and can be disconnected from the mains without any problems.
Set up the shelves of the appliance so that the distances correspond to the height of your goods.
Please wait 24 hours before switching on the device. During this time, we recommend that you leave the door open to remove any residual odours.
AFFILIATION
Connect the unit only to a grounding socket outlet with an earthing and a 230 volt connection.
Before connecting the device, make sure that the voltage and frequency of the power supply correspond to the information on the nameplate! Other voltages can lead to overheating of the device!
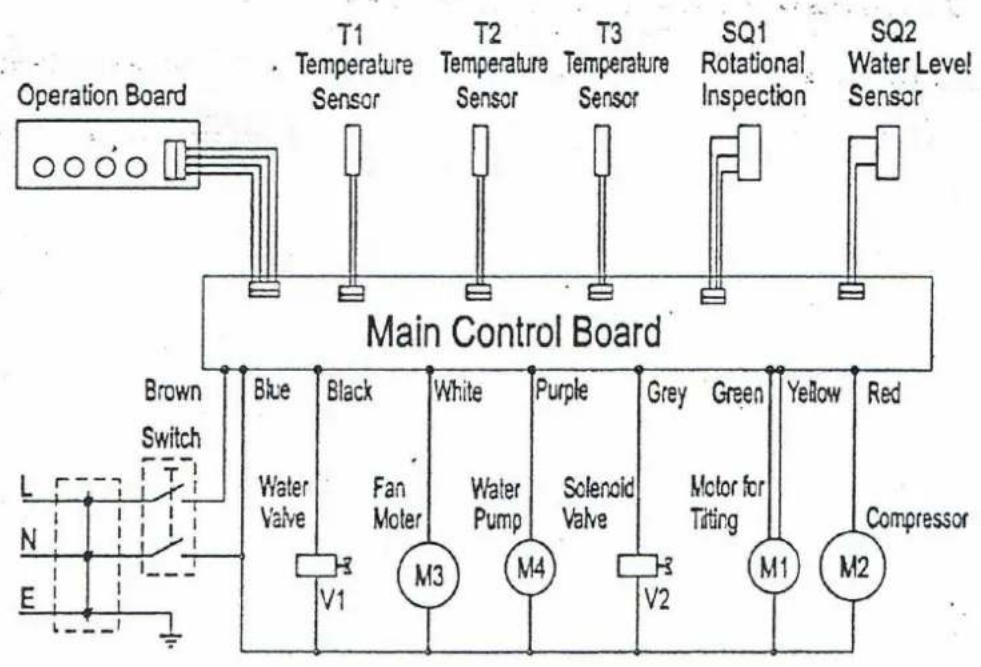
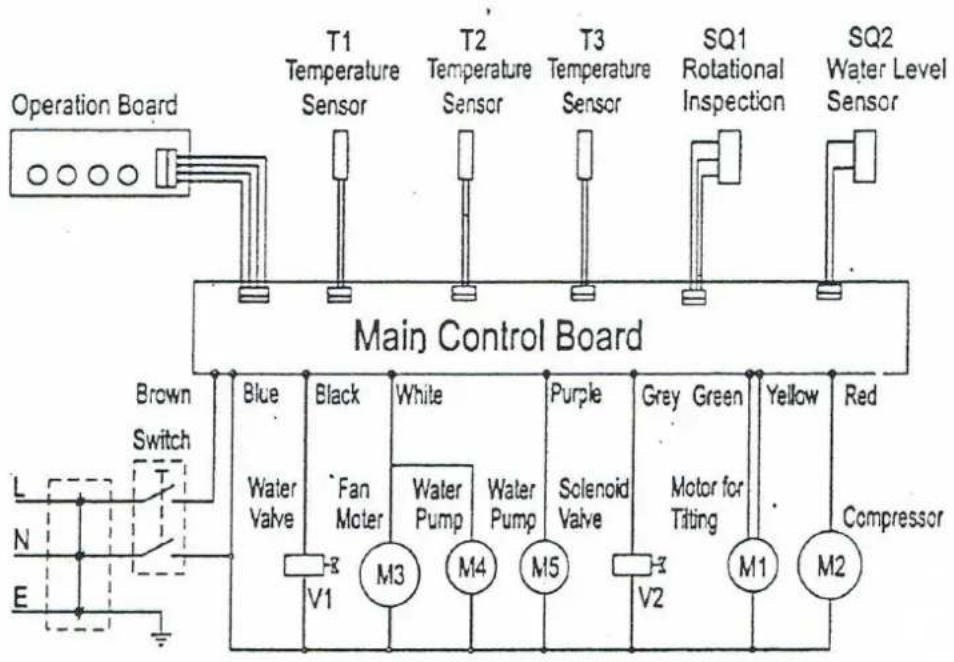
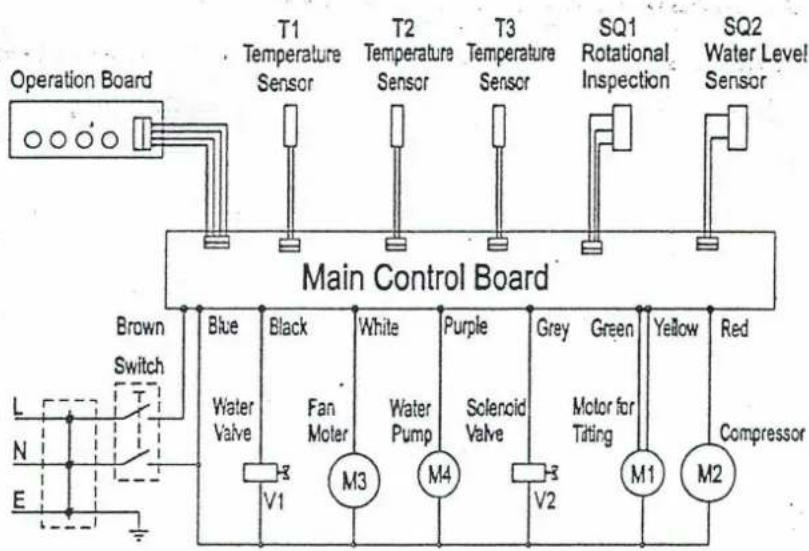
CIRCUIT DIAGRAMS
MODEL EB 26
flowchart
graph TD
    A["Operation Board"] --> B["Main Control Board"]
    B --> C["T1 Temperature Sensor"]
    B --> D["T2 Temperature Sensor"]
    B --> E["T3 Temperature Sensor"]
    B --> F["SQ1 Rotational Inspection"]
    B --> G["SQ2 Water Level Sensor"]
    H["L N E"] --> I["Brown Switch"]
    I --> J["Blue Water Valve"]
    I --> K["Black Fan Moter"]
    I --> L["White Water Pump"]
    I --> M["Purple Solenoid Valve"]
    I --> N["Grey Motor for Titing"]
    I --> O["Green Yellow Compressor"]
    P["V1"] --> Q["M3"]
    R["V2"] --> S["M4"]
    T["V3"] --> U["M1"]
    V["V4"] --> W["M2"]
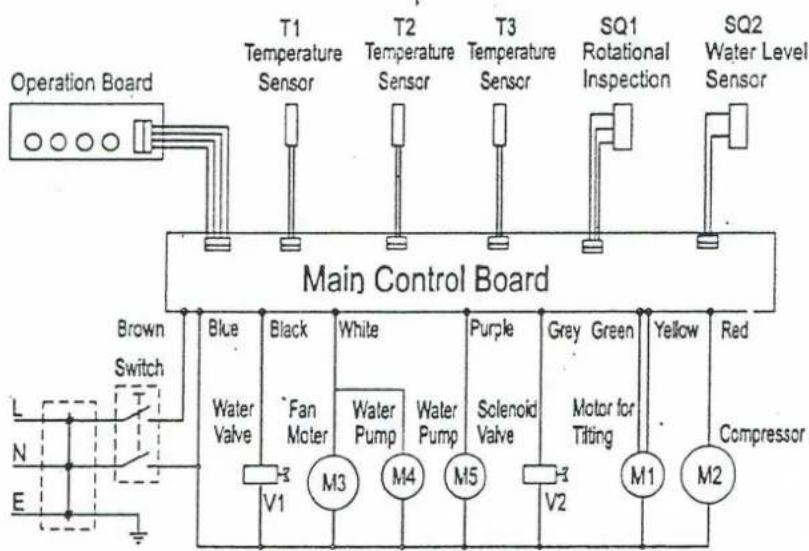
MODEL EB 40
flowchart
graph TD
    A["Operation Board"] --> B["Main Control Board"]
    B --> C["T1 Temperature Sensor"]
    B --> D["T2 Temperature Sensor"]
    B --> E["T3 Temperature Sensor"]
    B --> F["SQ1 Rotational Inspection"]
    B --> G["SQ2 Water Level Sensor"]
    H["Brown Switch"] --> I["Blue Water Valve"]
    H --> J["Black Fan Molar"]
    H --> K["White Water Pump"]
    H --> L["Purple Solenoid Valve"]
    H --> M["Grey Green Motor for Titing"]
    H --> N["Yellow Compressor"]
    H --> O["Red Red"]
    P["L N E"] --> Q["V1"]
    P --> R["M3"]
    P --> S["M4"]
    P --> T["M5"]
    P --> U["V2"]
    P --> V["M1"]
    P --> W["M2"]
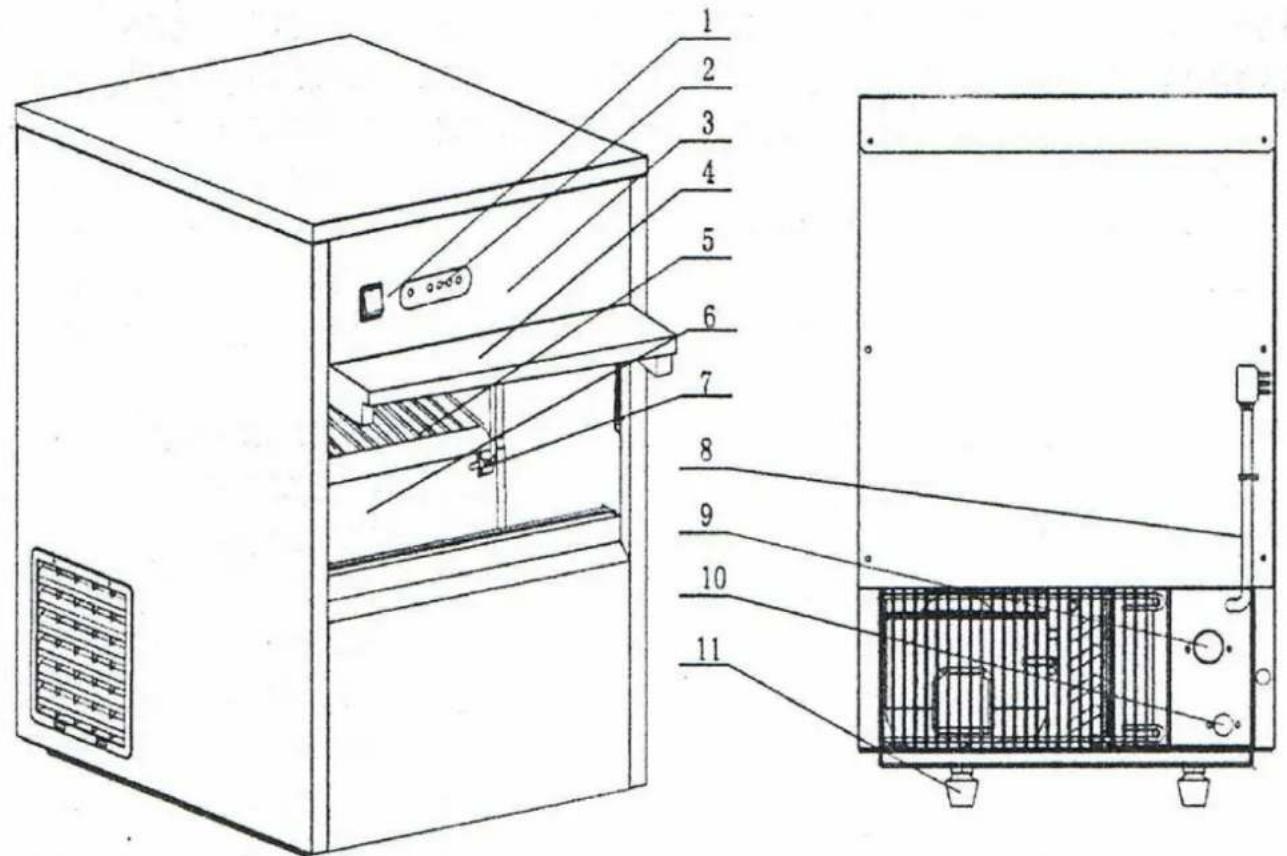
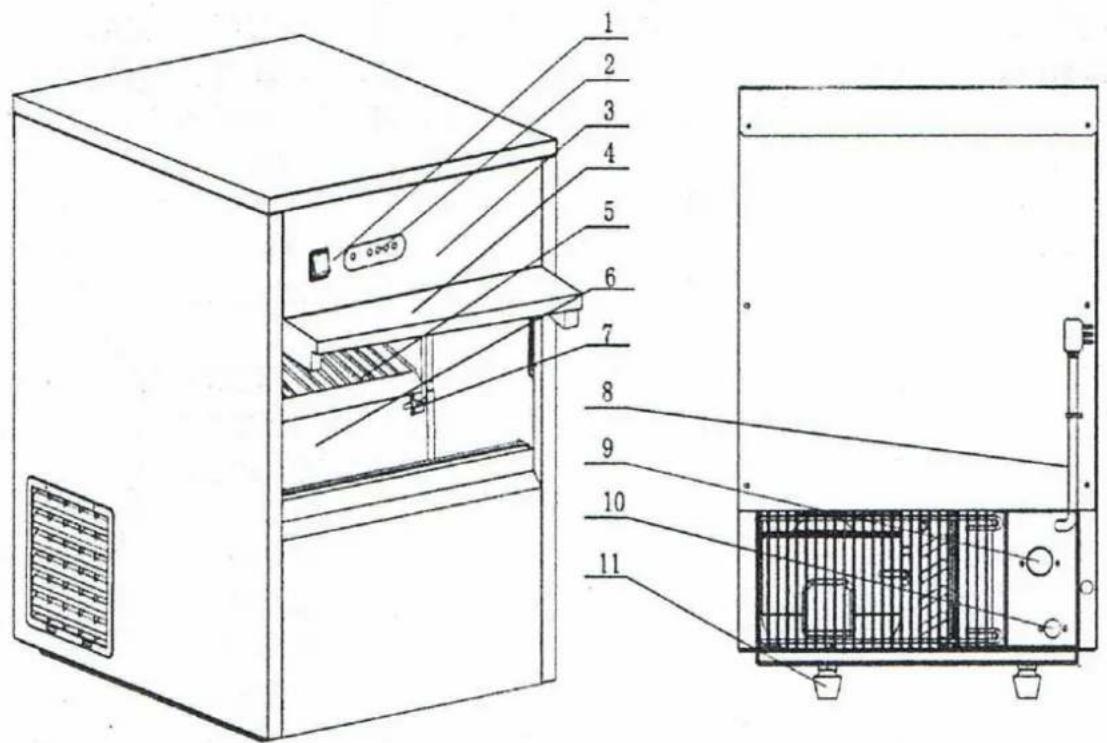
DEVICE PARTS
text_image
Technical diagram of a laboratory oven with numbered components and internal structure, including a side view of the interior.Ventilation slots at the front or on the side due to design.
1 Power Switch ON/OFF
2 Display panel
3 Front panel
4 Door
5 Ice bouncing shelf
6 Ice storage container
7 Ice lever sensor
8 Power cord
9 Water inlet valve
10 Drainage tube
11 Bottom foot
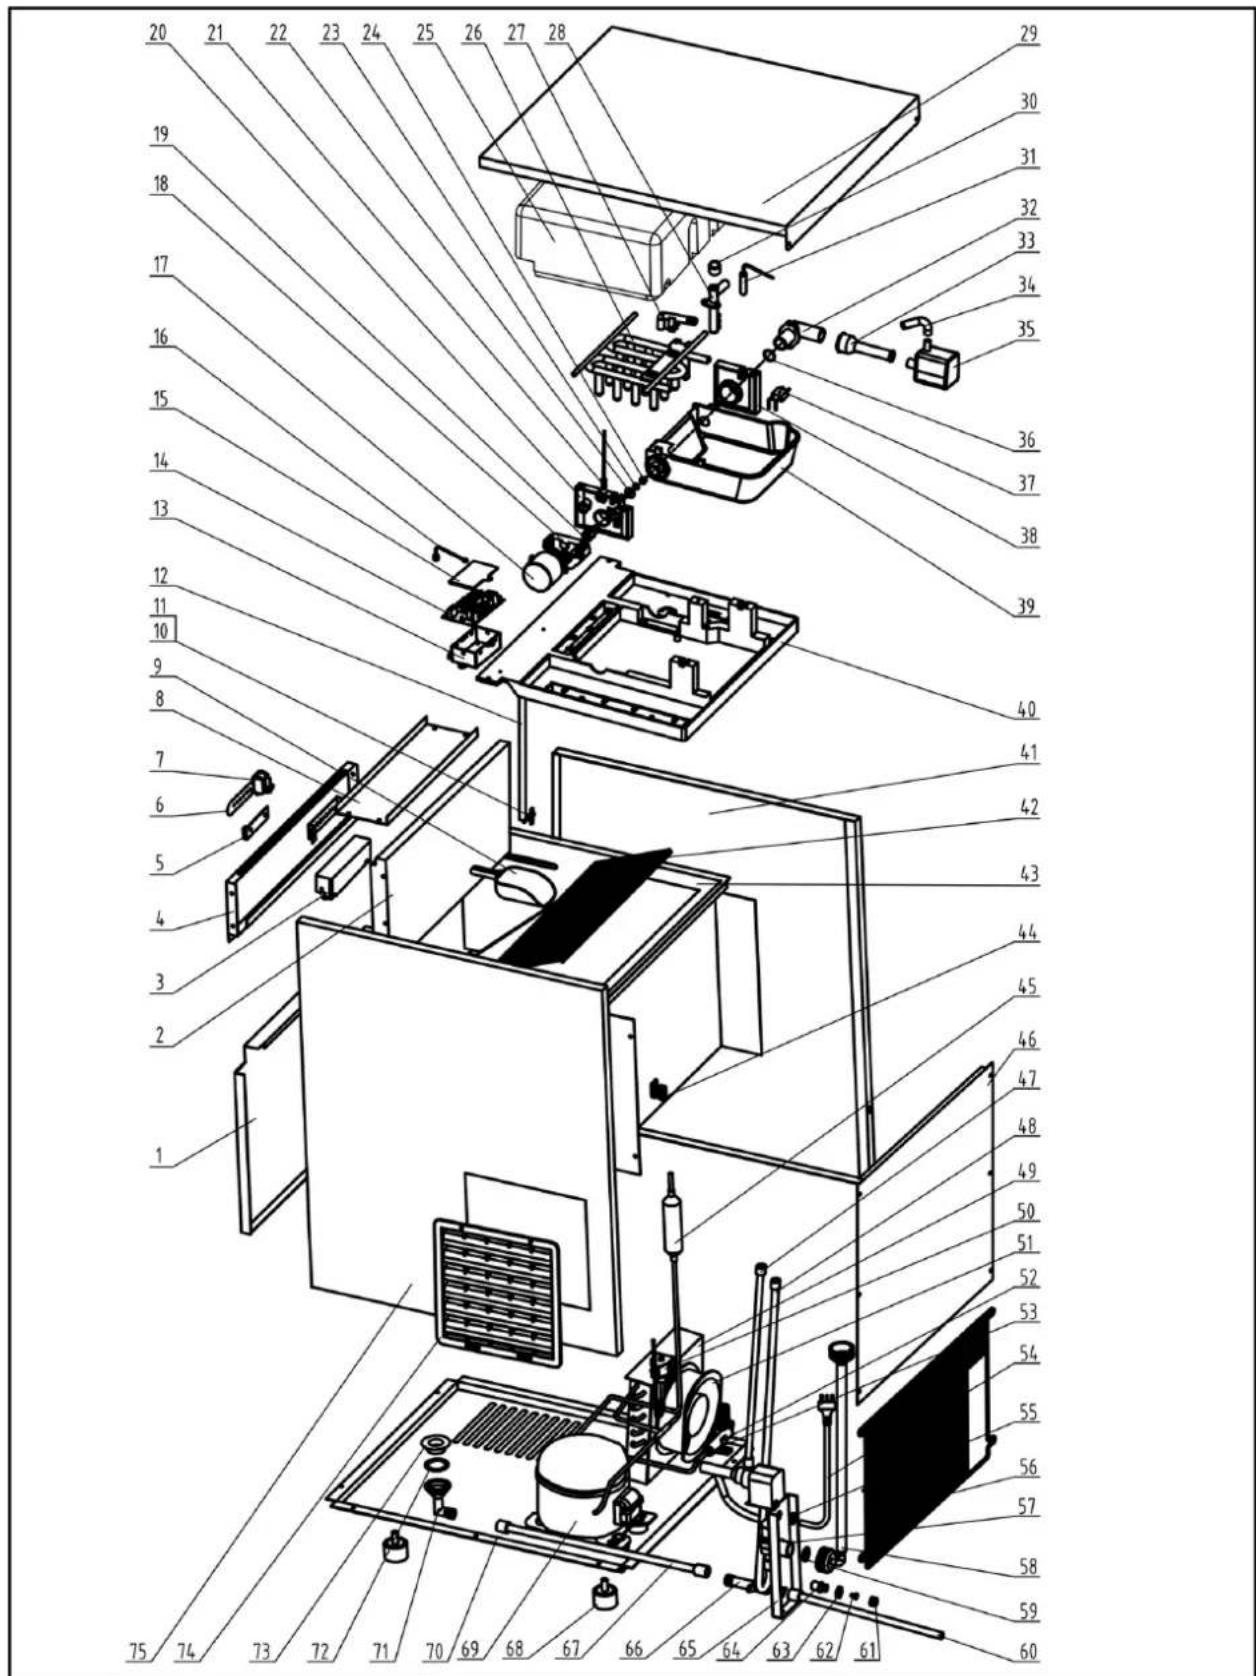
EXPLODED DRAWING
text_image
Exploded view diagram of a refrigerator with numbered parts for identificationEXPLODED DRAWING DESCRIPTION
| No. | Description No. Description | |||
| 1 down | panel 39 water box | |||
| 2 door | 40 up border plate | |||
| 3 covering for displays 41 left panel | ||||
| 4 upper panel 42 ice rack / shelf of ice-flipping | ||||
| 5 display panel 43 inner liner | ||||
| 6 operate board sticker 44 fixer for cable | ||||
| 7 switch 45 suction tube | ||||
| 8 up panel 46 back panel | ||||
| 9 ice scoop 47 cycle pipe | ||||
| 10 ice level sensor | 48 | injection | pipe | |
| 11 fixer of ice level sensor | 49 | condenser | ||
| 12 wiring pipe | 50 | magnetic | valve | |
| 13 box for main control board | 51 | fan | ||
| 14 main control board | 52 | support | for filter | |
| 15 cover of box for main control board | 53 | filter | ||
| 16 ambient temperature sensor | 54 | power cord | ||
| 17 turning motor | 55 | covering | for power cord | |
| 18 motor direction guide | 56 | metal grill | ||
| 19 motor connect axis | 57 | water inlet valve | ||
| 20 motor bracket | 58 | seal washer | for water inlet pipe | |
| 21 hall device | 59 | water inlet pipe | ||
| 22 plain washer | 60 | water outlet pipe | ||
| 23 spring washer | 61 | screw cap | for water inlet valve | |
| 24 block nut 62 T-plug | ||||
| 25 evaporator insulation | 63 | nut for water inlet valve | ||
| 26 evaporator | 64 | water outlet valve | ||
| 27 injection pipe connector | 65 | valve plate | ||
| 28 water spray head | 66 | silicia pipe | ||
| 29 top panel | 67 | ice outlet pipe | ||
| 30 water spray head cover | 68 | feet | ||
| 31 water temperatur sensor | 69 | compressor | ||
| 32 rinse pipe connector | 70 | compressor fixed board | ||
| 33 circulation water pipe | 71 | drainage | connector | |
| 34 rinse pipe for pump | 72 | seal washer | for drainage pipe | |
| 35 rinse pump | 73 | drainage | pipe warp | |
| 36 seal washer for rinse pipe connector | 74 | ventilation panel | ||
| 37 water level sensor | 75 | right panel | ||
| 38 evaporator bracket brig | ||||
CLEANING
To avoid the risk of electric shock or injury from the rotating fan, disconnect the unit from the power supply before cleaning. Do not start cleaning before the fan has come to a standstill!
WARNING: DANGER FROM ELECTRICAL CURRENT!
- The unit must be disconnected from the power supply before cleaning!
- Never use water directly or a water jet to clean the unit!
-
Never immerse the device, cable or plug in water!
-
Clean the exterior surfaces with a damp, warm rag and a commercial cleaning agent. Do not use aggressive detergents and under no circumstances steel wool or abrasive sponges. The appliance may not be hosed down with water.
- Clean the ice storage container with a clean rag. Before take out the ice cubes.
- Clean also from time to time the ventilation slots, because dust and dirt can block the slots. Remove for this the plastic cover from the left side of the appliance by loosening the two screws. With a soft brush or hand brush and a vacuum cleaner make everything clean there. On the right side of the appliance it is sufficient to wipe off the plastic cover.
- Check the connection points for the water inlet and outlet of the unit regularly.
-
the ice cube maker is to be taken out of operation for a longer period of time, then
-
turn it off
- remove the plug from the socket
- close the water supply
- clean the inside and outside of the unit.
- It is advisable to pour a descaler into the drains from time to time and let it work for about 20 minutes. After this time, open the rear drain screws to drain the water/lime mixture. Then rinse the drains with clear water and screw them back on again. For health reasons, do not use ice cubes produced in the first 4 to 5 cycles after decalcification.
• We recommend that you have the ice cube maker completely disinfected by your specialist dealer once a year or after every longer shutdown of the unit. The works include: Cleaning the condenser, cleaning the filter on the magnetic valve of the water supply and cleaning the ice tank, the water pan and the evaporator.
TROUBLE SHOOTING AND SOLUTIONS
| Errors Possible causes | Solutions | |
| The appliance does not work. | Problems with the main electricity connection.Ambient temperature is under 10°C. | Switch off and after 5 minutes restart.Restart, if the ambient temperature is higher. |
| Warning lamp for to less water lights up. | Water intake disturbedValve is damaged.Water pressure is too low. | Check the water intakeCheck valve, if necessary, let it exchange.The water pressure has to be at least 1 kg/cm2. |
| The condenser does not work. | Not enough water.Ice collector container is full. | Check the water supply.Empty the container. |
| The condenser works, but no ice cubes are produced. | Leak in the cooling system.Condenser dusty. | Kühlsystem vom Fachmann überprüfen lassen.Kondensator staubfrei machen,Lüftungsschlitze reinigen |
| The ice cubes do not fall at all or only partially into the container. | Ambient temperature or water temperature are to low.Valve is damaged. | Ambient temperature has to be at least 10°C and water temperature at least 7°C.Exchange the valve. |
| The ice cubes always stick together. | Storage tank is not sufficiently cooled. | Often emptying.Do not leave overnight in the storage tank.Control temperature. |
PACKAGING DISPOSAL

Please separate the packaging materials accordingly and return them to the responsible collection points for recycling and environmental housing.
DISPOSAL
Once the device has reached the end of its useful life, please dispose of it properly at a collection point for electrical appliances. Electrical appliances should not be disposed of with household waste.
Your responsible administration will inform you about the addresses and opening hours of collection points. This is the only way to ensure that old equipment is properly disposed of and recycled. Thank you very much!
CE
Cher client,
INSTALLATION, MISE EN SERVICE ET EXPLOITATION
Connect the unit only to a grounding socket outlet with an earthing and a 230 volt connection.
Before connecting the device, make sure that the voltage and frequency of the power supply correspond to the information on the nameplate! Other voltages can lead to overheating of the device!
SCHÉMA ÉLECTRIQUES
MODEL EB 26
flowchart
graph TD
    A["Operation Board"] --> B["Main Control Board"]
    B --> C["T1 Temperature Sensor"]
    B --> D["T2 Temperature Sensor"]
    B --> E["T3 Temperature Sensor"]
    B --> F["SQ1 Rotational Inspection"]
    B --> G["SQ2 Water Level Sensor"]
    H["Brown Switch"] --> I["L N E"]
    I --> J["Blue Water Valve"]
    I --> K["Black Fan Moter"]
    I --> L["White Water Pump"]
    I --> M["Purple Solenoid Valve"]
    I --> N["Grey Motor for Titing"]
    I --> O["Green Yellow Compressor"]
    I --> P["V1 V2"]
    Q["Motor for Titing"] --> R["M1"]
    Q --> S["M2"]
MODEL EB 40
flowchart
graph TD
    A["Operation Board"] --> B["Main Control Board"]
    B --> C["T1 Temperature Sensor"]
    B --> D["T2 Temperature Sensor"]
    B --> E["T3 Temperature Sensor"]
    B --> F["SQ1 Rotational Inspection"]
    B --> G["SQ2 Water Level Sensor"]
    H["Brown Switch"] --> I["L N E"]
    I --> J["Blue Water Valve"]
    I --> K["Black Fan Moter"]
    I --> L["White Water Pump"]
    I --> M["Purple Solenoid Valve"]
    I --> N["Grey Green Motor for Tiling"]
    I --> O["Yellow Compressor"]
    P["V1"] --> Q["M3"]
    P --> R["M4"]
    P --> S["M5"]
    P --> T["V2"]
    U["V2"] --> V["M1"]
    U --> W["M2"]
ÉLÉMENTS DU DISPOSITIF
text_image
Technical diagram of a laboratory oven with numbered components and internal structure, likely for assembly or labeling.text_image
Exploded view diagram of a refrigerator with numbered parts for identificationDESCRIPTION DE LA DESSIN EXPLOSÉ