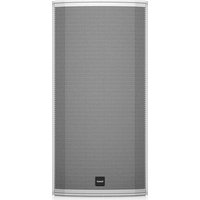
AMS 6ICT - Speaker TANNOY - Free user manual and instructions
Find the device manual for free AMS 6ICT TANNOY in PDF.
User questions about AMS 6ICT TANNOY
0 question about this device. Answer the ones you know or ask your own.
Ask a new question about this device
Download the instructions for your Speaker in PDF format for free! Find your manual AMS 6ICT - TANNOY and take your electronic device back in hand. On this page are published all the documents necessary for the use of your device. AMS 6ICT by TANNOY.
USER MANUAL AMS 6ICT TANNOY
natural_image
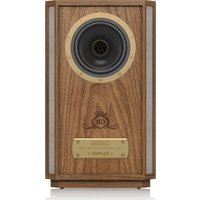
Three black TANOTI speakers with mesh backouts, displayed against a white background (no text or symbols visible on the devices themselves)AMS Series
AMS 8DC
8" Dual Concentric Surface-Mount Loudspeaker for Installation Applications
AMS 6DC, AMS 6ICT, AMS 6ICT LS
6" Dual Concentric/ICT Surface-Mount Loudspeaker for Installation
& Life Safety Installation Applications
AMS 5DC, AMS 5ICT, AMS 5ICT LS
5" Dual Concentric/ICT Surface-Mount Loudspeaker for Installation
& Life Safety Installation Applications
23Quick Start GuideAMS Series
EN

Important Safety Instructions
ES
Terminals marked with this symbol carry electrical current of sufficient magnitude to constitute risk of electric shock. Use only high-quality professional speaker cables with 14 " TS or twist-locking plugs pre-installed. All other installation or modification should be performed only by qualified personnel.
This symbol, wherever it appears, alerts you to the presence of uninsulated dangerous voltage inside the enclosure - voltage that may be sufficient to constitute a risk of shock.
This symbol, wherever it appears, alerts you to important operating and maintenance instructions in the accompanying literature. Please read the manual.
Caution To reduce the risk of electric shock, do not remove the top cover (or the rear section). No user serviceable parts inside. Refer servicing to qualified personnel.
Caution To reduce the risk of fire or electric shock, do not expose this appliance to rain and moisture. The apparatus shall not be exposed to dripping or splashing liquids and no objects filled with liquids, such as vases, shall be placed on the apparatus.
Caution These service instructions are for use by qualified service personnel only. To reduce the risk of electric shock do not perform any servicing other than that contained in the operation instructions. Repairs have to be performed by qualified service personnel.
- Read these instructions.
- Keep these instructions.
- Heed all warnings.
- Follow all instructions.
-
Do not use this apparatus
near water. -
Clean only with dry cloth.
-
Do not block any ventilation openings. Install in accordance with the manufacturer's instructions.
-
Do not install near any heat sources such as radiators, heat registers, stoves, or other apparatus (including amplifiers) that produce heat.
-
Do not defeat the safety purpose of the polarized or grounding-type plug. A polarized plug has two blades with one wider than the other. A grounding-type plug has two blades and a third grounding prong. The wide blade or the third prong are provided for your safety. If the provided plug does not fit into your outlet, consult an electrician for replacement of the obsolete outlet.
-
Protect the power cord from being walked on or pinched particularly at plugs, convenience receptacles, and the point where they exit from the apparatus.
-
Use only attachments/accessories specified by the manufacturer.

- Use only with the cart, stand, tripod, bracket, or table specified by the manufacturer, or sold with
the apparatus. When a cart is used, use caution when moving the cart/ apparatus combination to avoid injury from tip-over.
-
Unplug this apparatus during lightning storms or when unused for long periods of time.
-
Refer all servicing to qualified service personnel. Servicing is required when the apparatus has been damaged in any way, such as power supply cord or plug is damaged, liquid has been spilled or objects have fallen into the apparatus, the apparatus has been exposed to rain or moisture, does not operate normally, or has been dropped.
-
The apparatus shall be connected to a MAINS socket outlet with a protective earthing connection.
- Where the MAINS plug or an appliance coupler is used as the disconnect device, the disconnect device shall remain readily operable.

- Correct disposal of this product: This symbol indicates that this product must not be disposed of with ste, according to the
WEEE Directive (2012/19/EU) and your national law. This product should be taken to a collection center licensed for the recycling of waste electrical and electronic equipment (EEE). The mishandling of this type of waste could have a possible negative impact on the environment and human health due to potentially hazardous substances that are generally associated with EEE. At the same time, your cooperation in the correct disposal of this product will contribute to the efficient use of natural resources. For more information about where you can take your waste equipment for recycling, please contact your local city office, or your household waste collection service.
-
Do not install in a confined space, such as a book case or similar unit.
-
Do not place naked flame sources, such as lighted candles, on the apparatus.
-
Please keep the environmental aspects of battery disposal in mind. Batteries must be disposed-of at a battery collection point.
-
This apparatus may be used in tropical and moderate climates up to 45°C.
LEGAL DISCLAIMER
Music Tribe accepts no liability for any loss which may be suffered by any person who relies either wholly or in part upon any description, photograph, or statement contained herein. Technical specifications, appearances and other information
are subject to change without notice. All trademarks are the property of their respective owners. Midas, Klark Teknik, Lab Gruppen, Lake, Tannoy, Turbosound, TC Electronic, TC Helicon, Behringer, Bugera, Oberheim, Auratone, Aston Microphones and Coolaudio are trademarks or registered trademarks of Music Tribe Global Brands Ltd. © Music Tribe Global Brands Ltd. 2021 All rights reserved.
LIMITED WARRANTY
For the applicable warranty terms and conditions and additional information regarding Music Tribe's Limited Warranty, please see complete details online at musictribe.com/warranty.

45Quick Start GuideAMS Series

6 7 Quick Start GuideAMS Series

Achtung
Um eine Gefährdung
durch Feuer bzw.
BESCHRÄNKTE GARANTIE
8 9 Quick Start GuideAMS Series
12 13 Quick Start GuideAMS Series
FRISKRIVNINGSKLAUSUL
Thank you for purchasing this new AMS Series product. Designed for bath speech and music program material, the Tannoy AMS range provides exceptional sonic quality and long-term reliability in all surface mount applications. The AMS range offers five models: three featuring a new generation of Dual Concentric drivers and two with an improved version of Tannoy's ICT technology. All new drivers have 16 ohm nominal impedance for optimized use with Labgruppen amplifiers. Other features include IP65 rating for outdoor use, high-temperature molded cabinets and custom color options. All AMS loudspeakers include a built-in line transformer.
Because all AMS models are true point-source loudspeakers, they may be mounted horizontally or vertically without affecting performance. All models include a standard mounting yoke; a multi-angle VariBall accessory bracket is available as an option.
2. Safety Notices
Installation Safety Notice
-
The user is responsible for fixing the hardware to the surface to ensure safe operation. The fixings must support the weight of the product. Please consult the manual's specification page for the appropriate weights. Please consult the relevant construction codes in your region for further information on suitable hardware fixing methods.
-
Some regional construction codes require the use of a secondary method of securing loudspeakers to surfaces to provide security of a back-up support. A secondary support line should be attached from the safety loop on the rear of the product to a source point on the wall. Please consult the relevant construction codes in your region.
-
Tannoy will not be held accountable for any damage caused by incorrect installation.
Electrical Safety Notice: To comply with the standard UL1480, metal-clad flexible conduit (BX) is required for connection to the terminal block for proper earth grounding.
Safety Note: In order to comply with the relevant fire safety regulations (i.e. BS 5839:1998), it is required that in the event of fire, that failure of the circuit to which the loudspeaker is connected does not occur before evacuation of the building is complete. Suitable measures include:
- Use of terminal blocks (for connection to primary) with a melting point of not less than 650°C, for example constructed from ceramic materials;
- Use of terminal blocks of a lower melting point but protected with thermal insulation;
- Use of terminal blocks such that, on melting, an open-circuit or a short-circuit does not occur.
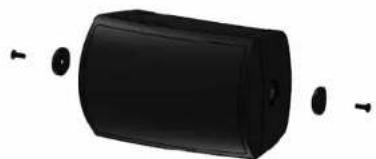
3. Unpacking
Every Tannoy product is carefully inspected before shipment. After unpacking, please inspect your product to ensure no damage has occurred in transit. In the unlikely event of damage, please notify your dealer and retain all shipping materials as your dealer may require return shipment.
4. Installation
Installation using included yoke bracket
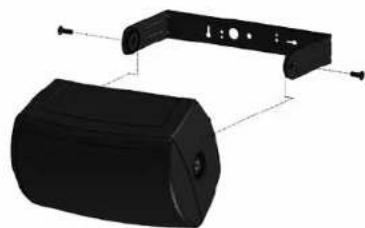
- Fix the yoke bracket to an appropriate structural surface using a suitable fixing method.
- Remove the yoke trims from the product to access the bracket fixing points.
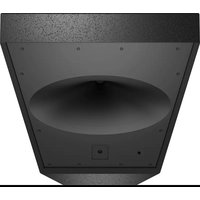
natural_image
3D rendering of a black cylindrical object with four small circular features, no text or symbols visible- Set the transformer tap as detailed in Chapter 5.
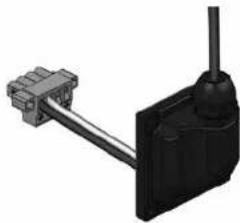
- For indoor installation (proceed to step 5 for outdoor installation): Connect the euro-style plug to the wires, observing correct polarity. Use pins 1(+) and 2(-) for connection of the loudspeaker. Use pins 3(-) and 4(+) for connection of additional loudspeakers in a distributed line. NOTE: Tighten pins 3 and 4 even if not used to prevent vibration of the screws.
- For outdoor installation: Feed the loudspeaker wire(s) through the opening in the neck of the cable entry cover included with the product.
Connect the euro-style plug to the wires, observing correct polarity. Use pins 1(+) and 2(-) for connection of the loudspeaker. Use pins 3(-) and 4(+) for connection of additional loudspeakers in a distributed line. NOTE: Tighten pins 3 and 4 even if not used to prevent vibration of the screws..
natural_image
3D rendering of a black mechanical component with attached wires and connectors (no text or symbols visible)- Place the loudspeaker inside the yoke bracket. Position buffers between bracket and loudspeaker as shown. Attach with supplied fixings using a 5 mm Allen key. Use the longer hex screws supplied when mounting the yoke bracket.
natural_image
3D rendering of a black cylindrical device with attached bracket and mounting points (no text or symbols)- Connect the euro plug to the loudspeaker. For outdoor installation, attach the cable entry cover using a 3 mm Allen key and the included screws. Orient the cover plate so that the neck opening is facing downward to minimise entry of moisture or particulates.
- Connect a secondary support line to the safety tab at the rear of the cabinet.
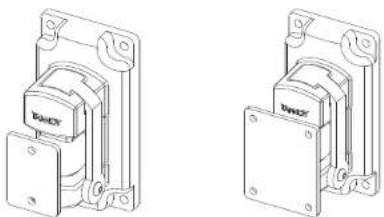
Optional multi-angle VariBall bracket
natural_image
Technical line drawings of two mechanical components with no visible text or symbolsAMS 5 Multi-Angle Bracket AMS 6 & 8 Multi-Angle Bracket
The optional multi-angle accessory bracket utilises a ball-in-socket design to enable free orientation of the loudspeaker at any angle on either the horizontal or vertical axis. If desired, the loudspeaker orientation can be easily changed within minutes. Download the AMS VariBall accessory bracket documentation for more details.
5. Setting transformer taps
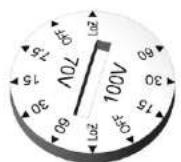
- The rotary transformer tapping switch is located directly above the wiring connector. CAUTION: THE LOUDSPEAKER IS SUPPLIED WITH THE TAP SWITCH IN LOW IMPEDANCE MODE. NEVER CONNECT THE LOUDSPEAKER TO A 70/100 V AMPLIFIER OUTPUT WHILE SWITCHED TO LOW IMPEDANCE MODE.
- Set the rotary switch to the appropriate position for low impedance operation or for use in 70/100 V distributed systems.2. Set the rotary switch to the appropriate position for low impedance operation or for use in 70/100 V distributed systems. Models with 5-inch drivers are fitted with 30 W transformers. In distributed line applications, the transformer can be tapped at 30 W, 15 W and 7.5 W, with an additional 3.75 W tap for 70 V line systems..
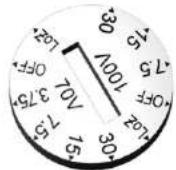
Models with 6-inch and 8-inch drivers are fitted with 60W transformers. In distributed line applications, the transformer can be tapped at 60 W, 30 W and 15 W, with an additional 7.5 W tap for 70 V line systems.
1. Introducción
natural_image
3D rendering of a black cylindrical object with four smaller circular features, shown from different angles (no text or symbols)natural_image
Mechanical assembly diagram showing a black connector with wires and a vertical shaft (no text or symbols)natural_image
3D rendering of a black cylindrical device with attached bracket and mounting holes (no text or symbols)natural_image
3D rendering of a black cylindrical object with four small circular features, shown in three stages (no text or symbols)natural_image
3D rendering of a black mechanical component with wires and connectors (no text or symbols visible)natural_image
3D rendering of a black cylindrical device with attached bracket and mounting points (no text or symbols)natural_image
3D rendering of a black cylindrical object with four smaller circular features, no text or symbols visible24 25 Quick Start GuideAMS Series
natural_image
3D rendering of a black mechanical component with attached wires and connectors (no text or symbols visible)natural_image
3D rendering of a black cylindrical device with attached bracket and mounting points (no text or symbols visible)natural_image
3D rendering of a black cylindrical object with four small circular features and two arrows pointing to it (no text or symbols)natural_image
3D rendering of a black mechanical component with attached wires (no text or symbols visible)natural_image
3D rendering of a black cylindrical device with attached bracket and mounting points (no text or symbols)28 29 Quick Start GuideAMS Series
Suporte VariBall multi-ângulo opcional

AMS 5 Multi-Angle Bracket AMS 6 & 8 Multi-Angle Bracket
natural_image
3D rendering of a black cylindrical object with four small circular features, shown from different angles (no text or symbols)natural_image
3D rendering of a black mechanical component with wires and connectors (no text or symbols visible)natural_image
3D rendering of a black cylindrical device with attached bracket and mounting points (no text or symbols)natural_image
Technical line drawings of two mechanical components with no visible text or symbolsAMS 5 Multi-Angle Bracket AMS 6 & 8 Multi-Angle Bracket
natural_image
3D rendering of a black cylindrical object with three small protrusions and a separate hole, shown without any text or symbols.natural_image
3D rendering of a black mechanical component with attached cable and connector (no text or symbols visible)natural_image
3D rendering of a black cylindrical device with attached bracket and mounting points (no text or symbols)natural_image
3D rendering of a black cylindrical object with four small circular features, shown from an angle to the right (no text or symbols)36
AMS Series
natural_image
3D rendering of a black electrical connector with wires and a vertical shaft (no text or symbols visible)natural_image
3D rendering of a black cylindrical device with attached bracket and mounting holes (no text or symbols)natural_image
Technical line drawings of two mechanical components with no visible text or symbolsAMS 5 Multi-Angle Bracket AMS 6 & 8 Multi-Angle Bracket
natural_image
3D rendering of a black cylindrical object with four small circular features, shown from different angles (no text or symbols)natural_image
3D rendering of a black electronic component with attached cable and connector (no text or symbols visible)natural_image
3D rendering of a black cylindrical device with attached bracket and mounting holes (no text or symbols)natural_image
Technical line drawings of two mechanical components with no visible text or symbolsAMS 5 Multi-Angle Bracket AMS 6 & 8 Multi-Angle Bracket
text_image
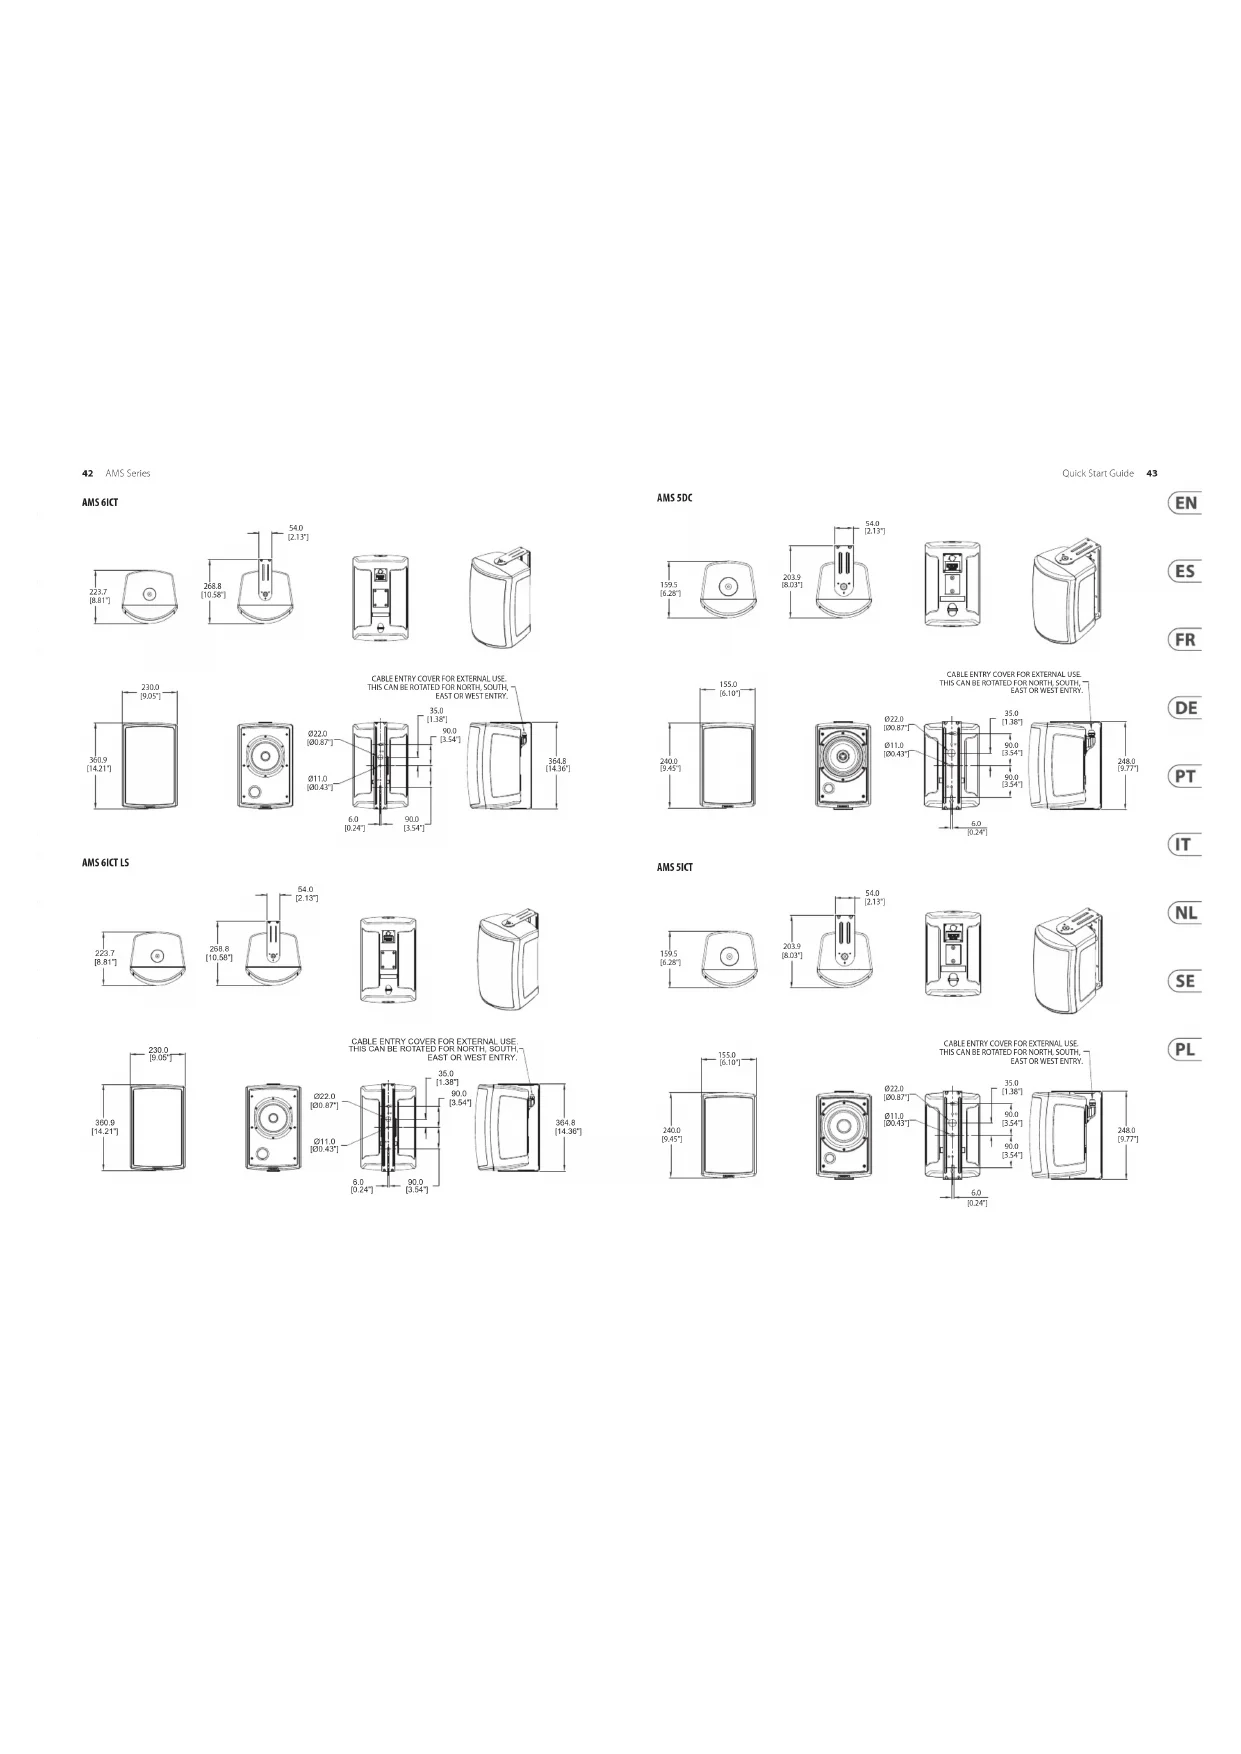
259.7 [10.22°] 306.3 [12.06°] 54.0 [2.13°] 260.0 [10.2°] 40.75 [16.04°] 272.0 [Ø0.87°] 251.0 [Ø0.43°] 6.0 [0.24°] 90.0 3.54° CABLE ENTRY COVER FOR EXTERNAL USE THIS CAN BE ROTATED FOR NORTH SOUTH- EAST OR WEST ENTRY. 35.0 [1.38°] 90.0 [3.54°] 409.8 [16.13°]AMS 6DC
text_image
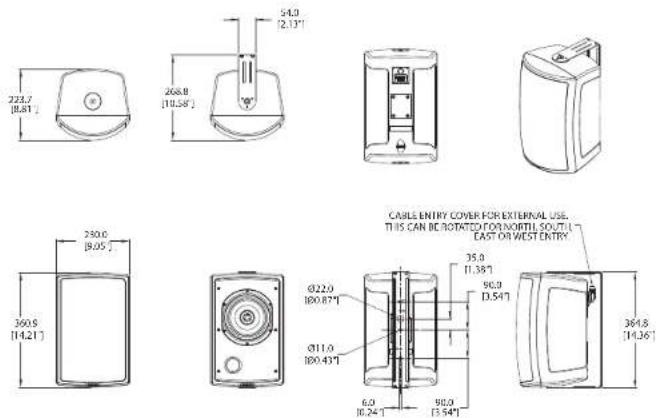
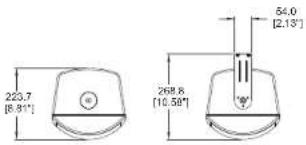
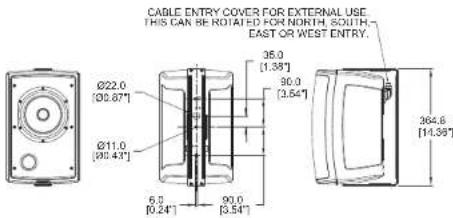
223.7 [8.81" 268.0 [10.58" 280.0 [9.05" 360.9 [14.21" CABLE ENTRY COVER FOR EXTERNAL USE. IT IS CAN BE ROTATED FOR NORTE SOLUTION. EAST OR WEST ENTRY Ø22.0 100.87" Ø11.0 100.43" 6.0 10.24" 95.0 [3.54"] 35.0 11.38" 96.0 D.54" 364.8 [14.36"AMS 6ICT
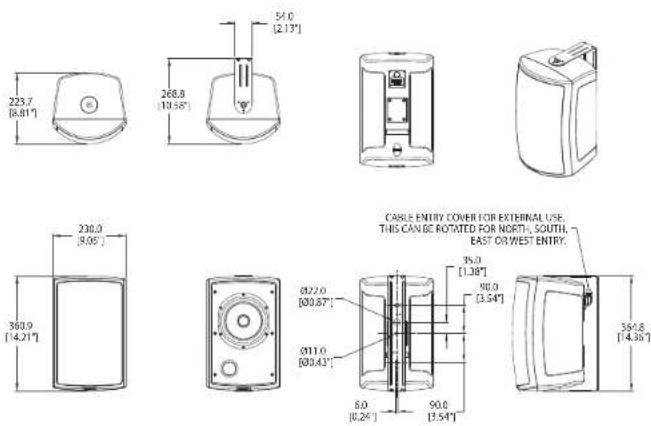
AMS 6ICT LS
text_image
223.7 [8.81°] 269.8 [10.58°] 54.0 [2.13°]
text_image
CABLE ENTRY COVER FOR EXTERNAL USE. THIS CAN BE ROTATED FOR NORTH SOUTH- EAST OR WEST ENTRY. Ø22.0 [90.67°] Ø11.0 [90.43°] 35.0 [1.38°] 90.0 [3.54°] 6.0 [0.24°] 90.0 [3.54°] 364.6 [14.38°]AMS 5DC
AMS 5ICT

AMS 5ICT LS
Specifications
| System | AMS 8DC |
| Performance | |
| Frequency response (-3 dB)1) | 65 Hz - 30 kHz |
| Frequency range (-10 dB)1) | 53 Hz - 40 kHz |
| System sensitivity (1 W @ 1m)1) | 92 dB (1 W = 4 V for 16 ohms) |
| Nominal Coverage Angle 90 degrees conical | |
| Power Handling1) | |
| Average 90 W | |
| Programme 180 W | |
| Peak 360 W | |
| Recommended Amplifier Power 180 W @ 16 ohms | |
| Nominal Impedance (Lo, Z) 16 ohms | |
| Rated Maximum SPL | |
| Average 111 dB | |
| Peak 117 dB | |
| Transformer Taps (via front rotary switch) | |
| 70 V 60 W / 30 W / 15 W / 7.5 W / OFF & Low impedance operation | |
| 100 V 60 W / 30 W / 15 W / OFF & Low impedance operation | |
| Transducers | |
| Dual Concentric point source driver | 1x 200 mm (8.00") Dual Concentric driver, using Omnimagnet technology |
| Low Frequency 44 mm (1.75") voice coil, treated multi fibre paper pulp cone | |
| High Frequency 25 mm (1.00") PEI dome | |
| Physical | |
| Enclosure | ABS |
| Grille | Steel, plated and painted |
| Connectors | Removable locking connector with screw terminals |
| Transformer setting | Rotary switch |
| Dimensions (H x W x D) | 409.8 x 260.0 x 306.3 mm (16.13 x 10.24 x 12.06") |
| Net Weight (ea) 7.8 kg (17.20 lbs) | |
| Shipped weight 8.8 kg (19.40 lbs) | |
| Included Accessories | Yoke bracket |
| Packed Quantity | 2 |
| System AMS 6DC AMS 6ICT AMS 6ICT LS | |||
| Performance | |||
| Frequency response(-3 dB)1) | 75 Hz - 30 kHz 75 Hz - 22 kHz 75 Hz - 30 kHz | ||
| Frequency range(-10 dB)2) | 55 Hz - 40 kHz 55 Hz - 30 kHz | ||
| System sensitivity(1 W @ 1m)2/2 | 89 dB (1 W = 4 V for 16 ohms) 90 dB (1 W = 4 V for 16 ohms) | ||
| Nominal Coverage Angle: 90 degrees conical | |||
| Power Handling3) | |||
| Average 80 W 60 W | |||
| Programme 160 W 120 W | |||
| Peak | 320 W 240 W | ||
| Recommended Amplifier Power | 160 W @ 16 ohms | 120 W @ 16 ohms | |
| Nominal Impedance (Lo, Z) | 16 ohms | ||
| Rated Maximum SPL | |||
| Average | 108 dB | ||
| Peak | 114 dB | ||
| Transformer Taps (via front rotary switch) | |||
| 70 V | 60 W / 30 W / 15 W / 7.5 W / OFF & Low impedance operation | ||
| 100 V | 60 W / 30 W / 15 W / OFF & Low impedance operation | ||
| Transducers | |||
| Dual Concentric point source driver | 1x 165 mm (6.50") DualConcentric driver, usingOmnimagnet technology | — | |
| Low Frequency | 44 mm (1.75") voice coil,treated multi fibre paperpulp cone | 1 x 165 mm (6.50") treated multi fibre paper pulp cone | |
| High Frequency | 25 mm (1.00") PEI dome | ICT | |
| Physical | |||
| Enclosure | ABS | ||
| Grille | Steel, plated and painted | ||
| Connectors | Removable locking connector with screw terminals | ||
| Transformer setting | Rotary switch | ||
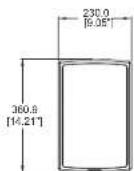
| Dimensions (H x W x D) | 364.8 x 230.0 x 268.8 mm (14.36 x 9.05 x 10.58") | ||
| Net Weight (ea) | 6.25 kg (13.78 lbs) | 5.25 kg (11.57 lbs) | 5.4 kg (11.90 lbs) |
| Shipped weight | 7.1 kg (15.6 lbs) | 6.1 kg (13.4 lbs) | 6.25 kg (13.77 lbs) |
| Included Accessories | Yake bracket | ||
| Packed Quantity | 2 | ||
| System | AMS SDC | AMS SICT | AMS SICT LS |
| Performance | |||
| Frequency response(-3 dB)1 | 90 Hz - 30 kHz | 90 Hz - 22 kHz | |
| Frequency range(-10 dB)1 | 80 Hz - 40 kHz | 80 Hz - 30 kHz | |
| System sensitivity(1 W @ 1m)1 | 87 dB (1 W = 4 V for 16 Ohms) | 88 dB (1 W = 4 V for 16 Ohms) | |
| Nominal Coverage Angle | 90 degrees conical | ||
| Power Handling2 | |||
| Average 60 W 50 W | |||
| Programme 120 W | 100 W | ||
| Peak | 240 W 200 W | ||
| Recommended Amplifier Power | 120 W @ 16 ohms | 100 W @ 16 ohms | |
| Nominal Impedance (Ln, Z) | 16 ohms | ||
| Rated Maximum SPL | |||
| Average | 105 dB | ||
| Peak | 111 dB | ||
| Transformer Taps (via front rotary switch) | |||
| 70 V | 30 W / 15 W / 7.5 W / 3.75 W / OFF & Low impedance operation | ||
| 100 V | 30 W / 15 W / 7.5 W / OFF & Low impedance operation | ||
| Transducers | |||
| Dual Concentric point source driver | 1x 130 mm (5.0") DualConcentric driver, usingOmmimagnet technology | — | |
| Low Frequency | 35 mm (1.38") voice coil,treated multi fibre paperpulp cone | 1 x 130 mm (5.00") treated multi fibre paper pulp cone | |
| High Frequency | 20 mm (0.79") PEI dome | ICT | |
| Physical | |||
| Enclosure | ABS | ||
| Grille | Steel, plated and painted | ||
| Connectors | Removable locking connector with screw terminals | ||
| Transformer setting | Rotary switch | ||
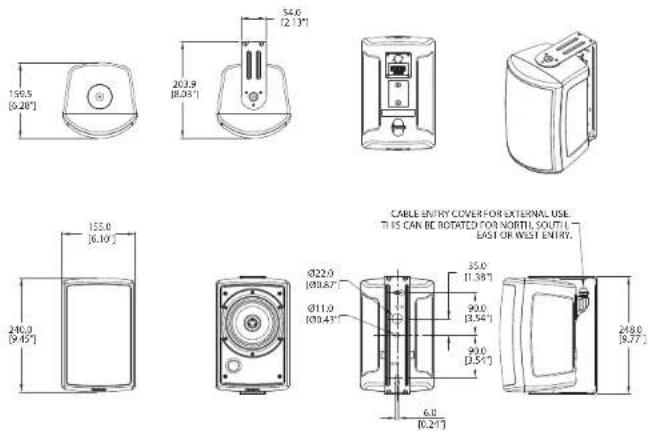
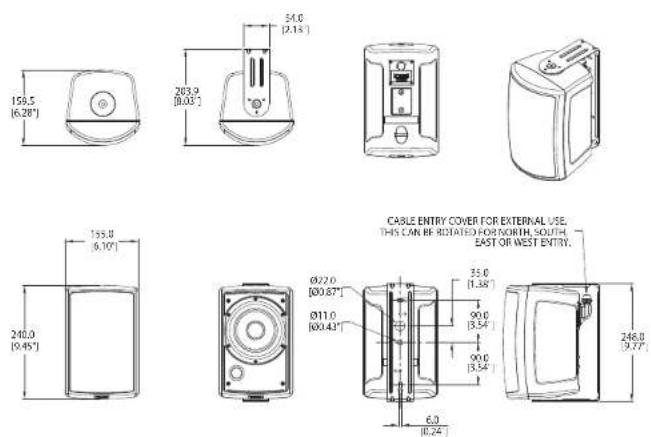
| Dimensions (H x W x D) | 248.0 x 155.0 x 203.9 mm (9.77 x 6.10 x 8.03") | ||
| Net Weight (ea) | 3.6 kg (7.9 lbs) | 3.4 kg (7.5 lbs) | 3.45 kg (7.60 lbs) |
| Shipped weight | 4.15 kg (9.15 lbs) | 3.95 kg (8.70 lbs) | 4.0 kg (8.82 lbs) |
| Included Accessories | Yoke bracket | ||
| Packed Quantity | 2 | ||
Other important information

Important information As

ortantes

Informations importantes
1. Register online.
Please register your new Music Tribe equipment right after you purchase it by visiting musictribe.com. Registering your purchase using our simple online form helps us to process your repair claims more quickly and efficiently. Also, read the terms and conditions of our warranty, if applicable.
- Malfunction. Should your Music Tribe Authorized Reseller not be located in your vicinity, you may contact the Music Tribe Authorized Fulfiller for your country listed under "Support" at musictribe.com. Should your country not be listed, please check if your problem can be dealt with by our "Online Support" which may also be found under "Support" at musictribe.com. Alternatively, please submit an online warranty claim at musictribe.com BEFORE returning the product.
3. Power Connections.
Before plugging the unit into a power socket, please make sure you are using the correct mains voltage for your particular model. Faulty fuses must be replaced with fuses of the same type and rating without exception.
1. Registro online.
Other important information

Hereby, Music Tribe declares that this product is in compliance with Directive 2011/65/EU and Amendment 2015/863/EU, Directive 2012/19/EU, Regulation 519/2012 REACH SVHC and Directive 1907/2006/EC, and this passive product is not applicable to EMC Directive 2014/30/EU, LV Directive 2014/35/EU.
Full text of EU DoC is available at https://community.musictribe.com/
EU Representative: Music Tribe Brands DK A/S
Address: Ib Spang Olsens Gade 17, DK - 8200 Aarhus N, Denmark