
Baltrum Flow - Heating Klarstein - Free user manual and instructions
Find the device manual for free Baltrum Flow Klarstein in PDF.

| Product Type | Convection Heater |
| Brand | Klarstein |
| Model | Baltrum Flow |
| Article Numbers | 10035033, 10035034 |
| Dimensions (approx.) | 60 x 30 x 25 cm |
| Weight (approx.) | 6 kg |
| Power Supply | 220-240 V~, 50-60 Hz |
| Consumption (3 speeds) | 800 W / 1200 W / 2000 W |
| Heating Modes | High, Medium, Low |
| Temperature Range | 7°C to 35°C |
| Timer | Up to 24 hours |
| Remote Control | Yes |
| Display | Digital with backlight |
| Anti-tilt Protection | Yes (automatic shutdown if tilt >30°) |
| Temperature Sensor | NTC |
| Memory Function | Yes (last setting) |
| Recommended Use | Well-insulated rooms or occasional use |
| Maintenance | Clean with damp cloth; vacuum air openings |
| Manufacturer | Chal-Tec GmbH, Berlin |
| Warranty | See manufacturer's conditions |
Frequently Asked Questions - Baltrum Flow Klarstein
User questions about Baltrum Flow Klarstein
0 question about this device. Answer the ones you know or ask your own.
Ask a new question about this device
Download the instructions for your Heating in PDF format for free! Find your manual Baltrum Flow - Klarstein and take your electronic device back in hand. On this page are published all the documents necessary for the use of your device. Baltrum Flow by Klarstein.
USER MANUAL Baltrum Flow Klarstein
BALTRUM BALTRUM FLOW
Konvektorheizung
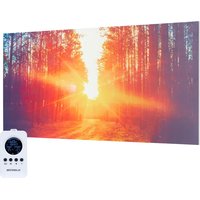
Convector Heater
ONNNNNNNNNNNNNNNNNNNNNNNNNNNNNNNNNNNNNNNNNNNNNNNNNNNNNNNNNNNNNNNNNNNNNNNNNNNNNNNNNNNNNNNNNNNNNNNNNNNNNNNNNNNNNNNNNNNNNNNNNN
KLARSTEIN
www.klarstein.com

Note: This product is only suitable for well insulated spaces or occasional use.
Berlin Brands Group UK Limited
PO Box 42
272 Kensington High Street
London, W8 6ND
United Kingdom
Congratulations on purchasing this device. Please read the following instructions carefully and follow them to prevent possible damages. We assume no liability for damage caused by disregard of the instructions and improper use. Scan the QR code to get access to the latest user manual and more product information.

CONTENTS
Technical Data 17
Safety Instructions 18
Product Description 20
Setup 21
Operation 22
Care and Cleaning 26
Disposal Considerations 27
Manufacturer & Importer (UK) 27
Technical Parameters 28
TECHNICAL DATA
| Item number 10035033 1003 | 5034 |
| Power supply 220-240 V~ 50 | 60 Hz |
| Power Level 1: 800 W | Level 2: 1200 W Level 3: 2000 W |
SAFETY INSTRUCTIONS
Read and follow all the instructions in this manual even if you feel you are familiar with the product, and find a place to keep it handy for future reference. Read all instructions before using this appliance and keep them for future reference.
- When using any electrically powered product, basic safety precautions should always be followed, including the following:
- Use only the voltage specified on the rating plate of the heater.
- Do not cover or restrict airflow to the inlet or exhaust grilles in any manner as the appliance may overheat and become a fire risk.
- Do not cover grilles, block entry or exhaust of airflow by placing appliance against any surface. Keep all object at least 1 meter from the front, side and rear of the appliance.
- Do not place the appliance close to a radiant heat source.
- Do not operate in areas where gasoline, paint or other flammable liquids are used or stored.
- This appliance heats up when in use. To avoid burns, do not let bare skin touch hot surface.
- Switch off and let cooling before moving.
- Do not use the appliance to dry clothes.
- Do not insert or allow foreign object or metal utensils to enter any ventilation or exhaust opening, as this may cause an electric shock, fire or damage to the appliance.
- Do not immerse in liquid or allow running into the interior of the appliance, as this could create an electrical shock hazard.
- Do not operate any appliance with a damaged cord, plug or after the appliance malfunctions or has been dropped or damaged in any manner. Return to a qualified electrical person for examination, electrical or mechanical adjustment, service or repair.
- Do not operate appliance with wet hands.
- The most common cause of overheating is deposits of dust or fluff in the appliance. Ensure these deposits are removed regularly by unplugging the appliance and vacuum cleaning air vents and grilles.
- Do not use this appliance in a window as rain may cause electric shock.
- Do not use a abrasive cleaning products on this appliance. Clean with a damp cloth (not wet) rinsed in hot soapy water only. Always remove plug from the mains supply before cleaning.
- Do not connect the appliance to the mains voltage until completely assembled and adjusted.
- This appliance is not intended for use in outdoor locations.
- Do not use this appliance in the immediate surrounds of a bath, a shower or a swimming pool or other liquids.
Always operate upright. - Switch off and let cooling before moving.
-
Do not operate with cord set coiled up as a build up of heat is likely, which could be sufficient to become a hazard.
-
The use of an extension cord with this appliance is not recommended.
- Do not remove plug from power socket until the appliance has been switched off.
- Do not remove plug from power socket by pulling the supply cord-always grip plug.
Always unplug appliance when not in use. - This product is NOT suitable to be used on long pile carpets or Flokati rugs.
- Do not allow cord to come in contact with heated surface during operation.
- Do not run cord under carpeting, throw rugs or runners etc. Arrange cord away from traffic areas so that it will not be tripped over.
- Do not twist, kink or wrap the cord around the appliance, as this may cause the insulation to weaken and split. Always ensure that all cord has been removed from any cord storage area.
- Do not use outdoors or whilst standing on a damp floor.
- Do not store appliance while it is still hot.
- This appliance is not intended for use by young children or infirm persons without supervision.
- Young children should be supervised to ensure they do not play with the appliance.
- The appliance must not be located immediately below a socket-outlet.
- Do not use this appliance with another programmer, timer or any other device that switches the heater on automatically, since a fire risk exists if the appliance is covered or positioned incorrectly.
- In order to avoid overloading, do not cover the heater.
- To reduce the risk of electric shock, do not immerse or expose the product or flexible cord to rain, moisture or any liquid other than those necessary for correct operation of the product.
- The fireguard does not give full protection for young children and for infirm persons.
- If the supply cord is damaged, it must be replaced by a qualified electrical persons in order to avoid a hazard.
- Do not use this appliance outdoors or on wet surfaces Avoid spilling liquid on the appliance
- In order to avoid a hazard due to inadvertent resetting of the thermal cutout, this appliance must not be supplied through an external switching device, such a timer, or connected to a circuit that is regularly on and off by the utility.
- Use this appliance only as described in this manual. Any other use is not recommended by the manufacturer and may cause fire, electric shock or injury.
- This appliance is intended for household use only and not for commercial or industrial use.
Modell 10035033
Modell 10035034
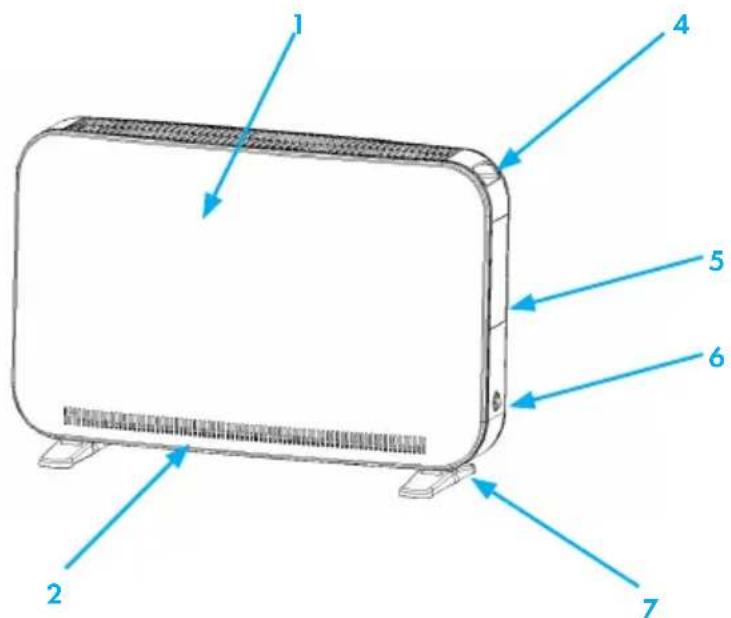
1 Air-inlet grille
2 Air-out grille
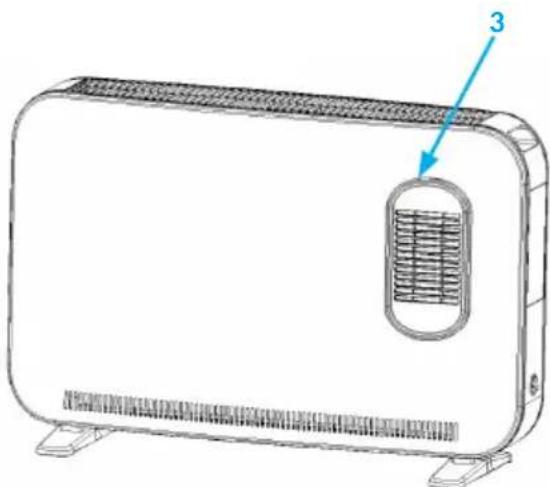
3 Turbo air outlet grille
4 Handles
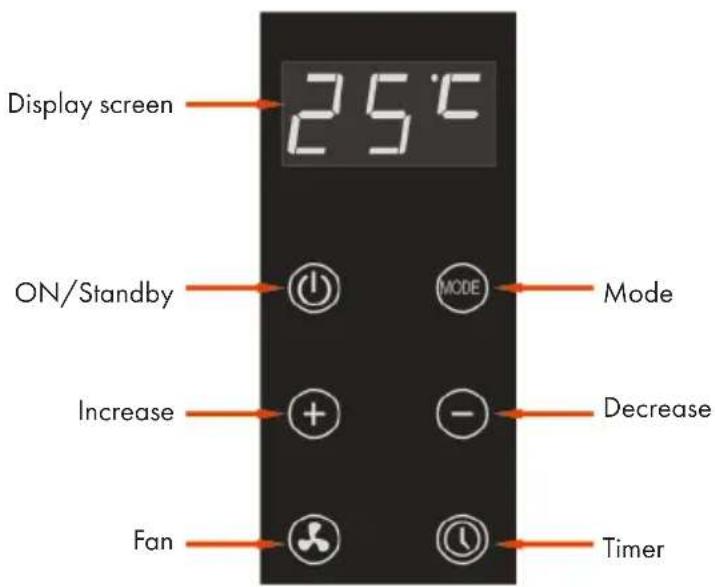
5 Control panel
6 Power switch
7 Feet
SETUP
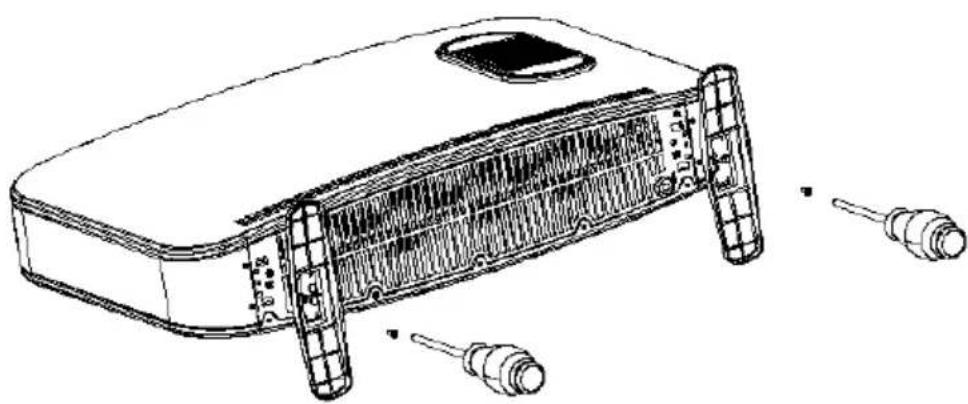
- Unpack the packing and pull the convector out gently, place on a steady plane on either vertical or horizontal position.
- Insert the power plug, ready to use.
Note: The air inlet should not be too close with the wall, which will affect the air flow in, and then affect the use effect. The air out also can not be on the wall for a long time.
OPERATION
Control panel on item 10035033
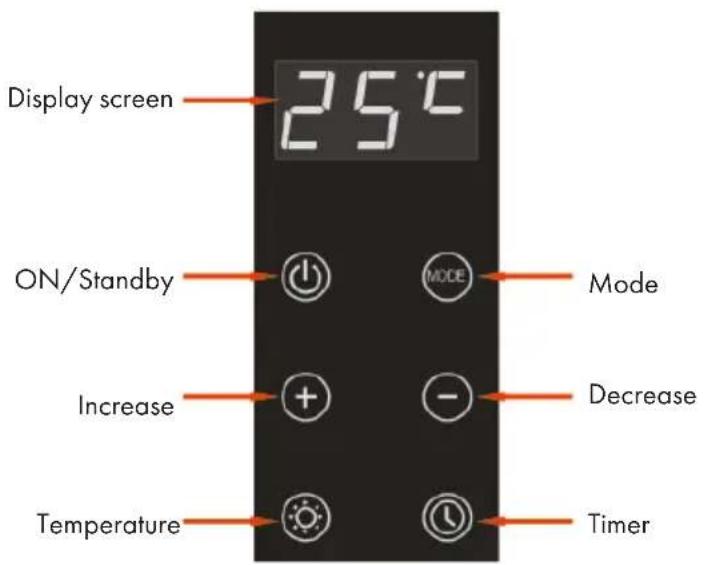
Control panel on item 10035034

Caution: Danger of Scalding.
Do not touch the heater during operation. The housing will become hot.
ON/Standalone (all items)
- Click on the key U. If no other setting has been made, the unit runs at the highest level (the factory-set temperature is 24^ ). The key Uights up and the screen displays "24 °C". The other 5 keys only light up weakly.
- Pressing again switches the device into standby. The key keys. The illumination of all other keys is off.
- The device has a memory function. If you turn on the machine after putting it into standby mode, the machine will return to the previous mode.
Modes (Item 10035033)
- The mode key switch follows the order of high middle low high middle... gear cycle. The middle one of the three digital tubes displays the "3 2 1, 3 2..." gear cycle in turn.
- When the mode is set and set, the indicator light in the middle of the mode key is highlighted, and a bit in the middle of the display screen shows the current setting gear. The display shows the setting temperature value.
- In all three modes, the temperature can be adjusted in the range of 7^ - 35^ . The heating function can be switched on/off by the set temperature and the temperature determined by the NTC sensor. To adjust the temperature, press the + or - buttons.
Modes (Item 10035034)
- The mode key switch follows the order of high middle low high middle... gear cycle. The middle one of the three digital tubes displays the "3 2 1, 3 2..." gear cycle in turn.
- When the mode is set, the "+" key / "-" key icon lamp is highlighted, and the point pressing the + / - keys can increase or decrease the setting temperature of each heating level.
- When the mode is set, the indicator light in the middle of the mode key is highlighted, and a bit in the middle of the display shows the current level set. After the mode is set for 5 seconds, the three-digit digital tube displays the set temperature value instead; or when the "+" and "-" key, the display indicates the set temperature value.
- Five seconds after you have completed the temperature setting, the + and - buttons light up only slightly.
- In the three modes, a temperature between 7 and 35^ can be set and the heating function can be switched on/off using the set temperature and the temperature detected by the NTC sensor. To do this, press the + or - buttons.
-
Temperature content is displayed by a three-digit digital tube, the first two digits display the temperature, and the last digit with the digital tube "dot" displays ^ C
-
The factory preset temperature is 24^ . The temperature can be adjusted by pressing the + and - keys. If no entry is made within 5 seconds, this value is automatically stored.
Timer (all items)
- If you press the Timer button, you can set the time until the unit switches off automatically. The timer indicator lights up. The screen displays the hour in the first two digits and the hour unit "h" in the last digit.
- The + and - buttons are illuminated. Adjust the time until the unit switches off by pressing the + and - buttons. If no key is pressed within 5 seconds, your setting is automatically confirmed. To confirm the time, you can also press the Timer button again immediately after entering it. The maximum setting is 24h , the minimum setting is 0h (no timer is activated).
- After the timer setting has been completed, the Timer button will light up and the setting temperature will be displayed on the screen again. At the same time, the + and - buttons light up only slightly.
- The timer can be set independently of the selected heating mode. If you want to display the remaining time until the timer expires, press the button again. The + and - buttons will then also light up again and you can adjust the time until automatic switch-off if desired.
Temperature setting (Item 10035033)
- When you press the temperature button, the + and - buttons and the temperature display light up. The temperature is displayed on the screen as follows: The first two digits indicate the temperature and the last digit shows the unit "°C".
- The factory-set temperature is 24^ C . The temperature can be adjusted by pressing the + and - keys (temperature setting range 7 - 35 °C).
- If you press and hold the temperature key for 5 seconds when the machine is working, you can change the temperature unit from "°C" to "°F". If you then press the temperature button again for 5 seconds, you can change the temperature unit from "°F" to "°C" again.
- The factory-set temperature is 75^ and the temperature setting range is 45 - 95°F).
- The device has a memory function for the temperature unit. Even after a power failure, the last temperature unit set is restored.
Fan (Modell 10035034)
- When you press the fan button, the fan indicator lights up and the fan motor starts running.
- If you press the fan button again, the fan indicator goes out and the fan motor stops running.
Increase/Decrease (Modell 10035033)
- If no temperature setting or timer setting has been made, the + and - buttons light up only dimly and do not react when pressed.
- If a temperature and/or timer setting has been made, the + and - buttons light up and are activated.
- The temperature button must be pressed before setting the temperature.
Increase/Decrease (Modell 10035034)
- If no temperature setting or timer setting has been made, the + and - buttons light up only dimly and do not react when pressed.
- If a temperature and/or timer setting has been made, the + and - buttons light up and are activated.
- If, once the temperature is set, you press the + and - buttons simultaneously, the temperature unit can be changed from "°C" to "°F". In the same way, the temperature unit can be changed from "°F" to "°C" again.
- The factory-set temperature is 75^ , the temperature setting range is 45 - 95^ .
- The instrument has a memory function for the temperature unit. Even after a power failure, the last temperature unit set is restored.
Tilt protection (Modell 10035033 und 10035034)
- If the angle between the horizontal and vertical positions is less than 30 ± 5 degrees, the digital display will blink and show "Eo". All instrument functions are automatically turned off.
- The unit must be turned off and on again after the unit is returned to the correct position to resume operation.
Notes
- If no adjustment is made in the operating mode within 3 minutes, the screen goes out automatically. Only the on/off button is dimmed. The other buttons are out. To turn on the screen again, press any key.
- If a short circuit of the sensor occurs, "EH" will flash on the screen. If a sensor is exposed, "EL" is displayed on the screen. In either case, turn the power off and contact customer service for repair.
- The unit can be controlled via remote control.
CARE AND CLEANING

Warning: Danger of electric shock
Unplug the power cord before cleaning.
- Switch off the unit and unplug the power cord from the wall outlet. Let the appliance cool down completely.
- Clean the surfaces of the unit with a soft cloth if they are only slightly dirty. For stubborn dirt, use a cloth soaked in lukewarm water and a little washing-up liquid. Then rub the unit dry with a soft cloth.
- Do not use any aggressive cleaning agents such as petrol, thinner, etc. as these will damage the surface of the unit or cause it to discolour.
- Switch off the unit and unplug the power plug from the wall outlet if you are not going to use the unit for a long period of time. Cover the unit to protect it from dust.
- Allow the unit to cool before storing and ensure that it is stored in a dry and well-ventilated place.
DISPOSAL CONSIDERATIONS
If there is a legal regulation for the disposal of electrical and electronic devices in your country, this symbol on the product or on the packaging indicates that this product must not be disposed of with household waste. Instead, it must be taken to a collection point for the recycling of electrical and electronic equipment. By disposing of it in accordance with the rules, you are protecting the environment and the health of your fellow human beings from negative consequences. For information about the recycling and disposal of this product, please contact your local authority or your household waste disposal service.
This product contains batteries. If there is a legal regulation for the disposal of batteries in your country, the batteries must not be disposed of with household waste. Find out about local regulations for disposing of batteries. By disposing of them in accordance with the rules, you are protecting the environment and the health of your fellow human beings from negative consequences.
MANUFACTURER & IMPORTER (UK)
Manufacturer:
Chal-Tec GmbH, Wallstrasse 16, 10179 Berlin, Germany.
Importer for Great Britain:
Berlin Brands Group UK Limited
PO Box 42
272 Kensington High Street
London, W8 6ND
United Kingdom
TECHNICAL PARAMETERS
| Model identifier(s): 10035033 | 10035034 | |||||
| Item Symbol Value Unit Item Unit | ||||||
| Heat output Type of heat input, for electric storage | local space heaters only | |||||
| Nominal heat output P | nom | 1.83 kW manual heat | charge control, with integrated thermostat | NO | ||
| Minimum heat output (indicative) | Pmin | 0.85 kW manual heat | charge control with room and/or outdoor temperature feedback | NO | ||
| Maximum continuous heat output | Pmax | 2.18 kW electronic heat | heat control with room and/or outdoor temperature feedback | NO | ||
| Auxiliary electricity consumption | fan assisted heat output NO | |||||
| At nominal heat output (fan motor) | elmax | N/A kW | Type of heat output/room temperature control | |||
| At minimum heat output (fan motor) | elmin | N/A kW single stage | heat output and no room temperature control | NO | ||
| In standby mode | elsb | 0.16 W | Two or more manual stages, no room temperature control | NO | ||
| with mechanic thermostat room temperature control | NO | |||||
| with electronic room temperature control | YES | |||||
| electronic room temperature control plus day timer | NO | |||||
| electronic room temperature control plus week timer | NO | |||||
| Other control options (multiple selections possible) | ||||||
| room temperature control, with presence detection | NO | |||||
| room temperature control, with open window detection | NO | |||||
| with distance control option | NO | |||||
| with adaptive start control | NO | |||||
| with working time limitation | YES | |||||
| with black bulb sensor | NO | |||||
| Contact details | Chal-Tec GmbH, Wallstraße 16, 10179, Berlin, Germany | |||||
Cher client,
Berlin Brands Group UK Limited
PO Box 42
272 Kensington High Street
London, W8 6ND
United Kingdom
FICHE DE DONNÉES PRODUIT
Berlin Brands Group UK Limited
PO Box 42
272 Kensington High Street
London, W8 6ND
United Kingdom
HOJA DE DATOS DEL PRODUCTO
PRODUTTORE IMPORTATORE (UK)
Produtlore:
Chal-Tec GmbH, Wallstraße 16, 10179 Berlin, Germania.
Berlin Brands Group UK Limited
PO Box 42
272 Kensington High Street
London, W8 6ND
United Kingdom
SCHEDA INFORMATIVA DEL PRODOTTO
INSTRUCTIES VOOR AFVOER
Berlin Brands Group UK Limited
PO Box 42
272 Kensington High Street
London, W8 6ND
United Kingdom
- BALTRUM BALTRUM FLOW
- CONTENTS
- TECHNICAL DATA
- SAFETY INSTRUCTIONS
- SETUP
- OPERATION
- Caution: Danger of Scalding.
- ON/Standalone (all items)
- Modes (Item 10035033)
- Modes (Item 10035034)
- Timer (all items)
- Temperature setting (Item 10035033)
- Fan (Modell 10035034)
- Increase/Decrease (Modell 10035033)
- Increase/Decrease (Modell 10035034)
- Tilt protection (Modell 10035033 und 10035034)
- Notes
- CARE AND CLEANING
- Warning: Danger of electric shock
- DISPOSAL CONSIDERATIONS
- MANUFACTURER & IMPORTER (UK)
- Cher client,
- PRODUTTORE IMPORTATORE (UK)
- Produtlore:
- INSTRUCTIES VOOR AFVOER
Brand : Klarstein
Model : Baltrum Flow
Category : Heating