
MEXGS820BT - Car stereo SONY - Free user manual and instructions
Find the device manual for free MEXGS820BT SONY in PDF.

| Product Type | Car Radio |
| Brand | Sony |
| Model | MEX-GS820BT |
| Dimensions (W x H x D) | Approx. 178 x 50 x 178 mm |
| Weight | Approx. 1.3 kg |
| Required power supply | Vehicle battery 12 V DC (negative ground) |
| Rated current consumption | 10 A |
| Maximum output power | 100 W x 4 (at 4 Ω) |
| Display | Backlit display window |
| Main functions | CD player, FM/MW/LW radio, hands-free Bluetooth and audio streaming, NFC (One-Touch), USB port, AUX input, voice recognition (Android), Siri Eyes Free, Sony | Music Center |
| Bluetooth connectivity | Bluetooth 2.4 GHz, profiles A2DP, AVRCP, HFP, PBAP, SPP, MAP, HID |
| Playable audio formats (CD) | MP3, WMA, AAC |
| Playable audio formats (USB) | MP3, WMA, AAC, WAV, FLAC |
| FM radio | 87.5 - 108.0 MHz (Europe) or 65 - 108 MHz (Russia) |
| MW/LW radio | MW: 531 - 1602 kHz, LW: 153 - 279 kHz |
| Maintenance and cleaning | Clean the connectors with a cotton swab after turning off the ignition. Clean discs from the center outward. |
| Security | Detachable front panel anti-theft. Warning alarm if the panel is not removed. AUTO OFF function to prevent battery drain. |
| Spare parts and repairability | Replaceable fuse (rated current indicated on the used fuse). Contact your Sony dealer for repairs. |
| General information | Made in Thailand. Compatible with iPod/iPhone (some models). Firmware update via USB. |
Frequently Asked Questions - MEXGS820BT SONY
User questions about MEXGS820BT SONY
0 question about this device. Answer the ones you know or ask your own.
Ask a new question about this device
Download the instructions for your Car stereo in PDF format for free! Find your manual MEXGS820BT - SONY and take your electronic device back in hand. On this page are published all the documents necessary for the use of your device. MEXGS820BT by SONY.
USER MANUAL MEXGS820BT SONY
Bluetooth® Audio System
Aydinocncema Bluetooth®
Operating Instructions
GB
Bedienungsanleitung
DE
Mode d'emploi
FR
To cancel the demonstration (DEMO) display, see page 19.
For the connection/installation, see page 35.
HCTpyKuIN NO yCTaHOBKe/NoKJIIOUeHNIO CM. Ha cTp. 43.
For safety, be sure to install this unit in the dashboard of the car as the left side of the unit becomes hot during use.
For details, see "Connection/Installation" (page 35).
Made in Thailand
Laser Diode Properties
- Emission Duration: Continuous
- Laser Output: Less than 53.3 W
(This output is the value measurement at a distance of 200mm from the objective lens surface on the Optical Pick-up Block with 7 mm aperture.)
The nameplate indicating operating voltage, etc., is located on the bottom of the chassis.
CE
Hereby, Sony Corporation, declares that this equipment is in compliance with Directive 2014/53/EU.
The full text of the EU declaration of conformity is available at the following internet address:
http://www.compliance.sony.de/
This equipment is intended to be used with the approved version(s) of software that are indicated in the EU Declaration of Conformity.
The software loaded on this equipment is verified to comply with the essential requirements of the Directive 2014/53/EU. Software version: 1_
The software version can be checked in the firmware setup item of the general setup menu.
Notice for customers: the following information is only applicable to equipment sold in countries applying EU Directives
This product has been manufactured by or on behalf of Sony Corporation.
EU Importer: Sony Europe Limited.
Inquiries to the EU Importer or related to product compliance in Europe should be sent to the manufacturer's authorized representative, Sony Belgium, bijkantoor van Sony Europe Limited, Da Vincilaan 7-D1, 1935 Zaventem, Belgium.

Disposal of waste batteries and electrical and electronic equipment (applicable in the European Union and other European countries
with separate collection systems)
This symbol on the product, the battery or on the packaging indicates that the product and the battery shall not be treated as household waste.
On certain batteries this symbol might be used in combination with a chemical symbol. The chemical symbols for mercury (Hg) or lead (Pb) are added if the battery contains more than 0.0005% mercury or 0.004% lead.
By ensuring these products and batteries are disposed of correctly, you will help prevent potentially negative consequences for the environment and human health which could otherwise be caused by inappropriate waste handling. The recycling of the materials will help to conserve natural resources.
In case of products that for safety, performance or data integrity reasons require a permanent connection with an incorporated battery, this battery should be replaced by qualified service staff only. To ensure that the battery and the electrical and electronic equipment will be treated properly, hand over these products at end-of-life to the applicable collection point for the recycling of electrical and electronic equipment.
For all other batteries, please view the section on how to remove the battery from the product safely. Hand the battery over to the applicable collection point for the recycling of waste batteries. For more detailed information about recycling of this product or battery, please contact your local Civic Office, your household waste disposal service or the shop where you purchased the product or battery.
CAUTION
The following frequency 65 - 74 MHz range is not allocated to sound broadcasting in the European Common Allocations table and cannot be used in Europe.
Warning if your car's ignition has no ACC position
Be sure to set the AUTO OFF function (page 20). The unit will shut off completely and automatically in the set time after the unit is turned off, which prevents battery drain. If you do not set the AUTO OFF function, press and hold OFF until the display disappears each time you turn the ignition off.
Disclaimer regarding services offered by third parties
Services offered by third parties may be changed, suspended, or terminated without prior notice. Sony does not bear any responsibility in these sorts of situations.
Important notice
Caution
IN NO EVENT SHALL SONY BE LIABLE FOR ANY INCIDENTAL, INDIRECT OR CONSEQUENTIAL DAMAGES OR OTHER DAMAGES INCLUDING, WITHOUT LIMITATION, LOSS OF PROFITS, LOSS OF REVENUE, LOSS OF DATA, LOSS OF USE OF THE PRODUCT OR ANY ASSOCIATED EQUIPMENT, DOWNTIME, AND PURCHASER'S TIME RELATED TO OR ARISING OUT OF THE USE OF THIS PRODUCT, ITS HARDWARE AND/OR ITS SOFTWARE.
Dear customer, this product includes a radio transmitter.
According to UNECE Regulation no. 10, a vehicle manufacturers may impose specific conditions for installation of radio transmitters into vehicles.
Please check your vehicle operation manual or contact the manufacturer of your vehicle or your vehicle dealer, before you install this product into your vehicle.
Emergency calls
This BLUETOOTH car handsfree and the electronic device connected to the handsfree operate using radio signals, cellular, and landline networks as well as user-programmed function, which cannot guarantee connection under all conditions. Therefore do not rely solely upon any electronic device for essential communications (such as medical emergencies).
On BLUETOOTH communication
- Microwaves emitting from a BLUETOOTH device may affect the operation of electronic medical devices. Turn off this unit and other BLUETOOTH devices in the following locations, as it may cause an accident.
- where inflammable gas is present, in a hospital, train, airplane, or petrol station
- near automatic doors or a fire alarm
- This unit supports security capabilities that comply with the BLUETOOTH standard to provide a secure connection when the BLUETOOTH wireless technology is used, but security may not be enough depending on the setting. Be careful when communicating using BLUETOOTH wireless technology.
- We do not take any responsibility for the leakage of information during BLUETOOTH communication.
If you have any questions or problems concerning your unit that are not covered in this manual, consult your nearest Sony dealer.
Table of Contents
Guide to Parts and Controls. 6
Getting Started
Detaching the Front Panel 7
Resetting the Unit. 8
Setting the Clock. 8
Checking the Battery Voltage 8
Preparing a BLUETOOTH Device 9
Connecting a USB Device. 11
Connecting Other Portable Audio Device 11
Listening to the Radio
Listening to the Radio 12
Using Radio Data System (RDS). 12
Playback
Playing a Disc 13
Playing a USB Device 13
Playing a BLUETOOTH Device 14
Searching and Playing Tracks 14
Handsfree Calling (via BLUETOOTH only)
Receiving a Call. 15
Making a Call. 15
Available Operations during Call. 17
Useful Functions
Sony | Music Center with iPhone/Android smartphone. 17
Using Voice Recognition (Android smartphone only) 18
Using Siri Eyes Free. 18
Settings
Canceling the DEMO Mode 19
Basic Setting Operation. 19
General Setup (GENERAL) 20
Sound Setup (SOUND) 21
Display Setup (DISPLAY) 23
BLUETOOTH Setup (BLUETOOTH) 23
Sony | Music Center Setup (SONY APP) 24
Additional Information
Updating the Firmware 24
Precautions. 24
Maintenance. 26
Specifications 26
Troubleshooting 28
Messages 32
Connection/Installation
Cautions 35
Parts List for Installation 35
Connection 36
Installation 39
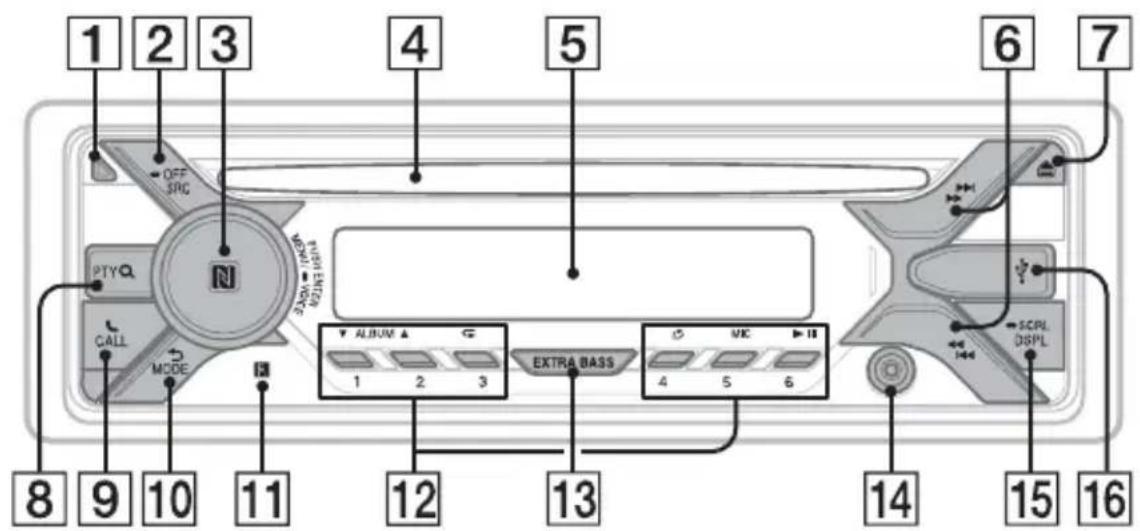
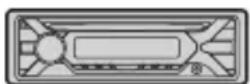
Guide to Parts and Controls
Main unit
Front panel removed (inner panel)
1 Front panel release button
2 SRC (source)
Turn on the power.
Change the source.
OFF
Press and hold for 1 second to turn the source off and display the clock.
Press and hold for more than 2 seconds to turn off the power and the display.
3 Control dial
Rotate to adjust the volume.
PUSH ENTER
Enter the selected item.
Press SRC, rotate then press to change the source (timeout in 2 seconds).
MENU
Open the setup menu.
- VOICE (page 16, 18, 19)
Press and hold for more than 2 seconds to activate voice dial, voice recognition (Android™ smartphone only), or the Siri function (iPhone only).
N-Mark
Touch the control dial with Android smartphone to make BLUETOOTH connection.
4 Disc slot
Display window


Tune in radio stations automatically. Press and hold to tune manually.
1/prev/next)
( fast-reverse/fast-forward)
7 (disc eject)
8 PTY (program type)
Select PTY in RDS.
Q (browse) (page 15)
Enter the browse mode during playback. (Not available when a USB device in Android mode or iPod is connected.)
9 CALL
Enter the call menu. Receive/end a call. Press and hold for more than 2 seconds to switch the BLUETOOTH signal.
10 (back)
Return to the previous display.
MODE (page 12, 17)
11 Receptor for the remote commander
12 Number buttons (1 to 6)
Receive stored radio stations. Press and hold to store stations.
ALBUM▼/▲
Skip an album for audio device. Press and hold to skip albums continuously.
(Not available when a USB device in Android mode or iPod is connected.)
(repeat)
(Not available when a USB device in Android mode is connected.)
(shuffle)
(Not available when a USB device in Android mode is connected.)
MIC (page 17)
II (play/pause)
13 EXTRA BASS
Reinforce bass sound in synchronization with the volume level. Press to change the EXTRA BASS setting: [1], [2], [OFF].
14 AUX input jack
15 DSPL(display)
Change display items.
SCRL (scroll)
Press and hold to scroll a display item.
16 USB port
17 RESET (inner panel) (page 8)
Getting Started
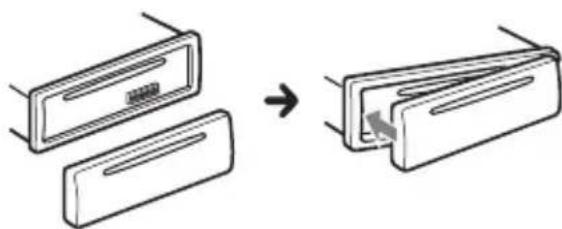
Detaching the Front Panel
You can detach the front panel of this unit to prevent theft.
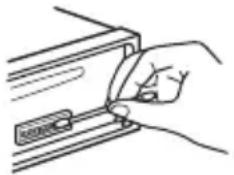
1 Press and hold OFF ① until the unit turns off, press the front panel release button ②, then pull the panel towards you to remove.
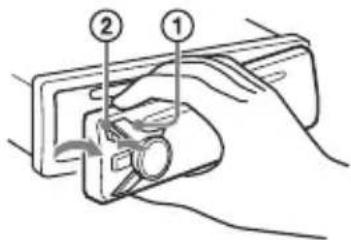
Caution alarm
If you turn the ignition switch to the OFF position without detaching the front panel, the caution alarm will sound for a few seconds. The alarm will only sound if the built-in amplifier is used.
Serial numbers
Make sure the serial numbers on the bottom of the unit and the back of the front panel are matched correctly. Otherwise you cannot make BLUETOOTH pairing, connection and disconnection by NFC.
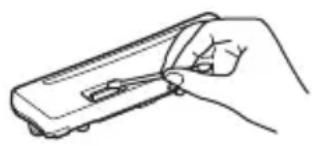
Attaching the front panel
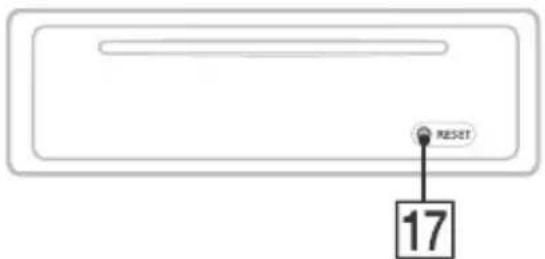
Resetting the Unit
Before operating the unit for the first time, or after replacing the car battery or changing connections, you must reset the unit.
Press RESET on the inner panel with a ballpoint pen, etc., after detaching the front panel.
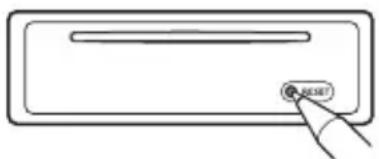
Note
Resetting the unit will erase the clock setting and some stored contents.
Setting the area/region
After resetting the unit, the area/region setting display appears.
1 Press ENTER while [SET AREA] is displayed.
The area/region currently set appears.
2 Rotate the control dial to select [EUROPE] or [RUSSIA], then press it.
3 Rotate the control dial to select [YES] or [NO], then press it.
If the setting area/region is changed, the unit is reset, then the clock is displayed.
This setting can be configured in the general setup menu (page 20).
Setting the Clock
1 Press MENU, rotate the control dial to select [GENERAL], then press it.
2 Rotate the control dial to select [SET CLOCK-ADJ], then press it. The hour indication flashes.
3 Rotate the control dial to set the hour and minute.
To move the digital indication, press 144 / 144 (SEEK-/+).
4 After setting the minute, press MENU.
The setup is complete and the clock starts.
To display the clock
Press DSPL.
Checking the Battery Voltage
You can check the current battery voltage. (Not available while the source is off and the clock is displayed.)
1 Press DSPL repeatedly until the battery voltage display appears.
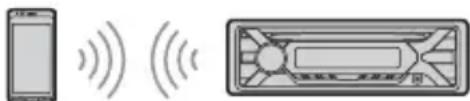
Preparing a BLUETOOTH Device
You can enjoy music, or perform handsfree calling depending on the BLUETOOTH compatible device such as a smartphone, cellular phone and audio device (hereafter "BLUETOOTH device" if not otherwise specified). For details on connecting, refer to the operating instructions supplied with the device.
Before connecting the device, turn down the volume of this unit; otherwise, loud sound may result.
Connecting with a Smartphone using One-touch connection (NFC)
By touching the control dial on the unit with an NFC* compatible smartphone, the unit is paired and connected with the smartphone automatically.
- NFC (Near Field Communication) is a technology enabling short-range wireless communication between various devices, such as mobile phones and IC tags. Thanks to the NFC function, data communication can be achieved easily just by touching the relevant symbol or designated location on NFC compatible devices.
For a smartphone with Android OS 4.0 or lower installed, downloading the app "NFC Easy Connect" available at Google Play™ is required. The app may not be downloadable in some countries/regions.
1 Activate the NFC function on the smartphone.
For details, refer to the operating instructions supplied with the smartphone.
2 Touch the N-Mark part of the unit with the N-Mark part of the smartphone.
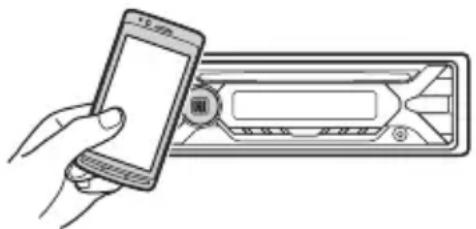
Make sure that lights up on the display of the unit.
To disconnect using NFC
Touch the N-Mark part of the unit with the N-Mark part of the smartphone again.
Notes
- When making the connection, handle the smartphone carefully to prevent scratches.
- One-touch connection is not possible when the unit is already connected to two NFC compatible devices. In this case, disconnect either device, and make connection with the smartphone again.
Pairing and connecting with a BLUETOOTH device
When connecting a BLUETOOTH device for the first time, mutual registration (called "pairing") is required. Pairing enables this unit and other devices to recognize each other. This unit can connect two BLUETOOTH devices (two cellular phones, or a cellular phone and an audio device).

1 Place the BLUETOOTH device within 1 m (3 ft) of this unit.
2 Press MENU, rotate the control dial to select [BLUETOOTH], then press it.
3 Rotate the control dial to select [SET PAIRING], then press it.
4 Rotate the control dial to select [SET DEVICE 1] or [SET DEVICE 2], then press it.
flashes while the unit is in pairing standby mode.
- [SET DEVICE 1] or [SET DEVICE 2] will be changed to the paired device name after pairing is complete.
5 Perform pairing on the BLUETOOTH device so it detects this unit.
6 Select [MEX-GS820BT] (your model name) shown in the display of the BLUETOOTH device.
If your model name does not appear, repeat from step 2.
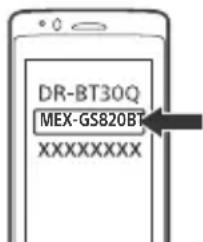
7 If passkey* input is required on the BLUETOOTH device, input [0000].
- Passkey may be called "Passcode," "PIN code," "PIN number" or "Password," etc., depending on the device.
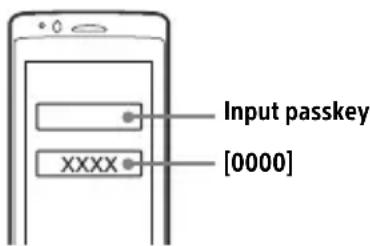
When pairing is made, stays lit.
8 Select this unit on the BLUETOOTH device to establish the BLUETOOTH connection.
or lights up when the connection is made.
Note
While connecting to a BLUETOOTH device, this unit cannot be detected from another device. To enable detection, enter the pairing mode and search for this unit from another device.
To start playback
For details, see "Playing a BLUETOOTH Device" (page 14).
To disconnect the paired device
Perform steps 2 to 4 to disconnect after this unit and the BLUETOOTH device are paired.
Connecting with a paired BLUETOOTH device
To use a paired device, connection with this unit is required. Some paired devices will connect automatically.
1 Press MENU, rotate the control dial to select [BLUETOOTH], then press it.
2 Rotate the control dial to select [SET BT SIGNL], then press it.
Make sure that lights up.
3 Activate the BLUETOOTH function on the BLUETOOTH device.
4 Operate the BLUETOOTH device to connect to this unit.
or fights up.
Icons in the display:
| B | Lights up when handsfree calling is available by enabling the HFP (Handsfree Profile). |
| C | Lights up when the audio device is playable by enabling the A2DP (Advanced Audio Distribution Profile). |
To connect the last-connected device from this unit
Activate the BLUETOOTH function on the BLUETOOTH device.
To connect with the audio device, press SRC to select [BT AUDIO] and press (play/ pause).
To connect with the cellular phone, press CALL.
Note
While streaming BLUETOOTH audio, you cannot connect from this unit to the cellular phone. Connect from the cellular phone to this unit instead.
Tip
With BLUETOOTH signal on: when the ignition is turned to on, this unit reconnects automatically to the last-connected cellular phone.
To install the microphone
For details, see "Installing the microphone" (page 39).
Connecting with an iPhone/iPod (BLUETOOTH Auto Pairing)
When an iPhone/iPod with iOS5 or later installed is connected to the USB port, the unit is paired and connected with the iPhone/iPod automatically.
To enable BLUETOOTH Auto Pairing, make sure [SET AUTOPAIR] in [BLUETOOTH] is set to [ON] (page 23).
1 Activate the BLUETOOTH function on the iPhone/iPod.
2 Connect an iPhone/iPod to the USB port.
Make sure that lights up on the display of the unit.
Notes
- BLUETOOTH Auto Pairing is not possible if the unit is already connected to two BLUETOOTH devices. In this case, disconnect either device, then connect the iPhone/iPod again.
- If BLUETOOTH Auto Pairing is not established, see "Preparing a BLUETOOTH Device" (page 9).
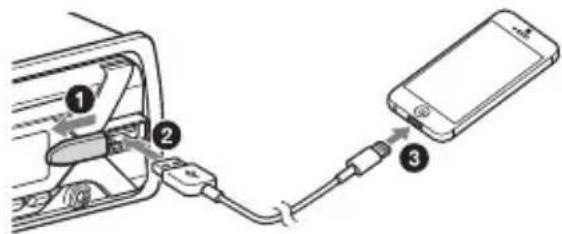
Connecting a USB Device
1 Turn down the volume on the unit.
2 Connect the USB device to the unit.
To connect an iPod/iPhone, use the USB connection cable for iPod (not supplied).

Connecting Other Portable Audio Device
1 Turn off the portable audio device.
2 Turn down the volume on the unit.
3 Connect the portable audio device to the AUX input jack (stereo mini jack) on the unit with a connecting cord (not supplied)*.
- Be sure to use a straight type plug.
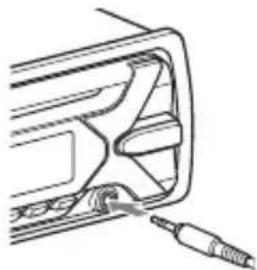
4 Press SRC to select [AUX].
To match the volume level of the connected device to other sources
Start playback of the portable audio device at a moderate volume, and set your usual listening volume on the unit.
Press MENU, then select [SOUND] SET AUX VOL.
Listening to the Radio
Listening to the Radio
To listen to the radio, press SRC to select [TUNER].
Storing automatically (BTM)
1 Press MODE to change the band (FM1, FM2, FM3, MW or LW).
2 Press MENU, rotate the control dial to select [GENERAL], then press it.
3 Rotate the control dial to select [SET BTM], then press it.
The unit stores stations in order of frequency on the number buttons.
Tuning
1 Press MODE to change the band (FM1, FM2, FM3, MW or LW).
2 Perform tuning.
To tune manually
Press and hold 1 / > (SEEK-/+ to locate the approximate frequency, then press 1 / > (SEEK-/+ ) repeatedly to finely adjust to the desired frequency.
To tune automatically
Press / (SEEK-/+).
Scanning stops when the unit receives a station.
Storing manually
1 While receiving the station that you want to store, press and hold a number button (1 to 6) until [MEM] appears.
Receiving the stored stations
1 Select the band, then press a number button (1 to 6).
Using Radio Data System (RDS)
Setting alternative frequencies (AF) and traffic announcement (TA)
AF continuously retunes the station to the strongest signal in a network, and TA provides current traffic information or traffic programs (TP) if received.
1 Press MENU, rotate the control dial to select [GENERAL], then press it.
2 Rotate the control dial to select [SET AF/TA], then press it.
3 Rotate the control dial to select [SET AF-ON], [SET TA-ON], [SET AF/TA-ON] or [SET AF/TA-OFF], then press it.
To store RDS stations with the AF and TA setting
You can preset RDS stations along with an AF/TA setting. Set AF/TA, then store the station with BTM or manually. If you preset manually, you can also preset non-RDS stations.
To receive emergency announcements
With AF or TA on, emergency announcements will automatically interrupt the currently selected source.
To adjust the volume level during a traffic announcement
Level will be stored into memory for subsequent traffic announcements, independently from the regular volume level.
To stay with one regional program (REGIONAL)
When the AF and REGIONAL functions are on, you will not be switched to another regional station with a stronger frequency. If you leave this regional program's reception area, set [SET REGIONAL] in [GENERAL] to [SET REG-OFF] during FM reception (page 20).
This function does not work in the UK and some other areas.
Local Link function (UK only)
This function enables you to select other local stations in the area, even if they are not stored on your number buttons. During FM reception, press a number button (1 to 6) on which a local station is stored. Within 5 seconds, press again a number button of the local station. Repeat this procedure until the local station is received.
Selecting program types (PTY)
1 Press PTY during FM reception.
2 Rotate the control dial until the desired program type appears, then press it. The unit starts to search for a station broadcasting the selected program type.
Type of programs
NEWS (News), AFFAIRS (Current Affairs), INFO (Information), SPORT (Sports), EDUCATE (Education), DRAMA (Drama), CULTURE (Culture), SCIENCE (Science), VARIORED (Varied), POP M (Pop Music), ROCK M (Rock Music), EASY M (M.O.R. Music), LIGHT M (Light classical), CLASSICS (Serious classical), OTHER M (Other Music), WEATHER (Weather), FINANCE (Finance), CHILDREN (Children's program), SOCIAL A (Social Affairs), RELIGION (Religion), PHONE IN (Phone In), TRAVEL (Travel), LEISURE (Leisure), JAZZ (Jazz Music), COUNTRY (Country Music), NATION M (National Music), OLDIES (Oldies Music), FOLK M (Folk Music), DOCUMENT (Documentary)
Setting clock time (CT)
The CT data from the RDS transmission sets the clock.
1 Set [SET CT] in [GENERAL] to [SET CT-ON] (page 20).
Playback
Playing a Disc
1 Insert the disc (label side up).
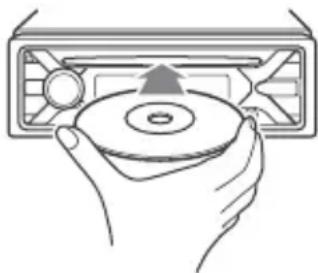
Playback starts automatically.
Playing a USB Device
In these Operating Instructions, "iPod" is used as a general reference for the iPod functions on an iPod and iPhone, unless otherwise specified by the text or illustrations.
For details on the compatibility of your iPod, see "About iPod" (page 25) or visit the support site on the back cover.
AOA (Android Open Accessory) 2.0, MSC (Mass Storage Class) and MTP (Media Transfer Protocol) type USB devices* compliant with the USB standard can be used. Depending on the USB device, the Android mode or MSC/MTP mode can be selected on the unit.
Some digital media players or Android smartphones may require setting to MTP mode.
- e.g., a USB flash drive, digital media player, Android smartphone
Notes
- For details on the compatibility of your USB device, visit the support site on the back cover.
-
Smartphones with Android OS 4.1 or higher installed support Android Open Accessory 2.0 (AOA 2.0). However, some smartphones may not fully support AOA 2.0 even if Android OS 4.1 or higher is installed. For details on the compatibility of your Android smartphone, visit the support site on the back cover.
-
Playback of the following files is not supported. MP3/WMA/AAC/FLAC:
-copyright-protected files
- DRM (Digital Rights Management) files
- Multi-channel audio files
MP3/WMA/AAC:
- lossless compression files WAV:
Multi-channel audio files
Before making a connection, select the USB mode (Android mode or MSC/MTP mode) depending on the USB device (page 20).
1 Connect a USB device to the USB port (page 11).
Playback starts.
If a device is already connected, to start playback, press SRC to select [USB] ([IPD] appears in the display when the iPod is recognized).
2 Adjust the volume on this unit.
To stop playback
Press and hold OFF for 1 second.
To remove the device
Stop playback, then remove the device.
Caution for iPhone
When you connect an iPhone via USB, phone call volume is controlled by the iPhone, not the unit. Do not inadvertently increase the volume on the unit during a call, as a sudden loud sound may result when the call ends.
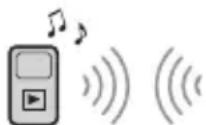
Playing a BLUETOOTH Device
You can play contents on a connected device that supports BLUETOOTH A2DP (Advanced Audio Distribution Profile).
1 Make BLUETOOTH connection with the audio device (page 9).
To select the audio device, press MENU, then select [BLUETOOTH] [SET AUDIODEV] (page 23).
2 Press SRC to select [BT AUDIO].
3 Operate the audio device to start playback.
4 Adjust the volume on this unit.
Notes
- Depending on the audio device, information such as title, track number/time and playback status may not be displayed on this unit.
- Even if the source is changed on this unit, playback of the audio device does not stop.
- [BT AUDIO] does not appear in the display while running the "Sony | Music Center" application via the BLUETOOTH function.
To match the volume level of the BLUETOOTH device to other sources
Start playback of the BLUETOOTH audio device at a moderate volume, and set your usual listening volume on the unit. Press MENU, then select [SOUND] [SET BTA VOL] (page 22).
Searching and Playing Tracks
Repeat play and shuffle play
Not available when a USB device in Android mode is connected.
1 During playback, press (repeat) or (shuffle) repeatedly to select the desired play mode.
Playback in the selected play mode may take time to start.
Available play modes differ depending on the selected sound source.
Searching a track by name (QuickBrowZerTM)
Not available when a USB device in Android mode or iPod is connected.
1 During CD, USB or BT AUDIO 1 playback, press (browse) 2 to display the list of search categories. When the track list appears, press (back) repeatedly to display the desired search category.
1 Available only for audio devices supporting AVRCP (Audio Video Remote Control Profile) 1.4 or above.
2 During USB playback, press (Browse) for more than 2 seconds to directly return to the beginning of the category list.
2 Rotate the control dial to select the desired search category, then press it to confirm.
3 Repeat step 2 to search the desired track.
Playback starts.
To exit the Quick-BrowZer mode
Press Q (browse).
Searching by skipping items (Jump mode)
Not available when a USB device in Android mode or iPod is connected.
1 Press Q (browse).
2 Press (SEEK +).
3 Rotate the control dial to select the item.
The list is jumped in steps of 10% of the total number of items.
4 Press ENTER to return to the QuickBrowZer mode.
The selected item appears.
5 Rotate the control dial to select the desired item, then press it.
Playback starts.
Handsfree Calling (via BLUETOOTH only)
To use a cellular phone, connect it with this unit. You can connect two cellular phones to the unit. For details, see "Preparing a BLUETOOTH Device" (page 9).

Receiving a Call
1 Press CALL when a call is received with a ringtone.
The phone call starts.
Note
The ringtone and talker's voice are output only from the front speakers.
To reject the call
Press and hold OFF for 1 second.
To end the call
PressCALL again.
Making a Call
You can make a call from the phonebook or call history when a cellular phone supporting PBAP (Phone Book Access Profile) is connected.
When two cellular phones are connected to the unit, select either phone.
From the phonebook
1 Press CALL.
When two cellular phones are connected to the unit, rotate the control dial to select either phone, then press it.
2 Rotate the control dial to select [PHONE BOOK], then press it.
3 Rotate the control dial to select an initial from the initial list, then press it.
4 Rotate the control dial to select a name from the name list, then press it.
5 Rotate the control dial to select a number from the number list, then press it.
The phone call starts.
From the call history
1 Press CALL.
When two cellular phones are connected to the unit, rotate the control dial to select either phone, then press it.
2 Rotate the control dial to select [RECENT CALL], then press it.
A list of the call history appears.
3 Rotate the control dial to select a name or phone number from the call history, then press it.
The phone call starts.
By phone number input
1 Press CALL.
When two cellular phones are connected to the unit, rotate the control dial to select either phone, then press it.
2 Rotate the control dial to select [DIAL NUMBER], then press it.
3 Rotate the control dial to enter the phone number, and lastly select [ ] (space), then press ENTER*.
The phone call starts.
- To move the digital indication, press I▶/▶I (SEEK -/+).
Note
[ ] appears instead of [#] on the display.
By redial
1 Press CALL.
When two cellular phones are connected to the unit, rotate the control dial to select either phone, then press it.
2 Rotate the control dial to select [REDIAL], then press it.
The phone call starts.
By voice tags
You can make a call by saying the voice tag stored in a connected cellular phone that has a voice dialing function.
1 Press CALL.
When two cellular phones are connected to the unit, rotate the control dial to select either phone, then press it.
2 Rotate the control dial to select [VOICE DIAL], then press it.
Alternatively, press and hold VOICE for more than 2 seconds.
3 Say the voice tag stored on the cellular phone.
Your voice is recognized, and the call is made.
To cancel voice dialing
Press VOICE.
Available Operations during Call
To adjust the ringtone volume
Rotate the control dial while receiving a call.
To adjust the talker's voice volume
Rotate the control dial during a call.
To adjust the volume for the other party (Mic gain adjustment)
Press MIC.
Adjustable volume levels: [MIC-LOW], [MIC-MID], [MIC-HI].
To reduce echo and noise (Echo Cancellation/Noise Cancellation Mode)
Press and hold MIC.
Settable mode: [EC/NC-1], [EC/NC-2].
To switch between handsfree mode and handheld mode
During a call, press MODE to switch the phone call audio between the unit and cellular phone.
Note
Depending on the cellular phone, this operation may not be available.
Useful Functions
Sony | Music Center with iPhone/Android smartphone
Downloading the latest version of "Sony | Music Center" application is required from the App Store for iPhone or from Google Play for Android smartphone.
Notes
- For your safety, follow your local traffic laws and regulations, and do not operate the application while driving.
- "Sony | Music Center" is an app for controlling Sony audio devices which are compatible with "Sony | Music Center", by your iPhone/Android smartphone.
- What you can control with "Sony | Music Center" varies depending on the connected device.
- To make use of "Sony | Music Center" features, see the details on your iPhone/Android smartphone.
- For further details on "Sony | Music Center," visit the following URL: http://www.sony.net/smcqa/
- Visit the website below and check the compatible iPhone/Android smartphone models. For iPhone: visit the App Store For Android smartphone: visit Google Play
Establishing the Sony | Music Center connection
1 Make the BLUETOOTH connection with iPhone/Android smartphone (page 9).
To select the audio device, press MENU, then select [BLUETOOTH] [SET AUDIOODEV] (page 23).
2 Launch the "Sony | Music Center" application.
3 Press MENU, rotate the control dial to select [SONY APP], then press it.
4 Rotate the control dial to select [CONNECT], then press it.
Connection to iPhone/Android smartphone starts.
For details on the operations on iPhone/Android smartphone, see the help of the application.
If the device number appears
Make sure that the number is displayed (e.g., 123456), then select [Yes] on the iPhone/Android smartphone.
To terminate connection
1 Press MENU, rotate the control dial to select [SONY APP], then press it.
2 Rotate the control dial to select [CONNECT], then press it.
Selecting the source or application
You can operate to select the desired source or application on iPhone/Android smartphone.
To select the source
Press SRC repeatedly. Alternatively, press SRC, rotate the control dial to select the desired source, then press ENTER.
To display the source list
Press SRC.
Announcement of SMS by voice guide (Android smartphone only)
Messages of SMS are automatically read out through the car speakers when they are received.
For details on settings, refer to the help of the application.
Replying a message of SMS (Android smartphone only)
You can reply a message by touching the reply icon.
1 Activate the "Sony | Music Center" application, then touch the [Reply] (reply) icon. The message input display appears on the "Sony | Music Center" application.
2 Input a reply message by voice recognition. The list of message candidates appears on the "Sony | Music Center" application.
3 Rotate the control dial to select the desired message, then press it. The message is sent out.
Making sound and display settings
You can adjust the settings relating to sound and display via iPhone/Android smartphone.
For details on settings, refer to the help of the application.
Using Voice Recognition (Android smartphone only)
1 Press and hold VOICE to activate voice recognition.
2 Say the desired voice command into the microphone.
To deactivate voice recognition
Press VOICE.
Notes
- Voice recognition may not be available in some cases.
- Voice recognition may not work properly depending on the performance of the connected Android smartphone.
- Operate under conditions where noise such as engine sound is minimized during voice recognition.
Using Siri Eyes Free
Siri Eyes Free allows you to use an iPhone handsfree by simply speaking into the microphone. This function requires you to connect an iPhone to the unit via BLUETOOTH. Availability is limited to iPhone 4s or later. Make sure that your iPhone is running the latest iOS version. You must complete BLUETOOTH registration and connection configurations for the iPhone with the unit in advance. For details, see "Preparing a BLUETOOTH Device" (page 9). To select the iPhone, press MENU, then select [BLUETOOTH] [SET AUDIODEV] (page 23).
1 Activate the Siri function on the iPhone.
For details, refer to the operating instructions supplied with the iPhone.
2 Press and hold VOICE for more than 2 seconds.
The voice command display appears.
3 After the iPhone beeps, speak into the microphone.
The iPhone beeps again, then Siri starts responding.
To deactivate Siri Eyes Free
Press VOICE.
Notes
- The iPhone may not recognize your voice depending on usage conditions. (For example, if you are in a moving car.)
- Siri Eyes Free may not function properly, or the response time may lag in locations where iPhone signals are difficult to receive.
Depending on the iPhone's operating condition, Siri Eyes Free may not function properly, or may quit. - If you play a track with an iPhone using the BLUETOOTH audio connection, when the track starts playback via BLUETOOTH, Siri Eyes Free automatically quits and the unit switches to the BLUETOOTH audio source.
- When Siri Eyes Free is activated during audio playback, the unit may switch to the BLUETOOTH audio source even if you do not specify a track to play.
- When connecting the iPhone to the USB port, Siri Eyes Free may not function properly, or may quit.
- When connecting the iPhone to the unit via USB, do not activate Siri with the iPhone. Siri Eyes Free may not function properly, or may quit.
- There is no audio sound while Siri Eyes Free is activated.
Settings
Canceling the DEMO Mode
You can cancel the demonstration display which appears when the source is off and the clock is displayed.
1 Press MENU, rotate the control dial to select [GENERAL], then press it.
2 Rotate the control dial to select [SET DEMO], then press it.
3 Rotate the control dial to select [SET DEMO-OFF], then press it.
The setting is complete.
4 Press (back) twice.
The display returns to normal reception/ play mode.
Basic Setting Operation
You can set items in the following setup categories:
General setup (GENERAL), Sound setup (SOUND), Display setup (DISPLAY), BLUETOOTH setup (BLUETOOTH), Sony | Music Center setup (SONY APP)
1 Press MENU.
2 Rotate the control dial to select the setup category, then press it.
The items that can be set differ depending on the source and settings.
3 Rotate the control dial to select the options, then press it.
To return to the previous display
Press (back).
General Setup (GENERAL)
AREA (area)
Specifies the area/region to use this unit: [EUROPE], [RUSSIA].
If the area/region currently set is changed, this unit is reset, then the clock is displayed.
(Available only while the source is off and the clock is displayed.)
DEMO (demonstration)
Activates the demonstration: [ON], [OFF].
CLOCK-ADJ (clock adjust) (page 8)
CAUT ALM (caution alarm)
Activates the caution alarm: [ON], [OFF] (page 7).
(Available only while the source is off and the clock is displayed.)
BEEP (beep)
Activates the beep sound: [ON], [OFF].
AUTO OFF (auto off)
Shuts off automatically after a certain time when the unit is turned off: [ON] (30 minutes), [OFF].
STEERING (steering)
Registers/resets the setting of the steering wheel remote control.
(Available only while the source is off and the clock is displayed.)
STR CONTROL (steering control)
Selects the input mode of the connected remote control. To prevent a malfunction, be sure to match the input mode with the connected remote control before use.
CUSTOM (custom)
Input mode for the steering wheel remote control
PRESET (preset)
Input mode for the wired remote control excluding the steering wheel remote control
EDIT CUSTOM (edit custom)
Registers the functions (SOURCE, ATT, VOL + / - , SEEK + / - VOICE, ON HOOK, OFF HOOK) to the steering wheel remote control:
1 Rotate the control dial to select the function you want to assign to the steering wheel remote control, then press it.
2 While [REGISTER] is blinking, press and hold the button on the steering wheel remote control you want to assign the function to. When registration is complete, [REGISTERED] is displayed.
3 To register other functions, repeat steps 1 and 2.
(Available only when [STR CONTROL] is set to [CUSTOM].)
RESET CUSTOM (reset custom)
Resetsthe setting of the steering wheel remote control: [YES], [NO].
(Available only when [STR CONTROL] is set to [CUSTOM].)
Notes
- While making settings, only button operation on the unit is available. For safety, park your car before making this setting.
- If an error occurs while registering, all the previously-registered information remains. Restart registration from the function where the error occurred.
- This function may not be available on some vehicles. For details on the compatibility of your vehicle, visit the support site on the back cover.
USB MODE (USB mode)
Changes the USB mode: [ANDROID], [MSC/MTP].
(Available only when the USB source is selected.)
CT (clock time)
Activates the CT function: [ON], [OFF].
AF/TA (alternative frequencies/traffic announcement)
Selects the alternative frequencies (AF) and traffic announcement (TA) setting: [AF-ON], [TA-ON], [AF/TA-ON], [AF/TA-OFF].
REGIONAL (regional)
Restricts reception to a specific region: [ON], [OFF].
(Available only when FM is received.)
BTM (best tuning memory) (page 12)
(Available only when the tuner is selected.)
FIRMWARE (firmware)
(Available only while the source is off and the clock is displayed.)
Checks/updates the firmware version. For details, visit the support site on the back cover.
FW VERSION (firmware version)
Displays current firmware version.
FW UPDATE (firmware update)
Enters firmware update process: [YES], [NO].
Updating the firmware takes a few minutes to complete. During the update, do not turn the ignition to the OFF position, nor remove the USB device.
Sound Setup (SOUND)
This setup menu is not available when the source is off and the clock is displayed.
C.AUDIO+ (ClearAudio+) Reproduces sound by optimizing the digital signal with the Sony recommended sound settings: [ON], [OFF]. (Automatically sets to [OFF] when [EQ10 PRESET] is changed and/or [EXTRA BASS] is set to [1] or [2] and/or [DSO] is set to [LOW], [MID] or [HIGH].)
EQ10 PRESET (EQ10 preset)
Selects an equalizer curve from 10 equalizer curves or off:
[OFF], [R&B], [ROCK], [POP], [HIP-HOP], [EDM], [JAZZ], [SOUL], [COUNTRY], [KARAOKE]*, [CUSTOM]. The equalizer curve setting can be memorized for each source.
- [KARAOKE] reduces the vocal sound but cannot fully remove it during playback. Also, using a microphone is not supported.
EQ10 CUSTOM (EQ10 custom) Sets [CUSTOM] of EQ10. Selects the equalizer curve: [BAND1] 32 Hz, [BAND2] 63 Hz, [BAND3] 125 Hz, [BAND4] 250 Hz, [BAND5] 500 Hz, [BAND6] 1 kHz, [BAND7] 2 kHz, [BAND8] 4 kHz, [BAND9] 8 kHz, [BAND10] 16 kHz. The volume level is adjustable in 1 dB steps, from -6 dB to +6 dB.
POSITION (listening position)
F/R POS (front/rear position) Simulates a natural sound field by delaying the sound output from speakers to suit your position:
[FRONT L] (front left),
[FRONT] (center front),
[ALL] (center of your car), [CUSTOM] (position set by the advanced car audio settings on "Sony | Music Center")
[OFF] (no position set)
ADJ POSITION (adjust position)
Fine-tunes the listening position setting: [+3] - [CENTER] - [-3] .
(Available only when [F/R POS] is not set to [OFF] or [CUSTOM].)
(Available only when [F/R POS] is set to other than [OFF].)
DSO (dynamic stage organizer)
Creates a more ambient sound as if there were speakers in the dashboard: [OFF], [LOW], [MID], [HIGH].
(Automatically sets to [OFF] when [C.AUDIO+] is set to [ON].)
BALANCE (balance) Adjusts the sound balance: [RIGHT-15] - [CENTER] - [LEFT-15].
FADER (fader)
Adjusts the relative level: [FRONT-15] - [CENTER] - [REAR-15].
DSEE (digital sound enhancement engine) Improves digitally compressed sound by restoring high frequencies lost in the compression process: [ON], [OFF]. This setting can be memorized for each source other than the tuner.
AAV (advanced auto volume)
Adjusts the playback volume level of all playback sources to the optimum level: [ON], [OFF].
RB ENH (rear bass enhancer)
Enhances the bass sound by applying a low pass filter setting to the rear speakers. This function allows the rear speakers to work as a subwoofer if one is not connected.
(Available only when [SW DIREC] is set to [OFF].)
RBE MODE (rear bass enhancer mode)
Selects the rear bass enhancer mode: [1], [2], [3], [OFF].
LPF FREQ (low pass filter frequency)
Selects the subwoofer cut-off frequency: [50Hz], [60Hz], [80Hz], [100Hz], [120Hz].
LPF SLOP (low pass filter slope)
Selects the LPF slope: [1], [2], [3]
SW DIREC (subwoofer direct connection)
Adjusts the settings for the subwoofer connected to the rear speaker lead without a power amplifier.
(Available only when [RBE MODE] is set to [OFF].)
Be sure to connect a 4 -8 subwoofer to either of the rear speaker leads. Do not connect a speaker to the other rear speaker lead.
Selects the subwoofer mode: [1], [2], [3], [OFF].
Selects the subwoofer phase: [NORM], [REV].
(Available only when [F/R POS] is set to other than [OFF].)
LPF FREQ (low pass filter frequency)
Selects the subwoofer cut-off frequency:
[50Hz], [60Hz], [80Hz], [100Hz], [120Hz].
LPF SLOP (low pass filter slope)
Selects the LPF slope: [1], [2], [3].
([ATT] is displayed at the lowest setting.)
Selects the subwoofer phase: [NORM], [REV].
(Available only when [F/R POS] is not set to [OFF].)
LPF FREQ (low pass filter frequency)
Selects the subwoofer cut-off frequency: [50Hz], [60Hz], [80Hz], [100Hz], [120Hz].
LPF SLOP (low pass filter slope)
Selects the LPF slope: [1], [2], [3].
HPF (high pass filter)
HPF FREQ (high pass filter frequency)
Selects the front/rear speaker cut-off frequency: [OFF], [50Hz], [60Hz], [80Hz], [100Hz], [120Hz].
HPF SLOP (high pass filter slope)
Selects the HPF slope (effective only when [HPF FREQ] is set to other than [OFF]): [1], [2], [3].
AUX VOL (AUX volume)
Adjusts the volume level for each connected auxiliary device: [+18dB] - [0 dB] - [-8 dB].
This setting negates the need to adjust the volume level between sources.
(Available only when the AUX is selected.)
BTA VOL (BLUETOOTH audio volume)
Adjusts the volume level for each connected BLUETOOTH device: [+6dB] - [0dB] - [-6dB]
This setting negates the need to adjust the volume level between sources.
(Available only when the BT audio or application is selected.)
MAX VOLUME (maximum volume)
Sets the maximum volume level of the unit: [30] - [50].
Display Setup (DISPLAY)
DIMMER (dimmer)
Changes the display brightness:
[OFF], [ON], [AT] (auto), [CLK] (clock).
([AT] is available only when the
illumination control lead is connected, and the head light is turned on.)
To set this function to be active only during a fixed period, select [CLK], then set the start and end times.
- To set the brightness when the dimmer function is activated:
Set [DIMMER] to [ON], then adjust [BRIGHTNESS].
- To set the brightness when the dimmer function is deactivated:
Set [DIMMER] to [OFF], then adjust [BRIGHTNESS].
The brightness setting is stored and applied when the dimmer function is activated or deactivated.
BRIGHTNESS (brightness)
Adjusts the display brightness. The brightness level is adjustable: [1] - [10].
BUTTON-C (button color)
Sets a preset color or customized color for the buttons.
COLOR (color)
Selects from 15 preset colors, 1 customized color.
CUSTOM-C (custom color)
Registers a customized color for the buttons.
RGB RED, RGB GRN, RGB BLUE
Adjustable color range: [0] - [32] ([0]
cannot be set for all color ranges).
DSPL-C (display color)
Sets a preset color or customized color for the display.
COLOR (color)
Selects from 15 preset colors, 1 customized color.
CUSTOM-C (custom color)
Registers a customized color for the display.
RGB RED, RGB GRN, RGB BLUE
Adjustable color range: [0] - [32] ([0]
cannot be set for all color ranges).
SND SYNC (sound synchronization)
Activates the synchronization of the
illumination with the sound: [ON], [OFF].
AUTO SCR (auto scroll)
Scrolls long items automatically: [ON], [OFF].
(Not available when the AUX or tuner is selected.)
BLUETOOTH Setup (BLUETOOTH)
PAIRING (pairing) (page 9)
Connects up to two BLUETOOTH devices: [DEVICE 1], [DEVICE 2].
[DEVICE 1] or [DEVICE 2] will be changed to the paired device name after pairing is complete.
AUDIODEV (audio device)
Selects the audio device.
[] appears on the device paired with
[DEVICE 1] or the current A2DP compatible audio device.
RINGTONE (ringtone)
Selects whether this unit or the connected cellular phone outputs the ringtone: [1] (this unit), [2] (cellular phone).
AUTOANS (auto answer)
Sets this unit to answer an incoming call automatically: [OFF], [1] (about 3 seconds), [2] (about 10 seconds).
AUTOPAIR (auto pairing)
Starts BLUETOOTH pairing automatically when iOS device version 5.0 or later is connected via USB: [ON], [OFF].
BT SIGNL (BLUETOOTH signal) (page 10)
Activates/deactivates the BLUETOOTH function.
BT INIT (BLUETOOTH initialize)
Initializes all the BLUETOOTH related settings (pairing information, device information, etc.): [YES], [NO].
When disposing the unit, initialize all the settings.
(Available only while the source is off and the clock is displayed.)
Sony | Music Center Setup (SONY APP)
AUTO LAUNCH (auto launch)
Activates the "Sony | Music Center" auto launch: [ON], [OFF].
When [ON] is selected, "Sony | Music
Center" will automatically connect after the BLUETOOTH connection is complete.
CONNECT (connect) (page 17)
Establish and terminate "Sony | Music
Center" function (connection).
Additional Information
Updating the Firmware
To update the firmware, visit the support site on the back cover, then follow the online instructions.
Notes
- Using a USB device (not supplied) is required for updating the firmware. Store the updater in the USB device, and connect the device to the USB port, then perform the update operation.
- Updating the firmware takes a few minutes to complete. During the update, do not turn the ignition to the OFF position, nor remove the USB device.
Precautions
Cool off the unit beforehand if your car has been parked in direct sunlight.
- Do not leave the front panel or audio devices brought in inside the car, or it may cause malfunction due to high temperature in direct sunlight.
- Power antenna (aerial) extends automatically.
Moisture condensation
Should moisture condensation occur inside the unit, remove the disc and wait for about an hour for it to dry out; otherwise the unit will not operate properly.
To maintain high sound quality
Do not splash liquid onto the unit or discs.
Notes on discs
- Do not expose discs to direct sunlight or heat sources such as hot air ducts, nor leave it in a car parked in direct sunlight.
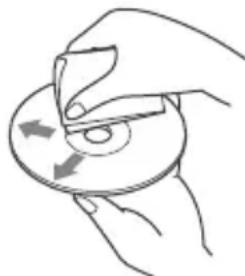
- Before playing, wipe the discs with a cleaning cloth from the center out. Do not use solvents such as benzine, thinner, commercially available cleaners.
- This unit is designed to play discs that conform to the Compact Disc (CD) standard. DualDiscs and some of the music discs encoded with copyright protection technologies do not conform to the Compact Disc (CD) standard, therefore, these discs may not be playable by this unit.
-
Discs that this unit CANNOT play
-
Discs with labels, stickers, or sticky tape or paper attached. Doing so may cause a malfunction, or may ruin the disc.
- Discs with non-standard shapes (e.g., heart, square, star). Attempting to do so may damage the unit.
-8cm(1B4in)discs.
Notes on CD-R/CD-RW discs
- If the multi-session disc begins with a CD-DA session, it is recognized as a CD-DA disc, and other sessions are not played.
-
Discs that this unit CANNOT play
-
CD-R/CD-RW of poor recording quality.
- CD-R/CD-RW recorded with an incompatible recording device.
- CD-R/CD-RW which is finalized incorrectly.
- CD-R/CD-RW other than those recorded in music CD format or MP3 format conforming to ISO9660 Level 1/Level 2, Joliet/Romeo or multi-session.
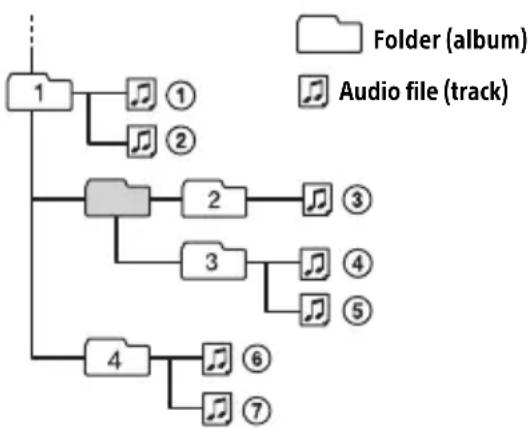
Playback order of audio files
About iPod
- You can connect to the following iPod models. Update your iPod devices to the latest software before use.
Compatible iPhone/iPod models
| Compatible Model | Bluetooth® | USB |
| iPhone 7 √ | √ | |
| iPhone 7 Plus √ | √ | |
| iPhone SE √ | √ | |
| iPhone 6s √ | √ | |
| iPhone 6s Plus √ | √ | |
| iPhone 6 √ | √ | |
| iPhone 6 Plus √ | √ | |
| iPhone 5s √ | √ | |
| iPhone 5c √ | √ | |
| iPhone 5 √ | √ | |
| iPhone 4s √ | √ | |
| iPod touch (6th generation) | √ | √ |
| iPod touch (5th generation) | √ | √ |
| iPod nano (7th generation) | √ |
- Use of the Made for Apple badge means that an accessory has been designed to connect specifically to the Apple product(s) identified in the badge, and has been certified by the developer to meet Apple performance standards. Apple is not responsible for the operation of this device or its compliance with safety and regulatory standards. Please note that the use of this accessory with an Apple product may affect wireless performance.
If you have any questions or problems concerning your unit that are not covered in this manual, consult your nearest Sony dealer.
Maintenance
Cleaning the connectors
The unit may not function properly if the connectors between the unit and the front panel are not clean. In order to prevent this, detach the front panel (page 7) and clean the connectors with a cotton swab. Do not apply too much force. Otherwise, the connectors may be damaged.
Notes
- For safety, turn off the ignition before cleaning the connectors, and remove the key from the ignition switch.
- Never touch the connectors directly with your fingers or with any metal device.
Specifications
Tuner section
FM
Tuning range:
When [AREA] is set to [EUROPE]:
87.5 MHz - 108.0 MHz
When [AREA] is set to [RUSSIA]:
FM1/FM2: 87.5 MHz - 108.0 MHz (at 50 kHz step)
FM3: 65 MHz - 74 MHz (at 30 kHz step)
Antenna (aerial) terminal:
External antenna (aerial) connector
Intermediate frequency:
When [AREA] is set to [EUROPE]:
FM CCIR: -1,956.5 kHz to -487.3 kHz and +500.0 kHz to +2,095.4 kHz
When [AREA] is set to [RUSSIA]:
FM CCIR: -1,956.5 kHz to -487.3 kHz and +500.0 kHz to +2,095.4 kHz
FM OIRT: -1,815.6 kHz to -943.7 kHz and +996.6 kHz to +1,776.6 kHz
Usable sensitivity: 8 dBf
Selectivity: 75 dB at 400 kHz
Signal-to-noise ratio: 73 dB
Separation: 50 dB at 1 kHz
Frequency response: 20Hz - 15,000Hz
MW/LW
Tuning range:
MW: 531 kHz - 1,602 kHz
LW:153kHz-279kHz
Antenna (aerial) terminal:
External antenna (aerial) connector
Sensitivity: MW: 26 V , LW: 50 V
CD Player section
Signal-to-noise ratio: 120 dB
Frequency response: 10Hz - 20,000Hz
Wow and flutter: Below measurable limit
Maximum number*1 of:
Folders (albums)*2:150
Files (tracks) and folders*3: 300
Displayable characters for a folder/file name:
32 (Joliet)/64 (Romeo)
Corresponding codec: MP3 (.mp3), WMA (.wma) and AAC (.m4a)
1 CD-R/CD-RW only
2 including the root folder
*3 may be less than the measured value if folder/file names contain many characters
USB Player section
Interface: USB (High-speed)
Maximum current: 1.5 A
Maximum number of recognizable files (tracks): 10,000
Compatible Android Open Accessory protocol (AOA): 2.0
Corresponding codec:
MP3 (.mp3)
Bit rate: 8 kbps - 320 kbps (Supports VBR (Variable Bit Rate))
Sampling rate: 16 kHz - 48 kHz
WMA (.wma)
Bit rate: 32 kbps - 192 kbps (Supports VBR (Variable Bit Rate))
Sampling rate: 32 kHz, 44.1 kHz, 48 kHz
AAC (.m4a, .mp4)
Bit rate: 8 kbps - 320 kbps
Sampling rate: 11.025 kHz - 48 kHz
WAV (.wav)
Bit depth: 16 bit
Sampling rate: 44.1 kHz, 48 kHz
FLAC (.flac)
Bit depth: 16 bit, 24 bit
Sampling rate: 44.1 kHz, 48 kHz
Wireless Communication
Communication System: BLUETOOTH Standard version 3.0
Output: BLUETOOTH Standard Power Class 2 (radiated +1 dBm)
Maximum communication range*1: Line of sight approx. 10m 33 ft
Frequency band: 2.4 GHz band (2.4000 GHz - 2.4835 GHz)
Modulation method: FHSS
Compatible BLUETOOTH Profiles2: A2DP (Advanced Audio Distribution Profile) 1.3
AVRCP (Audio Video Remote Control Profile) 1.5
HFP (Handsfree Profile) 1.6
PBAP (Phone Book Access Profile)
SPP (Serial Port Profile)
MAP (Message Access Profile)
HID (Human Interface Device Profile)
Corresponding codec: SBC (.sbc), AAC (.m4a)
*1 The actual range will vary depending on factors such as obstacles between devices, magnetic fields around a microwave oven, static electricity, reception sensitivity, antenna (aerial)'s performance, operating system, software application, etc.
*2 BLUETOOTH standard profiles indicate the purpose of BLUETOOTH communication between devices.
NFC Communication
Frequency band and maximum power spec NFC: 13.56MHz < 60dB A / m at 10m
Power amplifier section
Output: Speaker outputs
Speaker impedance: 4 Ω - 8 Ω
Maximum power output: 100W× 4 (at 4
General
Outputs: Audio outputs terminal: FRONT, REAR, SUB Power antenna (aerial)/Power amplifier control terminal (REM OUT)
Inputs: Remote controller input terminal Antenna (aerial) input terminal MIC input terminal
Power requirements: 12 V DC car battery (negative ground (earth))
Rated current consumption: 10 A
Dimensions: Approx. 178mm× 50mm× 178mm (7 1/8 in × 2 in × 7 1/8 in) (w/h/d)
Mounting dimensions: Approx. 182mm× 53mm× 161mm (7 1/4 in × 2 1/8 in × 6 3/8 in) (w/h/d)
Mass: Approx. 1.3 kg (2 lb 14 oz)
Package contents:
Main unit (1)
Microphone (1)
Parts for installation and connections (1 set)
Your dealer may not handle some of the above listed accessories. Please ask the dealer for detailed information.
Design and specifications are subject to change without notice.
Copyrights
The Bluetooth® word mark and logos are registered trademarks owned by the Bluetooth SIG, Inc. and any use of such marks by Sony Corporation is under license. Other trademarks and trade names are those of their respective owners.
The N-Mark is a trademark or registered trademark of NFC Forum, Inc. in the United States and in other countries.
Windows Media is either a registered trademark or trademark of Microsoft Corporation in the United States and/or other countries.
This product is protected by certain intellectual property rights of Microsoft Corporation. Use or distribution of such technology outside of this product is prohibited without a license from Microsoft or an authorized Microsoft subsidiary.
Apple, iPhone, iPod, iPod nano, iPod touch, and Siri are trademarks of Apple Inc., registered in the U.S. and other countries. App Store is a service mark of Apple Inc.
IOS is a trademark or registered trademark of Cisco in the U.S. and other countries and is used under license.
Google, Google Play and Android are trademarks of Google LLC.
libFLAC
Copyright (C) 2000-2009 Josh Coalson
Copyright (C) 2011-2013 Xiph.Org Foundation
Redistribution and use in source and binary forms, with or without modification, are permitted provided that the following conditions are met:
- Redistributions of source code must retain the above copyright notice, this list of conditions and the following disclaimer.
- Redistributions in binary form must reproduce the above copyright notice, this list of conditions and the following disclaimer in the documentation and/or other materials provided with the distribution.
- Neither the name of the Xiph.org Foundation nor the names of its contributors may be used to endorse or promote products derived from this software without specific prior written permission.
THIS SOFTWARE IS PROVIDED BY THE
COPYRIGHT HOLDERS AND COLNTRIBUTORS "AS IS" AND ANY EXPRESS OR IMPLIED
WARRANTIES, INCLUDING, BUT NOT LIMITED TO, THE IMPLIED WARRANTY OF
MERCHANTABILITY AND FITNESS FOR A
PARTICULAR PURPOSE ARE DISCLAIMED. IN NO EVENT SHALL THE FOUNDATION OR
CONTRIBUTORS BE LIABLE FOR ANY DIRECT,
INDIRECT, INCIDENTAL, SPECIAL,
EXEMPLARY, OR CONSEQUENTIAL DAMAGES (INCLUDING, BUT NOT LIMITED TO,
PROCUREMENT OF SUBSTITUTE GOODS OR SERVICES; LOSS OF USE, DATA, OR PROFITS;
OR BUSINESS INTERRUIPTION) HOWEVER CAUSED AND ON ANY THEORY OF LIABILITY,
WHETHER IN CONTRACT, STRICT LIABILITY,
OR TORT (INCLUDING NEGLIGENCE OR
OTHERWISE) ARISING IN ANY WAY OUT OF THE USE OF THIS SOFTWARE, EVEN IF
ADVISED OF THE POSSIBILITY OF SUCH DAMAGE.
Troubleshooting
The following checklist will help you remedy problems you may encounter with your unit. Before going through the checklist below, check the connection and operating procedures.
For details on using the fuse and removing the unit from the dashboard, see "Connection/Installation" (page 35). If the problem is not solved, visit the support site on the back cover.
General
The unit is turned off when playing at a high volume.
The power from the power supply lead of the car may not be sufficient.
- Check the power connection. If no problem is found in the connection, make the power connection to the battery directly. If the situation does not improve, consult your nearest dealer.
No sound or the sound is very low.
The position of the fader control [FADER] is not set for a 2-speaker system.
The volume of the unit and/or connected device is very low.
- Increase the volume of the unit and connected device.
No beep sound.
An optional power amplifier is connected and you are not using the built-in amplifier.
The contents of the memory have been erased.
The reset button has been pressed. -Store again into the memory.
The power supply lead or battery has been disconnected or not connected properly.
Stored stations and correct time are erased.
The fuse has blown.
Makes a noise when the position of the ignition is switched.
The leads are not matched correctly with the car's accessory power connector.
During playback or reception, the demonstration mode starts.
If no operation is performed for 5 minutes with [DEMO-ON] set, the demonstration mode starts.
- Set [DEMO-OFF] (page 20).
The display disappears from/does not appear in the display window.
The dimmer is set to [DIM-ON] (page 23).
The display disappears if you press and hold OFF.
- Press OFF on the unit until the display appears.
The connectors are dirty (page 26).
The display/illumination flashes.
The power supply is not sufficient.
- Check that the car battery supplies enough power to the unit. (The power requirement is 12VDC .)
The operation buttons do not function. The disc will not eject.
The connection is not correct.
- Check the connection of the unit.
If the situation does not improve, press the reset button (page 8). The contents stored in memory are erased.
For your safety, do not reset the unit while you are driving.
Radio reception
Stations cannot be received.
The sound is hampered by noises.
The connection is not correct.
- Check the connection of the car antenna (aerial).
- If the auto antenna (aerial) will not extend, check the connection of the power antenna (aerial) control lead.
Preset tuning is not possible.
The broadcast signal is too weak.
65 MHz to 74 MHz in FM3 cannot be tuned in.
[AREA] is set to [EUROPE].
- Set [AREA] to [RUSSIA] (page 20).
RDS
RDS services cannot be received (when [AREA] is set to [RUSSIA]).
FM3 is selected.
- Select FM1 or FM2.
RDS services are unavailable in the current region.
The SEEK starts after a few seconds of listening.
The station is non-TP or has weak signal.
- Deactivate TA (page 12).
No traffic announcements.
Activate TA (page 12).
The station does not broadcast any traffic announcements despite being TP.
- Tune in another station.
PTY displays [- - - -]
The current station is not an RDS station.
RDS data has not been received.
The station does not specify the program type.
Program service name flashes.
There is no alternative frequency for the current station.
- Press 14 / 10 (SEEK - / + ) while the program service name is flashing. [PI SEEK] appears and the unit starts searching for another frequency with the same PI (program identification) data.
CD playback
The disc does not play.
Defective or dirty disc.
The CD-R/CD-RW is not for audio use (page 25).
MP3/WMA/AAC files cannot be played.
The disc is incompatible with the MP3/WMA/AAC format and version. For details on playable discs and formats, visit the support site on the back cover.
MP3/WMA/AAC files take longer to play than others.
The following discs take a longer time to start playback.
- A disc recorded with a complicated tree structure.
- A disc recorded in Multi Session.
- A disc to which data can be added.
The sound skips.
Defective or dirty disc.
USB device playback
You cannot play items via a USB hub.
This unit cannot recognize USB devices via a USB hub.
A USB device takes longer to play.
The USB device contains files with a complicated tree structure.
The sound is intermittent.
The sound may be intermittent at a high-bit-rate.
DRM (Digital Rights Management) files may not be playable in some cases.
The audio file cannot be played.
USB devices formatted with file systems other than FAT16 or FAT32 are unsupported.*
* This unit supports FAT16 and FAT32, but some USB device may not support all of these FAT. For details, refer to the operating instruction of each USB device or contact the manufacturer.
Operations for skipping an album, skipping items (Jump mode), and searching a track by name (QuickBrowZer) cannot be performed.
These operations cannot be performed when a USB device in Android mode or iPod is connected.
- Set [USB MODE] to [MSC/MTP] (page 20).
- Remove the iPod.
The USB mode of the device is not set to the appropriate mode.
- Make sure that the USB mode of the device is set to MSC/MTP mode.
The sound cannot be output during playback in Android mode.
While the unit is in Android mode, the sound outputs only from the Android smartphone.
- Check the status of the audio playback application on the Android smartphone.
- Playback may not perform properly depending on the Android smartphone.
NFC function
One-touch connection (NFC) is not possible.
If the smartphone does not respond to the touching.
- Check that the NFC function of the smartphone is turned on.
- Move the N-Mark part of the smartphone closer to the N-Mark part on this unit.
- If the smartphone is in a case, remove it.
NFC receiving sensitivity depends on the device.
If One-touch connection with the smartphone fails several times, make BLUETOOTH connection manually.
BLUETOOTH function
The connecting device cannot detect this unit.
Before the pairing is made, set this unit to pairing standby mode.
While connected to two BLUETOOTH devices, this unit cannot be detected from another device.
- Disconnect either connection and search for this unit from another device.
When the device pairing is made, set the BLUETOOTH signal output to on (page 10).
Connection is not possible.
The connection is controlled from one side (this unit or BLUETOOTH device), but not both.
- Connect to this unit from a BLUETOOTH device or vice versa.
The name of the detected device does not appear.
Depending on the status of the other device, it may not be possible to obtain the name.
No ringtone.
Adjust the volume by rotating the control dial while receiving a call.
Depending on the connecting device, the ringtone may not be sent properly.
- Set [RINGTONE] to [1] (page 23).
The front speakers are not connected to the unit.
- Connect the front speakers to the unit.
The ringtone is output only from the front speakers.
The talker's voice cannot be heard.
The front speakers are not connected to the unit.
- Connect the front speakers to the unit. The talker's voice is output only from the front speakers.
A call partner says that the volume is too low or high.
Adjust the volume accordingly using Mic gain adjustment (page 17).
Echo or noise occurs in phone call conversations.
Lower the volume.
Set EC/NC Mode to [EC/NC-1] or [EC/NC-2] (page 17).
If the ambient noise other than the phone call sound is loud, try reducing this noise.
E.g.: If a window is open and road noise, etc., is loud, shut the window. If an air conditioner is loud, lower the air conditioner.
The phone is not connected.
When BLUETOOTH audio is played, the phone is not connected even if you press CALL.
- Connect from the phone.
The phone sound quality is poor.
Phone sound quality depends on reception conditions of cellular phone.
- Move your car to a place where you can enhance the cellular phone's signal if the reception is poor.
The volume of the connected audio device is low (high).
Volume level will differ depending on the audio device.
- Adjust the volume of the connected audio device or this unit (page 22).
The sound skips during playback of a BLUETOOTH audio device.
Reduce the distance between the unit and the BLUETOOTH audio device.
If the BLUETOOTH audio device is stored in a case which interrupts the signal, remove the audio device from the case during use.
Several BLUETOOTH devices or other devices which emit radio waves are in use nearby.
- Turn off the other devices.
- Increase the distance from the other devices.
The playback sound stops momentarily when the connection between this unit and the cellular phone is being made. This is not a malfunction.
The connected BLUETOOTH audio device cannot be controlled.
Check that the connected BLUETOOTH audio device supports AVRCP.
Some functions do not work.
Check if the connecting device supports the functions in question.
A call is answered unintentionally.
The connecting phone is set to answer a call automatically.
Pairing failed due to a timeout.
Depending on the connecting device, the time limit for pairing may be short.
- Try completing the pairing within the time.
Cannot pair.
The unit may not be able to pair with a previously paired BLUETOOTH device after initializing the unit if the pairing information of the unit is on the BLUETOOTH device. In this case, delete the pairing information of the unit from the BLUETOOTH device, and then pair them again.
BLUETOOTH function cannot operate.
Turn off the unit by pressing OFF for more than 2 seconds, then turn the unit on again.
No sound is output from the car speakers during handsfree call.
If the sound is output from the cellular phone, set the cellular phone to output the sound from the car speakers.
Siri Eyes Free is not activated.
Perform the handsfree registration for an iPhone that supports Siri Eyes Free.
Set the Siri function on the iPhone to on.
Cancel the BLUETOOTH connection with the iPhone and the unit, and reconnect.
Sony | Music Center operation
Application name is mismatched with the actual application in "Sony | Music Center".
Launch the application again from the "Sony | Music Center" application.
While running the "Sony | Music Center" application via BLUETOOTH, the display automatically switches to [BT AUDIO].
The "Sony | Music Center" application or BLUETOOTH function has failed.
Run the application again.
The "Sony | Music Center" application is automatically disconnected when the display switches to [IPD].
The "Sony | Music Center" application on iPhone/iPod does not support iPod playback.
- Change the source of the unit to other than [IPD], then establish the "Sony | Music Center" connection (page 17).
The "Sony | Music Center" connection is automatically disconnected when the USB mode of the unit is changed to [ANDROID].
The Android smartphone is not supporting playback in Android mode. - Set the USB mode of the unit to [MSC/ MTP], then establish the "Sony | Music Center" connection (page 17).
Messages
The following messages may appear or flash during operation.
INVALID
The selected operation could be invalid.
[USB MODE] cannot be changed during iPod playback.
OUTPUT ERROR: There may be an internal malfunction.
Check the connection. If the error message still remains on in the display, consult your nearest Sony dealer.
READ: Now reading information.
Wait until reading is complete and playback starts automatically. This may take some time depending on the file organization.
TEMP CAUTION: The thermal protector is activated.
Reduce the volume.
- (underscore): The character cannot be displayed.
For CD playback:
CD ERROR: The disc cannot be played. The disc will be ejected automatically.
Clean or insert the disc correctly, or make sure the disc is not blank or defective.
CD NO DISC: There is no disc.
Insert a disc containing playable files (page 26).
CD NO MUSIC: There is no playable file. The disc will be ejected automatically.
Insert a disc containing playable files (page 26).
CD PUSH EJT: The disc could not be ejected properly.
Press (eject).
L L L or :Tbeginning or the end of the disc has been reached.
For USB device playback:
HUB NO SUPRT: USB hubs are not supported.
IPD STOP: iPod playback has finished.
Operateryour iPod/iPhone to start playback.
NOT SUPPORT -Android MODE
A USB device not supporting AOA (Android Open Accessory) 2.0 is connected to the unit while [USB MODE] is set to [ANDROID]. - Set [USB MODE] to [MSC/MTP] (page 20).
USB ERROR: The USB device cannot be played.
Connect the USB device again.
USB NO DEV: A USB device is not connected or recognized.
Make sure the USB device or USB cable is securely connected.
USB NO MUSIC: There is no playable file.
Connect a USB device containing playable files (page 26).
USB NO SUPRT: The USB device is not supported.
For details on the compatibility of your USB device, visit the support site on the back cover.
USB OVERLOAD: The USB device is overloaded.
Disconnect the USB device, then press SRC to select another source.
The USB device has a fault, or an unsupported device is connected.
For RDS operation:
NO AF: No alternative frequencies.
Press 144 / 10 (SEEK-/+)while the program service name is flashing. The unit starts searching for another frequency with the same PI (program identification) data ([PI SEEK] appears).
NO PI: No program identification. The selected station has no PI (program identification) data.
Select another station.
NO TP: No traffic programs.
The unit will continue searching for available TP stations.
For BLUETOOTH function:
BTA NO DEV: The BLUETOOTH device is not connected or recognized.
Make sure the BLUETOOTH device is securely connected, or the BLUETOOTH connection is established with the BLUETOOTH device.
ERROR: The selected operation could not be performed.
Wait for a while, then try again.
NO DEVICE: The BLUETOOTH device supporting HFP (Handsfree Profile) is not connected or recognized.
Make sure the BLUETOOTH device is securely connected, or the HFP connection is established with the BLUETOOTH device.
NO SUPPORT: The selected operation is not allowed or supported.
Make sure the BLUETOOTH device is supporting HFP (Handsfree Profile).
UNKNOWN: A name or phone number cannot be displayed.
WITHHIELD: The phone number is hidden by the caller.
For Sony | Music Center operation:
APP : A connection with the application is not established.
Make the "Sony | Music Center" connection again (page 17).
APP DISCNET: The application is disconnected.
Make the "Sony | Music Center" connection (page 17).
APP DISPLAY: A screen setting display of the application is open.
Exit the screen setting display of the application to enable button operation.
APP LIST: The contents list of the CD/USB/iPod is open.
Exit the list of the application to enable button operation.
APP MENU: A setting display of the application is open.
Exit the setting display of the application to enable button operation.
APP NO DEV: The device with the application installed is not connected or recognized.
Make the BLUETOOTH connection and establish the "Sony | Music Center" connection again (page 17).
APP SOUND: A sound setting display of the application is open.
Exit the sound setting display of the application to enable button operation.
OPEN APP: The "Sony | Music Center" application is not running.
Launch the application.
For steering wheel remote control operation:
ERROR: An error occurred during the function registration.
Register again from the function where the error occurred (page 20).
TIMEOUT: The function registration failed due to a timeout.
Try completing the registration while [REGISTER] is blinking (about 6 seconds) (page 20).
For firmware update operation:
ERROR: The updater is not stored in the USB device.
Store the updater in the USB device, then try again (page 24).
NO DEVICE: The USB device containing the updater is not connected or recognized.
Make sure the USB device is securely connected.
Disconnect the USB device, then connect the device again.
UPDATE ERROR - PRESS ENTER: Firmware update is not completed properly.
Press ENTER to clear the message, then try again.
During the update, do not turn the ignition to the OFF position, nor remove the USB device (page 24).
If these solutions do not help improve the situation, consult your nearest Sony dealer. If you take the unit to be repaired because of CD playback trouble, bring the disc that was used at the time the problem began.
Connection/Installation
Cautions
- Run all ground (earth) leads to a common ground (earth) point.
- Do not get the leads trapped under a screw, or caught in moving parts (e.g., seat railing).
- Before making connections, turn the car ignition off to avoid short circuits.
- Connect the power supply lead ⑥ to the unit and speakers before connecting it to the auxiliary power connector.
- Be sure to insulate any loose unconnected leads with electrical tape for safety.
Precautions
- Choose the installation location carefully so that the unit will not interfere with normal driving operations.
- Avoid installing the unit in areas subject to dust, dirt, excessive vibration, or high temperature, such as in direct sunlight or near heater ducts.
- Use only the supplied mounting hardware for a safe and secure installation.
Note on the power supply lead (yellow) When connecting this unit in combination with other stereo components, the amperage rating of the car circuit to which the unit is connected must be higher than the sum of each component's fuse amperage rating.
Mounting angle adjustment Adjust the mounting angle to less than 45^
Parts List for Installation
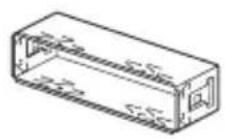
(1)
(2)


(3)
(4)


(5)

6

⑦
(8)

This parts list does not include all the package contents.
- The bracket ① and the protection collar ③ are attached to the unit before shipping. Before mounting the unit, use the release keys ② to remove the bracket ① from the unit. For details, see "Removing the protection collar and the bracket" (page 39).
- Keep the release keys ② for future use as they are also necessary if you remove the unit from your car.
Connection
1 Not supplied
2 Speaker impedance: 4 - 8 × 4
3 RCA pin cord (not supplied)
4 Depending on the type of car, use an adaptor for a wired remote control (not supplied). For details on using the wired remote control, see "Using the wired remote control" (page 39).
5 Whether in use or not, route the microphone input cord such that it does not interfere with driving operations. Secure the cord with a clamp, etc., if it is installed around your feet.
6 For details on installing the microphone, see "Installing the microphone" (page 39).
7 Depending on the type of car, use an adaptor (not supplied) if the antenna (aerial) connector does not fit.
8 Use speakers with 50W RMS or higher power input capacity. Using Sony XB series full range speakers is recommended.
9 When the amperage rating of the fuse used on your car is 10 A, make the power connection to the battery directly to avoid short circuits.
10 Before connection, arranging the yellow and black leads of the power connector is required.
Making connections
If you have a power antenna (aerial) without a relay box, connecting this unit with the supplied power supply lead ⑥ may damage the antenna (aerial).
To the car's speaker connector
| 1 | Rear speaker (right) | ⊕ | Purple |
| 2 | Purple/black striped | ||
| 3 | Front speaker (right) | ⊕ | Gray |
| 4 | Gray/black striped | ||
| 5 | Front speaker (left) | ⊕ | White |
| 6 | White/black striped | ||
| 7 | Rear speaker (left) | ⊕ | Green |
| 8 | Green/black striped |
To the car's power connector
| 12 | continuous power supply | Yellow |
| 13 | power antenna (aerial) /power amplifier control (REM OUT) | Blue/white striped |
| 14 | switched illumination power supply | Orange/white striped |
| 15 | switched power supply | Red |
| 16 | ground (earth) Black |
When connecting to the battery directly When the amperage rating of the fuse used on your car is 10A make the power connection to the battery directly to avoid short circuits.
to a metal point of car
to the positive battery terminal
Notes
- Despite connecting to the power supply lead of the car, the unit may not fully provide its performance due to insufficient power. In this case, make the power connection to the battery directly.
- All power wires connected to the positive battery post should be fused within 450~mm (18 in) of the battery post, and before they pass through any metal.
- Make sure that the car's battery wires connected to the car (ground (earth) to chassis)* are of a wire gauge at least equal to that of the main power wire connected from the battery to the head unit.
- During full-power operation, a current of more than 15 A will run through the system. Therefore, make sure that the wires to be connected to the +12 V and GND terminals of this unit are at least 14-Gauge (AWG14) or have a sectional area of more than 2mm^2 (3/32 in).
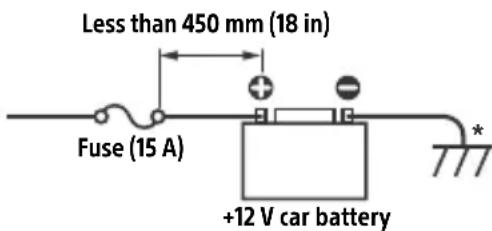
If you have any questions or problems concerning the connection, consult the dealer for details.
Subwoofer Easy Connection
You can use a subwoofer without a power amplifier when it is connected to a rear speaker cord.
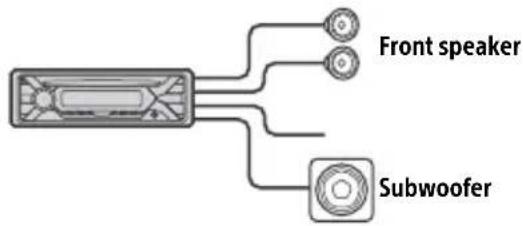
Notes
- Preparation of the rear speaker leads is required.
- Use a subwoofer with an impedance of 4 to 8 , and with adequate power handling capacities to avoid damage.
Memory hold connection
When the yellow power supply lead is connected, power will always be supplied to the memory circuit even when the ignition switch is turned off.
Speaker connection
- Before connecting the speakers, turn the unit off.
- Use speakers with an impedance of 4 to 8 , and with adequate power handling capacities to avoid damage.
Power connection diagram
Check your car's auxiliary power connector, and match the connections of leads correctly depending on the car.
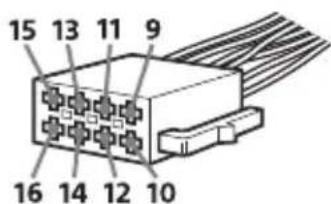
Auxiliary power connector

Common connection
Yellow Yellow
| 12 | continuous power supply | Yellow |
| 15 | switched power supply Red |
When the positions of the red and yellow leads are inverted

Yellow Yellow
| 12 | switched power supply | Yellow |
| 15 | continuous power supply | Red |
When the car without ACC position
Yellow
Yellow
After matching the connections and switching power supply leads correctly, connect the unit to the car's power supply. If you have any questions and problems connecting your unit that are not covered in this manual, consult the car dealer.
Installing the microphone
To capture your voice during handsfree calling, you need to install the microphone ⑦.
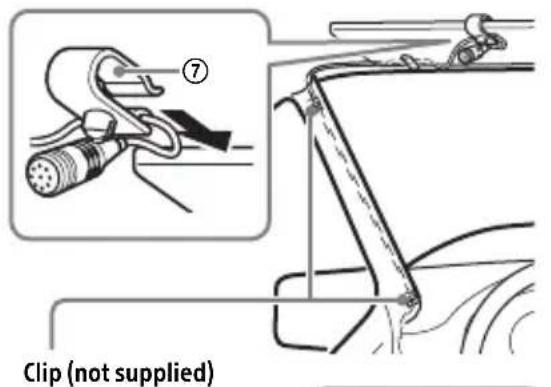

Cautions
- It is extremely dangerous if the cord becomes wound around the steering column or gearstick. Be sure to keep it and other parts from interfering with your driving operations.
- If airbags or any other shock-absorbing equipment is in your car, contact the store where you purchased this unit, or the car dealer, before installation.
Note
Before attaching the double-sided tape ⑧ , clean the surface of the dashboard with a dry cloth.
Using the wired remote control
1 To enable the wired remote control, set [STR CONTROL] in [SET STEERING] to [PRESET] (page 20).
Installation
Removing the protection collar and the bracket
Before installing the unit, remove the protection collar ③ and the bracket ① from the unit.
1 Pinch both edges of the protection collar ③, then pull it out.
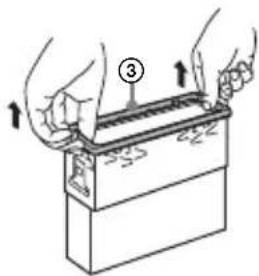
2 Insert both release keys ② until they click, and pull down the bracket ①, then pull up the unit to separate.
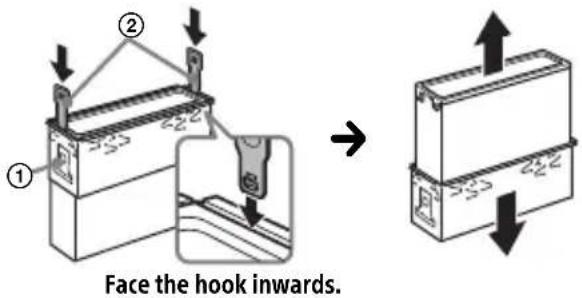
Mounting the unit in the dashboard
Before installing, make sure the catches on both sides of the bracket ① are bent inwards 2mm (3/32 in).
CAUTION
Do not touch the left side of the unit when removing from the dashboard. The heatsink on the left side of the unit remains hot right after use.
1 Position the bracket ① inside the dashboard, then bend the claws outward for a tight fit.
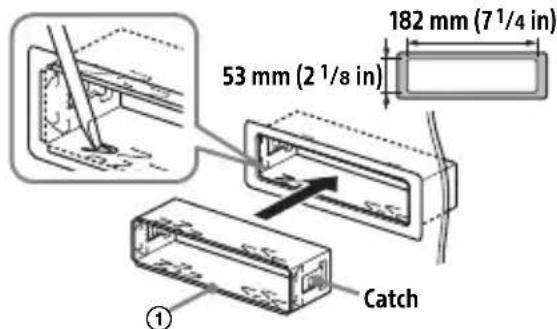
2 Mount the unit onto the bracket ①, then attach the protection collar ③.
Notes
- If the catches are straight or bent outwards, the unit will not be installed securely and may spring out.
Make sure the 4 catches on the protection collar ③ are properly engaged in the slots of the unit.
Detaching and attaching the front panel
For details, see "Detaching the Front Panel" (page 7).
Resetting the unit
For details, see "Resetting the Unit" (page 8).
Fuse replacement
When replacing the fuse, be sure to use one matching the amperage rating stated on the original fuse. If the fuse blows, check the power
connection and replace the fuse. If the fuse blows again after replacement, there may be an internal malfunction. In such a case, consult your nearest Sony dealer.
FW VERSION (Firmwareversion)
87,5 MHz - 108,0 MHz
Abtastrate: 32 kHz, 44,1 kHz, 48 kHz
AAC (.m4a, .mp4)
Bitrate: 8 Kbps - 320 Kbps
Abstraute: 11,025 kHz - 48 kHz
WAV (.wav)
Bittiefe: 16 Bit
Abstrate: 44,1 kHz, 48 kHz
FLAC (.flac)
(2,4000 GHz - 2,4835 GHz)
A2DP (Advanced Audio Distribution Profile) 1.3
AVRCP (Audio Video Remote Control Profile) 1.5
HFP (Handsfree Profile) 1.6
PBAP (Phone Book Access Profile)
SPP (Serial Port Profile)
MAP (Message Access Profile)
HID (Human Interface Device Profile)
Raccordement/Installation
Attention. 41
La lecture commence.
La lecture commence.
La lecture commence.
Appel mains libres (via BLUETOOTH uniquement)
DEMO (demonstration)
Permet d'activer la démonstration : [ON], [OFF].
EDIT CUSTOM (modifier personnalisation)
[OFF], [R&B], [ROCK], [POP], [HIP-HOP], [EDM], [JAZZ], [SOUL], [COUNTRY], [KARAOKE]*, [CUSTOM].
63 Hz, [BAND3] 125 Hz, [BAND4] 250 Hz,
[BAND5] 500 Hz, [BAND6] 1 kHz, [BAND7]
2 kHz, [BAND8] 4 kHz, [BAND9] 8 kHz, [BAND10] 16 kHz.
dossiers (albums)*2:150
Protocole AOA (Android Open Accessory) compatible : 2.0
Norme BLUETOOTH version 3.0
Sortie:
(2,400 GHz - 2,4835 GHz)
Raccordement/Installation
Attention
/ (prec/succ)
/ (indietro/avanti rapido)
7 (espulsionedisco)
8 PTY (tipodiprogramma)
[OFF], [R&B], [ROCK], [POP], [HIP-HOP], [EDM], [JAZZ], [SOUL], [COUNTRY], [KARAOKE]*, [CUSTOM].
Cartelle (album)*2: 150
File(brani)e cartelle*3:300
Interfaccia: USB (High-speed)
(2,4000 GHz - 2,4835 GHz)
A2DP (Advanced Audio Distribution Profile) 1.3
AVRCP (Audio Video Remote Control Profile) 1.5
HFP (Handsfree Profile) 1.6
PBAP (Phone Book Access Profile)
SPP (Serial Port Profile)
MAP (Message Access Profile)
HID (Human Interface Device Profile)
[OFF], [R&B], [ROCK], [POP], [HIP-HOP], [EDM], [JAZZ], [SOUL], [COUNTRY], [KARAOKE]*, [CUSTOM].
[BAND6] 1 kHz, [BAND7] 2 kHz, [BAND8]
4 kHz, [BAND9] 8 kHz, [BAND10] 16 kHz.
87,5 MHz - 108,0 MHz
+500,0 kHz a +2.095,4 kHz
+500,0 kHz a +2.095,4 kHz
FM OIRT: -1.815,6 kHz a -943,7 kHz y
+996,6 kHz a +1.776,6 kHz
Sensibilidad: 8 dBf
Según el estado del(other dispositivo,SEO,SEO,SEO,SEO,SEO,SEO,SEO,SEO,SEO,SEO,SEO,SEO,SEO,SEO,SEO,SEO,SEO,SEO,SEO,SEO,SEO,SEO,SEO,SEO,SEO,SEO,SEO,SEO,SEO,SEO,SEO,SEO,SEO,SEO,SEO,SEO,SEO,SEO,SEO,SEO,SEO,SEO,SEO,SEO,SEO,SEO,SEO,SEO,SEO,SEO, SEO, SEO, SEO, SEO, SEO, SEO, SEO, SEO, SEO, SEO, SEO, SEO, SEO, SEO, SEO, SEO, SEO, SEO, SEO, SEO, SEO, SEO, SEO, SEO, SEO, SEO, SEO, SEO, SEO
Ipon3BovnteIb: CoHn KopnpoeuH, 1-7-1
KoHaH MnHaTo-Ky TokNo, 108-0075 JnoHna
B ueJx 6e30nacHocTn o6raTeIbHo
yCTaHaBnBaIte 3TO yCTpoIcTBO Ha
np6OpHO nAHeJI N ABTOMO6nJI, TaK KaK
ero IeBa aSToHa HArpeBaETcR Bo
Bpemr pa6Otbl.
Io4Po6Hee cm."YCTaHOBka/
IOdkJIIOUeHne" (ctp. 43).
CboBCTBa Ia3epHoro DnOda
- PpOJXHTeJIbHOCTb n3JIyueHnA: HnpepbIBHOe
- BbIXoHnA MoUHocTb Ja3epa: MeHbIe 53,3 MKBT
(3HaueHne noJyueHo n3MepeHnem Ha pacctoHnn 200 MM OT NOBepXHOCTN JINH3bl OBeKtNbBa 6Ioka ONTNUeCKOTo CHTbIBaHnra c anepTypo7 MM.)
Ta6nukc cyka3aHneM pa6oeryo HnnpjKeHnI npyInx xapaKtepncTK HaxOuNTcHa HnXHei NaHei KOpnyca.
Iata n3rTOBHeHn yKa3aHa Ha TOBape, a
TAKKe Ha yNaKOBKe B CJIeDyIOUeM
fOpMaTe:
MM.YYYY, rnde MM-MecuN YYYYY- roD n3rOToBJIeHnA.
DaHbI aannapat npedctabJareT n3 ce6a ABTomO6nIbHyo ayDIOOCNTeMy, KOTOPaJaET Bam BO3MOXHOCTb IpOcIyUINBaTb ayDIO3aIncN, IcNoJIb3yB TOM YNCJe My3bIkaJIbHbIe npNJIOKeHNu cIyK6bl.
YcnoBna xpaHeHHa
Tobapb coxpaHOT BynaKOBaHHOM BnDe B TeMHbIX, CyNX, YnCTbIX, XopoWo BEHTUNIPyEmbIX NOMEeHnX, I3OJInpoBaHHbIX OT Mecr XpaHeHn KNCLOT nIeJIOueH.
TemnepaTypa xpaHeHn: oT-20 do +60°C.
OTHOCNTeNbHaBbJaxHoCTb XpaHeHHa: 80%.
Paboyam TemnepaTpa: ot 0do 40^ Paoboyam OTHOCHTbHaB BnaXHOCTb: 40-60%.
Cpok xpaHeHn He yCTaHOBnEh.

YTNIN3aunna NCNOJb3OBaHHbIX 3JeMeHTOB NITaHnN OTCJyXNBWeRo 3JeKTPnueckoroN
3neKtpOHHO O6OpydoBaHn (DnpeKtNa npImeHReTcB CTrpaHax EbpocOIO3a n Dpynx eBponecknx CTrpaHax, rIe JeNCTBYOT CNCTEmbl pa3dJIbHOrO c6opa OTXoIDOB)
IpeynpexkdeHne Ira clyuaeB, KOrda B 3aMKe 3axnraHna Het noLoxkeHHA CC
Y6eINTeCb, yTO HAcTpoEHa FyHKcIa AUTO OFF (ctp. 23). NocIe BbIKIOueHnA YCTPOIcTBa erO nITaHne 6yJeT aBTOMaTIuCeCKN OTKIOUeHO uepe3 YCTaHOBJIeHHoe BpeM, yTO IpeIOTBpaUaET pa3Pryk Ky aKKymJlToPA. EcIn FyHKcIa AUTO OFF He 3aJaHa, To npN KAKdOM BbIKIOUeHn 3aXnraHn HaXmMaTe N yDepxNbaiTe KhONKy OFF Do Tex nop, noka dncJIeH He IORaCHet.
OTka3 OT OTBeTCTBHeHOctn B OTHoWeHn ycIyr, npeOCTaBJaEmbIX CTOpOHnMn NoCTaBUnkamN
Cnyx6bl, npedoctabIeMbIe cToPOHHMn NOCTaBUNKaMIM, MOrYT 6bITb N3MeHEnbl, npIOCTaHOBJIeHb IIN OTMeHEnbl 6e3 PpeDbapntelbHoro yBeIDOMJIeHn. Kompanna Sony He Hecet OTBETCTBEHHOCT 3a cnTyaun noDobHOrO poJa.
Baxhoe npimechne
BHHMaHHe!
KOMПАнЯ SONY HN ПИ KAKIX YCЛOBИХ HE HECET OTBETCTBEHHOCTN 3A JILOBOJ CJUYAHbI, KOCBEHHbI, NOБОчьи ИЛДРУГЕ BnDbI UшЕРБА, BKJIIOUЧА (BE3 OГРАнчЕНИ) YIYUSEHHbie IOXOДы, YIYUSEHHYIO BbIPYKY, NOTEPIO DAHNbIX, HEBO3MOxHOCtBJ IcNoJIb3OBAHIN PPOДУКТА ИЛ JILOBOrO CBa3AHHOrO C HIM OБOPUДOBAHIN, IPOCTOn I NOTEPIO BPEMEHN IOKyIATEJIEM, CBa3AHHbIE INI IPOINCTEKAIOUSe I3 INCNoJIb3OBAHIN DAHHORO PPOДУKTA, A TAKKE OБOPUДOBAHIN INI INPOTPAMMHOrO OBeCNEUEHIN, BXODJaUSeTO B COCTAB IPOДУKTA.
B coCTabe daHoro npOdykTa nMeetcra
paIIOnepeDaIOUe ee yCTpoiCTBO.
CorlaacHo HopMaTnHBOMy aKTy
3KOHOmUeCKoKOMuCCnI dJa CTpaH
EbpOnbI (UNECE) N° 10 npOn3BOJnteJIi
TPaHCnOpTHbIX CpeDCTB MOrY T OROBaPnBaTb
opPeJeJIeHNbIe YCNoBnY UCTaHOBKn
paIIOnepeDaIOUxN YCTPOiCTB B
TPaHCnOpTHbIe CpeDCTBa.
IpexJe Yem YCTaHaBNIBaTb DaHHBI
npOdyKT B CBOI ABTOMO6NJb, IN3yUInTe
pyKOBoDCTBO NO 3KcPnlyAtaCnN ABTOMO6NJn
JIb6 pOkoHcyNbTnPyITecb c erO
pOOn3BOIDNTeJIeM INI nPpOdaBcOM.
BbI3OBbI 3KCTpeHHbIX cnyX6
Данная abTomobильна rapнтура BLUETOOTHи NOdklIOueHHoe K Hei элкторhoe yctpoIcTBO NcNoJIb3yIOT paAnocnHaJIbI, cOTOBle Ha3eMHbIe ceTn, a TaKxe 3anpoIpaMMIpOBaHHIe NOlb3OBaTeJIem fYHKUnn I He rapaHTnpIyIOT cTaBnJIbHOe NOdklIOueHne B pIe cIyuaE. IToTOMy npi Heo6xOdImOCTn COBepuNTb BaXhBI Bbl3OB (HaNPIMep, 3aNpOCNTb 3KCTpeHHyIO MeDINsHCKyIO NOMOuB) HNKOrda He NoJaRaIteCb TOLbKO Ha OJHO 3JIeKtporHHOye yCTpoIcTBO.
PnoBepka HapprKeHnB aKKymyIaTope. 8
IoproToBka yctpoNCTBa BLUETOOTH. 8
PoiKJIuyeHne yCTpoiCTBa USB 11
IopKJIoueHne IpyrOTo nepeHoCHoro ayDnOuyCTpoNCTBa 11
PpocnyuBauHne paHno
PpocnyuBauHne paDnO 12
CnCTembl paIIOaHbIX (RDS) 13
Bocnpon3BeDeHne
Bocnpoun3BeDeneHne Dncka 14
Bocnpoun3BeJeHne yCTpoiCTBa USB. 14
Bocnpon3BeJeHne c yctpoiCTBa BLUETOOTH. 15
- VOICE (ctp. 19, 21, 22)
Haxmte duCKobI peyIaTOp u yepKnBaTe ero haxaTbIM 6OJee 2cekynd, TTo6blakTNBupOBaTb FyHKUIO rIoocBOrHa6opa Homepa, FyHKUIO paCno3HaBaHnapeu (ToNbKO dJa cMapTfoHOBcOCAndroidTM), nIu FyHKUIO Siri (ToNbKO dJa iPhone).
3HaK N
YTo6bI yCTaHOBnTb NOKJIIOueHne NO BLUETOOTH, KOCHNTecb DnCKOBOro peryJlTopa cMapTfoHOM c OC Android.
4 Cnot dIy dNCKOB
5 Okowko dncnpea
6 S E E K - / + )
AByOMaTnuecka HaCTpoNka Ha paAnocTaHcun. HaxMnte n ydepKbBaIte dJa HAcTpoN BpyHyU. I/ (npebidyua/cJeDyoua) / (yckopeHHa nepemOTKa Ha3aJ/yckopeHHa nepemOTKa Bpepei)
7 (n3BneYb nCK)
8 PTY (Tn nporpaMMbl) Bb6op Tnna nporpaMMbl (PTY) B RDS.
Q (o63op) (ctp. 16)
IpepxoB B pexm o63opa npn BocnpoN3BeDeHnn. (HeocTynHO, ecn noKluoyeHo yctpoiCTBO USB B pexime Android nnn yctpoiCTBO iPod.)
9 CALL
BxO, B MeHIO BbI3OBOB. PpHem n 3aBepueHne Bbl3OBA. HaxMnte KhoNky u ydepxnBaIte ee haxaToi 6oee 2 cekyHd, YTO6bl nepeKlouuTb cnHan BLUETOOTH.
12 HomepHbIe KHOIIKn (1-6)
1 HaKMnte KhoNky MENU. NobopauBaJdNcKObI peYJrTOp, Bb6epTe [BLUETOOTH], 3aTeM HaKMnte DnCKOBI peYJrTOp.
2 NobopaunBaJ DNCKOBbl peYyIaTOp, BbI6epnte [SET BT SIGNL], a 3aTeM HaxMMte DNCKOBbl peYyIaTOp. Y6eIITecb, yTO BKJIIOueH INHdNkAToP
3 AKTINBnpyTe yHKuIO BLUETOOTH Ha yCTpoiCTBe BLUETOOTH.
4 BbIIOJIHnTe Heo6xOIMMbIe DeIcTBnHa yCTpoIcTBe BLUETOOTH, YTO6blNoIKJIIOuHTb erO K DaHHOMy annapaTy.

IJIyTeCBETbcra.
3NaKnHaIinCnIee
YcTaHOBka Yacob (CT)
1 YcTaHOBnTe IJIa HaCTpoiKn [SET CT] B MeHIO [GENERAL] napametp [SET CT-ON] (ctp. 24).
Bocnpon3BeDeHne
Bocnpon3BeDeHne dincka
1 BCTaBbTe DnCK (3TnKetKoB BBepx).
Bocnpo3BeDeHneHaunHeTcnaBTOMaTuYeCKn.
Bocnpon3BepeHne yctpoiCTBa USB
B daHno nHCTpyKcun no 3KcNlyatauNTepmNH "iPod" npImeHareTcIa o6o6ueHn cBIOK Ha fYHKcUN iPod B iPod n iPhone, ecn nHoe He cKa3aHO B TeKCTe nnHa pncyHke.
CBeHeHnO COBMeCTHMOCn BaUeRo yCTpoiCTBa iPod cm. B pa3DeIe "CBeHeHn o6 iPod" (cTp. 30) nIi Ha Be6-caIte NODepKKn, yKa3aHHOM Ha NocJeDHeN cTpaHnue ObloKKn.
Moryt nCnoJb3OBAbCSy UcTpoiCTBa USB* Tnna AOA (Android Open Accessory) 2.0, MSC (3aNoMaHaIOuIe yUcTpoiCTBO 6oJIbwoj emKoctn) u MTP (npToKoI nepeaun MyJBbTMMeJa), COBMeCTmMbIe Co CTaHdApTOM USB.B 3aBncMocTn OT Tnna NcNoJb3yEmoro UcTpoiCTBa USB Ha annapate MoXHo Bbl6paTb peKIM Android nnMSC/MTP.
Дя HeKOTopbIX MoJeJIe UINΦpObIx
ПлeepOB NIIc MApTФoHOB C OC Android
Mожет Notpe6obatbcr peЖIM MTP.
- Hanpimep, ΦЛeш-нakоNTeNB USB, сфpoBoi nleep, смрфонс OC Android.
PpimMeaHnA
Длгпolyчени поюрбьх CBeDEHnO o COBmecTmocTуCTpoiNCTBa USB nocTeTne Be6CaNT noIepKKN, yka3aHHbI Ha 3aDHeN CTopoHc OblokkN.
- CmapTfoHbI c yctaHOBLeHHoN OC Android 4.1 nnn 60onee no3dHe BepCnIOpePknBaOT Android Open Accessory 2.0 (AOA 2.0). Ondako, HeKOTOpBle cMapTfoHbIMoryt He noJIHoCTbIO noDcEApXnBaTb AOA 2.0, daKe eCNy UcTaHOBJeHa OC Android 4.1 nnn 60onee no3dHnBepCn. INaI NOUYeHnN IOpO6NbIX CBeDeHnO COBMeCTMocTn BaWero cMapTfoHa c OC Android NocETIne Be6-caNTnoDcEePKn, yKa3aHHbI Ha 3aNDHe CTOPHe o6IooKn.
Bocnpoun3BeJeHne nepeuNCleHHbIX HnXe
paIIOB He noJIepKuBaETc.
MP3/WMA/AAC/FLAC:
- aJbI,3aUuueHHBteabTOpCKMn npaBaMn;
-ФаньcDRM(ynpaBHeHneuΦpoBbIMnpaBamn);
-MHOROKaHaJIbHbIe 3ByKObIe aJbI. MP3/WMA/AAC:
- faibl, ckaTbIe 6e3 nOtepn daHHbIX WAV:
-MHOrOkaHaJIbHbIe3ByKObIe aJbl.
IpepeyctaHOBKO coeHHeHn Bb6epnte pexm USB (pexm Android nnn MSC/MTP) B 3aBnCmOCTn OT Tnna NcNoJb3yeMoro yctpoiCTBa USB (ctp.24).
1 PoiKJIouHTe yCTpoiCTBO USB K nopTy USB (cTp. 11).
HaHHeTc BocpOn3BeDeHne.
YTo6bHaaytBBOcnpOn3BeDeHne,ecn YCTPOINCTBO yXe NOKJIIOUeHO,HaXMITE KhoNk SRC n Bb6epnte [USB] (nocle TORO kak yCTPOINCTBO iPod 6ydet pacno3HaHO,Ha dncnnee oTO6pa3NTc[IPD]).
2 OtperyIpyTe rpoMkoCTb Ha daHHOM yCTpOiCTBe.
Для OCTaHOBKN BOCnpon3BeDEHnA
HaXMMTe n yIepxNBAaIe KHONKy OFF B TeueHne 1 cekyHdbI.
OCTaHOBnTe BOCpON3BeDeHne,3aTeM ydaJIte yCTPOINCTBO.
Ppeynpejckene KacaTeNbO iPhone
HaHHeTcTeIefoHHbipa3roBOp.
CobepueHne Bbl3OBA n3 KypHaIa Bbl3OB0B
1 HaXmTe KhOnKy CALL.
EcnK aannapaty noDKIIOyeHbI DBa MObNbHbIX TelefoHa,To NOBOPaUNBa IINCKOBBI peYJIArTO,BbIbepTe JIO6oN I3 TelefoHOB,a 3aTeM HaKMITE INCKOBBI peYJIArTO.
2 NobopaunBaJ DNCKOBbI peYJrTOp, BbI6epuTe [RECENT CALL], a 3aTeM HaxMMte DNCKOBbI peYJrTOp.
OTo6pa3ntcCnncOKKypHaJa Bbl3OBOB.
3 NOBOPaUNBaI DnCKOBbl peYJrTOp, BbI6epnte IIMr IIN HOMep TeJefoHa B JyPhaIe Bbl3OBoB, a 3aTeM HaxMMte DnCKOBbl peYJrTOp.
HaunheTcTelefoHHbpa3roBOp.
Cobepshne Bbl30Ba nyTeM BBoHa Homepa TeJefoHa
1HaxmTe KhOnkyCALL.
EcnK aannapaty noDKJIOUeHbI DAmo6nJIbHbIX TeJefoHa,TO NOBOPaUNBaIuCKOBbl peryJrTOp,BbIbepnte IIO60uN3 TeJefoHOB,a 3aTeM HaXMMTeIuCKOBbl peryJrTOp.
2 NobopaunBaJdNcKOBbI peYJrTOp, BbI6epnte [DIAL NUMBER], a 3aTeM Haxmnte dNcKOBbI peYJrTOp.
3 NobeprHnTe DnCKOBbI peRyJrTOp, BBeDnTe HOMep TeJefoHa, NOTOM Bbl6epnte [ ] (npo6e), a 3aTeM HaXmTe ENTER*.
HaunHeTc TeneoHHb pa3roBOp.
*IyBb6opaHaCTpaNBAEMo pa3pda nCNoJb3ynte KHOJKN //> (SEEK-/+).
PpmeaHne
Ha nucnnee BmecTo CmBOna [#] oTo6pa3ntc
CobepweHne Bbl3Oba nyTem nobtophoro Ha6opa Homepa
1HaxmTe KhoNkyCALL.
EcnK aannapaty nodkJIOUeHbI DBA MObNbBbIX TeJefoHa,TO NOBOPaUNBa IuCKOBbl peryIaTOp,BbIbepnTe IIO6oN U3 TeJefoHOB,a 3aTEM HaXMMTe IuCKOBbl peryIaTOp.
2 NobopaunBaJdNcKOBbI peYJrTOp, BbI6epnte [REDIAL], a 3aTeM Haxmnte dNcKOBbI peYJrTOp.
HaunHeTc TeIefoHbI pa3roBOp.
CobepueHne Bbl3OBA c NOMOuIIO TOLOCOBbIX MeTOK
BbIMoKTe COBepuNTb BbI3OB, npOn3HeCra
ROLOCOBYIO METKy, XpaHryUOcBA
PNOKJIIOyeHHOM MObIbHOM TeJefoHe,
KOTOpbI OCHaUeH cyHKUeN RoLOCOBORO
Ha6opa HOMepa.
1 HaXMMTe KHonKy CALL.
EcnK aannapaty noDKIIOUeHbI DBa MO6nJIbHbIX TeJefoHa,TO NOBOPaUNBa IuCKOBbI peYJrTOp,BbIbepTe JIO6oN I3 TeJefoHOB,a 3aTeM HaxMMTe DNCKOBblpeYJrTOp.
2 NobopaunBaJ DNCKOBbl peYIaTOp, BbI6epnTe [VOICE DIAL], a 3aTeM HaxMMte DNCKOBbl peYIaTOp.
Kpome toro, Bbl MOxTe HaXaTb KHONky VOICE n ydepxkBaTb ee HaxaToi 6oJIee 2 cekyHd.
3 PpOn3HeCnTe rOIOcoBvIO MeTKy, XpaHraUyOcR B Mo6NJIbHOM TeJefoHe.
Baawa peub 6ydt paCno3HaHa, nocne yero 6ydt coBepweH Bbl0B.
OTmeHa roIocoboro Ha6opa Homepa Haxmnte VOICE.
Bb6op nCTOuHnKa cnHaJa
Haxmte KhoNky SRC HeckoJbko pa3.
Kpome TOrO, MoXHo HaxaTb KhoNky SRC,
NoBepHyTb DnCKOBbl peYJrTOp, Bbl6paTb
Tpe6yembl NCTouHnik, a 3aTeM HaXaTb
KhoNky ENTER.
OTo6paXeHne cNnCKa nCToUHnKOB cnHaJIOB
Haxmte KhoNky SRC.
06BJBHeHne SMS c nOmoIbIO yHKuIN BocnpOn3BeDeHnpeuN (ToJIbKO dJa CMaprTfoHOBc OC Android)
Ipi noJyehnn SMS cncTeMa aBTOMaTnueckn 3aunTBBaet nx uepe3 dHAMNK aBTOMO6nJI.
CbeHnO COOTBeTCTByIOuNX npaMeTpax cm. B pa3dene "CnpabKa" npinloxehn.
OTBeT Ha SMS (ToIbKO IJRA cMaprfoHOB C OC Android)
BbIMoXeTeOTBeTntbHaCoO6uEHeNe,HaKaB 3NaUOKOTbeta.
1 3anyctnte npnloxehne "Sony | Music Center", a 3aTeM haxmnte 3haqok [Reply] (OTBETNb). B npnloxehn "Sony | Music Center" oTo6paNTcra kpaH BBOda coo6ueHna.
2ПоиЗнeСTe OTBET Ha COO6шeHne, nCNoJIb3yЯ Функшю paCno3HaBaHnЯ peu. B npIIOxKeHn "Sony | Music Center" oTo6pa3ntcraNcOK wabHOb COO6шeHn.
3 NOBOPaUNBa DNCKOBbI peYJrTOp, Bbl6epnte Heo6xOdImOe COo6uEHe, a 3aTeM HAXMnTe DNCKOBbI peYJrTOp. Coo6uEHe 6yJeT OTnpaBNeHo.
HactpoKa npaMeTpOB 3ByKa n DnCpIeJ
C nomoubI o iPhone nn cMapTfoHa C OC Android bbl moKeTe HacTpontb npaMeTpbl, CB3aHHbIe CO 3ByKOM I dnCnneem.
CbeHnO COOTBcTByIOuNX npaMeTpax cm. B pa3dJe "CnpabKa" npnloxehn.
Испобзоване Функциnpacno3HaBaHЯ peuN(Tobko Дя СмартфоHOBOC Android)
1 TTo6bl aKTHBnPoBaTb 0yHKUHO paCNo3HaBaHnpeu, HaxMnte KhoNkY VOICE n ydepxnBaIte ee HaxKaToi.
2 PpOu3HeCnTe Heo6xOaMMyIO FOJOCOBYIO KOMaHdY B MmKpOΦOH.
BbIKIIOUeHne yHKcnn paCnO3HaBaHnapeu
HaxmTe VOICE.
Ppimechn
B HeKoTOpbIX CnyaX FyHKUma paCno3HaBaHnpeu MoKeT 6bIb HeNoCTynHa.
- Φύнкυя paζοπο3HaBaHηρ ερη Moκετ paδοTaMb
- ένρανιλθό. KaúçεΤBO paδοΤb ἐΤΟύ Φύнкυιη
- 3aΒικιτ ŠO T ΜΟύΚινηθενΗΟ CмαρΤΦΟΗ C
- OC Android.
- IVcnoIb3yIte yHKUH npu MNHMaJIbHOM ypoBHe Wyma (HaNPmep, Wyma OT DBnIraTeJ).
3 NobopaunBaJ DNCKOBbI peYJrTOp, BbI6epnte npaMeTpbl, a 3aTeM HaxMMte DNCKOBbI peYJrTOp.
CLOCK-ADJ (yCTaHOBka yacob) (cTp. 8)
CAUT ALM (npdynpeintelhBn 3BykoBoCnHaJ)
BkIIOueHne npeDynpeDnTeJbHoro 3BykoBOrO cnHaJa: [ON], [OFF] (cTp.7).
(DoctyNHO TOJbKO npn BbIKIOueHOM nCTOuHnke, KOrda OTo6paXaIOTc yacbl.)
BEEP(3BykoBoCnHnJI)
AknBn3aun 3BykoBOrO cnHaJa: [ON], [OFF].
AUTO OFF (aBtOMaTnueckoe OTKIOUeHne)
AByOMaTnueckoe OTKIOUeHne uepe3 OnpedeJIeHHoe Bpem,ecnn yCTpoIcTB0 BbIKIOUeHo: [ON] (30 MNHyT), [OFF].
STEERING (ynpaBHeHne Ha pyne)
PereTpaun/In3MeHHe HacrpoKn pyIbTa DnCTaHcIOHOrO ynpabEnHa
(OCTyHNO TOJbKO npu BbIKNIOueHHOM NTOUHNKe, KOrDa OTo6paKaIOTcYacbl.)
STR CONTROL (nylbT dNCTaHcNoHHOrO ynpabLeHnHa pyne)
Bb6oppeKIma BBOda noDKJIuOeHHoro
nyIbTa DnCTaHcUOnHHoro ynpabLeHna.Bo
n36exKaHne HeNCppaBHOCTe nepeD
ncNoJb3OBaHnEM NoIDepNte
COOTBeTCTByIOUsn peKIM BBOda dJa
POdKJIuOeHHoro nyIbTa
ДиСТанцИОНHOrуУпавЛeнHA. CUSTOM (cpeuaNBbI)
Pexm BBOda IJnIyIbTa IInCTaHcNoHHOrO ynpaBHeHnHa pyne.
PRESET (CTaHdapThbI)
Pexm BBOda IJn npoBOnHO nylbTa
INCTaHcNoHHoro ynpabLeHna 3a
NCKIIOUeHnEM NylbTa
INCTaHcNoHHoro ynpabLeHna Ha
pyne.
EDIT CUSTOM (HactpoIka cneuaJIbHOropeXmu)
Perinctpaunya yHKn (SOURCE, ATT, VOL + / - ,SEEK + / - VOICE,ON HOOK u OFF HOOK)IyIyIbTa IncTaHcNoHOrO ynpabHeHa pyne:
1 NOBOPaNBaI DnCKOBbI peRyJIaTOp, Bbl6epNTe FyHKcNIO, KOTOpYIO HxKHO Ha3HaunTB IINr PylbTa DnCTaHcNoHOrO ynpaBneHnra Ha pyJe, a 3aTeM HaXKMITE nCKOBbI peRyJIaTOp.
2ПиMuraIoUeM coo6uHnN [REGISTER]HaXMMTe uYdepxNbAaTe KHOKNy Ha NylbTe DnCTaHcNoHOrO ynpabHeHna pUne, KOtOpoi Tpe6yeTcHa3HaunTb fYHKcIIO. I0 3aBepWeHnN peRnCTpaCnN oTo6pa3ntcR [REGISTERED].
3ДЯpernctpaunndpynxФyHKuIN NOBTOPte DeICTBna 1 n2.
(Дocунho,Только ecизачене napametpa [STR CONTROL] yctahOBJIeHo Ha[CUSTOM].)
RESET CUSTOM (c6poc cneuaJbHbIX Hactpoek)
I3MeHeHne HAcTpoE KnybTa InCTaHcUHOHHOrO ynpabJeHna pyuNe: [YES], [NO].
(Дocунho,Только ecn 3haueHne napaMeTpa [STR CONTROL] yctaHOBJIeHo Ha [CUSTOM].)
Ppimechn
- Bo Bpemr n3MeHnra HacTpoeK DoCTynHO ToIbKO KHOIOuHoe ynpaBneHne Ha daHHOM ycTpoiCTBe. B cJIax 6e3OnacHOCTn OCTaHOBnte aBTOMo6nIb nepei n3MeHeHnem 3TNX HAcTpoEK.
- Ecnn BO Bpemr pernctpaun npon3oienet Own6ka, Bcra pahee 3apernctpnpobaaHna HΦopmauncoxpanTc. BbInonHnte npoceDpy pernctpaun 3aHOBo,Haunha c Toh yHKun, rpe npon3oJna Own6ka.
3TaΦyHKzma MoKet 6bItb HeIOCTynHa B HekOTopbIX TpaHCnOpTHbIX CpeIcTBax.ДЯ NOLyueHna NOIpO6bIX CBeJeHn O COBMeCTNMOCTIN BaWero TpaHCnOpTHoro CpeIcTba NoCeTIne Be6-caIT NOIDepKKn, Yka3aHHbI Ha 3aDHei CTopoHe 0bLOxKn.
USB MODE (peknu USB)
ИзмениpeхимаUSB:[ANDROID], [MSC/MTP].
(ДocунHO,TOJIbKO KOrJa BbIbpaH nCTOuHnK USB.)
CT(BpemHa yacax)
BkIIOueHHe yHKcInn CT: [ON], [OFF].
AF/TA (aJIbTepHaTnBHbIe YacToTbI/ COo6uHnO TeKUSei CNTuAun Hdoporax)
BkIIOueHne/OTKJIIOUeHne
aIbTepeHaTINBHyX YacToT (AF) n
coo6uHn O TekyuSe CNTyaCnn Ha
doporax (TA): [AF-ON], [TA-ON], [AF/TA-ON], [AF/TA-OFF].
REGIONAL (pernohaJIbHbIe yAcTOTbl)
PpneM orpaHnUHbAeTc onpeJeJIeHHbIM perNoHom: [ON], [OFF].
(DocTyNHO ToJbKO npn npne FM.)
BTM (namrToB ONTmAmJIbHOH HaCTpoiKN) (cTp.12)
(DocTyHNO,ToIbKO KOrda BbI6paH TIOHEp.)
FIRMWARE (MnKpOnporpaMa)
(DocTyHNO TOJbKO pRn BvIKIIOueHHOM nCTOuHNKe, KOrDa OTo6paKaIoTc yacbl.) IpoBepKa/O6HOBJIeHne Bercn MmKpOpnporpaMMbl. POnpO6HbIe CBeDeHn MOxHo HaHTn Ha Be6-caTe, aDpeC KOTOPoYkA3aH Ha 3aJHei o6loXke.
FW VERSION (Bepcna MnkponporpaMMbl)
OTo6paXeHne TeKyuIeBepCmMnKpOnpOrpaMMbl.
FW UPDATE (o6HOBJIeHneMnKpOIpOrpaMMbl)
3aynck 6OBJIeHnMnKpOnpoPpaMMbl: [YES], [NO].
06HOBJIeHHe MIKpOIpoRpaMMbI 3aHIMaET HeCKoJIbKO MInHyT. Bo BpeM aOBJIeHnHe NOBOpaUBaIte BBKJIIOuHaTeJb 3aXnRaHnB NNoLOXKeHne OFF n He OTCoeDnHnTe NcNoJIb3yEmoe yCTpoIcTBO USB.
HactpoIka 3Byka (SOUND)
MeHIO HaCTpoKn HeoCTynHO npN BbIKJIOueHHOM NcTOHnke, KOrDa OTo6paKaHcTcYacbl.
C.AUDIO+ (ClearAudio+)
Bocnpoun3BeJeHne 3Byka c ONTmN3aUeNe uΦpoBOrO cnHaJa C nCNoJIb3OBaHHeM peKOMeHnyEmbIX HacTpOeK Sony: [ON], [OFF]. (Iapametp [OFF] yCTaHaBnBaETcA ABToMaTuYeCKn, eCIn n3MeHReTcA HAcTpOuKa [EQ10 PRESET] n/nn dJa YHKuIN [EXTRA BASS] yCTaHOBLeHo 3NaueHne [1] nn [2], n/nn dJa peKIma [DSO] yCTaHOBLeHo 3NaueHne [LOW], [MID] nn [HIGH].)
EQ10 PRESET (BbI6Op HAcTpoeK ЖБаЛаЗерE AQ10)
Bb6op KpUBoN 3KBaIaI3epa n3 10 KpNBbIX 3KBaIaI3epa IJI N BbIKIOUeHne 3KBaIaI3epa:
[OFF], [R&B], [ROCK], [POP], [HIP-HOP], [EDM], [JAZZ], [SOUL], [COUNTRY], [KARAOKE]*, [CUSTOM].
Bb6paHnyo IJn KaKdoRo NCTOCHNka KpNByIO 3KBaIaN3epa MoXHO 3aHeCTN B NaMrtb.
*PnBb6pe [KARAOKE] 3Byk BOKaJa BO BpemBaOcnpoun3BeHnna npurLyuaeTc, Ho He yctpaHareTc noHocTbI. VcnoJb3OBaHne MnkpoOHa He noDepxNBaTeC.
EQ10 CUSTOM (cpeuHaBhIe HaCTpoiKN 3KbAaJ3epa EQ10)
HacrtpoiKa dncnpej (DISPLAY)
DIMMER (pergylnpoBka noDCBETkn)
U3MeHeHne npKocTn DncnJe: [OFF], [ON], [AT] (aBTo), [CLK] (aoc)
(PeKIM [AT]doCTyneHToIbKO ToIgda, KOrDaNoDKNIOUeHNpOBoD ynpaBNeHnO CBeueHHeM, npabTaET, KOrDa BKNIOUeHbIpePdHneΦapbl.)
YTo6bI 3Ta yHKU8 6bILA aKTHBHa TOJbKO B TeueHne ONpeJeHHO BpeMeH, Bb6epnte [CLK], a 3aTeM 3aJaTe BpeMa HauJa N OKOHuaHn.
-утоби 3аадаьяркocь npn BKJIIOUeHHOI yHKcIN ynpaBJIeHnnoDCBETKoN:
yctahOBuTe IJIa [DIMMER] 3HaueHHe [ON] n otpepyu npy Te [BRIGHTNESS].
-TO6b3aDaTb npKoCTb npn BbIKHoueHHo yHKuN ynpaBHeHna NOcCBETKOJ:
yctaHOBnteIa [DIMMER]3HaueHne [OFF]nOtperynpuTe[BRIGHTNESS]
Hactpoika npKocTn coxpaHareTc n npImeHareTc npBkIIOueHn nn BbIKIOueHn FyHKUu ynpaBHeHn NOCBETKoN.
BRIGHTNESS (RapKocTB)
PerynipoBka npKocT nucnne.
HactpanBaembI dHaana3OH ypOBn
Rpkoctn: [1] - [10].
BUTTON-C (UBeT KhoNOK)
Bb6op npedBaupTeIbHo HacTpoEHHOrO nnnoB3OBaTeIbCKoro UBeTa dIg KHOJOK.
COLOR (UBeT)
Bb6op n3 15 npeDbapnteIbHo
HaCTpoeHHbIX UBeTOB I
1NoIb3OBaTeJIbCKOroUBeTa.
CUSTOM-C (NoB3OBaTeNbckn UBeT)
Hactpoika noIb3OBaTeIbckOro UBeTa 1nKHOPOK.
RGB RED, RGB GRN, RGB BLUE
HactpoIka zBeTOBOrO dnaana30Ha:
[0] - [32] (Знayaши [0] He
NcNoJIb3YeTcH NДЯ KaKNX Dnana3OHOB UBeTOB).
DSPL-C (UBeT dncnne)
HactpoikKa npedBapnteIbHo HactpoeHHoro nIIN NOIb3OBaTeIbCKOro UbetaTdNDCnpe.
COLOR (uBeT)
Bb6op n3 15 npeBapntelbHo NaCTpoeHHbIX CBeTOB I
1 noIb3OBaTeJIbCKOrO UBeTa.
CUSTOM-C (NoB3OBaTeNbckn UBeT)
Hactpoika noJIb3OBaTeJbCKOrO cBetaI IINCIIe.
RGB RED, RGB GRN, RGB BLUE
HacpoIka zBeTOBOrO duana3oHa:
[0] - [32] (Знayaшие [0] He
NcNoJIb3yETcH NДЯ KaKNX dNaIa3OHOB cBeTOB).
SND SYNC (cHxpoHn3aunIIO 3ByKy)
BkIIOueHne cINxPOHn3aunn NOcCBeTKn CO 3ByKOM: [ON], [OFF].
AUTO SCR (aBtOMaTnuecka npokpyTkα)
AByOMaTnuecka npOKpyTKaДЛINHbIX 3JIeMeHTOB: [ON], [OFF].
(Heioctynho,ecn BbI6paH nCTouHnK AUXnn TIOhep.)
HactpoJa BLUETOOTH (BLUETOOTH)
PAIRING (conpkaeHne) (ctp. 9)
ПодкlioquEHne Do DByX yCTpoiCTB
BLUETOOTH: [DEVICE 1], [DEVICE 2].
По завршEN coPpKaeHn BMeCTO
надпси [DEVICE 1] nIu [DEVICE 2] bYdET
OTOBpaKaTbCЯ nMЯ conpkaeHHOrO
yCTpoiCTBa.
AUDIODEV (aydnooyctpoiCTBO) Bb6op aydnooyctpoiCTBa. Ha annapaTe, coPjXeHHom C yCTPOICTBOM [DEVICE 1] nJI TKeYUIm aYdnooyCTPOICTBOM, COBMeCTnMbIM C npoHJIem A2DP, oTo6paJxaeTcra CmBOJI [ ]
RINGTONE (MeIOnBbI3OBA) Bb6Op yCTpOInCTBa,Ha KOTOpOM DoJXHa 3ByuTaB MeIOJnB bI3OBA (aannapat nn IN NOdkJIIOUeHHbIMo6NlBbHbITeJefoH): [1] - annapaT,[2] - Mo6NlBbHbIN TeJefoH.
AUTO ANS (aBTOMaTnueckn OTBeT) Hactpoynka annapata dny aBTOMaTnueCKoro OTBeTa Ha BXOJaUne Bbl3OBbl: [OFF], [1] - c 3aepKko npn6IIN3nteJbHo 3 cekyHdbI, [2] - c 3aepKko npn6IIN3nteJbHo 10 cekyHd.
AUTOPAIR (aBToMaTnueckoe cOpjxKeHne) ABToMaTnueckn 3aNyCK cOpjxKeHn rno BLUETOOTH npn noKJIuOeHnn yctpoiCTBa c iOS 5.0 nIn 6oJee nO3dHe Bercn qpe3 USB: [ON], [OFF].
BT SIGNL (cɪrɪhən BLUETOOTH) (ctp. 10)
BkIIOUeHne nɪn BbɪKJIIOUeHne φyɪKünN BLUETOOTH.
BT INIT (nHnuaJn3aun BLUETOOTH) HnuaJn3aun HaCTpoeK, CBa3aHbIX C BLUETOOTH (cBeJeHn o copjKeHn, cBeJeHn o6 yctpoiCTBe n T. d.): [YES], [NO]. Pn ytnJn3aun DaHHoro aannapata BbINOHNTE nHnuaJn3aun IO BCex HaCTpoeK. (OocTyNHO ToJIbKO pRn BBIKIQUeHHOM NCTOCHke, KOrDa OTo6paXaOTcYacbl.)
Hac troponka npiloxeHna Sony | Music Center (SONY APP)
AUTO LAUNCH (aBToMaTnueckn 3aNyck) BKnIoueHne fynKcunn aBToMaTnueckoro 3aNycka npniloJxHnra "Sony | Music Center":[ON],[OFF]. PnBb6ope napametpa [ON] npilooXHe "Sony | Music Center" 6ydt 3aNysKaTbcra aBToMaTnueckn, KOrda yCTaHOBJeHO NOdkIIOUeHne BLUETOOTH.
CONNECT (noikluohne) (ctp. 20) Bkluohne n BBkluohne yHKunn (noikluohna) "Sony | Music Center".
He npoJIuBaIe XnIDKOCTn Ha yCTPOIcTBO nII INCKN.
Приимechи OTHOCHTeIbHoДИСКOB
-He noDbepraTe DNCKN BO3deJCTBNUO npMbx COJIHeuHbIX JUyei N IUCTOCHNKOB TeIIa, TaKnx KaK BO3dyXoBOdBi C rOpAUM BO3dyxOM. He OCTabnIe DNCKN B MaUNHe, pPnnapKObaHHoB B COJIHeuHOM MecTe.
-NepeBOCPON3BeJeHEmIpoTnpaTe DnCKNuCTaSei TKaHbIO NoHaNpaBLeHIO OTcEHTpa K KpaM.HeNoJIb3yIteCbpactBOpNTeJMy,TakIMKaK 6eH3uH,pa36abTeb, a TaKKnpoJaKe YnCTaUIMN
-3To yCTpoIcTBO npEHa3HaueHo IJRA BOCnPOIN3BeDeHnA DnCKOB,OTBeuaIOx Tpe6oBaHnAM cTaNdApTa Compact Disc (CD).DbYxCtOpOHnHe DnCKn (DualDisc) n HeKOTOpBle My3bIKaJIbHbIE DnCKn, 3aKOINPOBaHnBHe C NOMOuB To TexHOJOrn 3aUHTbI aBTOPCKNX npaB, He COOTBeTCTByIOT cTaNdApTy Compact Disc (CD) n PO3Tomy MoYr He BOCnPOIN3BOIDITbc3TmM yCTpoIcTBOM.
-ДИСКИ, KOТОВЕ 3TO yCTPОИCTBO HE MOXET BOCIPON3BOДNTb:
-ДИСКИСЯРЛБИКAMN,HAKJIЕИКAMN,a TaKKe C npNKpeHJIeHHoN KJIeKoJ IeHTOuIIN6bymaRoI.PpIMeHHeNe TaKIXДИСΚOBMOXeT BbI3BaTb c60nB pa6OteIIN NOBpeKdEHNeДИСKa.
-ДИСКИ HeCTaHdApTHOиФОмbl (Ha npIMep,BΦOpMe cepIua,KBaIpaTa, 3Be3Ib).BnpOTnBHom cIyae 3TO MOKET pINBeCTN K NOBpeJdeHIO yCTpOuCTBa.
-Диски Диаметюм 8см.
Popraok Bocnpon3BedeHnaaynOaIIOB
Cbeheny o6 iPod
- Moxho noiklountb cJeDyUoune MoeJi iPod. Ipeep nCnoJIb3OBAHem ycTpoiCTB iPod o6HOBnTe nx nporpaMMHoe oecneueHne.
CobmecTumbIe MoJen iPhone/iPod
| Сов mintимая м odeль | Bluetooth® | USB |
| iPhone 7✓ | ✓ | |
| iPhone 7 Plus✓ | ✓ | |
| iPhone SE✓ | ✓ | |
| iPhone LTE6s✓ | ✓ | |
| iPhone 6s Plus✓ | ✓ | |
| iPhone 6✓ | ✓ | |
| iPhone 6 Plus✓ | ✓ | |
| iPhone 5s✓ | ✓ | |
| iPhone 5c✓ | ✓ | |
| iPhone 5✓ | ✓ | |
| iPhone 4s✓ | ✓ | |
| iPod touch (6-ロ Nokiaoklyn) | ✓ | ✓ |
| iPod touch (5-ロ Nokiaoklyn) | ✓ | ✓ |
| iPod nano (7-ロ Nokiaoklyn) | ✓ |
-Испοльзоване 3начka "ИЗROTOВлно Дд Apple" OЗначаET, УTO akCEccyap pa3pa6OTан Cпeциально Дд ПОДКЛЮченя KnpODYКТам Apple, УказаHHbIM B 3начKE, И сертуфицюван pa3pa6OTчNKOM Ha COOTBeTCTBVE СтандApTam KauchetBa Apple. Apple He HeCET OTBetCTBeHHOCTN 3a pa6OTу 3TOrO YCTPOnICTBa Или erO COOTBeTCTBVE СтандApTam 6e3ОпаСНоCTN И HOPMaTINBнblm Tpe6OBaHЯМ.ОБразпte ВнHMаHne, UTO ИСпОЛьЗOBaHиЕ 3TOrO akCEccyapa C npODYKtOM Apple может ПОВЛЯТь Ha KaucheTBO pa6OTbl 6ecnpoBoDнOH сети.
B clyaae Bo3HnKHOBeHna BOpocOB nI npo6JIem, KacaUOxxCra DaHHoro yCTpoiCTBa, KOToPbIe He OnncAHy B 3TOM pyKOBOdCTBe, o6paTntecb K 6JnxKaIWeMy dInlepy Sony.
YxOa yCTpoiCTBOM
UHCTKa KOHTaKTOB
Bo3MOxHo, yCTpoiCTBO He 6yJeT pa6oTaB
HaJIeXaIIM O6pa3OM n3-3a 3arpy3HeHn
KoHTaKToB, ClyXaIINx IJRA COeHNHeHn
NepdHe N aHeJIc yCTPOiCTBOM. Bo
n36eKaHHe 3TOrO OTcoEduHInTe nepeHIO
PaNHeJIb (CTp.7) n npOTpIte KOHTaKtbl
BaTHbIM TaMNoHOM. He npNKlaIbIBaIte
n3NIuHnx ycIIN. B npOTNBom cIyuae
MOxHO NOBpeDITb KOHTaKTbl.
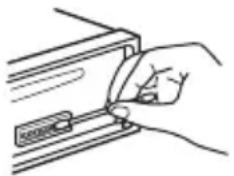
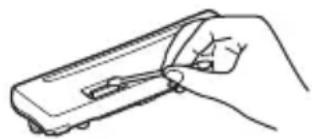
PpimMeuHn
BceJx 6e3oNaChocn nepeD uNCTKoI pa3beMOB BbIKJIIOHTe 3aXUNaHne N BbIHbTe KJIIOU IV3 BbIKJIIOHTeJIa3aXUNaHna.
- HnKOrda He npKacaiTecb K KOHTaTam NaIbIaMn IIN MeTaJIuYeCKMn IpeDMeTaMn.
TexhnuceknexapakTepnCTnKn
TIOHEP
FM
Dnaana3OH HAcTpoiKn:
ДляnapaMeТра[AREA]3адаHo
3HaueHne [EUROPE]:
87,5 MΓι - 108,0 MΓι
ДляnapaMeТра[AREA]3адаHo
Занейне [RUSSIA]:
FM1/FM2:87,5 MΓι - 108,0 MΓι (c υαρον 50 κΓι)
U36npuatelbHocTb:75d npn 400Kr
OTHOWeHne "CnHn-7yM": 73 d6
Pa3dJeIeHne:50Db npn1kTc
Диаэзн ВOCпpon3BOДИМьIXЧАСТОТ: 20Γι -15000Γι
MW/LW
Диаэзн Настpoик:
MW: 531 kT - 1602 kT
LW:153KΓ-279KΓ
ANTeHHoe rHe3do:
Pa3bem BHeuHne aHTeHHbl
YyBCTBnteJbHocTb: MW: 26 MKB, LW: 50 MKB
Pa3dI npoIrpblBaTeIa CD
OTHOWeHne "CunHaJ-ImM": 120 n6
Диаэзн ВOCпОИЗВОДИМьIXЧАСТОТ: 10Γι -20000Γι
Hn3KoactOTHaN N BbICOKOaCTOTHaI DeToHaun: Hxke ypoBn o6hApyKeHH
MaKcMaJIbHOe KOJIuYeCTBO*1
nanok (aIb6oMoB)*2:150
paIIOB (IopOxKe) n nanok*3: 300
OTobpaXaembIX CmMbONOB B Ha3BaHn
nank/phiJa:
32 (Joliet)/64 (Romeo).
CoOTBeTCTByUoIe KoJeKn: MP3 (.mp3), WMA (.wma) n AAC (.m4a)
1 ToJIbKO CD-R/CD-RW
2 Bклоча Корhevую пanky
*3ФakTnueckoe 3HaueHne MoKeT 6bItb MeHbWeДЯДИNHbIX Ha3BaHn nApOK nФaINOB
PpOurpbIbATEJb USB
BbIXoI: cTaHdapr BLUETOOTH,Knacc MouHocTn 2 (n3nyeHne +1 nBm)
MaKcImMaJIbHaj DaJIbHOCTb CBJ3N*1: BnpeJepax npaMOBnIMOCTN: np6J. 10 m
ДиаэончactOT:Диаэон2,4T(ot2,4000Tgdo2,4835Tt)
MToD MoDyJauu: FHSS
CoBmecTnMbIe npoФиJIu BLUETOOTH*2: A2DP (Advanced Audio Distribution Profile) 1.3
AVRCP (Audio Video Remote Control Profile) 1.5
HFP (Handsfree Profile) 1.6
PBAP (Phone Book Access Profile)
SPP (Serial Port Profile)
MAP (Message Access Profile)
HID (Human Interface Device Profile)
CoOTBeTCTByUOUsn KoJeK: SBC (.sbc), AAC (.m4a)
*1ФakTueckaДаIbHOCTbCB3N3aBNCNTOT pa3IINuHbIXΦaKTOpOB,HaNPmEpOT npenrTCTBmMeKdyYCTPOINCTBaMn,MaHNTHbIX NOJIe BOKpyr MUKPOBOJHOBBix Neey, CTaTueckOro 3JIeKTPnuCeTBA, YyBCTBInTeJIbHOCTn PnpEMHnKa,3ΦΦeKTHNBHOCTn aHTeHHbl,OnepaUHOHcNCTEmbl, IporpaMMHOIO pnpIoXeHnI T.D.
*2 CtaHapThbIe npoФnIN BLUETOOTH yKa3bIBaIOHa ueIb 6OMeHa daHHbIMn NO npoTOKOJY BLUETOOTH MeKdy yCTpoiCTBaMn.
PoiKJIIOUeHne no NFC
BxOJHoe rHe3do AUX (MHNCTepeopazbem)
NopT USB
Tpe6oBaHnK NcToUHnky nTuHaHn: aBtOMo6uNbHbI aKKyMylrTop 12 B NOCToRHHOro TOKa (C OTpNcaTeJIbHbIM 3a3eMJIeHNEm)
HOMHaJIbHbI TOK:10A
Pa3mepbl: npn61. 178 MM × 50 MM × 178 MM (W/B/r)
MoHTaXHbIe pa3Mepbl: np6JI.182MM×53MM×161MM (W/B/r)
Macc: npn6J.1,3 Kr
KOMnJIeKT nOCTaBKn: OChOBHoe yCtpoiCTBO (1) MnkpoΦoH (1)
YBaWeTo DnJIepa MoKeT He 6bITb HAnuHnHeKOTOpbIX N3 npHaJNeJXHOCTeN, IpeueNCLeHHbIX Bblwe. O6paNTecb K DnJIepy DnI NOlyeHnnoDpO6HoH INHOpMaun.
KoHCTpykUry u xapaKTepnCTnKn MOryT n3MeHrTbc8e3 npedBapntbHoro yBeDOMJIeHn.
TpaHcnpOpTuPoBaT B opuHaJIbHOy yNaKOBKe, BO BpeMraTpaHCnOpTpOBoKN He 6pocatb, oBepeRaT b OT NaJeHn, yJaopoB, He noDbepraT n3nUHeBn6paCm.
PeaHn3aUHO OCUSeCTBnTb B COOTBeTCTBnC DeIcTByIOUIMN Tpe6OBaHnA M3aKoHOdaTeJIbCTBa.OTcLyKuBWee n3dEJIneYTNIN3nPoBaTb B COOTBeTCTBnCDeIcTByIOUIMN Tpe6OBaHnA M3aKoHOdaTeJIbCTBa.
Ecn HeNCpabHocb He ydaetc yctpaHntb CJeDy DaHHoN HnCTpyKun - 6paTnTeCb B 6nnXaMn ABTopu3OBaHHbY SONY ceHTp no peMOHTy n O6CnyXnBaHHo.
Abtopckne npaba
CNoBechblTOBapHbIM3HaKINJIOROTnbl Bluetooth®AIBJIOTcra 3apeNtprnpOBaHHbIMMTOBapHbIMN 3HaKaMn Kopnpaunn Bluetooth S1G,Inc. n NcnoJb3yOTcra Sony Corporation no IInueH3nn.Dpyrne TOBapHbIe 3HaKn TOpROBbIe Ha3BaHnI npHaIJeXaT COOTBeTCTByUOUM BlaJeNbCaM.
3HaK NЯВJaTeCЯ TOBapHbIM 3HaKOM nIIN 3apeRnCTpnpOBaHHbIM TOBapHbIM 3HaKOM NFC Forum, Inc. B CUSA nДpyrnx cTpaHax.
Windows MediaЯВJaETCa TOBapHbIM 3HaKOM nIIN 3apeRnCTpnpoBaHHbIM TOBapHbIM 3HaKOM KOpnpaun Microsoft Corporation B CUSA n/nnn dpynx cTpaHax.
Данhoe n3deJIne 3aunueHo ОпpeIeHbIMn npaBamn ИNTeJIeKtYaJIbHOJ CO6CTBeHNOCTn Microsoft Corporation. ИспльЗованe улл pacnpoctpaHHeNoIo6HOJ texHOLOrn, КрOME KaK B DaHHom npOdyKTe, 6e3 ЛицeH3Nn KOpnapaUm Microsoft ул aВТOPиЗOBaHHOrO npeДСТaВиТьСТВa КорpopaUm Microsoft запeшeHo.
Apple, iPhone, iPod, iPod nano, iPod touch n Siri yBJIOTc TOBaPbIMn 3HaKaMn Apple Inc., 3aperncTpnpoBaHHbIMn B CUSA n dpynx ctpaHax.
YCTPOINCTBOOTKJIIOUaETcnp BOCNPOIN3BVeDEHmC BBICOKOI rPOMKOCTbIO.
Bo3MOxHNO, B KOHType 3JIeKTpOnuTaHnA bTOMo6nIa HeIOCTaTOUHb IyPOBeHb HApJxKeHn. -PpOBepbTe NOdkJIIOUeHne NITaHn. Ecnn PpO6JIembl C NOdKJIIOUeHnEm He o6hApUxKeHb, NOdkJIIOUte 3JIeMeHT 3JIeKTpOnuTaHn HaNpMyo K aKKymyTAToPy. Ecnn PpO6JIeMa He yCTpaHeHa, o6patNTecb K 6bnXaMWe My dInlepy.
3BYKOTCYTCTBYETNIN OueHb TUXNI.
→PeryIaTOp pacnpedeHnna CnHaHa [FADER] He yctaHOBneH dJa CnCTeMb c 2 rpoMkoROBopuTeJMaN. OueHb Hn3Kn yPoBeHb rPoMKOCTn DaHHoro YcTPOINCTBa n/Inn NODKJIIOUeHHORO YcTPOINCTBa. -YBeJIuNbTe rPoMKOCTb DaHHORO YcTPOINCTBa n NOdKJIIOUeHHORO YcTPOINCTBa.
He cIbIweH 3ByKOBoCnHaJI.
→ ΠоДКЛЮЧЕн ДОПОЛНИТЕЛБНБИ YСИЛNTЕЛБ MOШOCТи, a BCTpoEHHbI He INCПОЛБ3YEТСЯ.
YdaJIeHbI daHHbIe n3 naMrtn.
→БыlaнжаТаКногkaпepe3aRpy3kn. -ПOBTOpTe 3aINcьДaHHbIXВЯмЯТb.
OToeHnIcra HnHe npaBnIbHo nOdkIoueh npoBOJ nITaHnJ, IIn60 n3BLeueHa 6atapeKka.
I3 namrtn ydaJIeHbI 3aIporpaMMnPOBaHHbIe paNIOCTaHcII N UCTaHOBka BpeMeHN. Ipeperopel npedoxpAHntelb. CblIseH wym npn nepeKIOUeHm NoLOXeHn KIOUa 3aXnraHn.
→Пювда He npaBnIbHNo NOdcoeINHeHbI K pa3bemy 3JIeKTPoPNTaHnB BCNOMOraTeIbHOrO O6OpyIDOBaHnA aBTOMO6nJa.
Bo BpemBaocpon3BedeHnI npema NaHHaETcJeMoHCTpaZn.
Ecnn npn BkIIOUeHHOM
dEmOHCTpaUOHHOM pexKIme [DEMO-ON]
B TeueHne 5 MNHyT He BbINOJNHaOTcra
HnKaKHe ONEpaUIN, HauHnaETcra
dEmOHCTpaUIN.
-YctaHOBHTe 3NaueHne [DEMO-OFF] (cTp.23).
Iponana/He oTo6paXaetcHnDnKaunB Okowke dncnne.
→ДЯДИММеруCTaHOBJIeHO 3HaueHHe [DIM-ON] (cTp.27).
→Дисплел OTKЛIOUHTcЯ,ecnHaKaTb u ydepKINBaTb KHONKy OFF.
- HaxmTe KhoNky OFF Ha yCTpoiCTBe n ydepxnBaIte ee HaxaToI, noka dncJIeH He BKIOHTc.
→ KOHTaKTbI 3aIrp3HeHbI (CTp. 31).
Ducnnei/NoocBcTeKa Muraet.
HeoctaToHnaNoaHaNtAHn. -Y6eNTecb, YTO Ha yCTPOIcTBO nOdaTeCn DOCTaTOUHO NtAHn OT aBTOMoBnIbHO rAKKyMylrTopa. (Tpe6oBaHne K uCTOuHnky NtAHn: 12 B NOCTOARHO TOKa.)
He pa6oTaIOT KhoNk ynpaBLeHn. Nsck He n3BLeKaetc.
HenpaBnIbHoe coeDnHeHne. -PpOBepbTe nOdkIoueHne yCTpoiCTBa. EcIn npo6Iema He ycTpaHeHa, HaxMnte KHOKNy nepe3aRpy3Kn (cTp.7). CoepxKIMoe namrN 6yJeT yJaJIeHo. B cEJx 6e30NaChOCTn He bYbIOJIHnTe nepe3aRpy3Ky BO BpeM RA BoKdEHHa.
PpneMaioctaHcN
He ydaetc npnHtbpaHocTaHcun. 3Byk coppoBokdaeTc nomexamn.
HenpaBnIbHoe coeINHeHne.
-ПроверьтподсоeДинене abTOMO6nIbHOn aHTeHHbl.
- EcIn He BbIDBnraeTcA bTOMaTnuecka aHTeHHa, nPoBepbTe coeINHeHne npOBoJa ynpaBJIeHnA aHTeHHoJ C 3JIeKTPnueCKm pNBODOM.
He ydaetcBbINoHnTb npedBapnteIbHyIO HaCTpoiKy.
→ PapeaBaembI paAnocnHan cNnKOM cna6.
B dnaana3oHe FM3 He ydaTcHacTpOuTb 65 Mf -74 Mf.
Для [AREA] Вьбрано [EUROPE].
-YctaHOBnTe IJIa [AREA] 3HaueHne [RUSSIA] (cTp.23).
RDS
He ydaetc npnHryb ycIyRn RDS (KoIa dIy napameTp a [AREA] 3aDaHO 3HaueHne [RUSSIA]).
→ BbI6paH nnana3OH FM3.
- Bыберпerte FM1 улн FM2.
YcIyRn RDS HeIOCTUHHbIB daHHOM perNoHe.
Iocne HeckoJIbKnx CeKyHd npocnyuBaNn BkJIouHaetcA yHKunr SEEK.
→ CtaHnIa He nepeJaet daHbIe TP nIIn nepeJaet cNlKoM cna6bIcRHaI.
IopoxKhble coo6uEHHn He nepepaOTc.
→ BключиTe TA (cTp. 13).
→ CtaHnIa He TpaHCInpyeT DopoXhBIX coo6uHn, XOTn OTHocntc K TUNy TP. -HacptpoiTecb Ha npuyu cTaHnIO.
Ipn BKJIIOueHn HUHKcnn PTY oTo6paXkaeTcHdNkauaun[--.].
→ПинMuMaMa cTaHcNHe npeJaet daHHbIe RDS.
→ДааньеRDSHe npHIMaTcra.
→ CtaHnIa He yKa3bIbae TIN npoPpAMMbI.
Ha3BaHne nporpamMHOy ycIyRn MraeT.
→Дя ВьбраHHоь В даньи MOMENT CTaHци He nCNoIb3yETc aIbTePHaTINBna YacToTa.
- Haxmte KhoNky //>(SEEK-/+), noka mraet Ha3BaHne nporpaMMHO yCnyr. NOBNTcHnDnKaunra [PI SEEK], n yCTpOietBO NaHETNONCKdpyroJ yactotbCTakMn JKe DaHHbIMn PI (nporpaMMHa nDeHTnΦnKaunra).
Bocnpon3BeJeHne nckOB CD
KOMnakT-ДИСК He BOCPON3BOJNTcR.
→ДиCK3aRpy3HEnNIIIN NOBpeKdEh.
→ДиСКИ CD-R/CD-RW He npeHa3HaueHbI ДЯ BOCnpOu3BVeDEHnA 3Byka (CTp. 30).
HeBo3MOxHOBocpOu3BecTnΦaJIbI MP3/WMA/AAC.
→ДИСК He COBmecTnM C φOpMaTOM n BepCnei MP3/WMA/AAC. YTo6bl NOJyUHTb NOIpO6HbIe CBeJeHnO BOcPpON3BOIMMbIX INCKaX N φOpMaTAX, NocETnTe Be6-caIr, aIpec KOTOporo yKa3aH Ha 3aIHeN O6IoXKe.
ДяВOCрpon3BedeHЯФайLOB MP3/WMA/AAC Tpe6yeTc860JIbIe BpeMeHn,чemДЯДPyrIxФайLOB.
MoxketnoTpe6oBaTbC8 60JIbWe BpeMeHn Do NaUaIa BocnpOn3BeDeHn CNeDyUOuX DnCKOB:
-ДИСК,ЗАПИСАНHBI C ИСПОЛБ3OBaHNeM CLOXHOpa3BETBJIeHHOHTpyKTypbI NaNOK;
-ДИСК,ЗАПЕСАНHBIВФОРМATEMulti Session;
-ДИСК,HaKOTOpblMOxHObIaBnTb DaHHbIe.
3Byk npepbibaeTc.
→ДиCK3aRpa3HeHnIINNoBpeKdEh.
Bocnpo3BeDeHne cYcTpoiCTBa USB
HeBO3MOxHObOCpON3BOoNTb DaHHbIe C nCNoJIb3ObaHnem KOHcHTpaTopa USB.
Ha daHHOM yCTpoIcTBe HeBO3MOxHOp pacno3HaBaHne yCTpoIcTB USB, NOdkJIIOUeHHbIX Yepe3 KOHcHTpaTop USB.
YcIpoNCTBO USB Tpe6yeT 6oJIbwe BpeMeHn IJRA BOCpOu3BeDeHnA.
YcTpoiCTBO USB coepKnt faiJIbI CO CLOXHO pa3BeTBHeHHo CTpykTypoI nnOK.
IpepbibnctOb 3Byka.
→ 3ByK MoXeT 6bITb NpepbIbNCTbIM npn BBICOKoCkOPOCTn NepeDaun DaHHbIX.
B HekoToPbIX CnyuaX BocnpOn3BeDeHne
Файнос DRM (урравленье сфpoВым
празами) HeBO3MOxHNo.
He ydaetc Bocnpoun3Bectn aydnofaJI.
YcTpoiCTBa USB,OTΦopMaTnpOBaHHbIe c NOMOuBIO φaINoBbIX CNCTEm,OTJInuHbIX ot FAT16 nIN FAT32,He NOIDepXKNBAIOTCra*.
* DaHHOe yCTpoINCTBO NOIDepXnBaET FOpMaTbI
faiIOBOB CNTEmbl FAT16 n FAT32, OHaKO
HeKOTOpBle YCTPOINCTBa USB MoYr He
NoIePKNBaTB BCE 3TN FOpMaTbI faiIOBOB
CNTEmbl FAT. IJra NoJIyEHHaNO pOboHoi
IHΦOpMaun CM. IHCTpyKUnIO NO 3KcNlyaTaUHN
KOHKeTHOrO yCTpoINCTBa USB nIn CBxNtEcB c
IPOUN3BOdInTeJEM.
He ydaetcBbIIOJHnTb onepaun nponycka aJIb6Oma, nponycka 3JeMeHTOB (pexim nepexoJa) n noncka komnozun no Ha3BaHnIO (QuickBrowZer).
→ 3TN onepaunn HeoocTyHbI, ecnnnoKIOUeHO yCTpoiCTBO iPod nynycTPOiCTBO USB b peXmme Android.
-Для napaMeТpa [USB MODE] yctaHOBnTe 3HaueHne [MSC/MTP] (cTp.24).
- OTKIIOUHTe yCTpoiCtBO iPod.
Ha yctpoiCTBe 3aHaH HeBepHbI peXIM USB.
- Y6eIntecb, yTO B KaueCTBe peXmAm USB Ha ycTpoIcTBe 3aAnh peXmMSc/MTP.
B pexnme Android 3byk c annapaTa He BocnpoN3BODntc.
Korda annapaT haoDITcB peXnMe Android, 3ByK BocnpOn3BOIDTCa TOpIbKO co cMapTfoHa c OC Android.
-ПоверътсocToHнe ПиLOженЯДяВOCпpon3BeДeHЯaydnoHa cMapTфОHe c OCAndroid.
-B3aBnCmOCTNOTcMapTfoHa cOC Android Bo3MoXHbI npo6JIembl BocnpOn3BeDeHHeM.
Функця NFC
He ydaetc BbINOJIHrTb OIepaunn OdHM KacaHnem (C nCNOJb3OBAHnem FyHKuIN NFC).
Ecnn cMapTfoH He pearnpyeHa KaCaHne, BbIOnHnTe yKa3aHHbIe HNXe DeiCTBnI.
-Поберьт,ВКlioчениллфункциNFC Ha cMapTfoHe.
- Eüe 60JIbIe npn6IIN3bTe 3HaK N Ha cMapTΦOHe K 3HaKy N Ha daHHom annapaTe.
- EcIn cMapTfoH B yexJe, CHMnTe yexoJ.
YyBCTBNTeJIbHOCTb npnemHnka NFC 3aBnCt OT KOHKpeTHOrO ycTpoiCTBa. Ecn HeckoJbKO pa3 He ydaetcra co3daTb NOkNIOUeHne K CMapTFOHy Ondm KaCaHnEM, CO3JaTe NODKlIOUeHne BLUETOOTH BpyHyI.
Функць BLUETOOTH
IopKJIIOUaEMOMy yCTpOiCTBy He ydaetc8 o6Hapuykntb daHHbI aannapaT.
YTo6bI BblIOJIHHTb cOnpJxKeHne, nepeBeIte aannapatB pexIM OxndaHna cOnpJxKeHn.
Korda annapaT noDKJIIOueH K DBym yCTpoiCTBaM BLUETOOTH,pyrOmy yCTpOiCTBy He ydaCTcA oBhApyKHTb erO. -3aKPOiTBe BCE noDKJIIOueHnI BblONHITe NOnCK daHHOrO aannapata Ha dpYROM yCTpOiCTBe.
NocLe BbINOJIHeHnC onpJxKeHn C yCTPOINCTBOM BKIOUHTe BbIXOHOc nIHaN BLUETOOTH (ctp. 10).
He ydaetc co3daTb noKlioueHne.
Поdkлю悔нем упраьяет OДнаиЗсторон (данны annapat nIn yctpoiCTBO BLUETOOTH), Ho He o6e OndOBpeMeHHO. -Поdkлючайтесь K annapaTy c yctpoiCTBa BLUETOOTH nIn hao6oPoT.
He oTo6paXaetcMm o6HapyKeHHoro yCTpoiCTBa.
B 3aBnCmOCTn OT COCToHnA DpyrOTo yCTpOJCTBa, BO3MOxHo, He ydactcI NOJyUHTb eRo NIM.
OTcYCTByeT MeJIoN8 Bbl3OBa.
→Пи потулени BXODЯцero Bbl3OBa NaCTpoIte rPOMKoCTb, NOBOPaUNBaJ DNCKOBBI peRyJIaTOp.
B 3aBnCmOCTN OT NODKJIIOueHHORO yCTPOINCTBa MeIOJNA BbI3OBa MOKeT OTnpaBJIaTbcr HnPaBnJIbHo. -3aJaTe dIra napameTa [RINGTONE] 3NaueHne [1] (cTp.28).
Передни громковоритуни Кданноу annapaTy.
-Подклioчnte nepeДне
громкоговорптели Каappapatу.
Мeюдnia Вьзова Bocnpo3ВоДNTсЯ
Только Уерe3 NepeДнe
громкоговорптели.
He cIbIsho co6eecdHnka.
He ydaetcya npablaTb nodkloueHHbIM aydnoycptpoiCTBOM BLUETOOTH.
Y6eIntecb, yTO NOdkNoueHnoe ycTpoiCTBO BLUETOOTH noDepxNBAe Tnpofnlb AVRCP.
He pa6oTaIOr HeKOTOpbIe yHKnU.
Y6eIITecb, YTO NOKJIIOueHHoe YCTPOICTBO NOpIepXINBaET Heo6xOIMbIe yHKUIN.
PpOncxOoNT aBTOMaTnueckn OTBET Ha BXOJaUcN Bbl3OB.
→Подключehнь Teleфон HabcTpoeH TaK,уTO6bl aBTOMaTnueCKN OTBeuTaB HaBXOДЯШпЕ Bbl3OBbl.
He ydaioocb BblnoHHTb copjxKeHne n3- 3a npebblweHn BpemeHn OXndaHn.
→BpeM,OTBeHeHoeHa cOpJxKeHne, 3aBnCnT OT NODKlHOaEMoYO yCTpoYcTBa IM MoXeT bItb He6OJIbWIM. -IocTaPauTeScb BblNOJHnTb cOpJxKeHne B OTBeHeHoe BpeM.
He ydaetcBbInoHHTb cOpjxKeHne.
Co npjxhe nne aannapata c pahee co npjxheHHbIM yctpoiCTBOM BLUETOOTH MOxet 6bITb HeBO3MOxH0 Nocle HnIuaJIaIaIIN aannapaT,ecII CBeJeHnO CO npjxheHn aannapata HaxoJrTcHa yctpoiCTBe BLUETOOTH.B 3TOM Clyuae Heo6xoIIMO ydaIInTB CBeJeHnO CO npjxheHn aannapata C yctpoiCTBa BLUETOOTH,a 3aTeM BblONHHTb INCnpjxheHne NOBTOPOHO.
He ydaetcya npabTb yHKnnei BLUETOOTH.
→ BbIKIOUHTe annapaT, HaxkAB KHOKNy OFF n yIepKINBa ee HaxkatoB 6OJIee 2 cekyHd, a 3aTeM CHOBA BKIOUHTe ero.
Bo Bpemr TelefoHHoro pa3roBopa B pexnme 6ecnpoBOHOI raphHTypbI Het 3Byka n3 rpomKOROBOpnteJe ABTomO6nla.
EcIIN 3ByK NOCTyNaeT C Mo6nIbHOro TeIefoHa, HAcTPOInTe eTo TaK, YTO6bl 3ByK OT Hero IeJ UpeE3 rPOMKOROBOpNTeJIa ABTomO6nJIa.
Функця Siri Eyes Free He BKJIouyeHa.
→ BbIOnHnTe peRncTpaCnIO iPhone c ΦyHKcUeN Siri Eyes Free B pexKmE 6ecnpoBODHOr rapHNTypbl.
→ BkIIOuHTe ΦyHKcNIO Siri Ha yCTpOInCTBe iPhone.
→ OTMeHnTe NODKJIoueHne BLUETOOTH mExdy yCTpoiCTBOM iPhone n daHbIM aannapaTOM, a 3aTEM CHOBA co3daJte erO.
CD PUSH EJT: He ydaJocb npaBnIbHO n3BJIeY bNCK.
→ HaKmTe KHOIpKy (n3BVeUpb).
LLLnn TnHryTbHaayao NNI KOHeu DnCKa.
При ВоспponЗВeledн CyстpoиCTBa USB:
HUB NO SUPRT: He noДeрЖиВaIOTcKoHuceHTpaTOpbl USB.
IPD STOP: BOCPON3BeJeHne C yCTPOIcTBA iPod 3aKoHcHo.
→ Ha iPod iPhone BKNIOUte yHKNUO BOCNPOUN3BeDEHNA.
NOT SUPPORT -Android MODE
→ Kaannapaty nodkloueHo yctpoiCTBO USB, He noDepkNBAIOUee npotoKoI AOA (Android Open Accessory) 2.0, kOrda nI npametpa [USB MODE] 3aandaHO 3NaueHne [ANDROID].
-Для napaMeТpa [USB MODE] yctaHOBnTe 3HaueHne [MSC/MTP] (cTp.24).
USB ERROR: HeBO3MOXHO BOCnpon3BeCTN yCTpoiCTBO USB.
→ CHOBA NOДКЛЮЧИТЕ YСТРОДТВО USB.
USB NO DEV: yctpoiCTBO USB He IODKJIIOyeHO NIN He paCNO3HaHO.
Y6eIntecb, yTO yCTpoiCTBO USB nIIN Ka6eIb USB hAdexKHO NOdklOueHbl.
USB NO MUSIC: OTCYCTBYeT ΦaɪЛ ДЯ BOCnpoɪЗVeDEHɪŋ.
→ПодсоeДиНHTe ycTpoIcTBo USB c BOCpOuN3BOДИМыIMn faJIaMn (cTp. 32).
USB NO SUPRT: yctpoiCTBO USB He PoiDJIepKINBaETcI.
→Дяпolyчehняpo6hblx cbehen o coBmecTmocTN yctpoiCTBa USB nocetnte Be6-caNT noDepkKn, yKa3aHHbHa 3aHHe CTopoHE 06IoxKn.
USB OVERLOAD: yctpoiCtBo USB nepenolHeNo.
→ OTKIIOHTe yCTpOioCTBO USB, a 3aTeM HaxMMte KHOIIky SRCДЯ BbIbopa dpyrOro nCTOuHnka.
YcTPOIcTBo USB noBpeJxdeHo, nIINIOIDCOeINHeHO HeNoIePKeINBaemoeYcTPOIcTBO.
Pn nCnoJb3ObaHn RDS:
NO AF:OTCYTCTBYOT aJIbTepeHaTINBHBie yaCTOTbl.
→Haxmnte KhoNky /(SEEK-/+), noka mnaet Ha3BaHne nporpaMMHO yCnyr. YcTpoiCTBO hauHaet nonck dpyroJyactOTbIC TeMn JeaHHbIMn PI (nporpamMaI NdeHTnΦnKaunia) (noBJIaETc Hndkaun [PI SEEK]).
NO PI: oTCyTCTByeT nporpaMMHa
nDeHTnΦnKauzna.ДЯ BbIbpaHHoI cTaHcnn
Het DaHHbIX PI (nporpaMMHOJ
nDeHTnΦnKauznn).
→ Bb6epnte npyryo cTaHcHIO.
NO TP: HeT coo6uHn o TeKuSei CNTuaun Ha doporax.
YcTpoIcTBo npoIoJXnT nONCK cTaHcN, nepeJaIOuXn nporpaMMy TP.
ERROR: He ydaetcBbINOJHHTb Bbl6paHHyIO onepaunio.
Подождnte HeKOTOpoe BpeM, a 3aTeM NOBtOpuTe nonbITKy.
NO DEVICE: yctpoiCTBO BLUETOOTH, nopeKnBaIOoee npoHf HFP (Handsfree Profile), He noKJIoueHo nIi He pacno3HaHO.
Y6eIntecb, yTo yCTpoiCTBO BLUETOOTH HAdEJXHO NODKJIIOHeH N yTO K HeMy CO3DaHO NODKJIIOHeHc npoΦnIeM HFP.
NO SUPPORT: BbIbpaHna Oepaun 3anpeueHa IIN He NODepxNBAeTcA.
Y6eIntecb, yTo yCTpoiCTBO BLUETOOTH noIepKnBaet npoΦnHFP (Handsfree Profile).
UNKNOWN: He ydaetcra OTo6pa3ntb NMa IIN HOMep TelefoHa.
WITHHELD: 3BOHЯин a6OHeHT cKpbIcBOn HOpE TeIeΦOHa.
→ YTO6bIMOxH0 6bIIO NcNoJIb3OBaTb KHOKNY, BbIyIte n3 MeHIO npaMeTpOB 3KpaHaB pNIOXKeHN.
APP LIST: OTKpbIT CnncOK CoepxmoTO CD/USB/iPod.
→ YTO6bIMOxH0 6bIIO NcNoJIb3OBaTb KHOIIKBy, BbIДNTe I3 CnNCKa B npILOXKeHN.
APP MENU: OTKpbITo MeHIO napaMeTpOB B npJIOXKeHn.
→ YTO6bIMOxH06blIO NcNoJb3OBaTb KHOKNy, BbIINTe n3 MeHIO napaMeTpOB B npInIOXeHN.
APP NO DEV: yCTPOIcTBOCyCTaHOBJIeHHbIM
PpNILOXKeHnEM He NIOKJIIOUeHO IIN He
paCNO3HaHO.
Co3daiTe nodkJIOueHne BLUETOOTH, a 3aTeM eue pa3 co3daiTe noDKIIOueHne K npINOxKeHIO "Sony | Music Center" (cTp.20).
APP SOUND: OTKpbITo MeHIO napaMeTpOB 3ByKa B npNJIOXeHN.
→ YTO6bIMOxH06bIIO NcNoJb3OBaTb KHOKNy, BbIINTe IN3 MeHIO npaMeTpOB 3ByKaB pNIOKeHN.
OPEN APP:Пробожения "Sony | Music Center" He зашино.
3anyctnte npnloxhe.
NO DEVICE: yCTpoiCtBO USB c nporpammoI O6HOBJIeHnI He NODKJIIOUeHO IJIH He paCnO3HaHO.
Y6eIntecb, yTo yCTpoiCTBO USB HaeXho NOdkloueHo.
OTKJIIOUHTe n CHOBa NOKJIIOUHTe yCTpoIcTBo USB.
UPDATE ERROR - PRESS ENTER:
OboHbIeHne MmKpOnpOrpaMMbI He 3aBepSeHo DoJIKNbIM O6pa3OM.
→HaxmTe KhoNky ENTER, yTo6bI y6paTb coo6eHne, n NOBtOpnte NOnbItKy. Bo Bpem o6HOBLeHnA He noBOPaUNBaIte BBIKIOUaTeJb 3axnraHnB nOLOXeHne OFF n He oTcoEduHnTe nCNoJIb3yEmoe ycTpoiCTBO USB (cTp.29).
EcnBpe3yIbTaTe npedlaeraMbx
DeiCTBn He ydaCTcY UCTpaHntb
HeNoJaKy,OBpaNTecb K 6bnXaIWeMy
DInlepy Sony.
Ecnn ycTpoiCTBO cdaetcB pemOH T B
Clyuae KaKoJ-lno HeNoJaKn,
BO3NkWei npn BocnpOn3BeJeHNn DnCKa
CD,Heo6xOIMo NMeTb npn ce6e KomNaKT-
DNCK, npn BocnpOn3BeJeHNn KOToPOrO
0bHapyXnIacb HeNCpPaBHOCTb.
YctaHOBka/NoDKJIIOUeHne
Bнманne!
- ПоведиTe BCE 3a3eMЯIoUSe npoBoda K o6uE ToUKe 3a3eMJIeHnI.
- He donyckaTe nonaHaHna npoBOOB noB BuHTbI Nn MeKdy NoDBeHXhIMn DeTajMn (HaNPmep, MeKdy HappaBJIIOUcIMN cndeHn).
Bo n36exhaHne KopoTKoro 3aMbikaHna nepeyctahOBKO coeHHn BbIKJIOHTe 3axnraHne aBTOMO6nla. - Chauja nOdoeHnTe npoBOD nHTaHn ⑥ K yCTPOJCTBY n rPOMKOrOBOpNTeIam, a 3aTeM - K KOHTaKTam BHeUHero NCTOCHNka nHTaHn.
Buejx6e30nacHcTNo6aTeIbHO n3oJpyuTe Bce CBO6OHNbIE HenoDCoeDnHeHbIe npOBDa 3NeKTPOn3OJauOHHOJeHToN.
MepblnpedoctopoXhOCTn
TuaTeJIbHO BbIbnpaIte MeCTO dIyCTAHOBKn aIppaTa, yTO6bl OH He Me7aJynpaBLeHnIO ABTomO6nIeM.
He yctaHaBnBaIte aannapat tam, rde OH 6ydet nOdBepXeH BO3DeiCTBIO nbIN, rpa3n, Ype3MepHO Bn6paun nn BBICOKNX TempeATyp, HApPIMep B MecTAX, Kya IOnaIaOT npAble COJIHeuHbIe JyuN, NIn B6NJ3N BeHTnJRAUHOHHbIX peWetOK 06OrpeBaTeJeN.
B uejx oecneueHnaeJHoN 6e3oNaChOH yCTaHOBKn nCNoJIb3yIte IINb BXOJaUe B KOMnJIeKT MOHTaXHbIe DeTaII.
PnmuMeaHne OTHOCHTeJIbHO npoBoda nntAHna (XeJtbi)
Pn noKIOueHn DaHHoro yCTpOcTbBA BMeCTe C Dpyrnn CtepeOKOMHOHeHTAMN HOMHaJIbHOE 3NaueHne CNbl TOKa B KOHType NtTaHn ABTomO6nla DoJXHO npeBbIaTb CymMapHOE 3NaueHne CNbl TOKa, YKa3aHHoe Ha npEdoxpaHnteJx BCex KOMNOHeTOB.
Perynnpobka yrna yctaHOBKn
OtperynpyTe yroJ yctaHOBKn TaK, UTo6bI OH coCTaBJI MeHee 45°.
Ipepehev deTaJIeJ dJa UCTaHOBKn
(1)
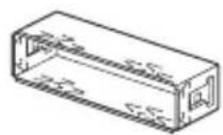
(2)

(3)

(4)

⑤

6

⑦
⑧


B 3TOT cncoc BxOaNT He BCE copepkmoe KOMnJIeKTA NOCTaBKn.
KpoHHTeH ① n 3aunTHa MaHKeTa ③ npKpeIeHb K yCTpoiCTBy Do noCTaBKn. IpeE yCTaHOBkoYCTPOIcTBa BOCnOJb3yTEcB KIOUamN DnA DeMOHTaKa ②, YTO6bl OTcoeHNHTb KPOHHTeH ① OT yCTPOIcTBa. NOpO6hble CBeDeHnA cm. B pa3dJe "OTcoeHNHeHne 3aunTHoI MaHKeTb n KPOHHTeHa" (ctp.48).
-CoxpaHnte KJIouN dIg DeMOHTaJa ② IJRA NCNoJIb3OBAHnB 6yDyuIeM, NocKoJIbKy OHI TaKKe NOTpe6yIOTc PpI DeMOHTaKe aannapata n3 aBTOMo6nla.
Покlioарно
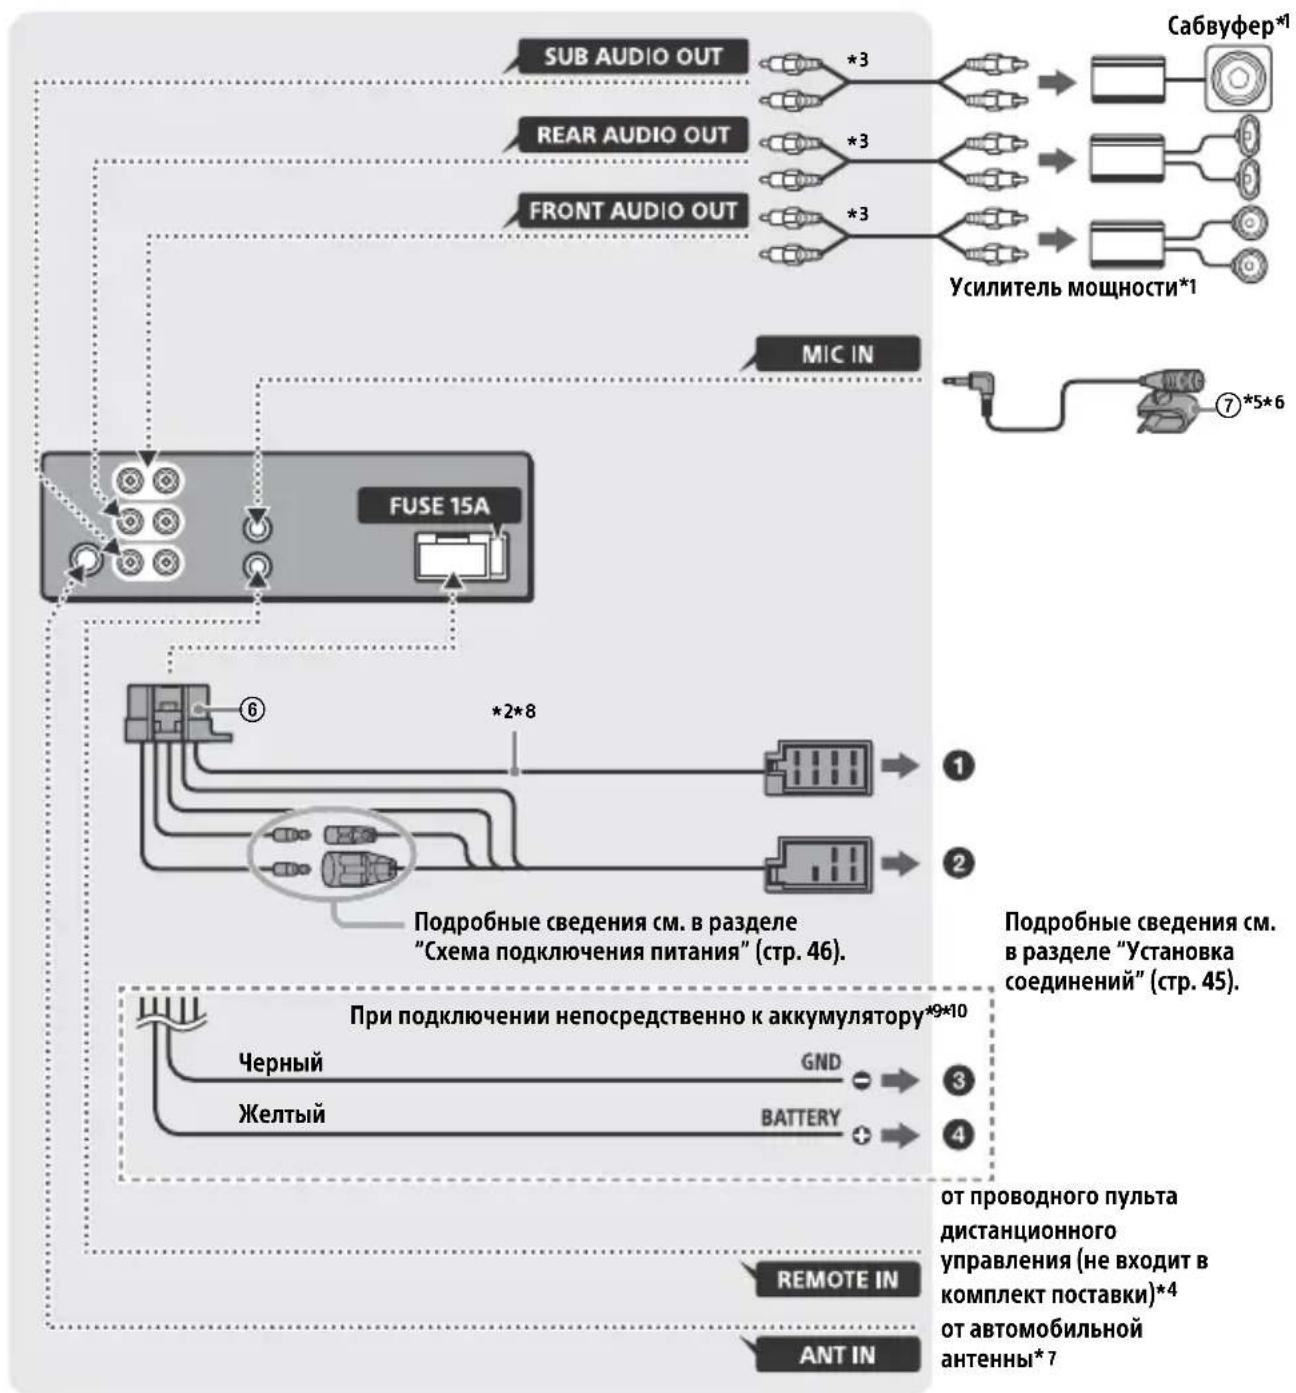
1 He BXOДNT B KOMПЛЕКТ NOCTaBKN.
2 Полное сорpoTNBHeHne ГрмКOrOBopNTeJIeN: 4 Ω - 8 Ω × 4
3 Ka6eNb c pa3bemAmn RCA (He BxOuNT B KOMNJIeKT NOCTaBKn).
^4 B 3aBnCmOCTn OT TnA aBTOMo6nIa, BO3MOxH0, NOtpe6yeTcra NcNoJb3OBaTb aIaNTep IJI npoBOJHO rNylbTa IINCTaHnOHOrO ynpaBHeHr (He BXoIIT B KOMnKeT NoCTabKn). PIOpObHbIe CBeJeHr o6 INcNoJb3OBaHN pOBoJHO rNylbTa IINCTaHnOHOrO ynpaBHeHr CM. B pa3dJe "UcNoJb3OBaHne npoBOJHO rNylbTa IINCTaHnOHOrO ynpaBHeHr" (CTp. 48).
5 He3aBnCmO OT TOrO, 6yJeTe JN Bbl NcNoJIb3OBaTb MnkPofoH, npoJoxKe Ka6eJIb MnkPofoHa TaK, yTo6bI OH He MeJaaJ BOxJdeHnIO. 3aKpeNiTE Ka6eJIb 3aXHMOM, ecJN, HApnpMep, OH npoxOAnr PraDom C BaUIMN HORAMN.
^6 CBeHnO ob yCTaHOBKe MmKpOfoHa CM. B pa3JeNe "YctaHOBka MmKpOfoHa" (cTp. 47).
7 B 3aBncmOCTn OT Tnna aBTOMo6nla
NcNoJIb3yIte aJaANTep (He BXoJNT B KOMnJIeKT
noCTaBKn), ecn pa3bem paIIOaHTehHbI He
NoJXoJNT.
*8 NcnoJb3yIte rpoMkoROBOpTeIe C BxoHoi cpeNHeKBaIpaTnUHO MouHocTbIO 50 BT nII NBiIe. PekomeHdyeTcNcNoJb3OBAtB rpOMKOROBOpTeIe NoIHOr Dnana3OHa cepIN Sony XB.
9 Ecn npeOxpaHntb abTomo6nla coOTBeTCTByET CnJe Toka 10 A, NoKnIOuHTe NITaHHe HEnOCpeDCTBeHHO K aKKyMylrTopy BO n36exaHne KOpOTKOrO 3amblKaHn.
*10 Перед подкючим Heобхомо
ПОДГ罗ВИТь Лгий И черны побoga на
Источни Кптая.
YCTaHOBka coeHHeHn
Ecnuocnojb3yeTcra aHTeHnac
3neKtpoPnPBODOM 6e3 peIeHOrO 6Joka,
NoCoeINHeHne 3TOrO yCTpOiCTBa C
NOMOUI npNJlaraEMORIO npOBoJa NITaHnRA ⑥ MoKeT npNBecTN K NOBpeXdEHnHO
aHTeHHbl.
Kpa3bemy rpomkoroboputejra aBTOMO6nla
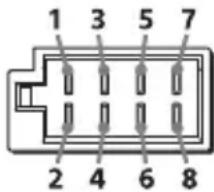
EcnKpaChbI N XeJIbI npoBoda nepeCTaBHeHbI MeCTaMn

KpacHbI KpacHbI
XeIbI XeIbI
"Pepe3arpy3ka yctpoiCTBa" (ctp. 7).
6paTecbK 6bnXaIWeMy dIlepy Sony.
BbIrapckn
Hereby, Sony Corporation declares that this equipment is in compliance with Directive 2014/53/EU.
The full text of the EU declaration of conformity is available at the following internet address: http://www.compliance.sony.de/
Eesti Keel
If you have any questions or for the latest support information on this product, please visit the web site below:
Site d'assistance
Register your product online now at:

- Bluetooth® Audio System
- Made in Thailand
- CE
- Notice for customers: the following information is only applicable to equipment sold in countries applying EU Directives
- Disposal of waste batteries and electrical and electronic equipment (applicable in the European Union and other European countries
- with separate collection systems)
- CAUTION
- Warning if your car's ignition has no ACC position
- Disclaimer regarding services offered by third parties
- Important notice
- Emergency calls
- On BLUETOOTH communication
- Table of Contents
- Getting Started
- Listening to the Radio
- Playback
- Handsfree Calling (via BLUETOOTH only)
- Useful Functions
- Settings
- Additional Information
- Connection/Installation
- Guide to Parts and Controls
- Main unit
- Front panel removed (inner panel)
- Front panel release button
- SRC (source)
- Control dial
- PUSH ENTER
- MENU
- - VOICE (page 16, 18, 19)
- N-Mark
- Disc slot
- Display window
- (disc eject)
- PTY (program type)
- Q (browse) (page 15)
- CALL
- ALBUM▼/▲
- Detaching the Front Panel
- Caution alarm
- Serial numbers
- Attaching the front panel
- Resetting the Unit
- Note
- Setting the area/region
- Setting the Clock
- Checking the Battery Voltage
- Preparing a BLUETOOTH Device
- Connecting with a Smartphone using One-touch connection (NFC)
- To disconnect using NFC
- Notes
- Pairing and connecting with a BLUETOOTH device
- To start playback
- To disconnect the paired device
- Connecting with a paired BLUETOOTH device
- To connect the last-connected device from this unit
- Tip
- To install the microphone
- Connecting with an iPhone/iPod (BLUETOOTH Auto Pairing)
- Connecting a USB Device
- Connecting Other Portable Audio Device
- To match the volume level of the connected device to other sources
- Storing automatically (BTM)
- Tuning
- Storing manually
- Receiving the stored stations
- Using Radio Data System (RDS)
- Setting alternative frequencies (AF) and traffic announcement (TA)
- To store RDS stations with the AF and TA setting
- To receive emergency announcements
- To adjust the volume level during a traffic announcement
- To stay with one regional program (REGIONAL)
- Local Link function (UK only)
- Selecting program types (PTY)
- Type of programs
- Setting clock time (CT)
- Playing a Disc
- Playing a USB Device
- Playing a BLUETOOTH Device
- To match the volume level of the BLUETOOTH device to other sources
- Searching and Playing Tracks
- Repeat play and shuffle play
- Searching a track by name (QuickBrowZerTM)
- Searching by skipping items (Jump mode)
- Receiving a Call
- To reject the call
- To end the call
- Making a Call
- From the phonebook
- Press CALL.
- From the call history
- By phone number input
- By redial
- By voice tags
- Available Operations during Call
- Sony | Music Center with iPhone/Android smartphone
- Establishing the Sony | Music Center connection
- If the device number appears
- To terminate connection
- Selecting the source or application
- To select the source
- To display the source list
- Announcement of SMS by voice guide (Android smartphone only)
- Replying a message of SMS (Android smartphone only)
- Making sound and display settings
- Using Voice Recognition (Android smartphone only)
- To deactivate voice recognition
- Using Siri Eyes Free
- To deactivate Siri Eyes Free
- Canceling the DEMO Mode
- Basic Setting Operation
- General Setup (GENERAL)
- AREA (area)
- DEMO (demonstration)
- CLOCK-ADJ (clock adjust) (page 8)
- CAUT ALM (caution alarm)
- BEEP (beep)
- AUTO OFF (auto off)
- STEERING (steering)
- USB MODE (USB mode)
- CT (clock time)
- AF/TA (alternative frequencies/traffic announcement)
- REGIONAL (regional)
- Sound Setup (SOUND)
- POSITION (listening position)
- Display Setup (DISPLAY)
- BLUETOOTH Setup (BLUETOOTH)
- Sony | Music Center Setup (SONY APP)
- Updating the Firmware
- Precautions
- Moisture condensation
- To maintain high sound quality
- Notes on discs
- Notes on CD-R/CD-RW discs
- Playback order of audio files
- About iPod
- Maintenance
- Cleaning the connectors
- Specifications
- Tuner section
- FM
- MW/LW
- CD Player section
- USB Player section
- Wireless Communication
- NFC Communication
- Power amplifier section
- General
- Copyrights
- libFLAC
- Troubleshooting
- The unit is turned off when playing at a high volume.
- No sound or the sound is very low.
- No beep sound.
- The contents of the memory have been erased.
- Stored stations and correct time are erased.
- Makes a noise when the position of the ignition is switched.
- During playback or reception, the demonstration mode starts.
- The display disappears from/does not appear in the display window.
- The display/illumination flashes.
- The operation buttons do not function. The disc will not eject.
- Radio reception
- Stations cannot be received.
- The sound is hampered by noises.
- Preset tuning is not possible.
- MHz to 74 MHz in FM3 cannot be tuned in.
- RDS
- RDS services cannot be received (when [AREA] is set to [RUSSIA]).
- The SEEK starts after a few seconds of listening.
- No traffic announcements.
- PTY displays [- - - -]
- Program service name flashes.
- CD playback
- The disc does not play.
- MP3/WMA/AAC files cannot be played.
- MP3/WMA/AAC files take longer to play than others.
- The sound skips.
- USB device playback
- You cannot play items via a USB hub.
- A USB device takes longer to play.
- The sound is intermittent.
- The audio file cannot be played.
- Operations for skipping an album, skipping items (Jump mode), and searching a track by name (QuickBrowZer) cannot be performed.
- The sound cannot be output during playback in Android mode.
- NFC function
- One-touch connection (NFC) is not possible.
- BLUETOOTH function
- The connecting device cannot detect this unit.
- Connection is not possible.
- The name of the detected device does not appear.
- No ringtone.
- The talker's voice cannot be heard.
- A call partner says that the volume is too low or high.
- Echo or noise occurs in phone call conversations.
- The phone is not connected.
- The phone sound quality is poor.
- The volume of the connected audio device is low (high).
- The sound skips during playback of a BLUETOOTH audio device.
- The connected BLUETOOTH audio device cannot be controlled.
- Some functions do not work.
- A call is answered unintentionally.
- Pairing failed due to a timeout.
- Cannot pair.
- BLUETOOTH function cannot operate.
- No sound is output from the car speakers during handsfree call.
- Siri Eyes Free is not activated.
- Sony | Music Center operation
- Application name is mismatched with the actual application in "Sony | Music Center".
- While running the "Sony | Music Center" application via BLUETOOTH, the display automatically switches to [BT AUDIO].
- The "Sony | Music Center" application is automatically disconnected when the display switches to [IPD].
- The "Sony | Music Center" connection is automatically disconnected when the USB mode of the unit is changed to [ANDROID].
- Messages
- INVALID
- OUTPUT ERROR: There may be an internal malfunction.
- READ: Now reading information.
- TEMP CAUTION: The thermal protector is activated.
- For CD playback:
- CD ERROR: The disc cannot be played. The disc will be ejected automatically.
- CD NO DISC: There is no disc.
- For USB device playback:
- NOT SUPPORT -Android MODE
- For RDS operation:
- For BLUETOOTH function:
- For Sony | Music Center operation:
- For steering wheel remote control operation:
- For firmware update operation:
- Cautions
- Parts List for Installation
- Connection
- Making connections
- To the car's speaker connector
- To the car's power connector
- Subwoofer Easy Connection
- Memory hold connection
- Speaker connection
- Power connection diagram
- When the positions of the red and yellow leads are inverted
- Installing the microphone
- Using the wired remote control
- Installation
- Removing the protection collar and the bracket
- Mounting the unit in the dashboard
- Detaching and attaching the front panel
- Fuse replacement
- Raccordement/Installation
- Appel mains libres (via BLUETOOTH uniquement)
- EDIT CUSTOM (modifier personnalisation)
- Attention
- (espulsionedisco)
- PTY (tipodiprogramma)
- IpeynpexkdeHne Ira clyuaeB, KOrda B 3aMKe 3axnraHna Het noLoxkeHHA CC
- OTka3 OT OTBeTCTBHeHOctn B OTHoWeHn ycIyr, npeOCTaBJaEmbIX CTOpOHnMn NoCTaBUnkamN
- Baxhoe npimechne
- BHHMaHHe!
- BbI3OBbI 3KCTpeHHbIX cnyX6
- PpocnyuBauHne paHno
- Bocnpon3BeDeHne
- 3HaK N
- YcTaHOBka Yacob (CT)
- Bocnpon3BeDeHne dincka
- Bocnpon3BepeHne yctpoiCTBa USB
- PpimMeaHnA
- Для OCTaHOBKN BOCnpon3BeDEHnA
- Ppeynpejckene KacaTeNbO iPhone
- CobepueHne Bbl3OBA n3 KypHaIa Bbl3OB0B
- Cobepshne Bbl30Ba nyTeM BBoHa Homepa TeJefoHa
- CobepweHne Bbl3Oba nyTem nobtophoro Ha6opa Homepa
- CobepueHne Bbl3OBA c NOMOuIIO TOLOCOBbIX MeTOK
- Bb6op nCTOuHnKa cnHaJa
- OTo6paXeHne cNnCKa nCToUHnKOB cnHaJIOB
- 06BJBHeHne SMS c nOmoIbIO yHKuIN BocnpOn3BeDeHnpeuN (ToJIbKO dJa CMaprTfoHOBc OC Android)
- OTBeT Ha SMS (ToIbKO IJRA cMaprfoHOB C OC Android)
- HactpoKa npaMeTpOB 3ByKa n DnCpIeJ
- Испобзоване Функциnpacno3HaBaHЯ peuN(Tobko Дя СмартфоHOBOC Android)
- BbIKIIOUeHne yHKcnn paCnO3HaBaHnapeu
- Ppimechn
- HactpoIka 3Byka (SOUND)
- EQ10 PRESET (BbI6Op HAcTpoeK ЖБаЛаЗерE AQ10)
- EQ10 CUSTOM (cpeuHaBhIe HaCTpoiKN 3KbAaJ3epa EQ10)
- HacrtpoiKa dncnpej (DISPLAY)
- HactpoJa BLUETOOTH (BLUETOOTH)
- Hac troponka npiloxeHna Sony | Music Center (SONY APP)
- Приимechи OTHOCHTeIbHoДИСКOB
- Popraok Bocnpon3BedeHnaaynOaIIOB
- Cbeheny o6 iPod
- YxOa yCTpoiCTBOM
- UHCTKa KOHTaKTOB
- PpimMeuHn
- TexhnuceknexapakTepnCTnKn
- TIOHEP
- Pa3dI npoIrpblBaTeIa CD
- PpOurpbIbATEJb USB
- PoiKJIIOUeHne no NFC
- Abtopckne npaba
- YCTPOINCTBOOTKJIIOUaETcnp BOCNPOIN3BVeDEHmC BBICOKOI rPOMKOCTbIO.
- 3BYKOTCYTCTBYETNIN OueHb TUXNI.
- He cIbIweH 3ByKOBoCnHaJI.
- YdaJIeHbI daHHbIe n3 naMrtn.
- I3 namrtn ydaJIeHbI 3aIporpaMMnPOBaHHbIe paNIOCTaHcII N UCTaHOBka BpeMeHN. Ipeperopel npedoxpAHntelb. CblIseH wym npn nepeKIOUeHm NoLOXeHn KIOUa 3aXnraHn.
- Bo BpemBaocpon3BedeHnI npema NaHHaETcJeMoHCTpaZn.
- Iponana/He oTo6paXaetcHnDnKaunB Okowke dncnne.
- Ducnnei/NoocBcTeKa Muraet.
- He pa6oTaIOT KhoNk ynpaBLeHn. Nsck He n3BLeKaetc.
- PpneMaioctaHcN
- He ydaetc npnHtbpaHocTaHcun. 3Byk coppoBokdaeTc nomexamn.
- He ydaetcBbINoHnTb npedBapnteIbHyIO HaCTpoiKy.
- B dnaana3oHe FM3 He ydaTcHacTpOuTb 65 Mf -74 Mf.
- He ydaetc npnHryb ycIyRn RDS (KoIa dIy napameTp a [AREA] 3aDaHO 3HaueHne [RUSSIA]).
- Iocne HeckoJIbKnx CeKyHd npocnyuBaNn BkJIouHaetcA yHKunr SEEK.
- IopoxKhble coo6uEHHn He nepepaOTc.
- Ipn BKJIIOueHn HUHKcnn PTY oTo6paXkaeTcHdNkauaun[--.].
- Ha3BaHne nporpamMHOy ycIyRn MraeT.
- Bocnpon3BeJeHne nckOB CD
- KOMnakT-ДИСК He BOCPON3BOJNTcR.
- HeBo3MOxHOBocpOu3BecTnΦaJIbI MP3/WMA/AAC.
- ДяВOCрpon3BedeHЯФайLOB MP3/WMA/AAC Tpe6yeTc860JIbIe BpeMeHn,чemДЯДPyrIxФайLOB.
- 3Byk npepbibaeTc.
- Bocnpo3BeDeHne cYcTpoiCTBa USB
- HeBO3MOxHObOCpON3BOoNTb DaHHbIe C nCNoJIb3ObaHnem KOHcHTpaTopa USB.
- YcIpoNCTBO USB Tpe6yeT 6oJIbwe BpeMeHn IJRA BOCpOu3BeDeHnA.
- IpepbibnctOb 3Byka.
- He ydaetc Bocnpoun3Bectn aydnofaJI.
- He ydaetcBbIIOJHnTb onepaun nponycka aJIb6Oma, nponycka 3JeMeHTOB (pexim nepexoJa) n noncka komnozun no Ha3BaHnIO (QuickBrowZer).
- B pexnme Android 3byk c annapaTa He BocnpoN3BODntc.
- Функця NFC
- He ydaetc BbINOJIHrTb OIepaunn OdHM KacaHnem (C nCNOJb3OBAHnem FyHKuIN NFC).
- Функць BLUETOOTH
- IopKJIIOUaEMOMy yCTpOiCTBy He ydaetc8 o6Hapuykntb daHHbI aannapaT.
- He ydaetc co3daTb noKlioueHne.
- He oTo6paXaetcMm o6HapyKeHHoro yCTpoiCTBa.
- OTcYCTByeT MeJIoN8 Bbl3OBa.
- He cIbIsho co6eecdHnka.
- He ydaetcya npablaTb nodkloueHHbIM aydnoycptpoiCTBOM BLUETOOTH.
- He pa6oTaIOr HeKOTOpbIe yHKnU.
- PpOncxOoNT aBTOMaTnueckn OTBET Ha BXOJaUcN Bbl3OB.
- He ydaioocb BblnoHHTb copjxKeHne n3- 3a npebblweHn BpemeHn OXndaHn.
- He ydaetcBbInoHHTb cOpjxKeHne.
- He ydaetcya npabTb yHKnnei BLUETOOTH.
- Bo Bpemr TelefoHHoro pa3roBopa B pexnme 6ecnpoBOHOI raphHTypbI Het 3Byka n3 rpomKOROBOpnteJe ABTomO6nla.
- Функця Siri Eyes Free He BKJIouyeHa.
- При ВоспponЗВeledн CyстpoиCTBa USB:
- Pn nCnoJb3ObaHn RDS:
- UPDATE ERROR - PRESS ENTER:
- YctaHOBka/NoDKJIIOUeHne
- Bнманne!
- MepblnpedoctopoXhOCTn
- PnmuMeaHne OTHOCHTeJIbHO npoBoda nntAHna (XeJtbi)
- Perynnpobka yrna yctaHOBKn
- Ipepehev deTaJIeJ dJa UCTaHOBKn
- Покlioарно
- YCTaHOBka coeHHeHn
- Kpa3bemy rpomkoroboputejra aBTOMO6nla
- EcnKpaChbI N XeJIbI npoBoda nepeCTaBHeHbI MeCTaMn
- BbIrapckn
- Eesti Keel
- Site d'assistance
Brand : SONY
Model : MEXGS820BT
Category : Car stereo