
AFS 18200mm f3.55.6G ED VR II - Camera lens NIKON - Free user manual and instructions
Find the device manual for free AFS 18200mm f3.55.6G ED VR II NIKON in PDF.

| Product type | Zoom photo lens |
| Brand | Nikon |
| Model | AF-S DX NIKKOR 18-200mm f/3.5-5.6G ED VR II |
| Mount | Nikon DX (bayonet) |
| Focal length | 18 mm to 200 mm |
| Maximum aperture | f/3.5 to f/5.6 |
| Optical construction | 16 elements in 12 groups (3 aspherical, 2 ED) |
| Angle of view | 76° to 8° |
| Focus | AF-S autofocus with M/A mode (manual priority) and manual focus |
| Vibration reduction | Yes (VR) – NORMAL and ACTIVE modes |
| Minimum focus distance | 0.5 m (independent of focal length) |
| Filter diameter | 72 mm |
| Number of diaphragm blades | 7 (circular) |
| Aperture range | f/3.5 to f/22 (at 18 mm) / f/5.6 to f/36 (at 200 mm) |
| Dimensions (diameter × length) | ≈ 77 mm × 96.5 mm |
| Weight | ≈ 565 g |
| Power supply | Via camera (CPU contacts) |
| Supplied accessories | Front cap LC-72, rear cap, lens hood HB-35, case CL-1018 |
| Maintenance and cleaning | Blower brush, soft brush, cotton or optical cloth slightly moistened with ethyl alcohol; do not use solvents |
| Safety | Do not disassemble, avoid flammable gases, do not look at the sun through the lens, keep out of reach of children |
| General information | Lens designed for Nikon DX-format digital SLR cameras; manual available for download |
Frequently Asked Questions - AFS 18200mm f3.55.6G ED VR II NIKON
User questions about AFS 18200mm f3.55.6G ED VR II NIKON
0 question about this device. Answer the ones you know or ask your own.
Ask a new question about this device
Download the instructions for your Camera lens in PDF format for free! Find your manual AFS 18200mm f3.55.6G ED VR II - NIKON and take your electronic device back in hand. On this page are published all the documents necessary for the use of your device. AFS 18200mm f3.55.6G ED VR II by NIKON.
USER MANUAL AFS 18200mm f3.55.6G ED VR II NIKON
natural_image
Illustration of a person walking on a bridge overlooking a cityscape with buildings and skyscrapers (no text or symbols)E〈花畑〉

natural_image
Grayscale aerial or satellite view of a textured field with four marked square boxes in the center (no visible text or symbols)Notes on Safety Operations
En

CAUTION
Do not disassemble
Touching the internal parts of the camera or lens could result in injury. Repairs should be performed only by qualified technicians. Should the camera or lens break open as the result of a fall or other accident, take the product to a Nikon-authorized service representative for inspection after unplugging the product and/or removing the battery.
Turn off immediately in the event of malfunction
Should you notice smoke or an unusual smell coming from the camera or lens, remove the battery immediately, taking care to avoid burns. Continued operation could result in injury. After removing or disconnecting the power source, take the product to a Nikon-authorized service representative for inspection.
Do not use the camera or lens in the presence of flammable gas
Operating electronic equipment in the presence of flammable gas could result in an explosion or fire.
Do not look at the sun through the lens or viewfinder
Viewing the sun or other strong light sources through the lens or viewfinder could cause permanent visual impairment.
Keep out of reach of children
Particular care should be taken to prevent infants from putting the batteries or other small parts into their mouths.
Observe the following precautions when handling the camera and lens
- Keep the camera and lens unit dry. Failure to do so could result in fire or electric shock.
- Do not handle or touch the camera or lens unit with wet hands. Failure to do so could result in electric shock.
- When shooting with back-lighting, do not point the lens at the sun or allow sunlight to pass directly down the lens as this may cause the camera to overheat and possibly cause a fire.
- When the lens will not be used for an extended period of time, attach both front and rear lens caps and store the lens away from direct sunlight. Failure to do so could result in a fire, as the lens may focus sunlight onto a flammable object.
Nomenclature
En
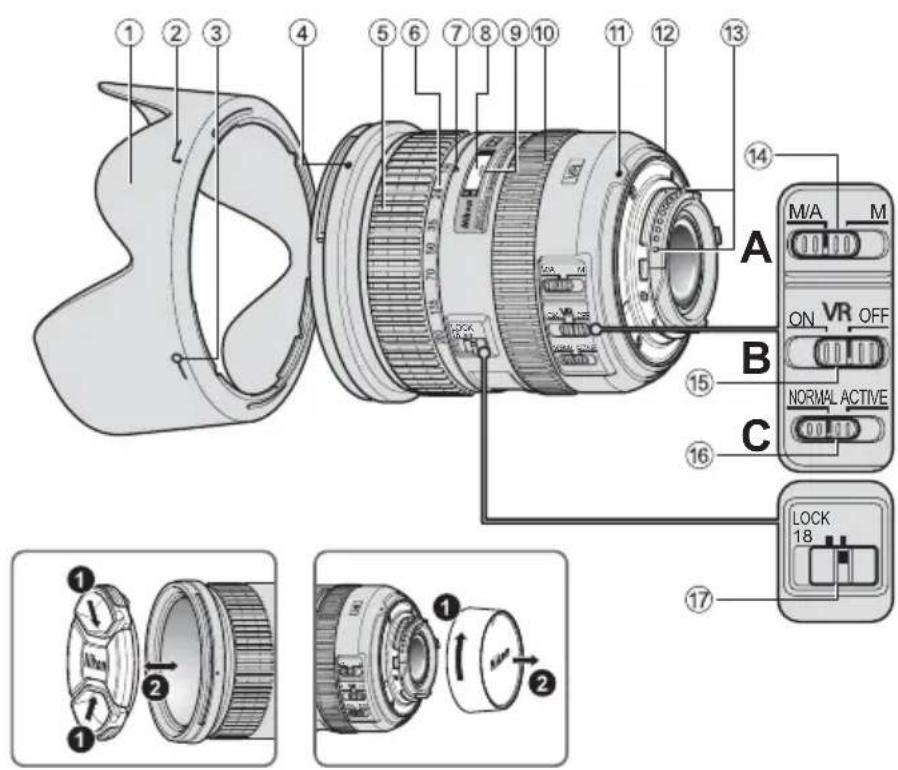
① Lens hood (P. 22)
② Lens hood attachment index (P. 22)
③Lens hood setting index (P. 22)
④ Lens hood mounting index (P. 22)
⑤Zoom ring (P. 16)
⑥Focal length scale (P. 16)
⑦Focal length index
⑧Distance scale
⑨Distance index line
⑩ Focus ring (P. 17)
⑪Mounting index
⑫ Lens mount rubber gasket (P. 22)
⑬CPU contacts (P. 22)
⑭ Focus mode switch (P. 17)
⑮Vibration reduction ON/OFF switch (P. 18)
⑯Vibration reduction mode switch (P. 18)
⑰ Zoom lock switch ( ) : reference page
Thank you for purchasing the AF-S DX NIKKOR 18-200mm f/3.5-5.6G ED VR II lens. DX NIKKOR lenses are specially designed for use with Nikon digital-SLR (Nikon DX format) cameras, such as the D300-series and D90. When mounted on Nikon DX format cameras, the lens picture angle is equivalent to approximately 1.5× the focal length in 35mm format. Before using this lens, please read these instructions and refer to your camera's User's Manual.
■Major features
- By enabling vibration reduction, slower shutter speeds (3.5 stops*) can be used, thus increasing the range of usable shutter speeds and zoom positions, particularly when hand-holding the camera. (*The effects of VR on shutter speed are measured according to Camera and Imaging Products Association (CIPA) standards; FX-format lenses are measured using FX-format digital cameras, DX-format lenses using DX-format cameras. Zoom lenses are measured at maximum zoom.)
- It is possible to switch between NORMAL mode, which reduces effects of camera shake under normal shooting conditions, and ACTIVE mode, which reduces effects of
more noticeable camera shake such as that which occurs when taking pictures from a moving vehicle.
In NORMAL mode, the camera automatically distinguishes camera shake from panning motion to reduce the effects of camera shake with horizontal or vertical panning.
- Superior optical performance and rendering characteristics are maximized with the use of three aspherical lens elements and two extra-low dispersion (ED) glass elements, which ensure correction of chromatic aberration. In addition, the rounded aperture produces soft and pleasing blur characteristics in portions of pictures that are out-of-focus.
■ Focusing, zooming, and depth of field
Before focusing, rotate the zoom ring ⑤ to adjust the focal length until the desired composition is framed.
If your camera has a depth-of-field preview (stop-down) button or lever, depth of field can be previewed through the camera viewfinder.
- This lens is equipped with the Nikon Internal Focusing (IF) system. As the shooting distance decreases, the focal length also decreases.
- The distance scale does not indicate the precise distance between the subject and the camera. Values are approximate and should be used only as a general guide. When shooting distant landscapes, depth of field may influence operation so that the camera may focus at a position that is closer than infinity.
- When the zoom lock switch ⑰ is set to LOCK position at the focal length of 18mm, the zoom ring is locked. When carrying the camera, lock the zoom ring to prevent the lens from extending due to its own weight.
■Setting the aperture
Use the camera to adjust the aperture setting.
■Variable maximum apertures
Zooming the lens from 18mm to 200mm decreases the maximum aperture by 1^1/3 stop.
However, there is no need to adjust the aperture setting to achieve correct exposures because the camera automatically compensates for this variable.
■Focusing (Fig. A)
Set your camera's focus mode selector according to the chart below:
| Camera focus mode | Lens' focus mode switch | |
| M/AM | ||
| AF | Autofocus with manual override | Manual focus (Focus assist is available.) |
| MF | Manual focus (Focus assist is available.) | |
For more information on camera focus modes, refer to your camera's User's Manual.
Autofocus with manual override (M/A mode)
1 Set the lens focus mode switch ⑭ to M/A.
2 Autofocus is enabled, but autofocus operation can be overridden by rotating the separate focus ring ⑩ while pressing the shutter-release button halfway, or by pressing the AF-ON button on the camera body of cameras so equipped.
3 Press the shutter-release button halfway or the AF-ON button once again to cancel manual focus and resume autofocus.
Getting good results with autofocus
Refer to "Notes on using wide- or super wide-angle AF NIKKOR lenses" (P. 26).
■Vibration reduction mode Basic concept behind vibration reduction
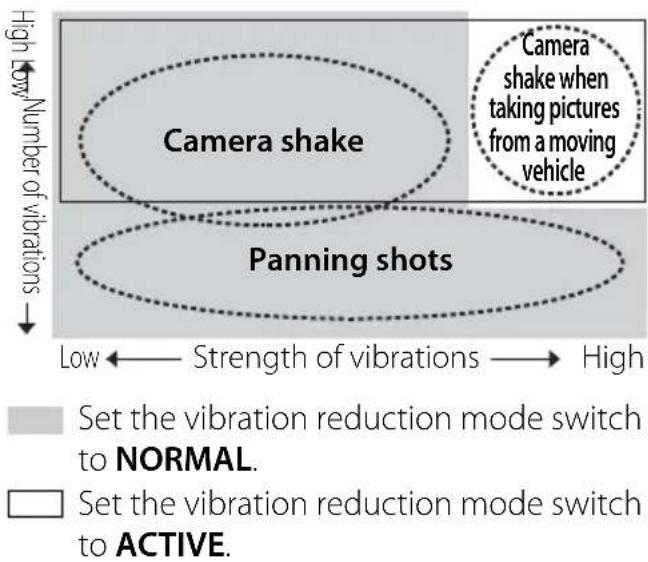
| When taking pictures | Set the vibration reduction mode switch to either NORMAL or ACTIVE. |
| When taking panning shots | Set the vibration reduction mode switch to NORMAL. |
| When taking pictures from a moving vehicle | Set the vibration reduction mode switch to ACTIVE. |
Setting the vibration reduction ON/OFF switch (Fig. B)
ON: The effects of camera shake are reduced while the shutter-release button is pressed halfway and also at the instant the shutter is released. Because vibration is reduced in the viewfinder, auto/manual focusing and exact framing of the subject are easier.
OFF: The effects of camera shake are not reduced.
Setting the vibration reduction mode switch (Fig. C)
Set the vibration reduction ON/OFF switch to ON and choose a vibration reduction mode with the vibration reduction mode switch.
NORMAL: The vibration reduction mechanism primarily reduces the effects of camera shake. The effects of camera shake are also reduced with horizontal and vertical panning.
ACTIVE: The vibration reduction mechanism reduces the effects of camera shake, such as that which occurs when taking pictures from a moving vehicle, whether it be normal or more intense camera shake. In this mode, camera shake is not automatically distinguished from panning motion.
Notes on using vibration reduction
- After pressing the shutter-release button halfway, wait until the image in the viewfinder stabilizes before pressing the shutter-release button the rest of the way down.
- Due to the characteristics of the vibration reduction mechanism, the image in the viewfinder may be blurred after the shutter is released. This is not a malfunction.
-
When taking panning shots, be sure to set the vibration reduction mode switch to NORMAL.
If the camera is panned in a wide arc, compensation for camera shake in the panning direction is not performed. For example, only the effects of vertical camera shake is reduced with horizontal panning. -
Do not turn the camera off or remove the lens from the camera while vibration reduction is operating. Failure to observe this note could result in the lens sounding and feeling as if an internal component is loose or broken when it is shaken. This is not a malfunction. Turn the camera on again to correct this.
- With cameras featuring a built-in flash, vibration reduction does not function while the built-in flash is charging.
- With autofocus cameras featuring an AF-ON button, vibration reduction does not function even when the AF-ON button is pressed.
- When the camera is mounted on a tripod, set the vibration reduction ON/OFF switch ⑮ to OFF. However, set the switch to ON when using a tripod without securing the tripod head, or when using a monopod.
■The built-in flash and vignetting
- The built-in flash cannot be used over distances of less than 0.6 ~m (2.0 ft.).
- To prevent vignetting, do not use the lens hood.
* Vignetting is the darkening of the corners around the image that occurs when light emitted by the flash is obstructed by the lens hood, or by the lens barrel depending upon the focal length or shooting distance.
| Cameras | Supported focal length/ Shooting distance |
| D7000/D300-series/D200/D100 | • 18mm/1 m (3.3 ft.) or greater• 24mm or longer/No restriction |
| D90/D80 | • 24mm and 35mm/1 m (3.3 ft.) or greater• 50mm or longer/No restriction |
| D70-series/D5100/D5000/D3100/D3000/D60/D50/D40-series | • 24mm/1 m (3.3 ft.) or greater• 35mm or longer/No restriction |
- The built-in flash on the D100 has an angle of coverage suited to focal lengths of 20mm and greater.
Vignetting occurs at a focal length of 18mm.
- For the latest information on vignetting with this lens, see the camera manual.
■Using the lens hood
The lens hood blocks light rays that have harmful effects on pictures. It also helps to protect the glass surface of the lens.
Attaching the hood
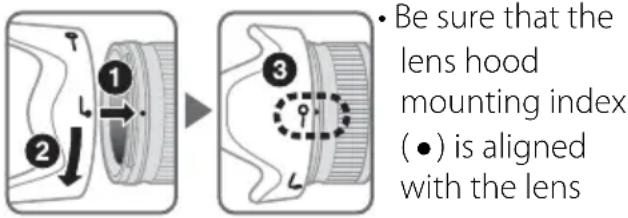
- To facilitate attachment or removal of the hood, hold it by the lens hood attachment index ( ) rather than its outer edge.
- If the lens hood is not correctly attached, vignetting may occur.
- The lens can be stored with the lens hood attached in the reverse position.
Lens care
- Be careful not to allow the CPU contacts ⑬ to become dirty or damaged.
- If the lens mount rubber gasket ⑫ is damaged, be sure to visit the nearest Nikon-authorized service representative for repair.
- Clean lens surfaces with a blower brush. To remove dirt and smudges, use a soft, clean cotton cloth or lens tissue moistened with ethanol (alcohol) or lens cleaner. Wipe in a circular motion from the center to the outer edge, taking care not to leave traces or touch other parts of the lens.
- Never use organic solvent such as thinner or benzene to clean the lens, as this could cause damage, result in a fire, or cause health problems.
-
NC filters are available to protect the front lens element. The lens hood also helps to protect the front of the lens.
-
When storing the lens in its flexible lens pouch, attach both the front and rear lens caps.
- When the lens is mounted on a camera, do not pick up or hold the camera and lens by the lens hood.
- When the lens will not be used for an extended period of time, store it in a cool, dry place to prevent mold and rust. Be sure to store the lens away from direct sunlight or chemicals such as camphor or naphthalene.
- Do not get water on the lens or drop it in water as this will cause it to rust and malfunction.
- Reinforced plastic is used for certain parts of the lens. To avoid damage, never leave the lens in an excessively hot place.
■Standard accessories
• 72mm snap-on Front Lens Cap LC-72
- Rear Lens Cap
- Bayonet Hood HB-35
• Flexible Lens Pouch CL-1018
■Optional accessory
- 72mm screw-on filters
Specifications
Type of lens: G-type AF-S DX Zoom- NIKKOR lens with built-in CPU and Nikon bayonet mount (specially designed for use with Nikon digital-SLR— Nikon DX format—cameras)
Focal length: 18mm-200mm
Maximum f/3.5-5.6
aperture:
Lens construction: 16 elements in 12 groups (3 aspherical lens and 2 ED lens elements)
Picture angle: 76°-8°
Focal length scale: 18, 24, 35, 50, 70, 135, 200mm
Distance information: Output to camera
Zoom control: Manually via separate zoom ring
Focusing: Nikon Internal Focusing (IF) system, autofocus using a Silent Wave Motor, manually via separate focus ring Vibration reduction: Lens-shift method using voice coil motors (VCMs) Shooting distance scale: Graduated in meters and feet from 0.5 m (3 ft) to infinity (∞) Closest focusing at all zoom settings distance: No. of diaphragm blades: 7 pcs. (rounded) Diaphragm: Fully automatic Aperture range: f/3.5 to f/22 (at 18mm), f/5.6 to f/36 (at 200mm) Exposure measurement: Via full-aperture method Attachment size: 72 mm (P = 0.75 mm)
Dimensions: Approximately 77 mm (dia.) × 96.5 mm (extension from the camera's lens-mounting flange)
Weight: Approximately 565 g (19.9 oz)
Specifications and designs are subject to change without notice or obligation on the part of the manufacturer.
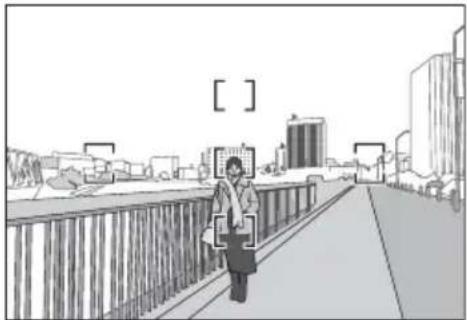
■ Notes on using wide- or super wide-angle AF NIKKOR lenses
In the following situations, autofocus may not perform as expected when shooting with wide- or super wide-angle AF NIKKOR lenses.
D A person standing in front of a distant background
natural_image
Illustration of a person walking on a bridge with city buildings in the background (no text or symbols)E A field filled with flowers
natural_image
Grayscale aerial or satellite view of a textured terrain with no visible text, numbers, or symbols.1. When the main subject in the focus brackets is relatively small
When a person standing in front of a distant background is positioned within the focus brackets, as shown in Fig. D, the background may be in focus, while the subject is out of focus.
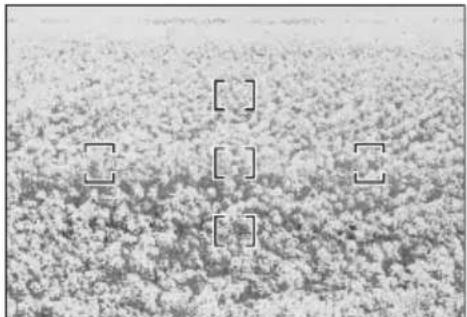
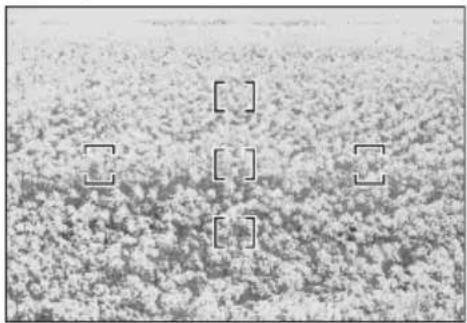
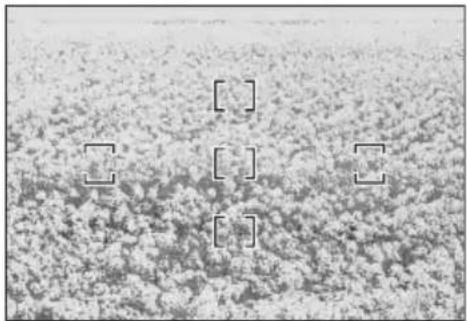
2. When the main subject is a finely patterned subject or scene
When the subject is finely patterned or of low contrast, such as a field filled with flowers, as shown in Fig. E, focus may be difficult to acquire using autofocus.
Responses to these types of situations
(1) Focus on a different subject located at the same distance from the camera, apply focus lock, recompose, and shoot.
(2) Set the camera's focus mode to manual focus and focus manually on the subject. Refer to "Getting Good Results with Autofocus" in the camera's User's Manual.
En
natural_image
Illustration of a person walking on a bridge with city buildings in the background (no text or symbols)E Eine Blumenwiese

natural_image
Grayscale aerial or satellite view of a textured field with four rectangular markers overlaying the image (no visible text or symbols)natural_image
Illustration of a person walking on a city street with buildings and a bridge in the background (no text or symbols)natural_image
Grayscale aerial view of a textured field with no visible text, numbers, or symbolsnatural_image
Illustration of a person walking on a bridge with city buildings in the background (no text or symbols)natural_image
Grayscale aerial view of a textured field with four rectangular markers highlighting specific regions (no text or symbols present)natural_image
Illustration of a person walking on a bridge with city buildings in the background (no text or symbols)natural_image
Grayscale aerial or satellite view of a textured field with four marked square boxes in the center (no text or symbols visible)natural_image
Illustration of a person walking on a bridge with city buildings in the background (no text or symbols)natural_image
Aerial view of a vast agricultural field with scattered crops and marked square boxes (no text or symbols)natural_image
Illustration of a person walking on a bridge with city buildings in the background (no text or symbols)E Een bloemenveld

natural_image
Grayscale aerial view of a field with scattered vegetation and three marked square boxes (no text or symbols)natural_image
Illustration of a person walking on a bridge with city buildings in the background (no text or symbols)E Prato fiorito

natural_image
Grayscale aerial view of a field with scattered debris and three marked square boxes (no text or symbols)natural_image
Illustration of a person walking on a bridge with city buildings in the background (no text or symbols)natural_image
Grayscale aerial or satellite view of a textured terrain with no visible text, numbers, or symbols.Ohnisková 18mm-200mm
vzdálenost:
Stupnice 18, 24, 35, 50, 70, 135, 200mm
ohniskových
vzdáleností:
natural_image
Illustration of a person walking on a city street with buildings and a bridge in the background (no text or symbols)E Pole plné květin
natural_image
Grayscale aerial view of a textured field with three marked square boxes (no text or symbols)① Slnečná clona objektívu (str. 124)
② Značka nasadenia tienidla objektívu (str. 124)
③ Značka umiestnenia tienidla objektívu (str. 124)
④ Značka upevnenia tienidla objektívu (str. 124)
⑤ Krúžok transfokátora (str. 121)
⑥ Stupnica ohniskovej vzdialenosti (str. 121)
⑦ Značka ohniskovej vzdialenosti
⑧ Stupnica vzdialenosti
⑨ Čiara značky vzdialenosti
⑩ Zaostrovací krúžok (str. 121)
⑪ Značka upevnenia
⑫ Gumové tesnenie upevňovacieho bajonetu objektívu (str. 125)
⑬ Kontakty CPU (str. 125)
⑭ Prepínač režimov ostrenia (str. 121)
⑮ Prepínač stabilizácie obrazu ON/OFF (str. 122)
⑯ Prepínač režimu stabilizácie obrazu (str. 122)
⑰ Prepínač uzamknutia transfokátora ( ): referenčná strana
Presvedčitesa, značkou upevnenia tienidla objektívu (●) sa zhoduje so značkou umiestnenia tienidla objektívu (—○) ③.
natural_image
Illustration of a person walking on a city bridge with buildings and skyscrapers in the background (no text or symbols)E Pole plné kvetov
natural_image
Grayscale aerial or satellite view of a textured terrain with no visible text, numbers, or symbols.natural_image
Illustration of a person walking on a bridge with city buildings in the background (no text or symbols)E花团锦簇的田野

natural_image
Grayscale aerial view of a textured field with four rectangular markers and three empty square boxes (no text or symbols)1. 对焦框内的拍摄对象较小时
必須確保鏡頭遮光罩接環標記(●)與鏡頭遮光罩設置標記(—○)③對準。
natural_image
Illustration of a person walking on a city street with buildings and a bridge in the background (no text or symbols)E 充满著鮮花田野

natural_image
Grayscale aerial view of a dense field with no visible text, numbers, or symbols1. 對焦框内的主體較小時
(* CIPA (Camera and Imaging Products
natural_image
Illustration of a person walking on a bridge with city buildings in the background (no text or symbols)E 꽃으로 가득 찬 들판

natural_image
Grayscale aerial or satellite view of a textured field with three marked square boxes and four empty rectangular boxes (no text or symbols)No reproduction in any form of this manual, in whole or in part (except for brief quotation in critical articles or reviews), may be made without written authorization from NIKON CORPORATION.

- Notes on Safety Operations
- En
- CAUTION
- Do not disassemble
- Turn off immediately in the event of malfunction
- Do not use the camera or lens in the presence of flammable gas
- Do not look at the sun through the lens or viewfinder
- Keep out of reach of children
- Observe the following precautions when handling the camera and lens
- Nomenclature
- ■Major features
- ■ Focusing, zooming, and depth of field
- ■Setting the aperture
- ■Variable maximum apertures
- ■Focusing (Fig. A)
- Autofocus with manual override (M/A mode)
- Getting good results with autofocus
- ■Vibration reduction mode Basic concept behind vibration reduction
- Setting the vibration reduction ON/OFF switch (Fig. B)
- Setting the vibration reduction mode switch (Fig. C)
- Notes on using vibration reduction
- ■The built-in flash and vignetting
- ■Using the lens hood
- Attaching the hood
- Lens care
- ■Standard accessories
- ■Optional accessory
- Specifications
- ■ Notes on using wide- or super wide-angle AF NIKKOR lenses
- When the main subject in the focus brackets is relatively small
- When the main subject is a finely patterned subject or scene
- Responses to these types of situations
- 对焦框内的拍摄对象较小时
- 對焦框内的主體較小時
Brand : NIKON
Model : AFS 18200mm f3.55.6G ED VR II
Category : Camera lens