PJS03A - Saw Tacklife - Free user manual and instructions
Find the device manual for free PJS03A Tacklife in PDF.

| Product Type | Jigsaw |
| Brand | Tacklife |
| Model | PJS03A |
| Rated Power | 570 W |
| Rated Voltage | 230 V ~ 50 Hz |
| Speed Range | 800 - 3000 RPM |
| Max. Cutting Depth (Wood) | 65 mm |
| Max. Cutting Depth (Metal) | 8 mm |
| Pendulum Stroke | 3 positions (0-3) |
| Bevel Angle | 0° - 45° (left and right) |
| Weight | 1.9 kg |
| Protection Class | II (double insulation) |
| Sound Pressure Level (LpA) | 70 dB(A) |
| Sound Power Level (LwA) | 80 dB(A) |
| Vibration Level | 4.35 m/s² |
| Blade Type | T-shank (quick change) |
| Blade Change System | Tool-free (quick release) |
| Speed Adjuster | 6 positions |
| On/Off Switch | With lock for continuous operation |
| Adjustable Base | Yes, up to 45° |
| Parallel Guide | Included |
| Dust Extraction | Vacuum adapter |
| Compatible Materials | Wood, plastic, metal, particle board |
Frequently Asked Questions - PJS03A Tacklife
User questions about PJS03A Tacklife
0 question about this device. Answer the ones you know or ask your own.
Ask a new question about this device
Download the instructions for your Saw in PDF format for free! Find your manual PJS03A - Tacklife and take your electronic device back in hand. On this page are published all the documents necessary for the use of your device. PJS03A by Tacklife.
USER MANUAL PJS03A Tacklife
natural_image
Line drawing of a TACK Life Jig Shoe (no text or symbols on the device itself)Model: PJS03A
Contents
English 01\~05
Deutsch 06\~11
Français 12\~17
Españo 18\~23
Italiano 24\~29
日本语 30\~34
Warning symbols

WARNING! To reduce the risk of injury, user must read instruction manual.

Double insulation
General Safety Instructions

WARNING! Read all safety warnings and all instructions. Failure to follow all instructions listed below may result in electric shock, fire and/or serious injury.
Save all warnings and instructions for future reference.
The term "power tool" in all of the warnings listed below refers to your mains operated (corded) power tool or battery operated (cordless) power tool.
1. Work area safety
a. Keep work area clean and well lit. Cluttered and dark areas invite accidents.
b. Do not operate power tools in explosive atmospheres, such as in the presence of flammable liquids, gases or dust. Power tools create sparks which may ignite the dust or fumes.
c. Keep children and bystanders away while operating a power tool. Distractions can cause you to lose control.
2. Electrical safety
a. Power tool plugs must match the outlet. Never modify the plug in any way. Do not use any adapter plugs with earthed (grounded) power tools. Unmodified plugs and matching outlets will reduce risk of electric shock. b. Avoid body contact with earthed or grounded surfaces such as pipes, radiators, ranges and refrigerators. There is an increased risk of electric shock if your body is earthed or grounded.
c. Do not expose power tools to rain or wet conditions. Water entering a power tool will increase the risk of electric shock.
d. Do not abuse the cord. Never use the cord for carrying, pulling or unplugging the power tool. Keep cord away from heat, oil, sharpedges or moving parts. Damaged or entangled cords increase the risk of electric shock.
e. When operating a power tool outdoors, use an extension cord suitable for outdoor use. Use of a cord suitable for outdoor use reduces the risk of electric shock.
f. If operating a power tool in a damp location is unavoidable, use a residual current device (RCD) protected supply. Use of an RCD reduces the risk of electric shock.
3. Personal safety
a. Stay alert, watch what you are doing and use common sense when operating a power tool. Do not use a power tool while you are tired or under the influence of drugs, alcohol or medication. A moment of inattention while operating power tools may result in serious personal injury.
b. Use personal protective equipment. Always wear eye protection. Protective equipment such as dust mask, non-skid safety shoes, hard hat, or hearing protection used for appropriate conditions will reduce personal injuries.
c. Prevent unintentional starting. Ensure the switch is in the off-position before connecting to power source and / or battery pack, picking up or carrying the tool. Carrying power tools with your finger on the switch or energising power tools that have the switch on invites accidents.
d. Remove any adjusting key or wrench before turning the power tool on. A wrench or a key left attached to a rotating part of the power tool may result in personal injury.
e. Do not overreach. Keep proper footing and balance at all times. This enables better control of the power tool in unexpected situations.
f. Dress properly. Do not wear loose clothing or jewellery. Keep your hair, clothing and gloves away from moving parts. Loose clothes, jewellery or long hair can be caught in moving parts.
g. If devices are provided for the connection of dust extraction and collection facilities, ensure these are connected and properly used. Use of these devices can reduce dust related hazards.
4. Power tool use and care
a. Do not force the power tool. Use the correct power tool for your application. The correct power tool will do the job better and safer at the rate for which it was designed.
b. Do not use the power tool if the switch does not turn it on and off. Any power too that cannot be controlled with the switch is dangerous and must be repaired.
c. Disconnect the plug from the power source before making any adjustments, changing accessories, or storing power tools. Such preventive safety measures reduce the risk of starting the power tool accidentally.
d. Store idle power tools out of the reach of children and do not allow persons unfamiliar with the power tool or these instructions to operate the power tool. Power tools are dangerous in the hands of untrained users.
e. Maintain power tools. Check for misalignment or binding of moving parts, breakage of parts and any other condition that may affect the power tools operation. If damaged, have the power tool repaired before use. Many accidents are caused by poorly maintained power tools.
f. Keep cutting tools sharp and clean. Properly maintained cutting tools with sharp cutting edges are less likely to bind and are easier to control.
g. Use the power tool, accessories and tool bits etc., in accordance with these instructions and in the manner intended for the particular type of power tool, taking into account the working conditions and the work to be performed. Use of the power tool for operations different from intended could result in a hazardous situation.
5. Service
a. Have your power tool serviced by a qualified repair person using only identical replacement parts. This will ensure that the safety of the power tool is maintained.
Specific Safety Rules
Only use blades in perfect condition.
Keep the shoe flat on the work piece.
Do not put pressure on the saw so that it will slow down.
Always switch off before you put the jig saw down.
Disconnect the saw from the power supply when it is not in use, before cleaning and changing saw blades.
The unit should only be used as a hand-held tool and must never be fixed in an inverted position for use as a bench saw.
Advice to wear a dust mask.
Hold power tool by insulated gripping surfaces, when performing an operation where the cutting accessory may contact hidden wiring or its own cord. Cutting accessory contacting a "live" wire may make exposed metal parts of the power tool "live" and could give the operator an electric shock.
Environmental protection

CAUTION! This product has been marked with a symbol relating to removing electric and electronic waste. This means that this product shall not be discarded with household waste but that it shall be returned to a collection system which conforms to the European WEEE Directive. Contact your local authorities or stocks for advice on recycling. It will then be recycled or dismantled in order to reduce the impact on the environment. Electric and electronic equipment can be hazardous for the environment and for human health since they contain hazardous substances.
Tool specifications
| techniCAL cHaractEristiCs | |
| Rated input power | 570W |
| Rated voltage | 120V/60Hz (6.7A)(US), 230V/50 Hz(UK) |
| No load speed | 0-3000 min ^-1 |
| Max. Cutting depth Lumber | Lumber : 65 mm Metal : 8 mm |
| Speed Adjusting Range | 800~3000 / min |
| Weight | 2.0 kg |
| LpA (Sound pressure level) | 70dB(A) KPA=3dB(A) |
| LwA (Sound power level) | 80dB(A) KWA=3dB(A) |
| Vibration level | 4.35 m/s ^2 K=1.5 m/s ^2 |
| Protection class | II |
that the declared vibration total value has been measured in accordance with a standard test method and may be used for comparing one tool with another;
that the declared vibration total value may also be used in a preliminary assessment of exposure.
warning: the vibration emission during actual use of the power tool can differ from the declared total value depending on the ways in which the tool is used".
warning: avoid vibration risk.
suggestion: 1. wear glove during operation;
- limit operating time and shorten trigger time.
OPERATION
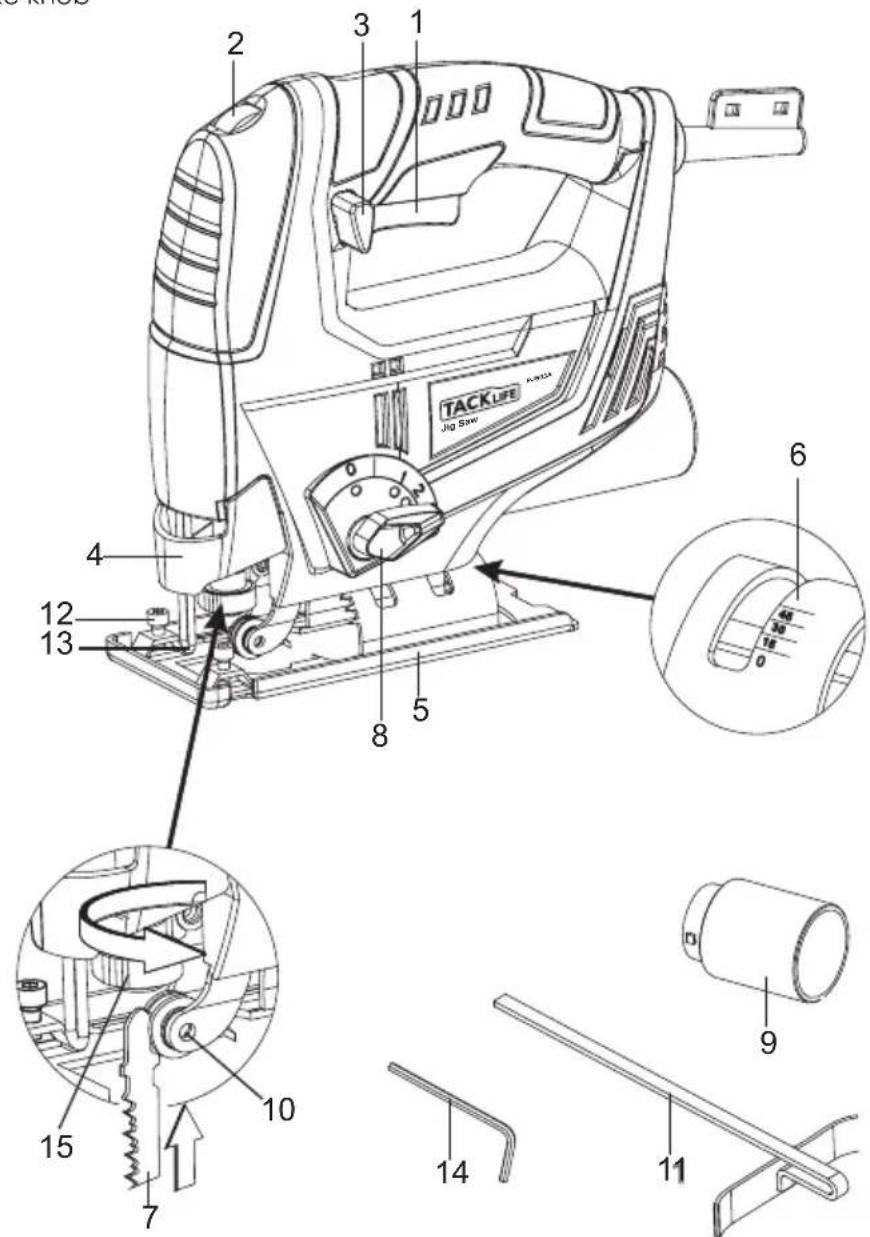
KNOW YOUR PRODUCT
Before using the power tool, familiarize yourself with all the operating features and safety requirements. Use the tool and accessories only for the applications intended.
All other applications are expressly ruled out.
1 ON/OFF switch
9 Dust extraction adapter
2 Variable speed regulator
10 Roller guide
3 Lock-on button
11 Parallel guide
4 Fence
12 Parallel guide fixing screw
5 Base plate
13 Blade guard
6 Bevel angle scale
14 Hex key
7 Saw blade
15 Blade quick release button
8 Pendulum stroke knob
This power tool is supplied from single-phase alternating current mains only. It is double insulated according to EN 60745-1, IEC 60745 and can be connected to grounded or not grounded sockets. This power tool is radio suppressed in compliance with EMC Directive 2004/108/EC.
This power tool is designed for sawing wooden, plastic and metal plates and shapes.
Operating instructions / Drawings
Power-on indicator
Connect the plug with power, then the power-on indicator will be light. To show the machine is power on.
Starting up (Fig.1)

Instant response operation
Switching on: Press the On/Off switch
Switching off: Release the On / Off switch
Continuous operation
Switching on: Press the On / Off switch and depress the locking button.
Switching off: Press the On / Off switch and release
Speed adjustment
The speed can be set with the knob up on the tool. There are six different speeds. Position 1 sets the lowest speed, and position 6 the highest. Hold the handle and turn the speed control to the required position with your thumb.
Setting the Pendulum
For soft materials (wood, plastic etc.) set the oscillation to position 2 or 3.
For sharp-edged cuts, set the oscillation to position 0 or 1.
For medium-hard materials (hard wood, aluminum etc.) set the oscillation to a suitable position for the application.
For thin workpiece, set the oscillation to position 0 or 1.
For hard materials (steel etc.) set the oscillation to position 0.
For round cuts, set the oscillation to position 0.
Mounting the saw blade (Fig.2)
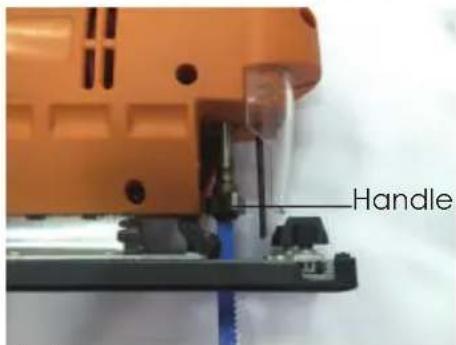
Disconnect the tool from the mains. A special handle ensures quick mounting.
Mount the saw blade
- Push the handle and keep the holder in open position.
- Insert the saw blade up to the end into the saw blade holder and release the handle. Make sure the saw blade is touching the guide roller.
- Slightly pull the saw blade to ensure firm fit.
Remove the saw blade
Push the handle and keep the holder in open position, then pull out the saw blade.
Attention: The saw blade will become very hot during cutting due to friction. Pay attention for that when removing the saw blade.
Protect yourself with protective gloves if necessary.
Adjusting the base (Fig.3)
For mitering and sawing near edges.
For miter and bevel cuts you can swivel thebase by up to 450 in either direction after undoing the two screws on the bottom. The angles 15^ , 30^ and 45^ are marked but you can adjust the saw to any angle between these markings as required.
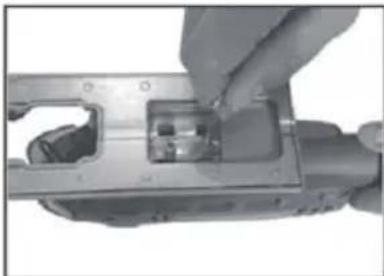
natural_image
Close-up of a hand inserting a component into a mechanical housing (no visible text or symbols)

Fig.3
To adjust the cutting angle, loose the two screws until you can just about move the base and adjust to the required angle, then re-tighten the two screws.
To enable you to saw right up to the edge, the base can be pushed backward. Loose the two screws underneath and push the base back. Then re-tighten the two screws.
It is prohibited to use the machine on asbestos materials. Please note the accident prevention regulations in force in you country.
Cutting veneered chipboard (Fig.4)
Use a fine saw blade.
Position the base on the uncovered area
Advance the saw with little force.

Cutting holes: possible only in chipboard and wood unless you drill a hole first. Press the jigsaw firmly against the support and move slowly in cutting direction.
Parallel guide
Use the supplied parallel guide to saw parallel to the edge of the workpiece.
- Loose the finger screws on the front of the base plate.
- Insert the parallel guide from the side in the slot in the base plate.
- Lock the parallel guide in the required position with the finger screws.
- Adjust the required cutting width in centimeter by putting the corresponding value on the scale by the laser on the base plate.
- Tighten the finger screws with your finger.
Dust extraction
The jig saw is equipped with a dust extractor socket. Any vacuum cleaner can be connected to the socket at the rear of the jig saw. If you require a special adapter, please contact the manufacture of your vacuum cleaner.
Maintenance and Service
WARNING: Before any work on the machine, pull the mains plug from the power source.
Only use accessories and spare parts recommended by the manufacturer. If the equipment should fail some day in spite of our quality controls and your maintenance, only have it repaired by an authorised electrician. If the carbon brushes need to be replaced, have this done by a qualified repair person (always replace the two brushes at the same time.
If the supply cord is damaged, it must be replaced by the manufacturer or its service anent in order to avoid a hazard. Disconnect from the power supply immediately if the supply cord is damaged.
Clean
For safe and proper working, always keep the machine and ventilation slots clean.
Clean dust and debris from vents, Keep the tool handles clean and free of oil or grease, Use only mild soap and a damp cloth to clean your tool since certain cleaning agents and solvents are harmful to plastics and other insulated parts. Never use flammable or combustible solvents around tools.
Warnsymbole

natural_image
Exterior view of a black and orange electronic device (no visible text or symbols)Sofortige Reaktion
natural_image
Close-up of hands installing or adjusting a mechanical component with internal parts (no visible text or symbols)

Abb. 3
CONNAISSEZ VOTRE PRODUIT
natural_image
Exterior view of a TACJ electric shaver with visible circuitry and mounting base (no text or symbols)natural_image
Close-up of a hand inserting a plastic component into a metal housing (no visible text or symbols)

Fig.3
natural_image
Close-up of a hand inserting a small electronic component into a device housing (no visible text or symbols)

natural_image
Tack machine with orange handle and black body, labeled 'On/Off interruttore' (no other text or symbols visible)natural_image
Close-up of a hand holding a mechanical component with internal components (no visible text or symbols)
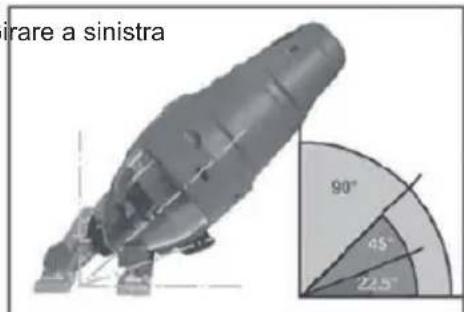
Fig.3
natural_image
Close-up of a hand inserting a small component into a mechanical housing (no visible text or symbols)

图.3
natural_image
Illustration of an orange electric drill bit cutting a surface with a tool, labeled 'Sup' (no text or symbols on the diagram itself)細かい刃を使用してください。
ベースを覆われていない領域に置きます。
ADD: No.31, Qing Linxi Road, Longgang District,
Shenzhen, Guangdong, China 518172
Made in China

RoHS