
PES01A - Saw Tacklife - Free user manual and instructions
Find the device manual for free PES01A Tacklife in PDF.
| Product Type | Circular Saw |
| Brand | Tacklife |
| Model | PES01A |
| Rated Voltage | 230 V ~ 50 Hz |
| Output Power | 1500 W (max 1800 W) |
| Max No-Load Speed | 4700 rpm |
| Blade Diameter | 185 mm |
| Blade Bore | 20 mm |
| Max Cutting Depth | 63 mm |
| Adjustable Cutting Angle | 0° to 45° |
| Weight | 4.3 kg |
| Sound Power Level | 97 dB(A) (K=3 dB) |
| Sound Pressure Level | 86 dB(A) (K=3 dB) |
| Maximum Vibration Level | 4.3 m/s² (K=1.5 m/s²) |
| Protection Class | II (double insulation) |
| Integrated Laser Guide | Yes (laser class not specified) |
| Parallel Guide | Yes |
| Aluminum Base | Yes |
| Maintenance and Cleaning | Clean with a damp cloth and mild detergent. Do not use abrasive solvents. |
| Safety | Wearing hearing and eye protection is mandatory. Do not look at the laser beam. Disconnect before maintenance. |
| Spare Parts and Repairability | Replacement blade (185x20 mm), locking key. Repairs by authorized center only. |
Frequently Asked Questions - PES01A Tacklife
User questions about PES01A Tacklife
0 question about this device. Answer the ones you know or ask your own.
Ask a new question about this device
Download the instructions for your Saw in PDF format for free! Find your manual PES01A - Tacklife and take your electronic device back in hand. On this page are published all the documents necessary for the use of your device. PES01A by Tacklife.
USER MANUAL PES01A Tacklife
User Manual Circular Saw
natural_image
Technical line drawing of a mechanical device with no visible text or symbolsPES01A
Contents
English 01\~03
Deutsch 04\~07
Français 08\~10
Español 11\~14
Italiano 15\~17
日本語 18\~20
DISASSEMBLE BLADE
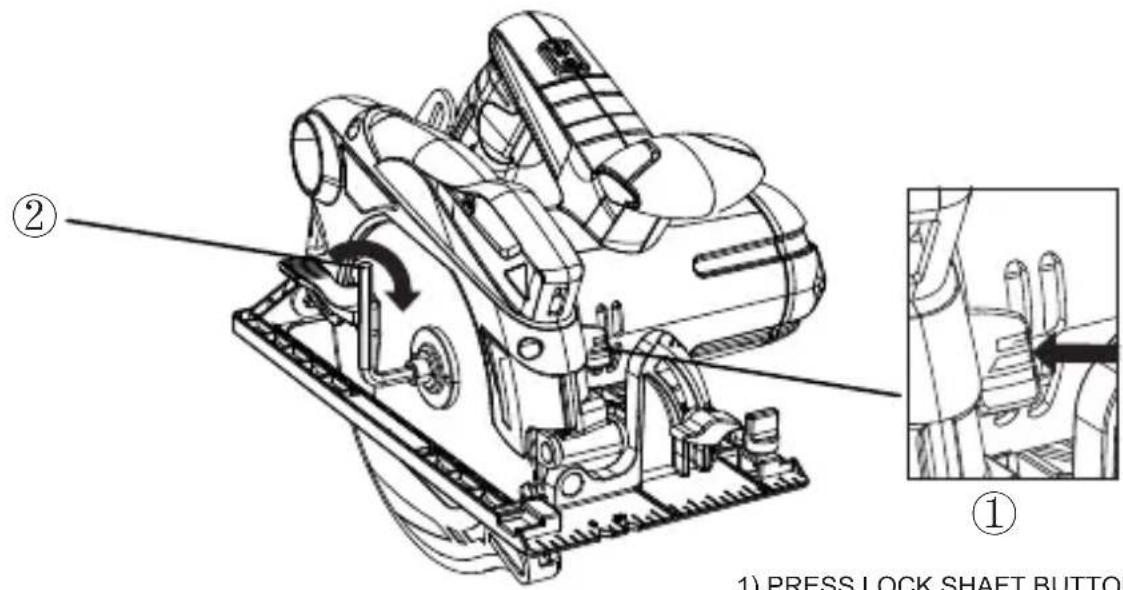
1) PRESS LOCK SHAFT BUTTON ;
2) LOOSE SCREW;
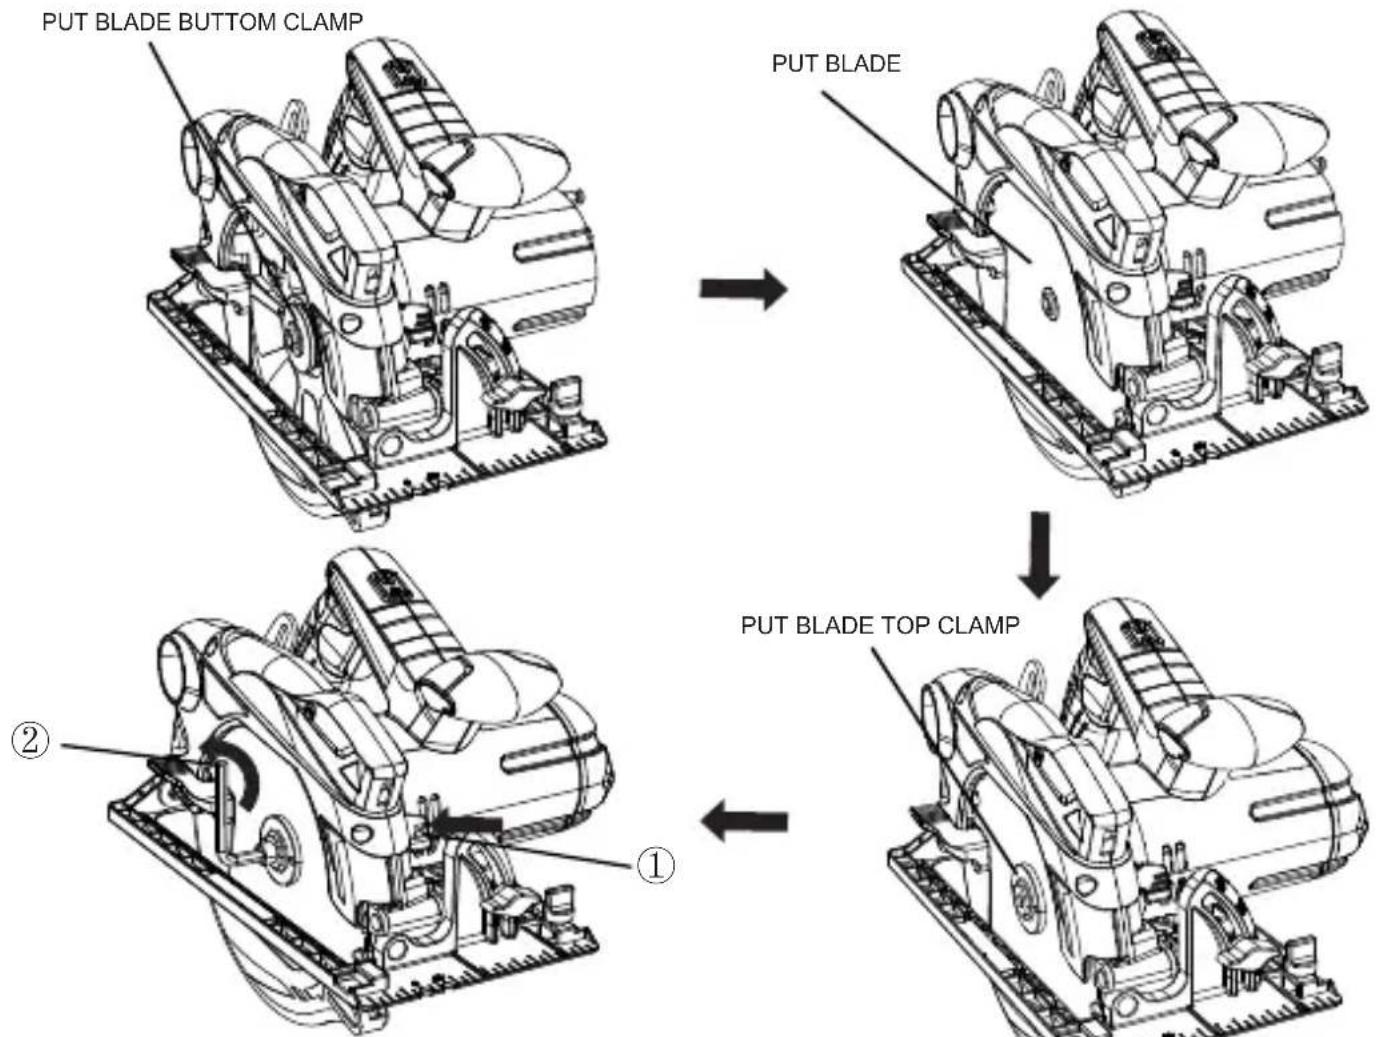
ASSEMBLE BLADE
flowchart
graph TD
    A["① PUT BLADE TOP CLAMP"] --> B["② PUT BLADE BOTTOM CLAMP"]
    B --> C["③ PUT BLADE"]
    C --> D["④ PUT BLADE TOP CLAMP"]
1) PRESS LOCK SHAFT BUTTON ;
2) WRENCH TIGHTEN SCREW;
SAFETY INSTRUCTIONS
Read the Operating Instructions carefully before use
General safety instructions
NOTE: Read all warnings, safety instructions and other directives. Failure to follow all the instructions and safety instructions can result in electric shock, fire and/or serious personal injury.
- Keep the work area clean and well lit.
- Do not use power tools in the rain or in damp areas.
- Avoid body contact with earthed surfaces such as pipes, radiators, cookers and refrigerators. There is an increased risk of electric shock if your body is earthed. Hold the tool by the insulated grips when working in areas where bits or attachments may come into contact with concealed cables.
- Keep children and onlookers at a safe distance when using power tools.
- Store power tools out of the reach of children in a dry, dust-free location when not in use.
- Use the power tool only for its intended purpose.
- Wear appropriate clothing. Loose-fitting clothing, jewellery and long hair can get caught in moving parts. Wear a hair net if you have long hair.
- Wear protective gloves.
- Wear eye protection. Wear a dust mask if the work generates dust.
- Be careful with the power cord. Never use the cord to carry or pull the tool or to pull out the plug from the mains socket.
- Keep the power cord away from heat, oil and sharp edges. A damaged power cord must be replaced by an authorised service centre, or other qualified person, to avoid putting safety at risk.
- Secure the workpiece with a clamp, vice or clips.
- Never touch the tool's moving parts until they have come to a complete standstill.
• Always maintain a firm footing and good balance. - Do not use the power tool if its power cord or plug are damaged, if a malfunction has occurred or if the tool has been damaged in any way.
• Install bits and other accessories correctly on the power tool. - Unplug the power cord before performing maintenance and/or cleaning and when the power tool is not in use.
- Make sure the power switch is in the OFF position before plugging in the cord.
- If using the machine outdoors, only use an extension cord approved for outdoor use.
- Check that the tool is in good condition before use. Make sure that moving parts are properly adjusted and do not jam and that no parts are incorrectly fitted or damaged. Check for other factors that could affect the operation of the power tool. Do not use the tool if it is damaged. The tool must be repaired by a qualified service centre.
- At low temperatures and if the power tool has not been used for an extended period, you should allow the tool to operate with no load for a few minutes before use, in order to distribute the lubricant.
- Clean the tool with a cloth moistened with water and mild detergent. Do not use strong or abrasive detergents or solvents.
- Wear ear protection.
- The tool is a class II electrical appliance, double insulated to provide protection against electric shock, and is powered by a single-phase motor.
Special safety instructions
- Check that the mains voltage corresponds to the rated voltage on the type plate.
- Make sure the power switch is in the OFF position before plugging in the cord.
- Always check that spanners etc. have been removed from the machine before switching it on.
- Never start the tool when any rotating parts are in contact with the workpiece.
- Hold the tool firmly with both hands.
- Make sure the workpiece is free of nails and foreign objects.
Never try to slow the blade by pressing it against the workpiece. - Never block the blade guard.
- Check that the blade is correctly installed and is rotating in the correct direction. The tool is intended for sawing wood.
- Do not attempt to saw or sand metal or stone.
- Do not press too hard when sawing. This can result in personal injury and can overload the tool.
- The cross section of the extension cord must be sufficient for the tool's power supply. Do not
- use extension cords that are longer than necessary. If an extension cord is used, the entire cord must be uncoiled.
- Never allow the blade to reach maximum speed before applying it to the workpiece.
- Only use sharp blades that are not cracked or deformed. If the blade is dull, the tool can be overloaded.
- Inspect all screw connections and tighten before use.
- Contact your dealer in the event of any problems.
- Repairs must only be carried out by qualified personnel using identical spare parts.
TECHNICAL DATA
| Rated voltage | 120 V ~ 60 Hz (US) 230V ~ 50Hz (UK) |
| Output power | 12.5A / 1500 W (MAX: 15A /1800W) |
| Max. speed | 4700 rpm |
| Blade | 185 x 20 mm |
| Saw depth | 63 mm |
| Weight | 4.3 kg |
| Sound power level, LwA | 97 dB(A), K=3 dB |
| Sound pressure level, LpA | 86 dB(A), K=3 dB |
| Max. vibration level | 4.3 m/s2, K=1.5 m/s2 |
Always wear ear protection.
The declared vibration value, which has been measured by a standardised test method, can be used to compare different tools with each other and for a preliminary assessment of exposure.
WARNING: The actual vibration level when using power tools may differ from the specified maximum value, depending on how the tool is used. It is therefore necessary to determine which safety precautions are required to protect the user, based on an estimate of exposure in actual operating conditions (taking into account all stages of the work cycle, e.g. the time when the tool is switched off and when it is idling, in addition to the start-up time).
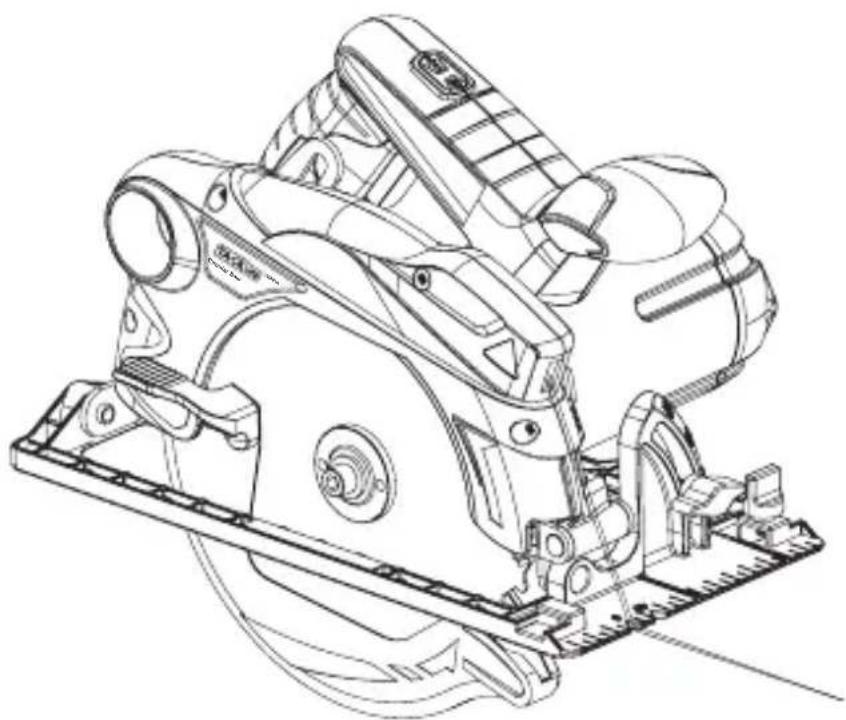
DESCRIPTION

- Handle
- Laser switch
- Support handle
- Laser line indication
- Aluminium sole
- Blade
- Blade guard
USE
Changing the blade
Switch off the tool and unplug the power cord. Disconnect the sole and lower it to its lowest position. Lock the blade with the spanner supplied. Undo the locking screw and the washer. Take off the blade. Install the new blade by following these instructions in the reverse order.
Setting the cutting depth
Switch off the tool and unplug the power cord. Undo the depth adjustment screw. Adjust the sole to the desired sawing depth and tighten the screw.
Setting the sawing angle
Switch off the tool and unplug the power cord. The sawing angle can be set between 0^ and 45^ C. Undo the two screws holding the sole. Turn the sole to the required angle. Tighten the screws to lock the sole.
Parallel fence
The parallel fence is used to saw parallel with the edge of the workpiece. Switch off the tool and unplug the power cord. Place the fence in the grooves at the front edge of the sole. Set the desired sawing width and tighten the screws to lock the parallel fence.
Laser line indication
Laser line indication is used to make it easier to saw along the desired line.
IMPORTANT: Do not look into the laser beam –risk of eye injury.
SICHERHEITSHINWEISE
ADD: No.B714, Niulanqian Building, Minzhi Road,
Longhua District, Shenzhen, Guangdong, China 518000
Made in China
RoHS


- User Manual Circular Saw
- Contents
- SAFETY INSTRUCTIONS
- Read the Operating Instructions carefully before use
- General safety instructions
- Special safety instructions
- DESCRIPTION
- USE
- Changing the blade
- Setting the cutting depth
- Setting the sawing angle
- Parallel fence
- Laser line indication
- SICHERHEITSHINWEISE
- Made in China
Brand : Tacklife
Model : PES01A
Category : Saw