USER MANUAL MOG23IX CI SABA
Thank you for choosing SABA quality. This product has been developed by our team of professional and according to European regulations. In order to get the most out of your new appliance, we recommend that you read this instruction manual carefully and keep it for future reference.
TABLE OF CONTENTS
Safety instructions 98
Specifications 103
Appliance description 103
Utensils 104
Installation: 105
Use 107
Cleaning 112
Disposal of old electrical appliances 112
Safety instructions
IMPORTANT PRECAUTIONS - READ CAREFULLY AND KEEP FOR FUTURE REFERENCE.
- This appliance is designed to be used for domestic and similar purposes such as:
- kitchens used by employees in shops, offices and other professionals;
-farms;
- use by guests in hotels, motels and other residential environments;
- other bed and breakfast type accommodation;
- This appliance can be used by children aged from 8 years and above and persons with reduced physical, sensory or mental abilities or lack of experience and knowledge if they have been given supervision or instruction concerning use of the appliance in a safe way and understand the hazards involved.
Children must not play with the appliance. Cleaning and maintenance by the user must not be carried out by children unless they are over 8 years of age and are supervised.
- Keep the appliance and its cable out of reach of children under 8 years of age.
If the power cable is damaged, it must be replaced by the manufacturer, their after-sales service or a qualified professional in order to avoid any danger.
Children must be supervised to ensure they do not play with the appliance.
Do not use outdoors.
- For safety reasons, never leave the appliance unsupervised while it is being operated.
WARNING: It is dangerous for anyone other than a qualified person to carry out maintenance or repairs involving the removal of a cover that protects from exposure to microwave energy.
WARNING: Liquids and other foods must not be heated in sealed containers as they are liable to explode.
WARNING: If the door or door seal is damaged, the microwave must not be switched on before being repaired by a qualified person.
WARNING: If the appliance does not work in combined mode, it is recommended that children only use the oven under adult supervision due to the high temperatures generated.
- Only use cooking utensils appropriate for use in microwave ovens.
- When heating food or drink in plastic or paper containers, keep an eye on the microwave given the possibility of fire;
If smoke appears, stop or unplug the microwave and keep the door closed to extinguish possible flames.
- Heating drinks in microwaves can cause sudden eruptions of boiling liquid. Caution must also be taken when handling the container.
- The contents of feeding bottles or jars of baby food must be stirred or mixed, and the temperature must be checked before serving to avoid burns.
It is not recommended that whole or hard-boiled eggs be cooked or heated in their shells as they are liable to explode, even after cooking;
It is recommended that you clean the microwave regularly and remove any food deposits.
- Failure to keep the appliance clean may lead to permanent deterioration of the surface, reducing the useful life of the appliance and potentially leading to hazardous situations.
The microwave must not be placed on movable furniture.
The appliance must be placed on an even table or surface
Group 2, Class B equipment
- This appliance is in Group 2 as it intentionally generates radiofrequency energy for treating materials and is designed for domestic use and use in establishments directly connected to a low-voltage power supply network supplying buildings used for domestic purposes.
Class B).
- The temperature of adjacent surfaces may be high when the appliance is on.
Warning, hot surface!
- This appliance is not designed to be used in conjunction with a separate timer or with a control system used at a distance.
WARNING: If the appliance does not work in combined mode, it is recommended that children only use the oven under adult supervision due to the high temperatures generated.
- Do not use containers other than those designed for microwave use.
- Never use metal containers or utensils (particularly aluminium) inside microwave ovens as this may damage the appliance and risks causing sparks or even fires.
- Paper or cardboard containers are liable to catch fire; remain near to the oven to watch closely.
In case of smoke, switch off the appliance and unplug it, and then leave the door closed in order to extinguish any flames.
In the case of ovens that allow for the use of thermal probes, only use the type of thermal probe recommended for the oven.
- Do not attempt to operate the oven while the door is open. This can cause dangerous exposure to microwave energy. It is essential that the locking system not be tampered with.
- No objects must be stuck in the door. Be careful not to let dirt or cleaning products accumulate on sealed surfaces.
- The oven must not be used if it is damaged. It is particularly important that the door be able to close correctly and that all the following parts be in good condition:
a. Door (must not be twisted),
b. Hinges and latches (must not be broken or loose),
c. Door seals and air-tight surfaces.
- For the minimum amount of free space above the appliance and installation, please refer to pages 8 and 10.
For cleaning the appliance, please refer to pages 9 and 10.
CAUTION
MICROWAVE RADIATION
DO NOT EXPOSE YOURSELF TO RADIATION FROM THE MICROWAVE GENERATOR OR OTHER PARTS CONDUCTING ENERGY.
BE CAREFUL OF HEAT RADIATION AND THE RISK OF BURNS WHEN THE CONVECTION, COMBINATION AND ALTERNATING COOKING FUNCTIONS ARE OPERATING.
Specifications
| Reference: M0G23IX CI | |
| Voltage: 230V~50Hz | |
| Power consumption: 1250W | |
| Power output: 800W | |
| Microwave frequency 2450MHz | |
| Grill power: 1000W | |
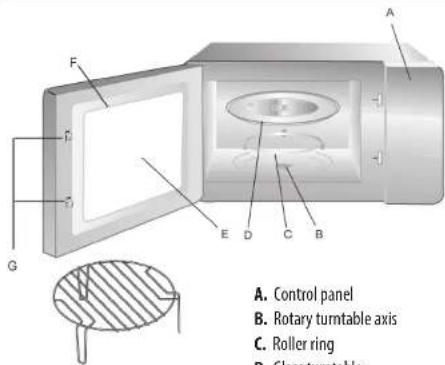
Appliance description
Grill (used only in grill mode and must be placed on the glass turntable).
A. Control panel
B. Rotary turntable axis
C. Roller ring
D. Glass turntable
E. Observation window
F. Door
6. Safety lock
Utensils
This oven is a combination microwave and convection oven. This poses some constraints regarding the types of utensils that can be used. Before use, it is recommended that you check that utensils are appropriate for microwave use.
- Containers that are most suited in every case are heat-resistant glass or ceramic containers. No metal containers or utensils must be used. In effect, microwaves cannot penetrate metals. In the event of using such utensils, sparks or flashes may appear that could be hazardous for the user and may seriously damage the appliance. Equally, do not put food or liquids into aluminium boxes or under aluminium foil.
In general, never put hermetically sealed containers into a microwave as they may explode due to the heat. Ensure that you remove the cover or leave openings to allow steam to escape.
The user is strongly advised to regularly and carefully monitor cooking.
- For short cooking periods not using the grill function, plastic or cardboard containers may be used, as wells as frozen food under plastic film, on the condition that films have been pierced with a fork beforehand to allow steam to escape.
- Before use, check that utensils are appropriate for use in a microwave oven. No metallic utensils must be used. In effect, metallic objects cause sparks or flashes that may cause serious damage to your appliance. Equally, do not put food or liquids into aluminium boxes or aluminium foil.
Do not use wooden containers as they may burn.
- Do not use any metal or cast iron crockery earthenware with even small metal parts (including silver or gold); your appliance might break down.
- When food is heated in plastic or paper containers, check the microwave frequently due to the risk of fire.
- The list below is an indicative guide to help you choose appropriate utensils and containers for cooking in safety.
| CONTAINER MATERIAL | MICROWAVE GRILL COMBINATION | |
| Heat-resistant glass YES | YES YES | | |
| Non heat-resistant glass | NOT NOT NOT | | |
| Heat-resistant ceramic YES | YES YES YES | | |
| Plastic and cellophane film | YES NOT NOT | | |
| Metal NOT YES NOT | | | |
| Aluminium and aluminium foil | NOT YES NOT | | |
| Wood NOT NOT NOT | | | |
| Recycled materials NOT NOT NOT | | | |
Installation:
After unpacking your appliance, examine it carefully for visible damage that may have been caused during transport;
- Unpack the appliance completely and remove all protective materials from inside the microwave oven.
- Place the microwave oven on a flat surface. The back of the appliance must be placed against a wall. Leave at least 30cm above the appliance and 7.5cm each side and behind to allow good ventilation. Ensure that nothing is obstructing the air vents on the sides, top and back of the appliance. Avoid placing the microwave oven close to other appliances generating heat. Do not use this microwave oven outside or in very damp or excessively hot places. Do place the appliance in a recess.
- It is also recommended that you do not place the microwave oven near a radio, television or magnetic fields that may create interference.
- Remove all packaging from the inside of the microwave oven.
Before using, clean the inside of the microwave with a damp cloth.
Plug the appliance into a 230V 50Hz power socket equipped with an earth.
Then check that the microwave functions correctly.
-
Place the plastic roller with the wheels into the microwave, and then place the turntable on the rotary axis. Caution: the glass turntable is fragile.
-
Place a glass of water in the microwave, on the glass turntable.
-
Close the door fully.
-
Turn on for 30 seconds.
If the microwave is functioning well, the water should be hot.
If the microwave is not working, do not try to repair it yourself, but return it to the After-Sales Service of the store in which you bought it.
Choose a horizontal surface with sufficient clear space for the air inlets and/or outlets.
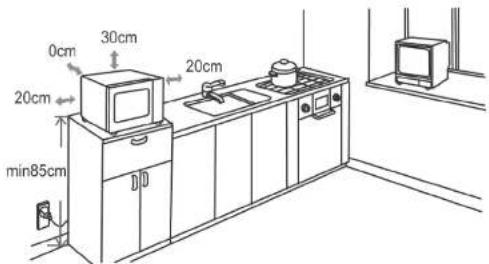
- The minimum installation height is 85 cm.
- The back of the appliance must be placed against a wall. Leave a clear space of at least 30cm above the oven and 20 cm between the oven and each wall.
- Do not remove the feet on the base of the microwave oven
- Do not block the air inlets and/or outlets as this may cause damage to the microwave oven. Place the microwave oven as far away from televisions and radios as possible. Using a microwave oven can cause interference liable to disturb the reception on radios or televisions.
- Plug your microwave oven into a standard power socket. Ensure that the voltage and frequency of the power supply are identical to those stated on the appliance data plate.
WARNING: Do not install the oven above a cooking surface or any appliance that produces heat. If the appliance is installed above a source of heat, this can damage it and render the warranty void.
Use
Setting the clock.
When you plug in the microwave oven, "0:00" will appear on the display and the alarm will sound once.
- Press " 三 " once to activate the clock-setting mode and the hour digits will start to flash.
- Turn " to set the hour to between 0 and 23.
- Press " 念 and the minute digits will flash.
- Turn " 一 " to set the minutes to between 0 and 59.
-
Press " to confirm the time setting." will flash and the time will appear. Note:
-
If the clock is not set, it will not be displayed when the appliance is connected to the power.
- While setting the clock, if you press , the display automatically returns to the previous mode.
Microwave cooking
Press "UN" and turn to select the desired mode.
Press " +30Sec .and turn to set the cooking time.
Press the 串 +30Sec." button to start cooking.
For example, to cook for 20 minute at 80% maximum microwave power, proceed as follows:
1. Press " UN" "P100" will appear on the display.
2. Turn " to set the microwave power level to 80% until "P80" is displayed.
3. Press " +30Sec." to confirm. "P80" will be on the display.
4. Turn " 品 to set the cooking time until the screen displays ^ 20:00
5. Press +30Sec to start cooking, or press "to cancel the setting. Note: The increments for setting the cooking time are as follows:
| 0-1 minute. | 5 seconds |
| 1-5 MINUTES | 10 seconds |
| 5-10 MINUTES | 30 seconds |
| 10-30 MINUTES | 1 minute |
| 30-95 MINUTES | 5 minutes |
Microwave/Grill/Combi. power table.
| Instructions Display | Microwave power | level | Grill power |
| 1 P100 100% | | | |
| 2 P80 80% | | | |
| 3 P50 50% | | | |
| 4 P30 30% | | | |
| 5 P10 10% | | | |
| 6 G 0% 100% | | | |
| 7 C-1 55% 45% | | | |
| 8 C-2 36% 64% | | | |
Grilling
- Press "P100" will appear on the display.
- Turn "to set the grill mode until the screen displays "G".
- Press "<<" + 30Sec." to confirm.
- Turn " " to set the cooking time.
- Press the "<<" +30Sec." button to start cooking.
Note: When cooking on the grill has reached the half-way point, the alarm will sound twice. This is normal. For best cooking results in grill mode, turn the food items over at this point, then close the door and press +30 Sec. " to continue cooking. If you do not do anything, the oven will start cooking again.
Combi cooking
- Press" ^
- Turn " to select the combi 1 or combi 2 mode until " C-1" or " C-2 " appear on the display.
- Press "<<" +30Sec." to confirm.
- Turn " 品 " to set the cooking time.
- Press the " +30Sec button to start cooking.
Express Cooking
- In standby mode, press " ( 0 + 30Sec.) to start cooking at 100% power. Each time you press this button the cooking time increases by 30 seconds. The maximum cooking time is 95 minutes.
- While cooking in microwave and defrost mode according to time, each time you press " +30Sec " the time will increase by 30 seconds.
- In auto-menu and when defrosting according to weight, it is not possible to extend the cooking time by pressing +30Sec .
- In standby mode, turn " ^ to the left to set the cooking time to 100% microwave power, then press " 1 +30Sec . "to start cooking.
Defrosting according to weight
- Press the " 串 " button once and "dEF1" will appear on the display.
- Turn " 品 " to set the weight of the food item to between 100 g and 2000 g.
- Press the " 41 +30Sec. button to start defrosting.
Defrosting according to time
- Press the " 串 button once and "dEF2" will appear on the display.
- Turn " 串 " to set the defrost time. The maximum cooking time is 95 minutes.
- Press the " +30Sec." button to start defrosting. The defrost power level is "P30" and cannot be changed.
Timer
- Press " 三 /" twice, "00:00" will appear on the display and the timer indicator will turn on.
- Turn " " to set a time period (the time maximum time period is 95 minutes).
- Press " +30Sec : to confirm the setting and the timer indicator will turn on.
- Once the set time period has elapsed, the timer indicator will turn off. The alarm will sound 5 times.
If the clock has been set (displayed in 24h), the time will be displayed.
Note: The timer is different to the system clock (24h), it's a cooking time and does not show the real time.
- In microwave, grill and combi cooking modes, press " √" ∪ ∪ " to display the current power level for 3 seconds. After 3 seconds the oven will return to the previous mode.
- In cooking mode, press " 12 " to display the time for 3 seconds.
-
Turn " ^ to the right to select one of the menus, the corresponding code, "AS-1" to A10" will be displayed.
-
Press " +30Sec " to confirm.
- Turn " 品 " to set one of the default weights on the menu table.
- Press the " +30Sec button to start cooking.
For example, if you want to use an Auto Menu to cook 350g of fish, follow these steps:
Turn to the right until the "A-6" is displayed.
Press ^ 密 +30Sec"to confirm.
Turn to set the weight of the fish until the screen displays "350".
Press the +30Sec. button to start cooking.
Sequential cooking
Up to 2 phases can be programmed in sequential cooking. If you would like to programme a defrost time in sequential cooking, it must be programmed as the first phase.
For example, to defrost food items for 5 minutes, then microwave cook for 7 minutes at 80% of maximum power-level, proceed as follows:
- Press the " button once and "dEF2" will appear on the display.
- Turn " to set the defrost time until the screen displays 05:00.
- Press" ^ ^ once and "P100" will appear on the display.
- Press "clear" again or turn to set the microwave power level to 80%.
- Press " +30Sec "to confirm."P80" will appear on the display.
- Turn "to set the cooking time until the screen displays 07:00.
- Press +30Sec to start cooking. The alarm will sound once to indicate the start of the first phase. The defrost time is split and the alarm will sound again at the start of the second phase. Once cooking has finished, the alarm will sound five times.
Menu table
| Menu Weight | t(g) Display | |
| A-1 Pizza | 200 g 200 | |
| 400 g 400 | |
| A-2 Meat | 250 g 250 | |
| 350 g 350 | |
| 450 g 450 | |
| A-3 Vegetables | 200 g 200 | |
| 300 g 300 | |
| 400 g 400 | |
| A-4 Pasta | 50 g (with 450ml of cold water) 50 | |
| 100 g (with 800 ml of cold water) 100 | |
| A-5 Potatoes | 200 g 200 | |
| 400 g 400 | |
| 600 g 600 | |
| A-6 Fish | 250 g 250 | |
| 350 g 350 | |
| 450 g 450 | |
| A-7 Drinks | 1 cup (120 ml) 1 | |
| 2 cups (240 ml) 2 | |
| 3 cups (360 ml) 3 | |
| A-8 Popcorn | 50 g 50 | |
| 85 g 85 | |
| 100 g 100 | |
Child lock
Locking: In standby mode, press "☑" for 3 seconds and a long beep will sound to indicate that the child lock has been activated and the time will be displayed if it has been set, otherwise "C = C" will appear on the display.
Unlocking In standby mode, press "☑" for 3 seconds. A long beep will sound to indicate that the child lock has been deactivated.
Cleaning
- Always ensure that your oven is has stopped fully before cleaning by unplugging from the mains power.
- Splashes on the inside of the door, as well as on the door seals and adjacent parts must be cleaned daily with warm soapy water.
- In the event that the seals or adjacent parts have deteriorated, the oven must not be used until these have been restored by a qualified After-Sales service.
- Never pour water into the oven.
- Do not put water into the air vents on the top, sides of back of the appliance.
- Always ensure that your oven is has stopped fully before cleaning by unplugging from the mains power.
- Keep the oven's internal cavity clean and dry by cleaning it regularly with a soft cloth. Do not use abrasive materials as you risk scratching or damaging the paint.
- Rinse and dry with care. It is best to clean the metal parts of the door using a damp cloth. Do not use a brush, sponge scourer or abrasive cloth, or any other liquid that may damage the turntable's drive motor.
The exterior of the oven is metal. Clean it using a cloth dampened with warm soapy water.
Rinse and dry with a soft cloth.
Disposal of old electrical appliances
The European directive 2002/96/EC on Waste Electrical and Electronic Equipment (WEEE), requires that old household electrical appliances must not be disposed of in the normal unsorted municipal waste stream. Old appliances must be collected separately in order to optimize the recovery and recycling of the materials they contain, and reduce the impact on human health and the environment.
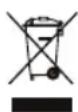
The crossed out "wheeled bin" symbol on the product reminds you of your obligation, that when you dispose of the appliance, it must be separately collected.
Consumers should contact their local authority or retailer for information concerning the correct disposal of their old appliance.