
X95254MI1 - Basket AEG - Free user manual and instructions
Find the device manual for free X95254MI1 AEG in PDF.
Frequently Asked Questions - X95254MI1 AEG
User questions about X95254MI1 AEG
0 question about this device. Answer the ones you know or ask your own.
Ask a new question about this device
Download the instructions for your Basket in PDF format for free! Find your manual X95254MI1 - AEG and take your electronic device back in hand. On this page are published all the documents necessary for the use of your device. X95254MI1 by AEG.
USER MANUAL X95254MI1 AEG
Thank you for choosing this AEG product. We have created it to give you impeccable performance for many years, with innovative technologies that help make life simpler – features you might not find on ordinary appliances. Please spend a few minutes reading to get the very best from it.
ACCESSORIES AND CONSUMABLES
In the AEG webshop, you'll find everything you need to keep all your AEG appliances looking spotless and working perfectly. Along with a wide range of accessories designed and built to the high quality standards you would expect, from specialist cookware to cutlery baskets, from bottle holders to delicate laundry bags...

Visit the webshop at: www.aeg.com/shop
ENVIRONMENT CONCERNS
Recycle the materials with the symbol Put the packaging in applicable containersto recycle it.
Help protect the environment and human health and to recycle waste of electrical and electronic appliances. Do not dispose appliances marked with the symbol with the household waste. Return the product to your local recycling facility or contact your municipal office.
CUSTOMER CARE AND SERVICE
We recommend the use of original spare parts.
When contacting Service, ensure that you have the following data available. The information can be found on the rating plate.
Model
PNC
Serial Number
1. RECOMMENDATIONS AND SUGGESTIONS
- The Instructions for Use apply to several versions of this appliance. Accordingly, you may find descriptions of individual features that do not apply to your specific appliance.
- The manufacturer will not be held liable for any damages resulting from incorrect or improper installation.
- The minimum safety distance between the cooker top and the extractor hood is 650~mm (some models can be installed at a lower height, please refer to the paragraphs on working dimensions and installation).
- Check that the mains voltage corresponds to that indicated on the rating plate fixed to the inside of the hood.
- For Class I appliances, check that the domestic power supply guarantees adequate earthing.
- Connect the extractor to the exhaust flue through a pipe of minimum diameter 120mm . The route of the flue must be as short as possible.
- Do not connect the extractor hood to exhaust ducts carrying combustion fumes (boilers, fireplaces, etc.).
- If the extractor is used in conjunction with non-electrical appliances (e.g. gas burning appliances), a sufficient degree of aeration must be guaranteed in the room in order to prevent the backflow of exhaust gas. The kitchen must have an opening communicating directly with the open air in order to guarantee the entry of clean air. When the cooker hood is used in conjunction with appliances supplied with energy other than electric, the negative pressure in the room must not exceed 0,04 mbar to prevent fumes being drawn back into the room by the cooker hood.
- In the event of damage to the power cable, it must be replaced by the manufacturer or by the technical service department, in order to prevent any risks.
- Connect the hood to the mains through a twopole switch having a contact gap of at least 3mm .
- If the instructions for installation for the gas hob specify a greater distance specified above, this has to be taken into account. Regulations concerning the discharge of air have to be fulfilled.
2. USE
- The extractor hood has been designed exclusively for domestic use to eliminate kitchen smells.
- Never use the hood for purposes other than for which it has been designed.
-
Never leave high naked flames under the hood when it is in operation.
-
Adjust the flame intensity to direct it onto the bottom of the pan only, making sure that it does not engulf the sides.
- Deep fat fryers must be continuously monitored during use: overheated oil can burst into flames.
- Do not flambe under the range hood; risk of fire.
- This appliance is not intended for use by persons (including children) with reduced physical, sensory or mental capabilities, or lack of experience and knowledge, unless they have been given supervision or instruction concerning use of the appliance by a person responsible for their safety.
Children should be supervised to ensure that they do not play with the appliance. - "CAUTION: Accessible parts may become hot when used with cooking appliances".
3. MAINTENANCE
- Switch off or unplug the appliance from the mains supply before carrying out any maintenance work.
-
Clean and/or replace the Filters after the specified time period (Fire hazard).
-
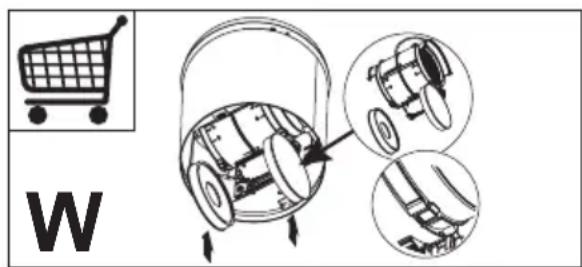
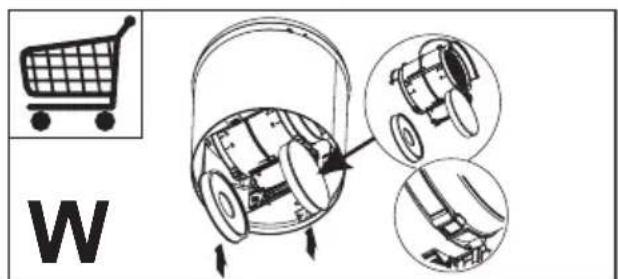
Activated charcoal filter W These filters are not washable and cannot be regenerated, and must be replaced approximately every 4 months of operation, or more frequently with heavy usage.
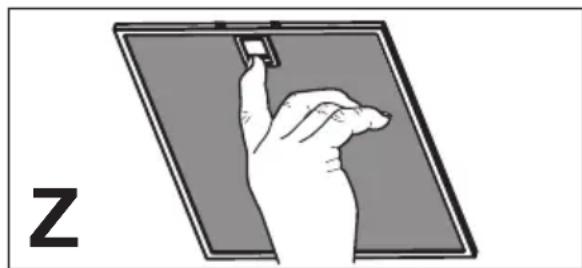
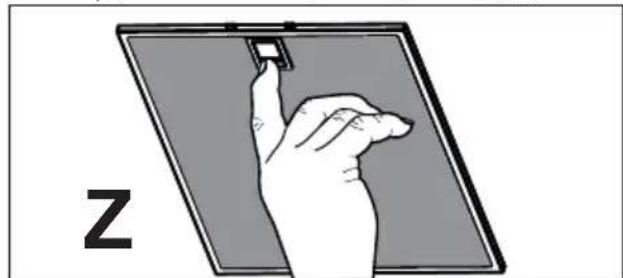
Grease filters Z The filters must be cleaned every 2 months of operation, or more frequently for particularly heavy usage, and can be washed in a dishwasher.
-
Control lights, if present.
-
Clean the hood using a damp cloth and a neutral liquid detergent.
4. CONTROLS
| Button Function Display | ||
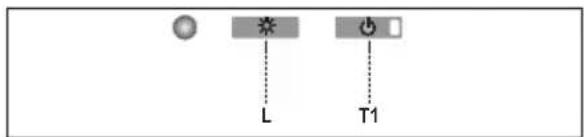
| L Turns the | lights On/Off. | - |
| T1 Hood Down | Press for 2 seconds to raise the Hood. Press briefly to turn the Motor On/Off. | On/Off |
| Hood Up Press once: The Hood lowers. Press a second time: The Hood Stops. When the move-ment has been completed the motor turns on at Speed two. | Off/Off | |
Warning: The Hood controls only control the Hood functions. The Lighting unit has a completely separate power supply and a separate switch.
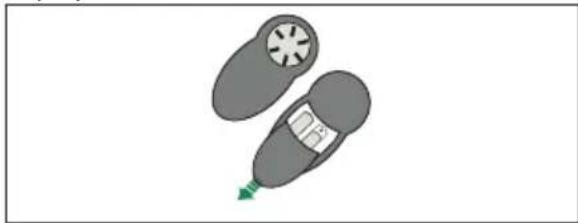
5. REMOTE CONTROL
The appliance can be controlled using a remote control powered by a 1.5 V carbon-zinc alkaline batteries of the standard LR03-AAA type (not included).
- Do not place the remote control near to heat sources.
Used batteries must be disposed of in the proper manner.
The electronic control system recognises and signals two types of fault
| Led T1 | |
| Slow flashing Current | If an overload condition occurs, the fault is signalled by LED T1 on the keyboard flashing once every 2 seconds. Check that nothing is blocking normal hood movements.The signal remains active until a new hood open/close command is given. |
| Rapid flashing Hood | If opening safety microswitch tripped:If the safety microswitch trips, the fault is signalled by LED T1 on the keyboard flashing quickly (once every 250 ms). This means that the hood has passed the microswitch.......Call Technical Assistance!You can continue to use the hood's light and motor functions while this fault is active. Whenever the motor is on, LED T1 will continue to flash, indicating that the fault is still present. |

| Button Function Display | ||
| Turns the Motor On/Off. - | ||
| Hood Closed: - Press the button briefly to start lowering the hood - It will stop when the button is pressed again. When the movement has been completed the motor will start at speed 2. | - | |
| Hood Open: - Press and hold for 2 seconds to activate raising of the hood, which stops when it reaches the stop. - Press (briefly) to stop the movement (before the stop is reached). - Press again briefly to turn the motor on/off. - Press and hold for 2 seconds to start raising of the hood. - If the motor is on, it will first stop the motor and then start the movement. | - | |
| - | Decreases the speed of the Motor. | - |
| + | Increases the speed of the Motor. - | |
| ① | INTENSIVE - This can only be activated with the hood lowered and when the delay or 24h functions are not active. - Activates Intensive speed from any other speed. To disable it, simply press the same button again or turn the motor off. - Intensive speed is timed to run for 10 minutes. At the end of the 10 minutes the system will automatically return to the speed that was set before. | The led on the motor button (on the hood controls) will flash once a second. |
| Press briefly for the Delay Function: Can only be activated if the Intensive or 24h function is not active. Activates and deactivates total shutdown of the hood (motor+lights) after 30 minutes: To disable the Delay, simply press the button again or turn the motor off. | The led on the motor button (on the hood controls) will flash once every 0.5 seconds. | |
| Press and hold for 2 sec. for the 24H Function: Can only be activated if the Intensive or Delay function is not active. Activates and deactivates the 24H function for 10 minutes every hour, for 24 hours. After this time it is deactivated. | The led on the motor button (on the hood controls) will flash once every 2 seconds. | |
| Turns the Hood lights On/Off. - | ||
Additional information for the installation technician
Procedure to be used in case of malfunction on the movement:
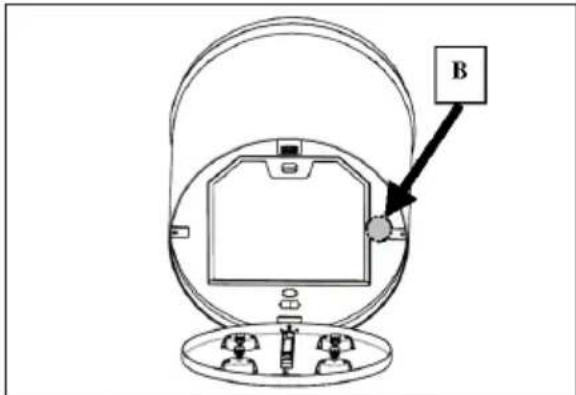
- Check that the fuse is properly inserted and that it has not burned out, for replacing the fuse open the lighting unit and unscrew the fuser holder and replace it with one having the same characteristics (Rif.B).
- Check that the hood canopy is fitted level (the use of a spirit level is recommended).
- Check that the four cables are all at the same tension. The front left cable must not be slacker than the others.
If even these operations do not solve the problem contact the Technical Assistance.
6. LIGHTING
Warning: This appliance is fitted with a white LED lamp classed as 1M according to EN 60825-1: 1994 + A1:2002 + A2:2001 standards; maximum optical power emitted @439nm: 7μW. Do not look directly at the light through optical devices (binoculars, magnifying glasses...).
- For replacement contact technical support. ("To purchase contact technical support").
ApiOoC oεipac (S.N.)
ELECTROLUX HOME PRODUCTS CORPORATION NV.
RAKETSTRAAT 40 / RUE DE LA FUSEE 40
B-1130 BRUSSEL / BRUXELLES
BELGIUM
TEL: +32 2 716 26 00
FAX: +32 2 716 26 01
www.electrolux.com
PROBLEME QÉ LIDHEN ME MJEDISIN
Ricikloni materialet me simbolin Vendoseni ambalazhin te kontejneret ericiklimit nese ka.
aaii iil llll jgi jao aaiall Jaiy 1ic
Jgall
jlll j
Lwll
1.1
sill jll ssy 1j yg g aai
A
1
blal 1 g jalilg jb bnaa aaln lgl
e alj 1le 1s jk d ydall) 65
. (lll jll g jla jy jg jy
aaiia aaii iil gill 12g 22c n jao 515
jaiia gall gl ggl 6d g gall baiii
auii 1 (I) gaiuall o jy auiy. bilal Jd auii jll aill
JgbyjoguL Jx jia dally blaill 1s y biy
oJgUall Jgup Jaiele 1000000000000000000000000000000000000000000000000000000
J 120 yblal 1y
.(....aallolal j)g
j 120 g jao blalil jS 13
(jlljai jilgillg)iiaylae 1
jlll jlljglglln jol gdo jn jn jn jn jn jn jn jn jn jn jn jn jn jn jn jn jn jn jn jn jn jn jn jn jn jn jn jn jn jn jn jn jn jn jn jn jn jn jn jn jn jn jn jn jn jn jn jn jn jn j
a bll lioic jy 1 bi in aia
1 11
- jblzglj
8 1 1 1 1 1 1 1 1 1 1 1 1 1 1 1 1 1
a a 1
clilblaljawla jolglalgall aai jipc . gall
aaiiaaiiie aiee iiee ie eieieieieieieieieieieieieieieieieieieieieieieieieieieieieieieieieieieieieieieieieieieieieieieieieieieieieie
gabll g 100000000000000000000000000000000000000000000000000000000000000000000000
JSLay) jlae Jgai JSL
J 1 J 1 1 1 1 1 1 1 1 1 1 1 1 1 1 1 1 1 1 1 1 1 1 1 1 1 1 1
jell jll jll jll jll jll jll jll jll jll jll jll jll jll jll jll jll jll jll jll jll jll jll jll jll jll jll jll jll jll jll jll jll jll jll jll jll jll jll jll jll jll jll jll jll jll
: 1.3
1 1
a 1
4
2
g
Jlue a Jua Juaaia Jlaai Iaiai . jiaia

eaiyieae aee eae aee ae aee aee aee aee aee aee aee
(Bg)
(ell all jzj 12w) g s iu u 4y j zaiisall a y j n 2
.3
1
aill eclil jll kall aal
.6
ENcJ 1M 4f LED
20012A+:2002 1A+ 1994:1-60825
439nm:7uW.
(……)
AaiyIyIyIyIyIyIyIyIyIyIyIyIy
(20
C