
43S901SUS - TV TESLA - Free user manual and instructions
Find the device manual for free 43S901SUS TESLA in PDF.
Frequently Asked Questions - 43S901SUS TESLA
User questions about 43S901SUS TESLA
0 question about this device. Answer the ones you know or ask your own.
Ask a new question about this device
Download the instructions for your TV in PDF format for free! Find your manual 43S901SUS - TESLA and take your electronic device back in hand. On this page are published all the documents necessary for the use of your device. 43S901SUS by TESLA.
USER MANUAL 43S901SUS TESLA
Please read these instructions before operating your set and retain them for future reference.
UDHEZIM PER PER
Ju lutemi lexonie kete udhezim para perdorimit te pajisje suaj dhe ruajeni per nevoja plotesuese eventuale.
UPUTSTVO ZA UPOTREBU
Prije upotrebe uredaja procitati ova uputstva i zadrzati ih radi kasnijih referenci.
HHTPYKUN 3A EKCNIIOATAUJA
MOn, npooyete Te3n HNCTpykun, npeyn da n3non3Bate yctpoicbTOI rnn 3ana3eTe 3a 6bdeu cnpaKn.
BETRIEBSANLEITUNGEN
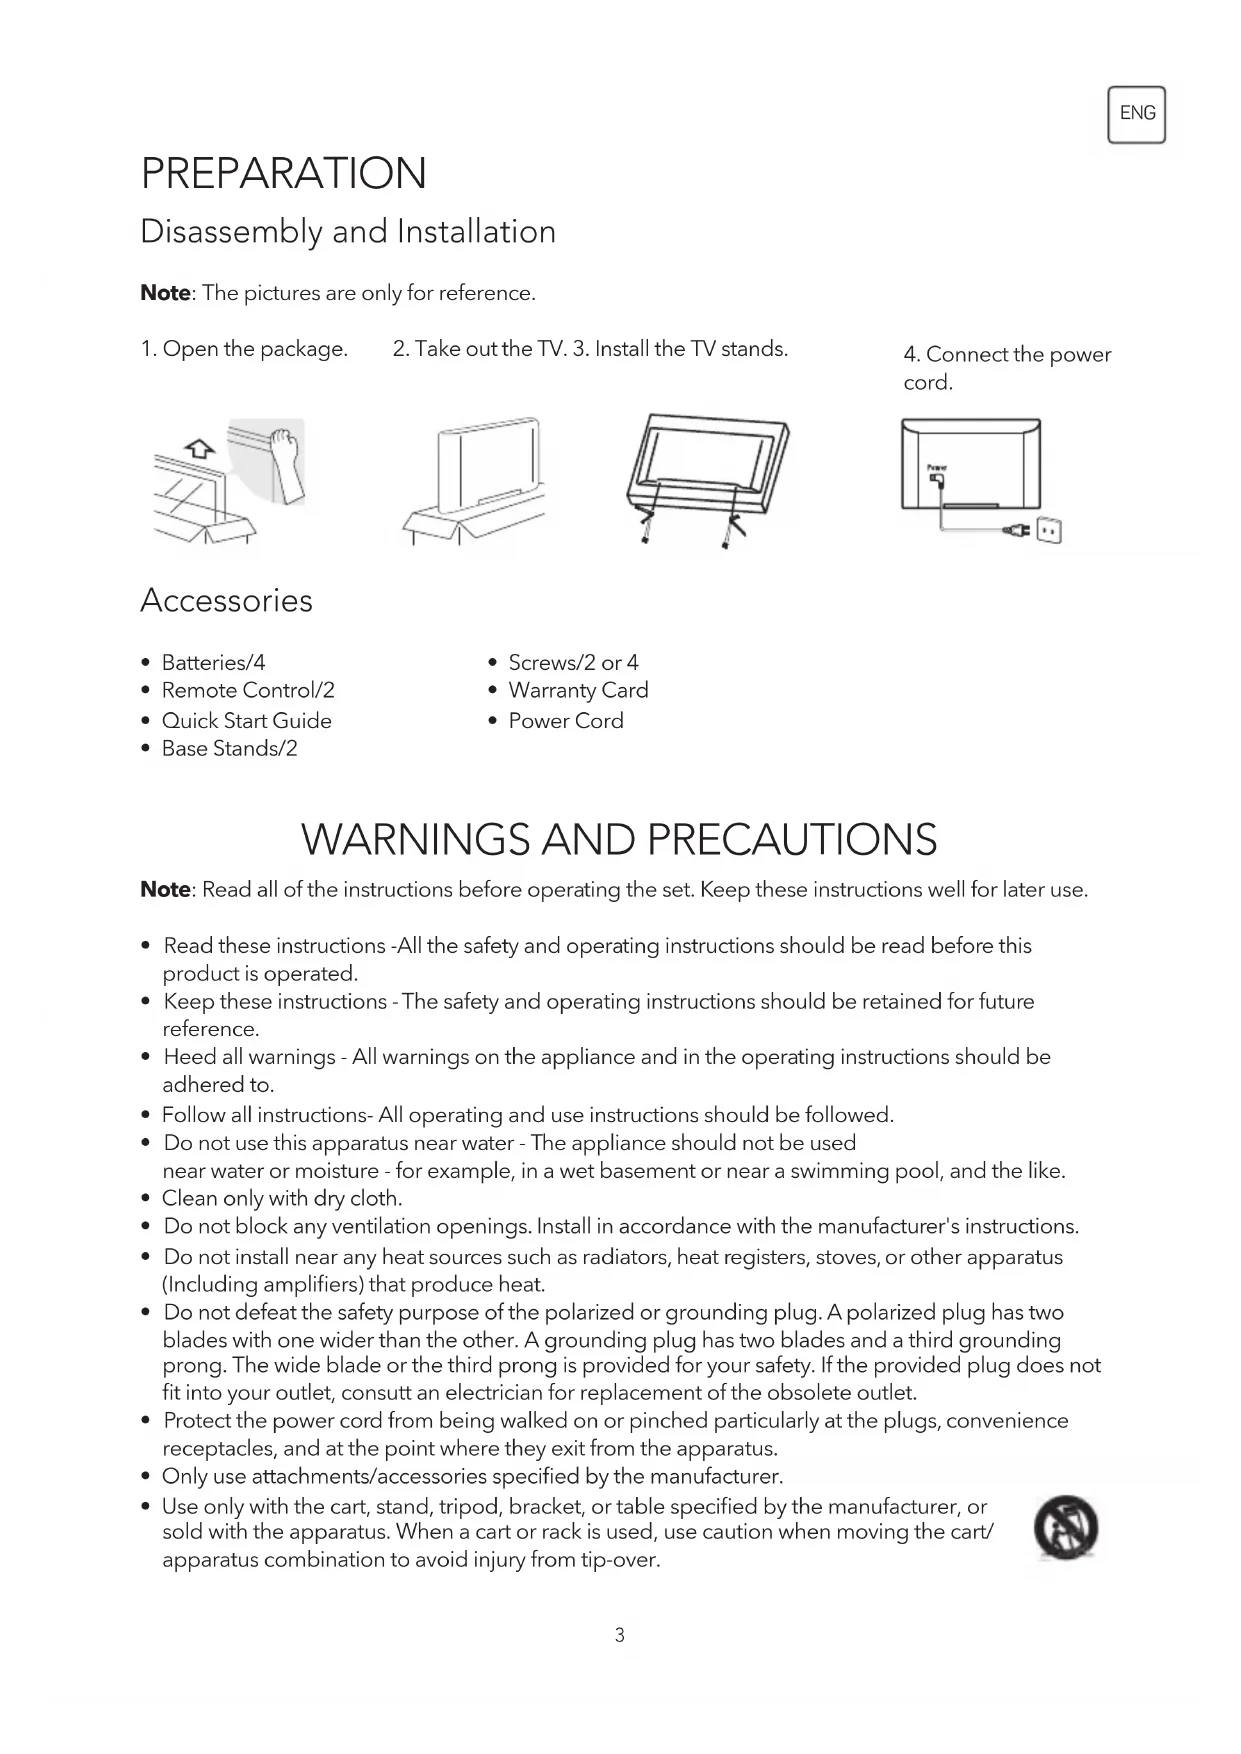
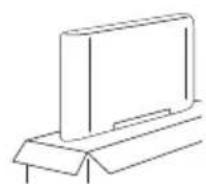
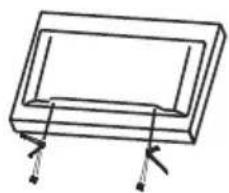
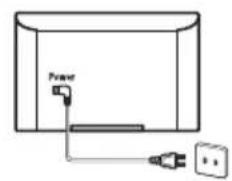
Disassembly and Installation
Note: The pictures are only for reference.
-
Open the package.
-
Take out the TV. 3. Install the TV stands.
-
Connect the power cord.

Accessories
- Batteries/4
Remote Control/2 - Quick Start Guide
-
Base Stands/2
-
Screws/2 or 4
Warranty Card
Power Cord
WARNING AND PRECAUTIONS
Note: Read all of the instructions before operating the set. Keep these instructions well for later use.
- Read these instructions -All the safety and operating instructions should be read before this product is operated.
- Keep these instructions - The safety and operating instructions should be retained for future reference.
- Heed all warnings - All warnings on the appliance and in the operating instructions should be adhered to.
- Follow all instructions- All operating and use instructions should be followed.
- Do not use this apparatus near water - The appliance should not be used near water or moisture - for example, in a wet basement or near a swimming pool, and the like.
Clean only with dry cloth. - Do not block any ventilation openings. Install in accordance with the manufacturer's instructions.
- Do not install near any heat sources such as radiators, heat registers, stoves, or other apparatus (Including amplifiers) that produce heat.
- Do not defeat the safety purpose of the polarized or grounding plug. A polarized plug has two blades with one wider than the other. A grounding plug has two blades and a third grounding prong. The wide blade or the third prong is provided for your safety. If the provided plug does not fit into your outlet, consult an electrician for replacement of the obsolete outlet.
- Protect the power cord from being walked on or pinched particularly at the plugs, convenience receptacles, and at the point where they exit from the apparatus.
- Only use attachments/accessories specified by the manufacturer.
-
Use only with the cart, stand, tripod, bracket, or table specified by the manufacturer, or sold with the apparatus. When a cart or rack is used, use caution when moving the cart/ apparatus combination to avoid injury from tip-over.
-
Unplug the apparatus during lightning storms or when unused for long periods of time.
- Refer all servicing to qualified personnel. Servicing is required when the apparatus has been damaged in any way, such as power supply cord or plug is damaged, liquid has been spilled or objects have fallen into the apparatus, the apparatus has been exposed to rain or moisture, does not operate normally, or has been dropped.
- CAUTION: These servicing instructions are for use by qualified service personnel only. To reduce the risk of electric shock, do not perform any servicing other than that contained in the operating instructions unless you are qualified to do so.
- Do not install this equipment in a confined or building-in space such as a book case or similar unit, and remain a well ventilation conditions at open site. The ventilation should not be impeded by covering the ventilation openings with items such as newspaper, table-cloths, curtains etc.
- Caution - To prevent electric shock hazard, replace grille.
- Please refer the information on rear enclosure for electrical and safety information before installing or operating the apparatus.
- To reduce the risk of fire or electric shock, do not expose this apparatus to rain or moisture. The apparatus shall not be exposed to dripping or splashing and that no objects filled with liquids, such as vases, shall be placed on the apparatus.
- For the terminals marked with symbol of " " may be of sufficient magnitude to constitute a risk of electric shock. The external wiring connected to the terminals requires Installation by an instructed person or the used of ready-made leads or cords.
- To prevent injury, this apparatus must be securely attached to the floor/wall in accordance with the installation instructions.
- Danger of explosion if battery is incorrectly replaced. Replace only with the same or equivalent type.
- The battery (battery or batteries or battery pack) shall not be exposed to excessive heat such as sunshine, fire or the like.
- Excessive sound pressure from earphones and headphones can cause hearing loss. Listening to music at high volume levels and for extended durations can damage one's hearing. In order to reduce the risk of damage to hearing, one should lower the volume to a safe, comfortable level, and reduce the amount of time listening at high levels.
- The mains plug/appliance coupler/direct plug-in adapter is used as disconnect device, the disconnect device shall remain readily operable.
- When not in use and during movement, please take care of the power cordset, e.g. tie up the power cordset with cable tie or something like that. It shall be free from sharp edges and the like that can cause abrasion of the power cordset. When put into use again, please make sure the power cord set being not damaged, If any damages found, please look for the service person to replace the power cord set specified by the manufacturer or have the same characteristics as the original one.
- Attention should be drawn to environmental aspects of battery disposal.
- No naked flame sources, such as lighted candles, should be placed on the apparatus. To prevent the spread of fire, keep candles or other open flames away from the apparatus at all times.
- If the apparatus have the symbol in its rating label and the power cord has two pins, it means that the equipment is a Class II or double insulated electrical appliance. It has been designed in such a way that it does not require a safety connection to electrical earth.
The following information are recommended to be included as far as applicable where applicable:
Refers to alternating current (AC)
Refers to direct current (DC)
Refers to Classll equipment
Refers to stand-by
Refers to power ON.
Refers to dangerous voltage
- Warning for Apparatus containing COIN/BUTION CELL BATTERIES (Below instruction only used for the apparatus containing a user-replaceable coin/button cell battery)
- Warning: Do not ingest the battery, Chemical Bum Hazard (The remote control supplied with) This product contains a coin button cell battery. If the coin button cell battery is swallowed, it can cause severe Internal burns in just 2 hours and can lead to death. Keep new and used batteries away from children. If the battery compartment does not close securely, stop using the product and keep it away from children. If you think batteries might have been swallowed or placed inside any part of the body, seek immediate medical attention.
WEEE Directive

Correct Disposal of this product. This marking indicates that this product should not be
disposed with other household wastes throughout the EU. To prevent possible harm to the environment or human health from uncontrolled waste disposal, recycle it responsibly to promote the sustainable reuse of material resources. To return your used device, please use the return and collection systems or contact the retailer where the product was purchased. They can take this product for environmental safe recycling.

CAUTION
RISK OF ELECTRIC SHOCK DO NOT OPEN

- This lightning flash with arrowhead symbol within an equilateral triangle is intended to alert the user to the presence of non-insulated "dangerous voltage" within the product's enclosure that may be of sufficient magnitude to constitute a risk of electric shock.
- To reduce the risk of electric shock. Do not remove cover (or back). No user serviceable parts inside. Refer to qualified service personnel.
- The exclamation point within an equilateral triangle is intended to alert the user to the presence of important operating and maintenance instructions in the literature accompanying the appliance.
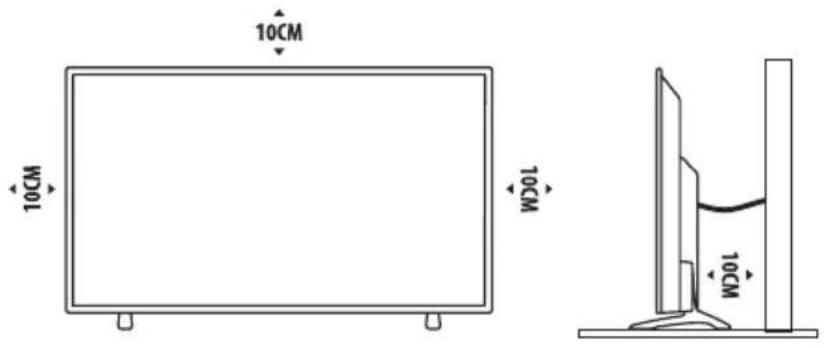
POSITIONING THE TV SET
- Install Display on solid horizontal surface such as a table or desk. For ventilation, leave a space of at least 10cm free all around the set. To prevent any fault and unsafe situations, please do not place any objects on top of the set. This apparatus can be used in tropical and/or moderate climates.
- Fixing the rear of enclosure to wall. Below picture is different from actual item, thus it's only for reference. (only for some regions)
Never place a television set in an unstable location. A television set may fall, causing serious personal injury or death. Many injuries, particularly to children, can be avoided by taking simple precautions such as:
- Using cabinets or stands recommended by the manufacture of the television.
- Only using furniture that can safely support the television.
- Ensuring the television is not overhanging the edge of the supporting furniture.
- Not placing the television on tall furniture (for example, cupboards or bookcases) without anchoring both the furniture and the television set to a suitable support.
- Not placing the television set on cloth or other materials that may be located between the television set and supporting furniture.
- Educating children about the dangers of climbing on furniture to reach the television or its controls.
If your existing television set is being retained and relocated, the same considerations as above should be applied (Only for the TV with mass exceed 7kg ).
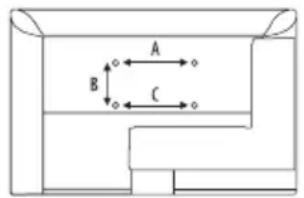
- An optional wall mount can be used with your television. Consult with your local dealer for a wall mount that supports the VESA standard used by your TV model.
Carefully attach the wall mount bracket at the rear of the TV. Install the wall mount bracket on a solid wall perpendicular to the floor. If you are attaching the TV to other building materials, please contact qualified personnel to install the wall mount.
Detailed instructions will be included with the wall mount. Please use a wall mount bracket where the device is adequately secured to the wall with enough space to allow connectivity to external devices.

Note: The pictures are only for reference.
- Disconnect the power before moving or installing the TV. Otherwise electric shock may occur.
- Remove the stand before installing the TV on a wall mount by performing the stand attachment in reverse.
- If you install the TV on a ceiling or slanted wall, it may fall and result in severe injury. Use an authorized wall mount and contact the local dealer or qualified personnel. Otherwise it is not covered by the warranty.
- Do not over tighten the screws as this may cause damage to the TV and void your warranty
- To prevent injury, this apparatus must be securely attached to the floor/wall in accordance with the installation instructions.
- Use the screws and wall mounts that meet the following specifications. Any damages or injuries by misuse or using an improper accessory are not covered by the warranty.
| Model Size: 43" Top Down | ||||
| Screw | Diameter (mm) "E" M6 | T3.5 | ||
| Depth (mm) "D" | Max 25 | 20 | ||
| Min 20 | 6 | |||
| Quantity 2 2 | ||||
| VESA (AxBxC) 200x200x20 | ||||

| Model Size: 49" Top Down | ||||
| Screw | Diameter (mm) "E" M6 | T3.5 | ||
| Depth (mm) "D" | Max 30 | 12 | ||
| Min 25 | 10 | |||
| Quantity 2 2 | ||||
| VESA (AxBxC) 400x250x30 | ||||
| Model Size: 55" Top Down | ||||
| Screw | Diameter (mm) "E" M6 | T3.5 | ||
| Depth (mm) "D" | Max 30 | 20 | ||
| Min 21 | 10 | |||
| Quantity 2 2 | ||||
| VESA (AxBxC) 400x280x40 | ||||
Note:
- The pictures are for reference only.
- For the TV sets with terminals towards the wall, in order to leave enough space to use the terminals, a rubber cushion is needed together with the screw to fix the wall mount. It is a small hollow pillar whose internal diameter is 8mm, external diameter is 18mm and height is 30mm.
- The information in this document is subject to change without notice. The manufacturer accepts no liability for damage resulting directly or indirectly from faults, incompleteness or discrepancies between the user manual and the product described.
- In dry environment due to static electricity, the product may be restart and return to the main OSD interface, USB player interface or the previous source mode, please continue to operate the TV as your will.
Operating Environment
- Do not install this device in confined spaces such as bookcases or similar units.
- Do not use the set in damp and cold areas. Protect the set from overheating.
- Keep away from direct sunlight.
- Do not use the set in dusty areas.
- Do not place candles to accessible, open areas to avoid flammable foreign material from entering the TV.
Precautions for Using Remote Control
- Use the remote control by pointing it towards the remote sensor. The items between the remote control and the remote sensor will interfere with the normal operation.
- Do not expose the remote control to violent vibrations. Also, do not splash liquid on the remote control and do not place the remote control in high humidity areas.
- Do not expose the remote control to direct sunlight which can cause deformation of the unit due to heat.
- When the remote sensor is exposed to direct sunlight or strong light, the remote control will not work. If this is the case, please change the light direction or the position of the TV, or use the remote control closer to the remote sensor.
Precautions for Using Battery
Inadequate use of batteries may cause leakage. Therefore, please follow the steps below and use them with care.
- Please note the batteries polarity to avoid short circuit.
- If the battery voltage is insufficient, which affects the remote control range, you should replace used batteries with the new ones. Remove batteries from the remote control unit if you do not intend to use it for a long time.
- Do not use different types of batteries (for example, manganese and alkaline batteries) together.
- Do not put the batteries into fire. Do not charge or disassemble batteries.
- Please dispose of batteries in accordance with the relevant environmental protection regulations.
- WARNING: The batteries (battery pack or batteries installed) shall not be exposed to excessive heat such as sunshine, fire or the like.
REMOTE CONTROL FUNCTIONS
Note:
- The pictures are for reference only.
- Some buttons may be invalid for some models. When you press such buttons, they will not respond or there will be a display "Not available" on the screen.
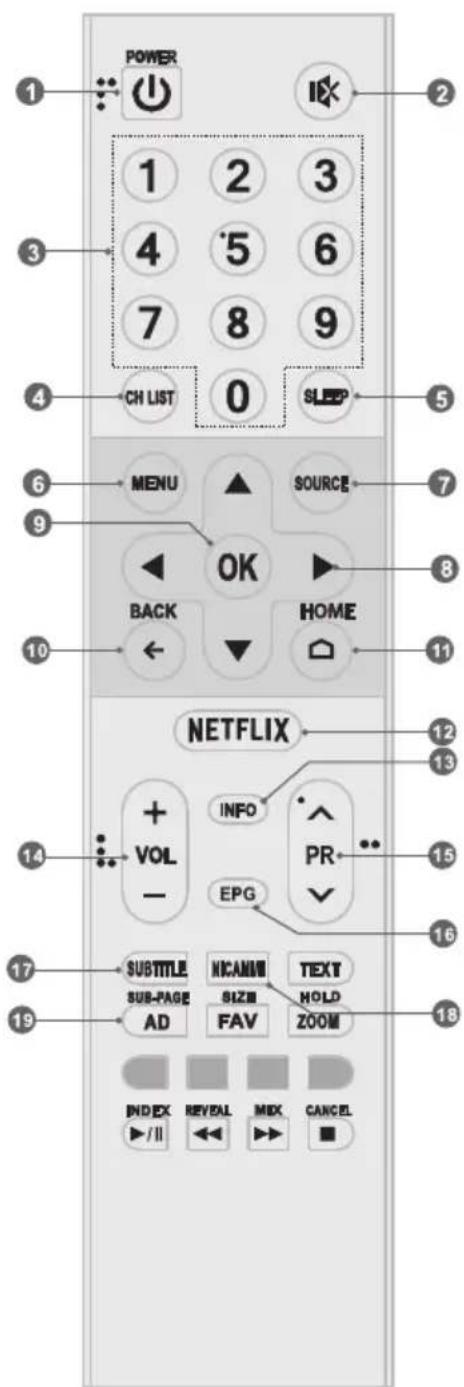
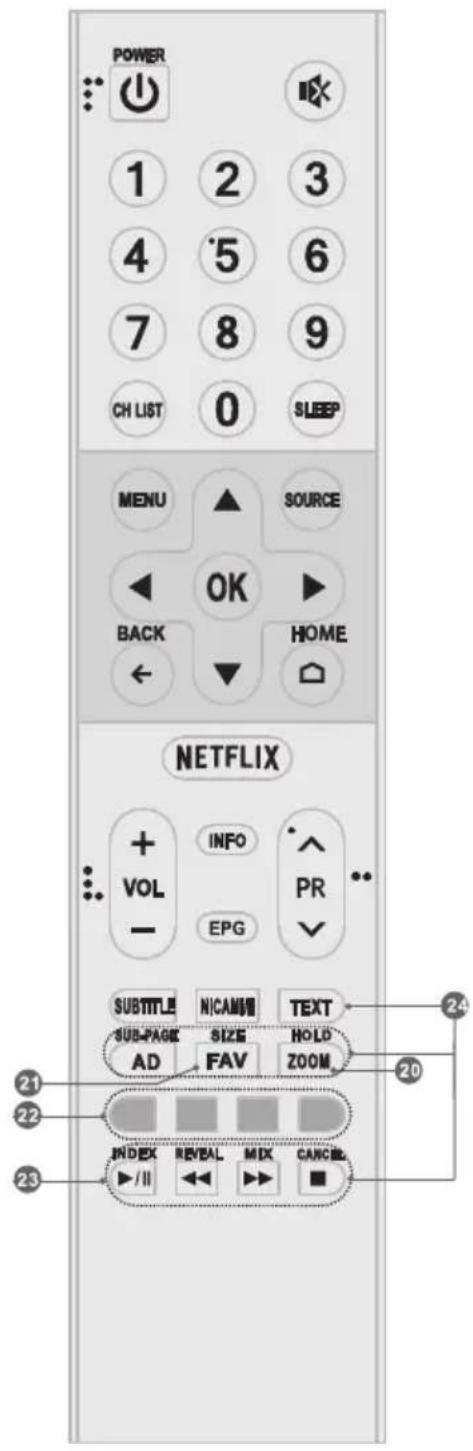
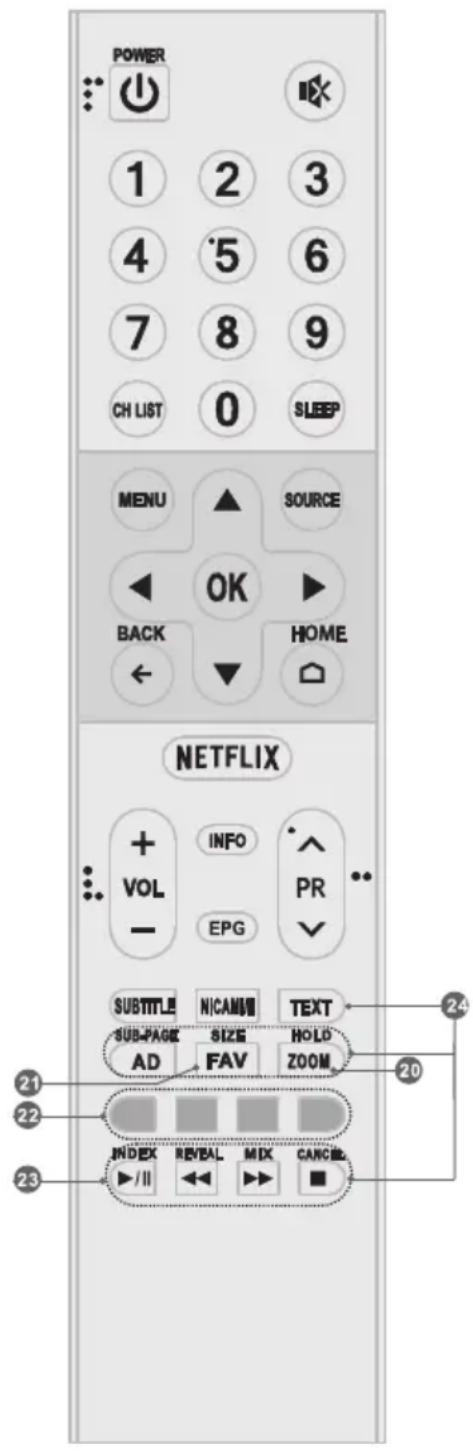
Remote Control (RC A)

- POWER ( ) Press to turn the TV on or to put it in standby.
- MUTE (X) Press to mute or restore the volume.
- Numeric buttons Choose channel directly.
- CH LIST Press to enter the channel list.
- SLEEP Press to select the sleep timer.
- MENU Open the menu options.
- SOURCE Select the input source mode.
- Up/Down/Left/Right (▲ /▼/▲ /▶) Navigate through the menu.
- OK Confirm the selection.
- BACK Exit the current menu.
- HOME Press this button will access the home page, you can use the smart features and media player etc.
- NETFLIX Access the NETFLIX.
- INFO Display information about current source.
- Volume Up/Down (VOL+/VOL-) Adjust the volume level.
- Program Up/Down (PR+/PR-) Change programs up or down.
- EPG Press to display the current EPG information in DTV mode.
- SUBTITLE Press to open or close the subtitle.
- NICAM I/II Press to select desired sound output depending on the broadcasting channel.
- AD Turn on th audio description to describe what is happening on the screen for the blind or visually impaired viewers.

20.ZOOM
Press to select the desired picture aspect ratio.
-
FAV Press to view your assigned favorite channels.
-
Color buttons Press to execute the prompt function in TV mode.
23. Play Control Buttons
Play & Pause (▶/I)
Press to pause playback, press again to continue playback.
Stop (
Press to stop playback.
Fast Backward Button (
Press to fast reverse.
Fast Forward (▶)
Press to fast forward.
24. TELEXTB BUTTONS
TEXT Press to enter or exit the teletext menu.
SIZE Enlarge the teletext display: Press this button once to enlarge upper half of the screen. Press this button again to enlarge lower half of the screen. Press this button again to resume to normal screen size.
HOLD
Press to hold the teletext page on screen without update and changes. Press again to release the hold state.
SUB-PAGE
Press this button to enter or exit subpage mode (if subpage is available). Press Red / Green buttons to select the desired subpage.
INDEX
Display index page.
REVEAL
Display concealed information such as solutions to riddles or puzzles or remove the information from the display.
MIX
Superimpose the teletext over the TV program or return to normal teletext mode.
CANCEL
Return to TV program temporarily while searching for a Teletext page. When the search is done, the page number will be displayed on the upper left of the screen. Press again to return to the Teletext page.
Note:
- The pictures are for reference only.
- Some buttons may be invalid for some models. When you press such buttons, they will not respond or there will be a display "Not available" on the screen.
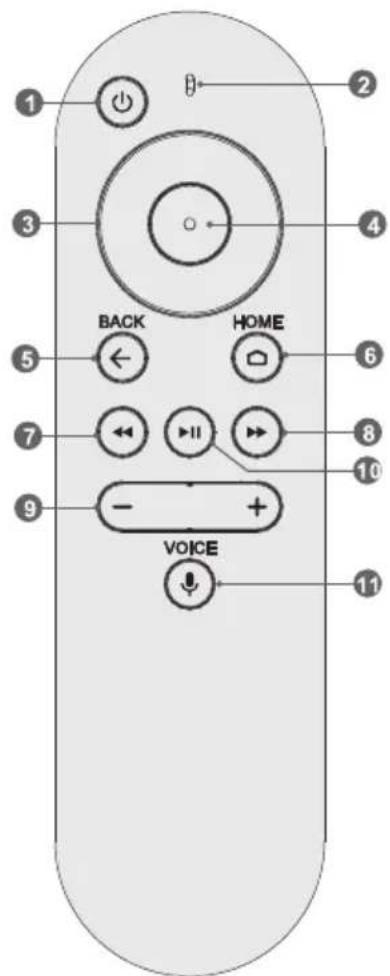
Bluetooth Remote Control (RC B)
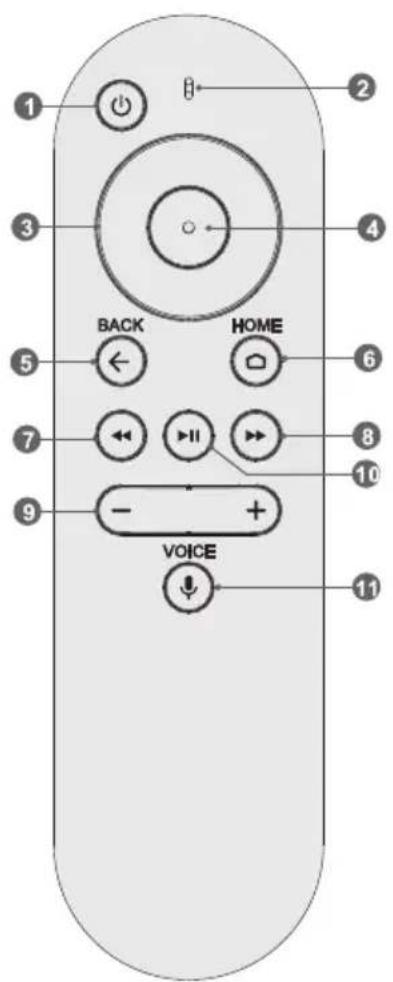
- POWER ( ) Press to turn the TV on or standby.
- Microphone Speak to input your voice.
- Up/Down/Left/Right
Navigate through the menu.
- OK Confirm the selection.
- BACK Exit the current menu.
- HOME Press this button to access the home page, you can use the network apps, media player, and so on.
- Fast Backward Button ( )
Press to fast reverse.
- Fast Forward (▶)
Press to fast forward.
- Volume Up/Down (+/-)
Adjust the volume up or down.
- Play & Pause (▶II)
Press to pause playback, press again to continue playback.
11.VOIDe
Press to open the voice searching function. You can click it to search for your favorite content easily and fastly just by speaking to the TV what you want.
How to Pair the Bluetooth Remote with Your TV
Before using the bluetooth remote, you need to pair it with the TV firstly. The following steps are for your reference:
- Press HOME button to enter the home page;
- Select "Settings" at the left-bottom corner of the home page;
- Enter "Settings" to select "Remote& accessories";
- Select "Add accessories" to enter the interface of searching for accessories;
- Press HOME and Left button together for a while until there is the sound "Di";
- Check and select your bluetooth remote name on the TV searching interface;
- Press OK button to start pairing the remote.
- After pairing, the bluetooth remote has been connected successfully for your usage right now.
BASIC OPERATION
How to use E-manual
E-manual are built into your TV and can be displayed on the screen. To learn more about your TV features, access your e-Manual by referring to the following.
Note: The picture is only for reference.

- Press HOME button to access the home page.
- Press / button to select the list of "Apps".
- Press button to select the icon of "E-Manual".
- Press OK button to enter the "E-Manual" to check the instructions of basic functions.
- The following buttons of remote control are used to help you operate the TV set in E-Manual.
| UP/DOWN/LEFT/RIGHT Navigation Buttons) | Move Upward/Downward//Leftward /Rightward to select an item. |
| OK | Enter the selected item. |
| EXIT/BACK Button | Exit the current display, or exit the E-Manual. |
Install Remote Control Battery
Place two AAA size batteries in the remote controls battery compartment, making sure to match the polarity markings inside the compartment.

Note: The picture is only for reference.
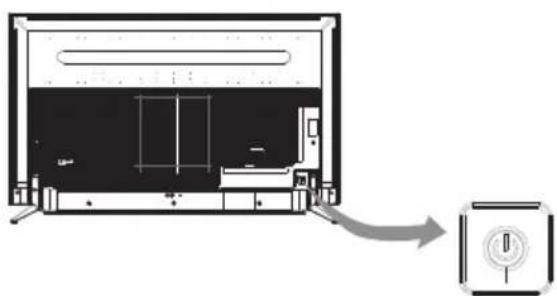
TV Button

- In standby mode, press it to turn on the TV.
- When the TV is turned on and there is no OSD, Short press it to access the source menu. Short press it again to select the desired source. Long press it to turn the TV to standby.
Note: The picture is only for reference.
TERMINAL CONNECTION
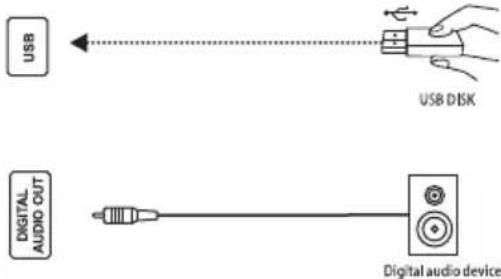
Terminals
USB
USB port.
DIGITAL AUDIO OUT
Use a SPDIF cable to output your TV audio signal to a compatible audio receiver.
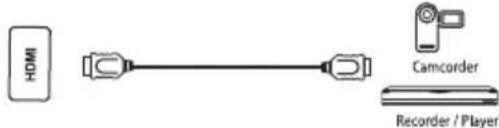
HDMI
Connect HDMI input signal from signal source such as DVD.
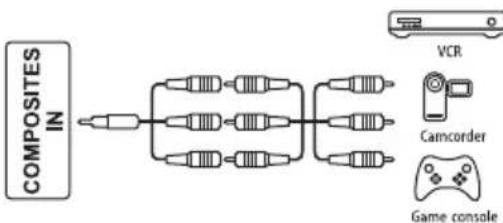
COMPOSITE IN
Connect audio and video signal from signal source such as DVD.
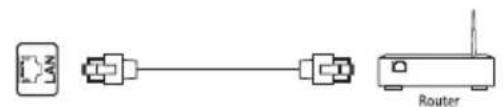
LAN
Network port.
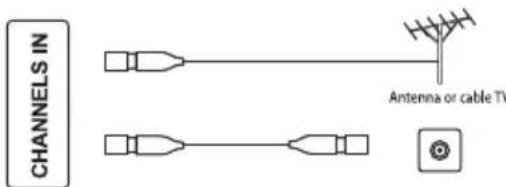
CHANNELS IN
Connect a coaxial cable to receive signal from the antenna or cable.
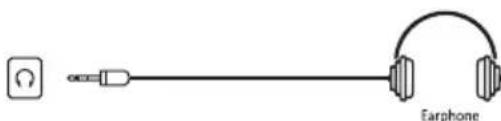
EARPHONE
Speakers will be muted when earphone.
SERVICE
Debugging port only for technicians.


Note:
1) The pictures are only for reference.
2) Some terminals may differ by different regions or models, and please take your actual TV set as the standard.
TROUBLESHOOTING
Before calling a service technician, review following information for possible causes and solutions for the problem you are experiencing.
| Problem Solution | |
| Remote control does not work. | Check the remote sensor on the remote control. Change the batteries. Batteries are not installed correctly. Main power is not connected. |
| Poor signal This is usually caused by interference from cell phones, walkie-talkie, automotive ignition system; neon, electric drill or other electronic equipment or radio interference sources. | |
| No picture, no sound • Check the signal source. • Plug another electrical device into the outlet to make sure it is working or turned on. • Power Plug is bad contact with the outlet. • Check the signal. | |
| No sound, picture OK • If no sound, do not mute or increase the sound volume. • Open the sound menu and adjust 'Balance'. • Check if a headphone has been inserted in, if so, pull out the headphone. | |
| Abnormal picture For no color or bad picture quality, you may: 1. Adjust the color option in menu settings. 2. Keep the TV at a sufficient distance from other electronic products. 3. Try another channel, maybe exit broadcasting signal problem. Bad TV signal (Display mosaic or snowflakes) 1. Check the signal cable and adjust the antenna. 2. Fine tune the channel. 3. Try anther channel. | |
| 'This file is invalid' appears or audio is normal but video is abnormal | • The media file maybe damaged, check if the file can be played on the PC. • Check if video and audio codec is supported. |
| 'Unsupported audio' appears or video is normal but audio is abnormal | • The media file maybe damaged, check if the file can be played on the PC. • Check if video and audio codec is supported. |
| Network failure (May not be available) | • Check if the router works well. • For models needing USB dongle to connect to internet, check if the USB dongle is inserted well. • Make sure the TV has connected to the router successfully. |
| Web page can not be displayed completely (May not be available) | Flash is not supported. |
| Browser is forced to be shut down (May not be available) | Web page include too many large pictures, thus lead to sufficient memory and close the browser. |
SPECIFICATION
| Working voltage 100-240V~50/60 Hz | |
| Rated power consumption | 43": 100 W 49": 120 W 55": 150 W |
| Audio output power (L+R) 10 W + 10 W | |
| Dimensions (W x H x D) with stand | 43": 966.2 x 611.6 x 202.1 mm 49": 1098.7 x 688.4 x 240.9 mm 55": 1235.8 x 766.9 x 265.1 mm |
| Dimensions (W x H x D) without stand | 43": 966.2 x 583.7 x 74.4 mm 49": 1098.7 x 659.5 x 76.5 mm 55": 1235.8 x 738.3 x 78.5 mm |
| Net weight with stand | 43": 9.7 kg 49": 12.7 kg 55": 15.5 kg |
| Net weight without stand | 43": 9.4 kg 49": 12.2 kg 55": 15.1 kg |
| RF aerial input 75 ohm unbalanced | |
| Language of OSD Multiple options | |
| System | DTV: DVB-T/T2/C ATV: PAL/SECAM BG/DK/I |
| Channel coverage | DTV: 177.5MHz ~ 858MHz ATV: 47.25MHz ~ 865.25MHz |
| Maximum number of storable programs | DTV: 10000 ATV: 200 |
| Environment (only for Tropical climates zone) | Working temperature: 5°C~45°C Working humidity: 20%~80% Storage temperature: -15°C~50°C Storage humidity: 10%~90% |
| Environment (only for Moderate climates zone) | Working temperature: 5°C~35°C Working humidity: 20%~80% Storage temperature: -15°C~45°C Storage humidity: 10%~90% |
Note: Some specifications may differ by different regions or models, and please take your actual TV set as the standard.
LICENCES
HDMI
HIGH-DEFINITION MULTIMEDIA INTERFACE
The terms HDMI and HDMI High-Definition Multimedia Interface, and the HDMI logo are trademarks or registered trademarks of HDMI Licensing LLC in the United States and other countries.

DOLBY
AUDIO
Manufactured under license from Dolby Laboratories.
Dolby, Dolby Audio and the double-D symbol are trademarks of Dolby
Laboratories.
DTS TruSurroundTM

dt
TruSurround
For DTS patents, see http://patents.dts.com.
Manufactured under license from DTS Licensing Limited. DTS, the
Symbol, & DTS and the Symbol together are registered trademarks, and
DTS TruSurround is a trademark of DTS, Inc. DTS, Inc. All Rights Reserved.
PERGATITJA
TÉ DHÉNA TÉ FSHEHURA (REVEAL)
SERVICE (PORTA E RIPARIMIT)
Porta e riparimit. Teperdoret vetem nga tekniku.
Shenim:
1) Vizatimet sherbejne vetem per ilustrim.
2) Disa terminale mund te ndryshojnë sipas rajonit ose modeleve. Ju lutei t e mrrni si standard televizorin tuaj real.
ZGJIDHJA E PROBLEMEVE
Remote Control (RC A)
- MOLUHOCT()HaTnCHHeTe,3a Da BKNIOHTe TeJIeBUN3Opa NII IN BpeKIM Ha ITOBOHOCT.
- MUTE (K) HaTnchTe, 3a Da 3arLyuNte nIIN Bb3CTaHOBInTe CnJaTa Ha 3ByKa.
- Numeric buttons Изберете канл диpeктно.
- CH LIST HaTnCHete, 3a Ja BJIe3eTe B CnncbKa C KaHaJIi.
- SLEEP IV36epete BpeMeTo 3a 3acnBaHe.
- MENU BbBeTe OUHHTe Ha MeHIOTo.
- SOURCE Select the input source mode.
8.Up/Down/Left/Right(A/V/4/D) N36peTe peKIma Ha BXOeH n3TOUHNK - OK NtBbpeTe n36opa.
- BACK HaTncHeTe, 3a da ce BbPHeTe KbM npeNiWeH rIeDaH KaHaJI.
- HOME BJIe3Te B NaHAnnpa6oTeH nIOT.AKO BaUNrT TeJIeBn3Op HMa yHKuHa HOME,TO3N 6yToH HMa Da pa6oTN.
- NETFLIX Doctbno NO NETFLIX.
- INFO HaTnchTe, 3a da n3BeJeTe nHOpMaun 3a TEkyu n3TOuHNK.
- Volume Up/Down (VOL+/VOL-)
Pergunpa'te cnlaTa Ha 3Byka. - Program Up/Down (PR+/PR-)
Помяна на порразмite harope Или надoly. - EPG HaTnchete, 3a da ce nokaxe Tekyuata HOpMaun 3a EPG B pexm DTV.
- SUBTITLE AkTnBupaHe / deaKTNbupaHe Ha cy6TnTpnte Bpexim DTV/USB..
- NICAM I/II HaTnchete, 3a da n36epete XeJahnna 3ByKOB CnHaJI B 3aBnCmOcT OT KaHaJa 3a ⅢJIbYBaHe.
19.AD HaTnchete,3a Da BkIIOHTe ayDno OINcaHneTo. Pa3Ka3BaYbT ige ONnue Ha 3pTeJIte Nnn 3pTeJIte cyBpeDeHO 3peHne KaKBO ce CnyuBa Ha ekpaHa.
20.ZOOM
PpomeHeTe nponopunite.
21.FAVHaTncHeTe,3a Da BUnIte BaunTe n36paHn IIO6mKahaln.
- Color buttons HaTnchTe, 3a da n3nblHnTe yHKuIraTa 3a 6bp30 CbBp3BaHe B pexm TV nn DTV.
23. Play Control Buttons Play & Pause (II)
HaTnCHete 3a npEkbcBaHe, cneT TOBa HaTnCHete 3a npOdbJkaBaHe Ha Bb3npOn3BexKaHaeTO.
Stop (HaTnucHe 3a cnnpaHe Ha Bb3npoN3BExKaHeTo.
Fast Backward Button (
Press to fast reverse.
Fast Forward
Press to fast forward.
24. ByToHn 3A yNpABJIeHne HA TEJETEKCT
TEXT HaTnchete, 3a da BJe3eTe nn da n3Je3eTe OT MeHIOTo 3a TeJIeTEKCT.
SIZE YBeJIuHaBaHe Ha TeIeTeKCTa: HATnCHeTe TO3n 6yToH BeINbX, 3a Da yBeJIuHuTe TOpHata NIOBnHa Ha ekpaHa. HATnCHeTe OTHOB To3n 6yToH, 3a Da yBeJIuHuTe DOJHaTa NOJOBnHa Ha ekpaHa. HATnCHeTe TO3n 6yToH OTHOB, 3a Da ce BbPHeTe KbM HopMaJIHHa pa3Mep Ha ekpaHa.
HOLD
HaTnchete,3a Da 3aBpKInTe cTpaHncaTa Ha TeIeTeKCTa Ha ekpaHa 6e3 Da aKtyaHn3npate N da ce npomeHa. HATnCHete OTHOBo, 3a Da oCBO6oNte cbCToRHeTo Ha 3aDbpxKaHe.
SUB-PAGE
HaTnchTe To3n 6yToH, 3a Da BJIe3eTe NJIu Da n3Je3eTe OT pexIM Ha NOCTpaHnU (aKo e HAnuHa noCTpaHnU).HaTnCHTe YepBeHn/3eJehn6yToH, 3a Da n36peTe KeJaHaTa NoCTpaHnU.
INDEX
HaTnchTe To3n 6yToH, 3a Da ce nokaxe HndekChHaTa CTpaHnua.
REVEAL
HaTnchTe To3n 6yToH, 3a Da BnDInTe cKpNtA HOpMaun, KaTo HaPnPmep peSeHn 3a 3araKn nn Pb3eHn. HaTnchTe gain, 3a Da n3TpneTe HOpMaunra ot DnCnner.
MIX
HaTnCHeTe To3n 6yToH, 3a Da HacNoXkTe TeJTeKCTa NO TeJIeBUNOHHaTa npOrpama.
CANCEL
HaTnCHTe To3n 6yToH, 3a Da Ce BbPHeTe BpeMeHHoB TeJIeBn3NoHHa IpOgPaMa, DOKaTO TbpcnteTeIeTEKCTHa CTpaHua. Korato npNKIOuN TbpcHeTo, HOMepbT Ha CtpaHuaTa ige Ce NOKaKe B rOpHna JIAVBbl Na ekpaHa. HaTnCHTe OTHOBO, 3a Da Ce BbPHeTe KbM CTpaHuaTa TeIeTEKCT.
3a6eIeKka:
- ChmKnte ca cmo 3a cnpaBka.
- HЯко модал'mоже да са HeBaIuIuHn 3a Hяко модал. Korato HaTucHete TaKbBa 6yToHn, Te HЯma da pearnap uHn ue ce noRbE ekpaH "Not available" ha ekpaHa.
Bluetooth Дистанционно упраз车联网е (RC B)
-
MOLUHOCT (O) HaTnCHHeTe, 3a Da BKNIOUHTe TeJIeBUN3Opa NII IN B PEXIM HA FOTOBHOCT.
-
MmKpooH TOBOpTe, 3a Na BbBeJeTe rJaca cn.
-
TOBOpTe, 3a Da BBBeTe Te Iaca CN. HABUNpaIe B MeHIOTo.
-
OKNoTbBpTe Te 36opa.
-
OBPATHOIN3ne3Te OT TekyIOTo MeHIO.
-
HAYANO HatncheTe To3n 6yToH, 3a Da noJyUte DoctbI IO HaayHaTa CTpaHua, MoXeTe Da n3NoJ3BaTe MpeXOBITE npINOxKeHna, MeuHnra PneBp T.H.
-
ByToH 3a 6bp3o Ha3aD («) HATnCHete 3a 6bp3o npeBbPtaHe Ha3aD.
8.Бbp30 Hanpei HATnchTe,3a da npemHHeTe Hanpei.
-
Cnla Ha 3Byka Harope /HaOJy (+/-) PeryInpaIte cnIata Ha 3Byka Harope nnHaOJy.
-
Play & Pause (▶)
HaTnCHeTe, 3a Да пеКьСеТe ВБЗпpon3ВexДаHETO,
HaTnCHeTe OTHOB, 3a Дa поДьЖИTe
ВБЗпpon3ВexДаHETO
11.ΓJIAC() HaTnchete,3a Da OTBOpnte yHKnUraTa 3a ΓIacOBO TbpceHe.MoKTe Da KlnKHeTe BbPxy Hero,3a Da TbpCnTe IecHO 6bp30 JIO6MOTO cN cbDbpxKaHne, Upe3 ROBopeHe KbM TeJebu3Opa TOBa KOeTO nCKate.
Kak da cBbpxKe Te yctpoiCTBOTO 3a dNCTaHcMOHHO ynpabJIeHne C Baunr TeJebu3Op
Ipei Da n3no3BaTe Bluetooth yctpoiCTBOTO 3a InctaHcNoHHO ynpabJIeHne, npbPO Tp6Ba da ro CbpxKeTe c TeJeBn3opa. CneBaunTe CTbnKu ca 3a BaSha cnpaBAka:
- HATNCHETe 6yToHa HOME,3a Da BJIe3eTe B HaayalHaTa CTpaHua;
2.Изберетe"HacpoKu"ВДОЛнЯлвгБлHa NaHaаJaHaTa CTpaHua. - BbBeNeTe "HactpoKn", 3a da n36epete "DuctahuOHHO akcecoapn";
4.И36epeTe"D06aBnHe Ha akcecoapu",3a Da BJe3eTe B INHTepFeiCa 3a TbpceHe Ha akcecoapu; - HATINCHETe 6yToHa HOME IN JIeBn8 6yToH 3aEINO 3a IN3BeCTHO BpeMe, JOKAto CE IIOBn 3ByKbT "Di"
- IpoBepete HIOCTaBeTe HOBOTO HMe Ha yCTPOINCTBOTo Ha INHTePfEInca 3a TbpceHe B TeJIeBn3Opa;
- Hatnche 6yToHa OK,3a da 3aNoHHe T Cbbp3BaHTo Ha yCTpoNCTBOTO C nCTaHnOHHO ynpabJeHne.
- CnEiCBp3BaHeTo, bluetooth nuctaHIOHHOTe cBbP3aHO ycneUHO, o e rTOBO 3a BaUeTo IOI3BaHe.
OCHOBHN ONEPAU
Kak da n3noJ3BaTe E cnpaBOHnK
E cnpaOuHnK a BrpaAeH b TBOr TeJeBn3Op mOKe da 6bIe Poka3aH Ha ekpaHa. 3a Da HayuTe NObue 3a yHKcHnTE Ha TeJeBn3Opa Cn, BNe3Te B pBkoBOdCTBOTO 3a eJekTPOHH KNHn, KaTO npeFneDaTe CNeHOTo.
3a6eIekka: CHIMKITE ce n3nOJI3BaT caMo 3a cnpaBka.

- Hatnche HOME 6yToHa 3a da BJe3HeTe Ha NaHaHaTa CTpaHua
- HatncheTe / 6yToHa 3a da n36epeTe cnncbka 'Apps'.
- HatncheTe 6yToHa 3a da n36peTe uKoHa, E cnpaBOuHnK
- HatncheTe OK 6yToHa 3a da BJe3HeTe B, E cnpabOuHnK', da 3a da npOBepnte nHctpykunTe Ha OCHOBHnTe yHKUIN
- CnEiHnTe 6yToHn Ha nIcTaHcNHOHOTo ynpaBHeHne ce n3NoJ3BaT, 3a da BV NOMORHaT da pa6OHTe c TeJIeBn3Opa B E cnpaBOuHnK'
| Нагоpe / Надолу / НаляBO / НадяCHO (Bутон 3A HABИГAUД) | Движete се наgope, надoly / наляBO / надяCHO за за изберete[element. |
| OK | ВъVEDete ИЗбразни[element] |
| ИзхoД/НаЗад,бутони | ИзлeЗTe OT tekuyся диспей улу ИЗлeЗTe OT e cnравочниka |
HcTaIpaTe 6aTepeYTa Ha dNCTaHcNoHHOTO
IocTaBete DBe AAA 6aTePnB OToJeHneTo 3a 6aTePnITE Ha NCTaHcNoHHTO ynpabHeHne, KaTo ce yBepTe, Ye OTROBaPte Ha MapKnPOBkTe Ha NOpAphOCTTa B OTDeJeHneTO.

3a6eIeKka: CHIMKInTe ce n3nOJI3BaT caMo 3a cnpaBka.
TV 6byToHn
3a6eJekka: CHIMKInTe ce n3noJ3BaT caMo 3a cnpaBka.
- BpeKIM Ha roTOBHOCT,HaTNCHeTe,3a Da BKJIIOUHTe TeJIeBUN3Opa.
- Korato TeJIeBn3OpbTe BkIIOueH HrMa OSD.
HaTnCHTe Kpatko 6yToHa 3a DoCTbn Do MEHIOTo Ha H3TOUHNka.
HaTnCHete KpaTKO 6yToHa OTHOBo 3a nI36epTe JekAHHN I3TOHnK.
IbJIroHaTnCHeTe,3aJaBkJIIOuHTe TeJIeBN3OpaBpeXUMHa rTOOBHOCT.
OCHOBHA ONEPAÇΥA
TepmnaJIaI
USB
USB port.

UHPOB AYUNHO N3XOJ
I3noJ3BaIte SPDIF ka6eI, 3a da n3BeJeTe aydno CnHaHa Ha TeJIeBn3Opa CN B CbBMecTm aydno peCnBb.

HDMI
CbpxketeHDMIBxoOeHcHnIOTn3TouHnK Ha cHnI,Ha npImep DVD.

KOMN03HTEH B
CbpxkTe ayuio n Bnueo cnHaJ ot n3ToHnK Ha cnHaJ, Hanpimep DVD.
LAN
MpexOB npT.
KAHAJI NT E B
CbpxKeTe Koakcnaien Ka6eJ, 3a da npneMaTe CnHaJ ON aHTeHaTa nn Ka6eJa.

EARPHONE
BncoKOrOBOpnteJIte 6bDaT n3KnHoyehN, KOrato cnUaJKNTe.

OBCJLYXBAHE
IopT 3a OTcTaPaHЯBaHe Ha rpeuKn cMo 3a TEXHNiTe.
3a6eJexka:
- CHIMKITE ca camo 3a cnpaBka
- Haryon TepMNHaN MoKe da ce pa3JIuHabT OT pa3JIuHHTe peHOnn Nm MOeJn MoJy, B3eMeTe peaJIHn Cn TeJeBn3Op KaTO CTaHApTeH
OTCTPAHЯBAHE HA ППОБЛЕМN
Ipei Da ce oadte Ha cepBn3eH TexHK, MoJ, npOBepTe cJeHaTa TaBnua 3a Bb3MOxHa
piuHa 3a CmITOMN HAKON peWeHn.
- Gore/Dolje/Lijevo/Desno
USCITA AUDIO DIGITALE
Ce odHeCyBa Ha noIroTBeHOCT.
Ce odHecyBa Ha BKJIYUeHA cTpyja.
Ce odHecyBa Ha onaceH hanoH.
- Ппдуншдувашие 3a anapat wTO coDPxN BATEPIN BO ΦOPMA HA KONQUE (ynatctbaT a noDOLy Baxkat cmo 3a anapat wTO coDPxN batepjuBa bo φopma Ha konque wTO moKe da ja ja 3amEHn KOpNCHKOT).
- PNEU PENEYBAHbE: He roJIaTe rN 6aTePnHTe, noCTOn onaCHocT oXemncka peakuJa (rIMa BO daleuHcKnot ynpabvBauch) OBOJ npOn3BOd coOpKu nnlockata 6aTePnJa BO fOpMa Ha KOnue. DoKoJIky ce npOrOJIta nILOCKaTATA 6aTePnJa BO fOpMa Ha KOnue, MoXe da npEn3BnKa TeWK BHaTpeuHn u3ropeHnCz 3a cAmO 2 qaca N da npUnHN cMpT. YbajTe rN HOBIne N KopncTeHNTe 6aTePnHn HAcTpHa oN deua. DOKoJIky npErpaDAta 3a 6aTePnHn He ce 3aTBopa 6e3BeiHO, He KopNCTeTe rO nobKe IpnON3BOJOT N dpXeTe rO HAcTpHa oN deua. Ako MscInTe DeKa 6aTePnJaTa 6nla npOrOJItHa nJIn CTaBeHa BO HeKOJ DeI ON TeJATO, BeDaHs Nobapajte MeDuINHcKa NOMoW.
-Диpeктва WEEE

TnPpAunHNo oPpIaHe Ha OBOJ npOn3BOD. OBaa 03HaKa 03NaUyBa IeKa OBOJ npOn3BOD He Tpe6a
Te oPpIa 3aeIHO co DpyrOTo r6pe od IOMaKInHCTBOTo Hn3 ceJa EY. 3a da cnpueHte eBeHTyaJIHa
Ta Ha OKoJIiHaTaNII HApUsyBaHe Ha OOBekOBTO 3dpaJBe O HeKOHTpOJIpaHO nCpplaHe
ID, peuNKIpajTe ro BHNMaTeJHO 3a Da npOMOBipate ODpxJIbBO NOBtOPHO KopNCTeHe
BaTepeNJalHnTe pecypcn. 3a Da Ro BpaITNe KOpNCTeHOT ypeD, KopNCTeTe rN IOBpaTHnTe N
HpHnTe CnCTeMn INI KOHTaKTnpajTe CO INuCaTa OD npOdaXHOTo MeCTO OD KaDe UTo CTe rO
Je npOn3BODOT. The MoXaT Da ce NorpnXaT 3a ekOJIoWko peuNKIpapHe.

CAUTION
RISK OF ELECTRIC SHOCK DO NOT OPEN

- Oba 3HaKue co MoJIb a BO paMHocTpaH TpnafoJHnK CnyKn Da FO ONOMEHe KOpNCHKOT 3a npncycTBo Ha HeN3OJInpaH „OnaceH HanoH" BO OKIOnOT Ha anapaTOT KoJ MOKe da NMa DOBOJHo CINa 3a Da npetCTaByBa OnacHOCT OD CTpyeH yAp.
3a da ce haama npu3nKOT od ctpyeH yap. He otcpaHyBaJTe ro KaNAKOT (nIIN 3aHNOT ne). BHaTpe Hema dJeIOBn 3a cepBncuPaHe. O6paTeCe kaj KBaJIuNkUyBaH cepBvceH nepcoHaI. - I3BnHnKOT BO paMHocTpaH TpnaRoiHNK CnyKn Da rO ONOMeHe KOpNCnKOT 3a npncycTBoHa BaXn yNaTCTBa 3a pa6oTeHbe N oDpxKyBaHbE BO npNJIOKeHaTa JInTEpaTypa.
ПОЗИЦИОНИРАБЕ HA TEЛEBN3OPOT
- IHCTaInpajTe ro ekpaHot Ha cBpcta XOpn3OHTaHa NOBpHHa, KaKo Ha npimep Maca. 3a npobetpyBaHe, octabeTe 6apem 10 cm cNo6oJen npocToP okoly TeJeBn3OpOT. 3a da cnpeuHte HEnpOniChn nI He6e36eHN CNTyaUH, He CTabajTe HnKaKBn ppeMeTb BP3 TeJeBn3OpOT. OBoj anapaT MoKeJa Ce KOpNCrN BO TpONcKn n/IIu yMepeHn KJIIMn.
- PnucBpctyBaHe Ha 3aHnOT DeI Ha KyKnUTeTo Ha snI, DOnHaTa Cnka ce pa3nkyBa od BnCTnHcKnot npeMomet 3aToa e cAmo pepepeHTe npiKa3. (cAmO 3a HeKoN perNoH).

Hnkoraaw He ctabajTe ro TeJeBn3OpOT Ha HecTa6uJHo MeCTo. TeJeBn3OpOT MOMKe da naHe i Da npedn3Bnka cepno3Ha nobpeDa nn cmpt. Moke da ce cnpeaT MHOry NobpeDi, ocObeHo kaj Deca, aKO Ce npe3emAT HeKON eHNOCTaBnMepKn Ha npetnaJIbOcT, KaKO wTO CE:
- KopncTeHe kyTn nn CTaNb npenopayan O nd pOn3BODnteJOT Ha TeJeBu3OpOT.
-Да ce kopnstn caMo Me6eHa KoJ MoKe 6e36eHNo Da ce notnpa TeIeBn3OpoT. - TorgnkeTe ce TeJIeBn3OpOT da He cToI oBeceH ha pa6oBnte O, nTnOpeH Me6eJ.
He ctabajte ro TeleBn3OpOT Ha Bucok Me6eI (Ha npimep opmapu n noJnCz 3a KnHr) 6e3 da rna 3aucbpcntte m6eJot n TeleBn3OpOT Ha COODBeTHa NOTKpeNa.
He nocTaBajTe ro TeIeBn3OpOT ha aIiUta IIN pyrMaTepujajn NOMEy Hero n NOTIOpHNOt Me6en. - Objachete NM Ha Deuata 3a Onachoctte OD KaCyBaHe Ha Me6eIOT 3a Da ro DocnHAT TeJeBn3OpOT Nn HerOBnTe KOHTpOJI.
Ako ro 3aipjxbyate n NomectybaTe noCToeuknot TeJeBn3Op, Tpe6a da ce 3eMaT npednropehaBeHne npenopapkn (cAmo 3a TeJeBn3Op notekok od 7 kg).
3aedno co TeJebn3OpOT MoKe Da Ce KopnCTn 136open Snden DpKa. PpOBepTe kaj IokaHnOt npOdaBaau dannmHa Snden DpKaU KoJ ro 3aIOBOJyBa cTaNapDTo VESA KojuTo Ro KopnCTn Baunot moeJ Ha TeJebn3Op. BHMateJHo npKauTe Ro SndHnOT DpKaU 3a MOHTnpaHe Ha 3aHaTa CtpaHa Od TeJebn3OpOT. Noctabete Ro SndHnOT DpKaU 3a MOHTnpaHe Ha CBpCT SnHOPMaIIHO Ha NODOT. Ako Ro npKauYbATE TeJebn3OpOT Ha dpyrI rpaJeXHi MaTePnJaII, KOHCytnpajTe ce Co KBaJINoNkYBaHN JNuca 3a INHCTaJIauNJa Ha DpKaUOT.
3aedno co dpkaot ke 6nad npniloxeHn
deTalHH ynatCTBa. KopncTeTe snden dpxka 3a
MOHTINpapahe co koj ypeDOT ke 6nde COOdBETHO
PnucBpCTeH ha sNDOT n CO DOBOJHO npocToP 3a
NOBp3yBaHe Ha npYn HADBopeuHN ypeN.

3a noodeCyBaHbe Ha jaHHaTa Ha 3ByKOT.
15.CJIeIHa HJIN INPEIXOJHA IPOPGAMA (PR+/PR-)
3a MeHyBaHHe Ha nporpamata Ha cIeHa IIN npTeXoHa.
16. EneKtpoHcKn nporpamckn BODn (EPG) nptncheTe 3a da ce npikkakat MOMeHTaJIHnTe EPG nHΦopMaun BO DTV peXm.
17. PPEBOI (SUBTITLE) 3a OBO3MOxyBaHe/ HeOBO3MOxMyBaHe Ha npeBoI Bo DTV/USB peXIM.
18.NICAM I/II PpntncHeTe 3a da ro n36epeTe nocakyBaHnOu H3Ne3 Ha 3ByK BO 3aBnCHOCT OJ KaHaJNotKoJ ce EMtYBa.
19.AD pntncheTe 3a da ro BKnyuTe aydno onncot. HapaTopoT 3a cIe nn Iua a nn Iua co OHTeH Bn Ke ONuWe wTO ce cnuyBa Ha ekpaHot.
- 3yMpaHbE (Zoom) 3a npomeHa Ha oOpMaTOT Ha cnKaTa.
21.FAV3a npereIeHa omJIeHnte,03HaueHn KaHaJI.
22.Oboehn konuHbApntncheTe 3a np30 da dojdeTe oOpeDeHN yHKunn BO TV nI DTV pexm. - KoHTpOJIHn KOnUHbA 3a peNpOduKuJa
PnTncTe 3a da nay3npate penpoDyKuJa. Notoa npTncTe NOBTOpHO 3a da npOdoJXKe co peNopOdyKuJa
Stop (■) 3a da npctaHete co penopoDyKuJa.
3a 6p3o npemotyBaHe Ha3aD (
PnTCHeTe 3a 6p3o da ja npemOTate coDpxHata HaHa3a.
6p3o npemOtYaBaHne Happei
PnTtncHe 3a 6p30 da npemOtate Hapei.
- KOHTPOJIHN KONUHbA 3A TEJETEKCT TEJETEKCT (TEXT)
PnTcHete 3a da Bne3eTe nn n3Je3eTe oD TeJTeKCT MEHHTO.
(ΓΟJIEMNHSA) (SIZE)
3a 3roJemyBaHBe Ha npka3OT Ha TeJeTeKCT:
PnTNCHeTe ro OBA KOnue eHaaw 3a da ja 3roJeMnte RopHata noLOBnHa oJ ekpaHot. PnTNCHeTe ro OBA KOnue NOBTOPOHO 3a da ja 3roJeMnte DOJHaTa noLOBnHa oJ ekpaHot. PnTNCHeTe ro KOnueTo NOBTOPOHO 3a da Ce BpATnte BO HOpMaJIHa RoJeMnHa Ha ekpaHot.
3AДРЖУBAHБ(HOLD)
PnTnCHTe 3a da ja 3aJpxKnte TeIeTeKCT cTpaHaTa Ha ekpanot 6ez axypnpaHa n npomeHn.3a da ro npeknHeTe 3aJpxyBaHbETo Ha cTpaHaTa, NOBTOpHO npTnCHTe rO nCTOTO KOnue.
IIOIDCTPAHILUA(SUB-PAGE)
PnTnCHTe ro OBA KOJue 3a Da BJIe3eTe NII INI3Je3eTe OD peKIMOT NOCTpaHnUa (aKO NOCTpaHnUaTa e OBO3MOxEHa). PnTnCHTe LpBeHo/3eJeHo KOnue 3a da ja Ondepete NoCaKyBaHaTa NOCTpaHnUa.
INDEKC (INDEX)
3a npika3 Ha uHneKC cTpaHncaTa, npNTncHeTe ro Oba KOnue.
CKPNEHNIODATOLN(REVEAL)
PnTCHETe ro Oba KOnue 3a da ce npokaxatCKpneHnte HOpMaun, KaKo wTo ce peSeHna Ha3araTkn NIn CNoKyBaJKN. PnTCHETe NOBTOPOHO 3a da ja OTCTpaHNTe HOpMaunjata Od ekpaHOT.
KOMBUNHUPAH PUNKA3 (MIX)
PnTncHeTe ro Oba konue 3a da do6ne Te npka3 Ha TeJeTeKCT npeky TB nporpaMaTa. PnTncHeTe NOBTOPOHO 3a da ce BpaNTe BO HopMaJIeH TeJeTeKCT peKM.
OTKAZIVANJE (CANCEL)
PnTCHTe ro OBA KOnue 3a npNBpeMeHO da ce BpaNTe Ha TB nporpamata Doideka ja 6apate TeIeTeKCT cTpaHATA. Kora npe6apyBaHbeto e 3aBpseHo, 6pojOT Ha cTpaHATA ye 6nJe npKaJahn Ha rOpHnOT JEB DeJ Od ekpaHOT. PnTCHTe ro NcTOTO KOnue NOBTOPOHO 3a Da ce BpaNTe Ha TeJIeTEKCT cTpaHATA.
Hanomeha:
1.Clnknte ce cmo 3a pepepeHua.
2. Hekon konyuHa moKe da 6nDaT heBaXeKu 3a Hekon MoJeN. Kora Ke r npitncheTe TaKBrTe KonuHa, Hema da pearnpaat nn Ha ekpaHot Ke ce nojabn Hatncot "Not available" (He e DoctanHO).
Bluetoothдалецнскупаввач (RC B)

- POWER (BKJYUyBAHbE) IpnTnucHeTe ro 3a BKJyBaHBe Ha TeJIeBn3OpOT nnn 3a aKtIbnpaHBe Ha standby pexNIMOT.
- Microphone(Mukpooh) 36opybaite 3a da rBheceTe noaTOuTe co rJaac.
3.Up/Down/Left/Right(Tope/Dony/JeBO/decho) HacouybajTe ro MeHnTo. - OK NotBpDeTe ro n36opot.
- BACK(HA3A) ⅠЗлесеOD MОмЕТаJIHOTOMeHn.
- HOME(Noctok)
IpnucheToOBAKoNe3aJaPncTaNTeKOHNoeTHaTcTaHnca.MoxTe DaKopuncteMpexHn annkaun,MeNjaPiEEPHTH. - Fast Backward Button («) (ПпсмOTуВа№ He HaHa3aД) ПптUCHETe 3a ПпсмOTуВа№ He HaHa3aД.
- Fast Forward () (PpeMoTyBaHbe HaHaNpei) PtntucHeTe 3a PpeMoTyBaHbe HaHaNpei.
- Volume Up/Down (+/-) (3roJemyBaHBe/HaMaIyBaHBe Ha TOHOT (+/-)) 3roJemTe rO HJIu HAJaTe FO TOHOT.
- Play & Pause (▶II)
(Penpoукиja и пayза) Ппитишисте за пайсяраль, на повторно за пождочьага на penpoукида. - VOICE (TJAC) ()
Причс悔е Го 3a OTBOPаьe Ha Функцида ГлacOBHOnpe6apyBaHBe.MoXeTe Da KlnKHeTe Ha Oba konYe 3a eДнoctabHNo Iбр3O npe6apyBaHBe Ha BaWata OMnJIeHaCoDPxNHa Taka WTO Ke KaXeTe Ha Tlac WTo CaKaTe.
Kako da ro cnapnte Bluetooth daleuHcknoT ynpaByBaU co Baunot TeJeBn3Op
Ipeynotpe6a Bluetooth daJIeunHcknOT ynpaByBaTpe6a da ro cnapnte co TeJeBn3opoT. CneHNTE ueKOpn ce 3a pepepeHua:
- PnTnCHTe To KOnHeTo HOMe 3a BnE3 Ha NoeTHaTa CtpaHua;
2.Изберетe"Settings"(IодсуBaHa) BOДОЛHNot JEB aRoi Ha NOUeTHaTcTpaHua; - BJIe3eTe BO "Settings" 3a Na n36epete Remote & Accessories"(JaIeunHcN ynpabyBaU mdoJHnTeHa onpeMa");
- 36epete "Add accessories" (DdaTe DonohnHa onpema") 3a BJe3 BO nHTepjc 3a npebapyBaHe Ha donoJIHnTeHaTa onpema;
- PnTnCHHe Tn BO nCTO BpeMe KOnuHbTa HOMEnLeft n 3aJpxKeTe rN cIdoeka He ro CnyuHHe T3ByKOT "Dn";
- IpoBepete ro n36epete ime 3a Baunot Bluetooth daJeHHckn ynpabyBaU BO nHTepcjc 3a npebapyBaHe Ha TeJIeBn3OpOT;
7.ПиТиСнeTe ro konueTo OK 3a cnapyBaHé HaДалунсКnot ynpaByBaU. - IIO cnapyBaHbTo Bluetooth daJIeunHcKnOT ynpaBvBaue yCneuHO NOBp3aH 3a yNtpe6a.
OCHOBHA PABOTA
Kako ce kopincteJeKtpoHcKOTO ynataCTBO
EneKtpoHCKOTO yNaTCTBO e DeI od Baunot TeJeBn3Op
mOKe Da ce npkaKe Ha ekpaHOT. 3a NobeKe
HHOpMaun 3a KapakTePncTnKnte Ha Baunot
TeJeBn3Op npctanete KOH BaWeto eNeKtpoHCKOTO
yNaTCTBO Ha CJIeHNOB HauH.
Press to select the desired picture aspect ratio.
- FAV Press to view your assigned favorite channels. 20.
