CT 1900 - Baby monitors Comtel - Free user manual and instructions
Find the device manual for free CT 1900 Comtel in PDF.
| Product type | Baby monitor |
| Brand | Comtel |
| Model | CT 1900 |
| Operating frequency | 864 MHz |
| Channels | 2 channels (K1: 864.850 MHz, K2: 864.864 MHz) |
| Digital coding | 16 digital codes selectable via DIP switch |
| Maximum range | 300 meters in open field (optimal conditions) |
| Power supply (transmitter) | 3.6 V DC: 3 micro AAA rechargeable batteries (included) or 3 V DC / 100 mA mains adapter |
| Power supply (receiver) | 3.6 V DC: 3 micro AAA rechargeable batteries (included) or 3 V DC / 150 mA mains adapter |
| Battery type | Ni-MH micro AAA rechargeable batteries (3 per device, 6 included) or AAA alkaline batteries |
| Main functions | Audio monitoring, sensitivity adjustment on the transmitter, volume adjustment on the receiver, LED light display, optical and audible range alarm, automatic power saving mode |
| Safety | Anti-interference digital coding, range alarm, do not place the transmitter in the baby's crib |
| Maintenance | Clean with a soft, dry cloth, without harsh detergents |
| Warranty | 1 year from the date of purchase |
Frequently Asked Questions - CT 1900 Comtel
User questions about CT 1900 Comtel
0 question about this device. Answer the ones you know or ask your own.
Ask a new question about this device
Download the instructions for your Baby monitors in PDF format for free! Find your manual CT 1900 - Comtel and take your electronic device back in hand. On this page are published all the documents necessary for the use of your device. CT 1900 by Comtel.
USER MANUAL CT 1900 Comtel
ITS Testing & Certification Ltd.
Operating instructions 10

Mode d'emploi 16

Operating instructions
Content
- Scope of delivery 10
- Safety notes 10
- Further requirements 11
4.Before start-up 11
4.1.Setting the digital code 11
4.2. Inserting the rechargeable batteries ... 11 - Initial operation 12
5.1. Transmitter 12
5.2. Receiver 12 - Functional test 13
- Battery monitoring 13
B. Charging the rechargeable batteries . 13
9.1. Charging the receiver battery 13
8.2. Charing the transmitter battery 13 - Consumer note 13
- 864 MHz technology 13
- Digital coding 13
- Digital code combination table 14
- Range 14
- Range alarm 14
- Belt clip/suspension arrangement ... 14
- Tips und tricks in case of problems ... 14
- Important information 15
- Notes on Disposal 15
- Care and warranty. 15
- Technical data 15
CT-1900 is ideally suitable for monitoring small children, babies or persons in need of care.
The babynote unit works on two different frequencies (channels) in the 864 MHz frequency range and therefore offers you the comfort of optimal transmission quality without annoying cables and disturbing CB- and amateur radio interference in a periphery of up to 600m (under optimal conditions).
The unit can be operated independent of mains supply with the enclosed Micro rechargeable batteries AAA or with the enclosed power packs.
The rechargeable batteries must remain in the devices, if you decide to use the power packs.
Scope of delivery
-1x transmitter
-1xreceiver
-2xpowerpacks
- 1 x charging station for receiver
- 6 x Micro rechargeable batteries AAA (3 units for transmitter and/or receiver each
- 1x operating instructions
Safety notes
Martyr claims concerning damages are void, if they are caused by non-observation of these operating instructions! We are not responsible for resulting damages! We are not responsible for damage to property or bodily injuries, which are caused by inappropriate handling or non-observation of the safety notes. The warranty claim is void in such cases.

Please read the operating instructions before using the babyphone!
The operating instructions are an integral part of the product. They contain important notes on start-up and handling of the device. Keep the enclosed operating instructions for renewed reading!
They must be handed over when passing the levice on to third persons.
Further requirements
- 864 MHz frequency range for optimal transmission quality
- continuous transmitter sensitivity adjustment
- continuous receiver volume control
- 2 different channels adjustable
- 16 different digital codes adjustable as additional protection from radio interference
battery monitoring - acoustic and visual receiver range alarm
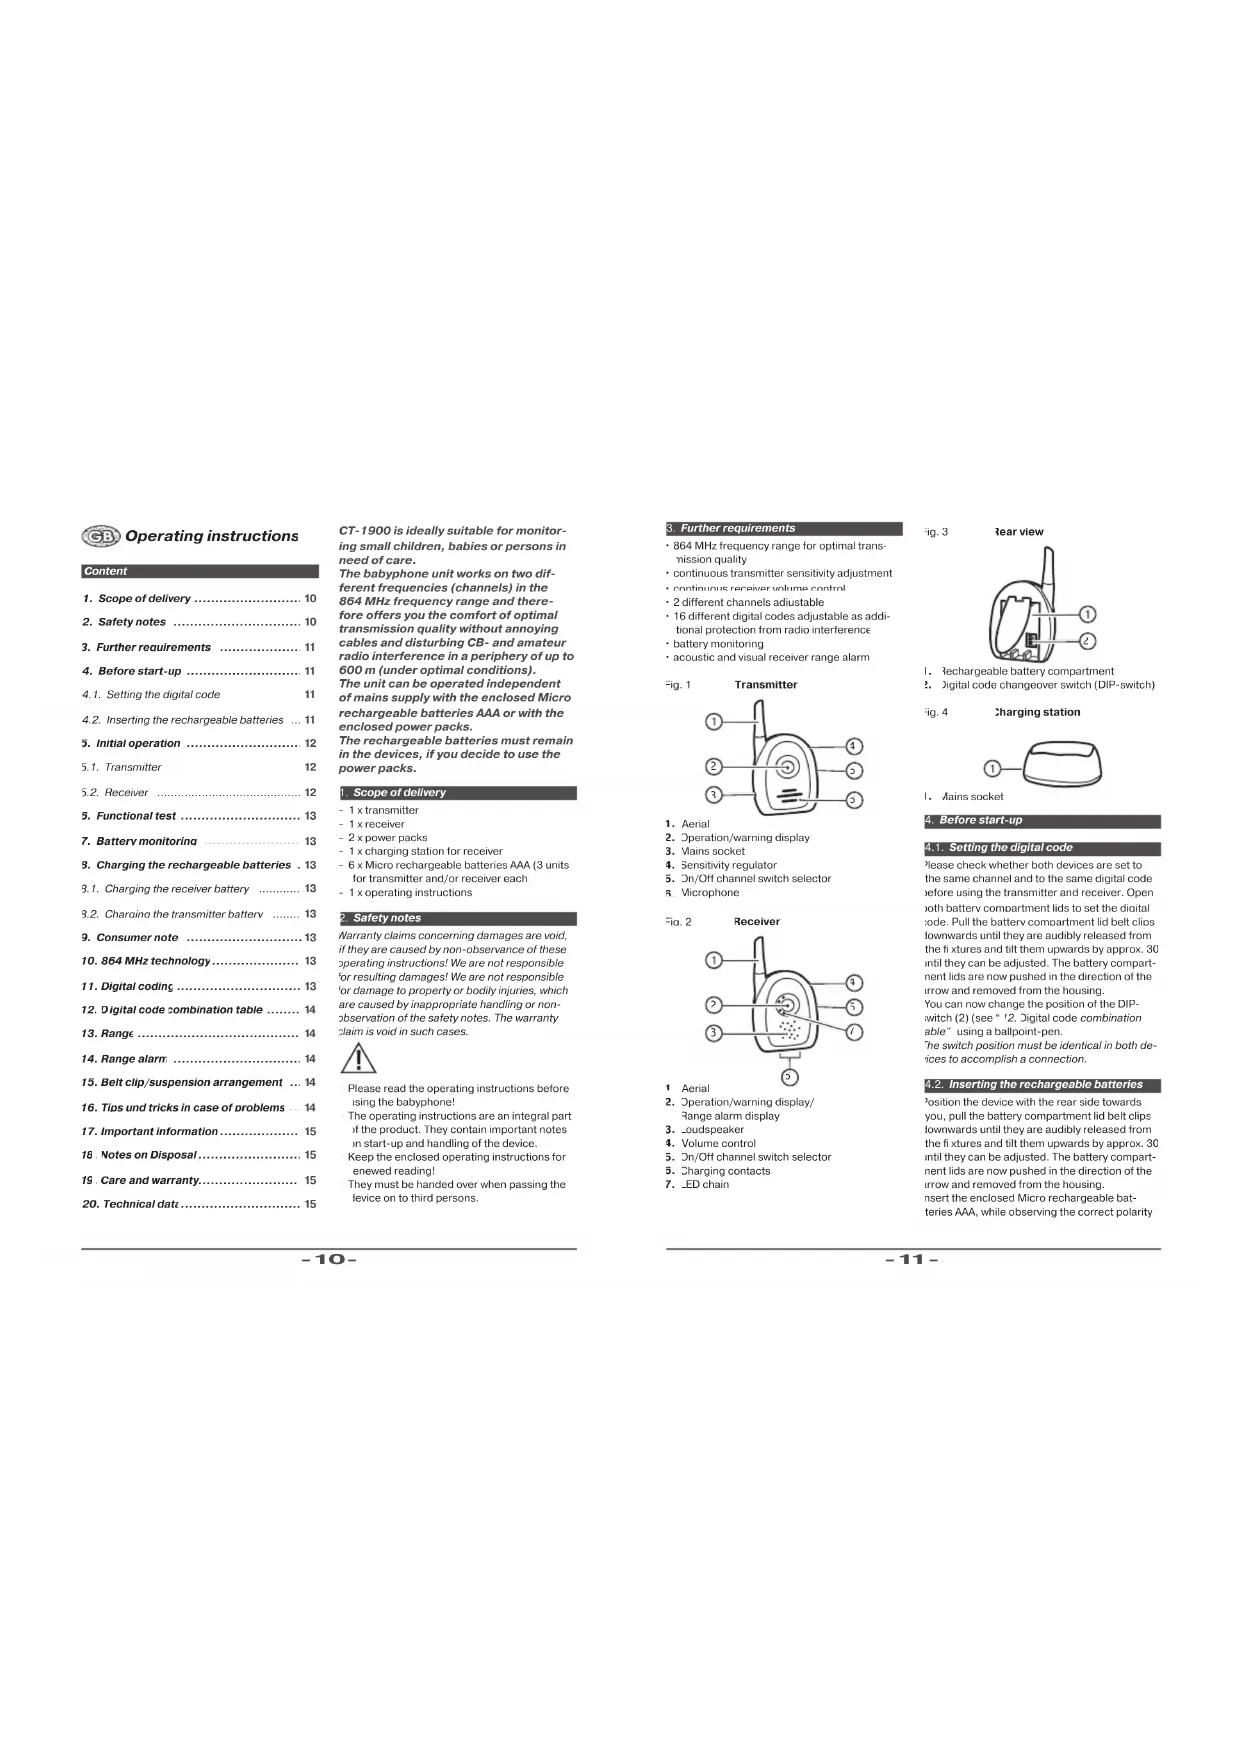
-ig.1
Transmitter
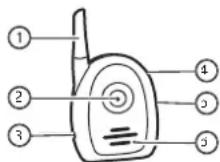
- Aerial
- Operation/warning display
- Mains socket
- Sensitivity regulator
- On/Off channel switch selector
Microphone
-ia.2
Receiver
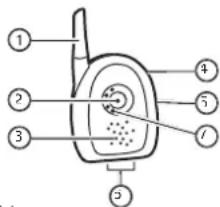
1 Aerial
2. Operation/warning display/
Range alarm display
3. Loudspeaker
4. Volume control
5. On/Off channel switch selector
3. Charging contacts
7. LED chain
Fig. 3
ear view
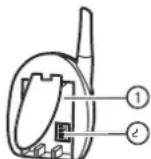
I. Rechargeable battery compartment
? Digital code changeover switch (DIP-switch)
Fig. 4
Charging station
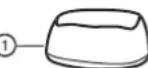
- Aains socket
4. Before start-up
Setting the digital code
Please check whether both devices are set to the same channel and to the same digital code before using the transmitter and receiver. Open both battery compartment lids to set the digital code. Pull the battery compartment lid belt clips downwards until they are audibly released from the fixtures and tilt them upwards by approx. 30 until they can be adjusted. The battery compartment lids are now pushed in the direction of the arrow and removed from the housing.
You can now change the position of the DIP-witch (2) (see '2. Digital code combination able' using a ballpoint-pen.
The switch position must be identical in both devices to accomplish a connection.
Inserting the rechargeable batteries
Position the device with the rear side towards you, pull the battery compartment lid belt clips downwards until they are audibly released from the fixtures and tilt them upwards by approx. 30 until they can be adjusted. The battery compartment lids are now pushed in the direction of the arrow and removed from the housing. Insert the enclosed Micro rechargeable batteries AAA, while observing the correct polarity
+ / - , into the provided recesses (see housing.
embossment).
Now close the battery compartment lid and push the clips into the initial position.
5. Initial operation
5.1. Transmitter
- Position the transmitter vertically in the room to be supervised to ensure optimal transmission. The front of the device should if possible be directed towards the person to be supervised (e.g. your baby). Furthermore ensure that the noises and/or the sounds are not disturbed by obstacles
- Process as described in 3. Charging the rechargeable batteries for accumulator operation.
- Connect one of the two enclosed power backs to the transmitter socket (3), to operate the device by mains supply
- Connect the power pack to the mains (check beforehand, whether the performance data on the rating plate of the power pack correspond to your mains supply data).
- The device is switched on and one of the two transmission channels selected with the transmitter slide switch (5). The device transmits on channel 1 in the position "K1" and on channel 2 in the position "K2". The transmitter sensitivity can be set according to your needs with help of the sensitivity regulator (4)
- A signal transmitted by the transmitter is displayed on the illuminated green transmission indicator (2).
- The transmitter automatically switches into the energy saving mode, if no more noises are recorded. This is indicated by the illuminated red transmission indicator (2)
Note! In order to avoid malfunctions during the use of the power pack leave the rechargeable batteries in the device.
The operational status indicator lights up red as soon as the transmitter is connected to the provided power pack, if the device is switched off, provided that there are no rechargeable batteries in the device.
We recommend observing a distance of at least 1m between transmitter and baby for safe
y reasons and to ensure optimal noise transmission.
5.2. Receiver
- Position the receiver vertically in your vicinity
- You can operate the receiver either with the enclosed charging station from your mains supply or with the enclosed rechargeable batteries.
- Proceed as described in "9. Charging the rechargeable batteries' for accumulator operation.
- Connect one of the two enclosed power backs to the mains socket of the charging station, if you want to operate the device by charging station.
- The device is switched on and one of the two transmission channels selected with the slide switch (5). The device receives on channel 1 in the position "K1" and on channel 2 in the position "K2". The receiver volume can be set according to your needs with help of the volume control (4).
- The LED (2) lights up red in the ready status as soon as the receiver is connected to the charging station. The LED (2) lights up green, if the device receives a signal. The receiver s furthermore provided with a LED chain (7). The LED chain not only acoustically, but also visually signals a transmitted noise. The number of lit up diodes corresponds to the amplitude of the received noise.
- The receiver automatically goes into the energy saving mode some seconds after the device has ceased to receive any signals. This is indicated by the illuminated red reception indicator (2).
Vote! The rechargeable batteries must stay in the receiver when using the charger station: 'the device does not work without rechargeable batteries!'

Further original power packs can be ordered with the enclosed order card.
The operational status indicator (2) fl asher: alternatively red and green during reception when the receiver, which receives a signal from the transmitter, is operated via the charging station with discharged rechargeable batteries.
The f ashing on the charging station does no effect the reception range.
Functional test
It is very important to check the function of the babynophone prior to initial use. Position the transmitter in the required room and e.g. turn a radio on at low volume. I then set the transmitter sensitivity regulator (4) to the required responsivity. The further you turn the regulator upwards, the more sensitive the transmitter. Now walk through your rooms with the receiver and set the desired volume.
Battery monitoring
Insufficient transmitter and receiver voltage will be indicated during rechargeable battery or battery operation. The transmitter and receiver operational status indicators (2) flash red, if the operating voltage is too low. The receiver additionally sounds an acoustic signal, if the rechargeable batteries are discharged.
Charging the rechargeable batteries
The rechargeable batteries provided for the transmitter and receiver must be fully charged before initial use.
Caution! Only exchange defective rechargeable batteries for original rechargeable batterios. Normal Micro rechargeable batteries AAA cannot be charged in these babyphones.

Further original rechargeable batteries can be ordered with the enclosec order card
We recommend operating both devices with the provided power packs, especially for night monitoring, to ensure perfect monitoring. It could otherwise happen that the battery signal is triggered according to the charging state during normal rechargeable battery operation during the night and you are woken up.
Charging the receiver battery
- Charge the receiver batteries by connecting a power pack to the charging station (1).
- Charging starts automatically as soon as you have connected the power pack to the charging station and the receiver is in the charging
station. The charging procedure is indicated by the green flashing LED (2)
The charging time is approximately 10 hours with completely discharged rechargeable batteries and switched off device. The charging time doubles, if the receiver is activated.
Overloading the rechargeable batteries is technically impossible.
- The LED (2) extinguishes after charging (when the device is switched off).
8.2. Charging the transmitter battery
- Charge the transmitter batteries by connect a power pack to the transmitter socket (3).
- Charging starts automatically as soon as you have connected the power back to the transmitter. The charging procedure is indicated by the green fl ashing LED (2)
The charging time is approximately 10 hours with completely discharged rechargeable batteries and switched off device. The charging time doubles, if the transmitter is activated. - Overloading the rechargeable batteries is technically impossible.
- The LED (2) switches to red after charging when the device is switched off).
9. Consumer note
Please note that all NiCd and NiM rechargeable batteries only achieve their full capacity after 4-6 charging cycles.
10.864 MHz technology
The unit operates in the 864 MHz frequency range and thereby eliminates the possibility of disturbances by CB and amateur radio operators.
11. Digital coding
The radio security and the freedom from interference of this babyphone are additionally improved by a non-audible and proven digital coded signal. The coding causes the receiver to only switch itself on, if noises are transmitted from your own transmitter e.g. the supervised baby. C1-1900 has 16 different digital codes available, which you can individually adjust to your environment with the DIP switches (see h g.3). Receiver activation by other transmitters or other baby monitoring systems is therefore almost impossible.
You have the additional possibility of switching to another channel in the rare case that the transmission is disturbed by other signal sources in the 864 MHz frequency range.
- Digital code combination table
| Digital code | Switch 1 | Switch 2 | Switch 3 | Switch 4 |
| Code 1 | On | On | On | On |
| Code 2 | On | On | On | Off |
| Code 3 | On | On | Off | On |
| Code 4 | On | On | Off | Off |
| Code 5 | On | Off | On | On |
| Code 6 | On | Off | On | Off |
| Code 7 | On | Off | Off | On |
| Code 8 | On | Off | Off | Off |
| Code 9 | Off | On | On | On |
| Code 10 | Off | On | On | Off |
| Code 11 | Off | On | Off | On |
| Code 12 | Off | On | Off | Off |
| Code 13 | Off | Off | On | On |
| Code 14 | Off | Off | On | Off |
| Code 15 | Off | Off | Off | On |
| Code 16 | Off | Off | Off | Off |
13. Range
You must test the range of your babyphone in your environment due to the physical propagation conditions of radio waves. A range up to 300m can be achieved in optimal conditions. However the actual range essentially depends on local conditions. E.g. the transmitter location, constructional and atmospheric conditions must be taken into consideration. The range can additionally be reduced, if you hold the receiver in your hands and enclose it.
14. Range alarm
The receiver sounds an acoustic range signal approx. 7 seconds after disconnection, if the receiver is outside of the transmitter range. The acoustic receiver range alarm is also furthermore triggered it: - the transmitter is switched off,
- the transmitter is set to a different channel than the receiver
- the transmitter is set to a different digital code than the receiver
- the transmitter is only working with discharged rechargeable batteries.
15. Belt clip/suspension arrangement
The transmitter and receiver can be attached to your belt with the rear belt clips or be fastened to a wall with the suspension arrangement (with suitable fastening material).
16. Tips und tricks in case of problems
- Check the power supply, if either the transmitter or receiver does not work.
- Check the digital code and the transmission/eception channels of both devices (Connection is only possible if these correspond), if no transmission between transmitter and receiver can be ascertained.
- A continuous beep in the receiver means that you have left the transmitter range. Please reduce the distance between transmitter and receiver.
- Since the CT-1900 is a radio device, it cannot be ruled out that you hear conversations of other radio participants and that other radio participants hear the conversations or noises your transmitter emanates. The CT-1900 how ever uses transmission frequencies, which should exclude such disturbances to a large extent. Switch to another channel (frequency) and/or change the digital code of your babyshone, if you should nevertheless determine such disturbances in exceptional cases.
- Place the transmitter and receiver upright to: ensure optimal transmission/reception conditions
- You might hear a whistle (feedback, acoustic feedback), if the receiver is located too near to the transmitter and the volume is too high. To avoid this increase the distance between transmitter and receiver!
- Too weak batteries can cause the receiver to emanate a hiss or trigger the range alarm.
Please note that there is no general protection against eavesdropping in the 864 MHz frequency range.
17. Important information
Only use the original power packs to operate the devices. Contact your dealer, if one of the power packs should become defective. The use of other power packs can substantially damage the devices, if the polarity (+/-) and voltage are applied incorrectly.
- A detective power pack cannot be repaired. The connection cable cannot be exchanged; the power pack must be disposed immediately.
- Do not pull the power packs out of the sockets and out of the babyphone by the cables; remove the power packs by holding the plugs and/or housing and then remove the power pack to avoid breaking or tearing a cable.
- Do not place the transmitter in the crib or olav pen.
- Always install the devices out of range of small children.
- The transmission and reception performance is somewhat less in comparison to power back operation, if one or both devices are operated with rechargeable batteries.
- Two power packs are enclosed so that you can connect both the transmitter and receiver to a mains socket (230 Volt/50 Hz).
The active receiver will hiss for a few seconds. f you fi rst switch the transmitter off when you don't need the devices anymore. The receiver tries to establish contact with the transmitter n this period. The receiver switches automatically to the range signal after some seconds, n order to signal the disconnection.
- We recommend removing the rechargeable batteries, if the devices are not to be used for a lengthy period because empty rechargeable batteries crystallize and can cause damage.
18. Notes on Disposal
Old units, marked with the symbol as illustrated, may not be disposed of in the household rubbish.
Jed rechargeable and non-rechargeable batteres which are marked with one of the symbols illustrated may not be disposed of in the house cold rubbish.
You must take them to a collection point for oldunits, old batteries or special waste (enquire at
your local authority) or the dealer from whom you bought them. These agencies will ensure environmentally friendly disposal.
19. Care and warranty
Before cleaning the unit, disconnect it if necessary from other components; do not use aggressive cleaning agents.
The unit has been carefully checked for defects. If nevertheless you do have cause for complaint, please send us the unit with your proof of purchase. We offer a 1 year warranty from date of purchase.
We are not liable for damage arising from incorrect handling, improper use or wear and tear. We reserve the right to make technical modifications.
20. Technical data
Carrier frequency:
channel 1-864.850 MHz
channel 2-86
Digital coding:
16 different digital codes selectable
Operating voltage (Transmitter):
3.6 V DC, with enclosed rechargeable batteres (AAA)
or Alkaline Micro batteries (AAA)
or with power pack
Operating voltage (Receiver):
3.6 V DC, with enclosed rechargeable batteries (AAA)
3r Alkaline Micro batteries (AAA)
or with power pack
max.rangc:
300 meters depending upon structural conditions
Plug-in power pack transmitter:
3 VDC, 150 mA secondary:
230 V AC/50 Hz primary
Plug-in power pack receiver:
3 V DC, 150 mA secondary;
230 V AC/50 Hz primary
You can find up-to-date product information on our website http://www.comtel.ch

Mode d'emploi
Contenu
as pilas y acumula-fores usados mar-adoes oed.