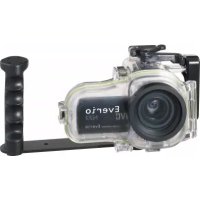
WRMG300 - Waterproof camera case JVC - Free user manual and instructions
Find the device manual for free WRMG300 JVC in PDF.
| Product type | Waterproof housing for camcorder |
| Maximum immersion depth | 40 meters |
| Dimensions (L x W x H) | 216 mm x 180 mm x 128 mm |
| Weight (without handle) | Approximately 890 g |
| Compatible filter diameter | 67 mm |
| Compatible camcorder models | GZ-HM30, GZ-HM50, GZ-HM350, GZ-HM430, GZ-HM435, GZ-HM440, GZ-HM450, GZ-HM650, GZ-HM690 |
| Accessible functions | Power on/off, video recording, photo capture, telephoto/wide-angle zoom |
| Supplied accessories | Anti-fog kit, silicone grease (5 g), silicone cloth, desiccant (2g x5), strap, 2 waterproof seals, large hex key (for handle), small hex key (for attachments), mediator |
| Housing material | Rigid plastic with glass front window |
| After-use maintenance | Rinse with fresh water, grease the seal, dry completely in shade |
| Seal replacement | Every year or if damaged |
| Safety test before diving | Submerge empty housing for 5 to 6 minutes and check for leaks |
| Common causes of leaks | Improperly installed, twisted, or damaged seal, presence of foreign objects (sand, hair, etc.) |
| Recommended storage temperature | Away from direct sunlight, in a dry place |
| Warranty | JVC disclaims any liability for leaks due to negligent use |
Frequently Asked Questions - WRMG300 JVC
User questions about WRMG300 JVC
0 question about this device. Answer the ones you know or ask your own.
Ask a new question about this device
Download the instructions for your Waterproof camera case in PDF format for free! Find your manual WRMG300 - JVC and take your electronic device back in hand. On this page are published all the documents necessary for the use of your device. WRMG300 by JVC.
USER MANUAL WRMG300 JVC
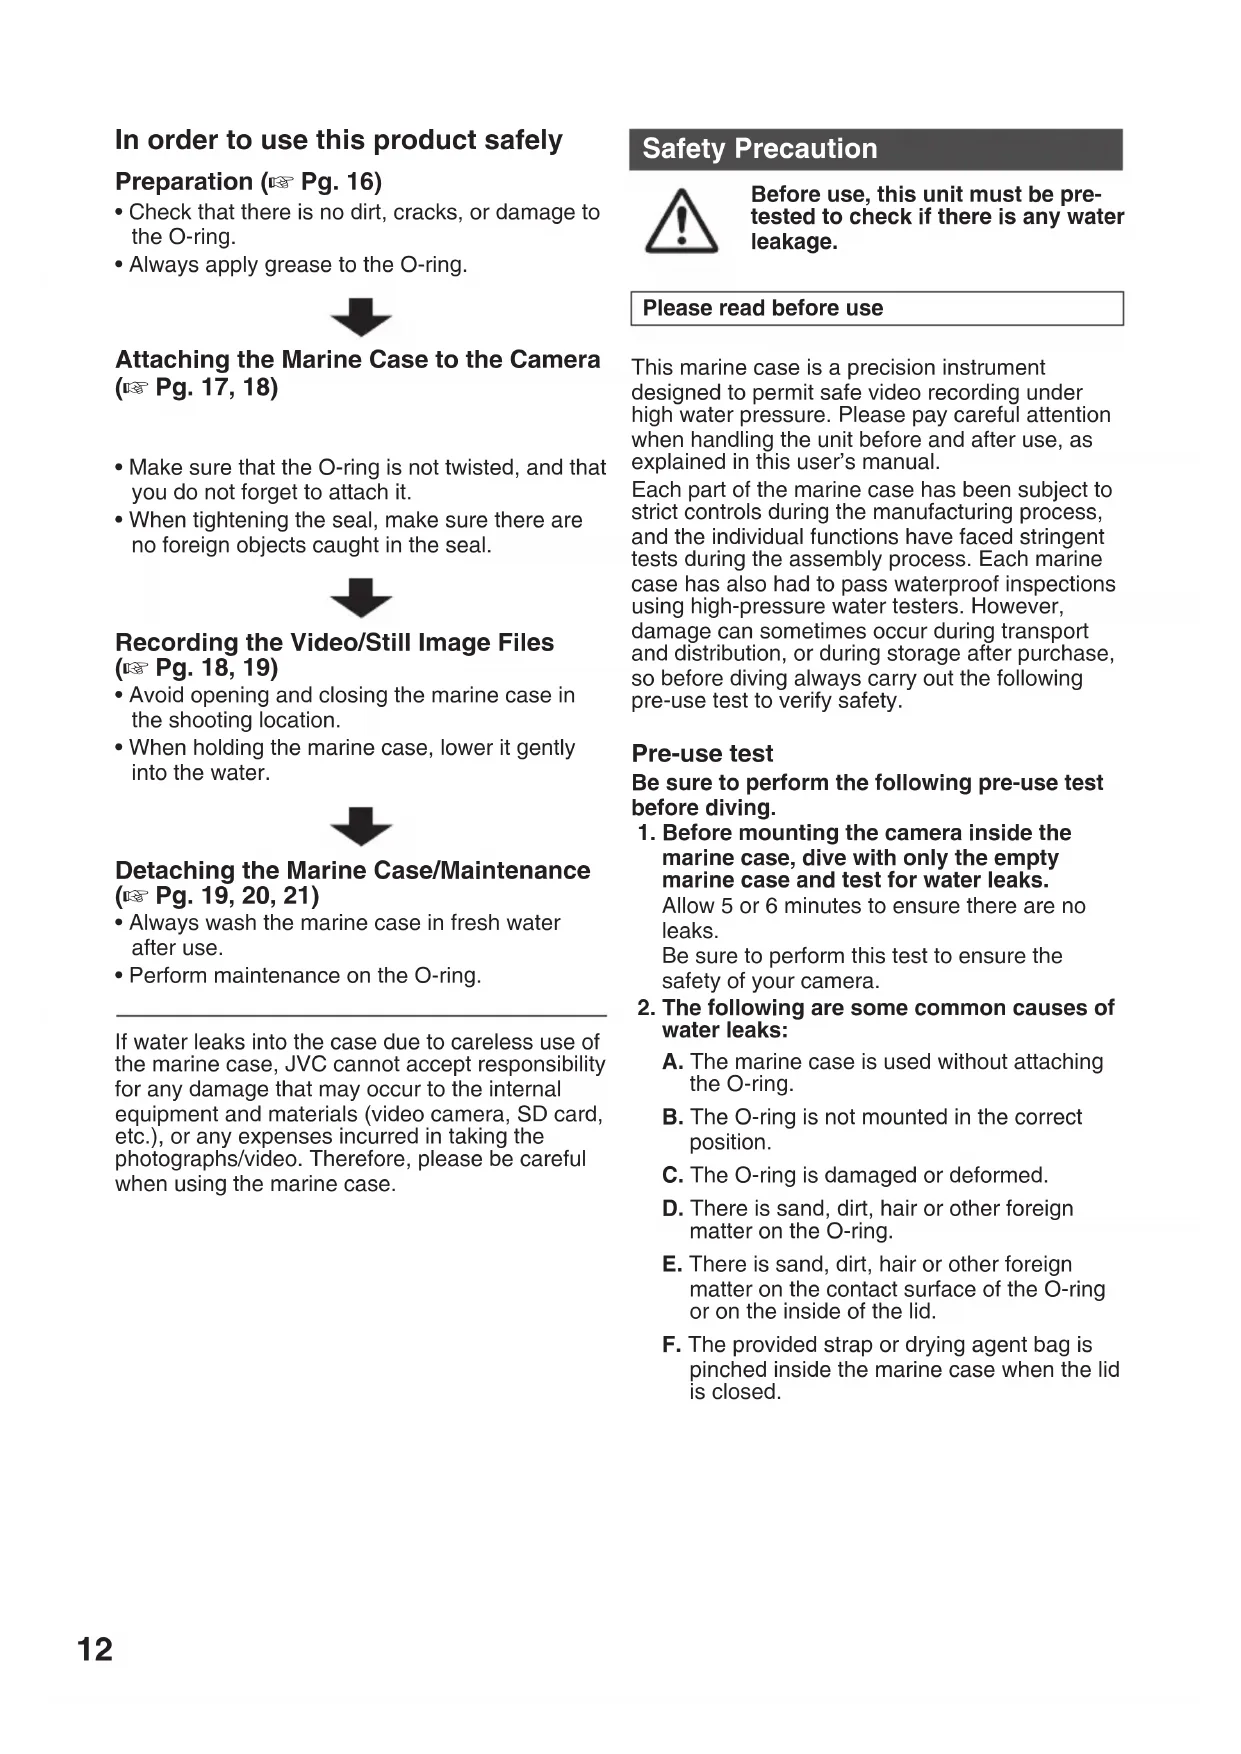
In order to use this product safely
Preparation (Pg. 16)
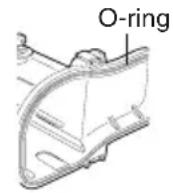
- Check that there is no dirt, cracks, or damage to the O-ring.
Always apply grease to the O-ring.

Attaching the Marine Case to the Camera (Pg. 17, 18)
- Make sure that the O-ring is not twisted, and that you do not forget to attach it.
- When tightening the seal, make sure there are no foreign objects caught in the seal.

Recording the Video/Still Image Files (Pg. 18, 19)
- Avoid opening and closing the marine case in the shooting location.
- When holding the marine case, lower it gently into the water.

Detaching the Marine Case/Maintenance (Pg. 19, 20, 21)
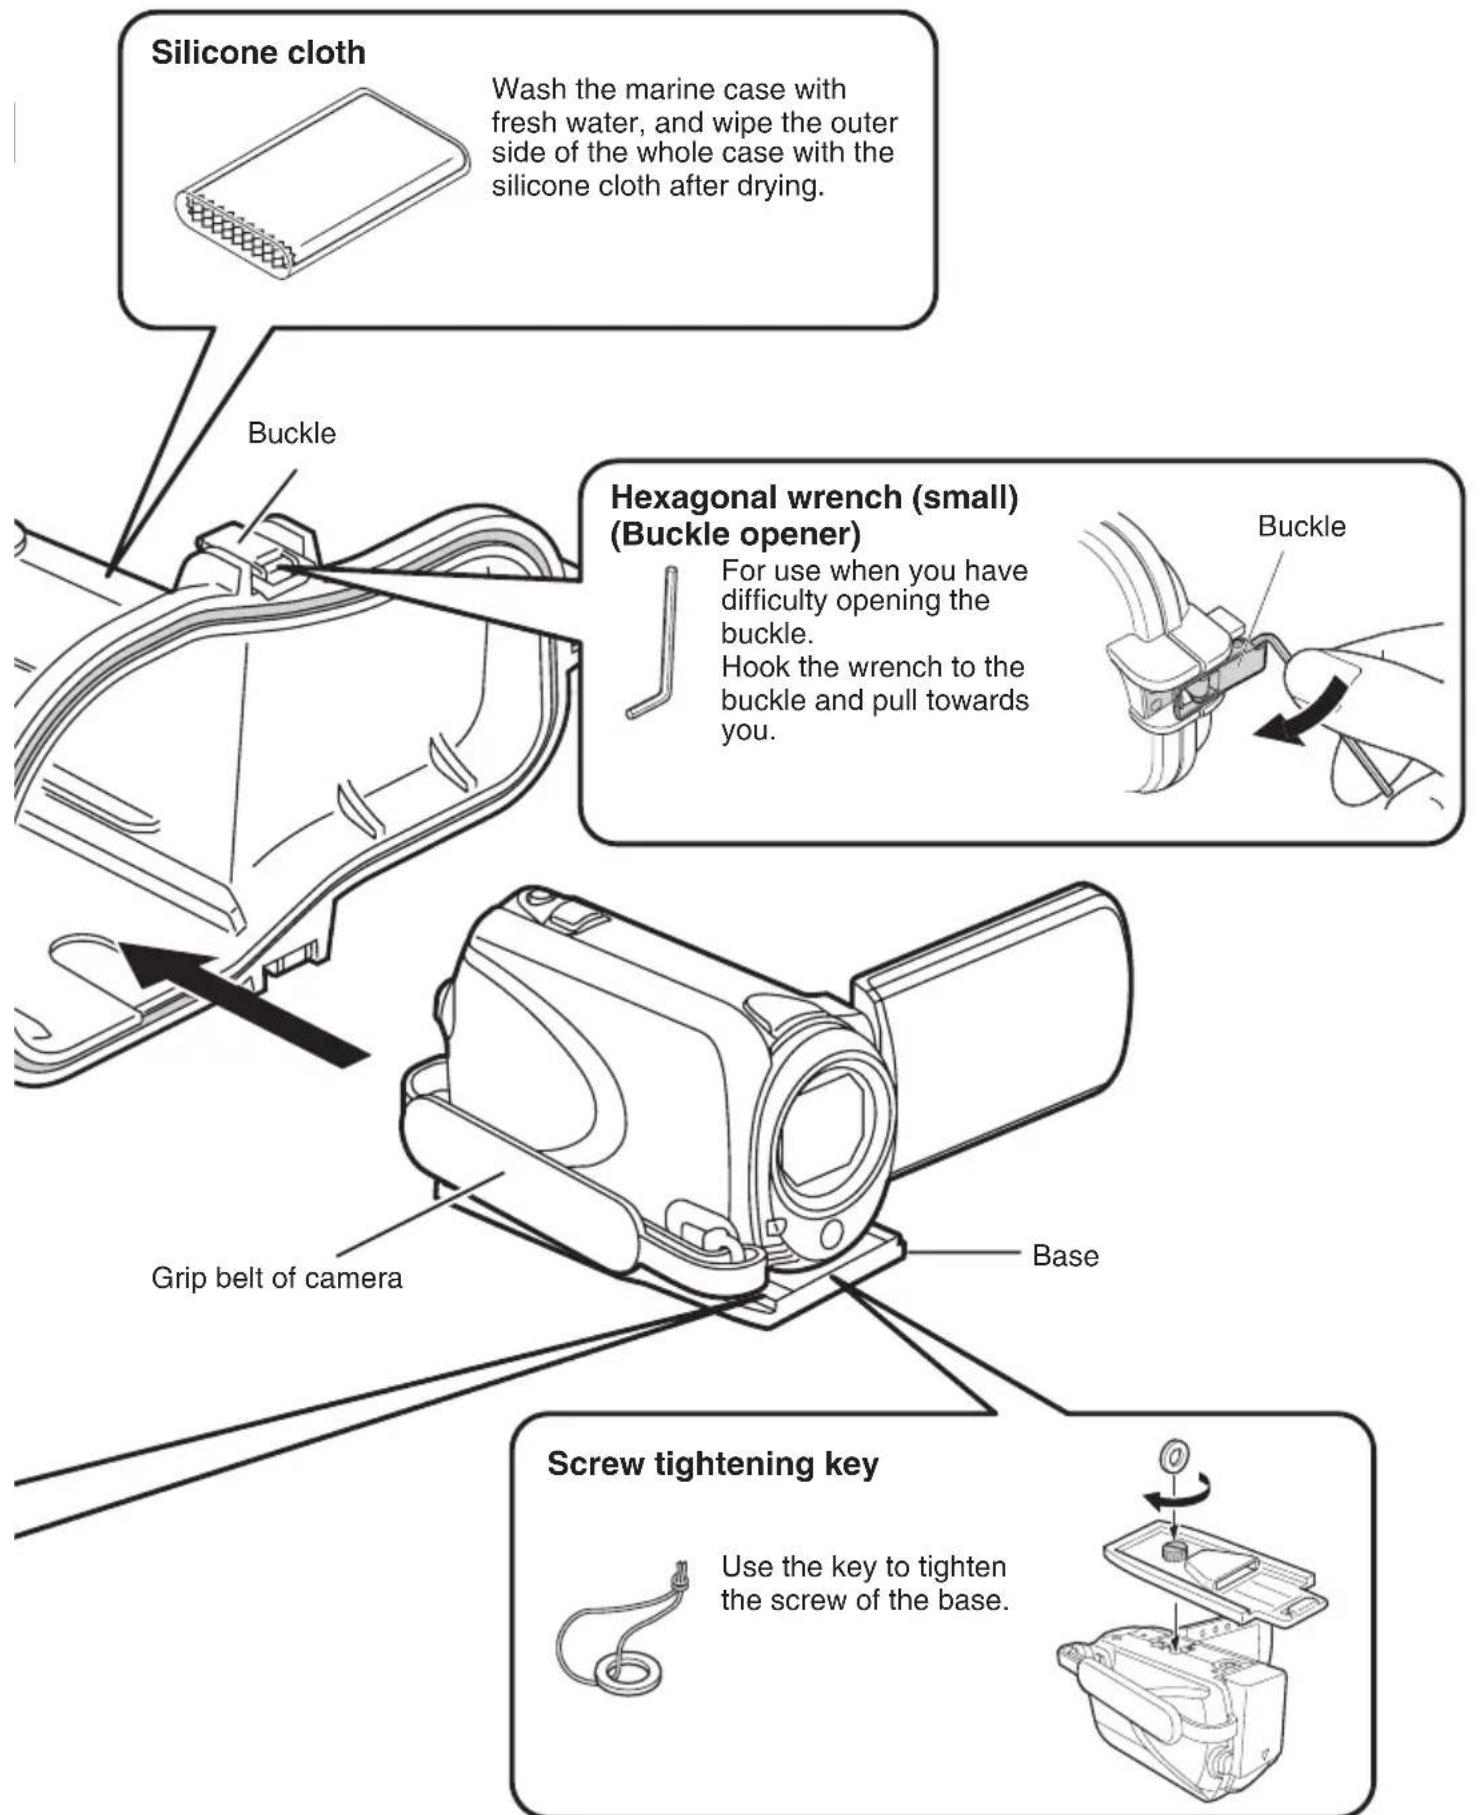
- Always wash the marine case in fresh water after use.
- Perform maintenance on the O-ring.
If water leaks into the case due to careless use of the marine case, JVC cannot accept responsibility for any damage that may occur to the internal equipment and materials (video camera, SD card, etc.), or any expenses incurred in taking the photographs/video. Therefore, please be careful when using the marine case.
Safety Precaution

Before use, this unit must be pretested to check if there is any water leakage.
Please read before use
This marine case is a precision instrument designed to permit safe video recording under high water pressure. Please pay careful attention when handling the unit before and after use, as explained in this user's manual.
Each part of the marine case has been subject to strict controls during the manufacturing process, and the individual functions have faced stringent tests during the assembly process. Each marine case has also had to pass waterproof inspections using high-pressure water testers. However, damage can sometimes occur during transport and distribution, or during storage after purchase, so before diving always carry out the following pre-use test to verify safety.
Pre-use test
Be sure to perform the following pre-use test before diving.
- Before mounting the camera inside the marine case, dive with only the empty marine case and test for water leaks.
Allow 5 or 6 minutes to ensure there are no leaks.
Be sure to perform this test to ensure the safety of your camera.
2. The following are some common causes of water leaks:
A. The marine case is used without attaching the O-ring.
B. The O-ring is not mounted in the correct position.
C. The O-ring is damaged or deformed.
D. There is sand, dirt, hair or other foreign matter on the O-ring.
E. There is sand, dirt, hair or other foreign matter on the contact surface of the O-ring or on the inside of the lid.
F. The provided strap or drying agent bag is pinched inside the marine case when the lid is closed.
3. Check that there are no scratches or cracks on the marine case every time you use it.
The marine case must withstand water pressure with use. Repeated exposure to pressure eventually leads to material fatigue, which may result in damage of the marine case. Every time you use the marine case, check in advance that there are no scratches or cracks. If you frequently use the marine case, be sure to ask for maintenance at the store of purchase. (There is a charge for maintenance.)
To protect your camera and ensure optimum use, keep the examples listed above in mind when using the marine case.
JVC accepts no responsibility for water leakage or damage to anything inside the marine case (camera, SD card, etc.) due to careless usage of this product. Be sure to follow correct procedures when using the marine case.
Accessories
- Anti-fog liquid
Silicone grease (5 g) x 1
Silicone cloth - Drying agent (2 g) x 5
- Strap
-
2 O-rings One spare O-ring.
-
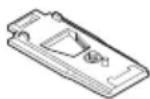
Base
- To attach to the camera.
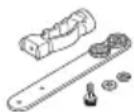
- Grip
-
Commercially available lights and weights can also be attached.
-
When there is a need for buoyancy adjustment, attach commercially available weights to the grip.
Pick
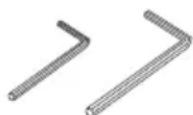
- Screw tightening key
- 2 hexagonal wrenches
Large: for screwing the grip
Small: buckle opener


Notes
Limitations in use with GZ-HM30/50/430/435.
1) These models neither have Power button nor Digital still camera function.
2) To prevent the Camcorder from switching off automatically, it is recommended to set "Auto power off" mode to "off" from the Camcorder setting menu.
3) With above procedure, the Camcorder would always be on in the marine case. Please prepare battery to meet your operation time while the Camcorder is in the marine case. (Larger capacity battery is recommended)
Maintenance Kit - Sold Separately (Part Number: MG200_MTKIT)
You can purchase the following set of expendable parts.
Please contact your local JVC service representative.
- O-rings x 2
Silicone grease (5g)× 1 - Drying agent (2 g) x 5
- Lens tissue paper (50 sheets) x 1
Power button cap x 2


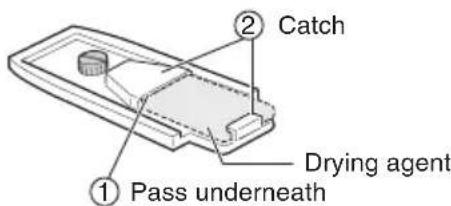
Drying agent
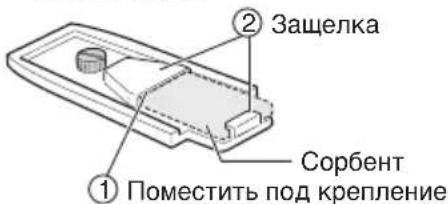
Prevents fogging inside the marine case. Insert it at the back of the base attached to the camera.
The moisture absorption ability of drying agent that has previously been used may deteriorate depending on the conditions of use. As such, we recommend that the drying agent be replaced each time.
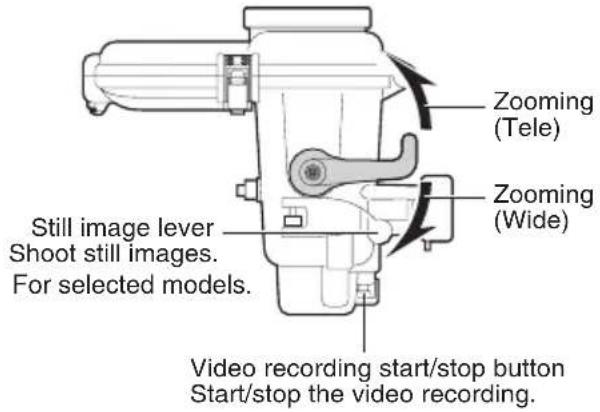
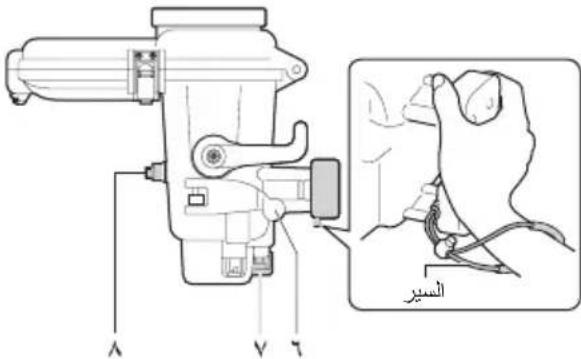
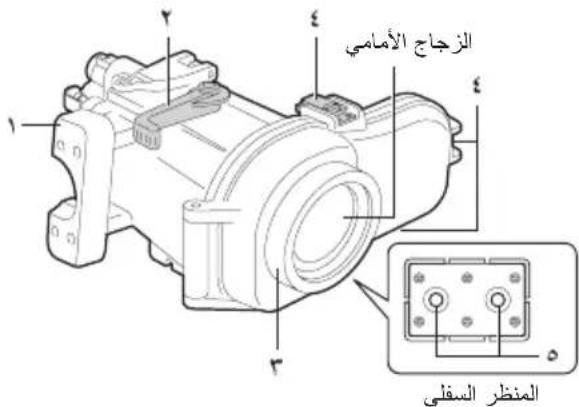
Parts and Functions
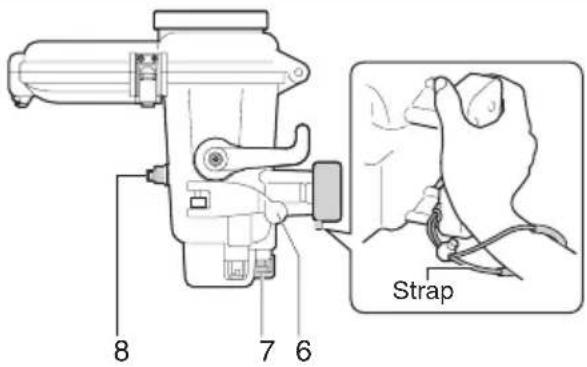
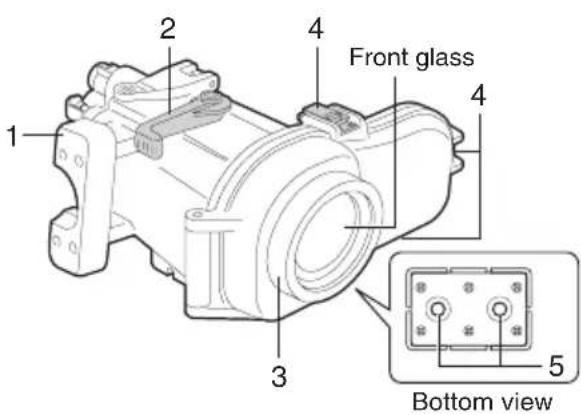
- Main casing grip
Attach the strap provided as shown in the diagram above.
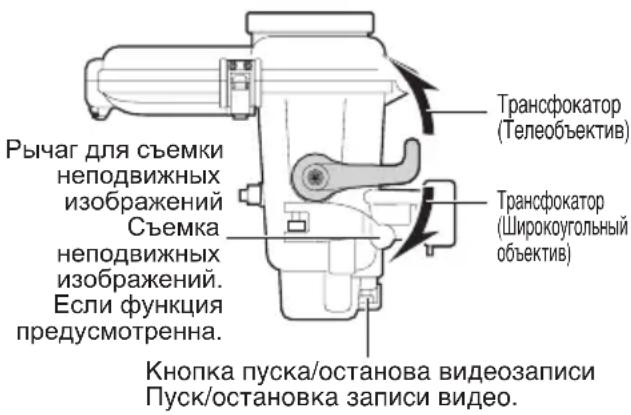
- Zoom lever
Zoom (tele/wide) while shooting.
- Ring
Commercially available filters (67 mm diameter) can be attached.
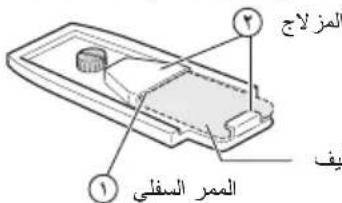
- Buckle (3 locations)
Seal the marine case.
- Grip attachment holes
You can attach the grip provided, or commercially available weights.
- Still image lever ( 1)
Press to take still images.
- Video recording start/stop button
Press once to start recording a video. Press again to stop.
- Power button ( 1)
Turns camera's power on/off.
( 1) : For selected models.
Preparation
Inspect the main casing for scratches and cracks.
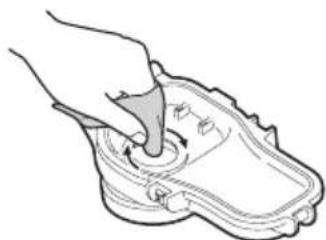
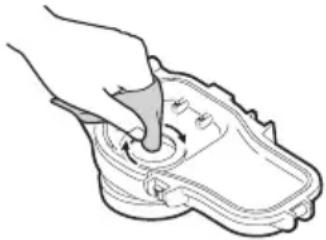
Apply 2 or 3 drops of the anti-fog liquid provided onto a lens tissue paper (commercially available) or a clean cloth, and wipe the inner side of the marine case front glass.

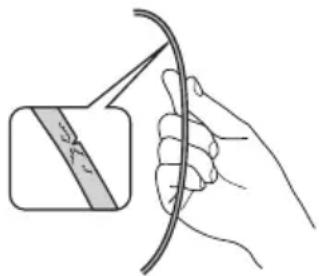
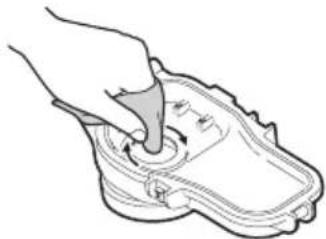
Check the O-ring.
Using the pick provided, remove the O-ring from the main case.

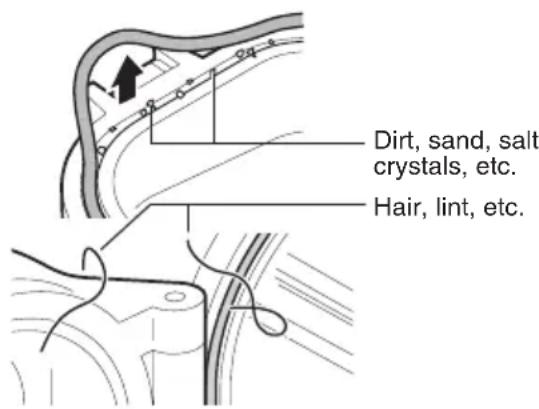
Check the O-ring, O-ring contact surface, and groove in which the O-ring fits for foreign matter, nicks, cracks, etc.
Be sure to remove any foreign matter (dirt, sand, salt crystals, hair, lint, etc.).
For details, refer to the "O-ring Maintenance Manual".
Caution
- Never use the O-ring in case of nicks and cracks.
- If the O-ring is handled inappropriately, it can cause water leakage.
Apply grease to the O-ring and re-attach.
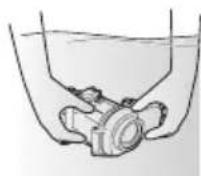
Close the empty marine case (no camera inside).
Submerge the marine case in water and check that there are no water leaks.
(Pg. 18)
Attaching the Marine Case to the Camera
Setup the camera.
- For models equipped with light, turn off the light.
- Open the lens cover.
- Set to the shooting mode (video/still image).
- Even when the shooting mode is set to "video", still images can be captured by pressing the still image lever during video recording. (For selected models.)
It is recommended to set to the auto shooting mode. - Insert the battery and the microSD/ microSDHC card or SD/SDHC card beforehand if needed.
- Please set "Auto power-off" mode to "off" from the Camcorder setting menu, the Camcorder has no power button.
To turn off the camera, press and hold the power button for more than 2 seconds.(For selected models.)
Insert the drying agent at the back of the base.
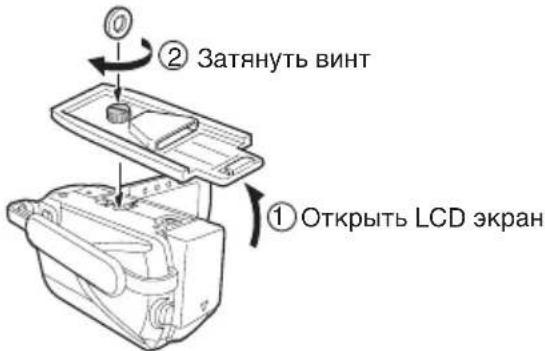
3 Attach the base to the bottom of the camera.
- Align the tripod screw hole at the bottom of your camera with the screw of the base, and tighten the screw.
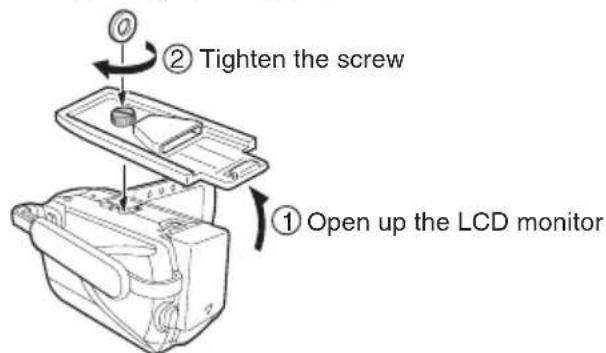
Caution
The camera turns on automatically when the LCD monitor is opened. To turn off the camera, press and hold the power button for more than 2 seconds.
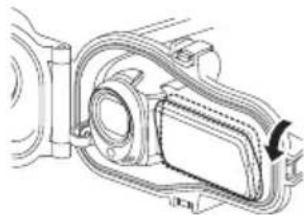
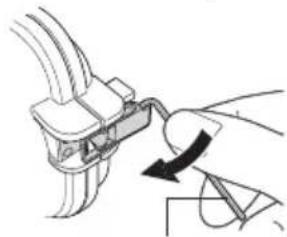
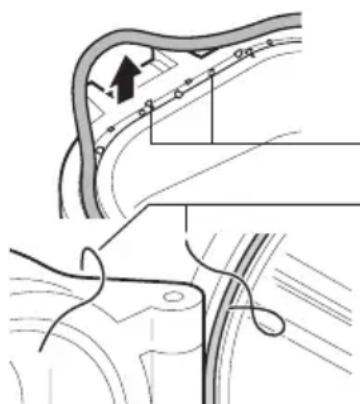
4 Fold the grip belt.
Make sure the grip belt is not caught between the marine case when sealing.
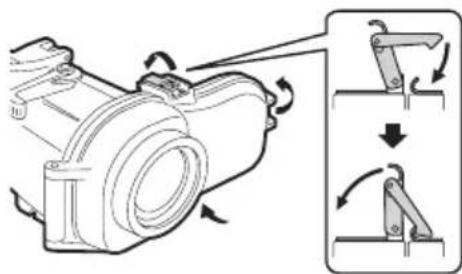
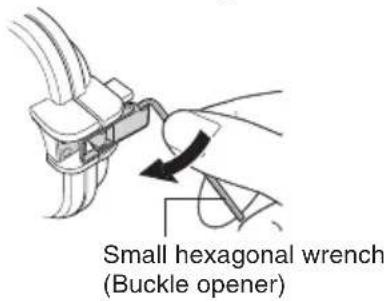
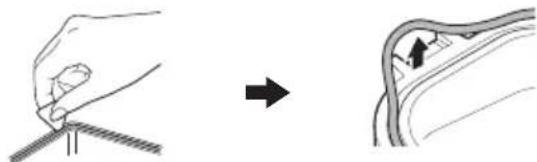
Open the marine case.
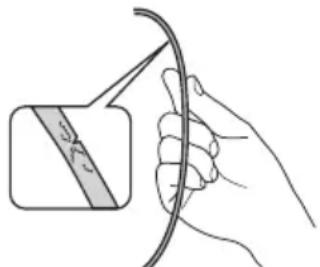
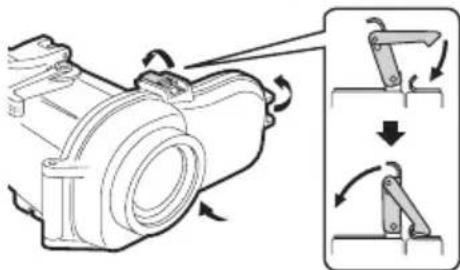
- If it is difficult to open buckles, use the small hexagonal wrench (buckle opener).
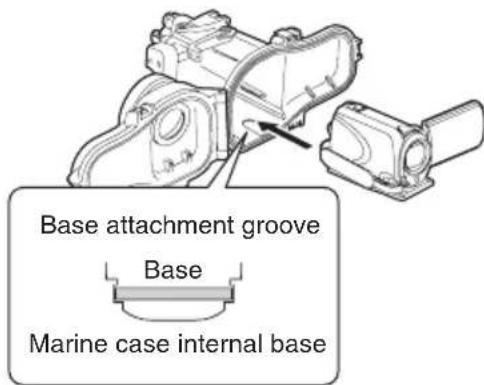
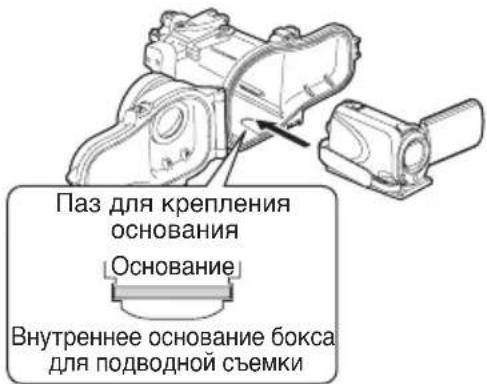
Insert the camera into the marine case.
- Align the base attachment groove with the base to insert.
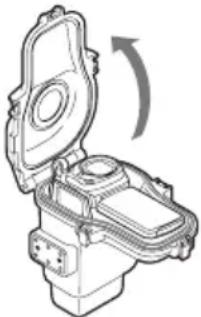
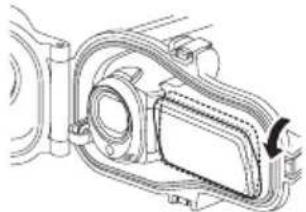
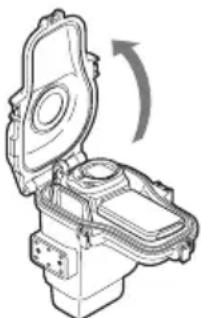
7 Adjust the angle of the LCD monitor.
The LCD monitor can be tilt upwards to a maximum angle of 30 degrees.
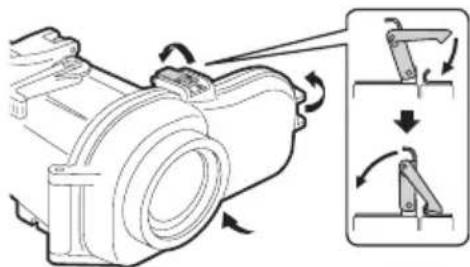
Seal the marine case.
Make sure that the O-ring is not twisted, and that you did not forget to attach it.
Make sure that foreign objects (wrap, belt, dirt, etc.) have not been caught in between.

Caution
The risk of water leakage is extremely high if the O-ring is twisted, if you forget to attach it, or if something is trapped in the seal.
Check that all the operation buttons of the camera are functioning properly.
- If it is not functioning, take out the camera and insert again.
10 Attach the grips.
- Attach the grips, lights or weights on the bottom of the marine case.
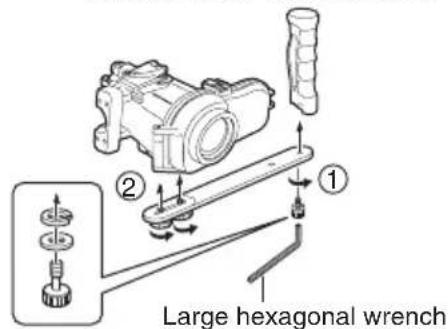
Large hexagonal wrench (for screwing the grips)
Recording the Video/Still Image Files
Before recording
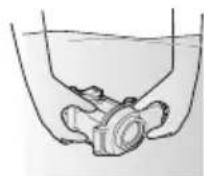
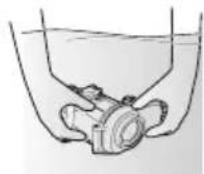
Submerge the marine case with the camera inserted into a bathtub or water tank full of fresh water. Gradually prolong the time the marine case is submerged as follows.
1st time: 5 ~ 10 seconds
2nd time: 30 seconds ~ 1 minute
- 3rd time: 3 minutes ~ 5 minutes (try operating the levers and buttons while the marine case is submerged).
Caution
Always have someone hold the marine case for you when diving into, or getting out of water, to prevent loss or damages.
- If for any reason water leakage occurs, remove the camera battery. It may cause the camera to explode.
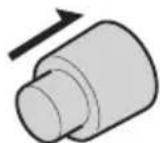
1 Turn on the camera's power.
- Press and hold the power button for more than 2 seconds to turn on the power. (The camera's power lamp lights and the monitor turns on.) For selected models.
ON/OFF
Note
- Sometimes, due to sudden shaking or impact to the marine case, the camera's drop detection function operates to turn off the camera's power. When the camera's power is turned off, turn it on again.
Press the video recording start/stop button or the still image lever to start recording.
3 When you have finished recording, press and hold the power button for more than 2 seconds to turn off the camera.
For Selectaedepower lamp goes out and the
- The camera's power lamp goes out and the monitor turns off.
Detaching the camera
If there is a need to detach immediately:
Submerge the marine case in fresh water and shake the marine case in the upward, downward, left and right directions for at least 10 times, followed by rinsing it.
2 Remove the marine case and wipe off water droplets on the case surface using a dry towel.
Face the front glass of the marine case upwards, and open the buckles to remove the camera, while paying attention not to let water droplets at O-ring or buckles enter the case.
Upon removing the camera, close the marine case again while paying attention not to allow water droplets enter the case, followed by tightening all the buckles.
* Always perform maintenance on the marine case after using. (Pg. 20)
If there is no need to detach immediately:
Perform maintenance on the marine case. (Pg. 20)
Maintenance on the marine case
Always perform maintenance on the marine case after you have finished recording.
Salt crystal or dirt will accumulate inside the marine case if maintenance is not performed, and this can cause water leakage.
Wash the marine case in water while it is still sealed
- Do this within 30 minutes after diving.
- Pour in fresh water until the marine case is completely submerged in the container, and shake the marine case in the upward, downward, left and right directions.
- Move the buttons and levers while the marine case is submerged, and rinse the dirt out from any gaps or grooves. Proceed to 3
If used in the sea -> Proceed to Performing salt removal
Performing salt removal
If the marine case was used in the sea, submerge the marine case in fresh water for at least 1 hour to remove salt.
Prepare a container that contains fresh water that is five times more than the volume of the marine case.
The container must be big enough to allow the marine case to submerge fully.
- If only small containers are available, pour in fresh water that is equivalent to at least five times the volume of the marine case over a few times.
- Shaking the marine case in the upward, downward, left and right directions will be more effective.
- Move the buttons and levers while the marine case is submerged, and rinse the salt out from any gaps or grooves etc.
Make sure the grip is also free of salt.
Put in fresh water for at least 1 hour.
3 Remove the marine case and wipe off water droplets on the case surface using a dry towel.
4 Remove the camera.
- Face the front glass of the marine case upwards, and open the buckles to remove the camera, while paying attention not to let water droplets at O-ring or buckles enter the case.
Caution
The camera may fall out if the buckles are opened with the front glass facing down.
- If you cannot avoid opening the marine case at the diving location, pay attention not to let water droplets from your hair or your body enter the case.
Remove the O-ring, and wipe off salt, sand and other foreign matter.
- Also wipe the groove in which the O-ring was inserted, and the part of the marine case that was in contact with the O-ring, and allow them to dry.
For details on handling and storing the O-ring, refer to the "O-ring Maintenance Manual".
Wipe the inside and outside of the marine case with a dry cloth.
Use a lint-free cloth to wipe the inside of the marine case.
Wipe the inner side of the front glass.
- Add a few drops of the cleaner liquid (commercially available) onto the inner side of the front glass, and wipe off using a lens tissue paper, clean cloth, etc.

Caution
The front glass will fog if it is dirty.
8 Let it dry completely in a shaded area.
Caution
- Do not leave the marine case in direct sunlight.
- Doing so may cause discoloration of the case, and may cause the O-ring to deteriorate more quickly.
Note
The conditions may vary depending on the environment of use such as temperature, humidity, water temperature, salinity and others.
Storing the O-ring
If you do not intend to use the marine case for longer than one month, remove and store the O-ring away.
For details, refer to the "O-ring Maintenance Manual".
The O-ring is an expendable part. Replace the O-ring with a brand new one every year.
Caution
- When re-using an O-ring after storage, always check the condition of the O-ring. Never use an O-ring if it is deformed (crushed, distorted), cracked, or damaged in any way.
Specifications
| Maximum pressure | Water depth up to 40 meters |
| Operations Power | on/off (*1)Video recording start/stopStill image shooting (*1)Zoom (tele/wide) |
| Filter diameter 67 mm | |
| Main unit dimensions(W x D x H) | 216 mm x 180 mm x 128 mm |
| Main unit weight Approx. 90g(excluding grip) | |
Applicable camera models
GZ-HM30/GZ-HM50/GZ-HM430/GZ-HM435
From GZ-HM440 to GZ-HM450
From GZ-HM650 to GZ-HM690
( 1) : For selected models.
HaXMMTeIJIa CbEMKn HeNoDnBXKhbIX n3o6paXKeHn.
- Khonka nycka/octaHOBa Bndeo3annc
HaKMTe OINH pa3 IJI HAUana BnDeOCbEMKn.
IIOCTaHOBKn HaxMnte KONky eue pa3.
- Khonka "Питане" (*1)
BkIIOueHHe/BbIKIOueHHe KaMepbl.
(^*1) :Ecnn FyHKun npeducMOTeHHa.
Iodrotobka
OcmoTpnte OCHOBHOJ KOpnyc Ha HAnuHne UapannH TpeunH.
HahecTe 2-3 KaIIn JxNdkoCTn OT 3aNoTeBaHn Ha caIpeTky dIy ObkeKTNaBa (mEeTCB npoJaXe) IIN NcCTyIO TKaHb IN npOtpTE n3HyTpIn nepeDHee CTeKIO 60kCa DnI NOBODHO CbeMKN.
2 PpOBepbTe yNIOHTHnTeIbHoe KOnbUo.
BbHbTe yNIOHTeJIbHOe KOJIbO u3 OCHOBHOro KOpnyCa npn NOMOu npnlaerMoN pnaCTnHKn.
IpoBepbTe yNIOHTHeJbHoe KOJIbO, NOBepxHOCTb KOHTaKTa C yNIOHTHeJbHbIM KOJIbCuOM I KaHaBky NOD yNIOHTHeJbHoe KOJIbCuHa HAIuHne NOCTOPOHHX npEdMeTOB, BmTnH, capaHH n T.I. Y6eINTecB B OTCyTCTBn IOCTOPOHHX npEdMeTOB (rpa3n, necka, KpncTaJINoB COJI, BOLOC, BOLOKOH n T.I.).
* Iopob6Hocn CM.BPyKoBOcTBO no yxOy 3a yNIOHTHNTbHbIM KOJIbC0M
BHHMaHHe
HnKoHa He nCNoB3yTe yNIOHTHeBHOe KOJIbO C BMATINHAMN UapaNNAMN.
He npabnblha yctaHObKa yIIOHTHNTeIbHOrO KOJIbUa I O6paueHne C HIM MOyT npuBecTu K npocauBaHIO BObl B NOIOCTb 6OKca.
3 CmaXbTe yNIOTHHTeJIbHOe KOJIbUO IN BCTaBBTe Ha MecTO.
3akpoTe ncyTo60KcIJIa NOBODHO CbemKn (6e3 Kamepbbl BHyTpnu).

5 Norpuy3nTe 60Kc dIy IIOBODHO CbeMKN B BOdy n npOBepbTe Ha HAIuHne IpOteueK BOdbl. (CTp.78)
MoHTaX KaMepbI B 6okce IЯ nOdBODHOcBEmKn
YcTaHOBnTe KaMepy.
EcnMOneIbOChaueHaΦoHapem, BblKJIIOHTe erO.
CHIMITE KpbIuKc oBeKTnBa.
BkIIOUHTepeXIMcEEMKn(BnDeo/ HEnoDBNXHoeN3O6paXeHne).
* Daxe ecn pexm CbemkyctaHOBneH a "Bndeo", HeoDBNXHbIe N3O6paxeHHa MOryt fNkCupOBaTbcra BO BpeMn Bnde03aNNc HaxKaTHeM pbIyara dJIa CbEMKn HeoDBNXHbIX N3O6paxeHH. Ecnn fynKuIN npedymOTpeHHa.
- PeKOMeHnyeTcB KJIHOuHTb aBTOMaTHueckn peKIM CbeMKN.
- Ппебарптелбно BCTаБТе AkКуМЛЯТО
н, пи необхоДимости, кapту microSD/
microSDHC ини SD/SDHC-kapту.
EcHn HET KONKn BKNIOU. Ha KaMepe NOXaJyNCTa, yCTaHOBNTe "ABTO BBIKNIOUeHHe" B pEXHM "BbIKN" B Me - UTo6bI BbIKIOHTb KaMepy, HaxMMTe uYdePKNBaIte 2 cekyHdbI KHOINKByBKOIOUeHnA NITaHn.
EcnnyHKnnpedyCMOTpeHna.
10meCTte cop6eHT B 3aHne Yactn OCHOBAHNA.
3 YctaHOBnTe KaMepy Ha OCHOBaHne.
COBMECTNEOTBEPCTNE NOI WTAINH HIXKHe CTEHKE KAMEpbIC OTBepCTNEM B OCHOBAHN 6OKCa N 3aTAHNTE BNHT.
BHMMaHne
Kamepa BkHouaetcABTOMaTHueckn, KOrda OTKpbIbAeTcLCD 3KpaH. YTO6bl BBIKHIOHTb KaMepy, HaxMITE u ydepxuBaTe 2 cekyHdbi KHONKy BkJIIOUeHn NITAHN.
4 CorHnTe peMewok pyuKn.
- y6eIntecb,HTOpemEwoK He nonanB 6OKC npu ycTaHOBKe yNIOTHEHnA.
5 OTKpoTe 6OKc IaI IOBHOH cEmKn.
- Ecni He ydaetcpaaccTeHyTb 3aCTeKKn, OTKPOIte INC NOMOuBIO He6oNbUoro KJIouHa-WeCTnIgpaHHNka (KJIouHa dJa 3acteKe).
He6oBwO KnIOU-WeCTnRpaHHK (KnOu dIra 3aCteXeK)
BCTaBbTe KaMepy B 6OKc IJI NOdBODHOJ CbeMKN.
CObMeCTte Na3ДЛЯ KpeNJIeHNA OCHOBaHnC OCHOBaHnEM.
OTperpyIynpyTe yroJ yctaHOBKn LCD 3KpaHa.
MaKcMaJIbHbI yrOJ HaKJHOHa LCD 3KpaHa coCTaBJIaTeT 30 rpaIycOB.
3aKpoTe 6OKc IINI NOBHOH CbEMKn.
CneIte, yTo6bI yNIOTHHTeJIbHOE KOJIbO He 6blIO nepeKpyeHo, n He 3a6bIBaIte BCTaBnTb erO.
- Y6eIInTeCb, yTO npn 3aKpbBaHmB 6oKc He nonaJI NocToPOHHne npeJMeTbI (peMeWOK, rpa3b n T.I.).
BHMaHne
Ecnn yNnOTHnTeNbHOe KOnbIo nepeKpyTnOcB,ecNN Bbl 3a6blIN BCTaBNTb erO,NII ecNN YTO-TO 3aCtpPANO BYNIOTHEHIN, PnCK nPOcauBaHn BObl MHOROKpaTHO Bo3pactaet.
9 Y6eIITecb B npaBnIbHOCTn HAcTPOKn BCEx ynpaBJIIOUx KHONOK KaMepbl.
- Pn Heo6XoDMOCtN BbIHbTe KaMepy N yCTaHOBNTe ee 3aHOBO.
10 3akpoIte 3aTeKKn.
3akpoTe 3acTeKKn, yCTaHOBnTe fOHaPn IIN rpy3bI Ha HxKHei CTeHKe 6OKCa dJa IODBOHOH CbeMKN.
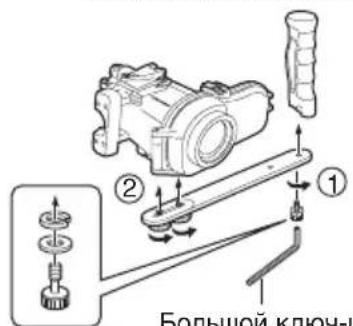
Bolbwo KnUO-WeCTnRpaHHNK (dIra 3akpyuBaHn pyuKn)
3ainncb Bndeo/phiJIOB HenoDBNXHbIX N3O6paXeHNI
Peped 3ainncbio
OkyHnTe 60Kc DnI NOBHOc BEmKn BmecTe CO BCTaBHeHHo Kamepoi B BaHHy NnBak Co CBexKe BOIO. NocTeeHNO yBeJIuNbAitpe npOJXHTbHOCTb HAXOXDeHHN 6OKCa IJI INoBDOH CbEMKn B NorpyxHHom COCTOHN, KaK yKa3aHO HnXe.
1- npa3: 5 ~ 10 cekyHd
2-η pa3: 30 cekyHД ~ 1 MNHyTa
3-pa3:3 MNHyTbI ~ 5 MNHyT (NOBUNaTe pbluarn KHOKN, NOKA BOKC DnRA NOBOHON CbeMKn HAXOINTCA B NORpyKeHHOM COCTOHN).
BHMaHne
- InpneDToBpaueHnner yTepn nIINIOBpeKJeHnO63aTeJbHO nonpocHTe KOROHbUb NOepKaTb 6OKC IJI NODBOHOINCBEMKN, POKA Bbl HbipReTe NIN BBIXOHTe N3BODbI.
Ecnn no kaKoJ-Ni6o npnHne npOn30uJa npoteka BObl, CHMNTe aKKymyIaTOp C kamepb. B npOTNBOM clyuae KaMepa MoKeT B3OPBaTbCra.
1 BkJIIOHTe NITaHne KAMEpbI.
- YTO6bI BKNIOUHTb NITaHHe, HAXMNTe n ydepxnBaTe KHOKBy BKIOUcEHn IITAHN6OJee 2 cekyHd. (Haunhaet CBETNbCnIHDAKATOp NITaHn KaMEpbi IN BKNIOUaETcA3KpaH.)

PpmeaHne
-3a pe3Kx TOUKO Bn yapOB NO 6OKcy IINIOBDOHO CbEMKn HOrda cpaabaBaet FyHKUN ONpeJeHnnaeHN KaMepbl, KOTOPaBbIKNIOaET nITAHne KaMepbl. Ecn nITaHne KaMepbl BbIKIOHNOcB, BKIOHTe eO CHOBA.
2 BkIIOuayTe 3aHcB HaXaTHeM KHOKN ycka/oCTaHOBa BVdeO3aHNCn HIN pbUra dJIa CbeMKn HeNoDBrHXHbIX n3o6paXeHn.
3aKOHnB 3aHnCb, HaxMnte N ydepXnBaIte 6oJee 2 ceKyHKd KhoNky BKJIIOUeHnI INTaHnI, YTObI BbIKJIIOuHTb KaMepy.
- Ppekpaaaet CBeTnTbCnHnKaTOp nHTaHn KaMepbl N BbIKNoaEcTc 3KpaH.
Ecnn yHKun npdeycmOTpeHHa.
OTcoeHHHeNe KaMepbl
Ipn Heo6xOaMocTn 6bictporo OTcoeUNHeHNA:
1Iorpy3HTe 6OKC dIJI NOBODHOB CbEMKn B YnCTyIO BDOY N BCTPAXHHTe erO DBNXKeHNAM BBepx, BHN3, BJeBO n BnpaBO He Mehee 10 pa3, nocle yero npomOnTe erO.
2 Doctahte 6okc dIy IIOBODHO CbeMKN BBITpHTe C Hero KaJIH BOblC NOMOu bO cyxO MaTePN.
3 PacnoJoxnTe 6OKC nepeHnM CTeKlOM KBepxu n OTkpoIte 3aCTeXKN, YTObI DOCTaTb KaMepy, CneJn 3a Tem, YTObI KaJIu C yNLOTHnTeJbHOrO KOJbUa NII 3actexek He nonaJIb BHyTpB 60Kca.
4 DocTav KaMepy, ChOBA 3aKpOte 6oKc dIa IIOBODHO CbEMKn, CJIeIa 3a TeM, YTO6bl KAnII BODI He NOnaII BHyTp6 6oKca, IocIe Yero 3aKpOte BCE 3actekkn.
★ Nocne KaXdOro HcNoIb3OBaHnO 6a3aTeIbHo OBeCneuBaIte 6okcy JnIOBDOHO CbeMKn yXoD. (80)
EcHn Het Heo6xOaMocTn 6bictporo OTcoeHNHeHn:
PnBveIte B nopAOK 60Kc IJIa NOBODHO cBeMKn. (Ctp.80)
YxOa 3a 6OKCOM JIЯ NOBODHOJ CbeMKN
Iocne 3aBepseHn 3anncn o6raTeNbHO 06ecneuBaIte yXoJ 6okcy IJa nOdBODHO CbeMKn.
EcnBbHe 6yTe npoBOnTb Texo6cnyxuBaHne 6okca,B HEm 6yDt CKaJIINBaTbCk PnCTaIIbI COJI N rP3b, BCJeCDTBNe Yero BHyTpboMKeT nonaCTb BOda.
ПROMОЛТЕ 6OKC ДЯ NOДВODHON СbeMKN B BODE, OCTaBIV eRO B RePMeTNUHO 3aKpbITOM ПОJOXeHIN
3TO Heo6xoJIMO CdeJaTb B TeueHne 30 MHyT NocNe NorpyxKeHn.
- Iorpy3nTe erO nonHocTbIO B uNCTyIO BOy IN BCTpAXHnTe erO DBNXeHNAMN BBepX, BHn3, BJIeBO N BnpaBO.
- POKa 60Kc IЯ NOДВODHON CbEMKn HAXOДNTCBA NOrpyXeHHOM NIOJoxeHn, DBURAITE KHOKNI pBvArN, BbINOLaCKNbAITe rP3b IN3 BCEx 3a3OpOB INI IN KaHaBOK. IpeenDInTe K 3
- Пи Использовань COлeн Морскоь BODE
->PepenDnteK OunchteOT coJN
OuInCTHe OT COJIN
Ecni 60Kc dIЯ NOBODHO CBemKn
NcNoJIb3OBAJcR B MOpCKoI BOJe,TO dJa
ydaJIeHnI COJI NOrpy3HTe erO MNHmym Ha 1 yac
B CBexkyIO ppeChyIO BOyU.
1 PnroTOBbTe EMKocTb C BOOn B KOJIueCTBe, B IaTb pa3 IpeBbIshaOuSeM o6bem 6OKca dJa IOdBODHOcBEMKn.
Pa3mep emKoCTn DOJXeH 6bITb TaKIM, UTO6bl 6OKC JINI NOBHOH CbeMKN MOr NORpy3NTBCB BBOy NOJHOCTbIO.
EcnI DoCTyHbI TOlbKO He6OblWne EMKoCTn, HaneiTe IpeChyIO BODy BO6bEM, NO KpaHHe Mpe, B NtB pa3 npBbIaIOUeM O6bEM 60kCa DnA NOBOHOH CbEMKN, HECKOJIbKO pa3.
-ДЯбьшeweФФeKTHBHOCTN BCTpAXHnTe 6OKCДЯ NOДBOHOn CBEMKN DBNXEHNrMBepx,BHn3,BJIeBO IN BnpaBO.
- Ioka 6OKC JIJI NOBODHOJ CbEMKIN HAXOINTCA B NORpyXeHHOM NIOJOxHIN, DBNraTe KHOKN IN pbUarN, BbINOJaCKBaIte COJIb N3 BCex 3a3OpOB INJIN KaHaBOK IN T.I.
- Y6eIntecb, yTO B pyUKe TaKxHe OCTaIOCb COJI.
10meCTnTe B uHcTyu BoDy Ha 1 qac.
3 DoctaHbTe 6OKc dIJI NIOBODHOJ CbeMKN I BbITpHTe C Hero KaJIH BOdBi C NOMOuBIO cyXoMATEpHn.
4 CHIMMTE Kaempy.
PacnoJoxKnte 60kC npeHnM CTeKJOM KBepxu NOTKpOIne 3aCTeXKn, YTObI DOCTaTb KaMepy, CneJa 3a Tem, YTObI KAJIcN C yNJNotHnTeJbHO KOnbua INN 3aCTeXek He INonaIN BHyTpB 60kCa.
BHUMAHNE
- Пи OTКрытбix 3aCTeЖКах И HanpaВнEHOM BHN3 NepeД hem CTeKJIne ПпсуTCTByet БероТHOCTь NaDEHЯ KaMepbl.
Ecnn 6OKC nIy IIOBHOH CbemKn Heo6xOIMO OTKpbITb PRAOM C MecTOM NorpyxeHn, CneIHTe, TTObI B 6OKc He nonaNN KaNN BODbIC BaWnx BONOC INI TeNa.
5 BbInbTe yNIOHTHnTEbHOe KOJIbUO u YdaIInTe C Hero BCE cIebl COJN, neCKa n dpyrnx 3arpa3HeHn.
TaKKe npOTpnte KaHaBky, B KOTOpyo BCTaBnAeTcayyNtOHNTeHbHOe KObUO, N Yactb 6OKCa IINI NOBDOH CbEMKn, KOTopar KOHTaKTnpyET C yNtOHNTeHbIM KOJIbUOM, IN daITe IM BBICOXHyTb.
*IINHOpMaUNOyOeN XpaHeHN yNIOHTeJbHOKoNbua,CMOTpNTe "PykoBODTBONo yXOdy 3a yNIOHTeJbHbIM KOnbQOM".
Pp3b, necok, KpncTaNblc cnn n T. n. BoJocbl, HnTKn n T. n.
6 IpoTpnte cyxoi caIpeTko 60Kc dJn NOBODHOI CbeMKN 3HyTpNI cHapyKn.
*IyXOda 3a BHyTpeHHIMN NOIOCTAMN 6OKca NcNoB3yIe HeBOJOKHnCTyIO TkaHb.
7 IpoTpnte BHyTpeHHIOIO NOBepXHOCTb nepeDHeRo CTeKJa.
HaheCNTHeeKoBkoKaanebMoIOuSei XnIKOCTN (mEeTcB NpOdaXe) Ha BHyTpEHHIO NOBepxHOCTb NpeDHeRo CTekna, a 3aTEM BbITpuTe ee caNpETKO JIg OBeKTINBa, YNCTOHTKaHbIO I.T.I.
BHHMaHHe
- Ecni Ha nepeHem cTeKne ocTanaCb rpa3b, OHO MOKeT 3aNoTeTb.
8 NOMECTHTe eRO B TEHb dJa NOJHORO BbICbIXaHnA.
BhmuHne
He ocTabeTte 6OKc IJIa NOBHOc CBEMKn IOI npMbIMC oJHcHbIMN lyuAMN.
3TO MOKET npBecTn K o6ecuBeyBaHIO 6OKca n yCKopeHIO npOcecca CTapeHna yNtHTnTeJbHO KOJIba.
PpmeaHne
TempeaTpa, BnaXHocTb, TemepaTpa BOIbI, KO30ΦnUeHT ee COJeHOCTn IN Dpyrne NapaMeTpbl MOryt N3MeHArTBcB 3aBNCIMOCTN OT OKpykaIOx yCNOBn.
XpaHeHne yIIOHTnTeJIbHOro KOJIbca
Ecn60Kc DnI NOBDOHOn CbEMKn He 6yDet NcNoJIb3OBAbC8 6OJee 1 MeCA, BbIHbTe yNIOHTHe bHOe KObUo.
Ioppo6HOCTn CM.BPyKOBOCTBO NO yXOy 3a yNIOHTHNTeHBHbIM KOJIbUOM
YnIOTHNTeNbHOe KOJbO OTHOCNTcK
pacXoHbIM MaTepnAnaAM. ExeroDHo
3aMeHnTe yNIOHTHeNbHOe KOJbO Ha HOBOe.
BHMaHne
- Пи NOВTOPHOM ИСОЛБ3OBAHIN yПNotHTeNTbHOrO KOLbUa NocNe XpaHeHn 6Я3aTeNbHO pOBepHne erO coCToHnE. Helen3r IcNoJIb3OBaTb yIIOThHTeNtBHO KOLbUO, ecIn OHO DeΦOpMnPoBaHo (CnIIIOSeHNO, INCKPnVBHeO), NOTpeCKaIOcB nIn NobpeXdEHO INhIM O6pa3Om.
TexHnueckne xapaKTepeNCTnKN
Lgill Jn 100000000000000000000000000000000000000000000000000000000000000000000000
calculalgall
| jε·∫l l y | gac binaill y |
| 1 | cal y/la y |
| *1 | cal y/la y |
| *1 a i s l l l l l l l l l l l l l l l l l l l l l l l l l l l l l l l l l l l l l l l l l l l l l l l l l l l l l l l l l l l l l l l l l l l l l l l l l l l l l l l l l l l l l l l l l l l l l l l l l l l l | |
| 67 | p o 7 v j h r d l p b |
| p o x p o × 180128216 | a y w y j k l l l l l l l l l l l l l l l l l l l l l l l l l l l l l l l l l l l l l l l l l l l l l l l l l l l l l l l l l l l l l l l l l l l l l l l l l l l l l l l l l l l l l l l l l l l l l l l l l l l x g a e l x j n j e l (e f f) |
| (∞) ∫ all y b o u n y y | 900 |
LgAolunlKofgilllllalolhyl
GZZ-HM300GZ-KM56D350
GZ-HM430/GZ-HM435
GZ-HM440-GZ-HM450
GZ-HM650-GZ-HM690
Jae aaii 1yolSly aalal alalal
LaogjLioo xLgol
aill jll
1
y j 1 yj 1 yj 1 yj 1 yj 1 yj 1 yj 1 yj 1 yj 1 yj 1 yj 1 yj 1 yj 1 yj 1 yj 1 yj 1 yj 1 yj 1 yj 1 yj 1 yj 1 yj 1 yj 1 yj 1 yj 1 yj 1 y
1 0 1 1 1 1 1 1 1 1 1 1 1 1 1 1 1 1 1 1 1 1 1 1 1 1 1 1 1 1 1 1 1
华
iie yglal jol waiy 12a scluay ailewly lal yaiy
yeg yolal clal no gryll d g uall g yg
jull jul jilus
jll jy jywl yj n yy gld lall y ygd jy
jull jy jydl ydy dy
1.
J 1 J 1 J 1 J 1 J 1 J 1 J 1 J 1 J 1 J 1 J 1 J 1 J 1 J 1 J 1 J 1 J 1 J 1 J 1 J 1 J 1 J 1 J 1 J 1 J 1 J 1 J 1 J 1 J 1 J 1 J 1 J 1 J 1 J 1 J
法一.
gall gagll jckl lglj 1 jk 1 k 1 k 1 k 1 k 1 k 1 k 1 k 1 k 1 k 1 k 1 k 1 k 1 k 1 k 1 k 1 k 1 k 1 k 1 k 1 k 1 k 1 k 1 k 1 k 1 k 1 k 1 k 1 k 1 k 1 k 1 k 1 k 1 k 1 k
aal 1 j 1 j 1 j 1 j 1 j 1 j 1 j 1 j 1 j 1 j 1 j 1 j 1 j 1 j 1 j 1 j 1 j 1 j 1 j 1 j 1 j 1 j 1 j 1 j 1 j 1 j 1 j 1 j 1 j 1 j 1 j 1 j 1 j 1 j

A
microSD/microSDHC aIbIaIaIaIaIaIaIaIaIaIaIaIaIaIaIaIaIaIaIaIaIaIaIaIaIaIaIaIaIaIaIaIaIaIaIaIaIaI
SD/SDHC
g"jE!" 1
j 1
j jaiy 100
y
baa a jia 0 Dgol
#

iigil jolc
yglal jn jn jna jia jia jia jia jia jia jia jia jia jia jia jia jia jia jia jia jia jia jia jia jia jia jia jia jia jia jia jia jia jia jia jia jia jia jia jia jia
120
a

山
aall 10000000000000000000000000000000000000000000000000000000000000000000
aillilililillll lllllllllllllllllll
#
1 1 1 1 1 1 1 1 1 1 1 1 1 1 1 1 1 1 1 1 1 1 1 1 1 1 1 1
1

(g)
A

i 1
()
1
a
a_i + 1 = 12
(20 1
(20 1
y
jaiill kji cli.0
gai j 1
1
a is all jol all biiny biy
y
a
Jnnnll 1s jol bniinl
Lgaiygi y gao gao gao yagao yagao yagao yagao yagao yagao yagao yagao yagao yagao yagao yagao yagao yagao yagao yagao yagao yagao yagao yagao yagao yagao yagao yagao yagao yagao yagao yagao yagao yagao yagao yagao yagao yaguo yaguo yaguo yaguo yaguo yaguo yaguo yaguo yaguo yaguo yaguo yaguo yaguo yaguo yaguo yaguo yaguo yaguo yaguo yaguo yaguo yaguo yaguo yaguo yaguo yaguo yaguo yaguo yaguo yaguo yaguo yaguo yaguo yaguo
pIe 1y
a
a 1
a
1 1
- yda 11 a 10 12
aallll l
ydlalall
aall glll y jilal all aill l 1
- gill 1 kill y jilal all aall
e 1
e 1
a glall jld aill Jale aia g aal llaie
J 1
(1)
aal 1
A
aalal

(A)
LgS JIe! pG y jilal aal 1 gllp G oJ 0

(9 A 10) aIslal Jyall yll lla
Aaalally aalall alalll
Jggl gll plssll aagaiy glall llal ygaa JG 100000000000000000000000000000000000000000000000000000000000000000000000000000
| ### | |
| JVC (العربية) | العربية العربية العربية العربية العربية العربية العربية العربية العربية العربية العربية العربية العربية العربية العربية العربية العربية العربية العربية العربية العربية العربية العربية العربية العربية العربية | العربية العربية العربية العربية العربية العربية العربية العربية العربية العربية العربية العربية العربية العربية العربية العربية العربية العربية العربية العربية العربية العربية العربية العربية الع-ie (العربية 0.) | العربية العربية العربية العربية العربية الع-ie (الع-ie 0.) |
日本語
ENGLISH
DEUTSCH
FRANÇAIS
NEDERLANDS
CASTE.ESP.
ITALIANO
PYCCKN
POLSKI
中文繁體

WR-MG300
MUNK
取叢説明書
Marine Case
INSTRUCTIONS
Unterwassergehäuse