WRMG200 - Waterproof camera case JVC - Free user manual and instructions
Find the device manual for free WRMG200 JVC in PDF.
| Product type | Waterproof housing for camcorder |
| Brand | JVC |
| Model | WRMG200 |
| Maximum depth | 40 meters |
| Dimensions (L × D × H) | 241 mm × 130 mm × 185 mm |
| Weight | Approximately 930 g (without handle) |
| Buoyancy | +450 g (with camcorder and battery) |
| Filter diameter | 67 mm |
| Functions | Power on/off, video recording start/stop, photo taking, mode switching (video/photo), zoom (telephoto/wide angle) |
| Power supply | Via camcorder battery |
| Housing material | High-strength plastic |
| Seal | Replaceable O-ring |
| Grease included | Silicone grease (5 g) |
| Included accessories | Silicone grease (5g), desiccant (2g ×5), lens cloth (50 sheets), cotton swab, strap, liquid cleaning product, 2 replacement O-rings, mediator, tightening key, 2 hex keys |
| Recommended maintenance | Rinse with fresh water after each use, grease the seal, remove seal for storage if prolonged non-use |
| Safety | Waterproof test before each use, inspect seal before each dive |
| Spare parts | Maintenance kit sold separately (ref. MG200_MTKIT): seals, grease, desiccant, cloth |
| Camcorder compatibility | JVC GZ-HD40, GZ-HD30, GZ-HD10 |
| Repairability | Service by authorized dealer (fee applies); replace seal annually |
Frequently Asked Questions - WRMG200 JVC
User questions about WRMG200 JVC
0 question about this device. Answer the ones you know or ask your own.
Ask a new question about this device
Download the instructions for your Waterproof camera case in PDF format for free! Find your manual WRMG200 - JVC and take your electronic device back in hand. On this page are published all the documents necessary for the use of your device. WRMG200 by JVC.
USER MANUAL WRMG200 JVC
In order to use this product safely
Preparation (Pg. 6)
- Check that there is no dirt, cracks, or damage to the O-ring.
• Always apply grease to the O-ring.

Attaching the Marine Case to the Camera (Pg. 7, 8)
- Make sure that the O-ring is not twisted, and that you do not forget to attach it.
- When tightening the seal, make sure there are no foreign objects caught in the seal.

Recording the Video/Still Image Files (Pg. 8, 9)
- Avoid opening and closing the marine case in the shooting location.
- When holding the marine case, lower it gently into the water.

Detaching the Marine Case/Maintenance (Pg. 9, 10, 11)
- Always wash the marine case in fresh water after use.
- Perform maintenance on the O-ring.
If water leaks into the case due to careless use of the marine case, JVC cannot accept responsibility for any damage that may occur to the internal equipment and materials (video camera, SD card, etc.), or any expenses incurred in taking the photographs/video. Therefore, please be careful when using the marine case.
Safety Precaution

Before use, this unit must be pre-tested to check if there is any water leakage.
Please read before use
This marine case is a precision instrument designed to permit safe video recording under high water pressure. Please pay careful attention when handling the unit before and after use, as explained in this user's manual.
Each part of the marine case has been subject to strict controls during the manufacturing process, and the individual functions have faced stringent tests during the assembly process. Each marine case has also had to pass waterproof inspections using high-pressure water testers. However, damage can sometimes occur during transport and distribution, or during storage after purchase, so before diving always carry out the following pre-use test to verify safety.
Pre-use test
Be sure to perform the following pre-use test before diving.
- Before mounting the camera inside the marine case, dive with only the empty marine case and test for water leaks.
Allow 5 or 6 minutes to ensure there are no leaks.
Be sure to perform this test to ensure the safety of your camera.
- The following are some common causes of water leaks:
A. The marine case is used without attaching the O-ring.
B. The O-ring is not mounted in the correct position.
C. The O-ring is damaged or deformed.
D. There is sand, dirt, hair or other foreign matter on the O-ring.
E. There is sand, dirt, hair or other foreign matter on the contact surface of the O-ring or on the inside of the lid.
F. The provided strap or drying agent bag is pinched inside the marine case when the lid is closed.
3. Check that there are no scratches or cracks on the marine case every time you use it.
The marine case must withstand water pressure with use. Repeated exposure to pressure eventually leads to material fatigue, which may result in damage of the marine case. Every time you use the marine case, check in advance that there are no scratches or cracks. If you frequently use the marine case, be sure to ask for maintenance at the store of purchase. (There is a charge for maintenance.)
To protect your camera and ensure optimum use, keep the examples listed above in mind when using the marine case.
JVC accepts no responsibility for water leakage or damage to anything inside the marine case (camera, SD card, etc.) due to careless usage of this product. Be sure to follow correct procedures when using the marine case.
Accessories
- Anti-fog liquid
- Cleaner liquid (to remove dirt)
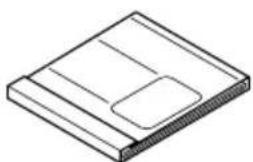
• Silicone grease (5 g) x 1 - Silicone cloth
• Drying agent (2 g) x 5 - Lens tissue paper (50 sheets) x 1
- Swab
-
Strap
• 2 O-rings One spare O-ring. -
Base To attach to the camera.
• Grip Commercially available lights and weights can also be attached. - Pick
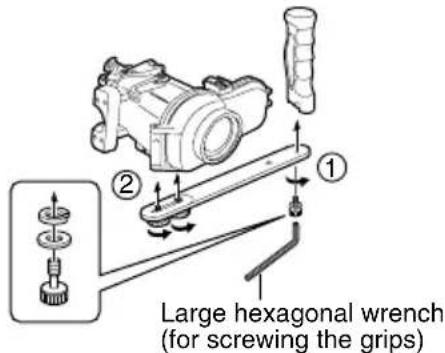
- Screw tightening key
• 2 hexagonal wrenches Large: for screwing the grip Small: buckle opener
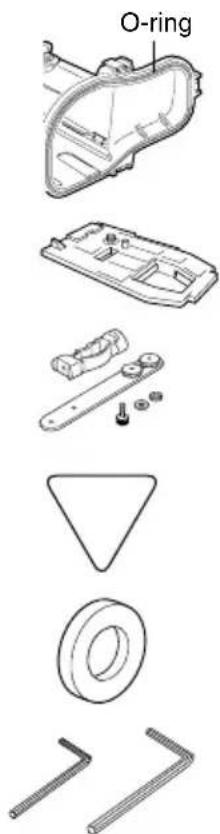
Maintenance Kit - Sold Separately (Part Number: MG200\_MTKIT)
You can purchase the following set of expendable parts.
Please contact your local JVC service representative.
- O - rings x 2
• Silicone grease (5 g) x 1 - Drying agent (2 g) x 5
- Lens tissue paper (50 sheets) x 1
Procedures for Using the Supplied Maintenance Kit
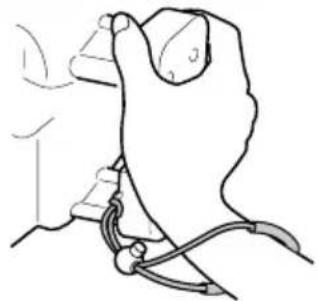
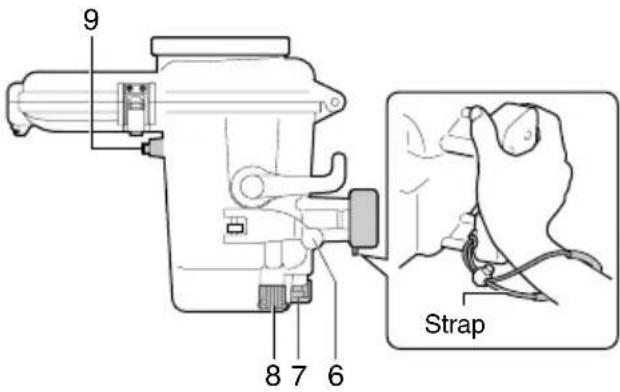
Strap
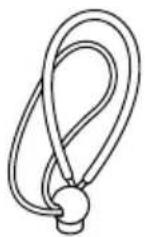
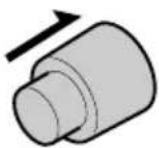
Pass the strap through the strap attachment hole before using the marine case to maintain a firm grip in water.
natural_image
Line drawing of a hand holding a tool or device, no text or symbols presentAnti-fog liquid
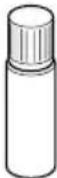
Apply the anti-fog liquid on the inner side of front glass before using the marine case.
Add two to three drops of the liquid on a lens tissue paper, and apply on the inner side of the front glass.
Cleaner liquid
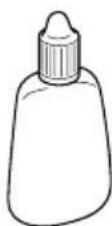
For removing dirt from the front glass after using the marine case.
Add two to three drops of the cleaner on a lens tissue paper, and wipe the inner side of the front glass.
Lens tissue paper
natural_image
Isometric line drawing of a rectangular electronic device with a slot and base (no text or symbols)Use the lens tissue paper when applying the anti-fog liquid on the front glass, or when removing dirt from the front glass using the cleaner liquid.
Marine case
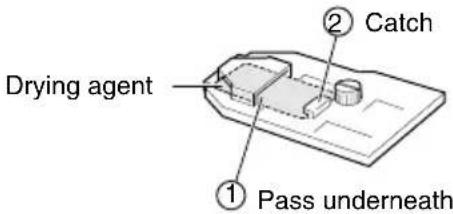
Drying agent

Prevents fogging inside the marine case. Insert it at the back of the base attached to the camera.
* The moisture absorption ability of drying agent that has previously been used may deteriorate depending on the conditions of use. As such, we recommend that the drying agent be replaced each time.
Parts and Functions
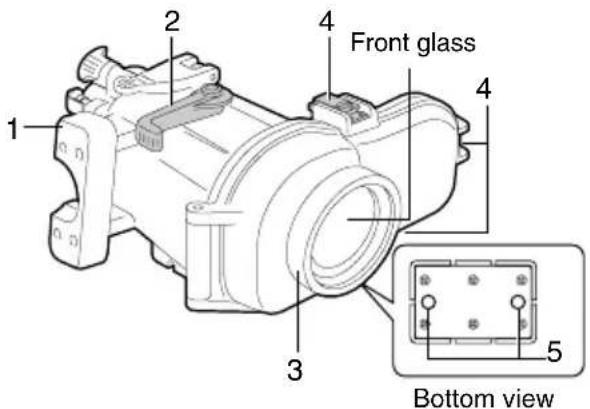
1. Main casing grip
Attach the strap provided as shown in the diagram above.
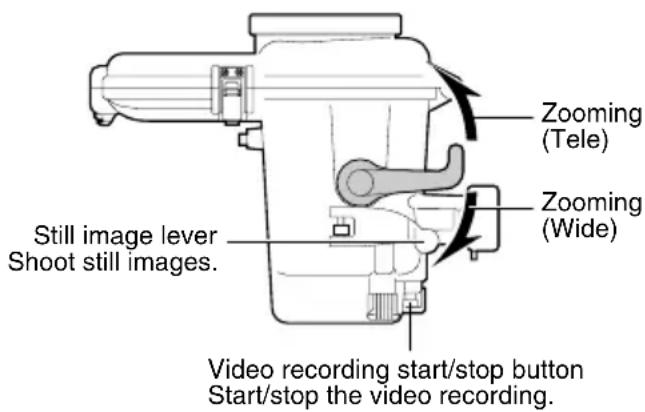
2. Zoom lever
Zoom (tele/wide) while shooting.
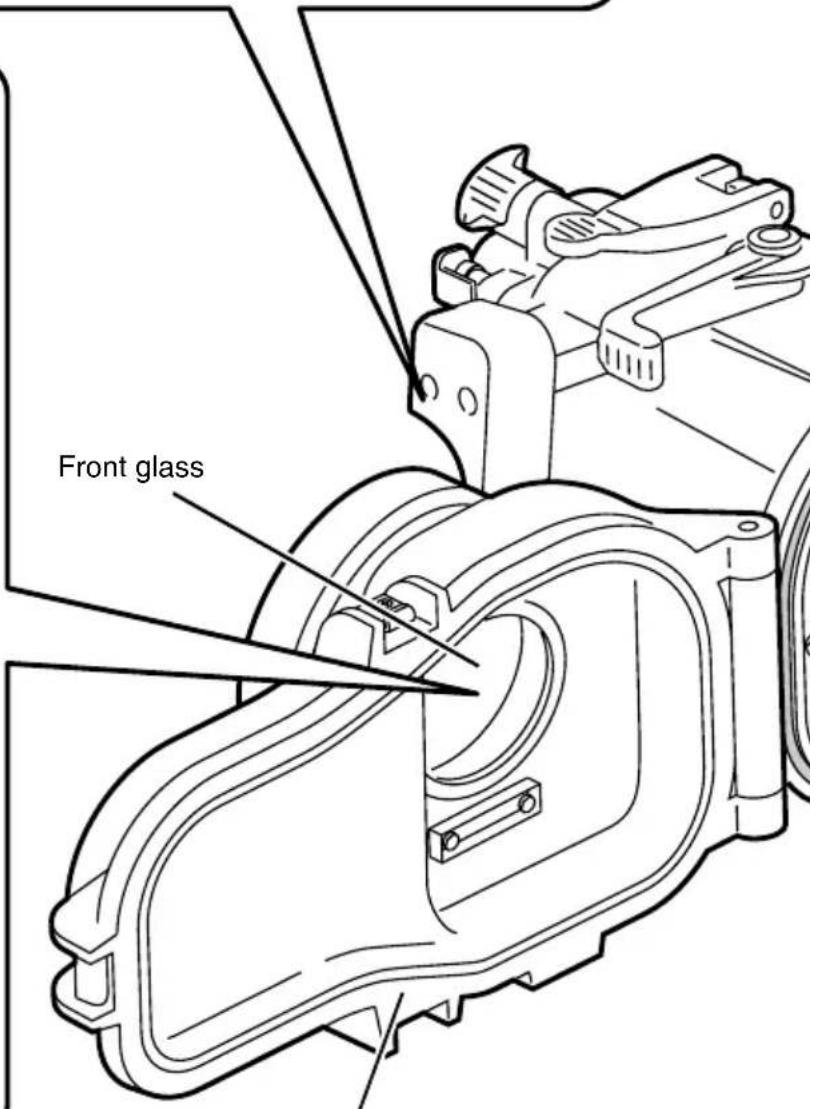
3. Ring
Commercially available filters (67 mm diameter) can be attached.
- The lens may vignette (darkening at the edges of the screen) depending on the filter or lens attached.
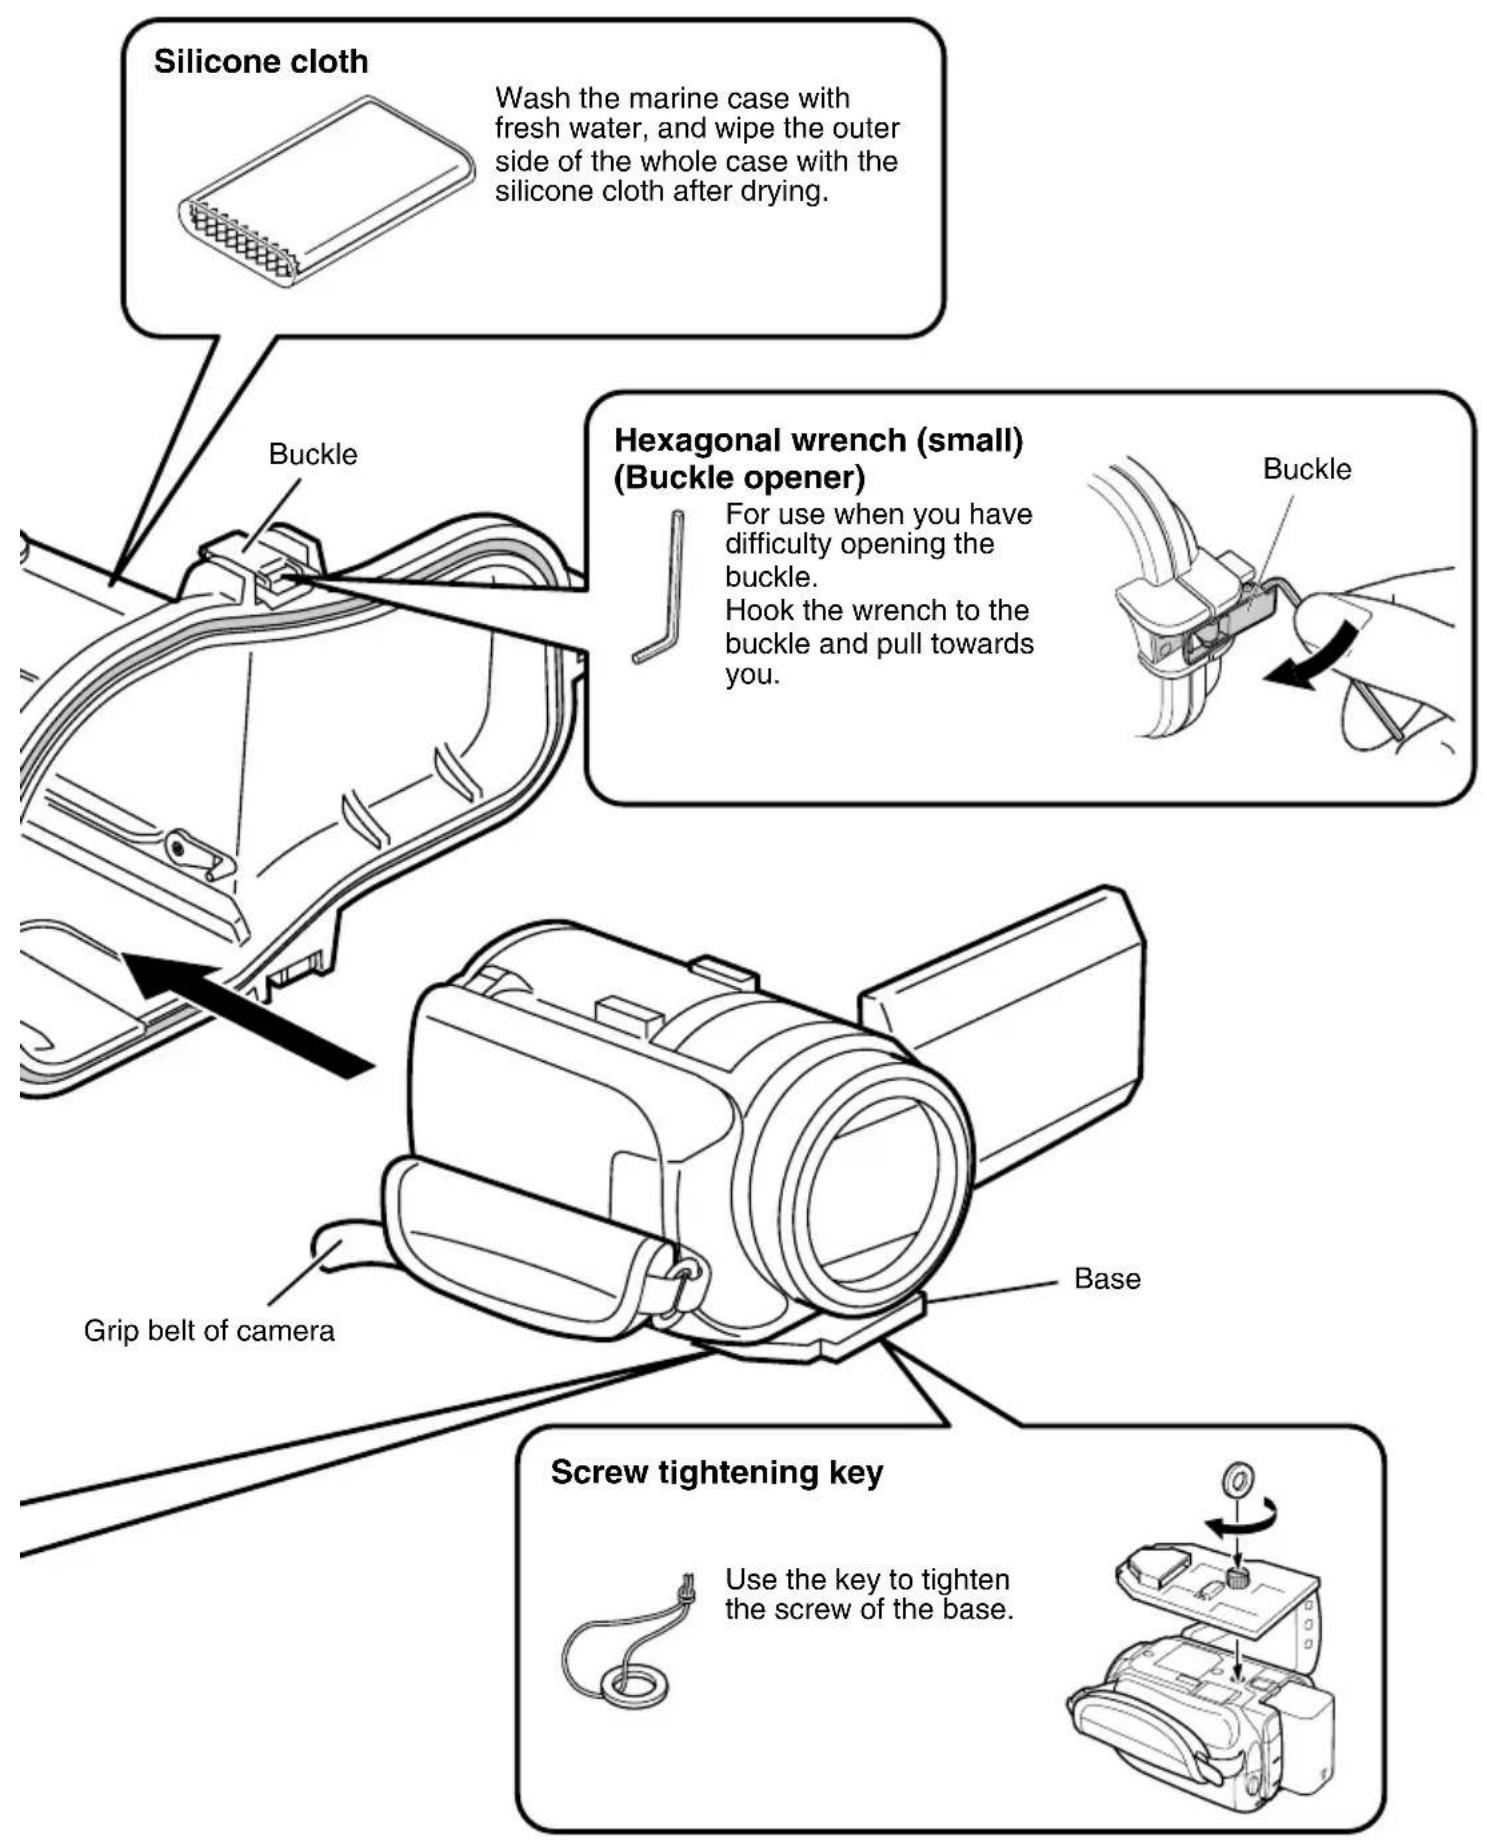
4. Buckle (3 locations)
Seal the marine case.
5. Grip attachment holes
You can attach the grip provided, or commercially available weights.
6. Still image lever
Press to take still images.
7. Video recording start/stop button
Press once to start recording a video. Press again to stop.
8. Mode switch
Switches the shooting mode (video/still).
9. Power button
Turns camera's power on/off.
Preparation
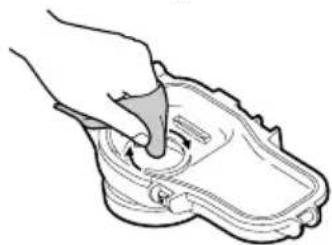
① Inspect the main casing for scratches and cracks.
Apply 2 or 3 drops of the anti-fog liquid provided onto a lens tissue paper provided or a clean cloth, and wipe the inner side of the marine case front glass.

natural_image
Line drawing of a hand pressing down on a shoe component (no text or symbols)② Check the O-ring.
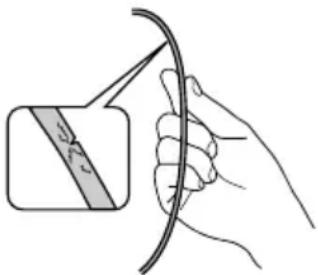
Using the pick provided, remove the O-ring from the main case.
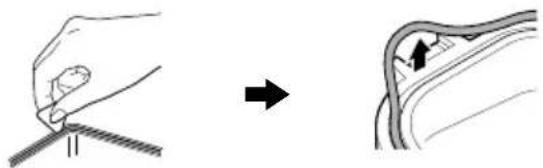
natural_image
Illustration showing a hand holding a tool and a close-up of the tool tip (no text or symbols present)Check the O-ring, O-ring contact surface, and groove in which the O-ring fits for foreign matter, nicks, cracks, etc.
Be sure to remove any foreign matter (dirt, sand, salt crystals, hair, lint, etc.).
* For details, refer to the "O-ring Maintenance Manual".
Caution
● Never use the O-ring in case of nicks and cracks.
- If the O-ring is handled inappropriately, it can cause water leakage.
③ Apply grease to the O-ring and re-attach.
④ Close the empty marine case (no camera inside).
⑤ Submerge the marine case in water and check that there are no water leaks.
(Pg. 8)
Attaching the Marine Case to the Camera
① Setup the camera.
- For models equipped with light, turn off the light.
- It is recommended to set to the auto shooting mode.
- Insert the battery and micro SD card beforehand if needed.
● To turn off the camera, press and hold the power button for more than 2 seconds.
Caution
- Be sure to open the lens cover.
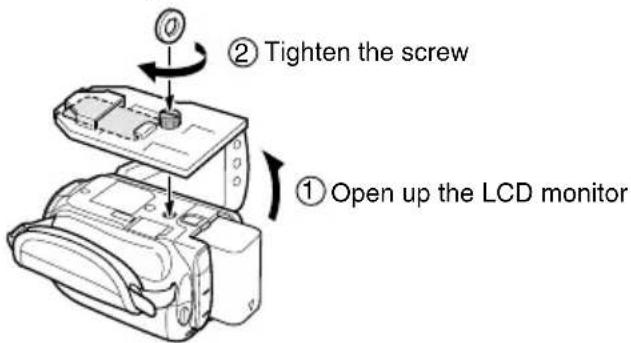
② Insert the drying agent at the back of the base.
③ Attach the base to the bottom of the camera.
- Align the tripod screw hole at the bottom of your camera with the screw of the base, and tighten the screw.
Caution
- The camera turns on automatically when the LCD monitor is opened. To turn off the camera, press and hold the power button for more than 2 seconds.
4 Fold the grip belt.
● Make sure the grip belt is not caught between the marine case when sealing.
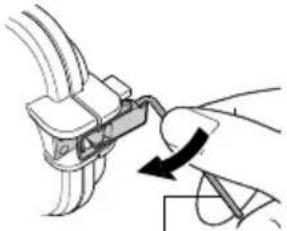
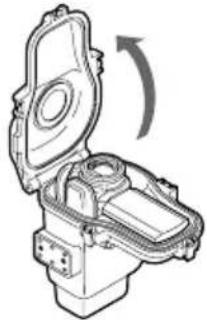
⑤ Open the marine case.
- If it is difficult to open buckles, use the small hexagonal wrench (buckle opener).
natural_image
Diagram of a hand holding a cable connector with a curved arrow indicating rotation (no text or symbols)Small hexagonal wrench (Buckle opener)
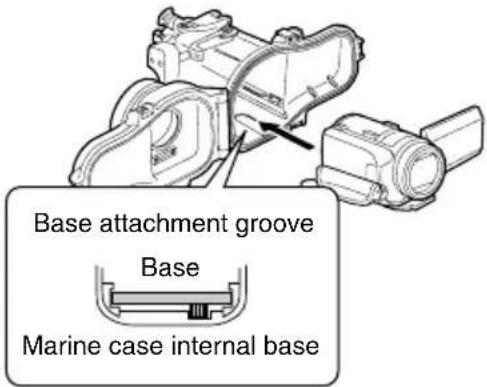
6 Insert the camera into the marine case.
- Align the base attachment groove with the base to insert.
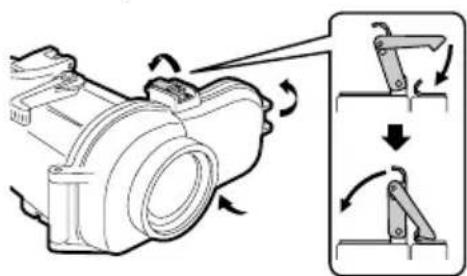
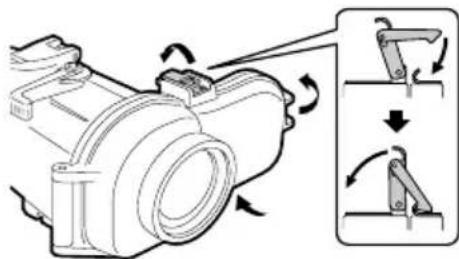
⑦ Adjust the angle of the LCD monitor.
● The LCD monitor can be tilt upwards to a maximum angle of 30 degrees.
natural_image
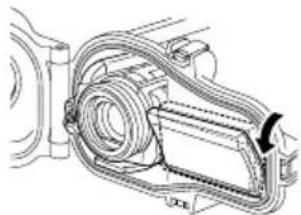
Technical line drawing of a mechanical assembly with no visible text or symbols8 Seal the marine case.
● Make sure that the O-ring is not twisted, and that you did not forget to attach it.
● Make sure that foreign objects (strap, belt, dirt, etc.) have not been caught in between.
Caution
- The risk of water leakage is extremely high if the O-ring is twisted, if you forget to attach it, or if something is trapped in the seal.
⑨ Check that all the operation buttons of the camera are functioning properly.
- If it is not functioning, take out the camera and insert again.
10 Attach the grips.
- Attach the grips, lights or weights on the bottom of the marine case.
Recording the Video/Still Image Files
Before recording
Submerge the marine case with the camera inserted into a bathtub or water tank full of fresh water. Gradually prolong the time the marine case is submerged as follows.
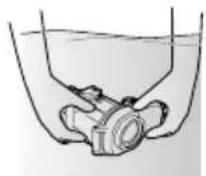
● 1st time: 5 \~ 10 seconds
● 2nd time: 30 seconds \~ 1 minute
- 3rd time: 3 minutes \~ 5 minutes (try operating the levers and buttons while the marine case is submerged).
Caution
● Always have someone hold the marine case for you when diving into, or getting out of water, to prevent loss or damages.
- If for any reason water leakage occurs, remove the camera battery. It may cause the camera to explode.
① Turn on the camera's power.
- Press and hold the power button for more than 2 seconds to turn on the power. (The camera's power lamp lights and the monitor turns on.)
ON/OFF
Note
- Sometimes, due to sudden shaking or impact to the marine case, the camera's drop detection function operates to turn off the camera's power. When the camera's power is turned off, turn it on again. When "VIDEO MANAGEMENT FILE IS BROKEN. TO RECORD/PLAYBACK VIDEO, RECOVERY IS REQUIRED. RECOVER?" is displayed, press the REC button to recover the file.
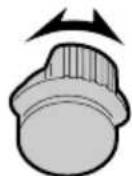
② Select the shooting mode (video/still).
● Turn the lever from side to side to switch between video and still mode.
Still mode Video mode
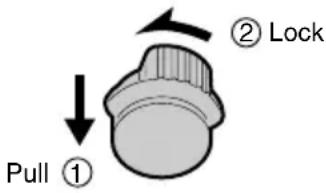
- Be sure to lock the lever after switching the shooting mode.
● To lock the lever, pull it towards you and turn it to the left. - To unlock, pull the lever towards you and turn to the right.
③ Press the video recording start/stop button or the still image lever to start recording.
4 When you have finished recording, press and hold the power button for more than 2 seconds to turn off the camera.
- The camera's power lamp goes out and the monitor turns off.
Detaching the camera
If there is a need to detach immediately:
1 Submerge the marine case in fresh water and shake the marine case in the upward, downward, left and right directions for at least 10 times, followed by rinsing it.
② Remove the marine case and wipe off water droplets on the case surface using a dry towel.
3 Face the front glass of the marine case upwards, and open the buckles to remove the camera, while paying attention not to let water droplets at O-ring or buckles enter the case.
4 Upon removing the camera, close the marine case again while paying attention not to allow water droplets enter the case, followed by tightening all the buckles.
* Always perform maintenance on the marine case after using. (Pg. 10)
If there is no need to detach immediately:
Perform maintenance on the marine case.
(Pg. 10)
Maintenance on the marine case
Always perform maintenance on the marine case after you have finished recording.
Salt crystal or dirt will accumulate inside the marine case if maintenance is not performed, and this can cause water leakage.
Wash the marine case in water while it is still sealed
- Do this within 30 minutes after diving.
- Pour in fresh water until the marine case is completely submerged in the container, and shake the marine case in the upward, downward, left and right directions.
- Move the buttons and levers while the marine case is submerged, and rinse the dirt out from any gaps or grooves. Proceed to ③
- If used in the sea
-> Proceed to Performing salt removal
Performing salt removal
If the marine case was used in the sea, submerge the marine case in fresh water for at least 1 hour to remove salt.
① Prepare a container that contains fresh water that is five times more than the volume of the marine case.
● The container must be big enough to allow the marine case to submerge fully.
- If only small containers are available, pour in fresh water that is equivalent to at least five times the volume of the marine case over a few times.
● Shaking the marine case in the upward, downward, left and right directions will be more effective.
- Move the buttons and levers while the marine case is submerged, and rinse the salt out from any gaps or grooves etc.
● Make sure the grip is also free of salt.
② Put in fresh water for at least 1 hour.
③ Remove the marine case and wipe off water droplets on the case surface using a dry towel.
4 Remove the camera.
- Face the front glass of the marine case upwards, and open the buckles to remove the camera, while paying attention not to let water droplets at O-ring or buckles enter the case.
Caution
● The camera may fall out if the buckles are opened with the front glass facing down.
- If you cannot avoid opening the marine case at the diving location, pay attention not to let water droplets from your hair or your body enter the case.
natural_image
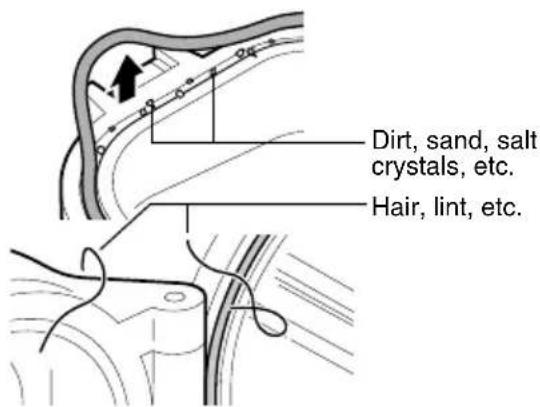
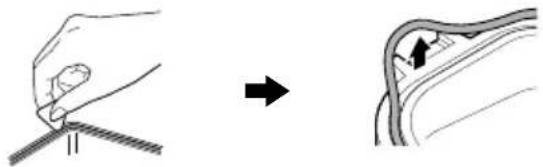
Technical line drawing of a mechanical component with an open lid and internal structure, showing a curved arrow indicating rotation (no text or symbols present)⑤ Remove the O-ring, and wipe off salt, sand and other foreign matter.
- Also wipe the groove in which the O-ring was inserted, and the part of the marine case that was in contact with the O-ring, and allow them to dry.
* For details on handling and storing the O-ring, refer to the "O-ring Maintenance Manual".
6 Wipe the inside and outside of the marine case with a dry cloth.
* Use a lint-free cloth to wipe the inside of the marine case.
⑦ Wipe the inner side of the front glass.
- Add a few drops of the cleaner liquid onto the inner side of the front glass, and wipe off using lens tissue paper etc.
natural_image
Line drawing of a hand pressing down on a shoe component (no text or symbols)Caution
● The front glass will fog if it is dirty.
8 Let it dry completely in a shaded area.
Caution
- Do not leave the marine case in direct sunlight.
- Doing so may cause discoloration of the case, and may cause the O-ring to deteriorate more quickly.
Note
- The conditions may vary depending on the environment of use such as temperature, humidity, water temperature, salinity and others.
Storing the O-ring
If you do not intend to use the marine case for longer than one month, remove and store the O-ring away.
* For details, refer to the "O-ring Maintenance Manual".
natural_image
Illustration of a hand holding a curved cable with a magnified inset showing a band (no text or symbols)The O-ring is an expendable part. Replace the O-ring with a brand new one every year.
Caution
- When re-using an O-ring after storage, always check the condition of the O-ring. Never use an O-ring if it is deformed (crushed, distorted), cracked, or damaged in any way.
Specifications
| Maximum pressure | Water depth up to 40 meters |
| Operations Power on/offVideo recording start/stopStill image shootingMode switching (video/still image)Zoom (tele/wide) | |
| Buoyancy +450 g (with the camera inserted and the supplied battery pack attached) | |
| Filter diameter 67 mm | |
| Main unit dimensions(W x D x H) | 241 mm x 130 mm x 185 mm |
| Main unit weight Approx. 930 g(excluding grip) | |
■Applicable camera models
GZ-HD40
GZ-HD30
GZ-HD10
natural_image
Line drawing of a hand gripping a small object, possibly a tool or device (no text or symbols present)Anti-Beschlagmittel
natural_image
Isometric line drawing of a rectangular electronic device with a slot and lid (no text or symbols)natural_image
Line drawing of a hand pressing down on a shoe component (no text or symbols)natural_image
Diagram showing a hand holding a tool with a ruler, before and after a close-up of a mechanical component (no text or symbols)① LCD-Monitor ausklappen
Achtung
natural_image
Diagram of a hand connecting cable connectors to a mechanical component with an arrow indicating rotation (no text or symbols present)natural_image
Technical line drawing of a mechanical assembly with no visible text or symbolsAchtung
natural_image
Technical line drawing of a mechanical component with an open lid and internal structure, showing a curved arrow indicating rotation (no text or symbols present)natural_image
Line drawing of a hand pressing down on a shoe component (no text or symbols)Achtung
natural_image
Illustration of a hand holding a cable with a magnified inset showing a band (no text or symbols)natural_image
Line drawing of a hand holding a tool or device, no text or symbols presentnatural_image
Isometric line drawing of a rectangular electronic device with a slot and base (no text or symbols)natural_image
Stacked rectangular sheets with no text or symbols visiblenatural_image
Line drawing of a hand pressing down on a shoe component (no text or symbols)natural_image
Illustration showing a hand holding a tool and a close-up of the blade with an arrow indicating direction (no text or symbols)natural_image
Technical line drawing of a mechanical assembly with no visible text or symbolsAvertissement
natural_image
Technical line drawing of a mechanical component with an open lid and internal structure, showing a rotational arrow (no text or symbols)natural_image
Line drawing of a hand pressing down on a shoe component (no text or symbols)Avertissement
natural_image
Illustration of a hand holding a curved cable with a magnified inset showing a band (no text or symbols)natural_image
Line drawing of a hand holding a tool, no text or symbols presentAnticondensvloeistof

natural_image
Isometric line drawing of a rectangular electronic device with a slot and base (no text or symbols)natural_image
Line drawing of a hand using a tool to press or adjust a shoe component (no text or symbols)② Controleer de O-ring.
natural_image
Diagram showing a hand holding a tool and a close-up of a curved object with an arrow indicating direction (no text or symbols present)① Stel de camera in.
① De Icd-monitor openen
Waarschuwing
natural_image
Technical line drawing of a mechanical assembly with no visible text or symbolsnatural_image
Mechanical assembly diagram showing a motor with rotational arrows and a close-up of the mechanism (no text or symbols)Waarschuwing
natural_image
Technical line drawing of a mechanical device with an open lid and internal components, showing a curved arrow indicating rotation (no text or symbols present)natural_image
Line drawing of a hand pressing down on a shoe component (no text or symbols)Waarschuwing
natural_image
Illustration of a hand holding a cable with a magnified inset showing a band (no text or symbols)natural_image
Line drawing of a hand holding a tool, no text or symbols presentAgente anti-empañó
natural_image
Isometric line drawing of a rectangular electronic device with a slot and base (no text or symbols)natural_image
Line drawing of a hand pressing down on a shoe component (no text or symbols)natural_image
Diagram showing a hand holding a tool and a close-up of the tool tip (no text or symbols present)natural_image
Technical line drawing of a mechanical assembly with no visible text or symbols8 Sellan la carcasa submarina.
Cuidado
Llave hexagonal grande (para atornillar la empuñaduras)
natural_image
Technical line drawing of a mechanical device with an open lid and internal components, showing a curved arrow indicating rotation (no text or symbols present)natural_image
Line drawing of a hand pressing down on a shoe component (no text or symbols)Cuidado
natural_image
Illustration of a hand holding a cable with a magnified inset showing a band (no text or symbols)natural_image
Line drawing of a hand gripping a small object, possibly a tool or device (no text or symbols present)Liquido anti-appannante
natural_image
Isometric line drawing of a rectangular electronic device with a slot and base (no text or symbols)natural_image
Line drawing of a hand using a tool to press or adjust a shoe component (no text or symbols)natural_image
Illustration showing a hand holding a tool and a close-up of a curved object with an arrow indicating direction (no text or symbols)natural_image
Diagram of a hand connecting cable clips to a mechanical component with an arrow indicating rotation (no text or symbols)natural_image
Technical line drawing of a mechanical assembly with no visible text or symbolsAvvertenza
natural_image
Technical line drawing of a mechanical device with an open lid and internal components, showing a rotational arrow (no text or symbols)natural_image
Line drawing of a hand using a tool to press or adjust a shoe component (no text or symbols)Avvertenza
natural_image
Illustration of a hand holding a cable with a magnified inset showing a band (no text or symbols)natural_image
Line drawing of a hand gripping a tool or device (no text or symbols present)natural_image
Isometric line drawing of a rectangular electronic device with a slot and base (no text or symbols)natural_image
Line drawing of a hand pressing down on a shoe component (no text or symbols)natural_image
Diagram showing a hand holding a tool and a close-up of a mechanical component with an arrow indicating motion (no text or symbols present)natural_image
Diagram of a hand connecting cable clips to a mechanical component with a curved arrow indicating rotation (no text or symbols)natural_image
Technical line drawing of a mechanical assembly with no visible text or symbolsВнимание
natural_image
Technical line drawing of a mechanical component with an open lid and internal structure, showing a rotational arrow (no text or symbols)natural_image
Line drawing of a hand pressing down on a shoe component (no text or symbols)Внимание
natural_image
Illustration of a hand holding a cable with a magnified inset showing a band (no text or symbols)natural_image
Line drawing of a hand holding a tool or device, no text or symbols presentnatural_image
Isometric line drawing of a rectangular electronic device with a slot and base (no text or symbols)
natural_image
Line drawing of a hand pressing down on a shoe component (no text or symbols)natural_image
Illustration showing a hand holding a tool and a close-up of the blade with an arrow indicating direction (no text or symbols)natural_image
Diagram of a hand holding a cable clip with a rotating arrow indicating rotation (no text or symbols)natural_image
Technical line drawing of a mechanical assembly with hoses and components (no text or symbols)Ostrożnie
natural_image
Technical line drawing of a mechanical device with an open lid and internal components, showing a rotational arrow (no text or symbols)natural_image
Line drawing of a hand pressing down on a shoe component (no text or symbols)Ostrożnie
natural_image
Illustration of a hand holding a cable with a magnified inset showing a band (no text or symbols)natural_image
Line drawing of a hand pressing down on a mechanical component (no text or symbols)② 檢查0型環。
使用隨附的開鎖器,白潛水盒移除0型環。
natural_image
Illustration showing a hand holding a tool and a close-up of the cable being held, with no visible text or symbols.⑤ 將潛水盒浸入水中,檢查是否滲水。
(第 88 頁)
將潛水盒裝上相機
① 設定相機。
natural_image
Technical line drawing of a mechanical assembly with hoses and components (no text or symbols)8 緊閉潛水盒。
小心
natural_image
Technical line drawing of a mechanical device with an open lid and internal components, showing a rotational arrow (no text or symbols)natural_image
Line drawing of a hand pressing down on a shoe component (no text or symbols)小心
natural_image
Illustration of a hand holding a curved cable with a magnified inset showing a band (no text or symbols)natural_image
Illustration of a hand holding a cable with a magnified inset showing a shaded band (no text or symbols)natural_image
Technical line drawing of a mechanical device with an open lid and internal components, showing a curved arrow indicating rotation (no text or symbols present)قَمْ بِازَالَةِ الْحَلَّقَةِ الْدَائِرِية، وَامُسْحِ الْمَلْحِ وَالْرُمالِ وَالْمُوَادِ الْغَرِيِيَةِ
الأخرى.
natural_image
Line drawing of a hand pressing down on a shoe component with a circular arrow indicating rotation (no text or symbols)ت Connectivity
natural_image
Technical line drawing of a mechanical assembly with no visible text or symbolsأحكم ربط المسمار
natural_image
Diagram of a hand connecting cable connectors to a mechanical component, showing a curved arrow indicating rotation (no text or symbols present)natural_image
Line drawing of a hand pressing down on a shoe component (no text or symbols)natural_image
Illustration showing a hand holding a tool and a close-up of the handle (no text or symbols present)natural_image
Exploded view diagram of mechanical parts including housing, gears, and fasteners (no text or labels)القاعة لتش BIT الك