Softy Ice Cream Party Time 634 - Ice machine ARIETE - Free user manual and instructions
Find the device manual for free Softy Ice Cream Party Time 634 ARIETE in PDF.

| Product Type | Ice Cream Machine |
| Brand | Ariete |
| Model | Softy Ice Cream Party Time 634 |
| Preparation Capacity | Maximum 700 ml |
| Basket Freezing Time | Minimum 12 hours at -18°C |
| Preparation Time | 20 to 30 minutes |
| Max Continuous Operation | 40 minutes |
| Rest Between Cycles | Minimum 30 minutes |
| Power Supply | 220-240 V ~ 50/60 Hz |
| Power | 15 W (estimated) |
| Materials | ABS plastic, stainless steel (stirrer), tempered glass (lid) |
| Dimensions (approx.) | 30 x 25 x 35 cm |
| Weight (approx.) | 3 kg |
| Pouring Spout | Yes, with container support and cone holder |
| Safety | Manual stop, must unplug before cleaning |
| Maintenance | Clean removable parts with warm soapy water, do not wash in dishwasher |
| Spare Parts | Available from Ariete after-sales service (basket, stirrer, lid, etc.) |
| Warranty | 2 years (subject to legal conditions) |
Frequently Asked Questions - Softy Ice Cream Party Time 634 ARIETE
User questions about Softy Ice Cream Party Time 634 ARIETE
0 question about this device. Answer the ones you know or ask your own.
Ask a new question about this device
Download the instructions for your Ice machine in PDF format for free! Find your manual Softy Ice Cream Party Time 634 - ARIETE and take your electronic device back in hand. On this page are published all the documents necessary for the use of your device. Softy Ice Cream Party Time 634 by ARIETE.
USER MANUAL Softy Ice Cream Party Time 634 ARIETE
The necessary precautions must be taken when using electrical appliances, and these include the following:
Make sure that the voltage on the appliance rating plate corresponds to that of the mains elec-1. tricity.
Never leave the appliance unattended when connected to the power supply; unplug it after 2. every use.
Never place the appliance on or close to sources of heat.3.
Always place the appliance on a flat, level surface during use.4.
Never leave the appliance exposed to the elements (rain, sun, etc....).5.
Make sure that the power cord does not come into contact with hot surfaces.6.
- This appliance must not be used by people (including children) with reduced physical or mental capabilities or by people without the relevant experience or knowledge of the appliance, unless they are carefully supervised or properly trained in its use by a person responsible for their safety.
Make sure that children cannot play with the appliance.8.
Never place the appliance body, plug or power cord in water or other liquids; always wipe clean 9. with a damp cloth.
Always unplug the power cord from the electricity mains before fitting or removing single attach-10.
ments or before cleaning the appliance.
Always make sure that your hands are thoroughly dry before using or adjusting the switches on 11. the appliance, or before touching the power plug or power connections.
To unplug the appliance, grip the plug and remove it directly from the power socket. Never pull 12. the power cord to unplug the appliance.
Do not use the appliance if the power cord or plug are damaged or if the appliance itself is faulty; 13. all repairs, including substitution of power cord, must be carried out exclusively by an Ariete assistance centre or by authorized Ariete technicians in order to avoid all risks.
In case of using extension leads, these must be suitable for the appliance power to avoid dan-14.
ger to the operator and for the safety of the environment in which the appliance is being used.
Extension leads, if not suitable, can cause operating anomalies.
- Never allow the cord to dangle in places where it may be grabbed by a child.
Do not threaten the safety of the appliance by using parts that are not original or which have not 16. been approved by the manufacturer.
- This appliance is designed for HOME USE ONLY and may not be used for commercial or industrial purposes.
This appliance conforms to the directives 2006/95/EC and EMC 2004/108/EC, and to the regula-18. tions (EC) No. 1935/2004 of 27/10/2004 regarding material in contact with foods.
Any changes to this product that have not been expressly authorised by the manufacturer may 19. lead to the user's guarantee being rendered null and void.
In the event that you decide to dispose of the appliance, we advise you to make it inoperative 20. by cutting off the power cord. We also recommend that any parts that could be dangerous be rendered harmless, especially for children, who may play with the appliance or its parts.
Packaging must never be left within the reach of children since it is potentially dangerous.21.
Keep fingers, utensils, etc. away from the ice container while it is operating; this will reduce the 22.
risk of damage to people and to the machine. UTENSILS OR SHARP OR METAL ITEMS MUST
NOT BE USED INSIDE THE ICE CONTAINER. These items can damage the ice cream maker.
It is possible to use rubber or wooden utensils, when the ice cream maker is switched off.
Never remove the power base while preparing ice cream.24.
Before starting the ice cream machine, make sure that is perfectly assembled and that the power 25. base is firmly attached to the lid.
Never operate the appliance when it is open.26.
Never hang up the appliance or angle it at more than 45 degrees27.
Place the appliance at least 8 cm away from items so that there is always good heat dispersion.28.
Never place ingredients in the freezer to pre-chill them, as in this way, the mixing paddle might 29.
block before the ice cream has actually formed.
After keeping the motor running without interruption to make an amount of ice cream, wait for at 30.
least thirty minutes before starting the appliance again.
Do not operate the appliance for more than 40 minutes consecutively.31.
If the ice cream or sorbet contain fresh ingredients, they need to be eaten within a week. Ice 32.
cream tastes better cold.
If the ice cream or sorbet contains raw eggs, they should not be eaten by children, pregnant 33.
women or the elderly.
If the freezing solution should come out of the container, stop using it. The freezing solution is 34.
not toxic.
Switch off the appliance and unplug it from the mains before taking out the container and the 35.
power base.

36.
To dispose of product correctly according to European Directive 2009/96/CE, please refer
to and read the provided leaflet enclosed with the product.
DO NOT THROW AWAY THESE INSTRUCTIONS
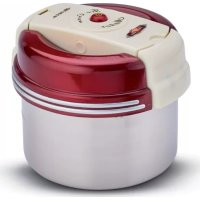
DESCRIPTION OF THE APPLIANCE (Fig. 1)
| A | On/off switch | G | Container |
| B | Power base release button | H | Appliance body |
| C | Power base | I | Dispenser |
| D | Chute for inserting ingredients | L | Container housing |
| E | Lid | M | Cone support |
| F | Mixer paddle | N | Device to lower the appliance body |
PREPARATION AND HINTS
IMPORTANT: Before using the appliance, wash all of the removable parts that will come into contact with the ice cream (container, mixer paddle, dispenser, and the transparent lid) with water and a common washing up detergent.
- The container (G) should be frozen before each use. The container (G) has a double insulated recipient that requires total freezing (about 12 hours) for perfect ice cream results.
- The freezer needs to arrive at a temperature of at least - 18^ .
- The container needs to be placed (preferably sealed inside a plastic bag to prevent it from absorbing odours or from coming into contact with the ice), so it is perfectly upright, with the opening facing upwards. The container needs to be placed in the back section of the freezer, where it is coolest.
- It is necessary to keep the container in the freezer for at least 12 hours.
- Keep the container (G) in the freezer when it is not in use; this will mean it will always be ready when needed.
- As well as the recipes in this booklet, it is possible to use personal recipes. In both cases, the total volume of the mix, well combined and even, must not be more than 700ml .
- Do not use hard ingredients and/or large pieces (e.g. whole hazelnuts, chocolate candy, large chunks of fruit, etc...) These ingredients could clog the dispenser and block any further dispensing of the ice cream, damaging and/or breaking the appliance.
- The mix needs to be left to cool to room temperature if made "hot" and then left in the fridge for 3-4 hours. Chill the mix in the fridge, even if made "cold".
APPLIANCE ASSEMBLY
IMPORTANT:
When assembling, disassembling or cleaning the appliance, always make sure it is switched off and disconnected from the mains power.
Before using the appliance, make sure that all parts have been correctly fitted.
- Holding the base firm with one hand, lift the appliance body (H) with the other hand until it clicks into place (Fig. 2).
- Take the container (G) out of the freezer and place it inside the appliance body (Fig. 3), taking care to use it straight from the freezer as it will start to thaw straight away.
- Insert the mixer paddle (F), with the spiral pin facing downwards, into the hole in the container (G) (Fig. 4).
- Close it with the lid (E) and lock it into place by turning it clockwise (Fig. 5).
- Insert the power base (C), pressing gently until it clicks into place (Fig. 6).
- Insert the dispenser (I) into the bottom of the appliance body (H) and lock it into place turning it clockwise (Fig. 7).
MAKING ICE CREAM
- Plug in the appliance and move the switch (A) to "ON" to start the ice cream maker.
IMPORTANT:
The appliance needs to be on and running before the mix is added, to prevent the mix from freezing immediately inside the container.
Keep the device (I) turned upwards until it is time to dispense.
- Pour the previously prepared and cooled mix into the container (G) through the special opening (D) in the lid (E).
IMPORTANT:
When filling the container, never go above the "MAX" level marked inside the container; leave at least 3cm between the mix and the top of the container (G), since the mix will inflate during freezing stage.
- Leave the mixing paddle (F) to operate for a maximum of 20 - 30 minutes, until the mix reaches the right consistency.
IMPORTANT:
Never stop and start the appliance during the freezing process, as the mix could freeze in contact with the container and prevent the paddle from moving.
For constant, even dispensing, the ice cream needs to remain soft. For this reason, do not freeze for too long.
- One the ice cream has reached the required consistency, switch off the appliance with the switch (A) and unplug it from the power mains.
- Position a container in the housing (L) on the base of the appliance body, or lift the cone support (M) by the tab and insert a standard wafer ice cream cone (Fig. 8).
- Press the dispenser (I) down and proceed to pour the ice cream (Fig. 9). Release the device (I) to stop dispensing.
- Switch off the appliance, moving the switch (A) to "OFF", at the end of dispensing.
- Keep any remaining ice cream that will not be used up straight away in an airtight freezer container.
IMPORTANT:
Never use metal utensils or items inside the container as they could damage the surface, and do not leave any ice cream inside the container for any length of time (over 30 minutes) to prevent it from freezing inside.
DISASSEMBLING THE APPLIANCE
IMPORTANT:
When assembling, disassembling or cleaning the appliance, always make sure that it is switched off and not connected to the mains power.
- With the appliance body raised, press the release button (B) and remove the power base (C) by pulling it upwards (Fig. 10).
- Remove the lid (E) by turning it anticlockwise.
- Remove the mixer paddle (F).
IMPORTANT:
Remove all of the ice cream from the container before removing the dispenser.
- Turn the dispenser (I) and remove it from the appliance body (H).
- Take out the container (G).
CLEANING
- Disassembly the appliance and all of its parts, as described above.
- Wash the lid (E), the mixer paddle (F), container (G) and dispenser (I) in lukewarm soapy water. Dry thoroughly.
- Clean the power base (C) and appliance body (H) with a damp sponge or cloth.
- Reassemble the ice cream maker as described previously, pressing the appliance body (H) down and at the same time, using the relevant device (N) (Fig. 11).
IMPORTANT:
Never use abrasives or metal utensils. Rinse and dry all of the parts with care.
Do not place the container in the freezer if it is still wet.
Never keep the plastic parts inside the fridge.
For your appliance to last longer, do not wash the parts in the dishwasher.
RECIPES
Fiordilatte ice cream
Ingredients:
400 ml whole milk
200 ml fresh cream
80 g sugar
1 vial vanilla essence
- Mix the cream and sugar together in a bowl until the sugar has dissolved completely.
- Add the milk and continue mixing.
- Chill in the refrigerator for 3-4 hours and then follow the instructions.
Chocolate ice cream
Ingredients:
200 ml fresh cream
300 ml milk
85 g sugar
2 eggs
1 vial vanilla essence
45/60 g unsweetened cocoa powder (to taste)
- Mix the cocoa powder and sugar together in a bowl.
- Add the eggs and vanilla and mix well.
- Add the cream and milk and mix well together.
- Chill in the refrigerator for 3-4 hours and then follow the instructions.
Vanilla ice cream
Ingredients:
3 egg yolks
85 g sugar
150 ml cream
1 vial vanilla essence
- Beat the eggs and sugar together in a large saucepan.
- Add the milk and cream a little at a time and mix constantly over a low flame until it thickens (about 10 minutes). The mix should stick to the spoon.
- Leave to cool and then add the vanilla, mixing well.
- Chill and then follow the instructions.
Fruit sorbet
Ingredients:
500/600 g fruit (strawberries, raspberries, blueberries or fresh pineapple)
60 g sugar
- Blend the ingredients in a kitchen mixer to reduce the fruit to puree.
- Chill in the refrigerator for 3-4 hours and then follow the instructions.
AVENTISSEMENTS IMPORTANTES
LIRE CES INSTRUCTIONS AVANT L'EMPLOI
BESCHRIJVING VAN HET APPARAAT (Fig. 1)
He cTabbTe np6op B6Jn3n nCTOuHKnOB OToJIeHn Ha nx NOBepxHOctn.3.
Pn 3Kcnpnyataun CTaBnTb np6op TOnbKO Ha rOpN3OHTaNbHbIe N yCToUHbIe NOBepxHOCTn.4.
He octabJrIe np6op noB 03deJCTBnEM aTMocpehblx JbIeHn (doKJa, coNHa n T.Д.). 5.
3neKtpnueckn npoBOD He doJxhen kacatbcra ropaynx nobepxnocte.6.
3TOT npnbop He doJxhen nCNOJb3OBaTbcra liuamn (BkIIOUy aTee) C HENONHBIMN 0H3NueckmN,7. CEHCOPHBIMN IIN yMCTBeHHbIMN cnooc6HOCTaMn; LIuca C HeoCTaTOUHbIM ONbITOM N3HaHnA Mn ObauneHc npnbopom MOrT noJIb3OBaTbcra npnbopom TOnbKO NOd CTporHM HaD3Opom YeNoBEKa, OTBETCTBeHHoro 3a INX 6e3ONaCHOCTb, INN NOcne NOdpo6HOrO INHCTpyKtJaKa 3TOrO YeNoBeka.
CneiTe 3a Tem, yTo6bI detn He irpaII c np6opom.8.
HnkOrda He norpykaTb Kopnyc MOTopa, 3neKtpnueckyU Bnky I npOBoB B Body nIIN dpyrne 9. XndKOCTN. I'ny IX OuchTKN INCNoJb3OBaTb TOJIbKO BnaXHyU TkaHb.
JaXe ecnn npnbop BbIKnIOueH, Heo6xOIMo OTcoEINHTB BnIKy npOBoJa ot 3neKtpnuecko10.
po3eTKn, npexJe Yem CObupaTb nIIN pa3bupaTb erO deTaII IN npNCtynaTb K uNCTke.
Heobxodmo TuaTeBbHO BbcUHTb pyKn, npexde yem haxmAtb n perynpoBaTb KhoKn npn-11. 6opa n doTpaNBAtbcra Do BnKn npoBoa n 3neKTpueecknx DeTanei.
Pn OTCoeHHeHn OT 3neKtpuecko po3eTKn 6paTbC pykamn HnocpeDCTBeHHO 3a wTeN-12. cIb. HnkOrda He TarytB 3a npoBOD Ipy TORO, YTObbl BbITaunTb erO.
He nCnoIb3yIe np6op, ecnI shHyp nHTaHnI nn BnIka nobpeJdeHbI, nIe ecnn obOpudoba-13. Hne IMeet kaNe-lNo deΦeKtbl; BCE peMOHTbIe pa6Obl, BKIOUay 3AmEhy shHpya nITaHnI, DOJIxHb I BInONHrTbcra TOnIbKO B cepBnCHOM ueHTpe Ariete nn yNOJHomOueHHbIMM TexHNkamn Ariete B ceJnx npedOTbPaueHnI kAnx-lNo pncOB.
B cnyuae nCnoIb3OBaHn ydInHnteNei NocJeHne DoJXhbl COOTBeTCTBOBaTb MoUHO-14. CTn npnbopa BO n36eJxHne onacHoctn dnn OepaTopa n 6e3oNaHocTn pa6oey cpebl. HenodxoJaune ydInHnteMaMoryt npuBecn K HeucnPabHoCTn.
- He octabnptb npnbop co Cbeunbaioumcshypom B MeCTe, doCTynHom dneTei.
Дя obecneueHЯ 6e3oNaChOCTn npi6opa nCnoIb3yIe ToIbKO peKOMeHdyEmbIe npOn3BODn-16. TeJIem 3aIacHbIe qaCTn I aKCEccCyapbl. - Пибор педаначен TOЛьКО ДЛЯ БыITOBОГО ИСПОЛь3OBAHЯ и He дожен Испль-3OBaTбСВВ ронЗБODCTBeHHbIX ИПКOMМерчecKIN Zeлax.
Данhoe устюв сооветсытгует Требоганям Диpeктув 2006/95/EC и 3MC 2004/108/EC 18. И Perлamentу (EC) № 1 935/2004 ot 27/10/2004 на матерпалы, kohtaktpuyoшие с пишевIMN рождам. - BhocimbIe n3MeHEnn B np6op, ecn OHn YETKO He yka3aHbI npOn3BOJnteJIem, mOryT npInBeCTN K notepe 6e30NaChOCTn I rapaHTmE rO kCnIyatauN CO CTOpOHbI nOTpe6nteJIa.
B cnyuae ecnn Bbl peunn Bblbopocntb 3TOT npnbop, pekomehdyetcnapepe3aTb 3neKtpn-20. Checkn npoBOD dny HeBO3MOXHOCTN erO daIbHeJwero nCNOlb3OBAHNA. PekomehdyETc TaKke oBe3BpeDNTb Te yactn np6opa, KOtOpbIe MOryT ppeDCTaBnArybOnaCHOCTb, B cnyuae nx NcNoJIb3OBAHNA DeTBMn DnA CBOx INrP.
CocTAbHbI ynaKOBKn He doJnxHbIOCTaBnTbcB MeCTax,doCTynhIx dJa deTei, taK ka21. OH MOryT npEcdTaBnTb NCTOuHnik ONaCHOCTN.
- He npnbIgKaTb NaIbIb, IHCTpyMeHTb I T.D. K Kop3nHe CO NbDOM BO BpeMpa6oTb IBueJx npedOTBpaueHnra pNcka nobpeKdEHHa n camoMaunHb.IHE NCIOJIb3OBATbOCTPbIE METAJIINUeCKNE IHCTpyMeHTb I NII IN PPEIMETbIBHYTPN KOP3INHbICo JbDOM.Takne npedMetbMOrT NOBpeHt b MOpoxeHuCy.MoXHO NCIOJIb3OBaTB IHCTpyMeHTb I3 pe3INbI INI DepeBa, npedBaNTeJIbHO BbIKIQUHb MOpoxeHuCy.
HINKOrDAHEIPINKACAITECB KIDBNXUYIMCMCACTM.23
Hnkorda He chImaite Kopnyc Dniratela BO BpeMa npiroTOBJeHnM MOpoxeHoro.24.
Ipejde yem haunhaTb npiroTOBneHne MOpoxeHoro, npOBepntb npaBnIbHOCTb MOHTaJa npn-25. 6opa n ycTaHOBky 6Ioka NITAHnHa Ka KpbIshKy.
He BkIIOuayTe np6Op nyCTbIM.26.
HnKoIa He nOBeuBaIe I He haknoHajTe np6op 60nee yem Ha 45 rpaucob.27.
Pa3meaTb npibop Ha pacctoHn He mehee 8 cm OT dpynx npedMeTOB, rapaHTnpy IocTa-28. ToHoe paccenBaHne Tennla.
He Klaadnte INHrpdeIeHTbI B MOpO3nIbHyo KaMepy IJIpeBapNTeIbHOro OXJaXdEHHa BO 29.
136exKaHne 6JIOKINPOBKN MeaJKN DO NOnHOr rOTOBHOCTN MOPOXeHOr..
После цИКla при�OTOBlenя морожeHOrO пождaТь He MeHee TrnIaTb MInHyT,праздe чem 30. CHOBA BKNIOuHaT b np6op.
He nCnoJb3yIte yCTpoIcTBO B TeueHne 6oJe 40 MnHyT noIpaI.31.
EcnMopoxeHoe nn cop6et cOepXaT CBexne npOyKtbl, ero cIeNyET ynoTppeBnTb B Teue-32. Hne HeJeN. MopoxeHoe Bkychee, KOrda OHO XoNoDHOe.
EcnM opoxehoe nn cop6et coepkata cbpbié na, He peKOMeHnyetcra daTb erO deTm, 33. 6epemHHbIM XeHnHaM n NOXnblm IIOdAm.
B cnyae yteukxnaadareHTa, npekpatntb nCnoIb3OBAHne npnbopa. Otpabotahnbi xnaDa-34. rHT He TOKcunHe
IpeD cHrTHeM KpbIuKn N Kopnyca DBrIaTeJIy BbIKNoHTe npIbOp I OTcoEduHnte erO ot 35. 3JIeKTPnuecko p03eTKn.

- B OTHOWeHn npaBnIbHOy yTnIu3aun npnbopa B COOTBeTCTBn C EbponeckoJ dIpeKToBo 2009/96/EC npouHTaTe nHΦOpMaTnBhbl JnCTOK, npnlaRaembl K npnbopy.
COXPAHNTb NHCTPYKNUO
1 amnyla BaHnJIbHOJ 3CCeHcUN.
- B mücke cmea t b cInBk n c caxapom Do nonHoro pactbopeHnra.
2.Добавиь молоки и поемшаь - OxnaIbBteueHne 3/4 yacob n daee cJeOBaTb INHCTpyKUmaR.
MopoxeHoe wokonadHoe
CocTAb:
200MnCBEXKXCNIBOK
300ДлцьногOMJOKa
85 rp caxapa
2Яиca
1 amnyla BaHnJIbHOH 3CCeHcUN.
45/60 r nopouka kaKaao (no Bkycy)
- CmewaTb B MnCKe KaKaO n caxap.
- 106abntb B cmecb rya n BaHnlb H xopoio nepemewaTb.
3.Добавиь спвки и молоко ихоршо nepemeшаь. - OxnaIbB TeueHne 3/-4 yacob n daee cneoBaT b HctpyKuJm.