
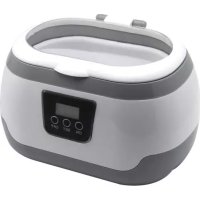
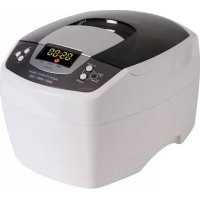
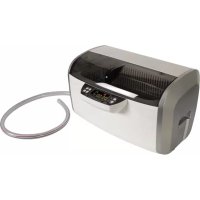
VTUSCT6 - Ultrasonic cleaner VELLEMAN - Free user manual and instructions
Find the device manual for free VTUSCT6 VELLEMAN in PDF.
| Product Type | Ultrasonic Cleaner |
| Brand | Velleman |
| Model | VTUSCT6 |
| Dimensions | 51.5 x 35.0 x 24.3 cm |
| Weight | 9.5 kg |
| Power Supply | 220-240 VAC, 50 Hz, 410 W |
| Tank Capacity | 7.5 L |
| Ultrasonic Frequency | 35 kHz |
| Temperature Settings | 40 °C, 45 °C, 50 °C, 55 °C, 60 °C (5 settings) |
| Timer | 1 to 30 minutes (adjustable in 5 min increments); solution function up to 1 h 20 |
| Main Functions | Normal, indirect, advanced, special cleaning; degassing; heating |
| Tank Material | Stainless steel SUS304 |
| Housing / Basket Material | ABS |
| Included Accessories | Plastic basket, tank, power cable, 2 suspension bands, drainage hose |
| Safety | Overheat protection; automatic shut-off; use on circuit with residual current circuit breaker recommended |
| Maintenance | Empty the tank after each use; clean with a soft cloth; do not use empty |
| Spare Parts and Repairability | No user-serviceable parts; contact dealer for spare parts |
| Warranty | 24 months for consumer products (EU) |
Frequently Asked Questions - VTUSCT6 VELLEMAN
User questions about VTUSCT6 VELLEMAN
0 question about this device. Answer the ones you know or ask your own.
Ask a new question about this device
Download the instructions for your Ultrasonic cleaner in PDF format for free! Find your manual VTUSCT6 - VELLEMAN and take your electronic device back in hand. On this page are published all the documents necessary for the use of your device. VTUSCT6 by VELLEMAN.
USER MANUAL VTUSCT6 VELLEMAN
INCLUDED ACCESSORIES
3
USER MANUAL
1. Introduction
To all residents of the European Union
Important environmental information about this product

This symbol on the device or the package indicates that disposal of the device after its lifecycle could harm the environment. Do not dispose of the unit (or batteries) as unsorted municipal waste; it should be taken to a specialized company for recycling. This device should be returned to your distributor or to a local recycling service. Respect the local environmental rules.
If in doubt, contact your local waste disposal authorities.
Thank you for choosing Velleman! Please read the manual thoroughly before bringing this device into service. If the device was damaged in transit, don't install or use it and contact your dealer.
2. Safety Instructions
| Keep the device away from children and unauthorised users. | |
| Always disconnect mains power when the device is not in use or when servicing or performing maintenance activities. Handle the power cord by the plug only. Never touch the plug with wet hands. | |
| Risk of electroshock when opening the housing. Touching live wires can cause life-threatening electroshocks. Do not open the housing yourself. Have the device repaired by qualified personnel. | |
| There are no user-serviceable parts inside the device. Refer to an authorized dealer for service and/or spare parts. |
3. General Guidelines
Refer to the Velleman® Service and Quality Warranty on the last pages of this manual.
| Indoor use only. Keep this device away from rain, moisture, splashing and dripping liquids. | |
| Keep this device away from dust and extreme heat. Do not cover the ventilation slots. | |
| Protect this device from shocks and abuse. Avoid brute force when operating the device. |
- Familiarise yourself with the functions of the device before actually using it.
- All modifications of the device are forbidden for safety reasons. The warranty does not cover damage caused by user modifications to the device.
- Only use the device for its intended purpose. Using the device in an unauthorised way will void the warranty.
- The warranty does not cover damage caused by disregard of certain guidelines in this manual and the dealer will not accept responsibility for any ensuing defects or problems.
- Remove the water from the tank after each use to prevent corrosion.
- Make sure that the available voltage does not exceed the voltage stated in the specifications of this manual.
- Never operate the device without water in the tank. Do not use abrasive or chemical solutions.
- Never operate the device for more than one hour at a time.
- Put the device on a flat surface and keep the area around it clean and dry.
- Do not crimp the power cord and protect it against damage. Have an authorised dealer replace it if necessary.
- Preferable connect the device to a circuit that contains an RCD (residual current device) with a tripping current of no more than 30mA .
- Nor Velleman nor its dealers can be held responsible for any damage (extraordinary, incidental or indirect) of any nature (financial, physical...) arising from the possession, use or failure of this product.
| ITEMS NOT SUITABLE FOR ULTRASONIC CLEANING | |
| Soft jewellery: pearls, emerald, ivory, coral, agate, sea turtle shells, etc. | As these items are soft, scratching may occur during the cleaning process. |
| Welded, plated, glued items | Ultrasonic cleaning may increase the gaps inside welded joints, plated coating or glue which may lead to breaking loose. |
| Watches: unless diving watches with a depth rating over 50 m (150 ft) | The strong penetration capabilities of the ultrasonic waves may cause water to penetrate weaker sealed watches. |
| Other: wood, glass, ceramic, camera filters with known cracks | Crack size may be increased by the ultrasonic waves. |
4. Features
for cleaning jewellery, dentures, eyeglasses, electric shaver heads, CDs/VCDs/DVDs, etc.
3 colour LED display
1 to 30 minute timer
5 temperature settings
○ working status indicators
cooling fan
- three ceramic heaters
- overheating protection
- three industrial grade ultrasonic transducers
drainage valve
5. Overview
Refer to the illustrations on page 2 of this manual.
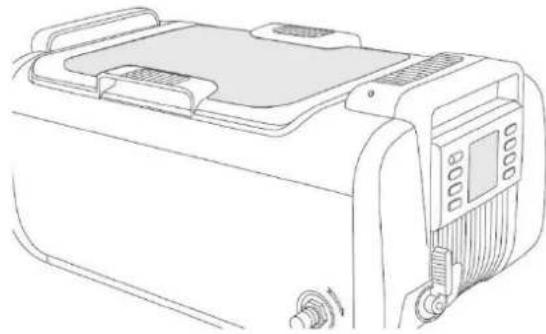
General Overview
| A | lid |
| B | handles |
| C | stainless steel tank |
| D | housing |
| E | control panel |
| F | drainage valve |
| G | fitting for drainage tube |
| H | lid holders |
| I | power socket |
| J | power switch |
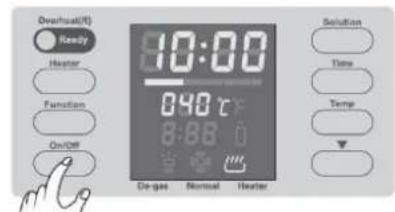
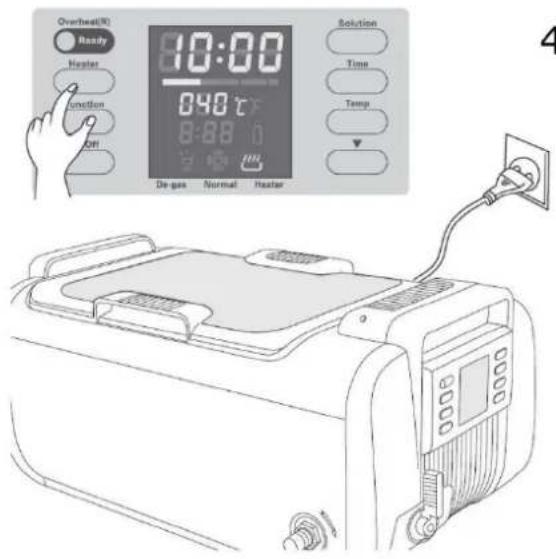
Control Panel
- Overheat(R) - Ready
Green - ready: normal working status.
Red - overheating: let the ultrasonic cleaner cool down for at least 20 minutes before resuming.
- Heater
Press to turn the heater on or off. See 11. heater status indicator.
The heater will turn off automatically when the water reaches the set temperature.
- Function
Press to select, to start or to interrupt the degassing function (max. 90 seconds).
See 9. degas status indicator and the note below.
- On/Off
Press to switch the ultrasonic cleaner on or off, and to start the cleaning process. The cleaner will automatically stop when the counter reaches 00:00.
- 05:00 - cleaning time
Counts down after the cleaning process is started.
6. - multistage temperature indicator
Solid green - the water temperature is at 0 - 30% of the set temperature.
Solid orange - the water temperature is at 30 - 60% of the set temperature.
Solid red - the water temperature is at 60 - 90% of the set temperature.
Red flashing - the water temperature is close to the set temperature.
All solid - the water temperature is at the set temperature.
7. 060 - set temperature
Indication of the selected temperature setting. See 16. Temp.
8. :40 - solution remaining time
Counts down after the solution function is started.
9. - degas status indicator
Appears when the degassing function is selected, flashes when the degassing process is engaged.
10. - normal cleaning status indicator
Appears when the normal cleaning function is selected.
11. - heater status indicator
Flashes when the heater is turned on, dims when heater is turned off.
12. - solution warning indicator
Appears when the solution cleaning function is selected, flashes when the solution needs to be changed.
13. - temperature unit indicator
° C : set temperature in ° C .
°F: set temperature in °F.
14. Solution
Press to add 20 minutes to the timer for the solution cleaning function.
8:88 indicates that the function is set to 1 hour and 20 minutes (max. 9 hours and 60 minutes).
15. Time
Press to increase the cleaning time by five minutes.
16. Temp
Press to select one of the five temperature settings.
17. -decrease button
Press to reduce the timer by one minute when the timer function is selected.
Press to select the previous temperature setting when the temperature function is selected.
Press to reduce the timer by 20 minutes when the solution cleaning function is selected.
Note on the Degas Function
A heavily soiled or greasy object, silver, copper or brass needs to be cleaned with added chemical solutions. These solutions may form small droplets and take a long time to dissolve in the water. Filling the tank or adding water may cause air bubbles to form onto the tank walls. These bubbles will reduce the cleaning effect. The degas function will dissipate droplets and air bubbles, and improve the cleaning efficiency.
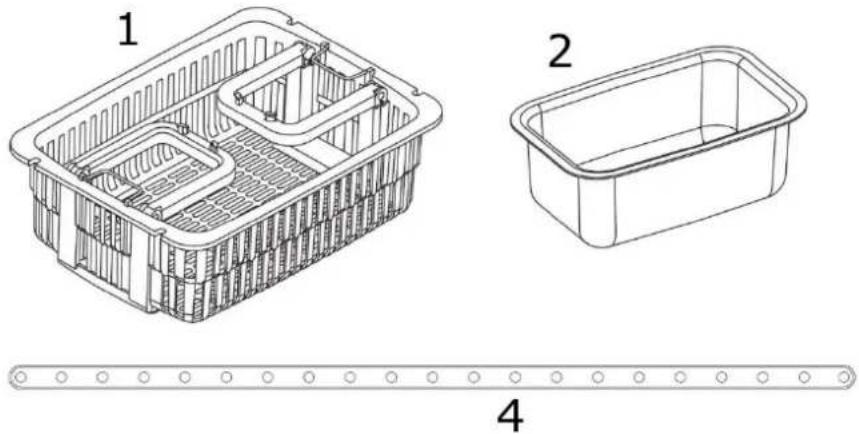
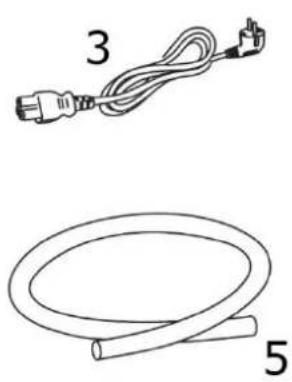
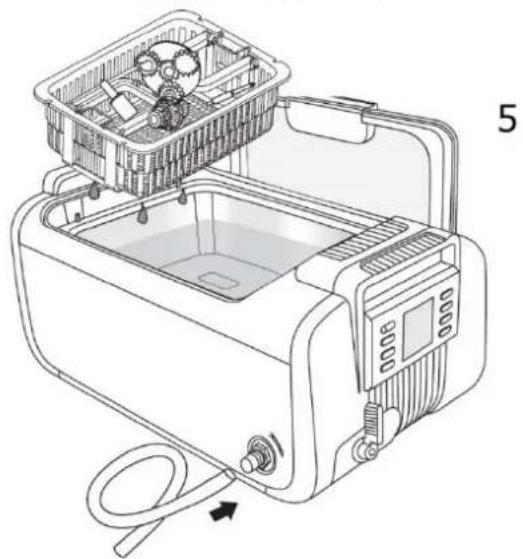
Included Accessories
| 1 | plastic basket |
| 2 | cleaning tank |
| 3 | power cord |
| 4 | suspension strip x 2 |
| 5 | drainage tube |
6. Operation
General Operation
Refer to the illustrations on pages 2 and 3 of this manual.
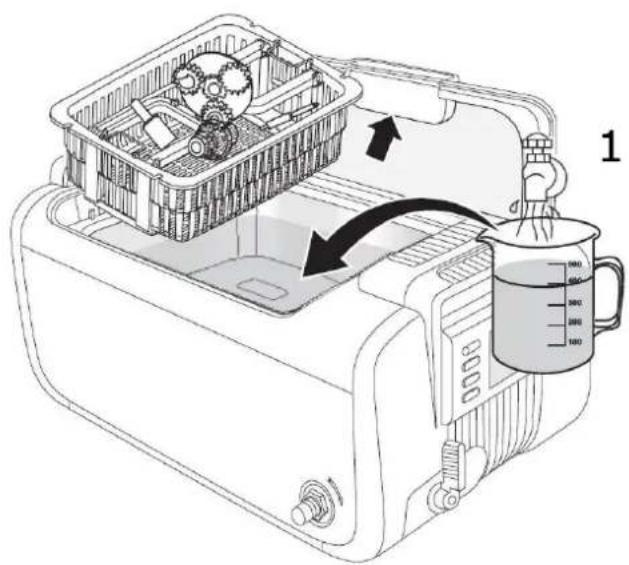
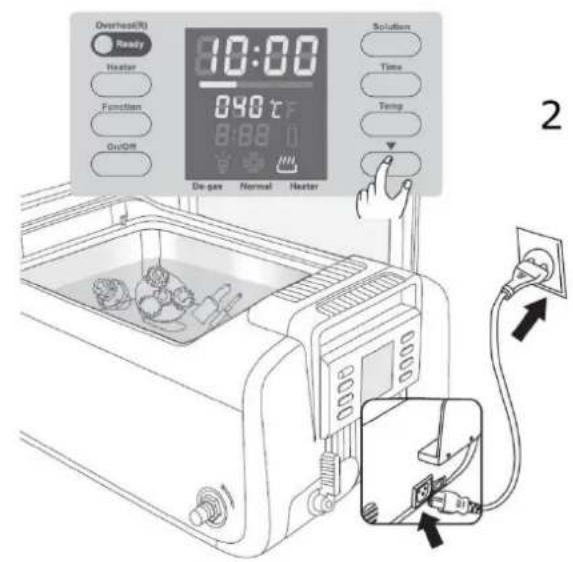
- Remove the lid and place it on the lid holders. Put the object(s) into the basket and place the basket inside the tank. Fill the tank with regular tap water to a level between the MIN and MAX markings, and so that the object(s) is (are) completely immersed.
Never operate the ultrasonic cleaner without water in the tank to avoid damage to the cleaner!
- Connect the power cord to the ultrasonic cleaner first and then to the mains. Switch on the cleaner with the power switch. The control panel automatically sets the timer at 05:00. Adjust the timer with the TIME and buttons.
- Close the lid and select one of the four cleaning methods (see below).
- Press the ON/OFF button to start the cleaning process. The ultrasonic cleaner will emit a slight buzzing sound and the timer will start counting down. The cleaning process is finished when the timer reaches 00:00. Press the ON/OFF button to interrupt the cleaning process manually. Note that, though this cleaner is equipped with an overheating protection, we strongly recommend avoiding continuous use without letting the cleaner cool down.
- Switch off the ultrasonic cleaner when cleaning is finished. Open the lid, lift the basket and let the cleaned object(s) drip. Connect the drainage tube to the fitting, open the drainage valve and drain the dirty water. Close the drainage valve. Clean and wipe the tank dry.
Regular Cleaning
The regular cleaning method uses regular tap water and is perfect to clean lightly soiled objects like jewellery. To use the regular cleaning method, proceed as described under the chapter General Operation above. Note that the use of the plastic basket will protect the objects from scratching but will reduce the cleaning efficiency by up to 30% .
Indirect Cleaning
Use the indirect cleaning method when cleaning requires a solution or detergent. This method is perfect to clean medical instruments, electrical and electronic components, watch and mobile phone parts, etc. Use pure alcohol, hexane, acetone, oil or other as a cleaning solution or detergent according to the object.
- Put the object(s) in the separate cleaning tank and add the proper solution until the object is completely immersed.
- Carefully place the cleaning tank into the stainless steel tank of the ultrasonic cleaner. Avoid spilling solution fluid over the housing, as this will damage it.
- Add regular tap water into the stainless steel tank to a level between MIN and MAX.
- Switch on the cleaner, set the timer, close the lid and start the cleaning process.
Enhanced Cleaning
Use the enhanced cleaning method to clean heavily soiled or greasy objects like automotive parts.
- Put the object(s) into the stainless steel tank of the ultrasonic cleaner. Do not put them on top of each other to avoid scratches.
- Add regular tap water into the stainless steel tank to a level between MIN and MAX.
- Add about 3 tablespoons of dishwashing liquid.
- Switch on the cleaner, set the temperature (45 °C or 113 °F) and timer (15 minutes), close the lid and start the cleaning process.
- After the cleaning process, drain the dirty water, clean the tank and refill with regular tap water. Clean for another three minutes to rinse the cleaned object(s).
Special Cleaning
Darkened or oxidised silver, brass and copper will need special cleaning.
- Put the object(s) into the basket and place the basket inside the tank. Fill the tank with regular tap water to a level between the MIN and MAX markings, and so that the object(s) is (are) completely immersed.
- Add a special solution liquid according to the instructions of the solution manufacturer.
- Switch on the cleaner, set the temperature (50 °C or 122 °F), solution timer (40 seconds) and timer (15 minutes), close the lid and start the cleaning process.
- After the cleaning process, drain the dirty water, clean the tank and refill with regular tap water. Clean for another three minutes to rinse the cleaned object(s).
How to Use the Included Accessories
- The plastic basket has foldable handles, which can be raised to let the object(s) drain. To do so, unfold the handles, pull them down and fix them with the steel hook.
- Use the silicon strips to suspend objects such as instrument cassettes. Fix them to the tabs near the stainless steel tank of the ultrasonic cleaner.
- Put the cleaning tank atop the stainless steel tank of the ultrasonic cleaner. You can use two cleaning tanks simultaneously.
7. Cleaning and Maintenance
Before starting any cleaning or maintenance activities:
- Unplug the device's power cord from the mains.
-
Let the cleaner cool down.
-
Do not turn on the ultrasonic cleaner without water in the tank. Even though the cleaner is equipped with multiple protections, running it for more than 15 seconds with an empty tank will damage the cleaner or severely reduce its life.
- Do not run the ultrasonic cleaner continuously or for a long period of time. Even though the cleaner has an overheat protection, it is recommended to let it cool down for 20 minutes after every 45 minutes of continuous use.
- Do not keep water in the cleaning tank after use. Connect the drainage tube to the fitting, open the drainage valve and drain the dirty water. Close the drainage valve. Clean and wipe the tank dry.
- Do not spray water over the housing but use a soft cloth to wipe the ultrasonic cleaner dry.
- Do not expose the ultrasonic cleaner to direct sunlight for a long period of time. Keep it in a dry, cool and ventilated place.
8. Technical Specifications
| ultrasonic frequency | 35 kHz |
| temperature settings | 40 °C / 45 °C / 50 °C / 55 °C / 60 °C |
| tank material | SUS304 stainless steel |
| housing/holder material | ABS |
| tank capacity | 7.5 L |
| power consumption | 410 W |
| power supply | 220-240 VAC 50 Hz |
| dimensions | 51.5 x 35.0 x 24.3 cm |
| weight | 9.5 kg |
Use this device with original accessories only. Velleman nv cannot be held responsible in the event of damage or injury resulting from (incorrect) use of this device.
For more info concerning this product and the latest version of this manual, please visit our website www.velleman.eu.
The information in this manual is subject to change without prior notice.
© COPYRIGHT NOTICE
The copyright to this manual is owned by Velleman nv. All worldwide rights reserved. No part of this manual may be copied, reproduced, translated or reduced to any electronic medium or otherwise without the prior written consent of the copyright holder.
GEBRUIKERSHANDLEIDING
1. Inleiding
Velleman® Service and Quality Warranty
Since its foundation in 1972, Velleman® acquired extensive experience in the electronics world and currently distributes its products in over 85 countries. All our products fulfil strict quality requirements and legal stipulations in the EU. In order to ensure the quality, our products regularly go through an extra quality check, both by an internal quality department and by specialized external organisations. If, all precautionary measures notwithstanding, problems should occur, please make appeal to our warranty (see guarantee conditions).
General Warranty Conditions Concerning Consumer Products (for EU):
-
All consumer products are subject to a 24-month warranty on production flaws and defective material as from the original date of purchase.
-
Velleman® can decide to replace an article with an equivalent article, or to refund the retail value totally or partially when the complaint is valid and a free repair or replacement of the article is impossible, or if the expenses are out of proportion.
You will be delivered a replacing article or a refund at the value of 100% of the purchase price in case of a flaw occurred in the first year after the date of purchase and delivery, or a replacing article at 50% of the purchase price or a refund at the value of 50% of the retail value in case of a flaw occurred in the second year after the date of purchase and delivery.
Not covered by warranty:
- all direct or indirect damage caused after delivery to the article (e.g. by oxidation, shocks, falls, dust, dirt, humidity...), and by the article, as well as its contents (e.g. data loss). compensation for loss of profits:
- consumable goods, parts or accessories that are subject to an aging process during normal use, such as batteries (rechargeable, non-rechargeable, built-in or replaceable), lamps, rubber parts, drive belts... (unlimited list);
- flaws resulting from fire, water damage, lightning, accident, natural disaster, etc...
- flaws caused deliberately, negligently or resulting from improper handling, negligent maintenance, abusive use or use contrary to the manufacturer's instructions;
- damage caused by a commercial, professional or collective use of the article (the warranty validity will be reduced to six (6) months when the article is used professionally);
- damage resulting from an inappropriate packing and shipping of the article;
- all damage caused by modification, repair or alteration performed by a third party without written permission by Velleman®.
- Articles to be repaired must be delivered to your Velleman® dealer, solidly packed (preferably in the original packaging), and be completed with the original receipt of purchase and a clear flaw description.
- Hint: In order to save on cost and time, please reread the manual and check if the flaw is caused by obvious causes prior to presenting the article for repair. Note that returning a non-defective article can also involve handling costs.
- Repairs occurring after warranty expiration are subject to shipping costs.
- The above conditions are without prejudice to all commercial warranties. The above enumeration is subject to modification according to the article (see article's manual).
NL
- USER MANUAL
- Introduction
- To all residents of the European Union
- Important environmental information about this product
- If in doubt, contact your local waste disposal authorities.
- Safety Instructions
- General Guidelines
- Features
- Overview
- General Overview
- Control Panel
- - multistage temperature indicator
- 060 - set temperature
- :40 - solution remaining time
- - degas status indicator
- - normal cleaning status indicator
- - heater status indicator
- - solution warning indicator
- - temperature unit indicator
- Solution
- Time
- Temp
- -decrease button
- Note on the Degas Function
- Operation
- General Operation
- Regular Cleaning
- Indirect Cleaning
- Enhanced Cleaning
- Special Cleaning
- How to Use the Included Accessories
- Cleaning and Maintenance
- Technical Specifications
- © COPYRIGHT NOTICE
- GEBRUIKERSHANDLEIDING
- Inleiding
- Velleman® Service and Quality Warranty
- General Warranty Conditions Concerning Consumer Products (for EU):
- Not covered by warranty:
- NL
Brand : VELLEMAN
Model : VTUSCT6
Category : Ultrasonic cleaner