
VTUSCT5 - Ultrasonic cleaner VELLEMAN - Free user manual and instructions
Find the device manual for free VTUSCT5 VELLEMAN in PDF.
| Product type | Ultrasonic cleaner |
| Brand | Velleman |
| Model | VTUSCT5 |
| Ultrasonic frequency | 35 kHz |
| Tank capacity | 2 L |
| Tank material | Stainless steel SUS304 |
| Housing material | ABS |
| Power | 160 W |
| Power supply | 240 VAC / 50 Hz |
| Dimensions | 26.5 x 23.0 x 18.0 cm |
| Adjustable timer | 1 to 30 minutes, digital display |
| Degas function | Yes, 90 seconds |
| Heating function | Up to 60 °C, auto-off after 45 min |
| Cooling fan | Yes |
| Overheat protection | Yes, red LED indicator |
| Status LED indicator | Two-color: green (ready), red (fault/overheat) |
| Included accessories | Stainless steel basket, transparent cover |
| Cleaning and maintenance | Drain and wipe the tank after each use; do not use abrasive products; do not rinse the housing with water |
| Safety instructions | Do not open the housing, unplug before cleaning, do not use with empty tank, avoid shocks |
| Spare parts and repairability | No user-serviceable parts; contact retailer |
Frequently Asked Questions - VTUSCT5 VELLEMAN
User questions about VTUSCT5 VELLEMAN
0 question about this device. Answer the ones you know or ask your own.
Ask a new question about this device
Download the instructions for your Ultrasonic cleaner in PDF format for free! Find your manual VTUSCT5 - VELLEMAN and take your electronic device back in hand. On this page are published all the documents necessary for the use of your device. VTUSCT5 by VELLEMAN.
USER MANUAL VTUSCT5 VELLEMAN
natural_image
Digital ultrasonic cleaner with digital display and control buttons (no visible text or symbols on device body)USER MANUAL 4
GEBRUIKERSHANDLEIDING 7
NOTICE D'EMPLOI 11
MANUAL DEL USUARIO 15
VTUSCT5
3
4
5
natural_image
Line drawing of a microwave oven connected to a power outlet with cable (no text or symbols)natural_image
Line drawing of a rice cooker with steam rising from its side (no text or symbols)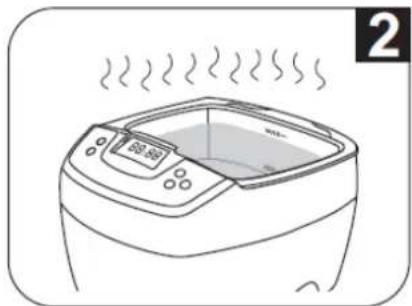
natural_image
Line drawing of a microwave oven with steam rising from the top (no text or symbols)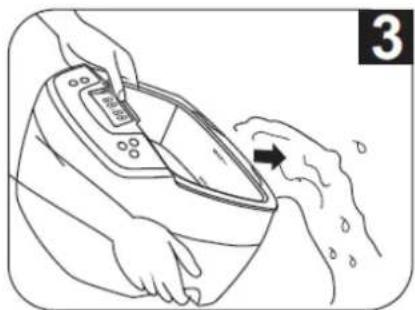
natural_image
Illustration of hands using a digital pressure monitor to lift a person's feet (no text or symbols)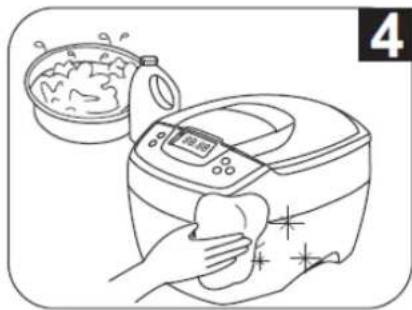
natural_image
Line drawing of a kitchen appliance with a hand cleaning it, next to a bowl of food (no text or symbols)
natural_image
Line drawing of an open box with a digital display and a numbered label (5) in the corner, no text or symbols on the diagram itself.User manual
1. Intro duction
To all residents of the European Union
Important environmental information about this product
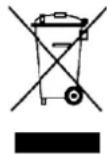
This symbol on the device or the package indicates that disposal of the device after its lifecycle could harm the environment.
Do not dispose of the unit (or batteries) as unsorted municipal waste; it should be taken to a specialized company for recycling.
This device should be returned to your distributor or to a local recycling service.
Respect the local environmental rules.
If in doubt, contact your local waste disposal authorities.
Thank you for choosing Velleman! Please read the manual thoroughly before bringing this device into service. If the device was damaged in transit, don't install or use it and contact your dealer.
The ultrasonic cleaner generates numerous micro bubbles which will clean hard-to-reach places.
Together with some detergent, this is a very effective way to clean jewellery, dentures, eyeglasses, printer heads, etc.
2. Safet y Instructions
Keep the device away from children and unauthorised users.
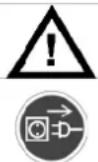
Always disconnect mains power when the device is not in use or when servicing or maintenance activities are performed. Handle the power cord by the plug only. Never touch the plug with wet hands.
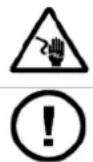
Risk of electroshock when opening the housing. Touching live wires can cause life-threatening electroshocks. Do not open the housing yourself. Have the device repaired by qualified personnel.

There are no user-serviceable parts inside the device. Refer to an authorized dealer for service and/or spare parts.
3. Gene ral Guidelines
Refer to the Velleman® Service and Quality Warranty on the last pages of this manual.
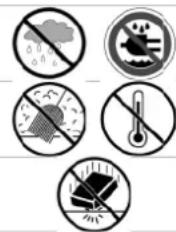
Indoor use only. Keep this device away form rain, moisture, splashing and dripping liquids.
Keep this device away from dust and extreme heat. Do not cover the ventilation slots.
Protect this device from shocks and abuse. Avoid brute force when operating the device.
- Familiarise yourself with the functions of the device before actually using it.
- All modifications of the device are forbidden for safety reasons. Damage caused by user modifications to the device is not covered by the warranty.
- Only use the device for its intended purpose. Using the device in an unauthorised way will void the warranty.
- Damage caused by disregard of certain guidelines in this manual is not covered by the warranty and the dealer will not accept responsibility for any ensuing defects or problems.
- Remove the water from the tank after each use to prevent corrosion.
- Make sure that the available voltage does not exceed the voltage stated in the specifications of this manual.
- Never operate the device without water in the tank. Do not use abrasive or chemical solutions.
- Never operate the device for more than one hour at a time.
- Put the device on a flat surface and keep the area around it clean and dry.
- Do not crimp the power cord and protect it against damage. Have an authorised dealer replace it if necessary.
- Preferable connect the device to a circuit that contains a RCD (residual current device) with a tripping current of no more than 30mA.
- Nor Velleman nv nor its dealers can be hed responsible for any damage (extraordinary, incidental or indirect) – of any nature (financial, physical...) arising from the possession, use or failure of this product.
VTUSCT5
ITEMS NOT SUITABLE FOR ULTRASONIC CLEANING
| Soft jewellery:pearls, emerald, ivory, coral, agate, sea turtle shells etc... | As these items are soft, scratching may occur during the cleaning process. |
| Welded, plated, glued items | Ultrasonic cleaning may increase the gaps inside welded joints, plated coating or glue which may lead to breaking loose. |
| Watches:unless diving watches with depth rating over 50m (150 ft) | The strong penetration capabilities of the ultrasonic waves may cause water to penetrate weaker sealed watches. |
| Other:glass, ceramic, camera filters with known cracks | Crack size may be increased by the ultrasonic waves. |
4. Features
• for cleaning of: jewellery, dentures, eyeglasses, electric shaver heads, CDs/VCDs/DVDs etc.
• 2 colour LED display: 1 to 30 minute timer
- cooling fan
- ceramic heater
• overheating protection
5. Working principle
The principle behind ultrasonic cleaning is cavitation.
When the ultrasonic cleaner is switched on, 3-dimensional sound waves of alternating positive and negative pressure are generated and transmitted into the water in the tank. These sound waves created micron-sized bubbles that grow and build up energy during negative pressure and implode at a very high speed during positive pressure (43,000 times per second). These implosions of high energy bubbles create cavities that literally pull contaminants of the surface (at speeds up to 400km/h). Due to the size of the bubbles, they are effective in removing contaminants from the smallest of crevices but harmless to the substrate itself.
Usually water is used as cleaning agent as it is inexpensive and environmentally safe.
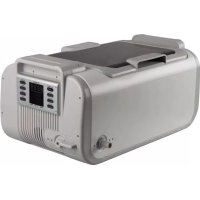
6. Overview
Refer to the illustrations on page 2 of this manual.
| A | transparent lid | E | housing |
| B | stainless steel tank | F | basket |
| C | drain groove | G | power socket |
| D | control panel | H | power cord |
| control panel | ||
| 1 | status indicator | Green: normal working status, ready.Red: fault condition, overheated. Let the VTUSCT5 cool down for at least 15 minutes. |
| 2 | On/off button | Press to switch the device on. Default time is shown (5 minutes). Press again to start the cleaning process; it stops automatically when the timer expires. Press the button at any time to interrupt the cleaning process. |
| 3 | function button | Press to start degassing function (degas). The indicator [4] will flash during the degas process ( ± 90s ). To interrupt the process, press the button again. See note below the table. |
| 4 | degas indicator | Flashing during the degassing process. |
| 5 | normal cleaning indicator Illuminated | during normal cleaning process . |
| 6 | heater indicator Illuminated when heater is active. | |
| 7 | timer display | Countdown timer indicates remaining cleaning time. |
| 8 | quick set time button (Time) | Press to show initial timer (05:00). Press again to increase the timer by 5 minutes. |
| 9 | decrease timer button ( ) | Each press decreases the timer by 1 minute. |
| 10 | heater on/off button (TC) | Press to switch on the heater; the indicator [6] flashes.When the water temperature reaches 60^ , the heater switches off automatically. |
Note: degassing process
When cleaning heavily soiled or greasy items or silver, copper or brass items, chemical solutions need to be added into the water. The solution might form many small droplets and take a long time to dissolve in the water. Newly added water may generate many air bubbles on the tank walls. These will reduce the cleaning effect: in the beginning phase of ultrasonic clearing.
Turning on the degas function will dissipate the droplets and the air bubbles, usually in 90 seconds, and improve cleaning efficiency.
7. Operation
Refer to the illustrations on pages 2 and 3 of this manual.
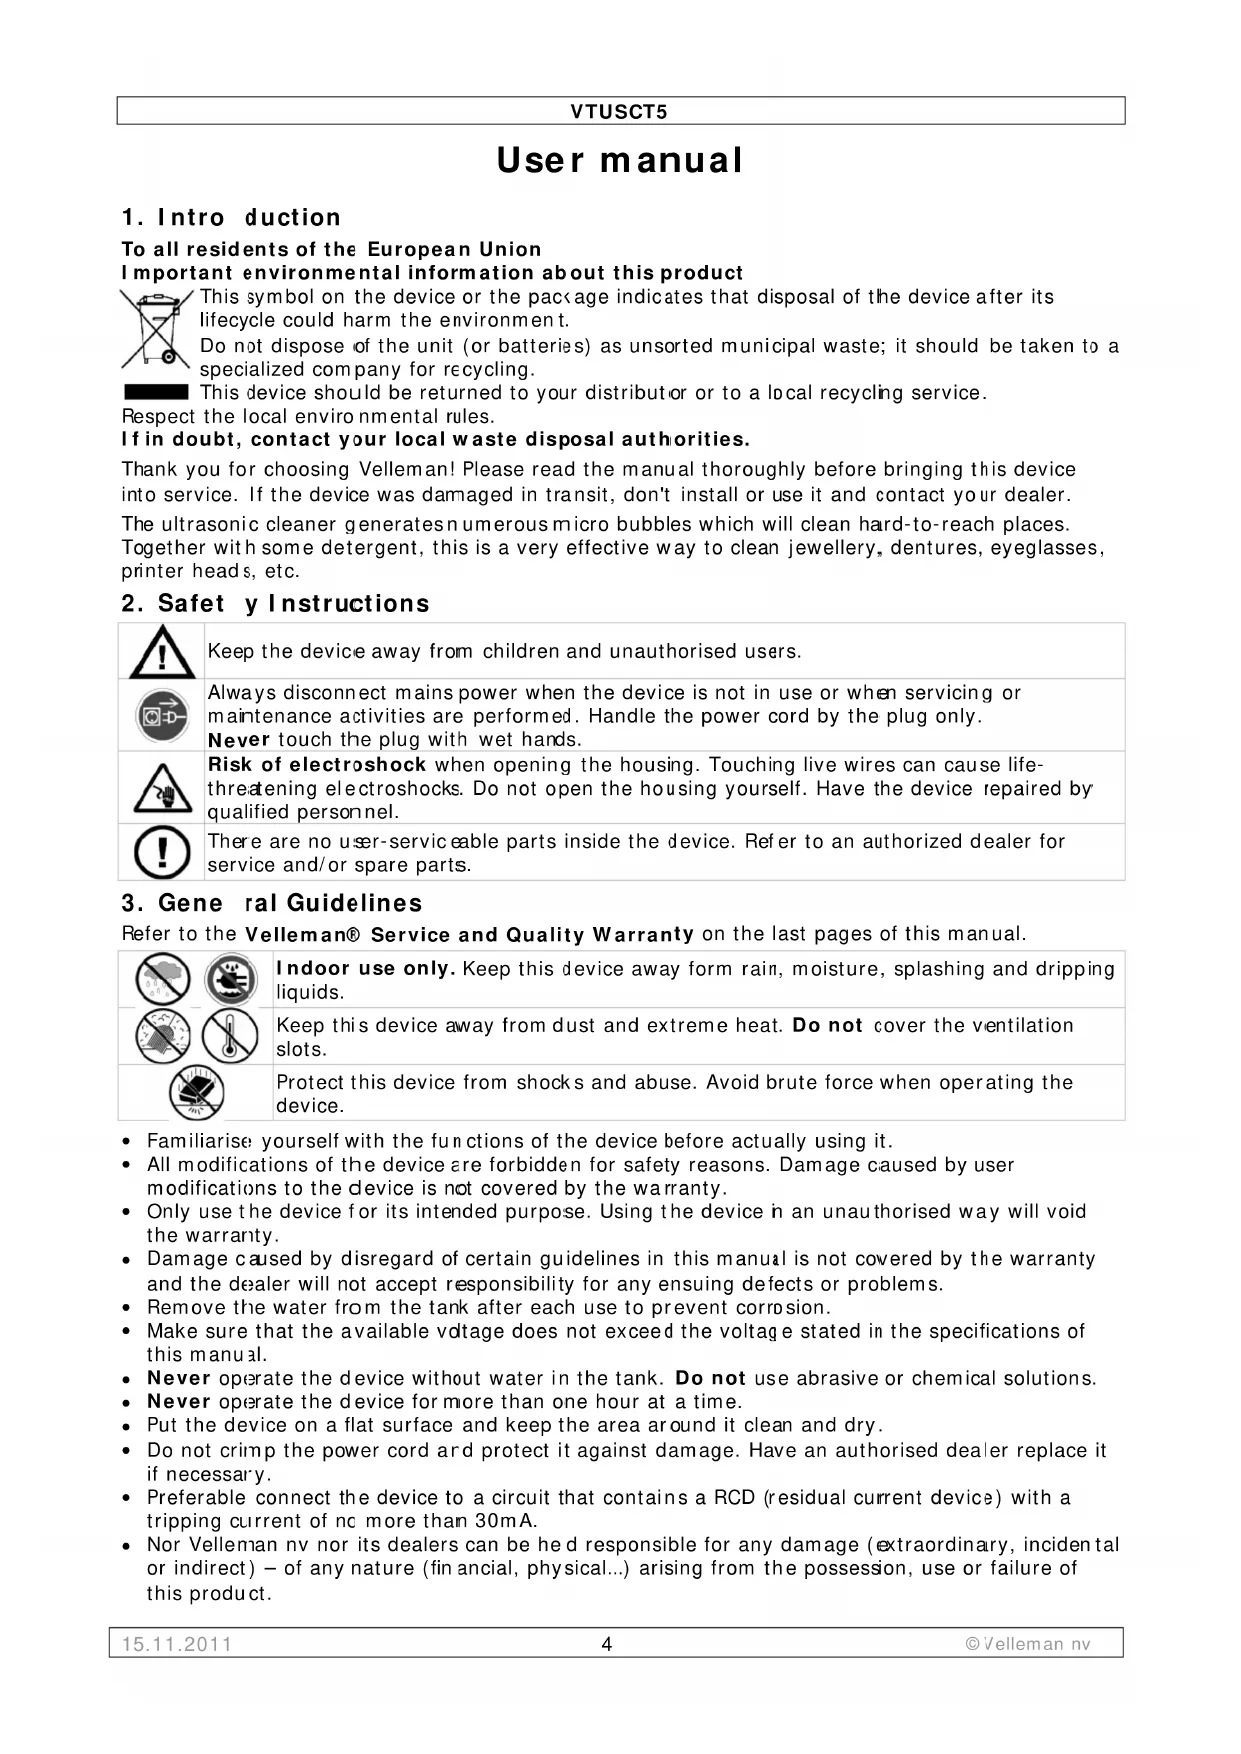
- Open the lid [A] as illustrated, put the items in the basket [F] then put them in the cleaning tank [C]. Do not overfill the basket and make sure the items don't touch each other to prevent scratches from rubbing.
Add water to a level between MIN and MAX and above the item (s) to be cleaned. When desired, add some dishwashing liquid.
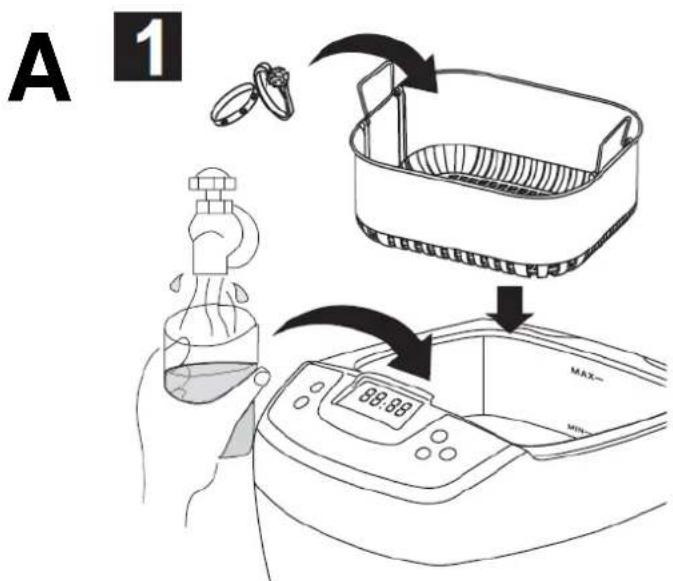
Note: indirect cleaning
- Place the objects in a small container (not included, e.g. glass jar, metal box...) and fill this container with fluid so the items are submerged. Possible fluids include: hexane ('o dissolve grease), acetone (to dissolve ink), pure alcohol (quick evaporation), watch oil (prevent rust), rubbing alcohol (clean and disinfect), ...
The selected container will absorb part of the ultrasonic energy which reduces the cleaning effect:
| container | absorbs |
| plastic | 30% |
| aluminium | 20% |
| stainless steel | 8% |
- Place the small container inside the stainless steel tank [B], do not use the basket [F]. Add water making sure the level is above the MIN indication but water doesn't flow into the small container.

Do not run the device without sufficient water inside the tank to prevent irreversible damage to the VTUSCT5.
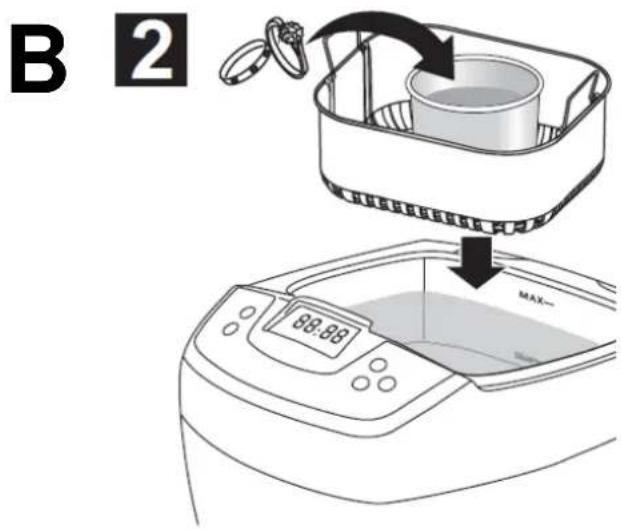
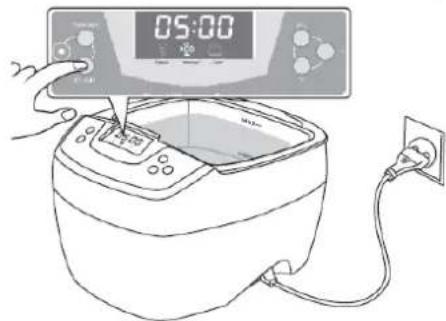
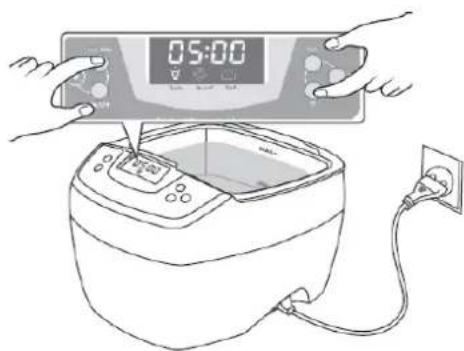
- Connect the power cord [H] to a mains outlet. The status indicator [1] turns green and the LED display shows:
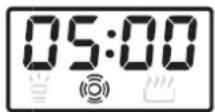
This is the most common timer setting and working state. If the timer needs to be adjusted, press the TIME button [8] and button [9]. The timer can be set between 1 to 30 minutes.
Note: do not set the cleaning time too long as this might lead to loosening of screws, cracks or coating peeling off.
- Press the On/Off button [2] to start cleaning. A buzzing sound can be heard from the cleaning tank and the normal cleaning indicator [5] is lit, indicating the cleaning is in progress. Closing the lid [A] will reduce the noise level.
The digital timer [7] will count down to show the remaining cleaning time. When it displays 00:00, the cleaning is done. To stop cleaning at any time, press the On/Off button [2]. The unit is designed with overheating protection to avoid extended and continuous operation for too long. When the red light [1] is on, the unit will not turn on. The unit will idle for about 20 minutes and can be restarted after the green light [1] comes on.
- When the heater is needed, press the TC button [10]; the heater indicator [6] flashes to indicate that the heater is turned on. When the water reaches 60^ C, the heater and heater indicator [6] turn off.
Note: to ensure safe operation, the heater is turned off automatically after 45 minutes.
To speed up mixing and use less solution, use the degas function. Press the Time button [8] to set the timer to 10 minutes then press the function button [3]; the heater indicator [6] illuminates. Press the On/Off button [2] to start degassing. The VTUSCT5 returns to normal cleaning automatically after 90 seconds.
When debris "smoke" is no longer visible, cleaning is done. If additional cleaning is needed, reset the timer and repeat the steps above.
VTUSCT5
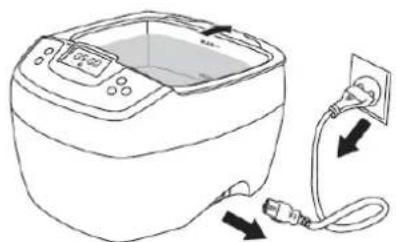
- When cleaning is completed, switch off the VTUSCT5, unplug the power cord [H], open the lid [A] and retrieve the basket [F] and the items. Rinse and dry the items.
Drain the dirty water via the drain groove [C]. Clean and wipe the tank dry. Do not use abrasive or corrosive solutions.
8. Care and maintenance
Refer to the illustrations on page 3 of this manual.
- Do not turn on the unit without water in the tank.
Even though the unit is designed with multiple protections, if it is turned on for over 15 seconds without water in the tank, it may damage the unit or severely reduce the life of the unit.
- Do not run the unit for extended time or continuously.
The unit is designed with overheat protection. If the unit has been running for 45 minutes, it is recommended to stop the unit for about 20 minutes to prolong the life of the unit.
- Do not keep water in the cleaning tank for a long time.
Remove the water from the tank after each use to prevent the tank from corroding. Clean and wipe the tank dry.
- Do not spray water over the housing.
Use a towel to wipe the tank and the housing dry.
- Do not expose the unit under direct sun shine for a long time.
Keep the unit in a dry, cool and ventilated place.
9. Tech nical specifications
| ultrasonic frequency | 35kHz |
| tank material | stainless steel SUS304 |
| housing/holder material | ABS |
| tank capacity | 2L |
| power consumption | 160W |
| power supply | 240Vac / 50Hz |
| dimensions | 26.5 x 23.0 x 18.0 cm / 10.4" x 9.1" x 7.1" |
Use this device with original accessories only. Velleman nv cannot be held responsible in the event of damage or injury resulted from (incorrect) use of this device.
For more info concerning this product and the latest version of this user manual, please visit our website www.velleman.eu.
The information in this manual is subject to change without prior notice.
© COPYRIGHT NOTICE
This manual is copyrighted. The copyright to this manual is owned by Velleman nv. All worldwide rights reserved. No part of this manual may be copied, reproduced, translated or reduced to any electronic medium or otherwise without the prior written consent of the copyright holder.
Velleman® Service and Quality Warranty
Velleman® has over 35 years of experience in the electronics world and distributes its products in more than 85 countries. All our products fulfil strict quality requirements and legal stipulations in the EU. In order to ensure the quality, our products regularly go through an extra quality check, both by an internal quality department and by specialized external organisations. If, all precautionary measures notwithstanding, problems should occur, please make appeal to our warranty (see guarantee conditions).
General Warranty Conditions Concerning Consumer Products (for EU):
- All consumer products are subject to a 24-month warranty on production flaws and defective material as from the original date of purchase.
- Velleman® can decide to replace an article with an equivalent article, or to refund the retail value totally or partially when the complaint is valid and a free repair or replacement of the article is impossible, or if the expenses are out of proportion.
You will be delivered a replacing article or a refund at the value of 100% of the purchase price in case of a flaw occurred in the first year after the date of purchase and delivery, or a replacing article at 50% of the purchase price or a refund at the value of 50% of the retail value in case of a flaw occurred in the second year after the date of purchase and delivery.
• Not covered by warranty:
- all direct or indirect damage caused after delivery to the article (e.g. by oxidation, shocks, falls, dust, dirt, humidity...), and by the article, as well as its contents (e.g. data loss), compensation for loss of profits;
- frequently replaced consumable goods, parts or accessories such as batteries, lamps, rubber parts, drive belts... (unlimited list);
- flaws resulting from fire, water damage, lightning, accident, natural disaster, etc. ...;
- flaws caused deliberately, negligently or resulting from improper handling, negligent maintenance, abusive use or use contrary to the manufacturer's instructions;
- damage caused by a commercial, professional or collective use of the article (the warranty validity will be reduced to six (6) months when the article is used professionally);
- damage resulting from an inappropriate packing and shipping of the article;
- all damage caused by modification, repair or alteration performed by a third party without written permission by Velleman®.
- Articles to be repaired must be delivered to your Velleman® dealer, solidly packed (preferably in the original packaging), and be completed with the original receipt of purchase and a clear flaw description.
- Hint: In order to save on cost and time, please reread the manual and check if the flaw is caused by obvious causes prior to presenting the article for repair. Note that returning a non-defective article can also involve handling costs.
- Repairs occurring after warranty expiration are subject to shipping costs.
- The above conditions are without prejudice to all commercial warranties.
The above enumeration is subject to modification according to the article (see article's manual).
NL
- VTUSCT5
- User manual
- Intro duction
- To all residents of the European Union
- Important environmental information about this product
- If in doubt, contact your local waste disposal authorities.
- Safet y Instructions
- Gene ral Guidelines
- Features
- Working principle
- Overview
- Note: degassing process
- Operation
- Note: indirect cleaning
- Care and maintenance
- Tech nical specifications
- © COPYRIGHT NOTICE
- Velleman® Service and Quality Warranty
- General Warranty Conditions Concerning Consumer Products (for EU):
- • Not covered by warranty:
- NL
Brand : VELLEMAN
Model : VTUSCT5
Category : Ultrasonic cleaner