ELGD10 - Gas detector HQ - Free user manual and instructions
Find the device manual for free ELGD10 HQ in PDF.

Frequently Asked Questions - ELGD10 HQ
User questions about ELGD10 HQ
0 question about this device. Answer the ones you know or ask your own.
Ask a new question about this device
Download the instructions for your Gas detector in PDF format for free! Find your manual ELGD10 - HQ and take your electronic device back in hand. On this page are published all the documents necessary for the use of your device. ELGD10 by HQ.
USER MANUAL ELGD10 HQ
Important! Not made for carbon monoxide detection.
MANUAL
MODE D'EMPLOI
MANUALE
HASZNÁLATI UTMUTATO
BRUKSANVISNING
MANUAL DE UTILIZARE
ANLEITUNG
GEBRUKSAANWIJZING
MANUAL DE USO
KÄYTTOOHJE
NAVOD KPOUZITI
Introduction
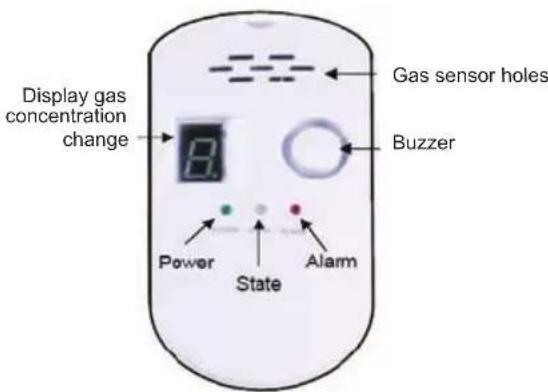
The EL-GD10 is a freestanding plug-in gas detector for LPG, naturalgas. The detector is made for indoor household use. When the gas leak concentration reaches certain preset levels the detector provides a visual signal (LEDs and numeric display indicate instant gas leak density) and a very strong alarm tone. When the gas concentration goes below these levels the detector regresses to normal state automatically.
Installation
For natural gas and town gas detection:
Depending on the specific gravity of this kind of gas the detector should be installed near by the ceiling (typically 0,3m below ceiling) at the room where gas leak can be expected and in a place where air movements are not impeded by furniture or furnishing.
For LPG gas detection:
Depending on the specific gravity of this kind of gas the detector should be installed near by the floor (typically < 0.1m above ground) at the room where gas leak can be expected and in a place where air movements are not impeded by furniture or furnishing.
Places where the detector should NOT be installed!
- In an enclosed space (e.g. in cupboard or behind a curtain).
- Directly above a sink.
- Next to a door or window.
- Next to an extractor fan.
- In an area where the temperature may drop to 16^ or exceed +40^ .
- Where dirt and dust may block the sensor.
- In a damp or humid location.
Operation
Warm up state:
- Plug-in the detector the "POWER" LED lights green and the alarm sounds "DiDi", Alarm LED flashes twice
- The display flashing " - after approx. 4 minutes display shows "0", then the detector is ready
Attention!!
The detector should work according the above mentioned points otherwise it will not provide the intended security. In that case do again the "Warming up" procedure. If there's still no good functioning the detector must be replaced.
Important! Not made for carbon monoxide detection.
Gas leak alarm state
Gas concentration in a normal range
- Display "1,2,3" and "STATE" LED is green.
Gas concentration slightly high - Display "3,4,5" the "STATE" LED is yellow and the alarm sounds slow "Di-Di".
Gas concentration high - Display "6,7,8,9" the "STATE" LED is yellow and the alarm sounds quick "DiDiDI--DiDiDi".
Gas concentration reached preset Lower Explosive Level (3%~20%) - Display "A", "STATE" LED red, "ALARM" LED lights red and alarm sounds.
Maintenance
To keep the detector working properly, following is recommended:
- Test the detector once a week e.g. press gently a lighter (without ignition) in front of the detector close to the gas hole.
- Keep the detector free of dust by gently vacuuming.
- Don't paint the detector.
- Don't spray aerosol on or near by the detector.
- By refurbishing rooms store the detector in a poly bag.
Important! What to do when the alarm starts
Keep calm and carry out the following act ions (not necessarily in the order given)
- Extinguish all open flames including all smoking material.
- Turn off all gas appliances.
- Don't switch on or off any electrical equipment including the EI-GD10
- Open doors and windows to increase ventilation.
- Don't use a telephone where the presence of gas is suspected.
If the alarm continues to evacuate immediately, the premises and contact the 24 hour emergency service of the gas supplier.
Specifications
- Detectable gases: LPG, natural gas and town gas
- Power supply: 100VAC - 240VAC ~ 50/60Hz
Power consumption: < 4W - Alarm level: 3% LEL 20% LEL
- Alarm volume: >85dB
- Temperature range: -10^ 50^
- Relative humidity: < 97% RH
Storage temperature: -25^ 55^ - Dimensions: 67 × 67 × 112 mm
Weight: 122g
Declaration of conformity
We,
Nedis B.V.
De Tweeling 28
Declare that product:
Name: HQ
Model: EL-GD10
Description: Plug-in type gas alarm
Is in conformity with the following standards
EMC: EN50270:1999/EN61000-3-2:2000/EN61000-3-3:1995/+A1:2001
LVD: EN50194:2000/EN60950-1:2001+A11:2004
Following the provisions of the 89/336/EEC amend by directive.
's-Hertogenbosch, 15.11.2007

Mrs. J. Gilad
Purchase Director
Safety precautions:

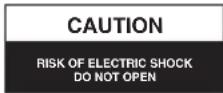

To reduce risk of electric shock, this product should ONLY be opened by an authorized technician when service is required. Disconnect the product from mains and other equipment if a problem should occur. Do not expose the
product to water or moisture.
Warranty:
No guarantee or liability can be accepted for any changes and modifications of the product or damage caused due to incorrect use of this product.
General:
Designs and specifications are subject to change without notice.
All logos brands and product names are trademarks or registered trademarks of their respective holders and are hereby recognized as such.

Attention:
This product is marked with this symbol. It means that used electrical and electronic products should not be mixed with general household waste. There is a separate collections system for these products.
Copyright ©

English
Deutsch
Français
Nederlandds
Italiano
Espanol
Magyar
Suomi
Svenska
Cesky
Romána