35020056 - Smart Home Niko - Free user manual and instructions
Find the device manual for free 35020056 Niko in PDF.
| Product type | Passive infrared (PIR) presence detector for ceiling recessed mounting |
| Brand | Niko |
| Model | 35020056 |
| Detection technology | Passive infrared (PIR) |
| Intended use | Indoor – small offices, open-plan offices, storage rooms |
| Recommended mounting height | 2 to 3 m |
| Detection range | 7 m (at 2.5 m height) |
| Detection angle | 360° (fig. 1) |
| Dimensions (visible part) | 24 × 90 mm (H × W) |
| Dimensions (total with recessed part) | 56 × 90 mm (H × W) |
| Weight | Approx. 50 g |
| Supply voltage | 230 Vac ± 10% |
| Power consumption | 0.8 W |
| Relay contact type | NO (normally open), max. 10 A |
| Maximum load (lamps) | Incandescent 2300 W, halogen 230 V 2300 W, low-voltage halogen 500 VA, energy-saving 1200 VA |
| Light sensitivity | 30 to 2000 lux (7 settings + custom) |
| Switch-off delay | 5 s to 30 min (6 settings, including pulse mode) |
| IP rating | IP20 |
| Protection class | Class II |
| Ambient temperature | -5 to 50 °C |
| Warranty | 4 years from delivery date |
| Maintenance and cleaning | Clean the lens with a damp cloth and water with a little detergent |
| Installation | By a qualified installer, in a Niko mounting box (390-20056) or flush-mounting box ø 55-60 mm |
| Repairability | Not repairable; in case of defect, replace the device |
Frequently Asked Questions - 35020056 Niko
User questions about 35020056 Niko
0 question about this device. Answer the ones you know or ask your own.
Ask a new question about this device
Download the instructions for your Smart Home in PDF format for free! Find your manual 35020056 - Niko and take your electronic device back in hand. On this page are published all the documents necessary for the use of your device. 35020056 by Niko.
USER MANUAL 35020056 Niko
6. WAARSCHUWINGEN VOOR INSTALLATIE
3.2.3. Bouton-poussoir
- Pression brève
lampes fluorescentes (non compensated) (1200 VA)
Read the complete user manual before carrying out the installation and activating the system.
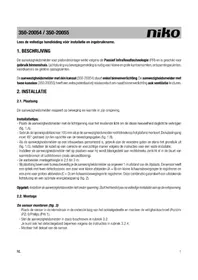
1.DESCRIPTION
The presence detector for flush mounting in a ceiling uses Passive Infrared Technology (PIR) and is suitable for indoor use. Lighting control through motion detection is useful for small offices, offices separated into islands and storage areas.
The IR remote control (not included) (350-20057) can be used to adjust the basic settings as well as additional settings for the presence detector (see section 3.2.).
2. INSTALLATION
2.1. Positioning
The presence detector reacts to motion and heat in its environment.
Installation tips:
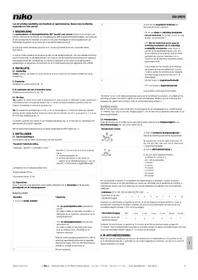
- The recommended mounting height is 2 to 3m . At a height of 2.5m , the presence detector has a detection range of 7m and a detection angle of 360^ (fig. 1).
- Do not install the presence detector near moving objects, heat sources (such as cookers and electric heaters) or air currents (fig. 2). This can result in undesired activation of the presence detector.
- Do not position the presence detector towards the light source it is meant to activate if application 1 and 2 are used.
Attention: Disconnect all power before installing the presence detector. Do not connect the device to the mains voltage until installation is completed.
2.2. Mounting
Mounting and connecting the presence detector
The presence detector is suitable for mounting in a Niko mounting box (not included) (390-20056) or a flush-mounting box with a screw fixing diameter of 60 or 55mm .
Follow the instructions in figure 3 to install the presence detector.
Connect the sensor (fig. 4.1).
Connect a push button if manual operation of the presence detector is also desired (fig. 4.2).
3. OPERATION AND SETTINGS
3.1. Operation
3.1.1. General
After the mains voltage has been switched on the presence detector will activate the load and the red LED will start flashing. After approximately one minute the connected load and the LED will be switched off. After five minutes warming-up time the presence detector is ready for use.
The integrated light sensor continuously measures the light level in the detection zone and compares this level with the set value. The light sensor automatically switches the lighting on only when the detector detects motion within the detection range and when the daylight level drops below the preset lux value. The lighting remains on as long as motion is detected.
The lighting automatically switches off when the preset daylight level is reached.
The default setting for the switch-off delay is five minutes. The lighting will remain on for the specified delay time after the last motion is detected. Once the switch-off delay has expired, the lighting will switch off.
3.1.2. Applications
The presence detector has four applications which are selected using DIP switches 3 and 4. Figure 5 shows how the DIP switches should be set per application.
1) Automatic ON and OFF with presence detector according to daylight level. The light sensor has priority.
- The lighting is automatically switched on if the presence detector detects motion within the detection range and if the daylight level is below the preset lux value.
- The lighting is automatically switched off after a preset period if the presence detector detects no motion within the detection range or if the daylight level remains higher than the preset lux value for five minutes.
Optional: A push button can also be connected to manually switch the presence detector on and off. The detector is activated according to the daylight level.
2) Manual ON or OFF with push button, or automatic OFF with presence detector or according to daylight level. The light sensor has priority.
For this application you should connect a push button (fig. 4.2).
- If the daylight level drops below the preset lux value, the lighting can be manually switched on using the push button.
- The lighting is automatically switched OFF after a preset period if the presence detector detects no motion within the detection range or if the daylight level remains higher than the preset lux value for five minutes.
3) Automatic ON and OFF with presence detector (walking test for five minutes - see section 3.2.2.).
In this application, the presence detector does not react to light. The light sensor does not function.
-
The lighting is automatically switched on when the presence detector detects motion within the detection range.
-
The light is automatically switched off after a preset period if the presence detector detects no motion within the detection range.
Optional: A push button can also be connected to manually switch the presence detector on and off.
4) Manual ON or OFF with push button or automatic OFF with presence detector (walking test for five minutes - see section 3.2.2.).
For this application you should connect a push button (fig. 4.2).
In this application, the presence detector does not react to light. The light sensor does not function.
- The lighting is automatically switched off after a preset period if the presence detector detects no motion within the detection range.
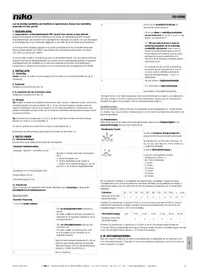
3.2. Settings
3.2.1. General
At delivery, the parameters are set as follows (factory settings):
| sensitivity high | |
| application application 1 | |
| light sensitivity 100 lux | |
| switch-off delay 5 min | |
| LED motion indicator off (can only be changed using the remote control) | |
The basic settings (sensitivity and application) can be changed using the DIP switches.
To set the sensitivity, use DIP switches 1 and 2. Figure 5 shows how to set these DIP switches for the desired sensitivity of the light sensor (minimum, low, high, maximum).
Select the application using DIP switches 3 and 4 (see section 3.1.4.)
The IR remote control should be used to adjust all other settings. This is available separately.
3.2.2. Walking test
A walking test can be used to verify if the presence detector is operating correctly.
Select the walking test by setting the appropriate DIP switches (settings for application 3 or 4) or via the test button (Test On/Off) on the IR remote control.
When the test is activated and the presence detector detects motion, the red LED indicator illuminates and the connected lighting switches on for five seconds.
Attention:
- The walking test is not affected by daylight.
- Reset the DIP switches to their original position if daylight detection is used (application 1 or 2).
3.2.3. Push button
- Short press
A short press (< 1 s) switches the lighting on and off and disables the presence detector for ten seconds. The presence detector is then automatically reactivated and switches the lighting on according to the selected application.
Pressing the push button briefly with the lighting switched off, will switch the lighting back on. The lighting will remain switched on while the presence detector detects motion within the detection range and the switch-off delay has not expired.
- Long press
A long press (>1s) with the lighting switched on, will switch the lighting off again. The presence detector remains disabled until it detects motion within the detection range and the switch-off delay +2 hours has not expired. The presence detector is then automatically reactivated and switches the lighting on according to the selected application.
Example: The switch-off delay is set to 15 minutes. The presence detector is automatically reactivated 2 hours and 15 minutes after the last motion was detected.
A long press (>1s) with the lighting switched off, will switch the lighting back on (regardless of the daylight level). The presence detector remains activated as long as it detects motion within the detection range and the switch-off delay +2 hours has not expired. The lighting is then switched off, the presence detector is automatically reactivated and the lighting switches on according to the selected application.
If a long press is applied to the push button, the red LED indicator on the presence detector flashes (1 second on, 3 seconds off).
3.2.4. Settings via the IR remote control (fig. 6)
- Lock/unlock
Press this button to unlock the presence detector. The green LED on the presence detector illuminates to indicate the settings can be changed.
After the settings have been changed, press this button again to lock the presence detector. The green LED goes out.
Note: The presence detector should be unlocked to change all settings (except Light 1 On/Off) and re-locked to activate the new settings. If the presence detector is not locked, it is locked automatically after five minutes. All changed settings will be saved.
Light 1 On/Off
This button has the same function as a long press on the push button (see section 3.2.3.).
You do not need to unlock the presence detector to use this button.
Light 2 On/Off
This button is not activated and therefore unusable.
- LED On/Off
Use this button to switch the red LED on or off to indicate motion is detected.
If you press this button with the red LED switched off, the green LED flashes and the red LED illuminates for two seconds. If you press this button with the red LED switched on, the green LED flashes for two seconds.
- Lux zone 1
These red buttons are used to set the light sensitivity. There are seven possible lux settings: 30, 100, 300, 600, 1000, 2000 and a custom lux value. The custom value is configured using the Learn actual lux button and ranges from 30 to 2000 lux.
When you press the Learn actual lux button, the green LED flashes for ten seconds to indicate the desired lux value is being loaded. The green LED then illuminates and the connected lighting switches on for five seconds.
If the set lux value is not between 30 and 2000 lux, the green LED flashes rapidly and continues to flash until one of the settings is selected.
These settings should be used when the light level in the room has reached the minimum value. This is the value at which the lighting in the room should be switched on if there is not enough daylight.
- Lux zone 2
The orange buttons on the IR remote control are not activated and are therefore unusable.
Time
These blue buttons are used to set the switch-off delay. There are six possible settings: 2, 5, 10, 15 or 30 minutes on pulse (5 seconds on and 60 seconds off).
The buttons Time 1, Time 2 and Time 3 are not activated and therefore unusable.
Test On/off
This button is used to activate the walking test.
If you press this button when the test is not activated, the green LED flashes and the red LED illuminates for two seconds. If you press this button when the test is activated, the green LED flashes for two seconds.
- Lux On/Off
This button determines whether or not the operation of the presence detector is dependent on daylight. This button is only valid for applications 1 and 2.
If you press this button when the presence detector is dependent on daylight, the green LED will flash for two seconds and the presence detector will no longer be dependent on daylight.
If you press this button when the presence detector is not dependent on daylight, the green LED will flash, the red LED will light up for two seconds, and the presence detector will become dependent on daylight.
- Reset
Pressing this button will return all settings to their factory values.
4. MAINTENANCE
Dirt may prevent the presence detector from functioning properly. Therefore, always keep the lens clean and dry. Use a damp cloth and water with some detergent to clean the lens. Never exert pressure to wipe the lens clean. The presence detector should be replaced if the lens or other parts of the presence detector are defective.
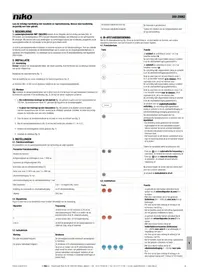
5. TECHNICAL DATA
Dimensions: 24 × 90 ~mm (HxW)
56 × 90 ~mm (HxW) (including non-visible part)
Power supply voltage: 230 Vac ± 10%
Power consumption: 0.8 W
Relay contact: NO (max. 10 A), light- and motion-sensitive
Maximum load: incandescent lamps (2300 W)
230 V halogen lamps (2300 W)
all low-voltage halogen lamps (500 VA)
fluorescent lamps (non-compensated) (1200 VA)
economy lamps (CFLi) (1200 VA)
Maximum switching capacity: 140 uF
Maximum inrush current: 80 A/20 ms
Detection angle: 360^
Mounting height: 2.5 - 4m
Detection range: circle, 7 - 12 m
Light sensitivity: 30 - 2000 lux
Switch-off delay: 5s / 2 - 30min
Protection degree: IP20
Protection class: class II devices
Ambient temperature: -5 - 50°C
Quality mark:
CE marked in compliance with EN 60669-2-1
6. WARNINGS REGARDING INSTALLATION
- The installation should be carried out by a registered installer and in compliance with the statutory regulations.
- This user manual should be presented to the user. It should be included in the electrical installation file, and it should be passed on to any new owners. Additional copies are available on the Niko website or via the Niko support service.
-
During installation, the following should be taken into account (non-exhaustive list):
-
the statutory laws, standards and regulations.
- the technology currently available at the time of installation.
- this user manual, which only states general regulations and should therefore be read within the scope of each specific installation.
- the rules of proper workmanship.

This product complies with all of the relevant European guidelines and regulations. If applicable, you can find the EC declaration of conformity regarding this product at www.niko.eu.
7. NIKO SUPPORT
In case of doubt or for the specific exchange procedure in case of a possible defect, contact the Niko support service in Belgium at +32 3 778 90 80 or your wholesaler/installer. Contact details and more information can be found at www.niko.eu under the "Help and advice" section.
8. GUARantee Provisions
- The period of guarantee is four years from the date of delivery. The delivery date is the invoice date of purchase of the product by the consumer. If there is no invoice, the date of production applies.
- The consumer is obliged to inform Niko in writing about the non-conformity, within two months after stating the defect.
- In case of a non-conformity, the consumer only has the right to a product repair or replacement free of charge, which shall be decided by Niko.
- Niko shall not be held liable for a defect or damage resulting from incorrect installation, improper or careless use, incorrect operation, transformation of the product, maintenance that does not adhere to the maintenance instructions or an external cause, such as damage due to moisture or overvoltage.
- The compulsory regulations of the national legislation concerning the sale of consumer goods and the protection of the consumer in the countries where Niko sells, directly or via sister companies, subsidiaries, chain stores, distributors, agents or permanent sales representatives, take priority over the above-mentioned rules and regulations.
Do not dump this product with the unsorted waste. Bring it to a recognised waste collection point. Together with producers and importers, you have an important role to play in the advancement of sorting, recycling and reusing discarded electrical and electronic appliances. In order to finance the waste collection and processing, the government levies a recycling contribution in some cases (included in the purchase price of this product).