Saneo BW - Camping DOMETIC - Free user manual and instructions
Find the device manual for free Saneo BW DOMETIC in PDF.

Frequently Asked Questions - Saneo BW DOMETIC
Download the instructions for your Camping in PDF format for free! Find your manual Saneo BW - DOMETIC and take your electronic device back in hand. On this page are published all the documents necessary for the use of your device. Saneo BW by DOMETIC.
USER MANUAL Saneo BW DOMETIC
The toilet may be installed only by trained personnel!

NOTICE!
- Cleaning agents for the toilet may not contain chlorine or alcohol!
- Do not shake the cassette tank vigorously.
- All components of the system must be installed in frost-free areas. In freezing temperatures, there is a risk of damage caused by frost.
- Do not use antifreeze. These agents may damage the cassette toilet.
- The operating pressure (water pressure) of the solenoid valve should not exceed 6 bar. The solenoid valve is damaged by excessive pressure.
Table of contents
1 General information. 5
1.1 Notes on this instruction manual 5
1.2 Copyright 5
1.3 Description of symbols used 5
1.4 Limitation of liability 5
1.5 Warranty 6
1.6 Environmental notes 6
1.7 Declaration of Conformity 7
2 Safety instructions. 8
2.1 Proper use 8
2.2 Responsibility of the user. 8
2.3 Installation instructions 8
2.4 Rules and standards 8
3 Model description 9
3.1 Model designation 9
3.2 Type plate of the toilet 10
3.3 Technical data 11
3.4 Explanation of components 12
4 Installing the toilet 13
4.1 Installing the service door 13
4.2 Making wall cutouts 14
4.3 Setting up the toilet 15
4.4 Setting up the Saneo B, Saneo C toilet 16
4.5 Water connection 24
4.6 Installing the tank flap 26
4.7 Electrical connection 27
1 General information
1.1 Notes on this instruction manual
Before installing the toilet, read this installation instruction manual carefully.
This instruction manual provides you with the necessary information for proper installation of the toilet.
Observe the safety instructions in particular. Compliance with the notes and instructions is important for safe use of your toilet and protects you and the system from damage. You must understand what you read before you perform an action.
1.2 Copyright
The information, texts and illustrations in this manual are protected by copyright and subject to industrial property right protection. No part of this publication may be reproduced, copied or otherwise used without the written permission of Dometic GmbH, Siegen.
1.3 Description of symbols used

CAUTION!
Safety instruction: Failure to observe this instruction can lead to injury.

NOTICE!
Failure to observe this instruction can cause material damage and impair the function of the product.

NOTE
Supplementary information for operating the product.
1.4 Limitation of liability
All information and instructions in this operating manual were created with consideration of the existing standards and regulations and the state of the art. Domatic reserves the right to make modifications to the product which are in the interest of improving the product and its safety.
Domatic accepts no liability for damage due to:
- Failure to obey the installation instructions
- Failure to observe the operating manual
- Improper use
Use of non-original spare parts
Device changes and interventions
1.5 Warranty
The warranty arrangements are in accordance with European Directive 44/1999/EC and the customary conditions for the country. In case of warranty claims or service needs, please contact our customer service.
Faults caused by operator errors are not covered by the warranty. Any modifications to the device or use of spare parts that are not original Dometic spare parts, as well as failure to follow the instructions in the installation and operating manuals, void the warranty and cause liability claims to be excluded.
1.6 Environmental notes
Disposal
In order to ensure recycling of recyclable packaging materials, they must be disposed of according to the local collection systems.
1.7 Declaration of Conformity
Domatic products correspond to the specified characteristics in accordance with the respective European directives.
You can request the current Declaration of Conformity directly from Domatic, Siegen.
Dometic
DECLARATION OF CONFORMITY
according to
Low Voltage Directive 73/23/EEC and
the Amendment to LVD 90/683/EEC, 2006/95/EC
EMC Directive 2004/108/EC
RoHS Directive 2011/65EC
ECE R10

10R-047317
Type of equipment
Brand Name
Type family
Manufacturer's (Factory)
name
address
telephone no
telefax no
Cassette Toilet
DOMETIC
SANEOB,C
DOMETIC GmbH
The following harmonized standards or technical specifications (designations) which comply with good engineering practice in safety matters in force within the EEA have been practiced:
following DIN EN 997 (12/2003)
EN 55014-1;06,A1,A2
EN 55014-2;97,A1,A2
The equipment conforms completely with the above stated harmonized standards or technical specifications.
By signing this document, the undersigned declares as manufacturer, or the manufacturer's authorized representative established within the EEA, that the equipment in question complies with the requirements stated above.
Date
2015.03.05

Joachim Kinscher
Position
General Manager
2 Safety instructions
2.1 Proper use
This toilet is designed for installation and use in recreational vehicles such as campervans or motor caravans.
2.2 Responsibility of the user

WARNING!
- This device can be used by children aged 8 or over, as well as by persons with diminished physical, sensory or mental capacities or a lack of experience and knowledge, providing they are supervised or have been taught how to use the device safely and are aware of the resulting risks.
- Cleaning and user maintenance must not be carried out by unsupervised children.
Children must be supervised to ensure that they do not play with the device.
2.3 Installation instructions
The toilet must be installed so that it is easily accessible for service work, easy to de-install and install, and easily removed from the vehicle.

NOTICE!
The toilet may be installed only by trained personnel!
2.4 Rules and standards
When setting up and connecting the device, the following stipulations, which correspond to the latest state of the art, must be observed:
- The electrical installation must comply with national and local regulations.
European standard EN 1645-1,EN 1646-1,EN 1648-1,EN 1648-2
3 Model description
3.1 Model designation
Example:
The cassette toilet Saneo Consists of a toilet permanently installed in the vehicle and a removable, mobile cassette as a holding tank. The cassette is externally accessible through a door. Depending on the model, the toilet gets the rinse water from a tank integrated in the housing or from a freshwater tank in the vehicle.
The following model versions are available:
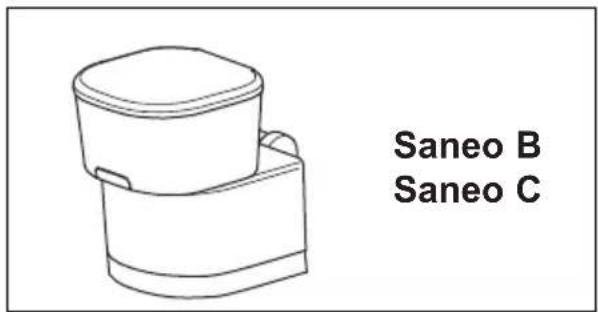
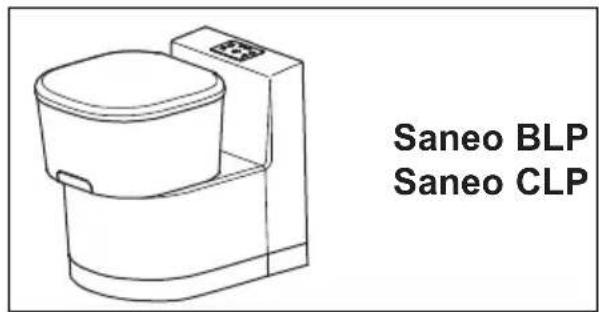
- Saneo B, Saneo C: freestanding, without water tank, without console
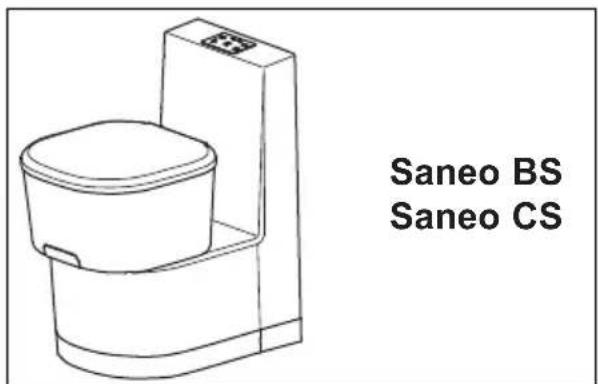
- Saneo BS, Saneo CS: freestanding, without water tank, with console
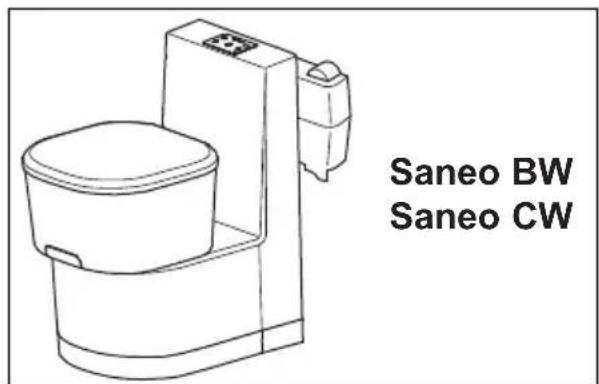
- Saneo BW, Saneo CW: freestanding, with a water tank in the console
- Saneo BLP, Saneo CLP: freestanding, without water tank, low console
3.2 Type plate of the toilet
The type plate contains all the important data. There you can see the model name, product number and serial number. You will need this information whenever you contact the customer service or order spare parts. You can find the type plate in the cassette housing after removal of the cassette.
1
Item Description
1 Model number
2 Product number
3 Serial number
3.3 Technical data
| Dometic Saneo | |
| Supply voltage: 12 V== | |
| Current: Max. 2 A with internal pump Max. 10 A with external pump | |
| Dimensions: See information in appendix | |
| Operating temperature: 0 °C to +50 °C | |
| Capacity: 16 l (cassette tank) 7 l (freshwater tank, optional) | |
| Test mark: | CE N1 10 R-047317 |

NOTE
Water supply (vehicle-side pump):
The toilet requires a min. of 7 l/min provided by the vehicle at the outlet of the hose connection of the toilet in order to ensure satisfactory flushing output of 5 l/min.
3.4 Explanation of components

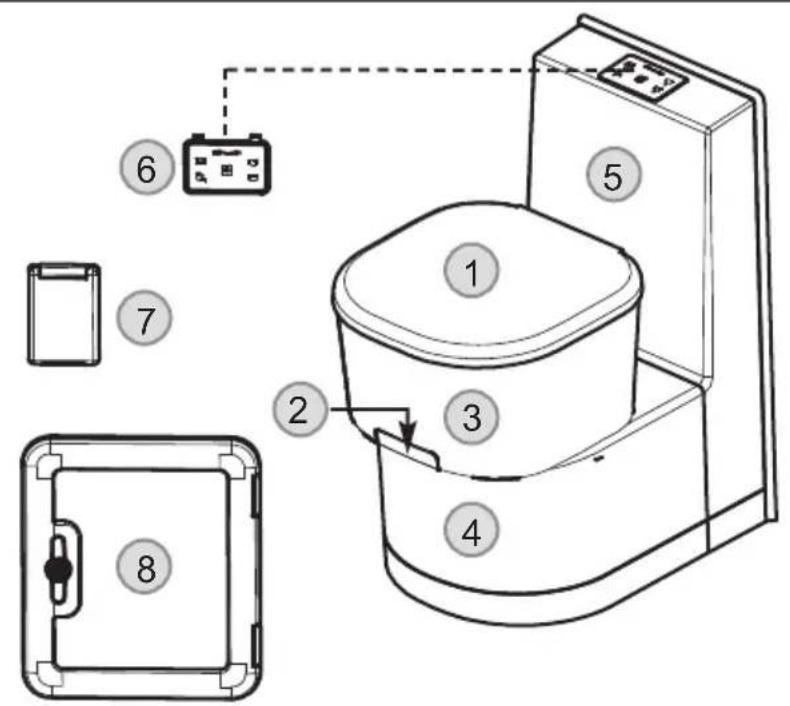
Item Description
1 Lid and seat, removable
2 Emptying slider for toilet bowl
3 Rotatable toilet bowl, plastic or ceramic
4 Cassette housing
5 Console for water tank
6 Level indicator / operating panel (flushing)
7 Saneo BW/CW only: tank flap / freshwater filler neck
8 Service door
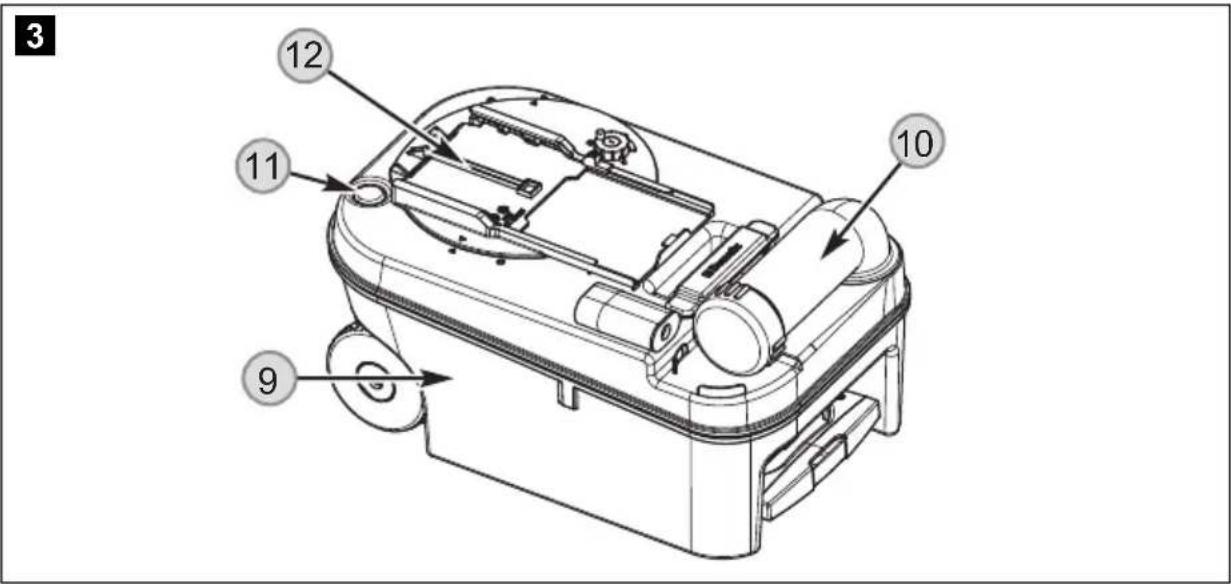
Item Description
9 Cassette tank
10 Draining neck
11 Vent knob for draining
12 Slider on the cassette
4 Installing the toilet
4.1 Installing the service door
The description for installation of the service door can be found in the enclosed document (Domatic Seitz SK 5) (optional and depends on the model).
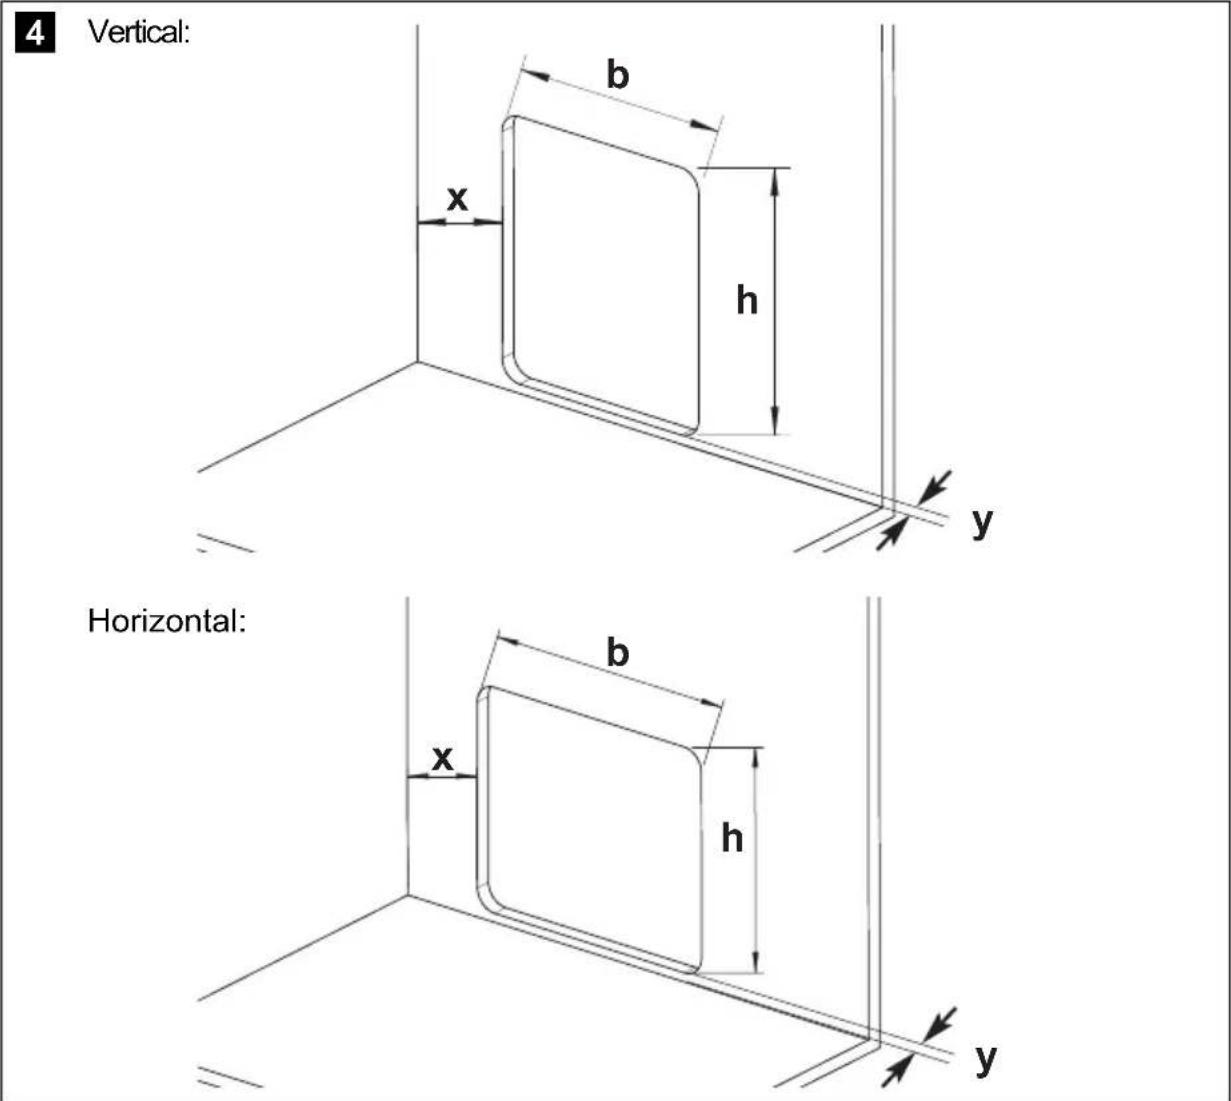
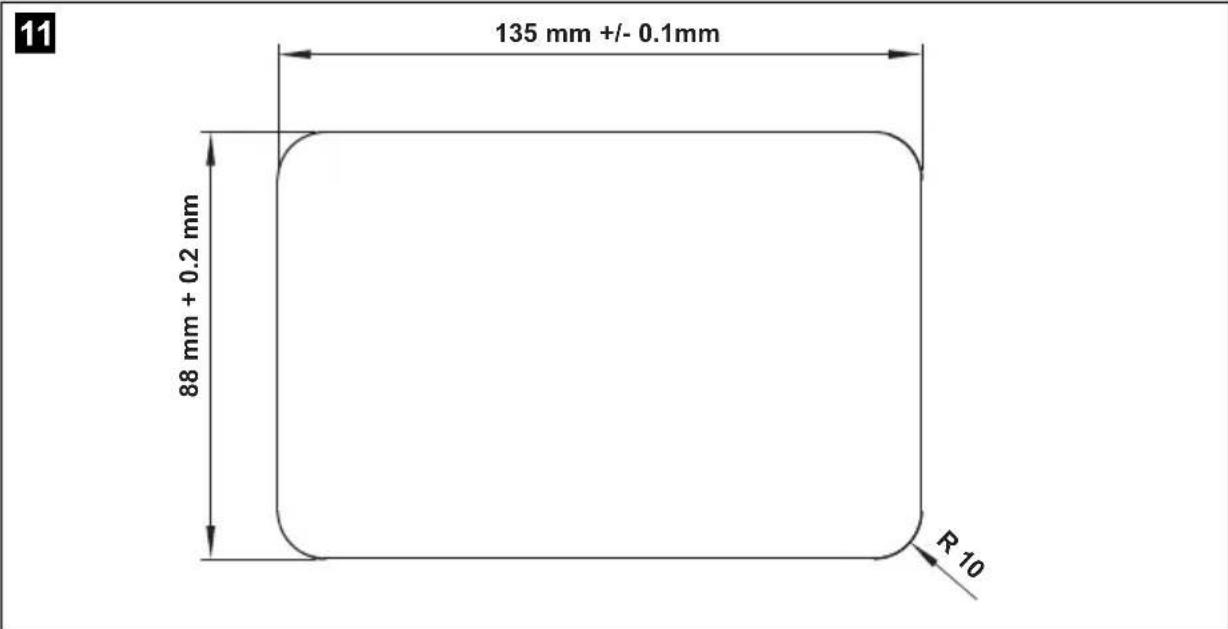
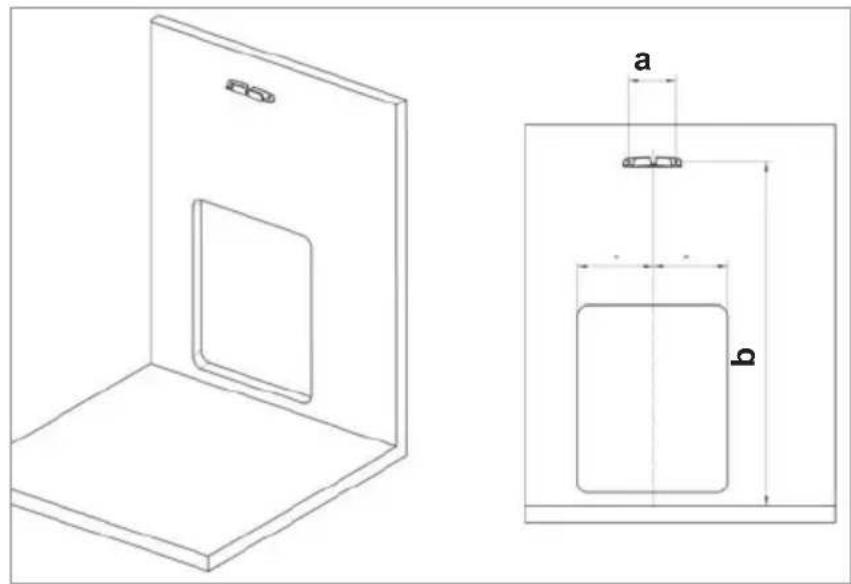
4.2 Making wall cutouts
4.2.1 Service door wall cutout
Make a cutout in the wall for the cassette with the dimensions:
For service door SK5 vertical
- y^ = 12.5 mm,y^ = 22 mm ;
-b = 310 mm + 1- 1 mm, h = 360 mm + 1- 1 mm .
For service door SK5 horizontal
- y^ = 12.5 mm,y^ = 26 mm ;
- b = 360 mm + 12 mm, h = 310 mm + 12 mm.
The dimension x results from the placement of the toilet. Note the position of the service door (template (3) and (4) on the packaging).
4.2.2 Wall cutout for the tank flap
The tank flap is used with models Saneo BW and CW Saneo with integrated water tank.
Use template (1), item 5.3.1 on page 163, for making the cutout for the tank flap.
You can find the installation description of the tank flap in chapter "Installing the tank flap" on page 26.
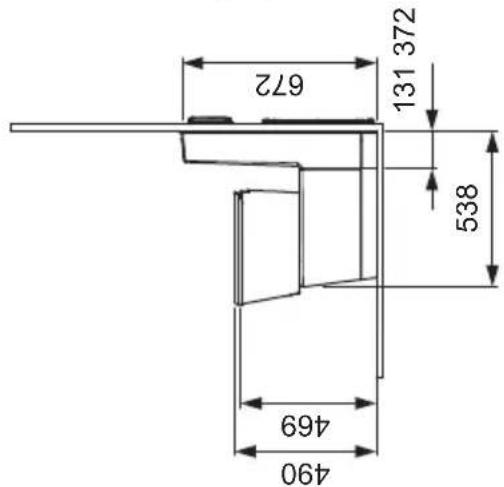
4.3 Setting up the toilet

NOTICE!
All components of the system must be installed in frost-free areas. In freezing temperatures, there is a risk of damage caused by frost.
Install the toilet according to the description for the respective model version.
Set up the toilet so that it is flush to a vertical wall only.
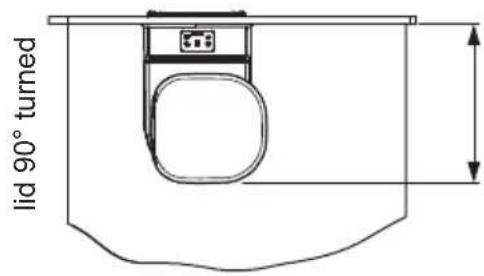
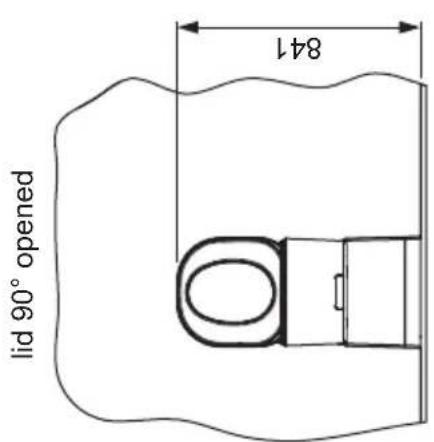
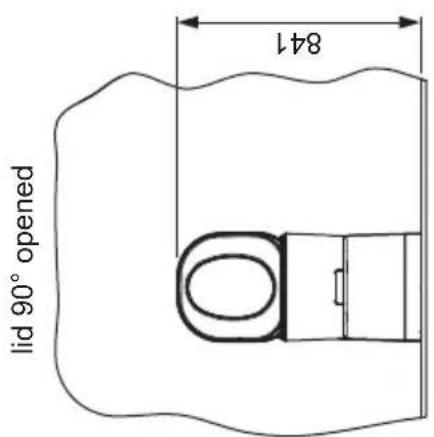
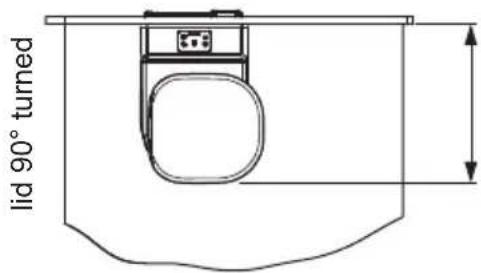
Leave at least 60~mm space to the side walls so that the swivelling of the upper part of the toilet (with seat) is not restricted.
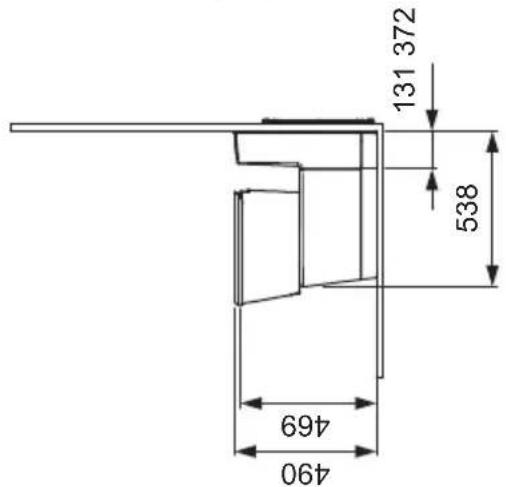
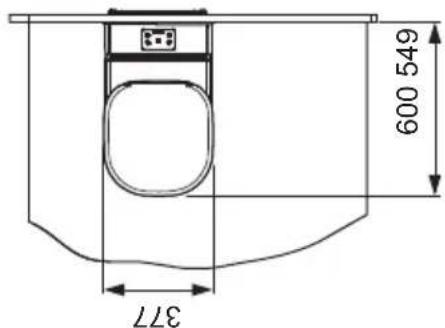
For installation, use the dimensioned drawings and templates in the appendix (items 5.2 on page 153, 5.3 on page 162).
5
When installing the toilet in a wet room, we recommend that you connect the toilet to the shower tray.
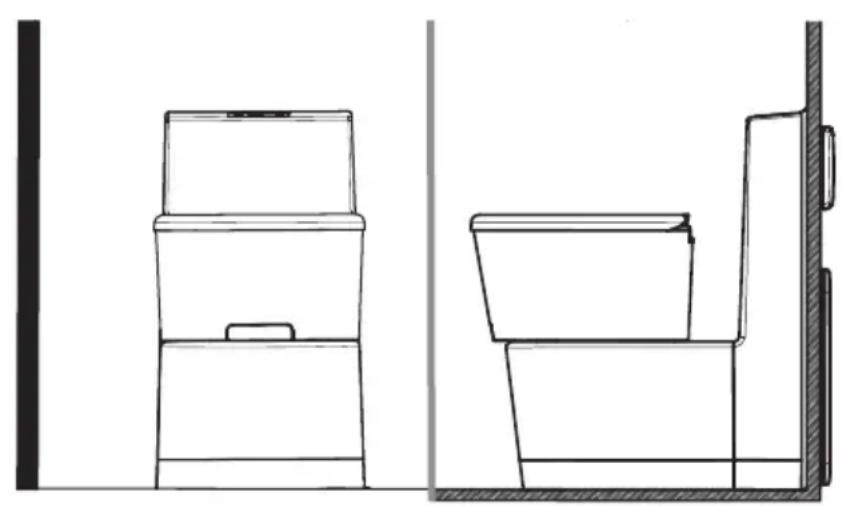
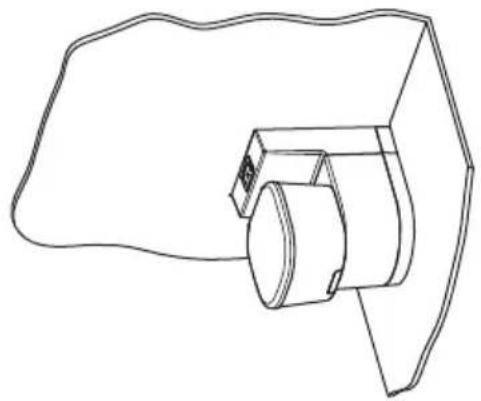
4.4 Setting up the Saneo B, Saneo C toilet
The freestanding models Saneo B and Saneo C have no integrated water tank. Set up this model so that the wall behind it can accommodate the operating unit of the toilet, the electrical connections and possibly a water tank. It is ideal if you put a box in front of the room wall, as shown in fig. 6. Install the control and operating panel in the wall in the immediate vicinity of the toilet (chapter "Installation of control and operating panel of the toilets Saneo B, Saneo C" on page 19).
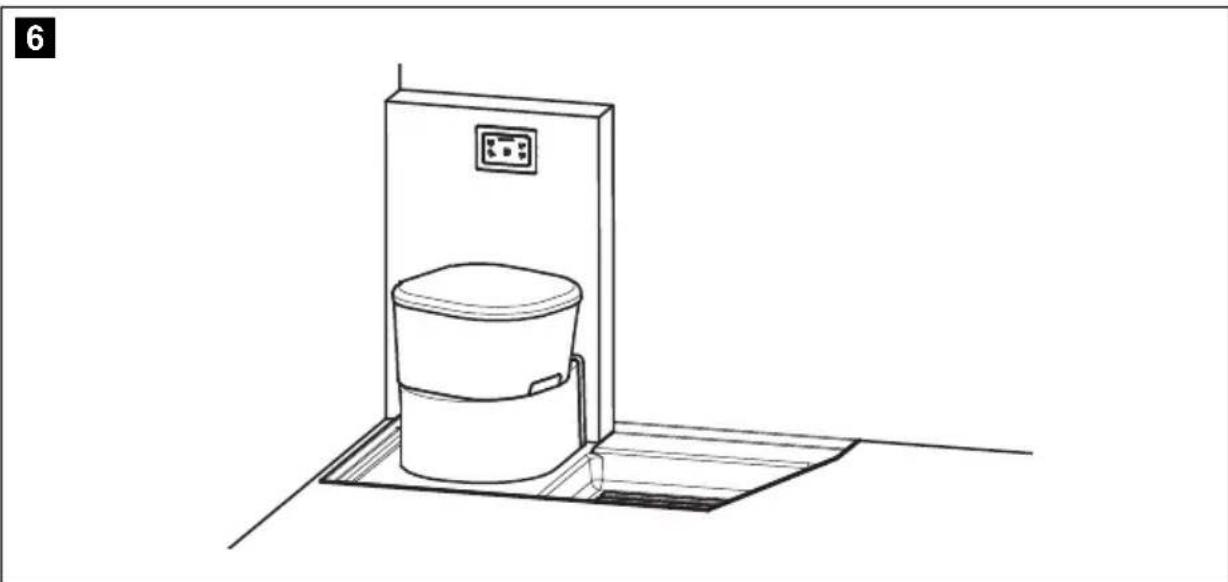

NOTE
The figure shows exemplary installation in a shower tray.
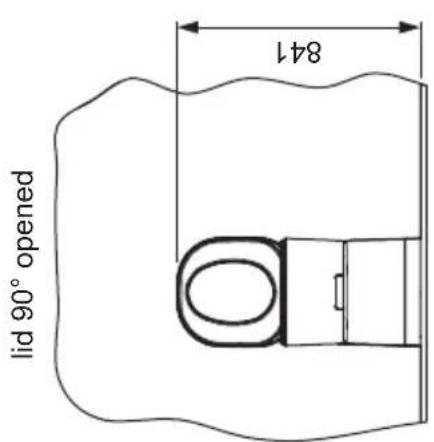
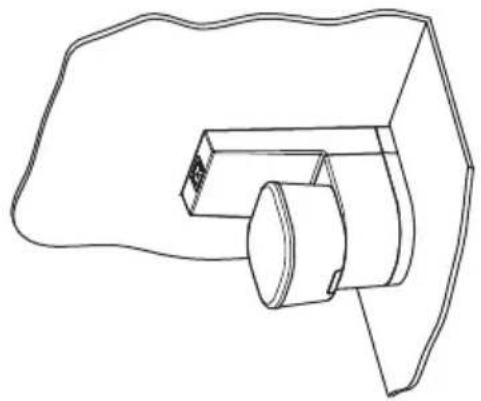
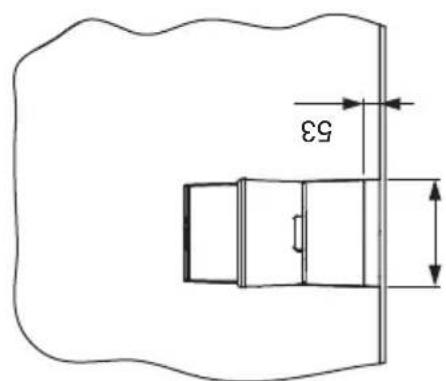
Note that the cassette protrudes 112mm (a) out of the cassette housing (fig. 7).
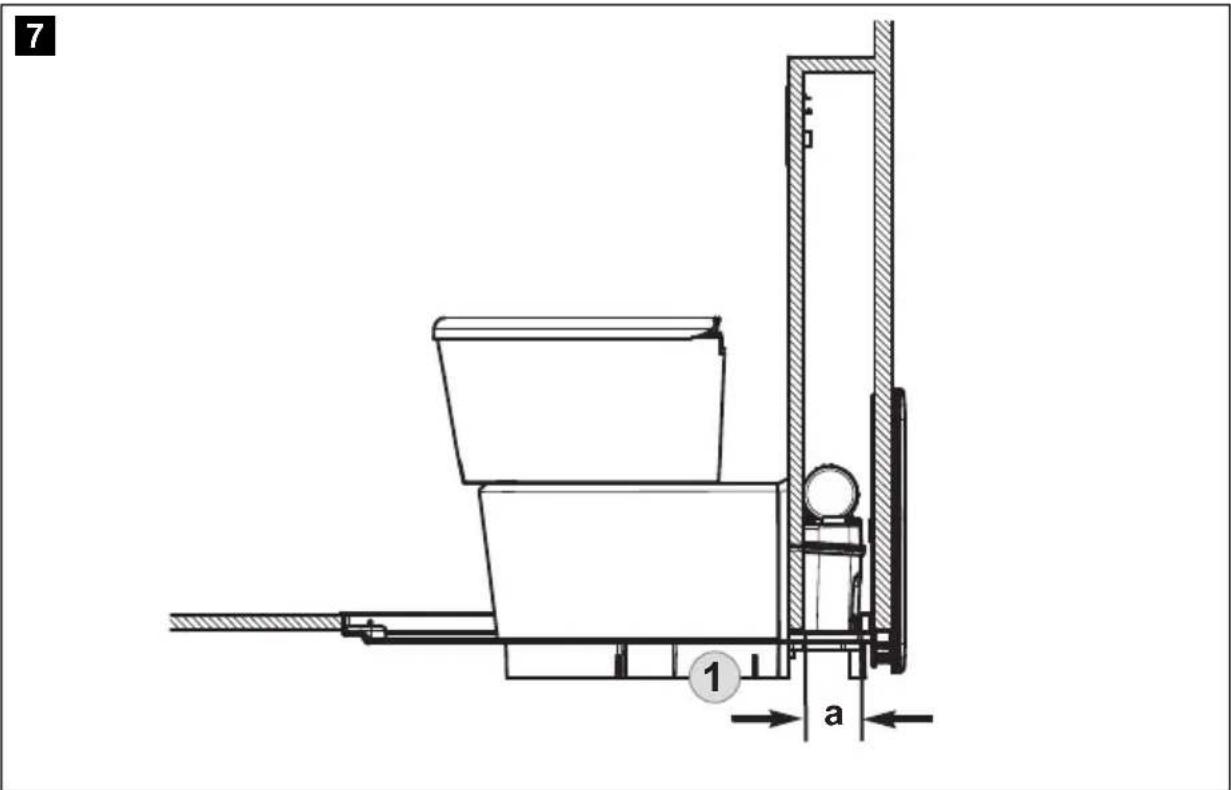

NOTE
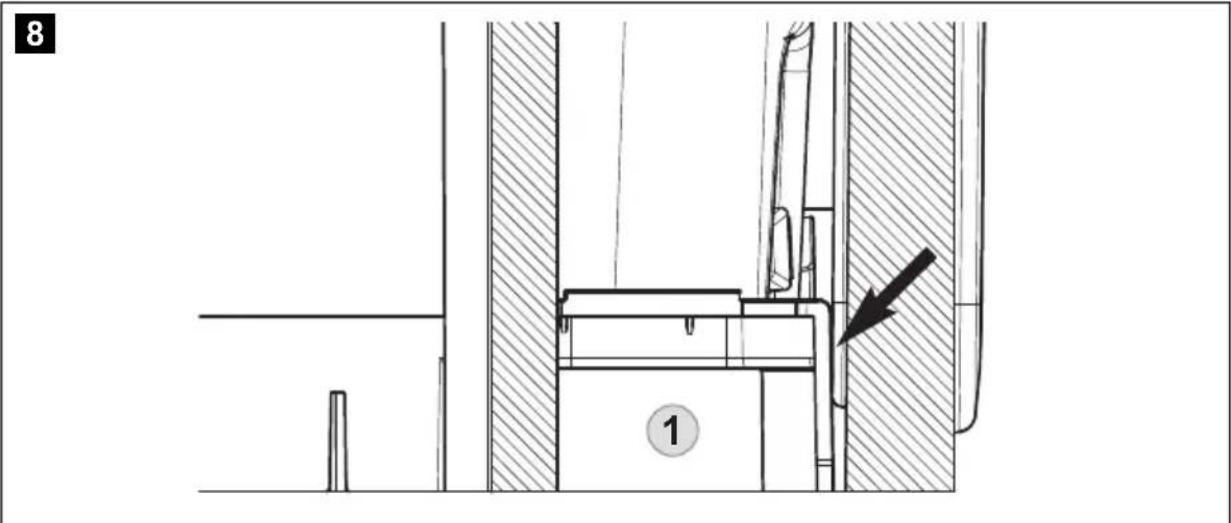
The figure shows exemplary installation in a shower tray.
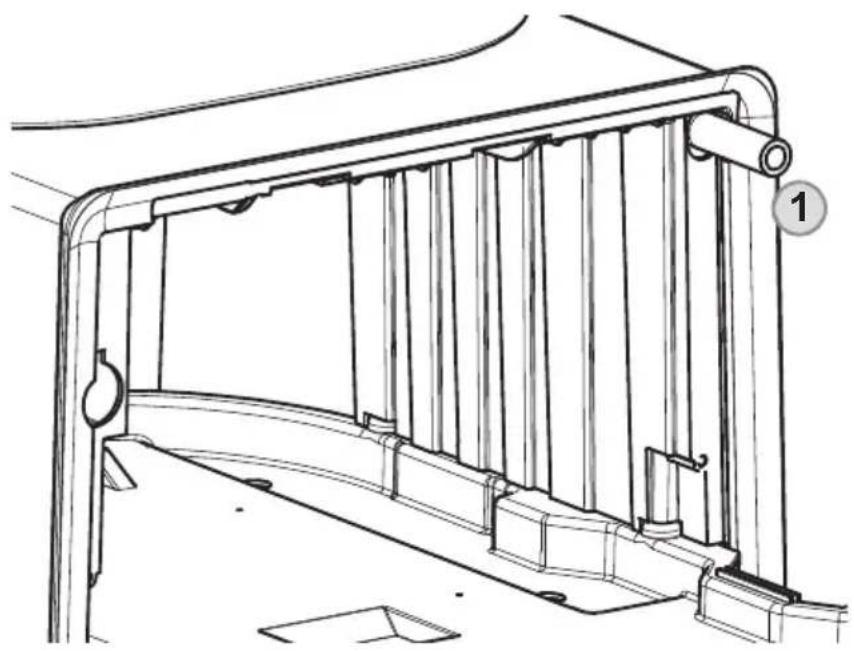
Place the housing base (1) flush with the installation frame of the service door so that there is a clean transition and no gap.
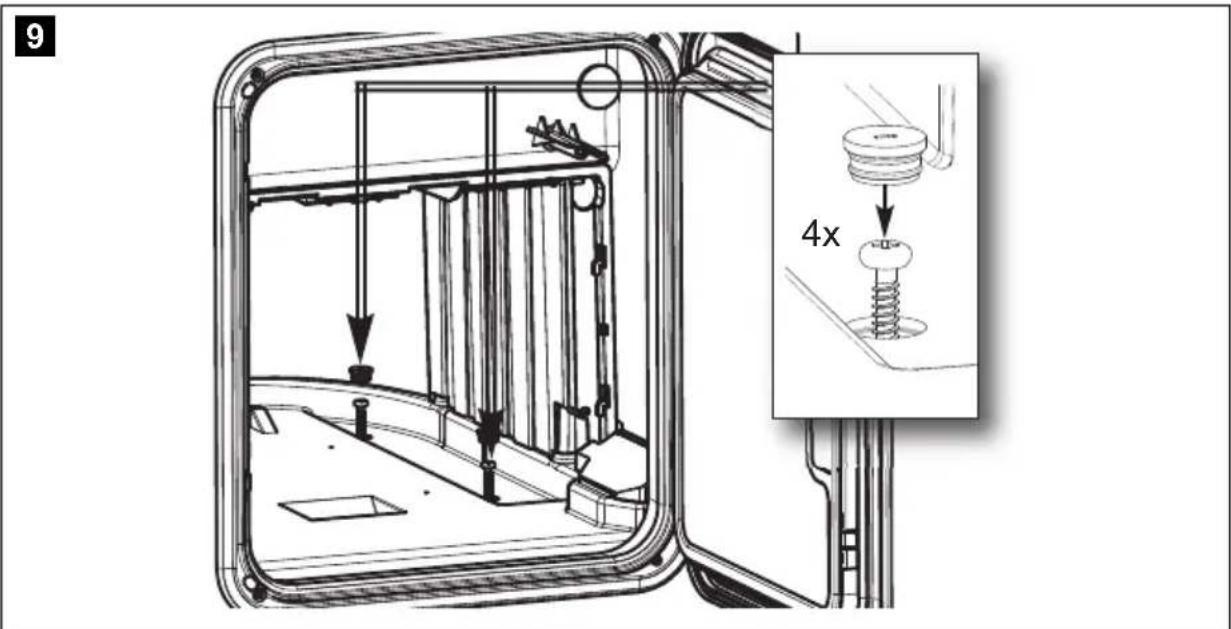
Attaching the toilets Saneo B, Saneo C
After the toilet is placed at the desired position, secure the base plate with four bolts (supplied) (fig. 9).
Then bolt the toilet housing to the wall (using a maximum of 4 bolts, not included) (fig. 10).

NOTE
1:1 template available from Domatic.
Installation of control and operating panel of the toilets Saneo B, Saneo C
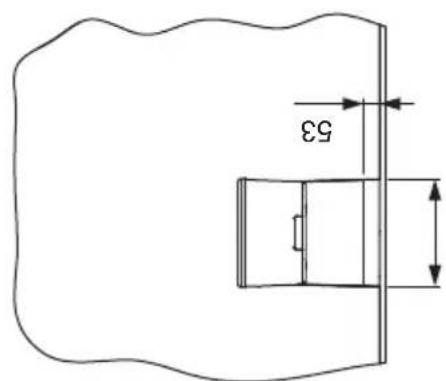
Attach the control and operating panel and for the toilets Saneo B, Saneo C at an easily accessible location in the wall. Make a cutout in the wall beforehand (fig. 11). Use the scale template (4) to make the cutout.
To insert the operating panel in the wall cut-out, press back the retaining springs (fig. 12 1) of the control and operating panel.

CAUTION!
There is a risk of injury due to the springs springing back!
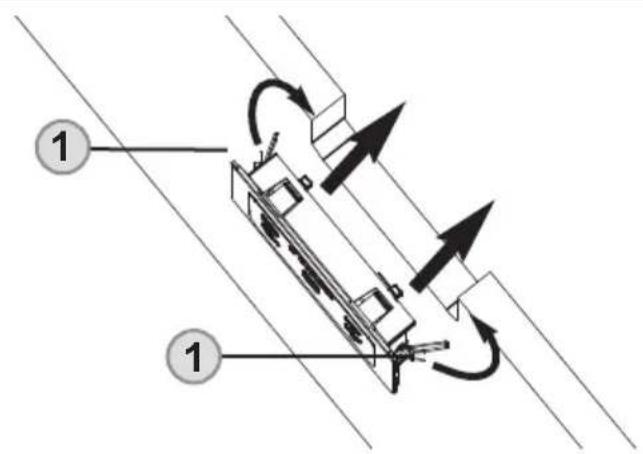
12
Connect the electrical cables to the couplings for installation of the operating and control panel (supplied unassembled) (chapter "Electrical connection" on page 27).
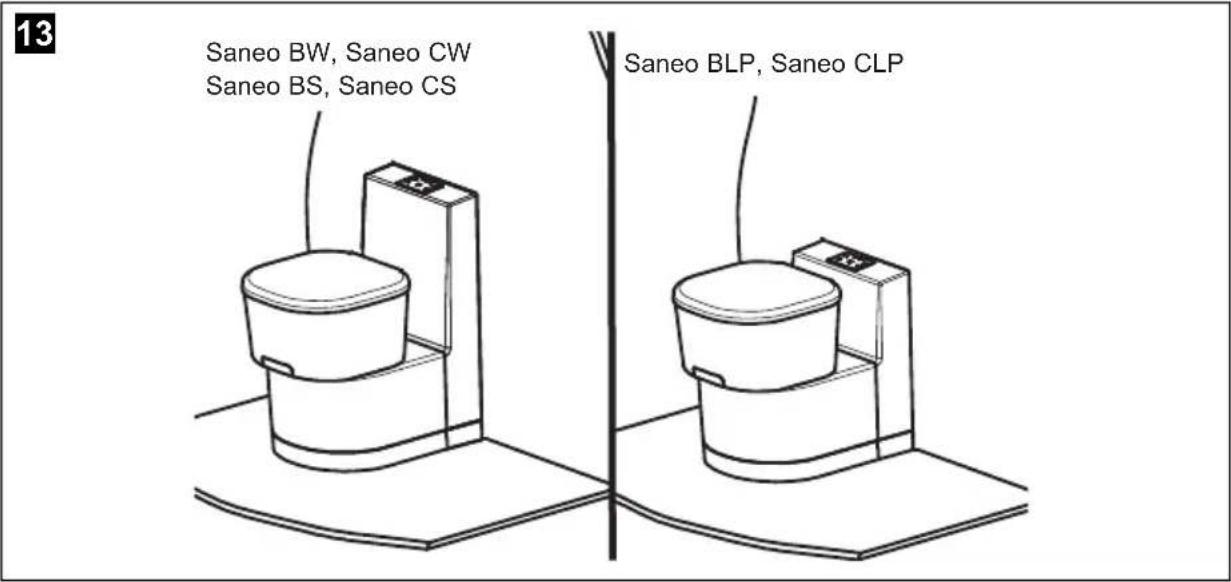
4.4.1 Setting up of the toilets Saneo BW, Saneo CW, Saneo BS, Saneo CS, Saneo BLP, Saneo CLP
These models have a wall connection console. The control and operating panel is integrated in the wall connection console.
Models Saneo BW and Saneo CW feature a built-in water tank, while models Saneo BS and Saneo CS do not have a water tank.
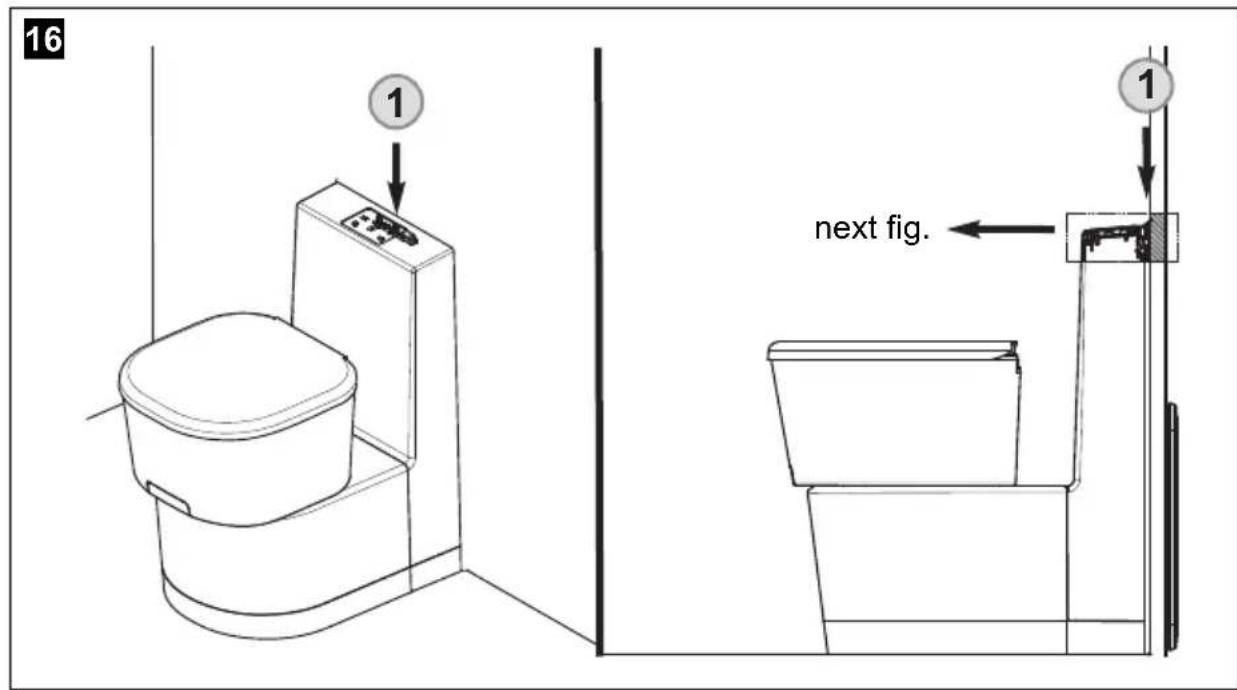
Set up all models with wall connection console directly against the room wall (fig. 13). A previously attached wall bracket is used to secure the toilet and the console (chapter "Attachment of the wall bracket" on page 21).
Attachment of the wall bracket
Secure the wall bracket (1) in the specified location (see fig. 14 table below).
Mounting height of the wall bracket (fig. 15):
Model a b
Saneo BW / Saneo BS
90 mm 644 mm
Saneo CW / Saneo CS
Saneo BLP
90 mm 461 mm
Saneo CLP
15
Attaching the toilets Saneo BW, Saneo CW, Saneo BS, Saneo CS, Saneo BLP, Saneo CLP
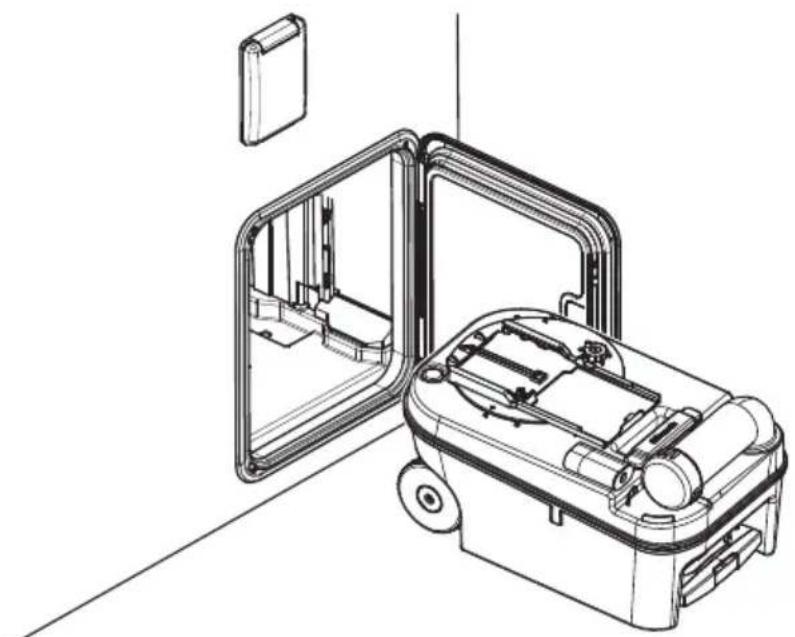
Put the entire toilet module into the desired position in front of the wall bracket.
Lift the toilet. Then put the toilet down so that the wall-side part of the housing hooks into the wall bracket (fig. 16).
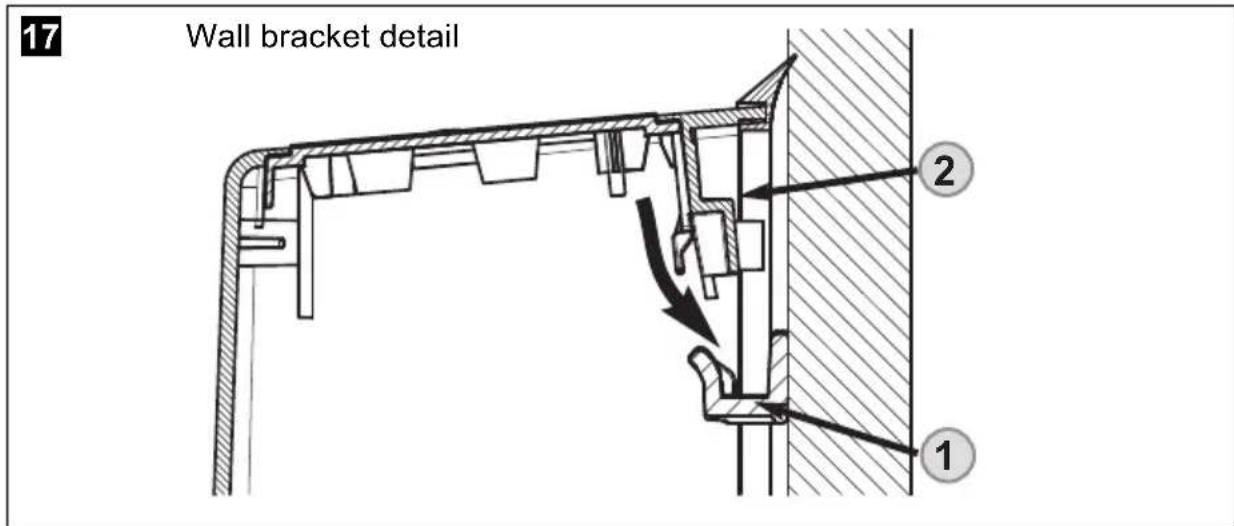
Item Description
1 Wall bracket
2 Wall connection console
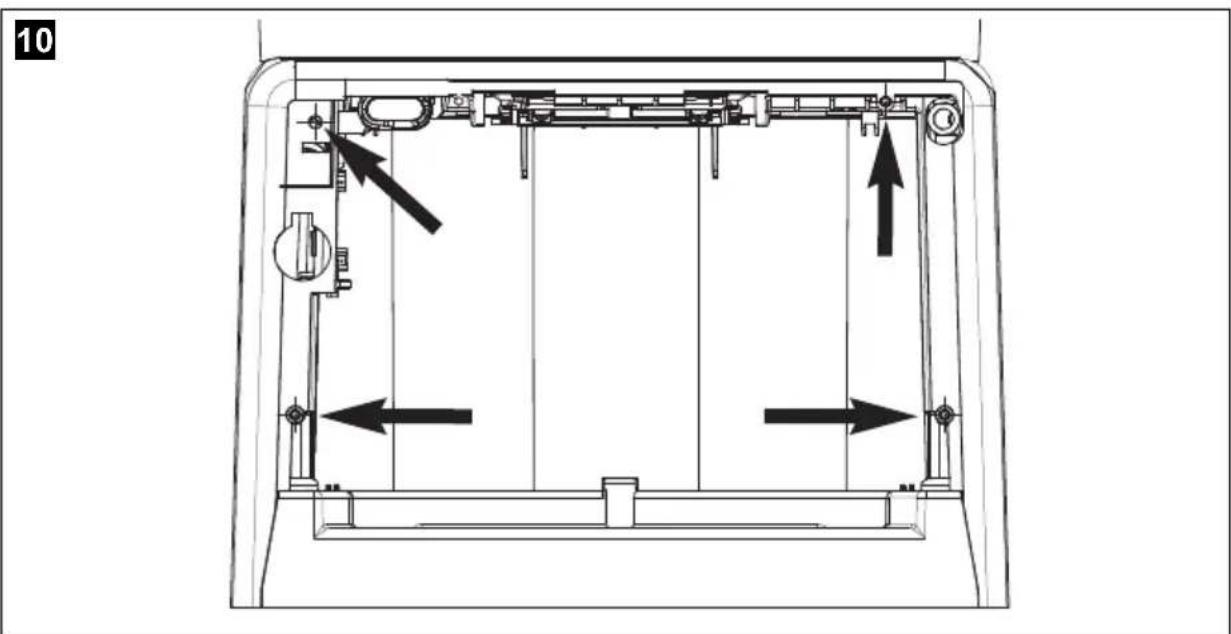
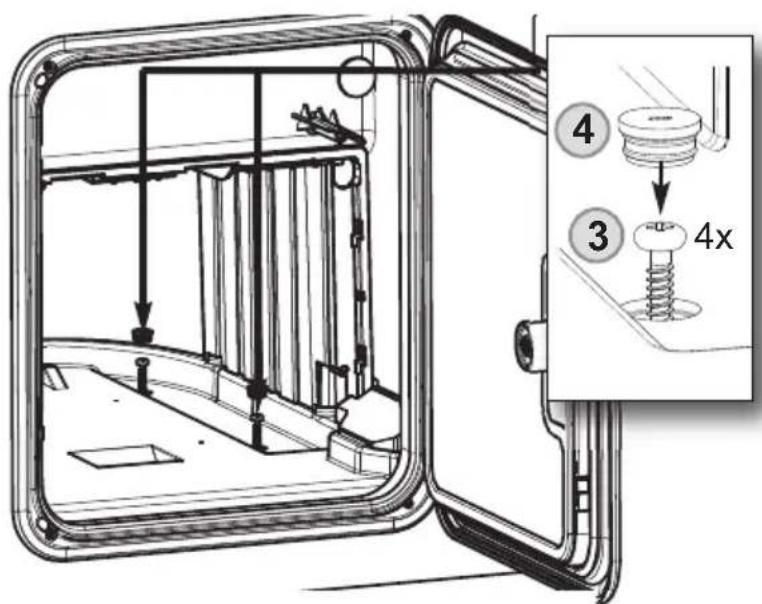
Once the toilet is set up in the desired position, securely bolt the base plate with four bolts (fig. 18, page 23) and slide in the mobile tank cassette (fig. 19, page 23).
Fastening bolts (3) and cover caps (4) are included.
18
19
4.5 Water connection
The water supply is connected with a smooth hose connection (1).
The connection socket is not included in the scope of delivery.
20
Then check the leak tightness.

NOTICE!
The operating pressure (water pressure) of the solenoid valve should not exceed 6 bar.
The solenoid valve is damaged by excessive pressure.
Performing a measurement to test the flushing output
For performing a measurement to test the flushing output, there are two variants:
Variant 1:
Disconnect the hose connection of the toilet from the vehicle line.
Place the open end of the line into a bucket.
Actuate the flushing for 1 minute using the toilet operating unit.
Measure the volume of water in the bucket. The volume of water that is in the bucket corresponds to the water flow rate in l/min.
Variant 2:
Disconnect the hose connection of the toilet from the vehicle line.
Connect a Gardena water meter to the toilet water line.
Actuate the flushing using the toilet operating unit.
Read the water flow in l/min on the Gardena water meter.
With all Saneo models, the water connection is established as described above.
Exception: Models Saneo xW with integrated water tank.

NOTE
Water supply (vehicle-side pump): The toilet requires a min. of 7 l/min provided by the vehicle at the outlet of the hose connection of the toilet in order to ensure satisfactory flushing output of 5 l/min.
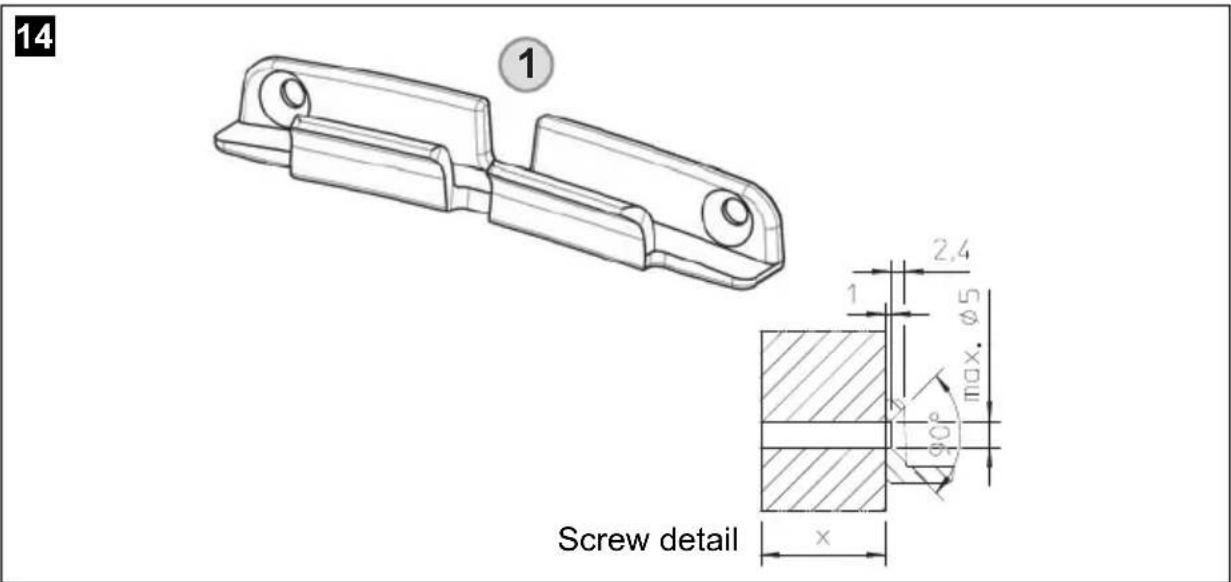
4.6 Installing the tank flap
Use the tank flap when using the models Saneo BW and CW Saneo with integrated water tank.
For installing the tank flap, use the template (1), item 5.3.1 on page 163, to make the cutout in the wall.
Item Description
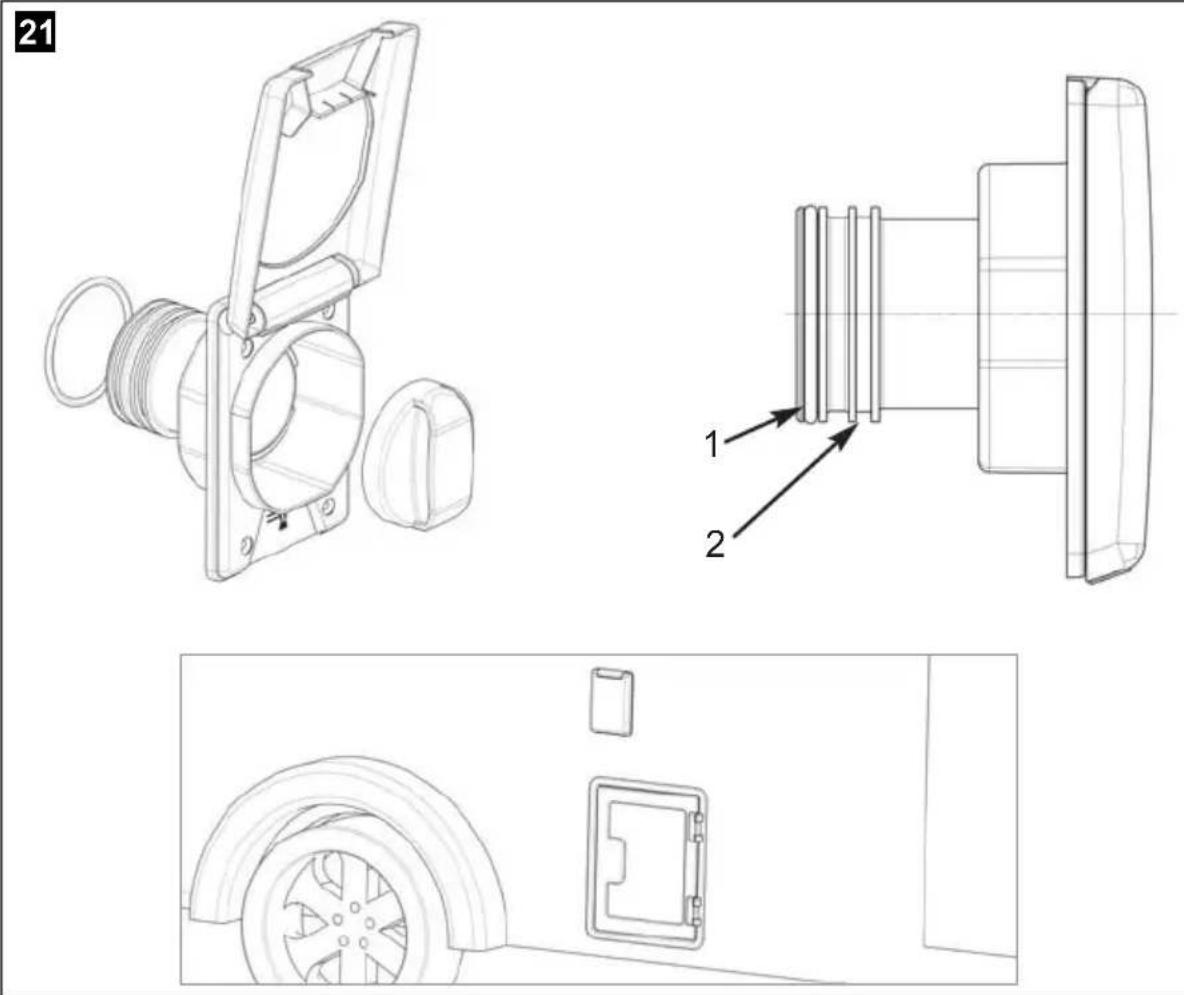
1 Position of the O-ring with a wall thickness of 30 mm - 50 mm
2 Position of the O-ring with a wall thickness of 20.5 mm - 30 mm
Provide a sealant (butyl rubber) between the vehicle outer wall and the tank flap.
Then place the tank flap on the tank and secure the tank flap with bolts.
Use grease to lubricate the O-ring in order to prevent difficulties when connecting the filler neck to the upper part of the tank.
The tank flap is bolted with four countersunk screws (C4x25) (not included).
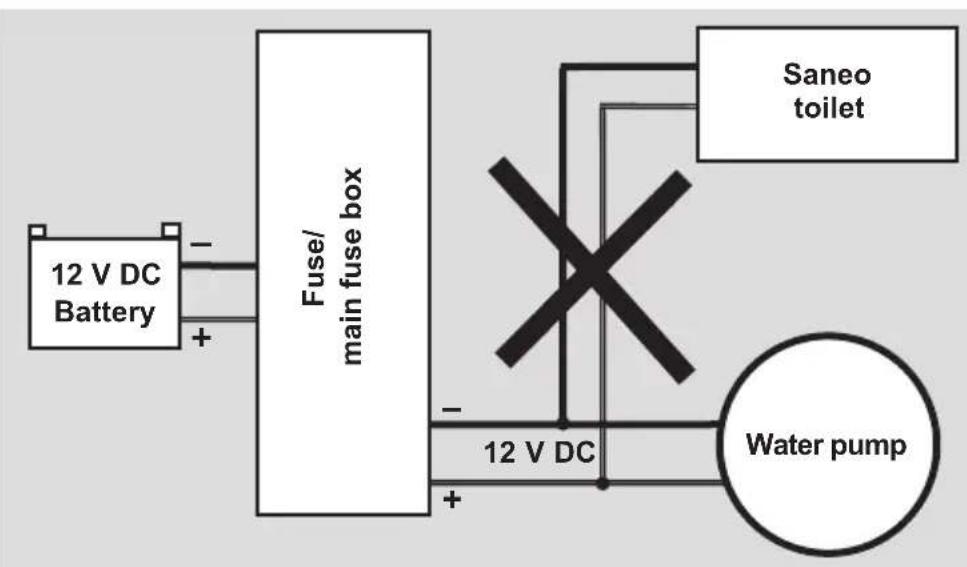
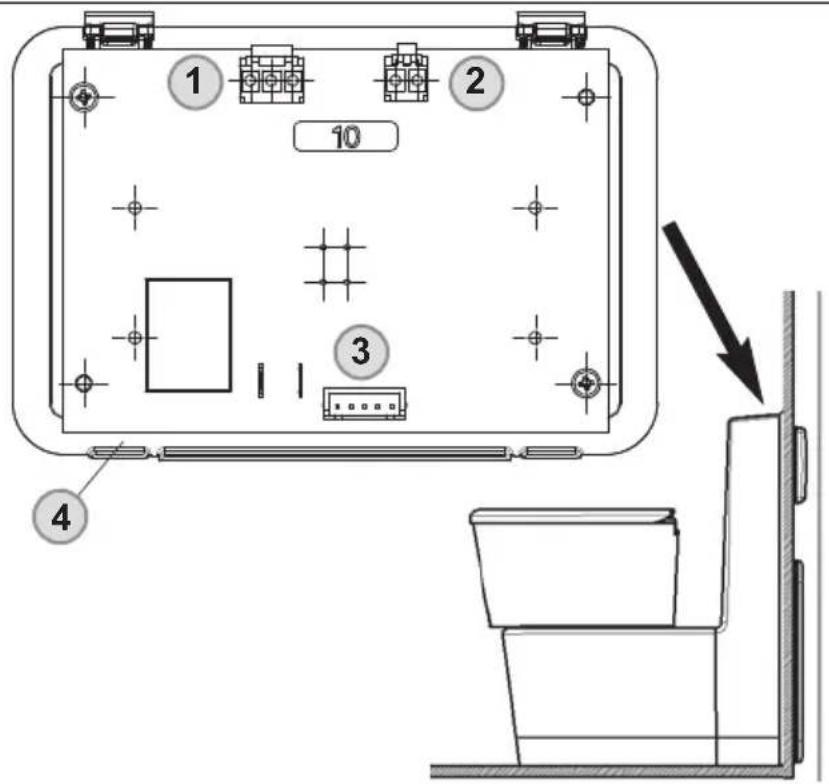
4.7 Electrical connection
4.7.1 System scheme
General system scheme

WARNING!
The electrical system must be wired by qualified personnel.
Please note the following instructions before installing the cassette toilet:
- Connect the toilet to its own voltage supply from the main terminal block of the vehicle (fig. 22).
- The toilet should not be directly connected in parallel with other power-consuming devices, since there can otherwise be malfunctions or the toilet control can be damaged (fig. 23).
- A pre-fuse is not necessary, because the toilet is internally fused.
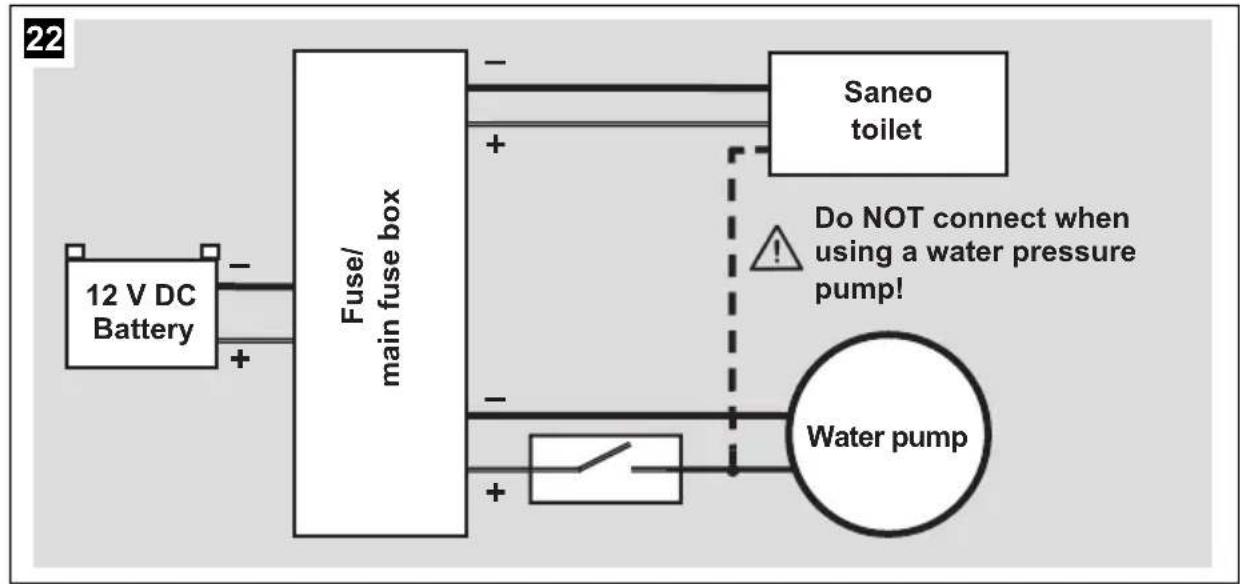

NOTICE!
Do not connect the toilet to the voltage supply directly in parallel with other power-consuming devices.

NOTE
Circuit diagrams can be found in section 5, appendix.
23
System scheme (model Saneo xW with internal water pump)
Supply voltage: 12V =
Cross-section of 12V connection cable: at least 0.75mm^2
- Toilet control fuse: 10 A (automotive fuse integrated)
Power consumption of the pump: max. 2 A

24
Item Description
1 12 V supply connection
2 Solenoid valve connection
3 Control and operating panel
System scheme (models Saneo B, C/ Saneo xS/ Saneo xLP with external water pump)
Supply voltage: 12V =
Cross-section of 12 V connection cable: min. 1.5 mm^2
- Toilet control fuse: 10 A (automotive fuse integrated)
Power consumption of the external pump: max. 8 A

NOTICE!
The external water pump may not exceed a rated power of 100W .

NOTE
The external water pump is not included in the scope of delivery.
25
Item Description
1 12 V supply connection
2 Solenoid valve connection
3 External pump connection
4 Control and operating panel
Für ihre Sicherheit

VORSICHT!
DECLARATION OF CONFORMITY
according to
Low Voltage Directive 73/23/EEC and
the Amendment to LVD 90/683/EEC, 2006/95/EC
EMC Directive 2004/108/EC
RoHS Directive 2011/65EC
ECE R10

10R-047317
Type of equipment
Brand Name
Type family
Manufacturer's (Factory)
name
address
telephone no
telefax no
Cassette Toilet
DOMETIC
SANEOB,C
DOMETIC GmbH
The following harmonized standards or technical specifications (designations) which comply with good engineering practice in safety matters in force within the EEA have been practiced:
following DIN EN 997 (12/2003)
EN 55014-1;06,A1,A2
EN 55014-2,97,A1,A2
The equipment conforms completely with the above stated harmonized standards or technical specifications.
By signing this document, the undersigned declares as manufacturer, or the manufacturer's authorized representative established within the EEA, that the equipment in question complies with the requirements stated above.
Date
2015.03.05

Joachim Kinscher
Position
General Manager
DECLARATION OF CONFORMITY
according to
Low Voltage Directive 73/23/EEC and
the Amendment to LVD 90/683/EEC, 2006/95/EC
EMC Directive 2004/108/EC
RoHS Directive 2011/65EC
ECE R10

10R-047317
Type of equipment
Brand Name
Type family
Manufacturer's (Factory)
name
address
telephone no
telefax no
Cassette Toilet
DOMETIC
SANEOB,C
DOMETIC GmbH
The following harmonized standards or technical specifications (designations) which comply with good engineering practice in safety matters in force within the EEA have been practiced:
following DIN EN 997 (12/2003)
EN 55014-1;06,A1,A2
EN 55014-2;97,A1,A2
The equipment conforms completely with the above stated harmonized standards or technical specifications.
By signing this document, the undersigned declares as manufacturer, or the manufacturer's authorized representative established within the EEA, that the equipment in question complies with the requirements stated above.
Date
2015.03.05

Joachim Kinscher
Position
General Manager
DECLARATION OF CONFORMITY
according to
Low Voltage Directive 73/23/EEC and
the Amendment to LVD 90/683/EEC, 2006/95/EC
EMC Directive 2004/108/EC
RoHS Directive 2011/65EC
ECER10

10R-047317
Type of equipment
Brand Name
Type family
Manufacturer's (Factory)
name
address
telephone no
telefax no
Cassette Toilet
DOMETIC
SANEOB,C
DOMETIC GmbH
The following harmonized standards or technical specifications (designations) which comply with good engineering practice in safety matters in force within the EEA have been practiced:
following DIN EN 997 (12/2003)
EN 55014-1;06,A1,A2
EN 55014-2-97,A1,A2
The equipment conforms completely with the above stated harmonized standards or technical specifications.
By signing this document, the undersigned declares as manufacturer, or the manufacturer's authorized representative established within the EEA, that the equipment in question complies with the requirements stated above.
Date
2015.03.05

Joachim Kinscher
Position
General Manager
DECLARATION OF CONFORMITY
according to
Low Voltage Directive 73/23/EEC and
the Amendment to LVD 90/683/EEC, 2006/95/EC
EMC Directive 2004/108/EC
RoHS Directive 2011/65EC
ECE R10

10R-047317
Type of equipment
Brand Name
Type family
Manufacturer's (Factory)
name
address
telephone no
telefax no
Cassette Toilet
DOMETIC
SANEOB,C
DOMETIC GmbH
The following harmonized standards or technical specifications (designations) which comply with good engineering practice in safety matters in force within the EEA have been practiced:
following DIN EN 997 (12/2003)
EN 55014-1;06,A1,A2
EN 55014-2;97,A1,A2
The equipment conforms completely with the above stated harmonized standards or technical specifications.
By signing this document, the undersigned declares as manufacturer, or the manufacturer's authorized representative established within the EEA, that the equipment in question complies with the requirements stated above.
Date
2015.03.05

Joachim Kinscher
Position
General Manager
5.1.1 Circuit diagram (models with external water tank)
5.1.2 Circuit diagram (models with internal water tank)
5.1.3 Circuit diagram (models with internal water tank, UK)
5.1.4 Circuit diagram (models with external water tank and permanent pressure pump, Australia)
5.1.5 Légende / Legenda
English Français
5.2.2 Saneo BLP, Saneo CLP
6
5.2.3 Saneo BS, Saneo CS
7

5.2.4 Saneo BW, Saneo CW
8


5.2.5 Fitting the toilet
Befestigen der Toilette
Bevestigen van het toilet
Fixation des toilets
Fissaggio della Toilette
Fijacion del WC - Fresado
Fixar a sanita
Στερέωση της τουαλέτας
Fastsätting av toalett
Fastgorelse af toiettet
Festing av toalettet
WC:n kiinnitys
Zamocowanie toalety
Крелене туалета
Upevnéni toalety
9
Routing dimensions
Fräsmäße
Dimensions de routage
Dimensioni fresatura
Freesmaten
Drill holes
Bohrungen
Forages
Fori
Boringen
10
11
RADIUSes
Raden
Rayons
Raggi
RADIUSse
5.3 Templates
Schablonen
Sjabloonen
Gabarits
Sagome
Plantillas
Molds
Túmoi αντίγραφής
Schabloner
Skabeloner
Sjablonger
Mallineet
Szablony do montazu
Sla6IohbI dIyCTaHOBKn
Montážní šablony
Montážne šablóny
5.3.1 Flap (1) / Service door (2, 3)
Tankklappe (1) / Servicetüre (2, 3)
Tankklep (1) / Servicedeur (2, 3)
Fit to the outside of the vehicle!
Templates greatly shrunk / For the original, see the individual packaging cardboard
5.3.2 Template (4) control and operator panel
Dometic Australia Pty. Ltd.
1 John Duncan Court
Varsity Lakes QLD 4227
1800212121
+61755076001
Mail: sales@dometic-waeco.com.au
AUSTRIA
Dometic Austria GmbH
Neudorferstraße 108
A-2353 Guntramsdorf
+432236908070
+43223690807060
Mail: info@dometic.at
BENELUX
Dometic Branch Office Belgium
Zincstraal 3
B-1500 Halle
+32 2 3598040
+3223598050
Mail: info@dometic.be
BRAZIL
Dometic DO Brasil LTDA
Avenida Paulista 1754, conj. 111
SP 01310-920 Sao Paulo
票+551132513352
+551132513362
Dometic Group Asia Pacific
Suites 2207-11·22/F·Tower 1
The Gateway 25 Canton Road
Tsim Sha Tsui·Kowloon
+85224611386
+85224665553
Mail: info@waeco.com.hk
HUNGARY
Domicic Zrt. Sales Office
KerekgyarTo u.5.
H-1147 Budapest
+3614684400
+3614684401
Domatic Italy S.r.l.
Via Virgilio, 3
1-47122 Forli (FC)
+390543754901
+390543754983
Mail: vendite@dometic.it
JAPAN
Domatic KK
Maekawa-Shibaura,Bldg.2
2-13-9 Shibaura Minato-ku
Tokyo 108-0023
+81354453333
+81354453339
Mail: info@dometic.jp
MEXICO
Domatic Mx, S. de R. L. de C. V.
Circuito Médicos No. 6 Local 1
Colonia Ciudad Satélite
CP 53100 Naucalpan de Juarez
Estado de Mexico
+52553744108
+525553934683
Mail: info@dometic.com.mx
NETHERLANDS
Dometic Benelux B.V.
Ecustraat 3
NL-4879 NP Etten-Leur
+31765029000
+31765029019
Mail: info@dometic.nl
NEW ZEALAND
Dometic New Zealand Ltd.
Unite E, The Gate
373 Neilson Street
Penrose 1, Auckland
+6496221490
+6496221573
Mail: customerservices@dometic.co.nz
NORWAY
Dometic Norway AS
Osteroyveien 46
N-3232 Sandefjord
+4733428450
+4733428459
Mail: firmapost@dometic.no
POLAND
Domatic Poland Sp. z o.o.
Ul. Puławska 435A
PL-02-801 Warszawa
+48224143200
+48224143201
Mail: info@dometic.pl
PORTUGAL
Dometic Spain, S.L.
Komsomolskaya square 6-1
RU-107140 Moscow
+74957807939
+74959165653
Mail: info@dometic.ru
SINGAPORE
Dometic Pte Ltd
18 Boon Lay Way 06-140 Trade Hub 21
Singapore 609966
+6567953177
+65 6862 6620
Mail: dometic@dometic.com.sg
SLOVAKIA
Domatic Slovakia s.r.o. Sales Office Bratislava
Nadražna 34/A
900 28 Ivanka pri Dunaji
/241245529680
Mail: bratislava@dometic.com
SOUTH AFRICA
Domatic (Pty) Ltd.
Regional Office
South Africa & Sub-Saharan Africa
2 Avalon Road
West Lake View Ext 11
Modderfontein 1645
Johannesburg
+27114504978
+27114504976
Mail: info@dometic.co.za
SPAIN
Dometic Spain S.L.
Avda. Sierra del Guadarrama, 16
E-28691 Villanueva de la Canada
Madrid
+34902111042
+34 900 100 245
Mail: info@dometic.es
SWEDEN
Dometic Scandinavia AB
Gustaf Melins qata 7
Dometic Switzerland AG
Riedackerstrasse 7a
CH-8153 Rümlang
+41448187171
+41448187191
Mail: info@dometic.ch
UNITED ARAB EMIRATES
Dometic Middle East FZCO
P.O.Box 17860
S-D 6, Jebel Ali Freezone
Dubai
+97148833858
+97148833868
Mail: info@dometic.ae
UNITED KINGDOM
Dometic UK Ltd.
Dometic House, The Brewery
Blandford St. Mary
DorsetDT119LS
+443446260133
+443446260143
Mail: customerservices@dometic.co.uk
USA
Dometic RV Division
1120 North Main Street
Elkhart, IN 46515
+1574-264-2131