
Saneo BLP - Camping DOMETIC - Free user manual and instructions
Find the device manual for free Saneo BLP DOMETIC in PDF.
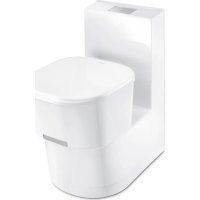
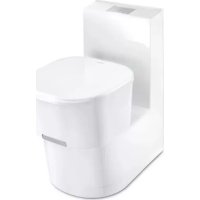
| Product type | Cassette toilet for motorhome and caravan |
| Brand | Dometic |
| Model | Saneo BLP |
| Cassette tank capacity | 16 liters |
| Water supply | Via the vehicle's fresh water tank (min. flow 7 l/min) |
| Power supply | 12 V DC |
| Current consumption | 2 A max (internal pump), 10 A max (external pump) |
| Operating temperature | 0 °C to +50 °C |
| Maximum user weight | 150 kg |
| Bowl material | Plastic or ceramic (depending on version) |
| Toilet seat | With or without lowering mechanism (Autoclose) depending on configuration |
| Seat orientation | Rotatable 180° (90° on each side) |
| Installation type | Freestanding, low console |
| Recommended maintenance | Regular cleaning, monthly lubrication of seals (silicone grease OKS 1110 or spray OKS 1111) |
| Prohibited cleaners | Products containing chlorine, alcohol, acids, abrasives, polish |
| Frost protection | Do not use antifreeze, drain if there is a risk of frost |
| Spare parts | Available from Dometic after-sales service |
| After-sales service | European network, contact details on www.dometic.com |
| Warranty | According to legal conditions, invoice and defect description required |
| Conformity | CE, N1 10 R-047317 |
Frequently Asked Questions - Saneo BLP DOMETIC
User questions about Saneo BLP DOMETIC
0 question about this device. Answer the ones you know or ask your own.
Ask a new question about this device
Download the instructions for your Camping in PDF format for free! Find your manual Saneo BLP - DOMETIC and take your electronic device back in hand. On this page are published all the documents necessary for the use of your device. Saneo BLP by DOMETIC.
USER MANUAL Saneo BLP DOMETIC
Store the sanitary accessories so that children cannot access them.

NOTICE!
- Cleaning agents for the toilet may not contain chlorine or alcohol!
- Do not shake the cassette tank vigorously.
- Do not clean the inside of the cassette tank with a high-pressure cleaner.
- Do not hang the cassette tank on a bicycle or other vehicle for transportation.
- Do not use antifreeze. These agents may damage the cassette toilet.
- Do not use polish for cleaning.
Table of contents
1 General information 6
1.1 Preface 6
1.2 Notes on this instruction manual 6
1.3 Copyright 6
1.4 Description of symbols used 7
1.5 Limitation of liability 7
1.6 Warranty 8
1.7 Customer service. 8
1.8 Spare parts 8
1.9 Declaration of Conformity 9
1.10 Dometic sanitary accessories 10
1.11 Environmental notes 11
2 Safety instructions. 12
2.1 Proper use 12
2.2 Responsibility of the user. 12
2.3 Use of sanitary additives 12
2.4 Working on and inspecting the toilet 13
3 Model description 14
3.1 Model designation 14
3.2 Type plate of the toilet 15
3.3 Technical data 16
3.4 Explanation of components 17
4 Using the toilet. 18
4.1 Cleaning. 18
4.2 Preparing the cassette tank 18
4.3 Filling the freshwater tank 21
4.4 Control and operating unit 21
4.5 Interval flushing (optional only) 22
4.6 Using the toilet 23
4.7 Draining the cassette tank 25
4.8 Positioning the toilet seat. 28
4.9 Winter operation 29
4.10 Taking the toilet out of service 29
5 Maintenance 30
5.1 Cleaning the flushing nozzle 31
5.2 Greasing the slider rods. 31
5.3 Greasing the slider seal 32
5.4 Greasing the cassette seal 32
5.5 Replacing the cassette seal. 33
5.6 Cleaning the bayonet fitting and greasing the bayonet seal . 35
5.7 Replacing the bayonet seal 37
5.8 Greasing the O-ring of the cassette vent 38
5.9 Replacing the fuse in the operating unit 38
5.10 Removing the operating unit (wall) 39
5.11 Replacing the wheels on the cassette tank 39
5.12 Removing and replacing the lid and seat. 40
5.13 Installing/replacing the Autoclose 41
5.14 What to do in case of problems 43
1 General information
1.1 Preface
You have made a good choice with this cassette toilet from Domatic. We are convinced that you will be satisfied with this toilet in every respect. It meets high quality standards and guarantees efficient use of resources and energy throughout its entire life cycle – in production, use and disposal.
1.2 Notes on this instruction manual
Before you put the toilet into operation, read this entire operating manual carefully.
This instruction manual provides you with the necessary information for proper use of the toilet. Observe the safety instructions in particular. Compliance with the notes and instructions is important for safe use of your toilet and protects you and the system from damage. You must understand what you read before you perform an action.
Carefully store this instruction manual near the toilet so it can be used at any time.
1.3 Copyright
The information, texts and illustrations in this manual are protected by copyright and subject to industrial property right protection. No part of this publication may be reproduced, copied or otherwise used without the written permission of Dometic GmbH, Siegen.
1.4 Description of symbols used

WARNING!
Safety instruction: Failure to observe this instruction can cause fatal or serious injury.

CAUTION!
Safety instruction: Failure to observe this instruction can lead to injury.

NOTICE!
Failure to observe this instruction can cause material damage and impair the function of the product.

NOTE
Supplementary information for operating the product.
1.5 Limitation of liability
The manufacturer accepts no liability for damage in the following cases:
- Damage to the product resulting from mechanical influences and excess voltage
- Alterations to the product without express permission from the manufacturer
- Use for purposes other than those described in the operating manual
1.6 Warranty
The statutory warranty period applies. If the product is defective, please contact your retailer or the manufacturer's branch in your country (see the back of the instruction manual for the addresses).
For repair and guarantee processing, please include the following documents when you send in the device:
A copy of the receipt with purchasing date
- A reason for the claim or description of the fault
1.7 Customer service
Domatic offers a Europe-wide service network. Authorized customer service centres are available on the Internet on the website www.domatic.com. When contacting customer service, please always specify the model, product number, serial number and MLC code, if applicable. This information can be found on the type plate of the toilet.
1.8 Spare parts
Spare parts can be obtained from the customer service centre of the respective country.
Information about sanitary accessories can be found on the Internet at http://www.dometic.com
1.9 Declaration of Conformity
Domatic products correspond to the specified characteristics in accordance with the respective European directives.
You can request the current Declaration of Conformity directly from Domatic, Siegen.
Dometic
DECLARATION OF CONFORMITY
according to
Low Voltage Directive 73/23/EEC and
the Amendment to LVD 90/683/EEC, 2006/95/EC
EMC Directive 2004/108/EC
RoHS Directive 2011/65EC
ECER10

10R-047317
Type of equipment
Brand Name
Type familily
Manufacturer's (Factory)
name
address
telephone no
telefax no
Cassette Toilet
DOMETIC
SANEOB,C
DOMETIC GmbH
The following harmonized standards or technical specifications (designations) which comply with good engineering practice in safety matters in force within the EEA have been practiced:
following DIN EN 997 (12/2003)
EN 55014-1;06,A1,A2
EN 55014-2:97, A1, A2
The equipment conforms completely with the above stated harmonized standards or technical specifications.
By signing this document, the undersigned declares as manufacturer, or the manufacturer's authorized representative established within the EEA, that the equipment in question complies with the requirements stated above.
Date
2015.03.05

Joachim Kinscher
Position
General Manager
1.10 Domatic sanitary accessories
With the "Domatic CARE" series, Domatic offers quality sanitary accessories for your toilet. These products help to make use of the toilet more convenient and hygienic and are available from accessory retailers.
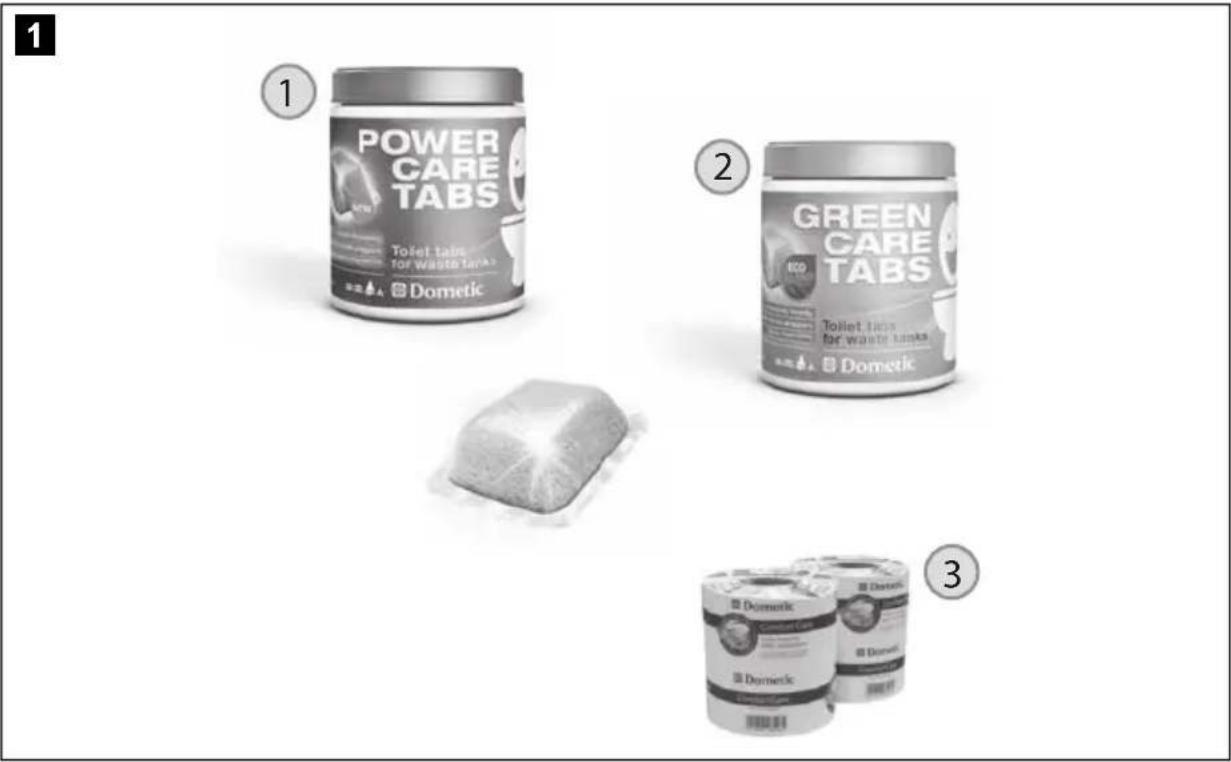
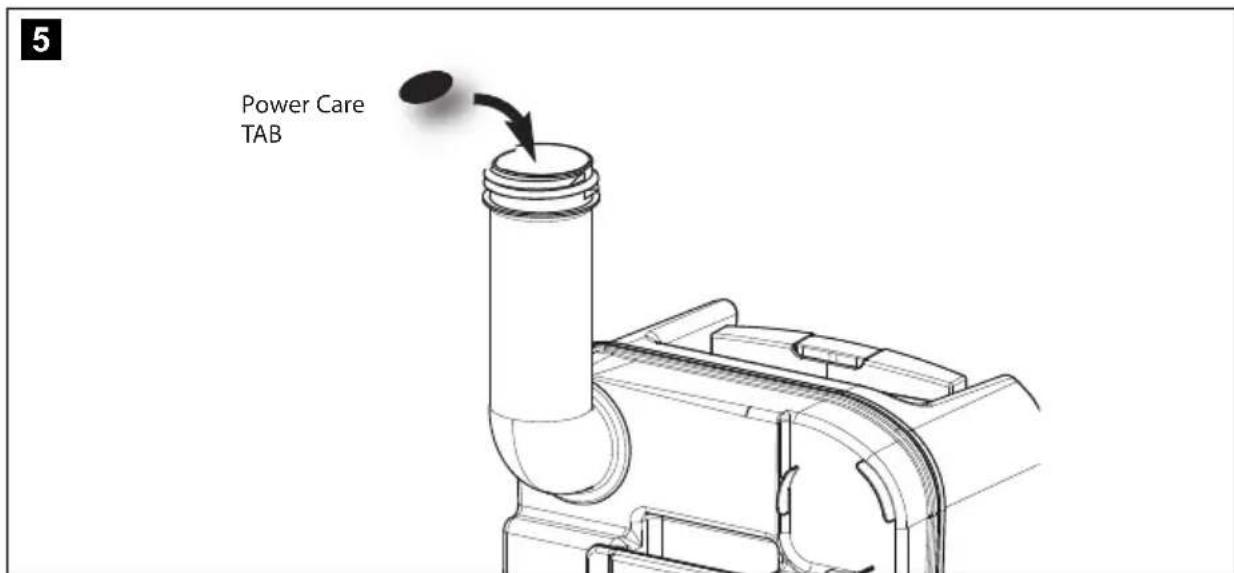
Dometic POWER CARE TABS (1)
Highly effective additive for the waste holding tank; breaks down faeces and prevents unpleasant odours:
- Powerful and inexpensive
- Packaged in film that dissolves
- Only 1 tab per tank filling
- Suitable for all portable toilets
Space-saving packaging
Quantity per container: 16 pieces
Dometic GREEN CARE TABS (2)
Highly effective additive for the waste holding tank; breaks down faeces and prevents unpleasant odours:
- Powerful and environmentally friendly
- Only 1 tab per tank filling
- Suitable for all portable toilets
Space-saving packaging
Quantity per container: 16 pieces
Dometic COMFORT CARE (3)
Special, fast-dissolving toilet paper for the comfort of home:
- Fast dissolving
Prevents clogging of the toilet
2-ply - Extra soft
- Simplifies emptying of the waste holding tank
Quantity per package: 4 pieces
1.11 Environmental notes
Use of sanitary additives
When using sanitary additives, please note the instructions for use on the packaging.
Disposal
In order to ensure recycling of recyclable packaging materials, they must be disposed of according to the local collection systems. The device should be given to a disposal company that guarantees recovery of recyclable materials and proper disposal of the rest.
2 Safety instructions
2.1 Proper use
This toilet is designed for installation and use in recreational vehicles such as campervans or motor caravans.

NOTE
The toilet is designed for a person weighing no more than 150kg
2.2 Responsibility of the user

WARNING!
- People who operate this cassette toilet must be familiar with safe handling and know the instructions in this operating manual.
- This device can be used by children aged 8 or over, as well as by persons with diminished physical, sensory or mental capacities or a lack of experience and knowledge, providing they are supervised or have been taught how to use the device safely and are aware of the resulting risks.
- Cleaning and user maintenance must not be carried out by unsupervised children.
Children must be supervised to ensure that they do not play with the device.
2.3 Use of sanitary additives

CAUTION!
- Store the sanitary accessories so that children cannot access them.

NOTICE!
- When using sanitary additives for use and cleaning of the toilet, pay attention to the instructions for use on the packaging.

NOTE
- Conventional toilet paper can clog the toilet. Use Domatic COMFORT CARE, a special fast-dissolving toilet paper.
2.4 Working on and inspecting the toilet
Have all maintenance and service work performed by qualified personnel.
Exceptions
- Greasing of the named chapter "Maintenance" on page 30 seals on a regular basis
- Removal of the cassette seal

CAUTION! Beware of injury!
Prevent accidental closing of the toilet slider during cleaning and greasing.
3 Model description
3.1 Model designation
Example:
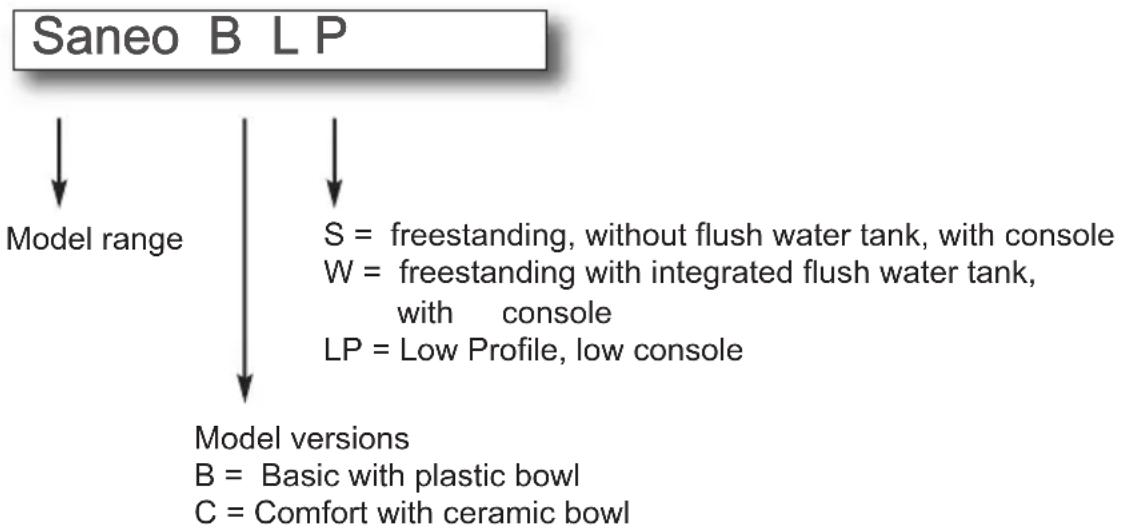
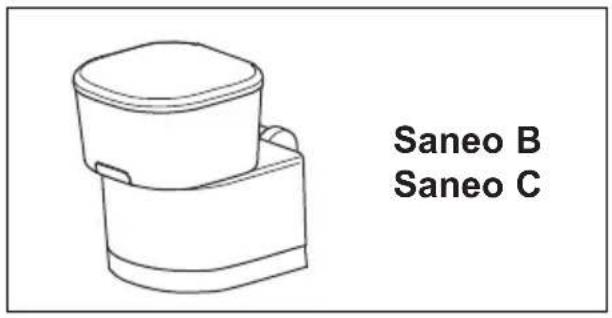
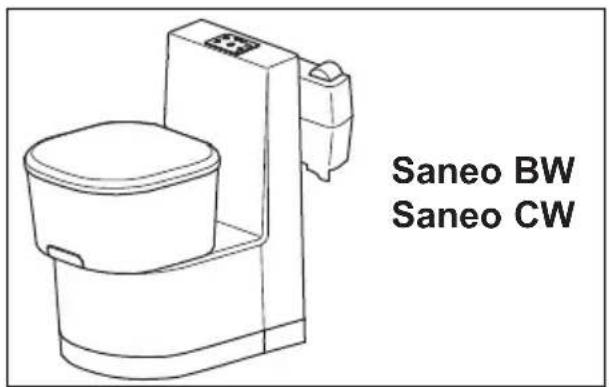
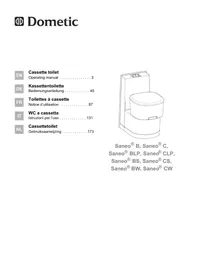
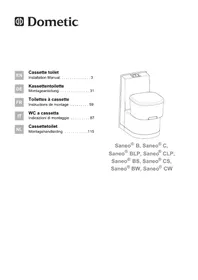
The cassette toilet Saneo consists of a toilet permanently installed in the vehicle and a removable, mobile cassette as a holding tank. The cassette is externally accessible through a door. Depending on the model, the toilet gets the rinse water from a tank integrated in the housing or from a freshwater tank in the vehicle.
The following model versions are available:
- Saneo B, Saneo C: freestanding, without water tank, without console
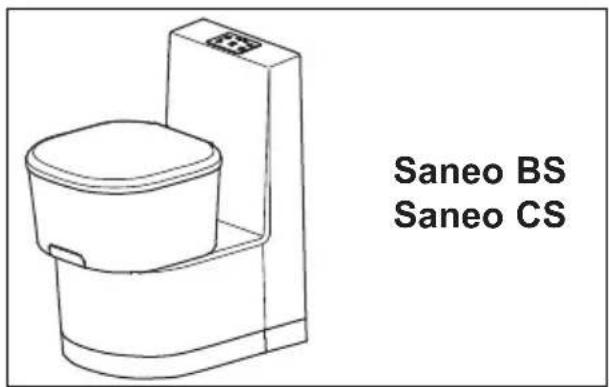
- Saneo BS, Saneo CS: freestanding, without water tank, with console
- Saneo BW, Saneo CW: freestanding, with a water tank in the console
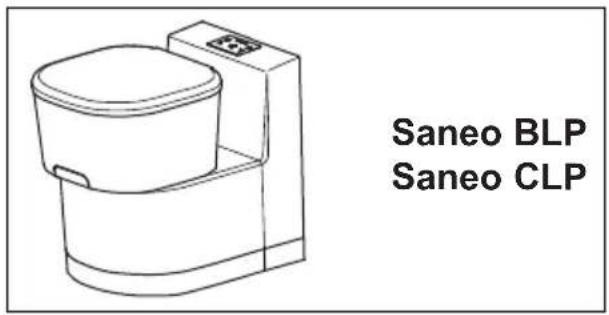
- Saneo BLP, Saneo CLP: freestanding, without water tank, low console
3.2 Type plate of the toilet
The type plate contains all the important data. There you can see the model name, product number and serial number. You will need this information whenever you contact the customer service or order spare parts. You can find the type plate in the cassette housing after removal of the cassette.
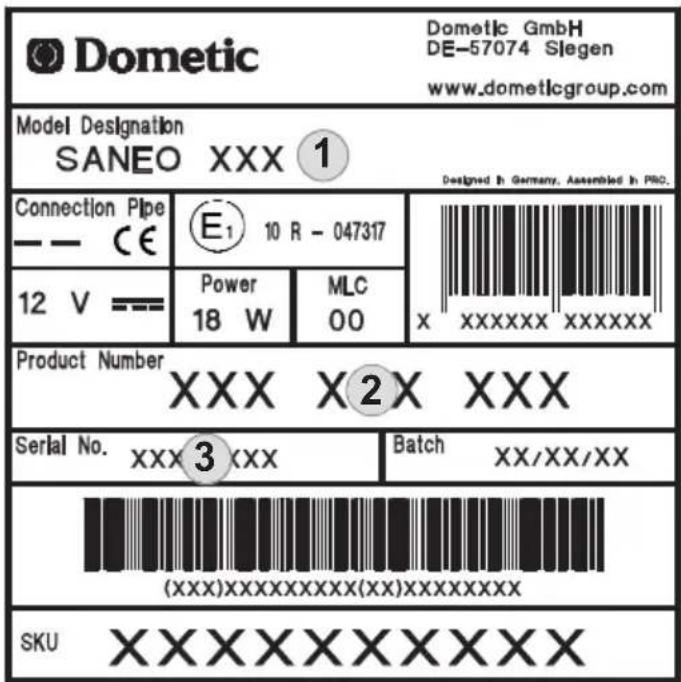
1
Item Description
1 Model number
2 Product number
3 Serial number
3.3 Technical data
| Dometic Saneo | |
| Supply voltage: 12 V== | |
| Current: max. 2 A with internal pump max. 10 A with external pump | |
| Dimensions: | see specifications in the installation instructions |
| Operating temperature: 0 °C to +50 °C | |
| Capacity: 16 l (cassette tank) | 7 l (freshwater tank, optional) |
| Test mark: | CE N1 10 R-047317 |

NOTE
Water supply (vehicle-side pump):
The toilet requires a min. of 7 l/min. provided by the vehicle at the outlet of the hose connection of the toilet in order to ensure satisfactory flushing output of 5 l/min.
3.4 Explanation of components
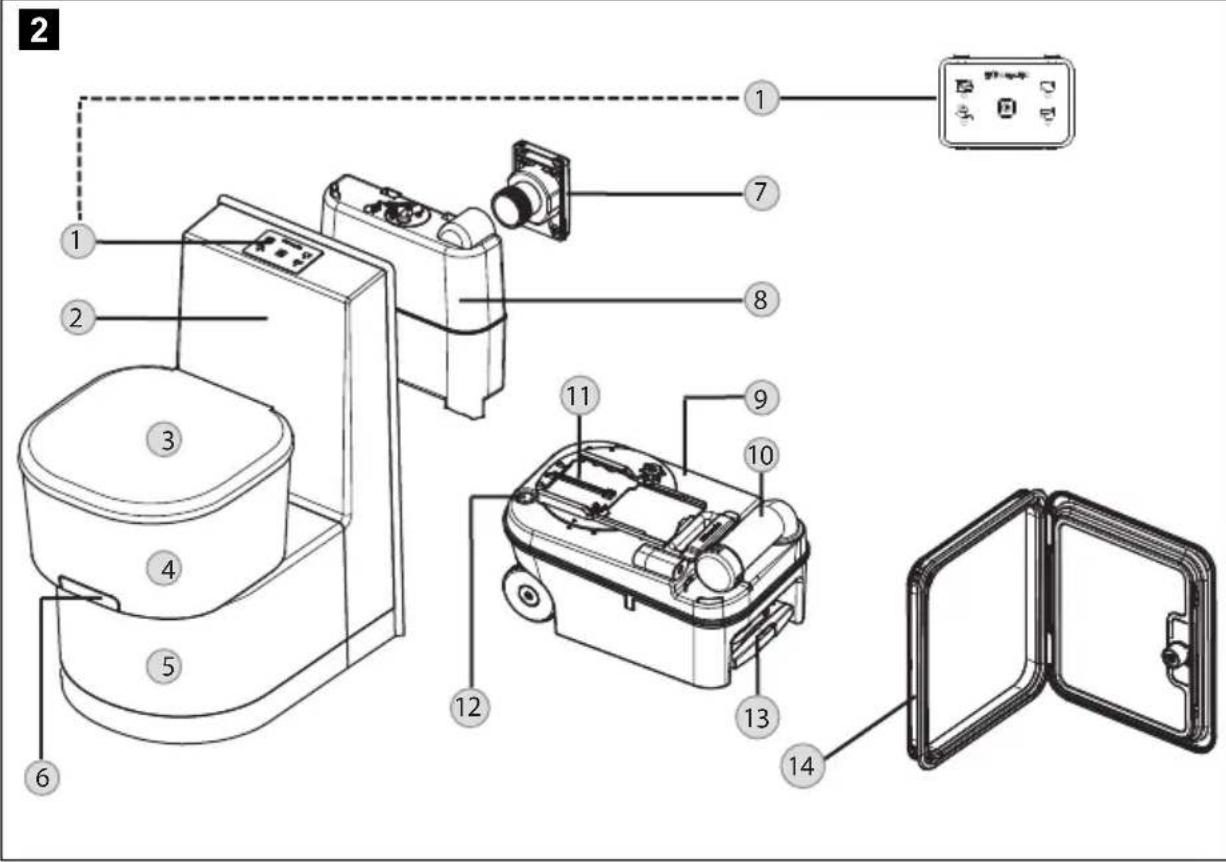
Item in
fig. 2, page 17
Description
1 Level indicator / flushing (control and operating unit)
| 2 | C | 0 | n | s |
3 Seat (lid / toilet seat):
- Saneo Comfort models with "Autoclose"
- Saneo Basic models without Autoclose ("Autoclose" retrofit kit optional)
4 Toilet bowl made of plastic or ceramic
5 Housing for cassette tank
6 Draining slider for toilet bowl
7 Tank flap (optional: lockable tank flap), Saneo BW/CW only
8 Integrated freshwater tank, Saneo BW/CW only
9 Cassette tank
Item in Description
10 Draining neck
11 Slider on the cassette
12 Vent knob for draining
13 Pull-out handle (cassette tank can be moved)
14 Service door
4 Using the toilet
4.1 Cleaning
Before you use the toilet for the first time, we recommend that you clean it inside and out. Use a soft cloth and lukewarm water with a mild cleaning agent. Then wash the surfaces with clear water. To prevent material changes, do not use hard, abrasive or soda-based cleaning agents (scouring agents).

CAUTION!
Cleaning agents for the toilet may not contain chlorine or alcohol!

NOTICE!
Do not use polish for cleaning.

NOTE
For regular cleaning of the toilet bowl, use a mild colourless cleaning agent.
4.2 Preparing the cassette tank
Before you use the toilet for the first time:
Open the service door.
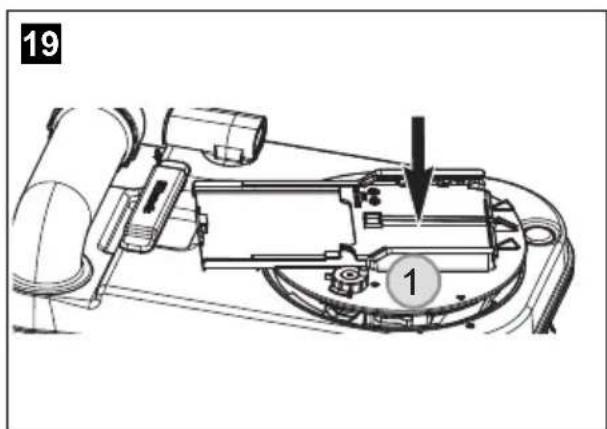
Unlock the cassette tank by pressing the lock (fig. 1, page 19) upwards.

NOTE
For convenient use and handling, the cassette slider must always be greased.

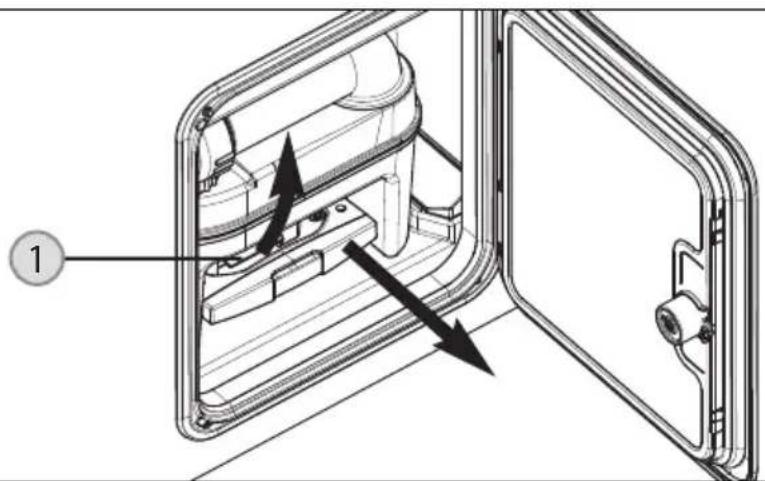
Pull out the cassette tank. When pulling out the tank, resistance has to be overcome.

NOTE
When the cassette is removed, the slide handle on the toilet housing is locked. Do not pull the handle! The cassette cannot be inserted when the slider is open.
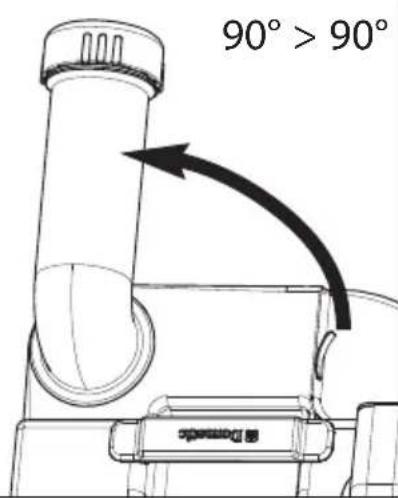
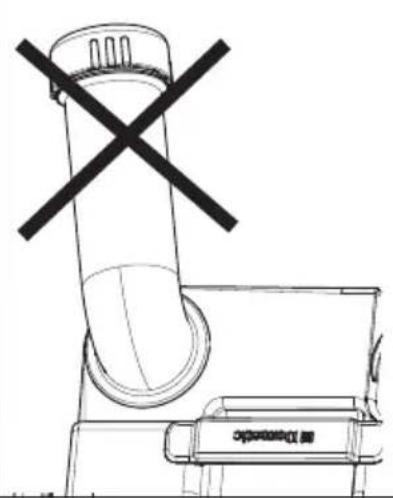
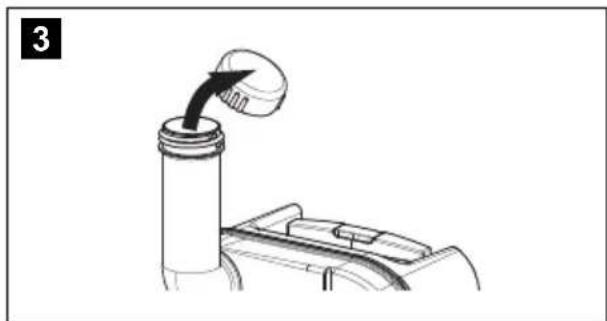
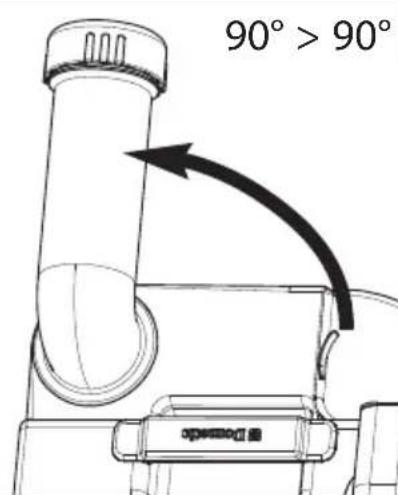
Set the cassette tank upright and turn the draining neck by approximately 90^ upwards.

NOTE
Avoid turning the neck more than 90^ , as it otherwise can come off.

Remove the seal cap (fig. 3, page 20).
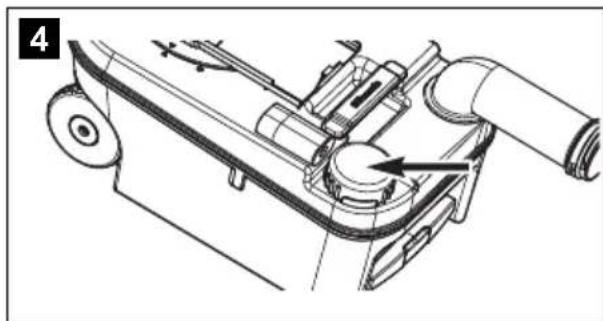
Attach the cap to the cassette at the location shown (fig. 4, page 20).
Put a Dometic Power CARE Tab through the neck into the cassette tank according to the instructions (chapter "Dometic sanitary accessories" on page 10).

NOTICE!
Ensure that the tank can be pushed in easily. Make sure that the tank does not bump into other objects or components.
Insert the cassette tank again and push it inward as far as it will go.
The tank lock locks by itself upon being pushed in. Nevertheless, check that the cassette tank is securely seated.
Close and lock the service door.
4.3 Filling the freshwater tank
Fill the freshwater tank through the filler neck on the outside of the vehicle. The amount depends on the tank used (the integrated tank for models Saneo BW and Saneo CW = 7 litres).

4.4 Control and operating unit
Tact switch operating unit (standard on Saneo Basic)
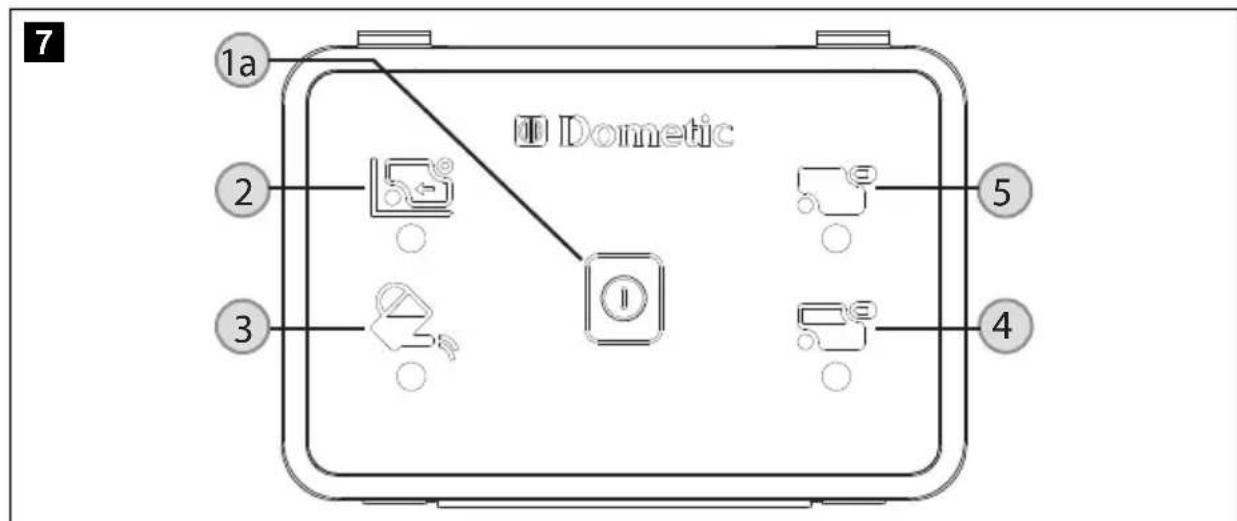
To flush the toilet, press the switch (fig. 1a) with a finger.
Touch switch operating unit (standard on Saneo Comfort)
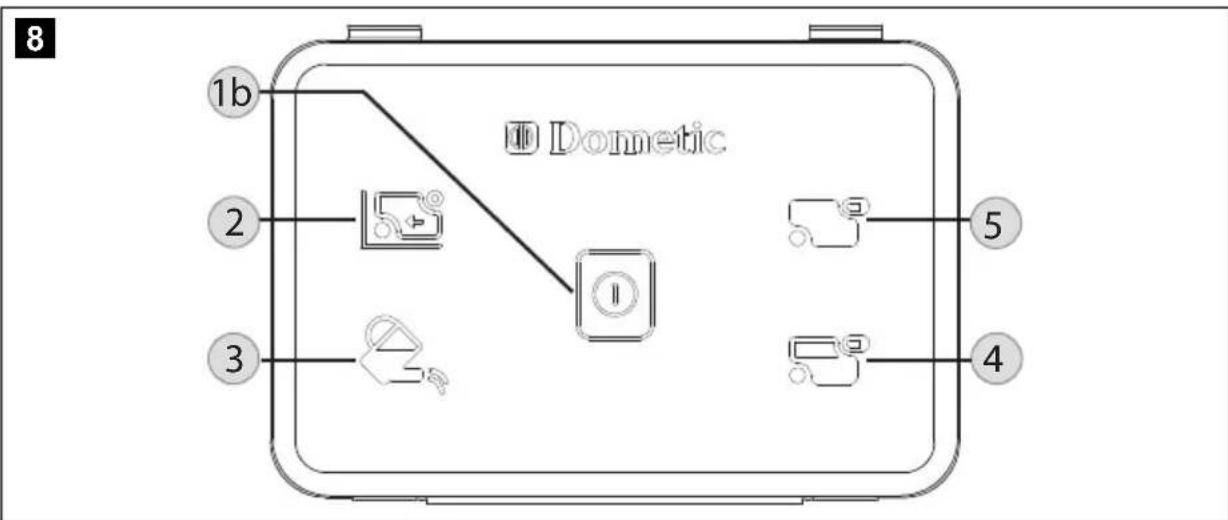
To flush* the toilet, touch the operating panel in the area of the switch (fig. 8 1b) with a finger. In order to avoid triggering the flushing inadvertently, do not place or lay any objects on the surface.
- A touch switch panel can include pre-set flush programs (interval flushing).
Explanation of the operating unit
| Item in fig. 8, page 22 | Description |
| 1a | “Flush” button |
| 1b | “Flush” touch switch |
| 2 | “Cassette tank removed” indicator |
| 3 | “Fill freshwater tank” indicator (Not always connected when using the on-board tank) |
| 4 | “Cassette tank 3/4 full” indicator |
| 5 | “Cassette tank full” indicator |
4.5 Interval flushing (optional only)
The toilet is equipped with interval flushing. The water is pumped into the toilet bowl in short spurts in order to achieve improved flush wetting and cleaning. The wetting and cleaning depend on the amount of water available in the vehicle.
4.6 Using the toilet
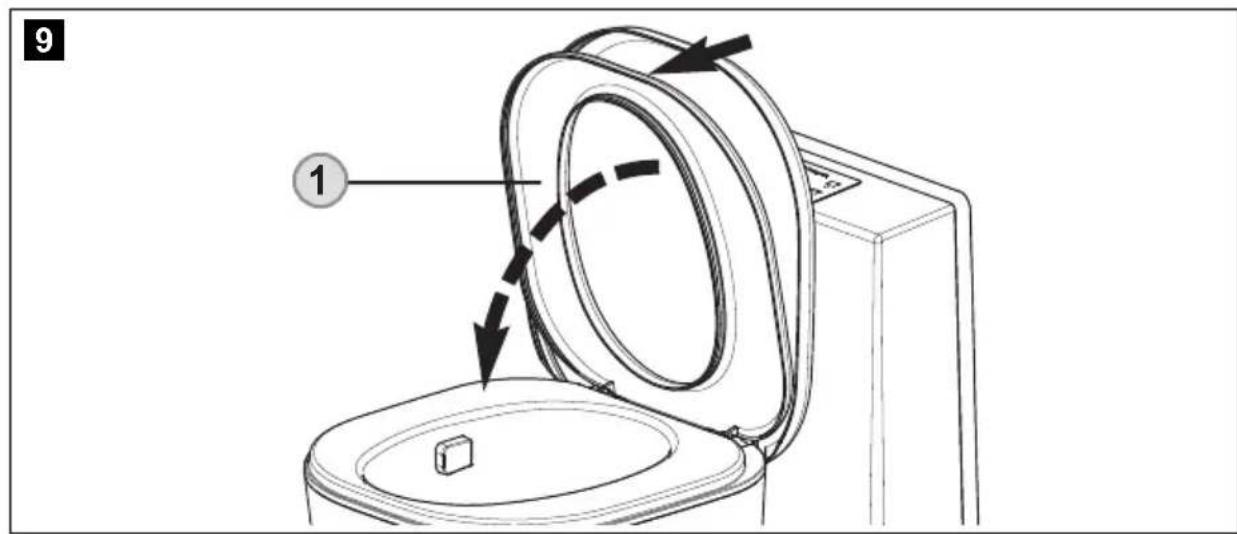
The toilet seat (fig. 9 1) is secured against falling in the open 90^ position. With Saneo Comfort models with Autoclose, the seat lowers slowly when triggered.
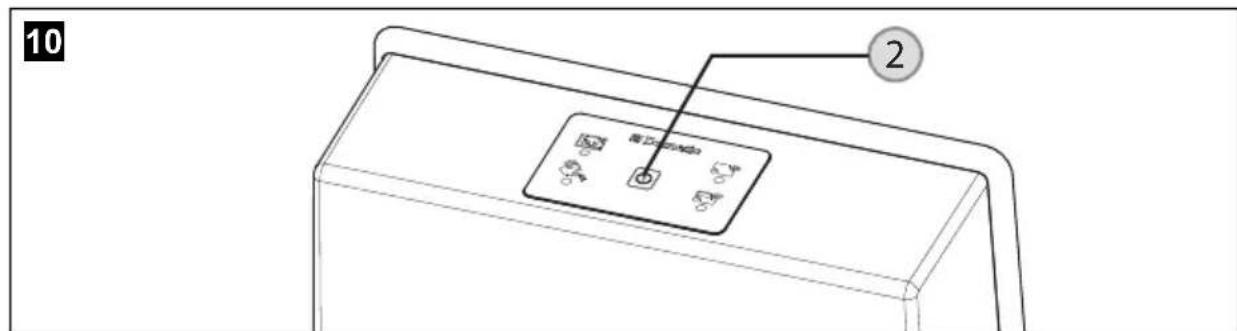
Before use, press the flush button (fig. 10 2, page 23) to allow some water to run into the bowl. A flushing operation is limited to 20 seconds regardless of how long the button is pressed. You may be able to hear the relay switching.
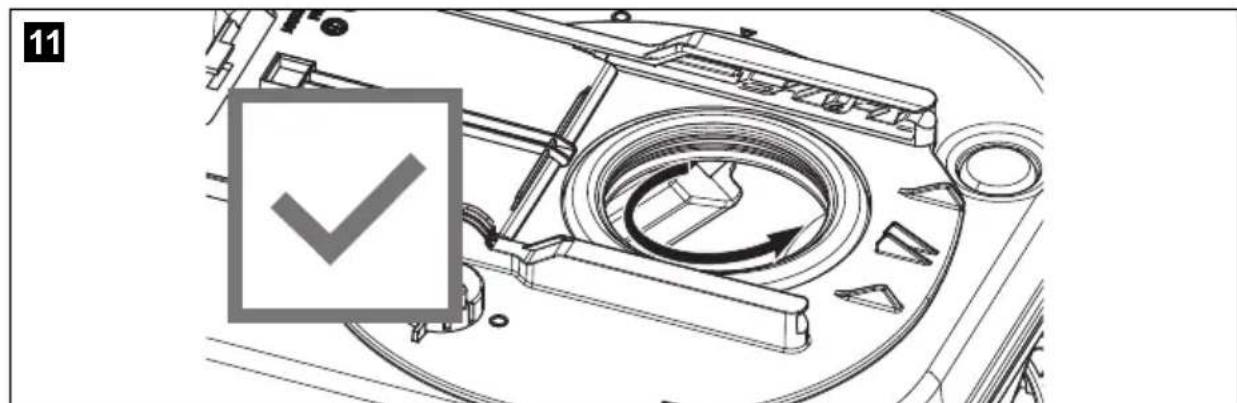
Pull the slider (fig. 11 3, page 23) forward.
Leave the slider open during use.

After use, press the flush button (fig. 10 2, page 23) to rinse the bowl again.
Close the slider (fig. 11 3, page 23).

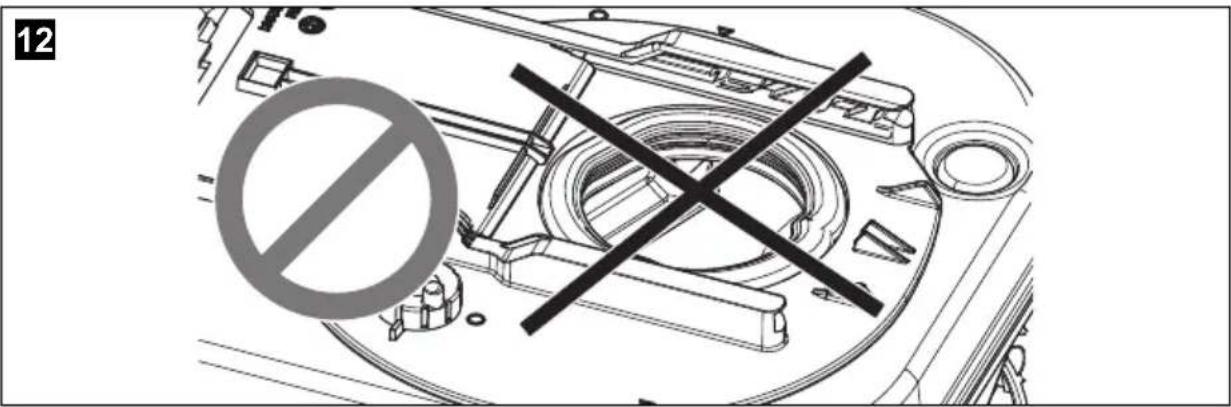
NOTE
The slider must be closed while driving, and no liquid should be above the slider.
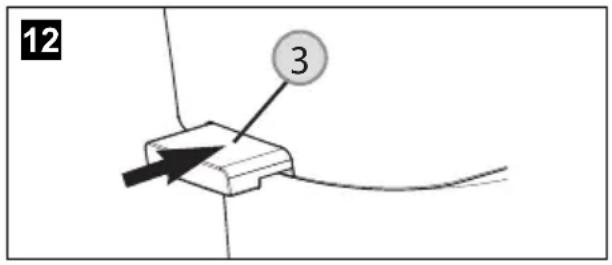
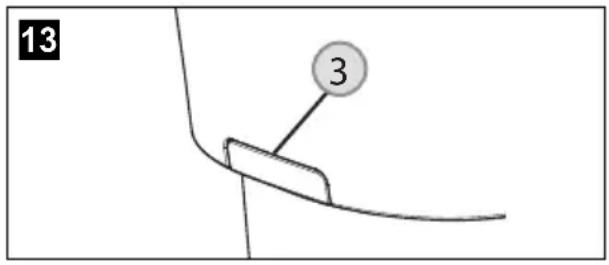
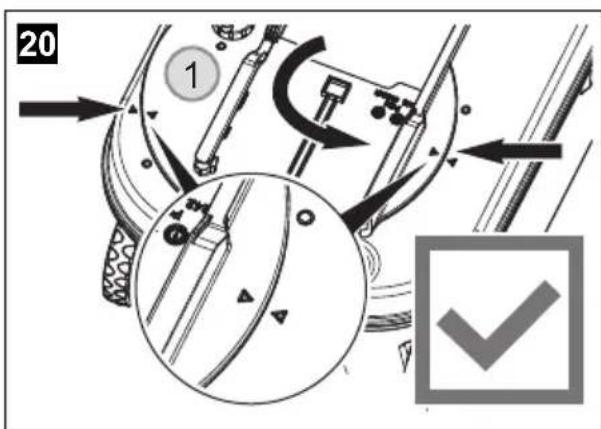
When closing the slider, slight resistance can be felt from a distance of about 10mm from the housing. The slider is closed when the slider handle (fig. 12 3) does not protrude over the toilet housing (fig. 13, page 24). Otherwise the cassette tank cannot be removed.
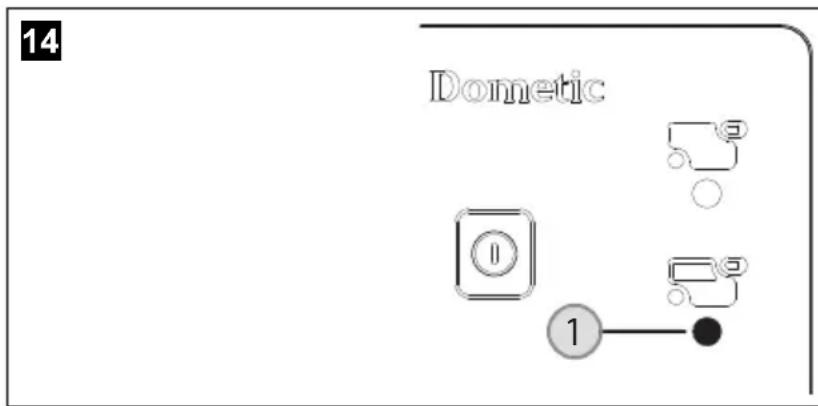
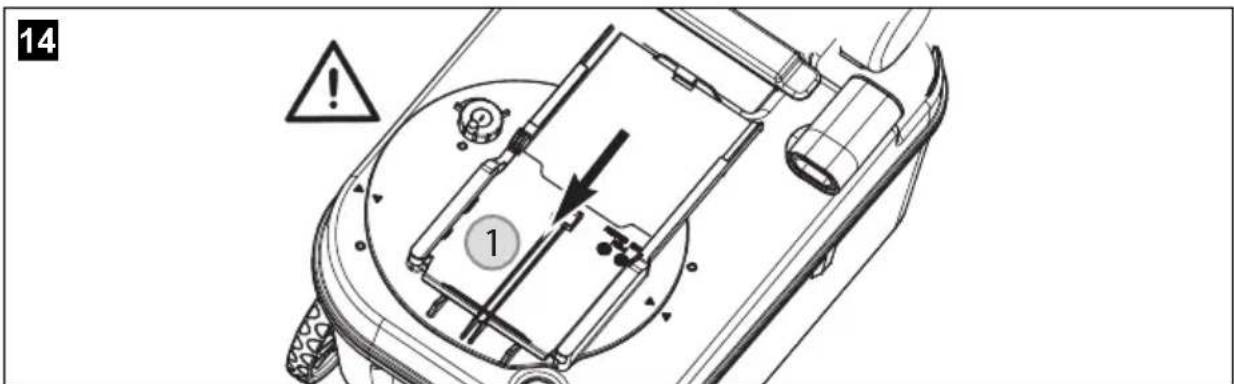
The cassette tank has a capacity of 16 l. When the indicator (fig. 14 1) lights up, the tank is 3/4 full. This means the toilet can be used only a few more times.

NOTE
With a 3/4-filled cassette, use is only possible when the slider is open. With a tilted position (such as lasting inclination of the vehicle), the cassette may only be 3/4 full. Overflowing through the vent is possible.
4.7 Draining the cassette tank
Empty the cassette tank when the level indicator LED lights up:
Remove the cassette tank as described in chapter "Preparing the cassette tank" on page 18.
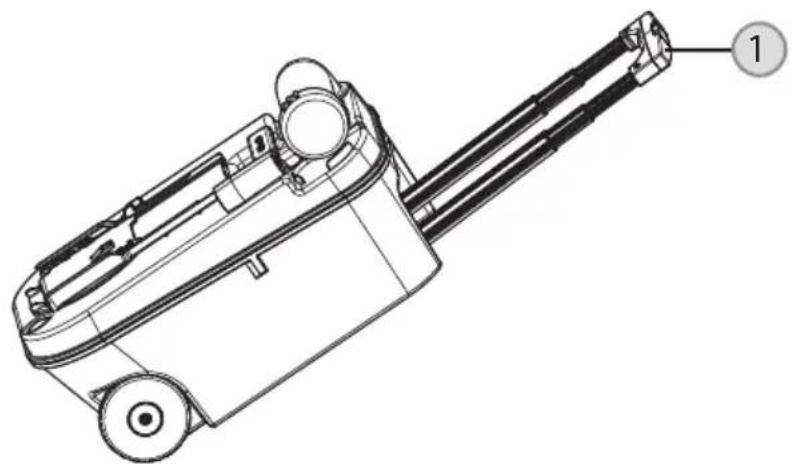
The cassette tank has integrated wheels and an extensible handle. To release the handle, press the button (fig. 1) in the middle of the handle. Pull the handle out all the way.
Bring the tank to the nearest designated disposal location.
15

NOTICE!
- Do not shake the cassette tank vigorously.
- Do not hang the cassette tank on a bicycle or other vehicle for transportation.
- Do not place heavy objects on the cassette tank during transport.
This can damage the housing and rollers.
To bring the handle back to its original position, press the release button of the handle and push the handle back into the cassette.
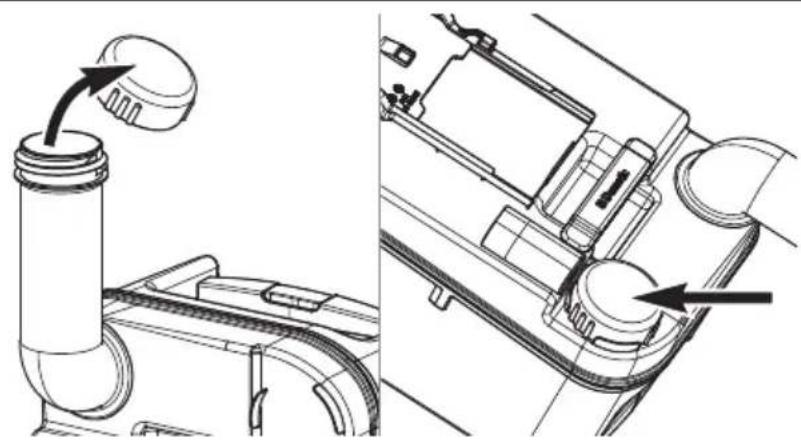
Set the cassette tank upright and turn the draining neck upwards (fig. 16, page 26).
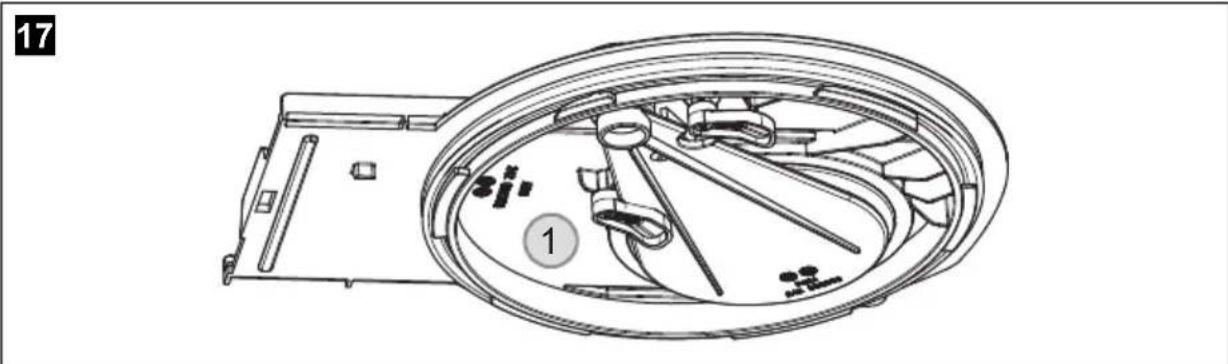
Remove the seal cap (fig. 17, page 26).
Attach the cap to the cassette at the location shown (fig. 17, page 26).
16
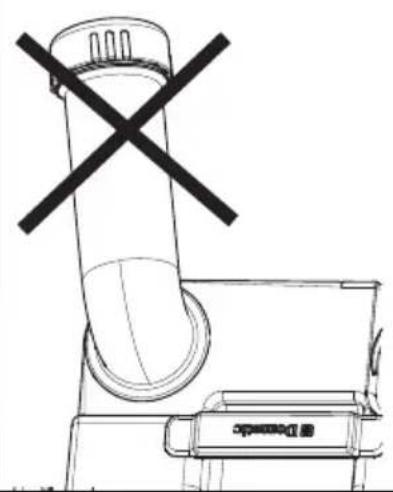

NOTE
Avoid turning the neck more than 90^ , as it otherwise can come off.
17
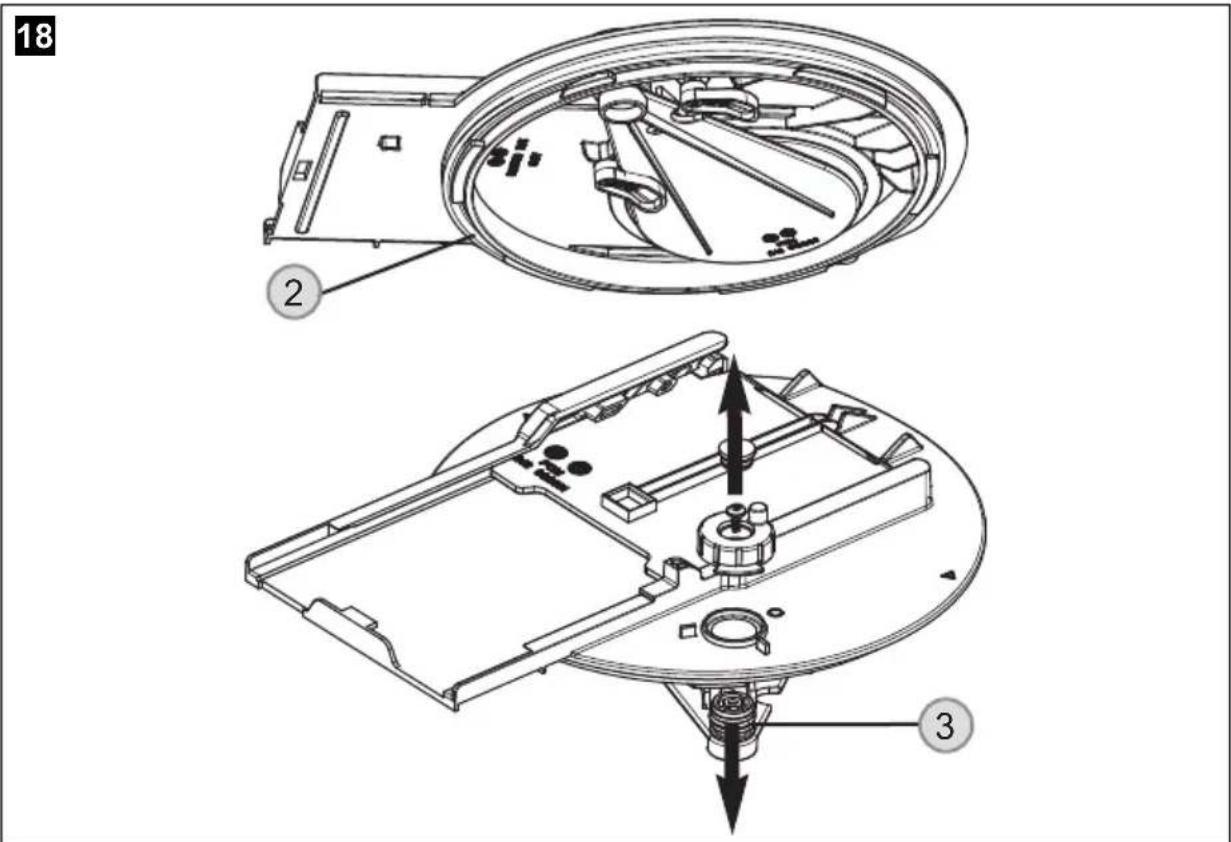
Hold the cassette tank on the handle (fig. 18 2) with one hand while holding the tank with the other hand on the housing (fig. 18 3) so that you can press the vent button (fig. 18 1) while it is draining.
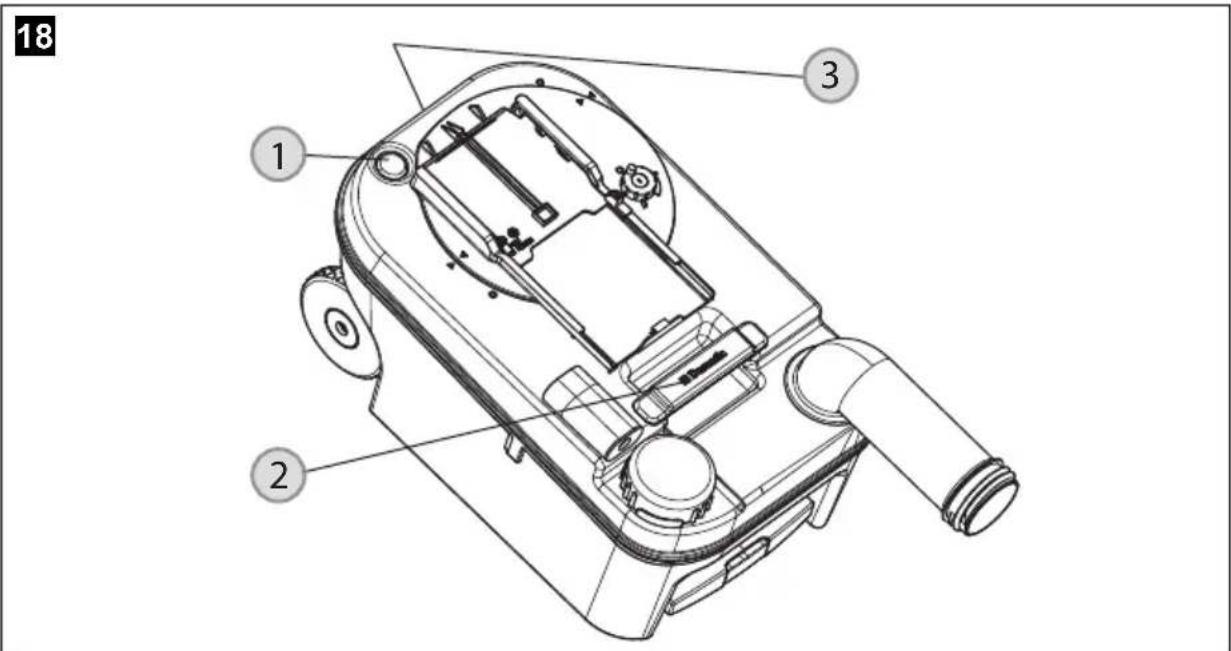
Do not press the vent button until the draining neck is pointing downwards!
✓The tank drains steadily and without splashing.
After draining, rinse out the cassette tank carefully.
Then get the tank ready for use as described in chapter "Preparing the cassette tank" on page 18 before inserting it into the toilet.
Clear away course dirt from the wheels of the cassette tank to prevent scratching of the cassette housing.

NOTICE!
Do not clean the inside of the cassette tank with a high-pressure cleaner. This can damage the float for the level indicator.
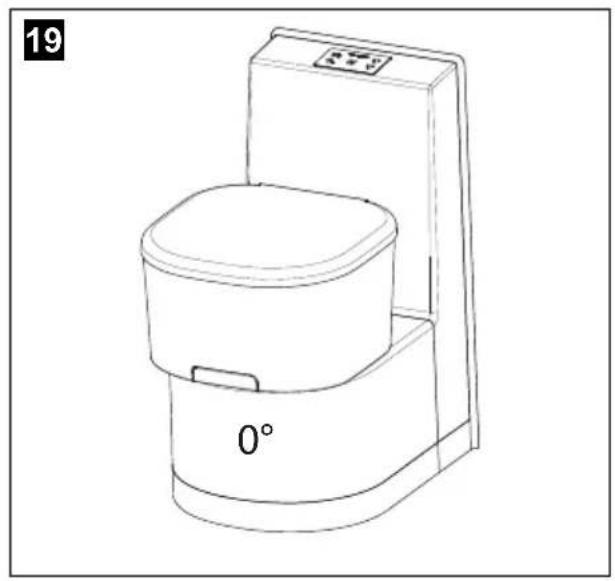
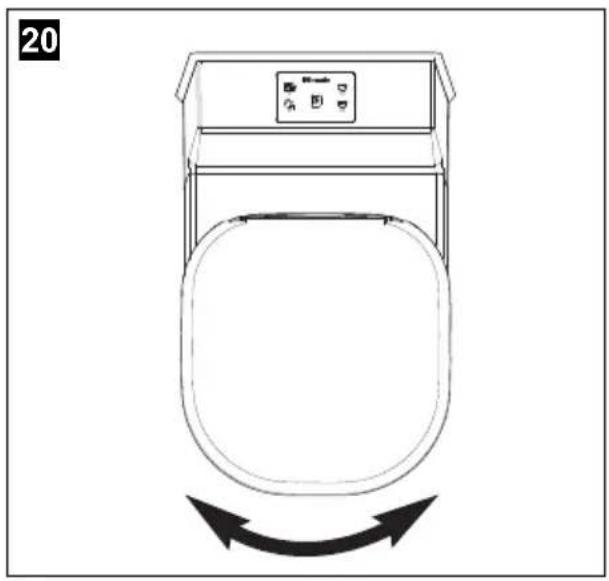
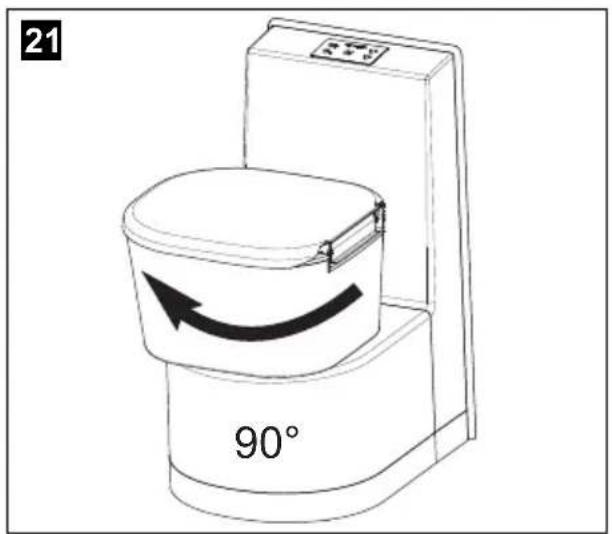
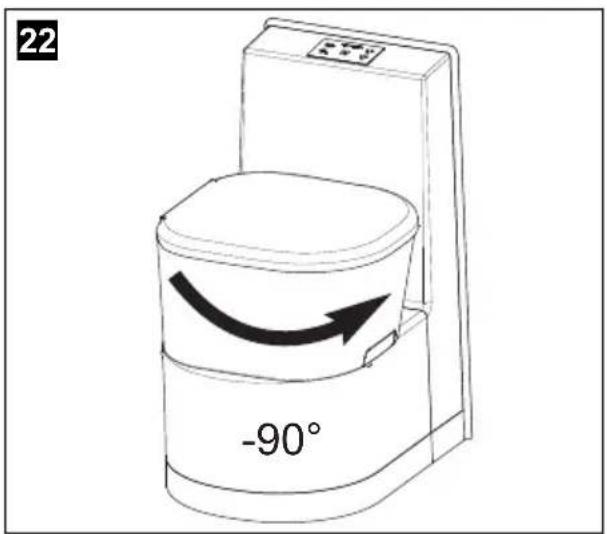
4.8 Positioning the toilet seat
The upper part of the toilet is can be rotated out of the basic position by 180^ (continuously), 90^ in both directions. A limitation prevents the upper part of the console from being bumped.
4.9 Winter operation
You can also use the cassette toilet in the winter, as long as the toilet and cassette tank are in a frost-free area.
If this is not the case, empty the freshwater tank, the cassette tank and the water line of the freshwater supply.
This will prevent damage by frost (chapter "Taking the toilet out of service" on page 29).

NOTICE!
Do not use antifreeze. These agents may damage the cassette toilet.
4.10 Taking the toilet out of service
Drain the freshwater tank and the water supply system completely if you are going to take the toilet out of service for an extended period of time.
Clean the toilet carefully.
Operate the flush button until no more water is in the pipes.
Interrupt the power supply to the toilet.
Then drain the cassette tank and rinse it out carefully. Clean the cassette. To allow the cassette tank to dry, do not close the outlet neck.
Clean and grease all seals and moving parts of the toilet and the cassette tank (chapter "Maintenance" on page 30) and repeat this operation before putting the toilet back into service.
5 Maintenance
Clean the toilet bowl regularly.
Information about sanitary accessories can be found on the Internet at:
http://www.dometic.com
Clean and grease all seals on the toilet and cassette tank regularly. In case of frequent use, perform this action monthly or after 3 - 5 drainings of the cassette. Use grease or silicone-based spray.
We recommend:
Grease: OKS 1110
Spray: OKS 1111

CAUTION!
Inadvertent closing of the slider during cleaning and greasing can cause injury!

NOTE
The cassette slider must always be greased for convenient use and better handling.

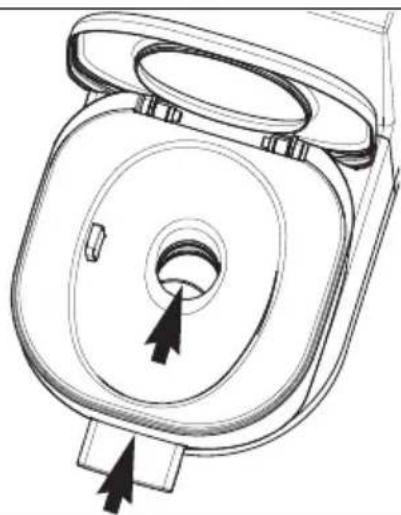
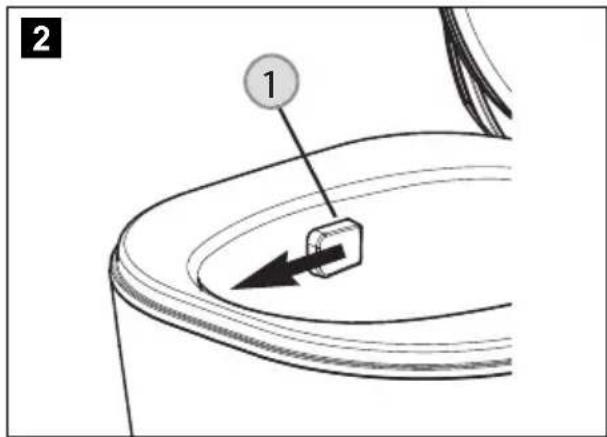
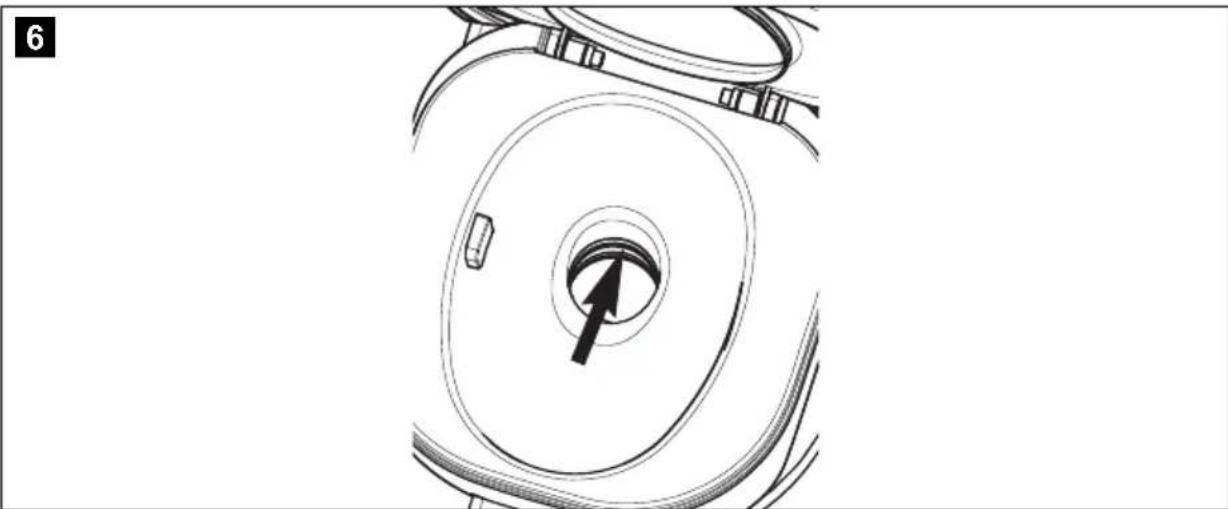
5.1 Cleaning the flushing nozzle
Pull off the cover of the flushing nozzle (fig. 2 1) in the direction shown.
Remove any dirt or debris with a cloth or soft brush.
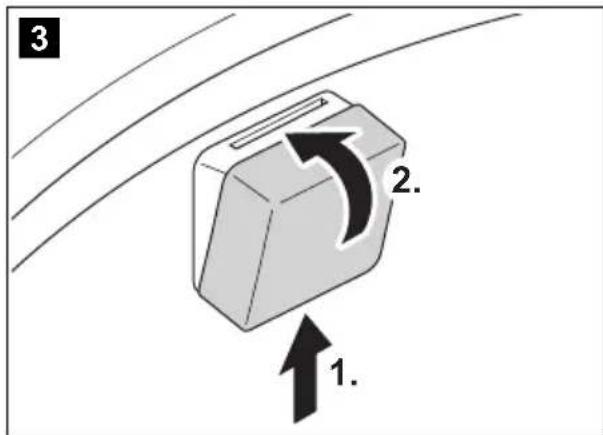
Reattach the cover of the flushing nozzle in the manner shown (fig. 3, page 31).
5.2 Greasing the slider rods
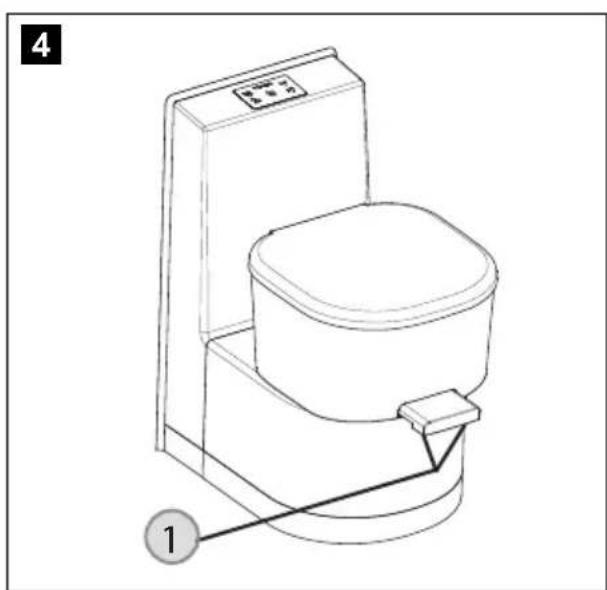
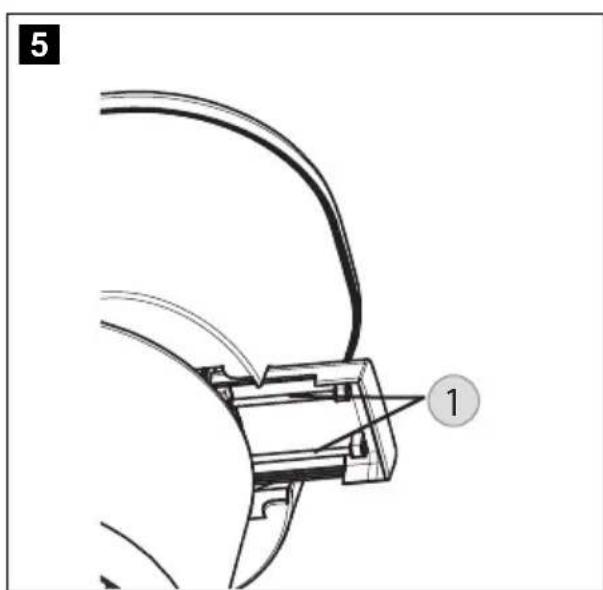
Spray the rods of the slider (fig. 5 1) with silicone spray.
5.3 Greasing the slider seal
At the bottom of the toilet bowl, there are two seals that receive the slider when it is closed.
Grease this area carefully to prevent binding.
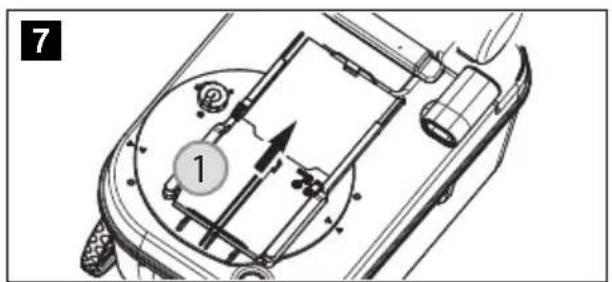
5.4 Greasing the cassette seal
Remove the cassette tank and place it on a firm surface. Pull back the cover (fig. 7 1) so that the seal is accessible.
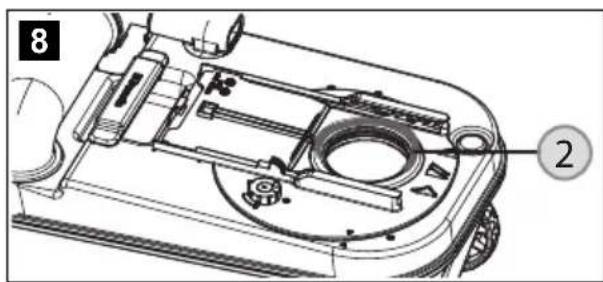
Evenly grease the cassette seal (fig. 3 2) at the top with silicone-based grease. In this way the cover remains movable.
Close the cover (fig. 9, page 32).
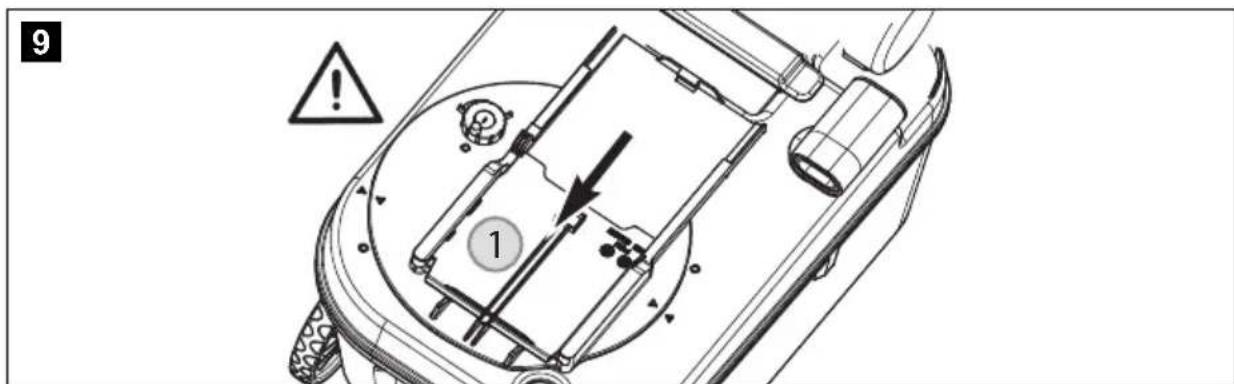
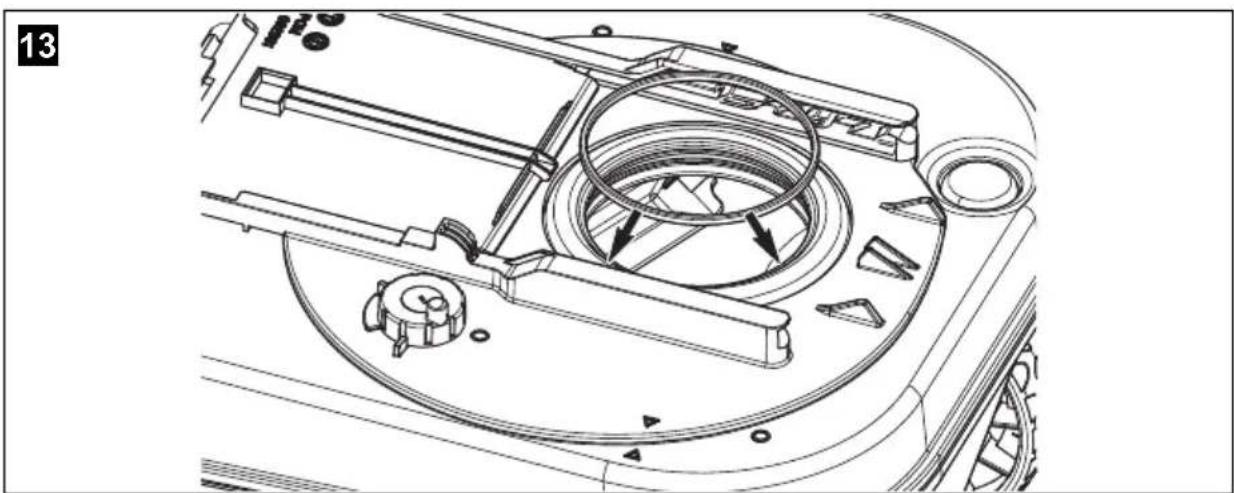
5.5 Replacing the cassette seal
Remove the cassette tank and place it on a firm surface. Pull back the cover (fig. 10 1) so that the seal is accessible.
Remove the support ring (fig. 10 2).
Remove the seal (fig. 10 3) as shown in the following figures.

Insert the new seal (fig. 11, page 33).

NOTICE!
The seal must rest uniformly in the opening, since otherwise leaking and the binding of the slider are possible (fig. 12, page 34).
Then place the support ring in the provided groove in the cassette seal (fig. 13, page 34).
Close the cover (fig. 14, page 34).
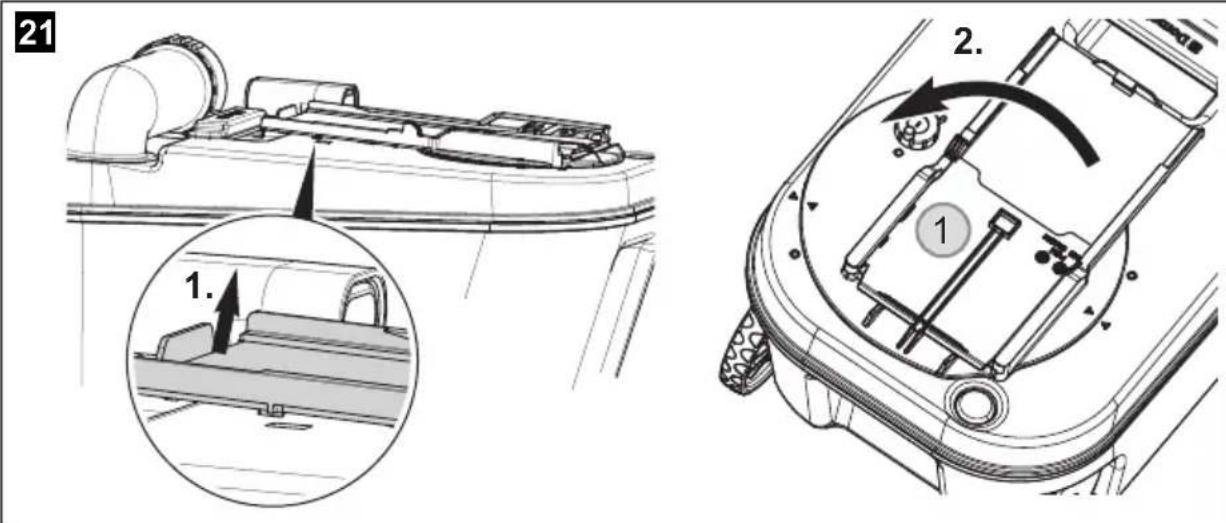
5.6 Cleaning the bayonet fitting and greasing the bayonet seal
Loosen the bayonet lock (fig. 15 1) on the cassette. In the state upon delivery and after extended use, the bayonet fitting can be loosened only with difficulty.

Remove the bayonet fitting (fig. 16 1).

Clean the bayonet fitting (fig. 17 1) completely.
Uniformly grease the bayonet seals (fig. 18 2, 3) (bottom of the bayonet fitting) with silicone grease.
Put the bayonet fitting (fig. 19 1, fig. 20 1) back in.
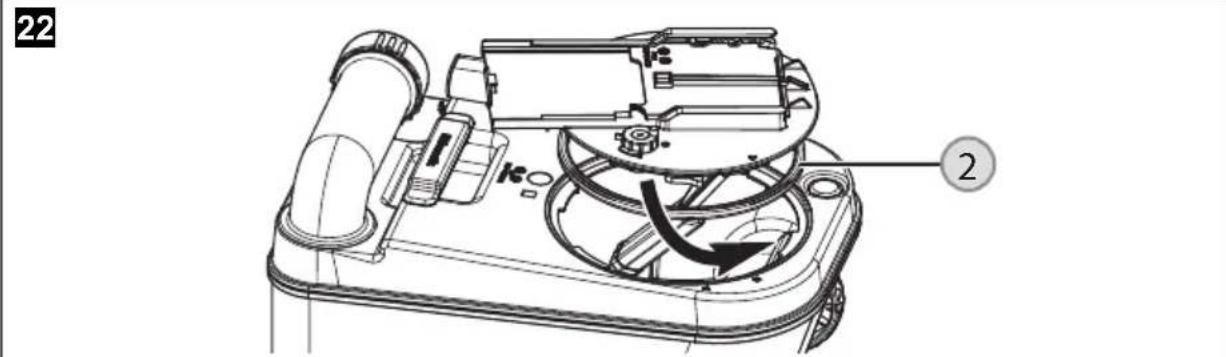
5.7 Replacing the bayonet seal
Loosen the bayonet lock (fig. 21 1) on the cassette. In the state upon delivery and after extended use, the bayonet fitting can be loosened only with difficulty.
Insert the new seal.
Ensure uniform seating of the new seal (fig. 22 2).
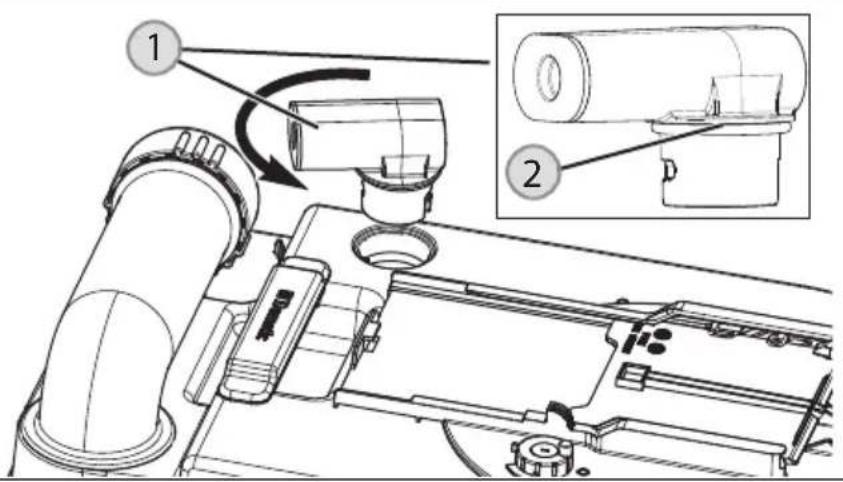
5.8 Greasing the O-ring of the cassette vent
Take the adapter (fig. 23 1) off the cassette.
Grease only the attached O-ring (fig. 23 2) with silicone grease.
23
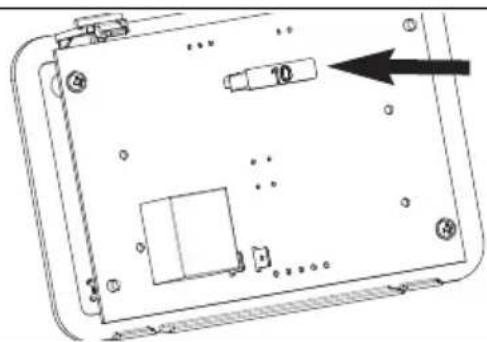
5.9 Replacing the fuse in the operating unit

CAUTION!
Switch off the voltage supply before you start!
The fuse (automotive fuse: 10 A) is located on the underside.
24
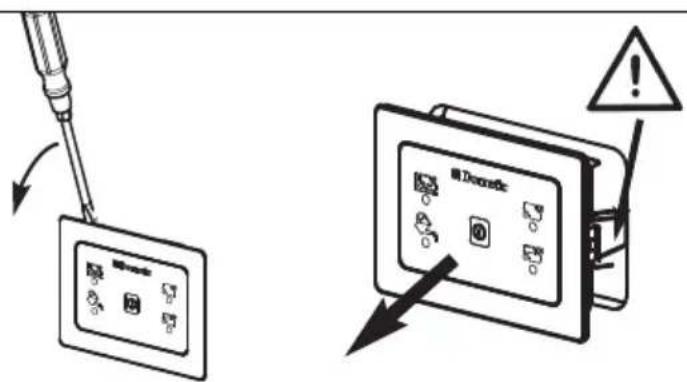
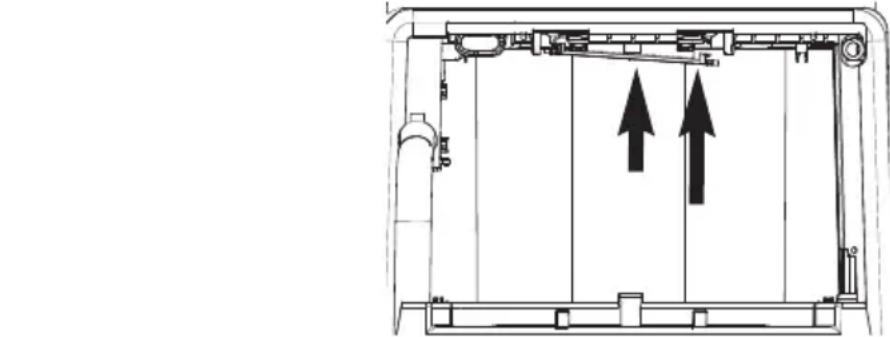
5.10 Removing the operating unit (wall)
Lift the operating unit with a suitable tool and then pull it out of the wall (fig. 25, page 39).

CAUTION! Carefully pull the operating unit out of the wall opening. There is a risk of injury due to the springs springing back!
25
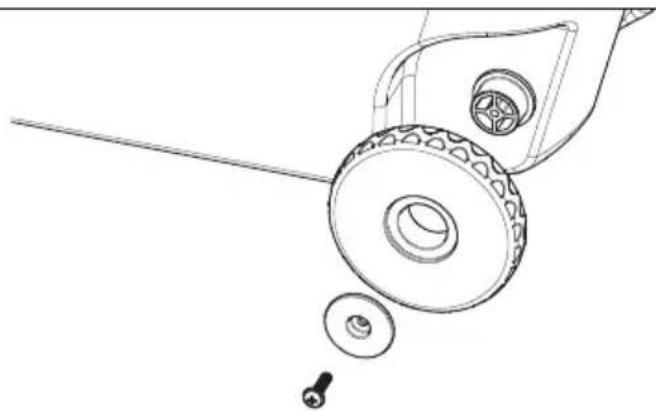
5.11 Replacing the wheels on the cassette tank
The wheels on the cassette tank can be replaced individually if required.
Loosen the bolt and pull off wheel along with the washer (fig. 26, page 39).
Attach a new wheel and tighten the bolt.
Ensure that the wheel is free running.
26
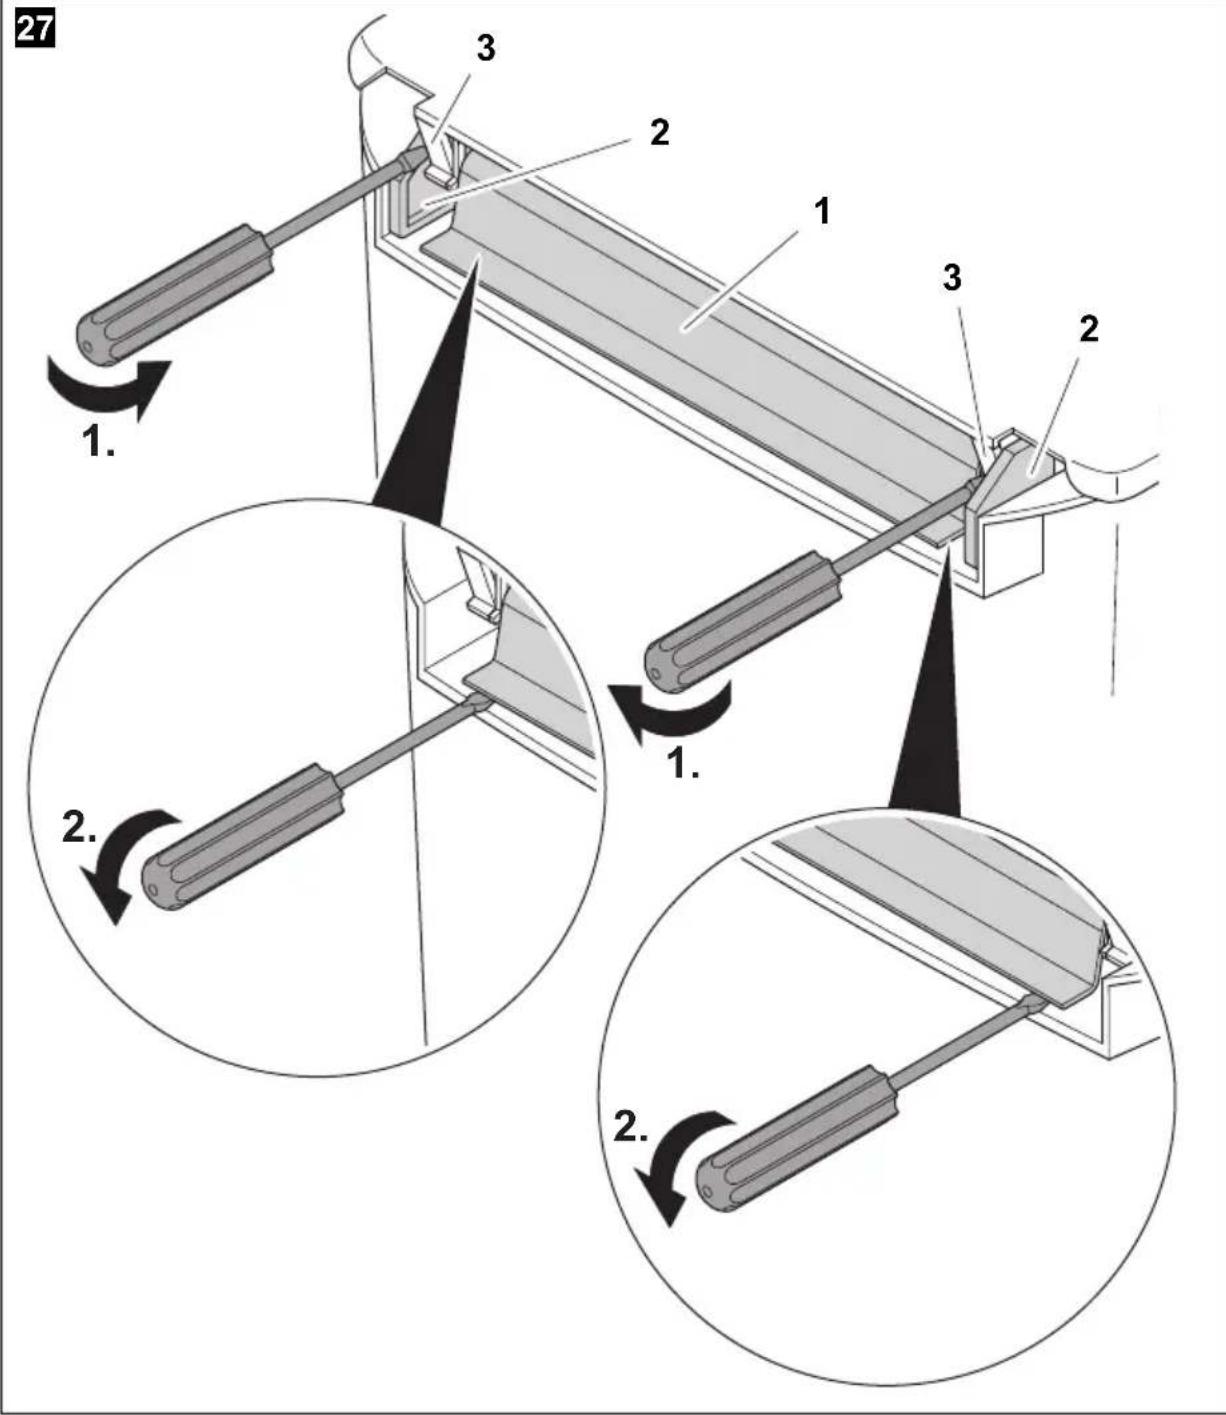
5.12 Removing and replacing the lid and seat

NOTE
The manufacturer accepts no liability for damage resulting from incorrect or faulty installation.
Proceed as follows (fig. 27, page 41):
Loosen the spacer (2) by prying it out of its position with a screwdriver.
Use a screwdriver to carefully pry the lid (1) out of its mounting and remove it.
If necessary, remove the components of the Autoclose with the markings "CW" and "CCW".
Lift the lid.
Use both hands to grasp the lid above the hinges (3) and bend it slightly toward the bowl to detach it.
Lift the seat.
Use both hands to grasp the seat above the hinges (3) and bend it slightly toward the bowl to detach it.
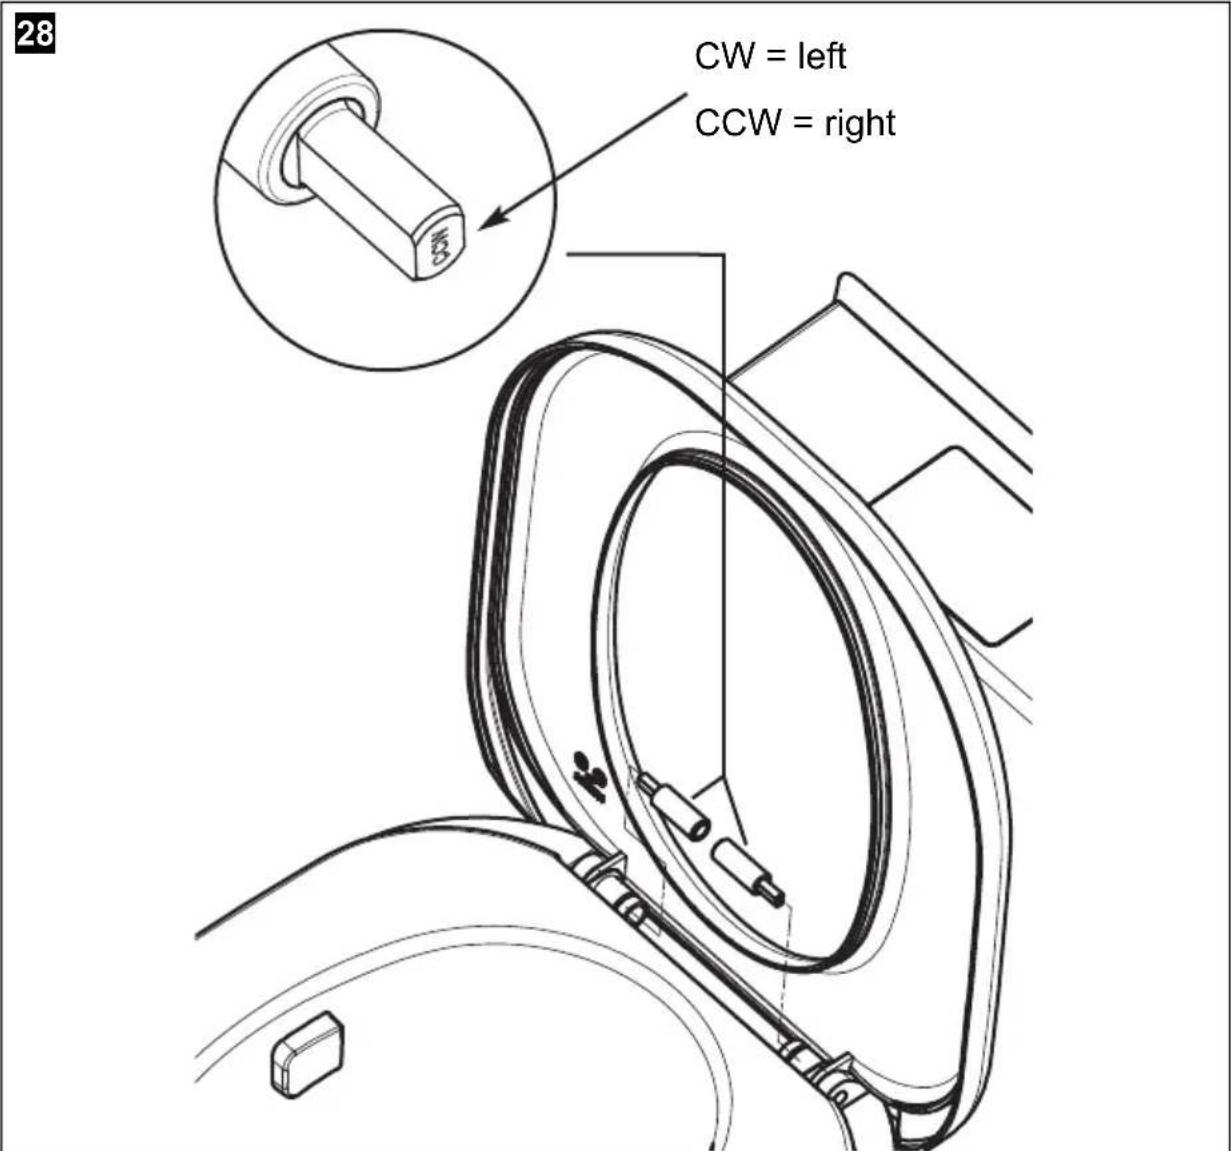
5.13 Installing/replacing the Autoclose
The Autoclose is integrated in Saneo Comfort models. With Saneo Basic models, this function can be retrofitted.

NOTE
The manufacturer accepts no liability for damage resulting from incorrect or faulty installation.
Use a screwdriver to carefully pry the lid (fig. 27 1, page 41) out of its mounting and remove it.
Lift the lid and seat.
If necessary, remove the components of the Autoclose with the markings "CW" and "CCW".
Take the new components of the Autoclose and place the part with the "CW" mark in the left hinge and the component with the "CCW" mark in the right hinge.
Lower the lid by tapping it.
The seat and lid lower slowly.
Place the lid (fig. 27 1, page 41) into the mounting.
5.14 What to do in case of problems
Problem Possible cause Remedy
Toilet no longer flushes.
Faulty fuse.
Cassette not inserted.
Cassette full.
No power.
Electronics defective.
Pump defective.
Solenoid valve defective.
Filter of the solenoid valve is dirty.
Replace the fuse (see chapter
"Replacing the fuse in the operating unit" on page 38).
If there are repeated failures, check the electrical connections!
Replace defective parts.
Cassette tank leaks.
Seal worn. Replace the
cassette seal (see chap-
ter "Replacing the cassette seal" on page 33).
No level indication.
The float in the
cassette tank is
hung up or jammed
by toilet paper.
Clean the float in the cassette.
Do not use a high-pressure cleaner!
Cassette tank cannot be pushed in completely.
Lower slider flange has
Press slider flange into the correct position.
Slider can be opened, even though the cassette has
been removed.
Cassette can not be removed.
Slider is opened. Close the slider.
Cassette does not lock in the cassette compartment.
Cassette lock is defective.
Replace the cassette lock.
Problem Possible cause Remedy
Cassette can be removed although the slider is open.
The cassette locking cover is defective.
Replace the bayonet fitting unit of the cassette.
Slider cannot be opened.
Cassette not inserted. Insert the cassette.
Für ihre Sicherheit

VORSICHT!
DECLARATION OF CONFORMITY
according to
Low Voltage Directive 73/23/EEC and
the Amendment to LVD 90/683/EEC, 2006/95/EC
EMC Directive 2004/108/EC
RoHS Directive 2011/65EC
ECER10

10R-047317
Type of equipment
Brand Name
Type familily
Manufacturer's (Factory)
name
address
telephone no
telefax no
Cassette Toilet
DOMETIC
SANEOB,C
DOMETIC GmbH
The following harmonized standards or technical specifications (designations) which comply with good engineering practice in safety matters in force within the EEA have been practiced:
following DIN EN 997 (12/2003)
EN 55014-1;06,A1,A2
EN 55014-2:97, A1, A2
The equipment conforms completely with the above stated harmonized standards or technical specifications.
By signing this document, the undersigned declares as manufacturer, or the manufacturer's authorized representative established within the EEA, that the equipment in question complies with the requirements stated above.
Date
2015.03.05

Joachim Kinscher
Position
General Manager
Dometic Australia Pty. Ltd.
1 John Duncan Court
Varsity Lakes QLD 4227
1800212121
+61755076001
Mail: sales@dometic-waeco.com.au
AUSTRIA
Dometic Austria GmbH
Neudorferstraße 108
A-2353 Guntramsdorf
+43 2236 908070
+43223690807060
Mail: info@dometic.at
BENELUX
Dometic Branch Office Belgium
Zincstraat 3
B-1500 Halle
+3223598040
+3223598050
Mail: info@dometic.be
BRAZIL
Dometic DO Brasil LTDA
Avenida Paulista 1754, conj. 111
SP 01310-920 Sao Paulo
+551132513352
+551132513362
Domatic Group Asia Pacific
Suites 2207-11·22/F·Tower 1
The Gateway 25 Canton Road
Tsim Sha Tsui·Kowloon
+85224611386
+8522466553
Mail: info@waeco.com.hk
HUNGARY
Domatic Zrt. Sales Office
KerekgyarTo u.5.
H-1147 Budapest
+3614684400
+3614684401
Domatic Italy S.r.l.
Via Virgilio, 3
1-47122 Forli (FC)
+390543754901
+390543754983
Mail: vendite@dometic.it
JAPAN
Dometic KK
Maekawa-Shibaura,Bldg.2
2-13-9 Shibaura Minato-ku
Tokyo 108-0023
+81354453333
+81354453339
Mail: info@dometic.jp
MEXICO
Domatic Mx, S. de R. L. de C. V.
Circuito Médicos No. 6 Local 1
Colonia Ciudad Satélite
CP 53100 Naucalpan de Juarez
Estado de Mexico
+52553744108
+525553934683
Mail: info@dometic.com.mx
NETHERLANDS
Dometic Benelux B.V.
Ecustraat 3
NL-4879 NP Etten-Leur
+31765029000
+31765029019
Mail: info@dometic.nl
NEW ZEALAND
Dometic New Zealand Ltd.
Unite E, The Gate
373 Neilson Street
Penrose 1, Auckland
+6496221490
+6496221573
Mail: customerservices@dometic.co.nz
NORWAY
Dometic Norway AS
Osteroyveien 46
N-3232 Sandefjord
+4733428450
+4733428459
Mail: firmapost@dometic.no
POLAND
Dometic Poland Sp. z o.o.
Ul. Puławska 435A
PL-02-801 Warszawa
+48224143200
+48224143201
Mail: info@dometic.pl
PORTUGAL
Dometic Spain, S.L.
Komsomolskaya square 6-1
RU-107140 Moscow
+74957807939
+74959165653
Mail: info@dometic.ru
SINGAPORE
Dometic Pte Ltd
18 Boon Lay Way 06-140 Trade Hub 21
Singapore 609966
+6567953177
+65 6862 6620
Mail: dometic@dometic.com.sg
SLOVAKIA
Dometic Slovakia s.r.o. Sales Office Bratislava
Nadražna 34/A
900 28 Ivanka pri Dunaji
/241245529680
Mail: bratislava@dometic.com
SOUTH AFRICA
Dometic (Pty) Ltd.
Regional Office
South Africa & Sub-Saharan Africa
2 Avalon Road
West Lake View Ext 11
Modderfontein 1645
Johannesburg
+27114504978
+27114504976
Mail: info@dometic.co.za
SPAIN
Dometic Spain S.L.
Avda. Sierra del Guadarrama, 16
E-28691 Villanueva de la Canada
Madrid
+34902111042
+34 900 100 245
Mail: info@dometic.es
SWEDEN
Dometic Scandinavia AB
Gustaf Melins qata 7
Dometic Switzerland AG
Riedackerstrasse 7a
CH-8153 Rümlang
+41448187171
+41448187191
Mail: info@dometic.ch
UNITED ARAB EMIRATES
Dometic Middle East FZCO
P.O.Box 17860
S-D 6, Jebel Ali Freezone
Dubai
+97148833858
+97148833868
Mail: info@dometic.ae
UNITED KINGDOM
Dometic UK Ltd
Dometic House, The Brewery
Blandford St. Mary
DorsetDT119LS
+443446260133
+443446260143
Mail: customerservices@dometic.co.uk
USA
Dometic RV Division
1120 North Main Street
Elkhart, IN 46515
+1574-264-2131
- NOTICE!
- Table of contents
- General information 6
- Safety instructions. 12
- Model description 14
- Using the toilet. 18
- Maintenance 30
- General information
- Preface
- Notes on this instruction manual
- Copyright
- Description of symbols used
- WARNING!
- CAUTION!
- NOTE
- Limitation of liability
- Warranty
- Customer service
- Spare parts
- Declaration of Conformity
- Dometic
- DECLARATION OF CONFORMITY
- Domatic sanitary accessories
- Dometic POWER CARE TABS (1)
- Dometic GREEN CARE TABS (2)
- Dometic COMFORT CARE (3)
- Environmental notes
- Use of sanitary additives
- Disposal
- Safety instructions
- Proper use
- Responsibility of the user
- Use of sanitary additives
- Working on and inspecting the toilet
- Exceptions
- CAUTION! Beware of injury!
- Model description
- Model designation
- Example:
- Type plate of the toilet
- Item Description
- Technical data
- Explanation of components
- Using the toilet
- Cleaning
- Preparing the cassette tank
- Filling the freshwater tank
- Control and operating unit
- Touch switch operating unit (standard on Saneo Comfort)
- Explanation of the operating unit
- Interval flushing (optional only)
- Using the toilet
- Draining the cassette tank
- 15
- Positioning the toilet seat
- Winter operation
- Taking the toilet out of service
- Maintenance
- Cleaning the flushing nozzle
- Greasing the slider rods
- Greasing the slider seal
- Greasing the cassette seal
- Replacing the cassette seal
- Cleaning the bayonet fitting and greasing the bayonet seal
- Replacing the bayonet seal
- Greasing the O-ring of the cassette vent
- Replacing the fuse in the operating unit
- Removing the operating unit (wall)
- Replacing the wheels on the cassette tank
- Removing and replacing the lid and seat
- Installing/replacing the Autoclose
- What to do in case of problems
- Problem Possible cause Remedy
- Für ihre Sicherheit
- VORSICHT!
- AUSTRIA
- BENELUX
- BRAZIL
- HUNGARY
- JAPAN
- MEXICO
- NETHERLANDS
- NEW ZEALAND
- NORWAY
- POLAND
- PORTUGAL
- SINGAPORE
- SLOVAKIA
- SOUTH AFRICA
- SPAIN
- SWEDEN
- UNITED ARAB EMIRATES
- UNITED KINGDOM
- USA
Brand : DOMETIC
Model : Saneo BLP
Category : Camping