Lucca Ego - Electric bike Batavus - Free user manual and instructions
Find the device manual for free Lucca Ego Batavus in PDF.
| Product type | Electric bike EPAC (Electrically Power Assisted Cycle) |
| Brand | Batavus |
| Model | Lucca Ego |
| Battery | Lithium-ion 10 Ah, 24 V |
| Battery weight | 3 kg |
| Charging time | ~5 hours |
| Range | 30 to 70 km (depending on conditions) |
| Motor power | 250 W max (pedal assistance) |
| Maximum assisted speed | 25 km/h |
| Assistance levels | 5 levels + throttle |
| Brakes | Hand brakes with automatic motor cut-off |
| Safety | Battery lock, automatic shut-off after 10 min of inactivity |
| Maintenance | Do not clean with high-pressure jets; store battery in a cool, dry place |
| Frame warranty | 10 years (manufacturing defects) |
| Other parts warranty | 2 years (excluding wear parts) |
| Recommended use | Paved roads, paths, leisure and transport |
| Compliance | EN15194 Directive, CE |
| Charging temperature | 0°C to 45°C |
| Operating temperature | -15°C to 45°C |
| Recharge frequency | Recharge after each use, at least once every 2 months during storage |
Frequently Asked Questions - Lucca Ego Batavus
User questions about Lucca Ego Batavus
0 question about this device. Answer the ones you know or ask your own.
Ask a new question about this device
Download the instructions for your Electric bike in PDF format for free! Find your manual Lucca Ego - Batavus and take your electronic device back in hand. On this page are published all the documents necessary for the use of your device. Lucca Ego by Batavus.
USER MANUAL Lucca Ego Batavus
1.1 Safety warnings before use 19
1.2 Parts 3
1.2.1 Recharger and battery pack 20
1.2.2 Handlebar control 20
2 Battery and recharger 21
2.1 Battery pack 21
2.1.1 Removing the battery pack 21
2.1.2 Inserting the battery pack 22
2.2 Recharging the battery 23
2.2.1Warnings before use 23
2.2.2 Recharging 23
2.2.3 Recharger and battery protection 24
2.2.4 Recommendations for maintenance and storage 24
3 Handlebar control 25
3.1 Handlebar control unit 25
3.1.1 Buttons and indicators.. 25
3.1.2Turning the system on 25
3.1.3 Setting the assistance 25
3.1.4 The charge level 26
3.1.5 Adjusting the handlebar control unit 26
3.2 Throttle 27
3.3 Handbrakes 27
4 Range 28
4.1 Range indication table 28
4.2 Important factor 28
5 Technical details 29
5.1 Battery details 29
5.2 Battery cell temperature ranges 29
6 Guarantee conditions and legal requirements 30

For the most recent guarantee provisions and the legal provisions that apply in your country, we refer you to www.batavus.com.
1 Descriptions
1.1 Safety warnings before use
- Read the instruction manual carefully and make sure you understand it properly.
- Check your bicycle before using it for loose and/or damaged parts. Loose or damaged parts must be secured properly and/or replaced.
- The luggage carrier is not suitable for use as a child's seat.
-
Scratches, cracks or discolorations may occur in parts that experience serious stress. This means that the end of their economic lifespan has been reached and that they must be replaced.
The Batavus E-go® is exclusively intended for: -
cycling on asphalted/paved roads and paths;
-
recreation and transport.
The construction of the Batavus E-go® may never be changed.
- Safety warnings for recharging the battery are given in paragraph 2.2.1.
1.2 Parts
1.2.1 Recharger and battery pack

A Recharging point
B K e y
C Docking station contact point
D Recharger plug
E Recharger
F Indicator light
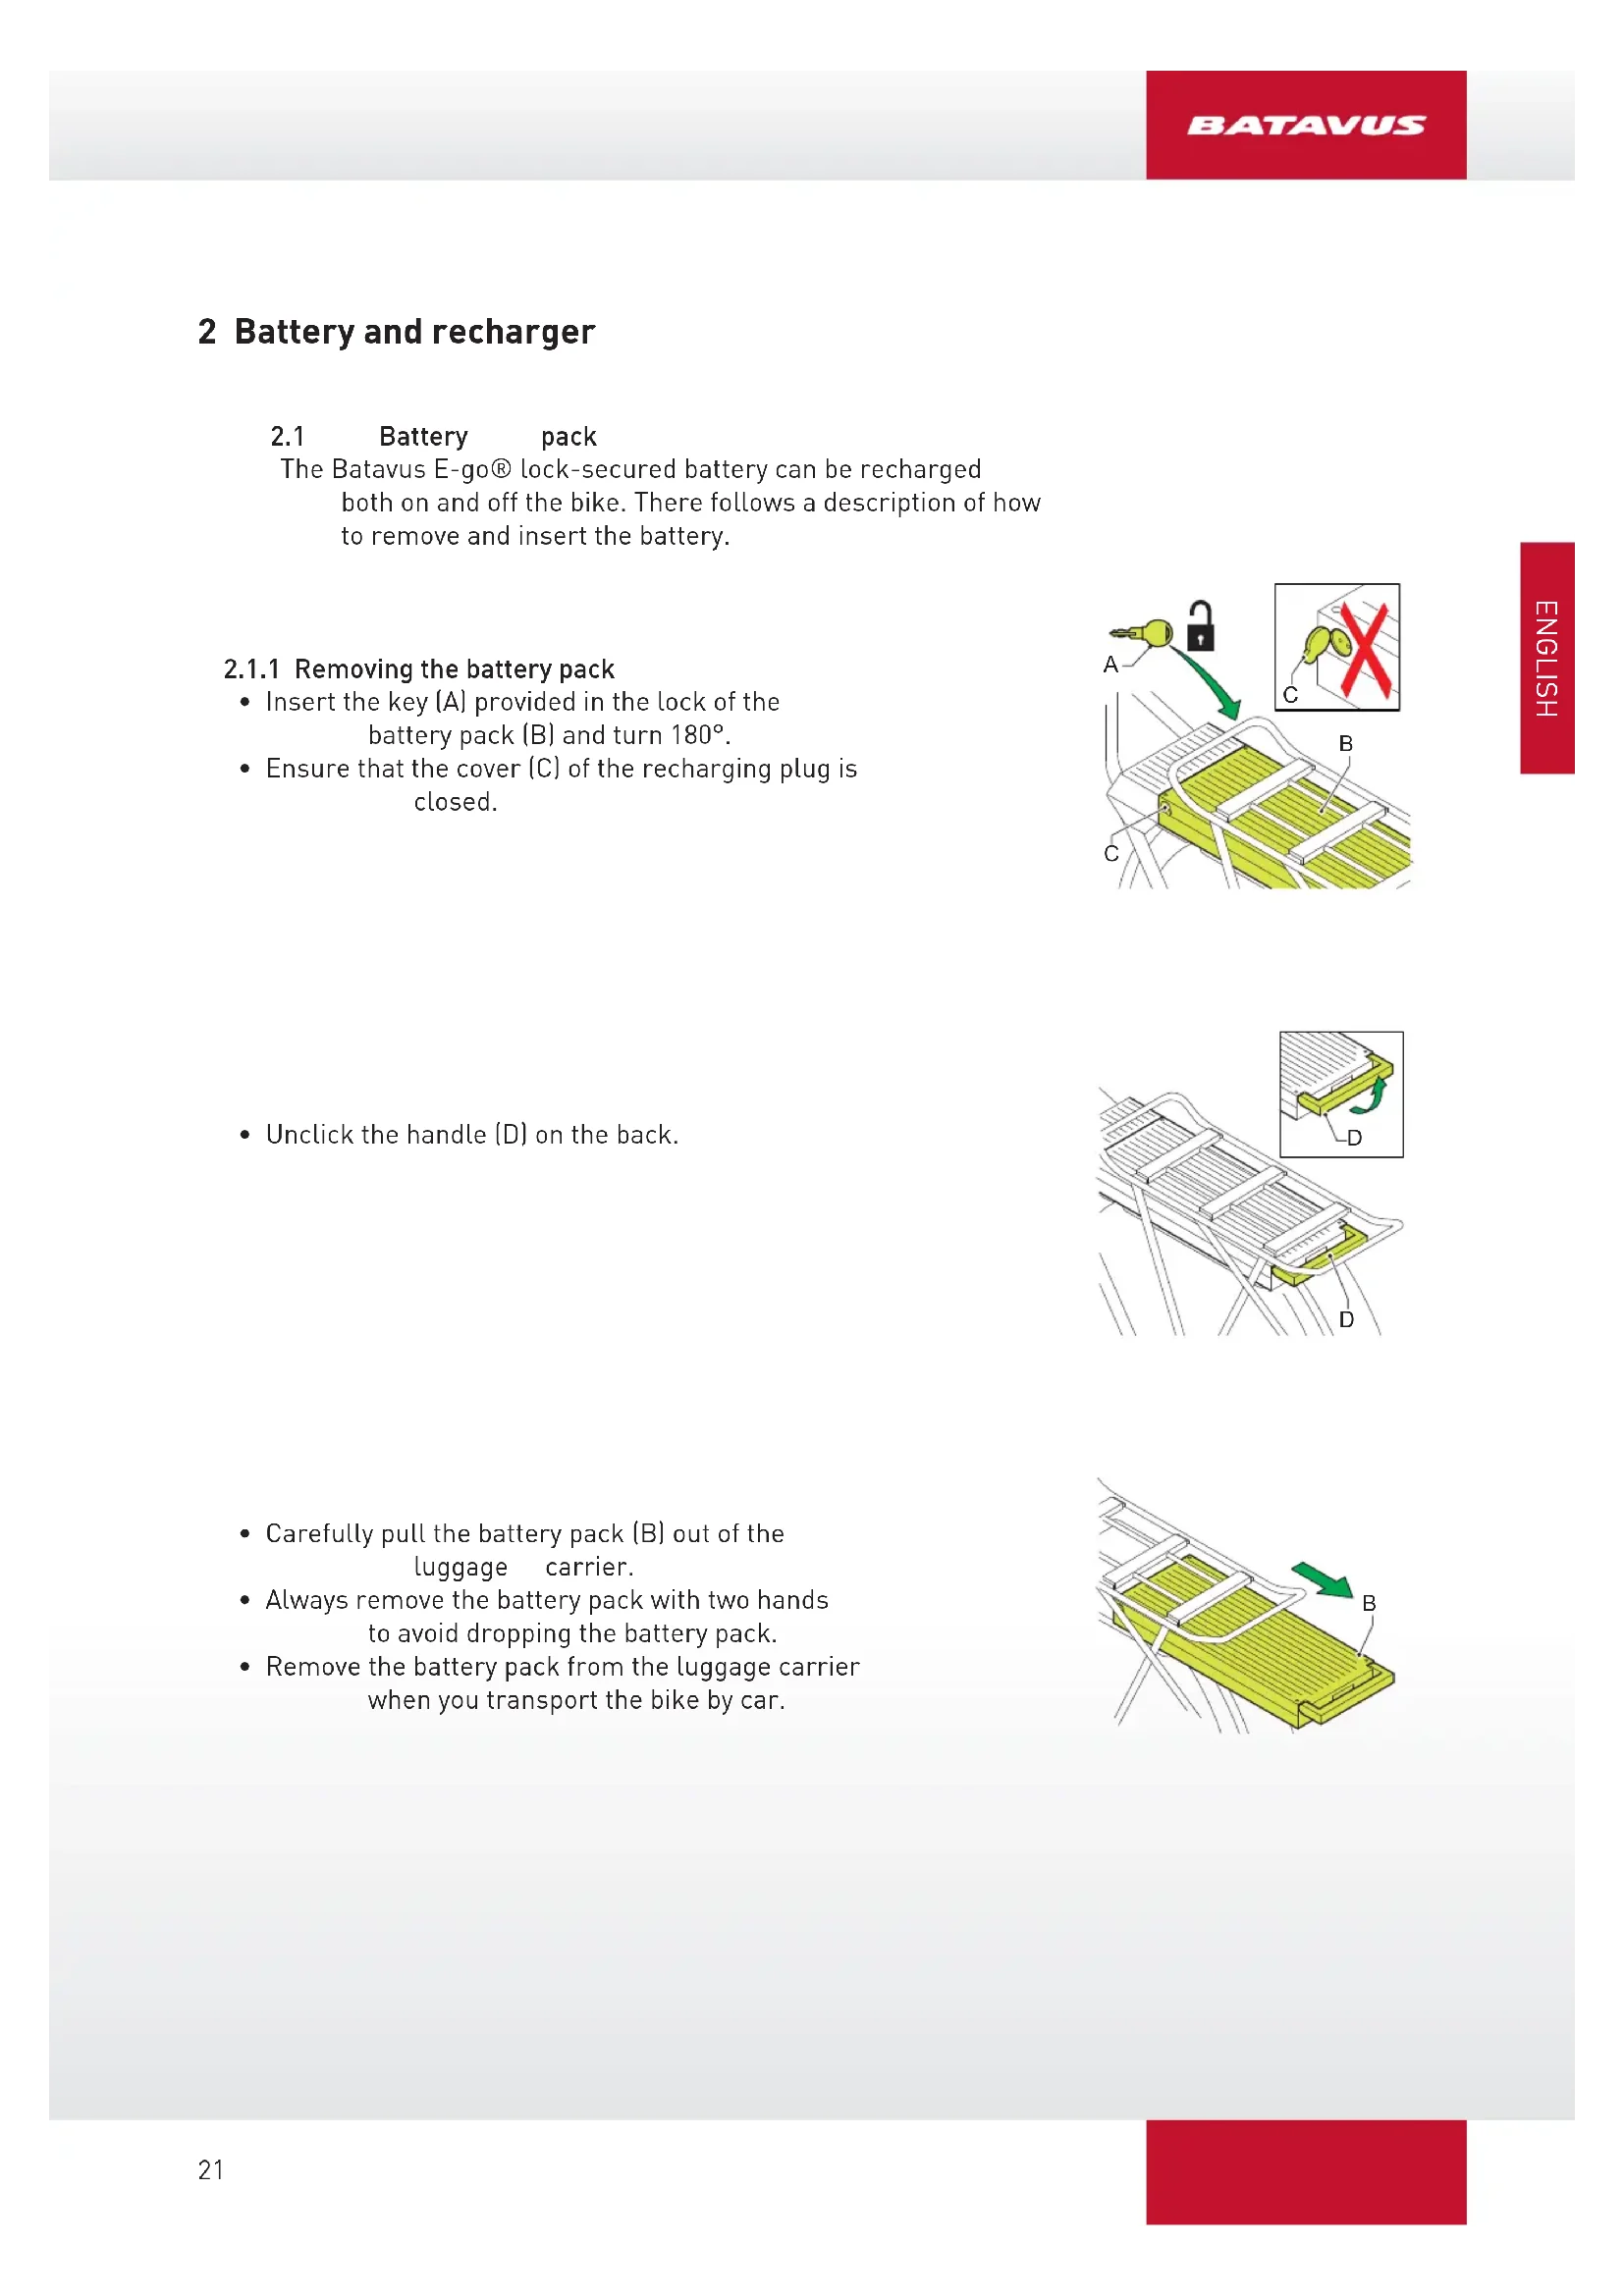
1.2.2 Handlebar control
A Handlebar control unit
B Throttle
C Handbrakes
2 Battery and recharger
2.1 Battery pack
The Batavus E-go® lock-secured battery can be recharged both on and off the bike. There follows a description of how to remove and insert the battery.
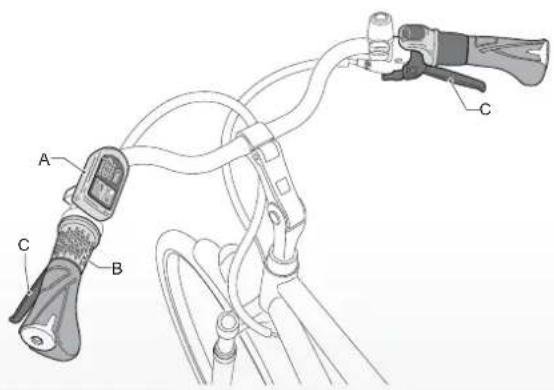
2.1.1 Removing the battery pack
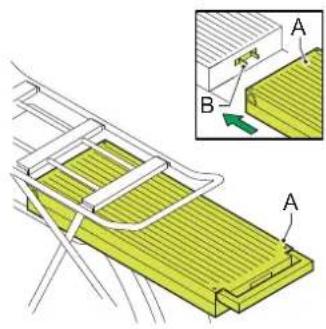
- Insert the key (A) provided in the lock of the battery pack (B) and turn 180^ .
- Ensure that the cover (C) of the recharging plug is closed.
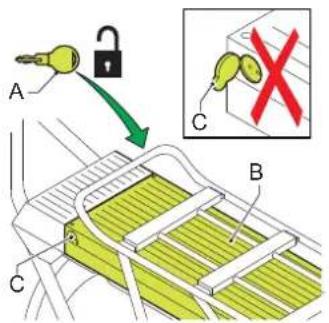
- Unclick the handle (D) on the back.

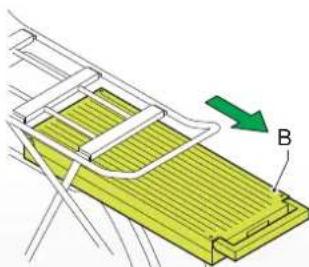
- Carefully pull the battery pack (B) out of the luggage carrier.
- Always remove the battery pack with two hands to avoid dropping the battery pack.
- Remove the battery pack from the luggage carrier when you transport the bike by car.
2.1.2 Inserting the battery pack
- Carefully slide the battery pack (A) into the luggage carrier. Take care with the contact points of the battery pack and those of the docking station (B).
- Push the handle (C) on the back downwards and click it into place.
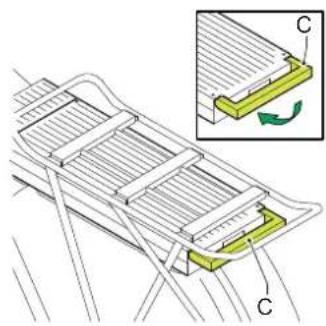
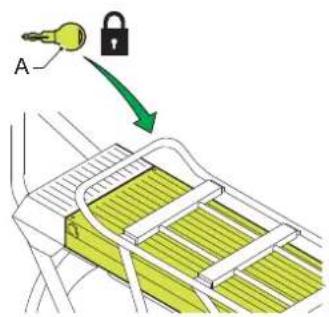
- Lock the battery with the key (A). This locks the battery into place and prevents theft.
2.2 Recharging the battery
2.2.1Warnings before use

the warnings below carefully. Batavus is not liable for accidents or faults caused by improper use of (parts of) the E-bike.
- Only use the recharger that is supplied with the Batavus E-go®. Using other battery rechargers causes the guarantee to lapse and may seriously damage the battery and electrical system.
- Only use the recharger in dry places.
- Do not connect the recharger with wet hands.
- Do not recharge the bicycle in full sun.
- Do not touch the recharger during thunderstorms.
- Ensure good ventilation during recharging.
- Immediately stop recharging if you hear unusual sounds or detect leakage.
- Do not take the battery apart. The battery pack is sealed. The guarantee will lapse if the seal is broken.
- Batteries may not be intentionally heated or damaged. Otherwise the batteries can break open releasing poisonous chemicals.
- Do not dip the battery pack in water or another fluid.
- Keep the battery pack away from children.
- Do not connect the recharger to the mains when not in use.
- Never open or damage the motor.
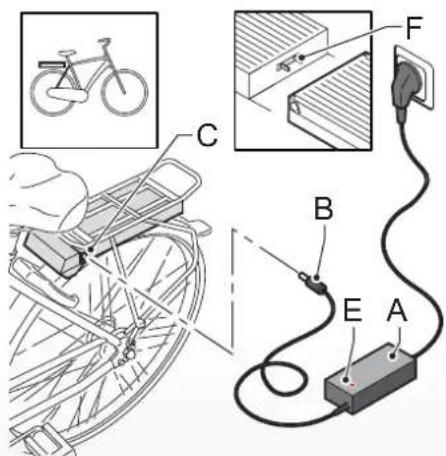
2.2.2 Recharging
- Check whether the recharger is suitable for the local voltage that your power company supplies.
- Connect the recharger A to the mains (F).
- Connect the plug [B] on the recharger to the contact point of the battery pack (C).
The indicator light (E) will come on.
- A full recharge takes about five hours. Recharging stops automatically after the battery pack has been fully recharged.
- Disconnect the battery pack within 12 hours after it has recharged.
- Remove the recharger cable and remove the plug from the mains socket.
2.2.3 The recharger and battery protection
- Recharge the battery pack once fully until the indicator light turns green before using the bicycle for the first time.
- Do not allow a fully recharged battery pack to stay in the recharger for more than 12 hours.
- The battery pack does not need to be entirely empty before recharging. The battery pack is kept in good condition by recharging it after each time you use the bicycle (irrespective of the distance).
- In the case of lengthy storage: fully recharge the battery pack and disconnect the battery pack from the charger within 12 hours. Recharge the battery pack at least once every two months.
- Ensure that the recharging of the battery pack occurs within the temperature limits (between 0^ and 45^ ). This extends the life and increases the performance of the battery pack.

Every battery runs down over time. This process is called 'self-discharge'. So-called deep discharge occurs when the battery discharges too much. Deep discharge can permanently damage the battery pack.
The guarantee lapses if it is determined that deep discharge has occurred.
2.2.4 Recommendations for maintenance and storage
- Keep the battery in a cool dry place.
Always keep the battery in a room that is adequately ventilated. Avoid contact with sunlight. - Fully recharge the battery at least every two months. This conserves the quality of the battery if stored for a lengthy period.

Do not clean the bicycle with a high-pressure spraying pistol. A too powerful jet of water may damage the motor's electronics. This will make the guarantee null and void.
3 Handlebar control
3.1 Handlebar control unit
3.1.1 Buttons and indicators
A Peddling assistance on/off
B Assistance level adjustment
C Charge level display
D Assistance level display
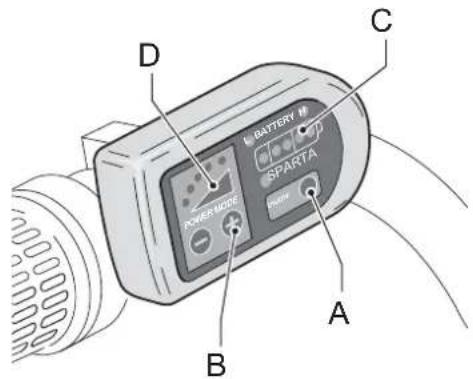
3.1.2 Turning the system on
You can turn the assistance on and off by keeping button 'A' depressed. You can do this at any time, also while cycling.
Press button 'A' for 1 second to turn on, and 3 seconds to turn off. The E-bike switches off automatically if it is not used for more than 10 minutes.
3.1.3 Setting the assistance
The system has five support levels that are indicated by five LEDs (D).
You can set the degree of assistance using the Power mode + and - buttons (B). You can change the assistance level at any moment, even while you are cycling. The assistance level is as standard set at the third level.
3.1.4 The charge level
The charge level (C) of the battery pack is indicated on the handlebar control unit using five LED lights. The clearest indication of the charge level is displayed if the throttle is not in use and the assistance level is set to the lowest setting.
The charge level (B) can also be read off from the rear of the battery pack by pressing button A.
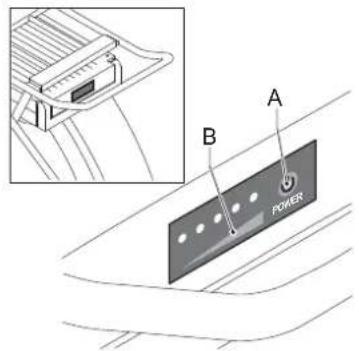
You can see the % charge of your battery from the number of illuminated LEDs and their colour.
| Number of LEDs | Charge level | |
| Battery pack Display | ||
| 4x green 5 80 - | 100% | |
| 3x green 4 60 - | 80% | |
| 2x green 3 40 - | 60% | |
| 1x green 2 20 - | 40% | |
| 1x red 1 0 - 20% | ||
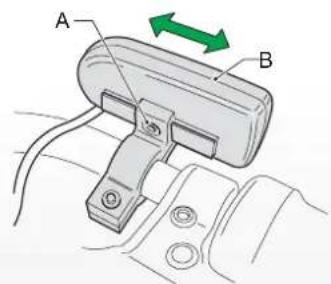
3.1.5 Adjusting the handlebar control unit
The handlebar control unit (B) can be adjusted both left and right by using the screw assembly (A). The handlebar control unit is as standard set to the middle position.
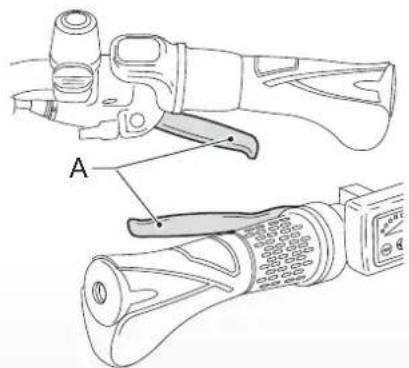
3.2 Throttle
The throttle (A) is to the left of the handlebar control unit. The throttle can be used after the peddling assistance has been turned on.

You can accelerate by rotating the throttle away from you.

Turn the throttle slowly when first using it to get used to the power that the throttle provides.

The throttle offers extra assistance and can be used in the following ways:
- Extra assistance when you're walking alongside the bicycle
When walking up a hill with the bicycle the throttle can provide you with extra assistance.
This means that you do not have to bear the full weight of the bicycle on the hill yourself.
- Extra assistance when pulling away
You can use the throttle when pulling away. Without pedalling, the throttle can assist up to a speed of 6 km/hour. To get assistance above this you must peddle yourself.
- Extra assistance during cycling
The throttle can give peddling assistance an extra impulse during cycling. This may be useful when overtaking or riding up a hill. The impulse is most discernible at a low peddling assistance level.
3.3 Handbrakes
The handbrakes (A) are provided with a safety function. When you operate the handbrakes, the drive automatically disengages.
4 Range
4.1 Range indication table
The range of your bicycle is 30 - 70km . Factors that adversely affect the range are named in paragraph 4.2.
The range noticeably declines as the battery ages.
4.2 Important factors
The range is adversely affected by the following factors:
| Factor Negative factor situation | |
| Ambient temperature Low temperature | |
| Wind Headwind | |
| Height differences Hilly terrain | |
| State of the road Soft surface | |
| Tyre pressure Low tyre pressure | |
| Driving program A lot of pedalling assistance | |
| Speed High speed | |
| Bicycle maintenance No or poor maintenance | |
| Accelerating in the wrong gear Low gear | |
| Driving behaviour | Little peddling |
| Throttle | Use of the throttle |
| Weight | A lot of weight (heavy rider and load) |
5 Technical details
5.1 Battery details
| Detail Specific cation | |
| Battery pack 10 Ah Li-on, 24 V | |
| Recharging time 5 hours | |
| Maximum power 250W | |
| Weight 3kg | |
| Maximum speed with pedal assistance 25 km/hour | |
| Fuse 30A |
5.2 Battery cell temperature ranges
| Status Minimum [°C] | Maximum [°C] | |
| Storage (minimum 60-80%) | -10°C | 35°C |
| During pedal assistance use | -15°C | 45°C |
| While recharging | 0° | 45°C |
CE
The Batavus E-go® complies with the applicable European directive EN15194 for electrical bicycles.

6 Guarantee conditions and legal requirements
Guarantee conditions
The following guarantee conditions supplement your applicable legal rights.
Article 1 Guarantee
1.1 Batavus BV guarantees that Batavus bicycles are free of construction and/or material defects and/or rust, one thing and another insofar that this flows from these guarantee provisions.
1.2 The guarantee can only be invoked by the first owner of the Batavus bicycle concerned.
1.3 The guarantee lapses by virtue of the provisions of articles 3.1 and 5.1.
1.4 The guarantee is non-transferable.
1.5 The guarantee provided by Batavus on the basis of these conditions does not prejudice the option of the seller to invoke the ordinary, legal provisions of the Civil Code.
Article 2 Guarantee period
2.1 Batavus frames and front forks without suspension are guaranteed against construction and/ or material defects for a period of 10 years.
2.2 The same guarantee applies for suspension front forks, dampers and all other parts, with the exception of the parts referred to in paragraph 2.4 of this article, for a period of 2 years.
2.3 A guarantee against rust formation from the inside applies to paintwork on the frame and fork for a period of 2 years.
2.4 Parts that are subject to wear and tear, such as tyres, the chain, cog rings, freewheel, cog wheels, cables and brake blocks are not guaranteed, unless there are construction and/or material defects.
2.5 A guarantee against rust formation applies to other painted and chromed parts, if maintained, for a period of 2 years.
Article 3 Guarantee exclusions
3.1. The guarantee lapses in the following cases:
a. Incorrect and/or careless use of the bicycle and use that is contrary to the intended use;
b. The bicycle has not been maintained in accordance with the service book;
c. Technical repairs are performed unprofessionally;
d. Parts mounted later do not satisfy the technical specifications of the bicycle concerned or are mounted incorrectly;
e. If proof of ownership, which shows that the bicycle was assembled and checked professionally before it was delivered to the customer, is not present or has not been signed by the seller.
3.2. Moreover, Batavus BV is explicitly not liable for damage caused to (parts of) the bicycle as a result of:
a. Incorrect adjustment/tensioning of the handlebars, handlebar spindle, saddle, saddle spindle, derailleur set, brakes and snap fasteners of the wheels and saddles;
b. Too late replacement of parts, such as brakes/derailleur cables, brake blocks, tyres, chain and cog wheels;
c. Climatic influences such as normal weathering of the paint or chrome rust.
Article 4 Guarantee on parts
4.1. During the guarantee period, all parts, for which Batavus BV determines that there is a material and/or construction defect, will, at the option of Batavus BV, be repaired or reimbursed. Any costs of [dis]assembly are for the account of the owner.
4.2. Contrary to that determined in the previous paragraph, the cost of labour for material and/or construction defects in frames and front forks are also for the account of the manufacturer during three years after the purchase date.
4.3. Costs of transport of the bicycle and/or parts from and to Batavus BV are for the account of the owner, unless the part concerned is covered by the guarantee.
4.4 If a certain part is covered by the guarantee and the original is no longer stocked, then Batavus BV will provide at least an equivalent alternative.
Article 5 Submitting a claim
5.1. Claims under this guarantee must be submitted subject to presenting the bicycle or the part concerned for inspection at the Batavus dealer from whom the bicycle was purchased. At the same time, a receipt of purchase as well as the proof of ownership provided with the bicycle must be handed over to the dealer.
5.2. If the owner has moved or the dealer is no longer available, Batavus BV will if required report this to the closest Batavus dealer.
Article 6 Liability
6.1 A guarantee claim accepted by Batavus BV does not automatically mean that Batavus BV also accepts liability for any damage suffered. The liability of Batavus BV never extends any further than described in these guarantee conditions. Any liability of Batavus BV for consequential damage is explicitly excluded. That stipulated in this provision does not apply if and insofar as flows from a mandatory provision.
Legal requirements
According to European legislation, the vehicle described is a bicycle because it satisfies the following rules:
The assistance is only active if the cyclist pedals himself/herself.
- The assistance is active until a speed of maximum 25km/ hour is reached.
The power provided is maximum 250 Watt.

The electric bicycle is an EPAC (Electrically Power Assisted Cycle) in accordance with EN15194.
Compliance
The manufacturer hereby declares that your electric bicycle complies with all requirements and other relevant provisions of the directives 2004/108/EC and 2002/24/EC. The declaration of compliance can be requested from the manufacturer.

The environment
We recommend that you return a faulty bicycle battery pack to your dealer in accordance with the environmental regulations for collecting and processing batteries drawn up by the Ministry of Housing, Spatial Planning and the Environment. The dealer is required to accept the battery and must ensure that it is processed further by the manufacturer.

Periodic maintenance
Your electric bicycle regularly requires a periodic service. Your dealer can provide you with expert advice and inform you on how to make optimum use of your bicycle.
We wish you every pleasure with the purchase of your Batavus E-bike.
Batavus B.V., November 2011 62513272
Inhalt
1 Beschreibungen 51
Batavus B.V., November 2011 62513272
Indhold
1 Beskrivelser 67
1.1Sikkerhedsadvarsler for brug 67
1.2 Dele 68
1.2.1 Lader og batteripakke 68
1.2.2 Styrbetjening 68
2.2.1 Advarsler for drug

Batavus BV, November 2011-12-12
62513272
Innehalle
1 Beskrivning 83
1.1 Sakerhetsforeskrifter fore anvandning 83
1.2 Delar 84