Monaco Ego - Electric bike Batavus - Free user manual and instructions
Find the device manual for free Monaco Ego Batavus in PDF.
| Brand | Batavus |
| Model | Monaco Ego |
| Product type | Electric bike (EPAC) |
| Battery type | Lithium-ion, 36 V |
| Battery capacity | 8.8 Ah, 11 Ah or 14.5 Ah depending on version |
| Battery weight | 2.55 kg (8.8 Ah), 3.00 kg (11 Ah), 3.10 kg (14.5 Ah) |
| Average range | From 18 to 161 km depending on battery capacity and assistance level |
| Maximum speed | 25 km/h (with assistance) |
| Motor power | 250 W |
| Assistance levels | 5 adjustable levels |
| Throttle control | Yes, for walking assistance and start-up up to 6 km/h |
| Display screen | Displays speed, battery level, assistance, time, trip data |
| Charging time | Approximately 4.5 to 7.5 hours depending on battery capacity |
| Lighting | Automatic, on or off via control |
| Frame and fork warranty period | 10 years for manufacturing and material defects |
| Electric parts warranty | 2 years (manufacturer) |
| Battery warranty | 2 years under conditions (excluding deep discharge) |
| Standard | EN15194 (EPAC) |
| Recommended maintenance | Minimum tire pressure 4 bar, periodic servicing at dealer |
| Charging temperature | 0 °C to 45 °C |
| Operating temperature | -15 °C to 45 °C |
Frequently Asked Questions - Monaco Ego Batavus
User questions about Monaco Ego Batavus
0 question about this device. Answer the ones you know or ask your own.
Ask a new question about this device
Download the instructions for your Electric bike in PDF format for free! Find your manual Monaco Ego - Batavus and take your electronic device back in hand. On this page are published all the documents necessary for the use of your device. Monaco Ego by Batavus.
USER MANUAL Monaco Ego Batavus
1 User safety warnings. 24
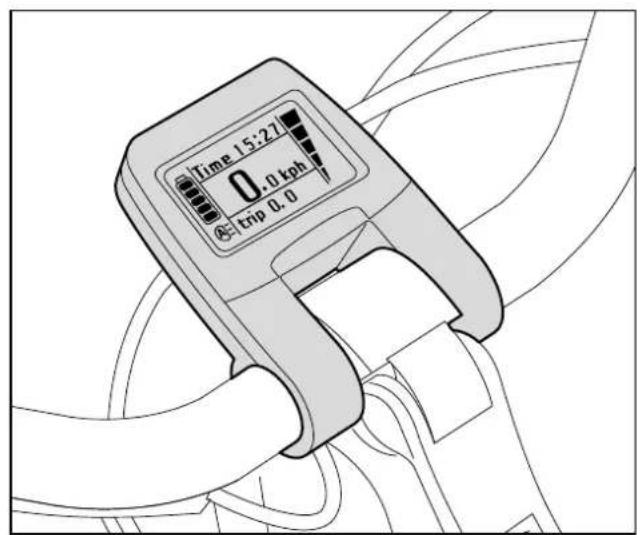
2 Parts overview 25
3 Display and control unit 27
3.1 Functions control unit 27
3.2 Functions display 29
3.3 Error codes 32
3.4 Throttle 32
4 Battery pack and charger 33
4.1 Advice for charging 33
4.2 Removing the battery pack 36
4.3 Re-installing the battery back 36
5 Range. 37
6 Technical data 38
7 Warranty conditions 38
1 User safety warnings

- Read the user instructions carefully and make sure that you understand them clearly.
- Check your bicycle for loose and/or damaged parts before each use. Loose or damaged parts must be tightened and/or replaced.
- The luggage carrier is not suitable for use as a child's seat.
- Scratches, cracks or discolouration can occur in parts that are heavily loaded. This means that the end of their useful life has been reached and the parts must be replaced.
-
The Batavus E-go is only intended for:
-
riding on paved roads and paths.
-
recreation and transportation.
-
The construction of the Batavus E-go may never be altered.
- Safety warnings for charging the battery pack are given in Chapter 4.
2 Parts overview
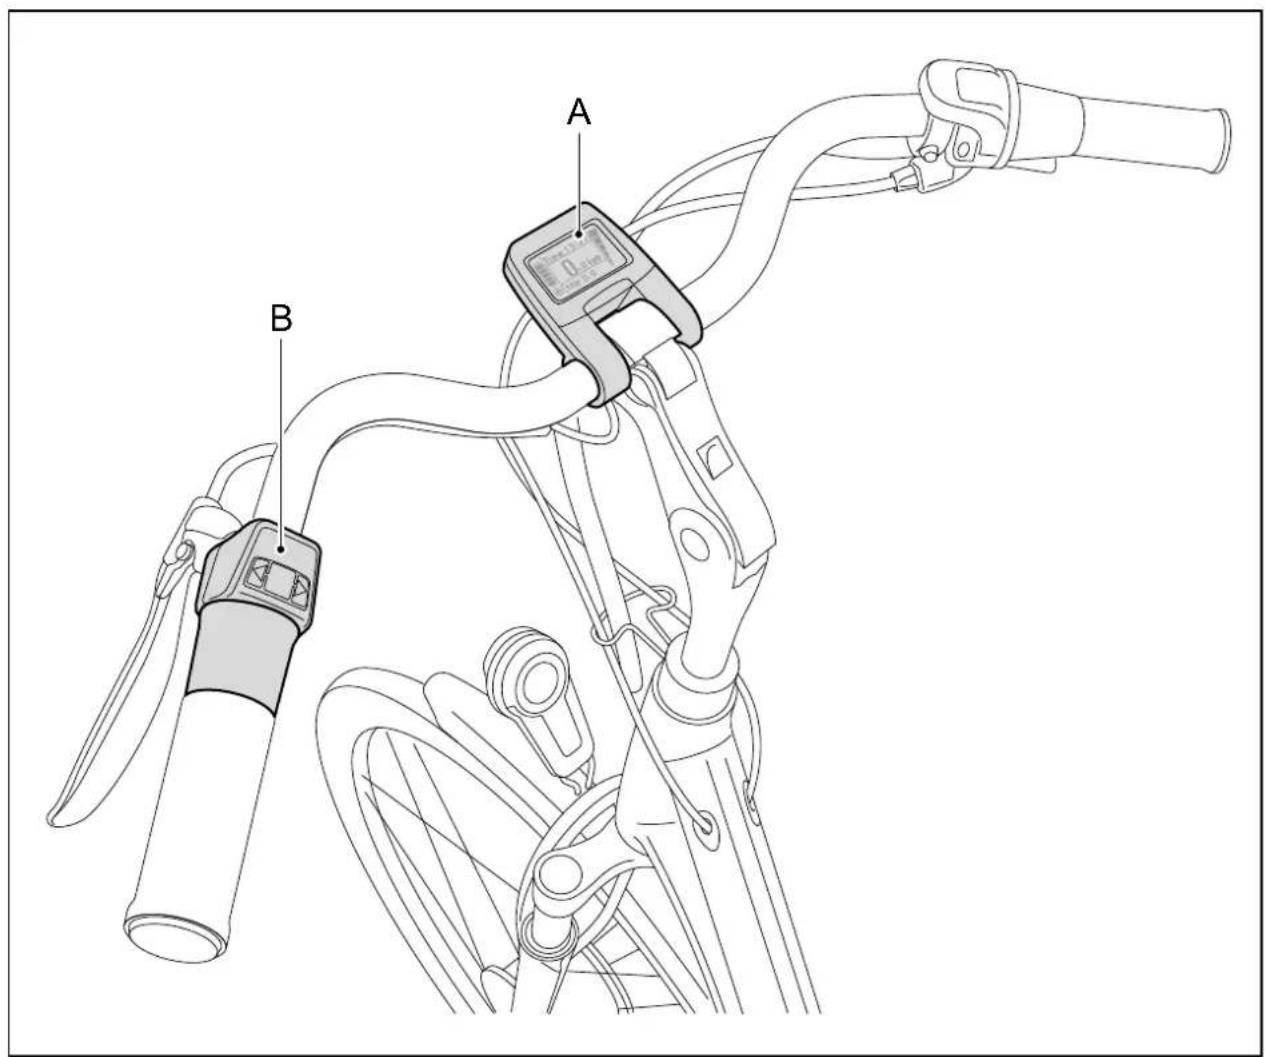
A display
B control unit including throttle
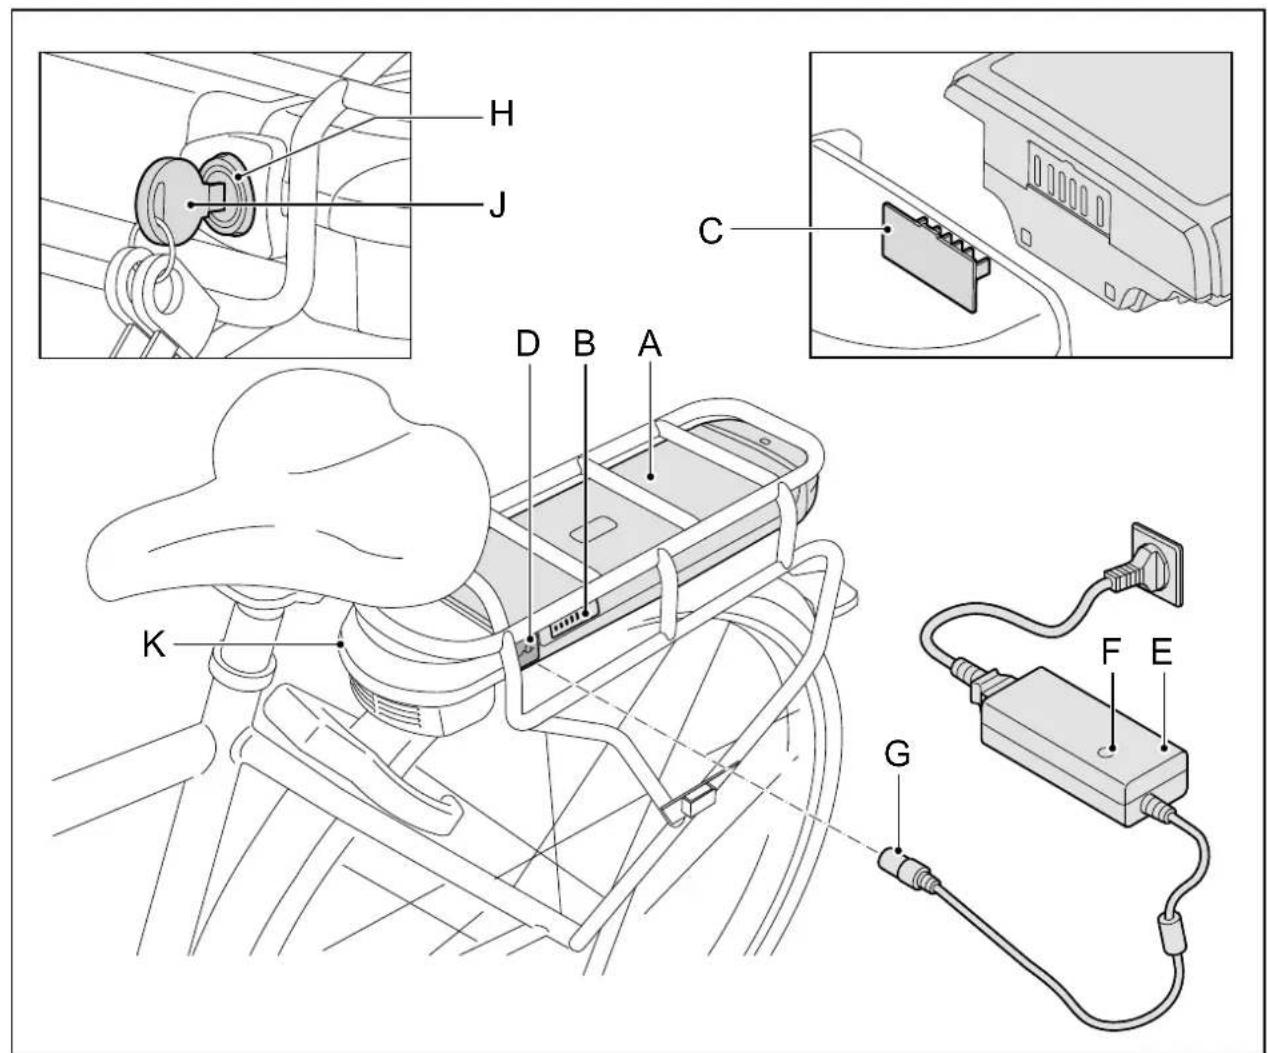
A battery pack F indicator
B state of charge display G chargerplug
C docking station contact point H lock
D charging point J key
E charger K docking station
3 Display and control unit
3.1 Functions control unit
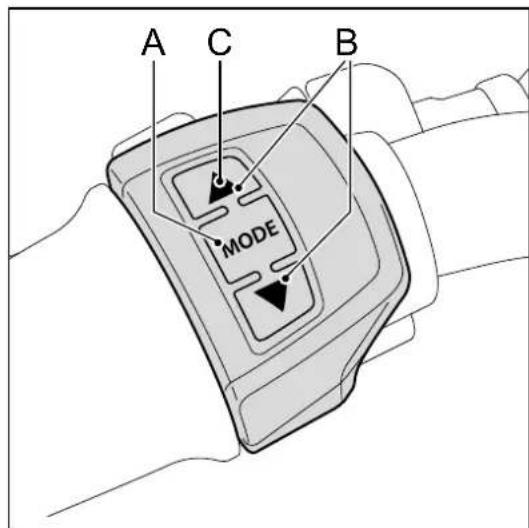
A. Turning pedal assistance on and off
To turn the pedal assistance on and off, you use the mode button. You can turn the pedal assistance on or off at any time, even when you are already cycling. To turn it on, press the mode button for one second. To turn it off, press the mode button for three seconds.
B. Changing the pedal assistance level
You can use the and buttons (control unit), you can set the amount of pedal assistance. There are five pedal assistance levels. You can use the and buttons at any time to indicate whether you want more or less pedal assistance. When the pedal assistance is first activated, it is set to Level 1.
C. Lights
You can switch between lights on, lights off and automatic lights by holding the button pressed in for 3 seconds. If you select automatic lighting, the bicycle light switches on and off automatically. A light sensor constantly measures the amount of light, and switches the lights on or off accordingly. The mode selected appears on the bottom left of the screen. However, the use of lighting is only possible when the electric system has been turned on. If you only want to use the lighting and not the pedal support, then you can use the button to switch off the pedal support.
D. Setting the time
- Press and at the same time.
- Using and set the hour. Confirm your selection by pressingMODE briefly
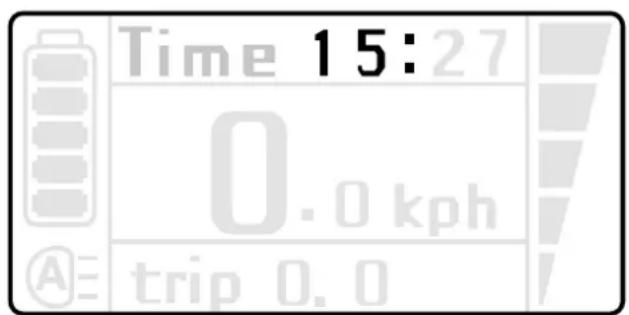
- Using and , set the minutes. Confirm your selection by pressing MODE briefly.
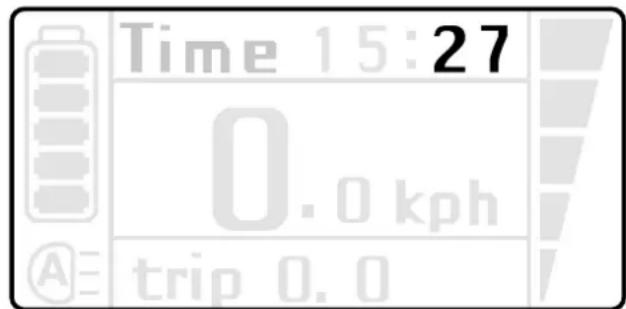
- Complete setting the time by pressing the and athe same time again.
3.2 Functions display
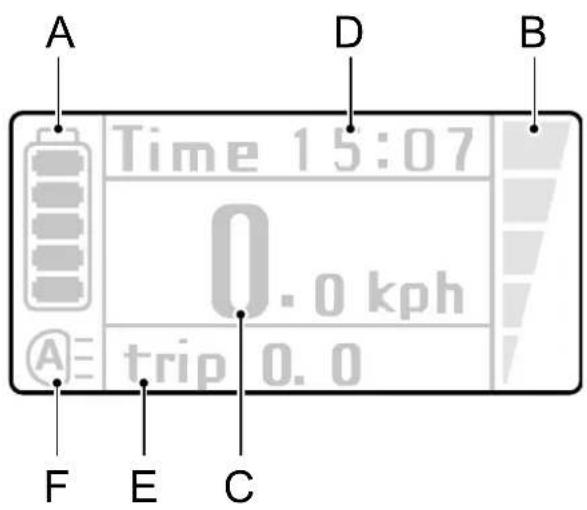
A. Charge level indicator
The charge level of the battery pack is shown on the display by five levels in the battery icon.
| Number of LEDs illuminated | I Indicates charge level of | |
| On battery pack On display | ||
| 5 (4x green) 5 | 75 - 100 % | |
| 4 (3x green) 4 | 50 - 75 % | |
| 3 (2x green) 3 | 30 - 50 % | |
| 2 (1x green) 2 | 10 - 30 % | |
| 1 (1x green) 1 | 0 - 10 % | |
The E-bike will no longer be able to provide any pedal support once all LED's on the battery pack have gone off. However, at this stage the battery pack will have sufficient energy to keep the bicycle lighting going for at least another two hours.
B. Changing the pedal assistance level
The display shows the power assistance level on the basis of the five blocks on the right-hand side (five power level steps).
C. Speed
The current speed in kph.
D. Time
Display of current time.
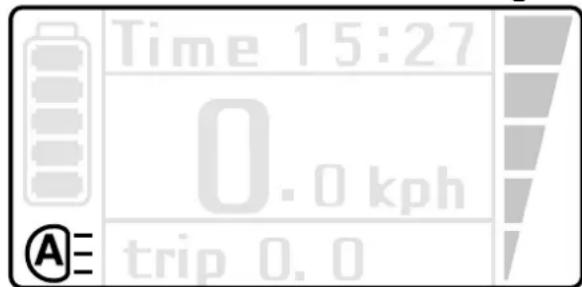
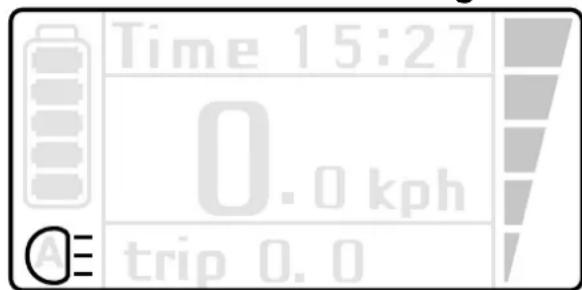
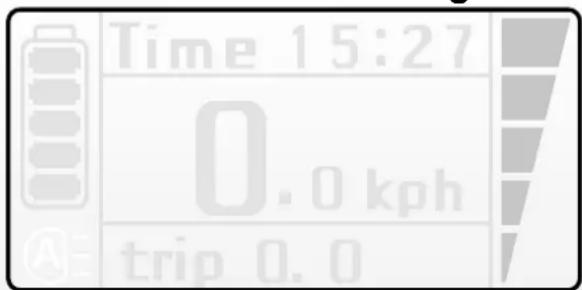
E. Variable indicator
Briefly pressing the MODE button will allow you to toggle between displaying the daily distance (TRIP), Trip time (TRIP), maximum speed (MAX), average speed (AVG) and total distance (ODO). You can reset the daily distance, trip duration and average speed simultaneously by keeping the button pressed down for three seconds, whilst one of these three details is being displayed. The maximum speed can be reset by keeping pressed down for three seconds whilst the maximum speed is displayed.
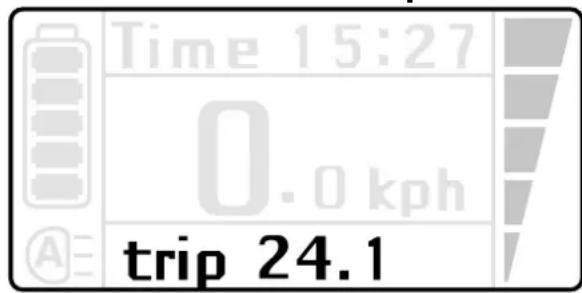
Trip distance
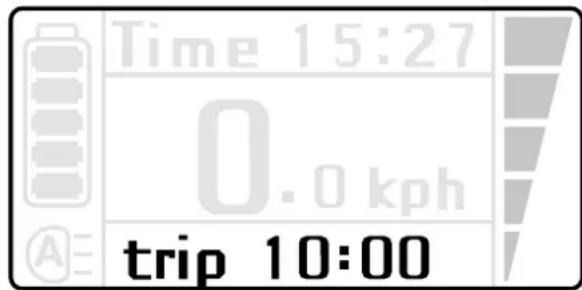
Trip time
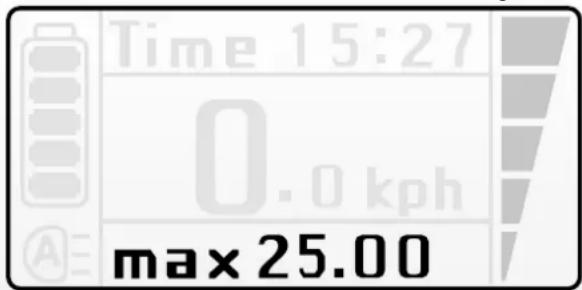
Maximum speed
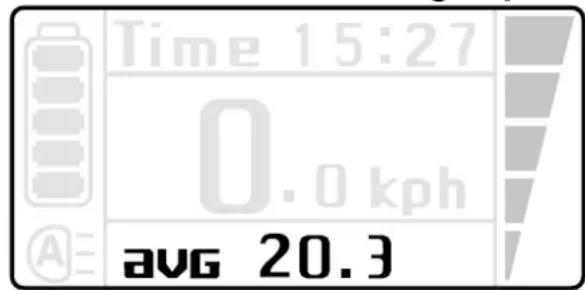
Average speed
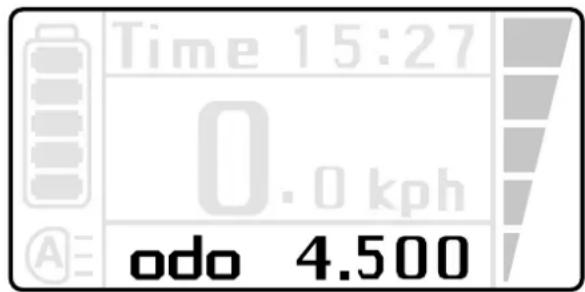
Total distance
F. Light
There are 3 lighting modes, namely automatic lighting, lighting on and lighting off.
Please refer to paragraph 3.1, point C for the operating instructions.
Automatic lights
Lights on
Lights off

To adjust the display position forward or backward, loosen the screws on the back.
3.3 Error codes
An error code may appear in the display with certain faults. Please contact your dealer, should an error code appear.
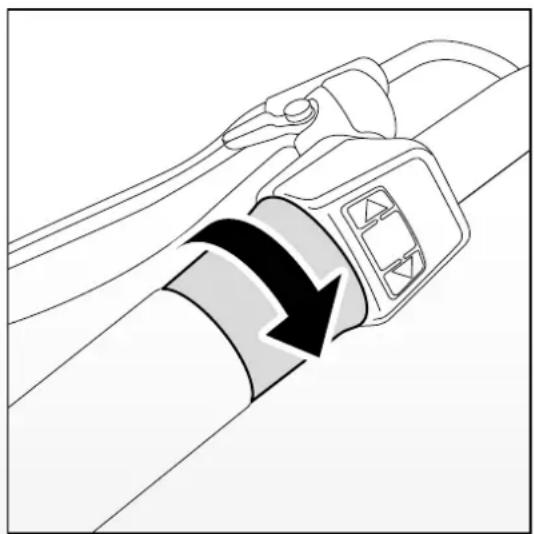
3.4 Throttle
The accelerator can be used once the E-bike is switched on. You 'open the throttle' by rotating the accelerator toward you. For the first use, try out the accelerator carefully to become accustomed with the power that the accelerator gives. Use of the throttle at low speeds will demand a great deal of energy. This will affect the E-bike's radius of action. The accelerator provides extra assistance and can be used in the following ways.
Extra assistance when you are walking alongside your bike
When, for example, you are getting your bike out of a basement, the throttle can give you additional assistance so that you don't have to use strength alone to push it up the ramp.
Extra pedal assistance when starting
You can use the throttle when you set off. The throttle will boost, without pedalling, up to a speed of 6 km/hour. After that you have to pedal to get assistance.
Extra pedal assistance while riding
The throttle can give an extra boost to the pedal assistance as you ride. This is useful when you want to overtake someone or if you have to ride up an incline.
You can feel the boost most strongly at a low level of pedal assistance.
4 Battery pack and charger
4.1 Advice for charging
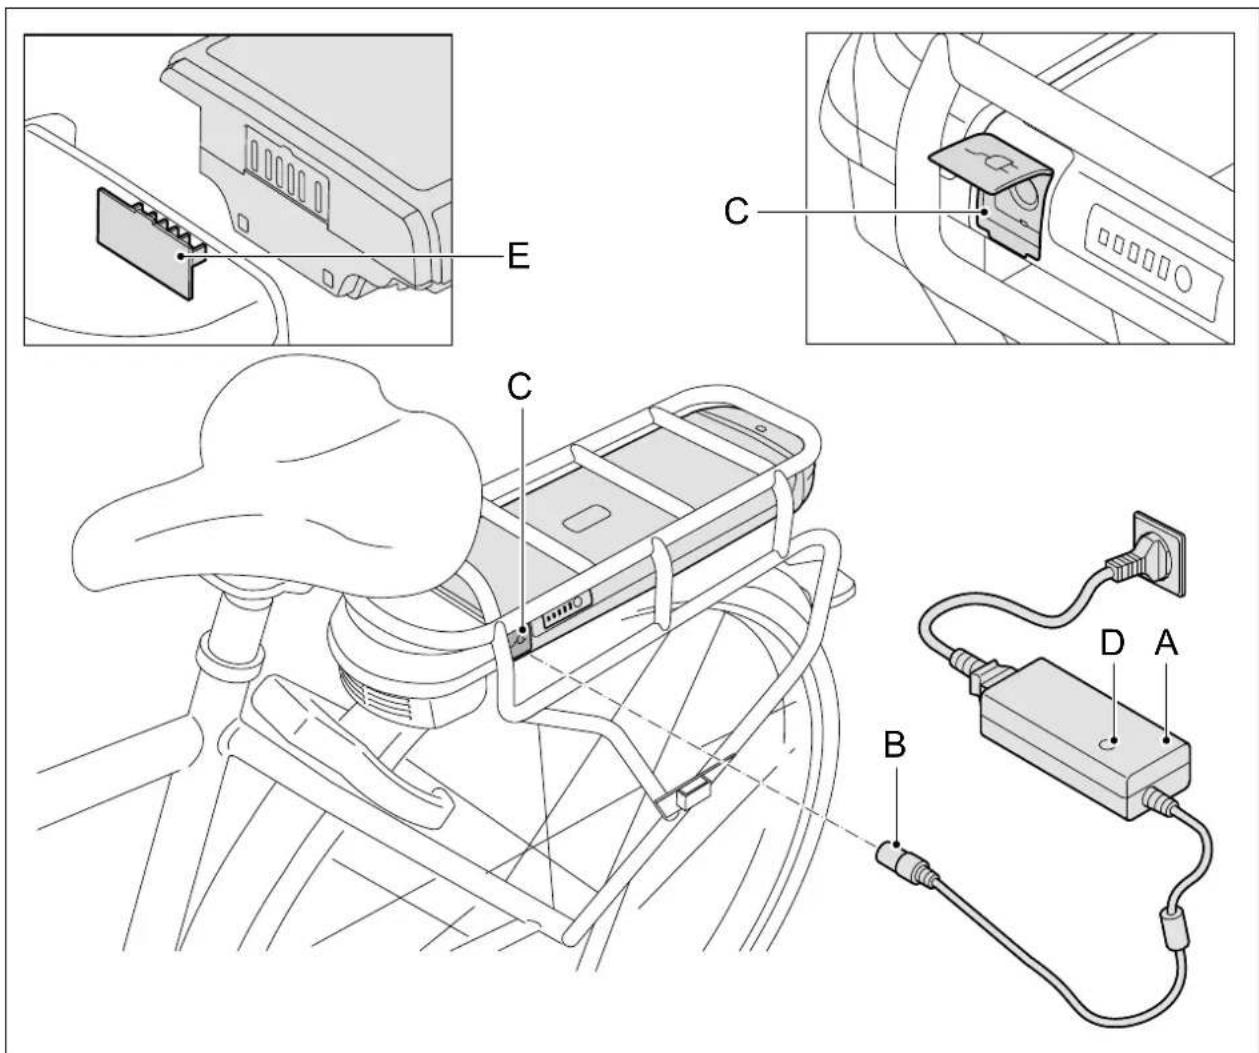
- Connect the charger (A) to the mains voltage.
- Connect the chargerplug (B) of the charger to the contact point of the battery pack (C).
- The indicator lamp glows red while the battery is still charging. When the battery pack is fully charged, charging will stop automatically after 24 hours. The small lamp on the charger will continue to glow green.

- A full charge will take approximately 4.5 - 7.5 hours. This will be dependent on your battery pack.
- With models equipped with a removable battery pack, the battery pack can be charged both in and outside the bicycle.
- When placing back, ensure that the contact points of the battery pack meet those of the docking station (E).
Advice for charging
- Before using the bike for the first time, charge the battery pack completely until the indicator lamp on the charger turns green. The indicator lamp glows red while the battery is still charging.
- Always charge the battery pack using the charger supplied with the bike. Never use another charger.
- When the battery pack is fully charged, charging will stop automatically after 24 hours. The small lamp on the charger will continue to glow green. Connect the charger to the mains again each time you charge to ensure that the charging process starts immediately. The charger does not automatically switch on unless it is reconnected to the mains power supply.
- A battery pack can become defective if it is emptied and not recharged.
- The warranty on the battery pack will be invalidated if a deep discharge is detected.
- In the event of long-term stalling: Charge the battery pack fully and disconnect the charger from the battery pack. Charge the battery pack at least once every two months. You can also leave the battery pack connected to the charger if you wish. If you do that, disconnect the charger once every two months and reconnect it to make sure the charging process is started again.
- The battery pack will not charge if the temperature is lower than about 0^ or above about 45^ . This prolongs the service life and improves the performance of the battery pack.
Warnings

Carefully read the warnings given below. The manufacturer is not responsible for accidents or faults caused by improper use of (parts of) the E-bike.
- Make sure that no short circuit occurs when connecting the battery pack.
- Do not expose the battery pack to fire or heat. Never place the battery pack into fire.
- Do not drop the battery pack and do not damage it.
- Do not immerse the battery pack in water or in any other liquid.
- Keep the battery pack away from children.
- Never open up the battery pack without permission. The battery pack comes with a seal. You will immediately void the guarantee by breaking the seal.
- Do not put any liquids or metal into the charger.
- Do not connect the charger with wet hands.
- Do not touch the charger in case of lightning.
- Do not use the charger in an environment with a very high humidity level.
- Do not use the charger for any other purposes.
- Ensure proper ventilation while charging.
- No not connect the charger to the mains voltage when it is not used.
- Do not charge the battery pack in direct sunlight.
- Never open or damage the motor.
| Temperature ranges Minimum Maximum | ||
| Charge | 0 °C 45 | °C |
| Use of peddling assistance | -15 °C 45 | °C |
| Storage (minimum state of charge 60 - 80 %) | -10 °C 35 | °C |
4.2 Removing the battery pack
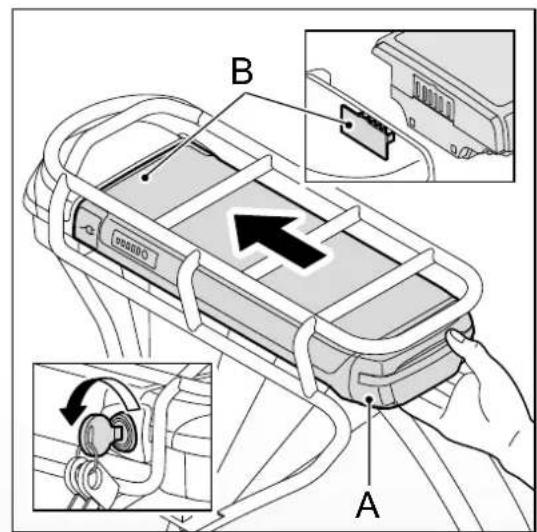
The battery has a lock to secure it against theft.


- Insert the supplied key (A) into the lock of the battery pack (B) and turn through 45 degrees.
- Make sure that the cover (C) of the charging plug is closed.
- Carefully slide the battery pack (B) out of the luggage rack.
4.3 Re-installing the battery back
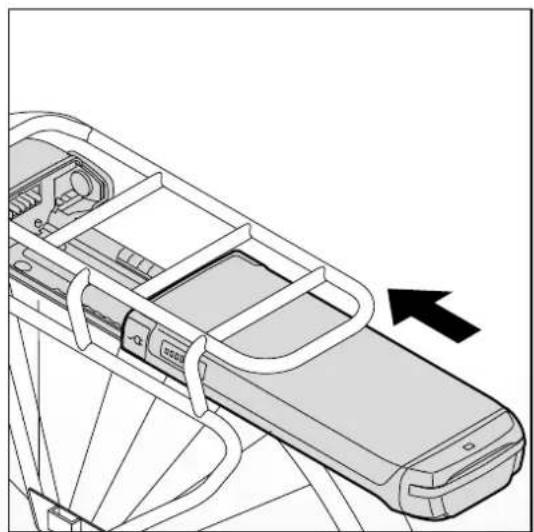
- Carefully slide the battery pack (A) into the luggage rack. Make sure that the battery pack (A) and the docking station (B) are well connected.
- Lock the battery pack to fix it in place and prevent theft.
5 Range
The range (i.e. the number of miles/kilometres that you can ride with a fully-charged battery pack) greatly depends on the pedal assistance setting you use. This table gives an indication of the range for each pedal assistance setting.
Average range (km)
| Battery pack | Pedal assistance setting | ||||
| (Wh) 1 2 3 | 4 5 | ||||
| 317 68-98 | 56-65 38-41 | 23-33 18-29 | |||
| 396 86-12 | 2 70-81 47-51 | 29-41 23-36 | |||
| 522 113-1 | 61 92-106 62 | 30-47 | |||
The above values have been measured with the use of a new battery pack. The average radius of action will decline as the battery pack gets older.
There are factors which affect the range to a greater or lesser extent, causing deviation from the above table. Follow the instructions below to get as close as possible to the values shown in the above table.
- Use the accelerator in moderation. Using the accelerator takes up a lot of power, especially at low speeds.
- Make sure you keep pedalling too, as this will ensure the engine consumes less energy.
- Make sure your tyres have enough pressure: at least 4 bar.
- When setting off, use a low gear insofar as possible and change gears as necessary to increase the range.
- As far as possible, cycle at a constant speed. Frequent stops and starts use up a lot of battery power.
- Follow up the charging instructions (see § 4.1) carefully and keep your bike and battery pack maintained regularly to keep them in top condition.
- As far as possible, load and keep the battery pack at room temperature. This will have a positive effect on the range. Remember that you will get noticeably less range from your E-bike when the ambient temperature is less than 10^ .
- Keep in mind that the rider's weight, the age of the battery pack, wind speed and the state of the road all affect the range.
6 Technical data
| Weight and performance S | Specification | ||
| Battery pack | Li-ion battery pack, 36 V | ||
| 8,8 Ah 11 Ah | 14,5 Ah | ||
| Weight of battery pack 2,55 kg | kg 3,00 kg 3,10 kg | ||
| Charging time 4.30 hours 6.0 | 0 hours 7.30 hours | ||
| Wh 317 396 522 | |||
| Maximum speed delivered by peddling assistance | 25 km/h | 25 km/h | 25 km/h |
| Maximum engine capacity | 250 W | 250 W | 250 W |
The E-bike is an EPAC (Electrically Power Assisted Cycle) in accordance with EN15194.
7 Warranty conditions
The following warranty conditions are in addition to the legal rights to which you are entitled.
Article 1 Warranty
1.1 Batavus B.V. guarantees Batavus bicycles to be free of manufacturing and/or material defects and/or rusting, all insofar as this follows from these warranty conditions.
1.2 The warranty can only be exercised by the first owner of the Batavus bicycle.
1.3 The warranty expires in accordance with the provisions in articles 3.1 and 5.1.
1.4 The warranty is not transferrable.
1.5 The warranty provided by Batavus on the basis of these conditions does not affect the right to sue the seller on the basis of the normal legal provisions of the Dutch Civil Code.
Article 2 Warranty period
2.1 Batavus frames and rigid front forks are guaranteed against manufacturing and/or material defects for a period of 10 years.
2.2 Suspension forks, dampers and all other components, except the components listed in section 2.4 of this article, are covered by the same warranty for a period of 2 years.
2.3 Paintwork on the frame and fork are covered by a warranty on rusting from within for 2 years.
2.4 Components that are subject to wear, such as tires, chain, chain rings, freewheel, rear cogs, cables and brake pads are not under warranty, except in case of manufacturing faults and/or material defects.
2.5 Other painted or chrome-plated parts are covered by a 2-year warranty, subject to proper maintenance.
2.6 The electrical components of your E-bike (display, drive system and battery pack) are covered by a 2-year factory warranty. Do not clean the bicycle with a pressure washer. A powerful water jet can damage the electronics. This will void the warranty. The warranty will also be voided if deep discharge of the battery pack is detected.
Article 3 Guarantee exclusions
3.1. The warranty is void in the following cases:
a. Incorrect and/or careless use of the bicycle or use other than the intended use;
b. The bicycle is not maintained in accordance with the service manual;
c. Technical repairs are not done competently;
d. Components added later do not correspond with the technical specifications of the bicycle or are installed incorrectly;
e. If the proof of ownership that shows that the bicycle was professionally assembled and inspected prior to being supplied to the customer is not present or not signed by the seller.
3.2. Batavus B.V. further shall not be liable for damage to (components of) the bicycle as a result of:
a. Incorrect adjustment/tightening of the handlebar, stem, seat, seat
post, derailleur set, brakes, quick release levers for the wheels and seat;
b. Failure to replace components such as brake/derailleur cables, brake pads, tires, chain and cogs on time;
c. Climatological effect such as normal weathering of paint of chrome rust.
Article 4 Warranty - components
4.1. During the warranty period, all components for which Batavus B.V. confirms that there is a materials and/or manufacturing defect will be repaired or replaced at the discretion of Batavus B.V. Any costs of assembly or disassembly will be at the owner's expense.
4.2. As an exception to the provision of the paragraph above, labour costs will be at the manufacturer's expense in case of material and/or manufacturing defects in frames and forks within three years after the purchase date.
4.3. Costs of transport of the bicycle and/or components to and from Batavus B.V. will be at the owner's expense, unless the components are covered by warranty.
4.4 If a certain component is covered by warranty and the original is no longer available, Batavus B.V. will provide an alternative of equal or greater value.
Article 5 Submitting a claim
5.1. Claims under this warranty must be submitted together with the bicycle or the defective component for inspection through the Batavus dealer where the bicycle was purchased. The proof of purchase as well as the proof of ownership provided with the bicycle must also be provided to the dealer.
5.2. If the owner has moved or the dealer is no longer available, Batavus B.V. will state the nearest Batavus dealer upon request.
Article 6 Liability
6.1 A warranty claim honoured by Batavus B.V. does not automatically mean that Batavus B.V. also accepts liability for any damages suffered. The liability of Batavus B.V. shall never extend beyond the provisions of these warranty conditions. Batavus B.V. shall in no case be liable for
consequential damages. The provisions stated here do not apply if and insofar as this ensues from a mandatory legal provision.
Legal requirements
The described conveyance is a bicycle according to European legislation, because the bicycle complies with the following rules:
- The support is only active when the user peddlies himself as from 6 km/hour.
- The support is active for up to 25km/hour .
- The maximum supplied engine power is 250 Watts.
Environment

We recommend that you return a defective battery pack to your dealer in accordance with the environmental regulations for collecting and processing batteries drawn up by the Ministry of Housing, Spatial Planning and the Environment. The dealer is obliged to accept the battery and must ensure further processing of it by the manufacturer.
Periodical maintenance and faults
Your E-bike needs regular service. Your dealer can advise and inform you on how to make optimum use of your bicycle. In case of any questions or problems concerning your E-bike, please contact your dealer.
We hope you greatly enjoy your Batavus E-bike.
Batavus B.V.
Industriebweg 4
Postbus 515
NL-8440 AM Heerenveen