
TE16 - Phone SWITEL - Free user manual and instructions
Find the device manual for free TE16 SWITEL in PDF.
Frequently Asked Questions - TE16 SWITEL
User questions about TE16 SWITEL
0 question about this device. Answer the ones you know or ask your own.
Ask a new question about this device
Download the instructions for your Phone in PDF format for free! Find your manual TE16 - SWITEL and take your electronic device back in hand. On this page are published all the documents necessary for the use of your device. TE16 by SWITEL.
USER MANUAL TE16 SWITEL
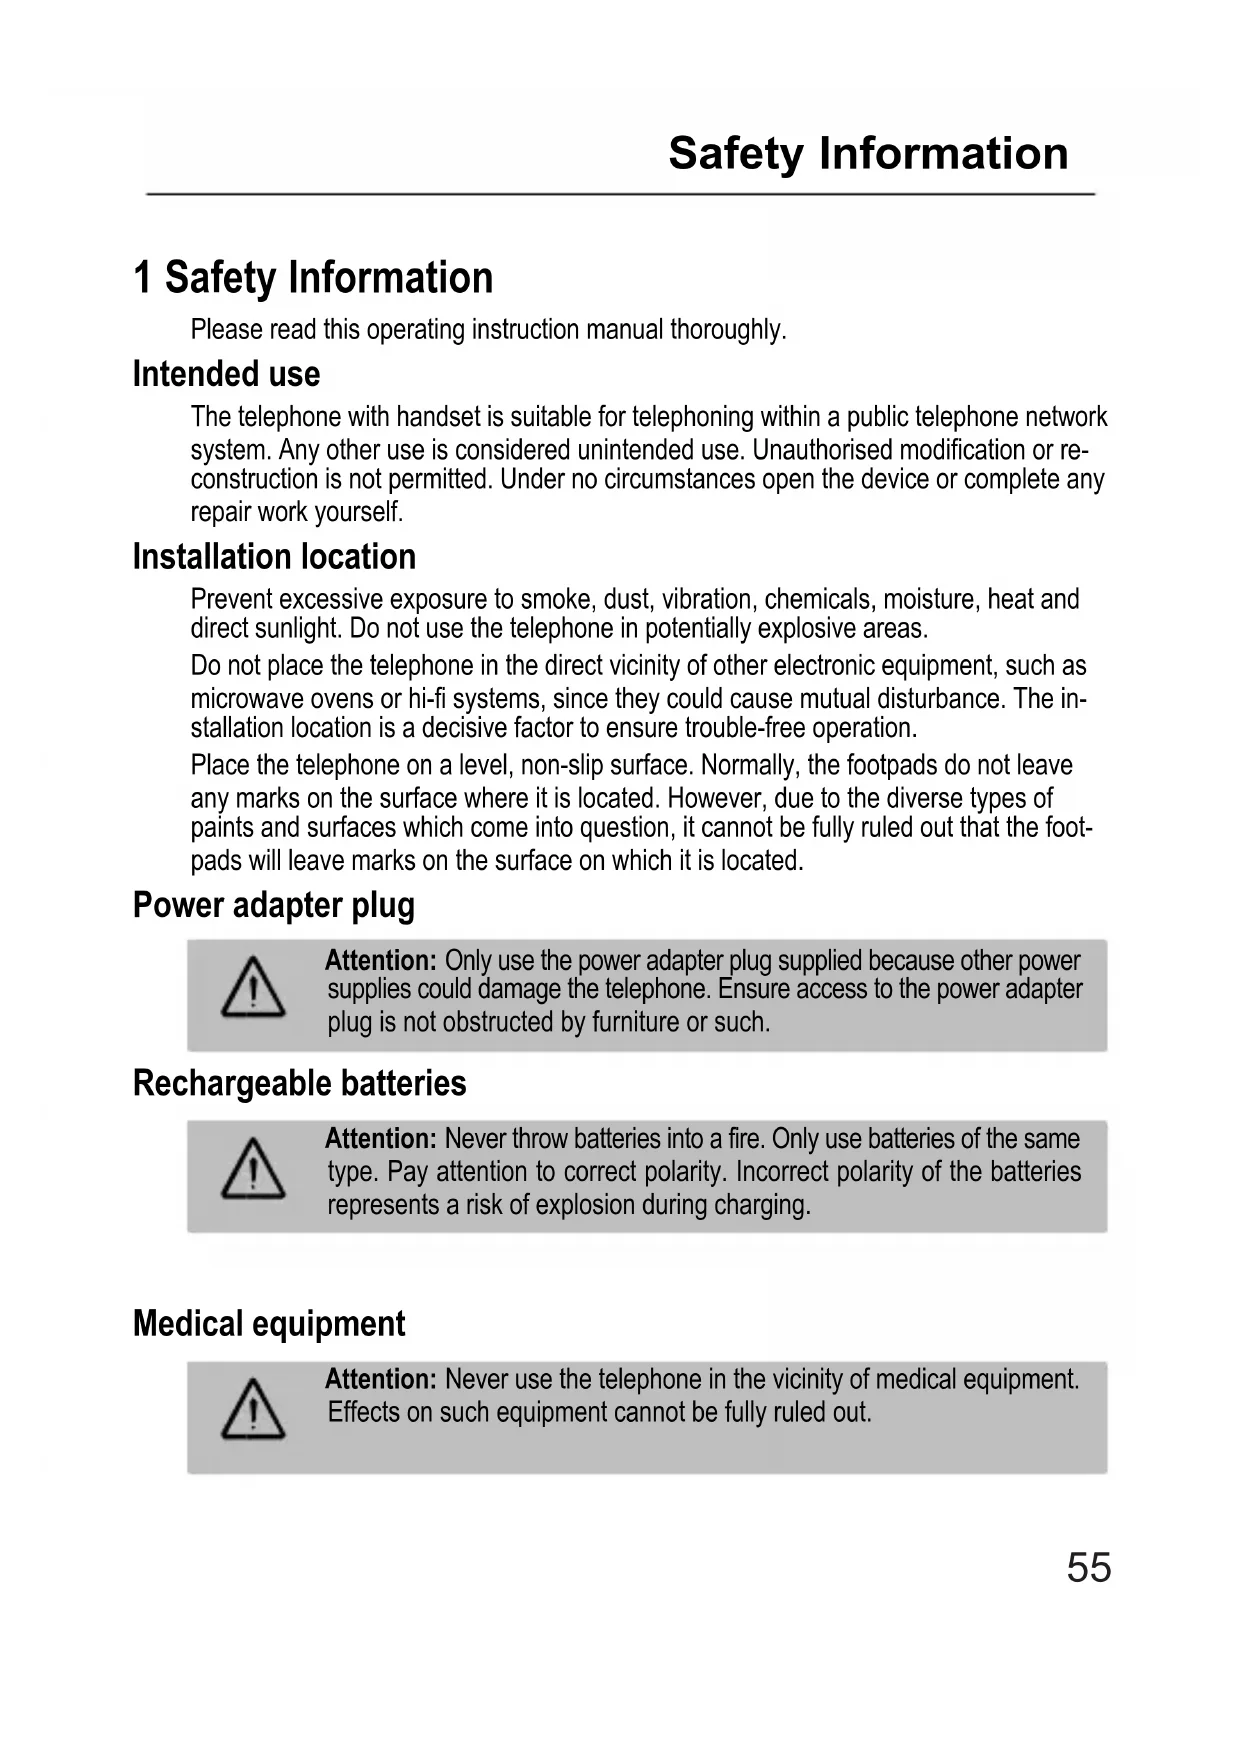
Conventional telephone
TE16
natural_image
Black and silver office telephone with coiled cord and digital keypad (no visible text or symbols)Bedienungsanleitung Mode d'emploi Istruzioni per l'uso Operating Instructions
SWITEL
Declaration of Confirmity 72. . . .
natural_image
Two black-and-white symbols: a recycling symbol and a crossed-out trash bin (no text or labels)2 Inbetriebnahme

text_image
Diagram of an electronic device rear panel with battery pack and indicator lights, showing internal components and a battery symbol.natural_image
Two black-and-white symbols: a recycling triangle and a crossed-out trash bin (no text or labels)2 Mise en service

text_image
Diagram of an electronic device showing internal components and battery pack with a black arrow pointing to a component.Mise en service
Raccorder le combiné
text_image
Technical diagram of a device with labeled components, showing internal layout and internal wiring.natural_image
Two black-and-white symbols: a recycling triangle and a crossed-out trash bin (no text or labels)2 Messa in funzione

text_image
Diagram of an electronic device rear panel with battery pack and indicator lights, showing internal components and a battery labeled 'B11F22:134'.text_image
Technical diagram of a device with labeled components, showing internal layout and internal layout views.Please read this operating instruction manual thoroughly.
Intended use
The telephone with handset is suitable for telephoning within a public telephone network system. Any other use is considered unintended use. Unauthorised modification or reconstruction is not permitted. Under no circumstances open the device or complete any repair work yourself.
Installation location
Prevent excessive exposure to smoke, dust, vibration, chemicals, moisture, heat and direct sunlight. Do not use the telephone in potentially explosive areas.
Do not place the telephone in the direct vicinity of other electronic equipment, such as microwave ovens or hi-fi systems, since they could cause mutual disturbance. The installation location is a decisive factor to ensure trouble-free operation.
Place the telephone on a level, non-slip surface. Normally, the footpads do not leave any marks on the surface where it is located. However, due to the diverse types of paints and surfaces which come into question, it cannot be fully ruled out that the footpads will leave marks on the surface on which it is located.
Power adapter plug

Attention: Only use the power adapter plug supplied because other power supplies could damage the telephone. Ensure access to the power adapter plug is not obstructed by furniture or such.
Rechargeable batteries

Attention: Never throw batteries into a fire. Only use batteries of the same type. Pay attention to correct polarity. Incorrect polarity of the batteries represents a risk of explosion during charging.
Medical equipment

Attention: Never use the telephone in the vicinity of medical equipment. Effects on such equipment cannot be fully ruled out.
Disposal
In order to dispose of your device, take it to a collection point provided by your local public waste authorities (e.g. recycling centre). According to laws on the disposal of electronic and electrical devices, owners are obliged to dispose of old electronic and electrical devices in a separate waste container. The adjacent symbol indicates that the device must not be disposed of in normal domestic waste!

Risks to health and the environment from batteries!
Never open, damage or swallow batteries or allow them to pollute the environment. They could contain toxic and ecologically harmful heavy metals. You are legally obliged to dispose of power packs and batteries at the point of sale or in the corresponding containers provided at collection points by local public waste authorities. Disposal is free of charge. The above symbols indicate that the batteries must not be disposed of in domestic waste and that they must be disposed of at an authorised collection point.
Packaging materials must be disposed of according to local regulations.

natural_image
Two black-and-white symbols: a recycling triangle and a crossed-out trash bin (no text or labels)2 Starting Up

Attention: It is essential to read the Safety Information in Chapter 1 before starting up.
Checking the package contents
The package contains:
- Base unit - Helix cable
- Receiver - Telephone connection cable
- Telephone connection adapter - Operating manual
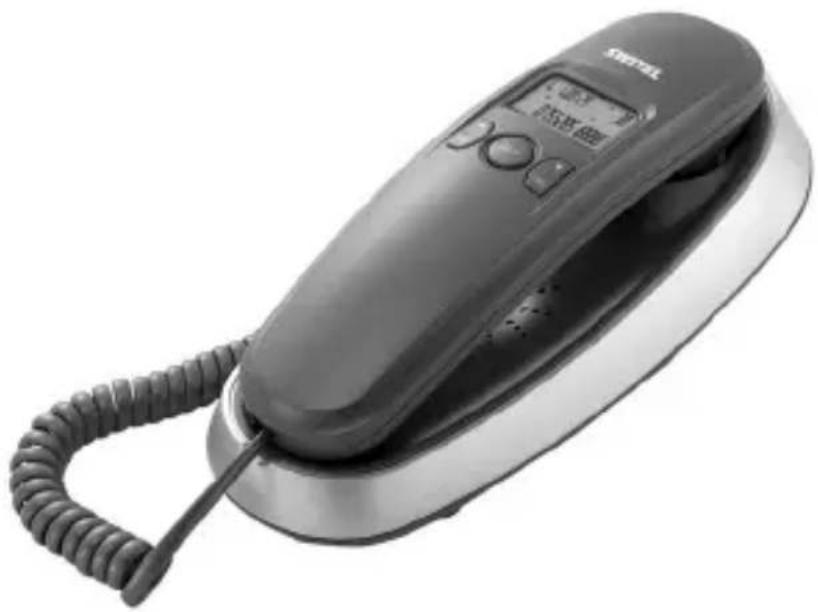
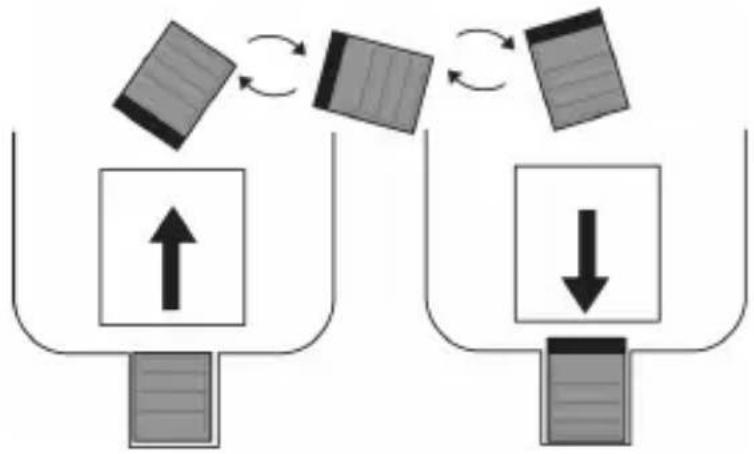
Inserting the batteries
The batteries are necessary to operate the telephone display.

Prior to inserting or replacing the batteries, ensure that the telephone is disconnected from the telephone network!
The battery compartment is located on the underside of the telephone (base unit). Open the battery compartment and insert three AAA 1.5V alkaline batteries. Pay attention to the correct polarity. Close the battery compartment cover.
text_image
Diagram of an electronic device rear panel with battery pack and indicator lights, showing internal components and a battery labeled 'H1P3-T24'.Starting Up
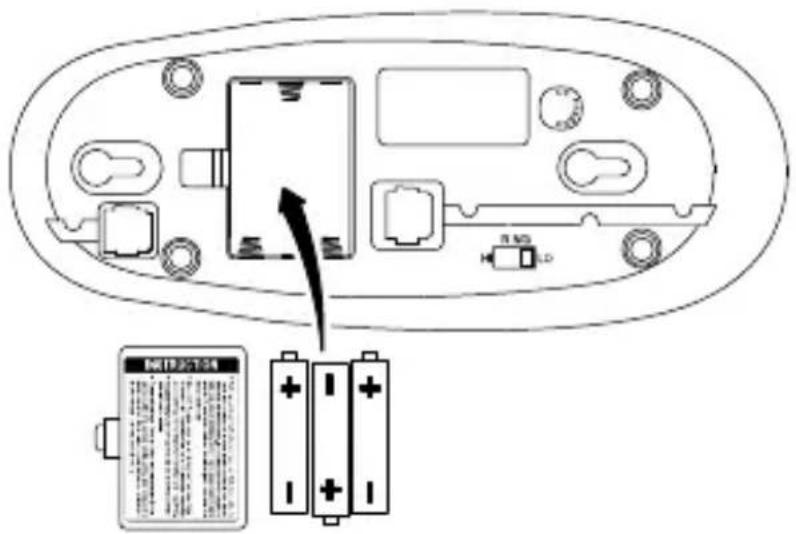
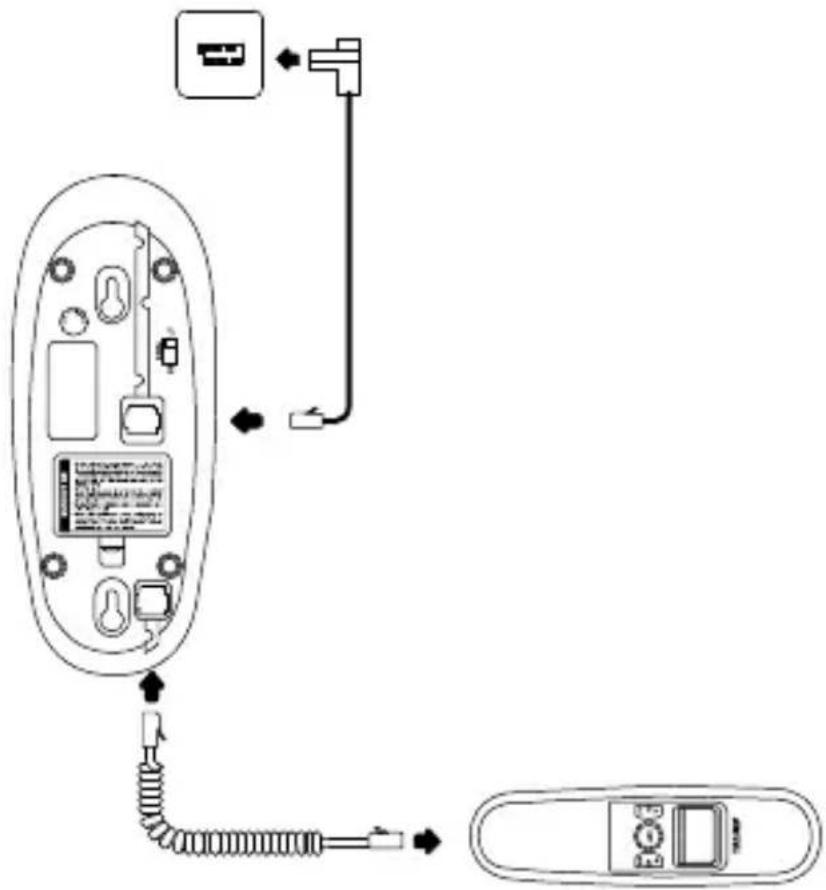
Connecting the receiver
Use the helix cable to connect the receiver to the telephone base unit. The helix cable has two identical connectors; plug one end of the cable in the helix cable socket at the bottom end of the receiver and the other end of the cable in the helix cable socket on the underside of the base station. The plugs engage in the sockets audibly.
Connecting the telephone cable
Plug the telephone connection cable supplied in the telephone connection socket on the underside of the telephone (base unit) until it audible engages. Plug the other end of the telephone connection cable in the telephone line socket.
If the plug on the telephone connection cable does not fit in telephone connection socket, use the telephone connection adapter enclosed or contact your network operator.
text_image
Diagram showing a remote control device with labeled ports and internal components, including cable routing and connector connections.Setting the date and time
The time and date are set via the menu. A detailed description is provided on Page 63.
Private branch exchanges
The information on Page 64 explains how to install your telephone in a private branch exchange.
Wall installation
The telephone can also be installed on a wall. Two screws are necessary to fix the telephone in place (screws are not included in the material supplied). Drill two holes at a distance corresponding to the slots (35 mm apart) and insert the screws leaving approx. 5 mm projecting from the wall. Align the slots in the telephone base unit to the screws, fit the screws in the slots and slide the telephone base unit downwards a little.
Attention: Risk of serious electric shock!

Before drilling the holes for wall installation, ensure there are no electrical lines in the wall in the area to be drilled!
Turn the hook in the receiver cradle so that the receiver can be placed on-hook.
flowchart
graph TD
    A["Input Unit 1"] --> B["Process Step 1"]
    B --> C["Output Unit 2"]
    C --> D["Process Step 2"]
    D --> E["Output Unit 3"]
    style A fill:#f9f,stroke:#333
    style E fill:#bbf,stroke:#333
3 Operating Elements
The telephone buttons in this operating manual are subsequently depicted with a uniform contour. Therefore, slight deviations in the appearance of the symbols on the telephone keys compared to those depicted here are possible.
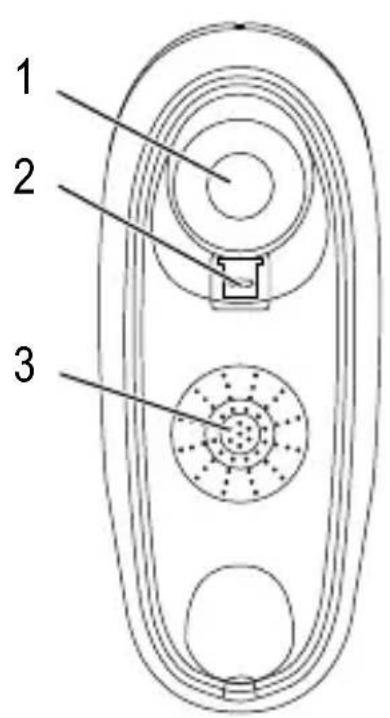
Base unit
text_image
1 2 3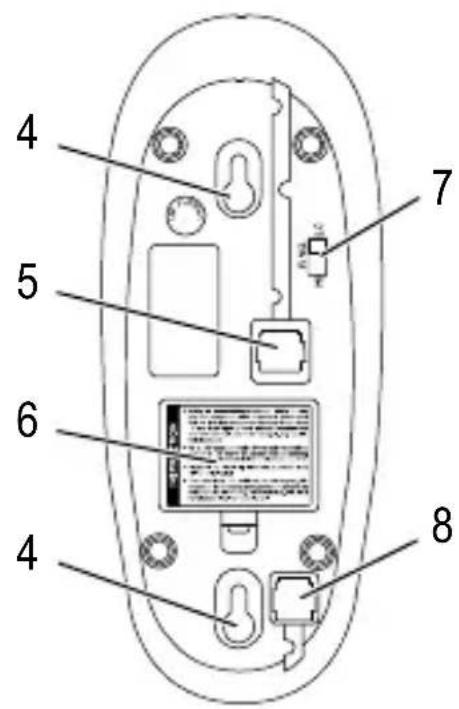
text_image
4 5 6 4 7 81 On-hook contact
2 Receiver hook (for wall installation)
3 Loudspeaker
4 Slots for wall installation
5 Telephone line connection socket
6 Battery compartment cover
7 "Ringing volume" sliding switch
8 Helix cable socket
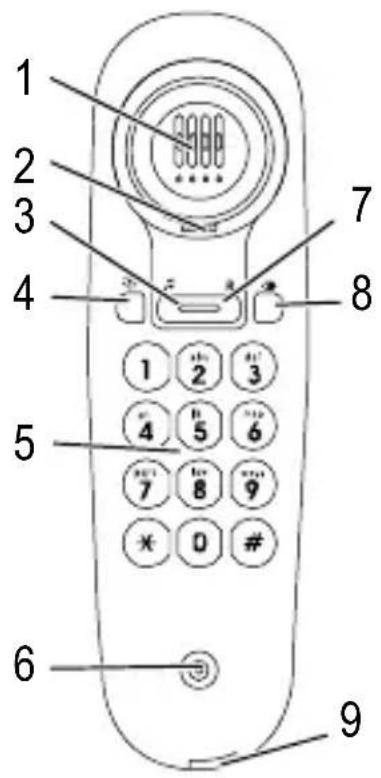
Receiver
text_image
1 2 3 4 5 6 7 8 9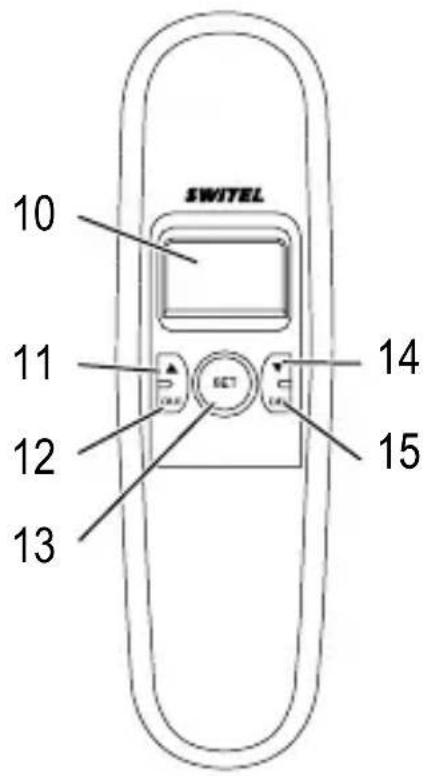
text_image
SWITEL 10 11 12 13 14 151 Loudspeaker
2 Slot for receiver hook
3 button
4 🙏 button
5 Digit keys
6 Microphone
7 R button
8 button
9 Helix cable socket
10 Display
11 ▲ button
12 |OUT| button
13 SET button
14 ▼ button
15 DEL button
4 Preliminary Information
This chapter provides basic information on using the operating instruction manual.
Description of operating sequences in the manual
| Display Description | |
| Enter digits | |
| (“) | Phone rings |
| ▲Lift the receiver | |
| ▼Replace the receiver | |
| ---End--- | Texts which appear in the display |
Standby mode
All descriptions in this operating manual assume that the handset is in Standby mode. The phone is in Standby mode when no call is in progress.
5 Settings
The receiver must be replaced on the base unit to complete all the settings described in this chapter.
Setting the date and time
Proceed as follows to set the date and time:
| SET | Press the button |
| ▲ | / ▼ SET 1 DATE SET Select the menu option and confirm it |
| ▲ | / ▼, SET Set the year and confirm it |
| ▲ | / ▼, SET Set the month and confirm it |
| ▲ | / ▼, SET Set the day's date and confirm it |
| ▲ | / ▼, SET Set the hour and confirm it |
| ▲ | / ▼, SET Set the minute and confirm it |
Then wait 12 seconds. The settings are accepted.
Setting the area code
You can store an area code with up to 5 digits in the phone. If a number is received with the stored area code, the number appears in the display without the area code.
Proceed as follows to save an area code:
| SETPress the button | |||
| ▲/▼ | SET 2 CODE | SET | Select the menu option and confirm it |
| ▲/▼, SET | Enter the digits of the area code required in succession and confirm each entry by pressing the SET button. | ||
If the area code to be entered has less than 5 digits, simply enter the necessary digits and leave the rest free.
Then wait 12 seconds. The settings are accepted.
Operating on PABX systems
Access code for PABX systems
When using private branch exchanges, it is necessary to dial an access code to obtain the dialling tone for an outside line. The number for an outside line is often "0" or "9".
Dial this number first and wait for the dialling tone. You can then dial the actual phone number.
You can store a two-digit access code number for PABX systems in the phone which is subsequently predialled each time you call back a call received from the list and the number being called has more than 6 digits.
Proceed as follows to save an access code for PABX systems:
SET Press the button

Select the menu option and confirm it

Enter the digits of the access code required in succession and confirm each entry by pressing the SET button.
If the access code you want to save only has one digit, simply leave the remaining position free.
Then wait 12 seconds. The settings are accepted.
Flash function for PABX systems
Your telephone supports supplementary services provided by your telephone network provider, such as brokering, call waiting and conference facilities. These supplementary services can be used by implementing the R button. The Flash time of the phone is 100 ms. Also contact your telephone network provider with regard to enabling supplementary services.
Setting Auto-IP
If you want to integrate the phone within a network for Internet telephony, you can obtain the IP address for the phone automatically by activating this function.

Internet telephony is not common in Europe and, therefore, is not supported by every Internet provider. For more detailed information on this topic, contact your Internet provider.
Proceed as follows to obtain the IP address automatically:
SET Press the button

Select the menu option and confirm it

Switch the function on or off
Setting the dialling mode
It is possible that no connection can be established if the dialling mode is set to "Pulse". Tone dialling mode is now the standard mode throughout Europe.
Proceed as follows to change the dialling mode:
SET Press the button

Select the menu option and confirm it

Select the required dialling mode and confirm it
Then wait 12 seconds. The settings are accepted.
Setting the display contrast
Proceed as follows to set the display contrast:
SET Press the button

Select the menu option and confirm it
▲ / ▼ Set the required display contrast
Then wait 12 seconds. The settings are accepted.
Operation
6 Operation
Telephoning
Taking a call
((0)) Lift the receiver / Take the call
Complete the call
Ending a call
Replace the receiver on-hook / End the call
Making a call
▲ Lift the receiver
Dial the phone number
Complete the call
Calls lists
The phone records two call lists. One list records the missed calls, the other records the last five numbers dialled.
Press the ▼ button to open the list of missed calls, press the OUT button to open the list of calls made.
Use the ▲ / ▼ buttons to scroll through the call list.
Dialling a number from the call list
▼/OUT, ▲/▼
Open the call list and select an entry
Call the phone number from the call list
Deleting phone numbers from a call list
Deleting individual phone numbers
▼/OUT, ▲/▼
Open the call list and select an entry
DEL Delete the phone number
Deleting all phone numbers
▼ /OUT Open the call list
3 sec. DEL Delete all entries
Redialling
Your telephone stores the last phone number dialled. If you want to dial a number again, e.g. because the connection was engaged or the call was not taken, use the re-dialling function:
▲ Lift the receiver
Press the button, dial the number
The phone number stored is automatically dialled.
Displaying the duration of a call (CLIP)
A few seconds after a call has begun, the current duration of the call appears in the display in minutes and seconds.
Caller number display (CLIP ^1 )
The caller number display (CLIP) is a supplementary service offered by your telephone network provider. The caller's number appears in the display if the service is offered by your telephone network provider. Contact your network provider for further information.
If this function is available with your telephone line, the number of the caller appears in the display when the phone rings. If the caller has suppressed transmission of his/her phone number, the corresponding message appears in the display. The phone number is not displayed and, as a result, is not stored in the call list.
Setting the ringing tone volume
You can change the volume of the ringing tone.
Move the sliding switch on the underside of the base unit to position "LO" for a quieter ringing tone and to "HI" for a louder ringing tone.
Putting a call on hold
After putting a call on hold, the caller hears a melody and can no longer hear you. Press the 🎥 button during a call to switch the function on and off.
1 CLIP: Calling Line Identification Presentation = Display the caller's phone number.
7 Problems
| Problems Solutions | |
| No telephone calls possible - The | telephone is not connected properly or is defective. Only use the telephone connection cable supplied.- Test whether the telephone connection is in order by using another telephone.- The telephone connection cable is not plugged in or there is a complete power failure.- The wrong dialling mode is set; Page 65. |
| The system no longer responds | - Disconnect the telephone cable from the telephone line socket briefly and remove the batteries from the base unit. |
| The batteries are empty within a short time | - The batteries are empty or defective. |
| The caller number display (CLIP) does not function | - The caller number display (CLIP) is a supplementary service offered by your telephone network provider. Contact your network provider for further information.- The caller has suppressed the transmission of their phone number. |
8 Maintenance / Guarantee
Maintenance
- Clean the housing surfaces with a soft, fluff-free cloth.
- Do not use any cleaning agents or solvents.
Apart from occasionally cleaning the housing, no other upkeep is necessary.
Guarantee
SWITEL equipment is produced and tested according to the latest production methods. The implementation of carefully chosen materials and highly developed technologies ensure trouble-free functioning and a long service life. The terms of guarantee do not apply where the cause of equipment malfunction is the fault of the telephone network operator or any interposed private branch extension system. The terms of guarantee do not apply to the batteries or power packs used in the products. The period of guarantee is 24 months from the date of purchase.
All deficiencies related to material or manufacturing errors within the period of guarantee will be redressed free of charge. Rights to claims under the terms of guarantee are annulled following tampering by the purchaser or third parties. Damage caused as the result of improper handling or operation, normal wear and tear, incorrect positioning or storage, improper connection or installation or Acts of God and other external influences are excluded from the terms of guarantee. In the case of complaints, we reserve the right to repair defective parts, replace them or replace the entire device. Replaced parts or devices become our property. Rights to compensation in the case of damage are excluded where there is no evidence of intent or gross negligence by the manufacturer.
If your device does show signs of a defect within the period of guarantee, please contact the sales outlet where you purchased the SWITEL device, producing the purchase receipt as evidence. All claims under the terms of guarantee in accordance with this agreement can only be asserted at the sales outlet. No claims under the terms of guarantee can be asserted after a period of two years from the date of purchase and handover of the product.
Declaration of Conformity
This device fulfils the requirements stipulated in the EU directive:
1999/5/EU directive on radio equipment and telecommunications terminal equipment and the mutual recognition of their conformity. Conformity with the above mentioned directive is confirmed by the CE mark on the device.
To view the complete Declaration of Conformity, please refer to the free download
available on our web site www.switel.com.

9 Index
A
Access code, 64
C
Calls lists, 66
CLIP feature, 67
Connecting the receiver, 58
Connecting the telephone cable, 58
D
Date, 59
Deleting phone numbers, 66
Dialling a number from the call list, 66
E
Ending a call, 66
F
Flash function, 64
G
Guarantee, 69
|
Inserting the batteries, 57
M
Maintenance, 69
Making a call, 66
N
Notation, 62
0
Operating elements, 60
Base unit, 60
Handset, 61
Operation, 66
P
PABX systems, 64
Package contents, 57
Pulse dialling, 65
Putting a call on hold, 67
R
Redialling, 67
Ring volume, 67
S
Safety information, 55
Setting the area code, 63
Setting the dialling mode, 65
Setting the display contrast, 65
Setting the ringing tone volume, 67
Standby mode, 62
Starting Up, 57
T
Taking a call, 66
Talk time, 67
Telephone hook, 59
Telephoning, 66
Time, 59
Time and date, 63
Tone dialling, 65
W
Wall installation, 59
Notes
SWITEL Declaration of Conformity
CE
This equipment complies with the European R&TTE directive.
To view the complete Declaration of Conformity, please refer to the free download available at our web site: www.switel.com.
Service Hotline
In the event of technical problems, you can contact our hotline service, Tel. 0900 00 1675 within Switzerland (cost via Swisscom at time of going to print: CHF 2.60/min).