
DC2000 - Phone SWITEL - Free user manual and instructions
Find the device manual for free DC2000 SWITEL in PDF.
| Product type | DECT phone |
| Brand | Switel |
| Model | DC2000 |
| Base station power supply | Input: 100-240V 50/60Hz, Output: 7.5 VDC, 300 mA |
| Handset power supply | 2 NiMH rechargeable batteries, 1.2 V, 300 mAh |
| Range | Outdoor: approx. 300 m, Indoor: approx. 50 m |
| Max. standby time | Up to 100 hours |
| Max. talk time | Up to 6 hours |
| Display | Indicator display (battery level, ringing, etc.) |
| Main features | Phonebook (100 entries), call list, speakerphone (hands-free), call transfer, conference, alarm, keypad lock, speed dial |
| Dialing mode | Tone dialing (DTMF) / pulse dialing |
| Max. number of handsets | Up to 5 handsets per base |
| Safety functions | Keypad lock, call block (4 numbers), PIN code (default 0000), Easy Call function |
| Care and cleaning | Clean with a soft, dry cloth. Do not use liquids. |
| Repairability and warranty | 24-month warranty. Do not disassemble. Contact the retailer. |
| Included parts | 1 base station, 1 handset, 2 NiMH batteries, 1 power adapter, 1 telephone cable |
| Operating conditions | Temperature: 0 °C to 40 °C, max. humidity 80% |
| ECO mode | Reduced transmission power in standby |
Frequently Asked Questions - DC2000 SWITEL
User questions about DC2000 SWITEL
0 question about this device. Answer the ones you know or ask your own.
Ask a new question about this device
Download the instructions for your Phone in PDF format for free! Find your manual DC2000 - SWITEL and take your electronic device back in hand. On this page are published all the documents necessary for the use of your device. DC2000 by SWITEL.
USER MANUAL DC2000 SWITEL
text_image
Diagram of a device with labeled ports, wiring, and connection points showing connections to an electrical outlet.Akkus einlegen
Telgo AG, Route D'Agy 16, 1763 Granges-Paccot, Switzerland
Technische Daten
text_image
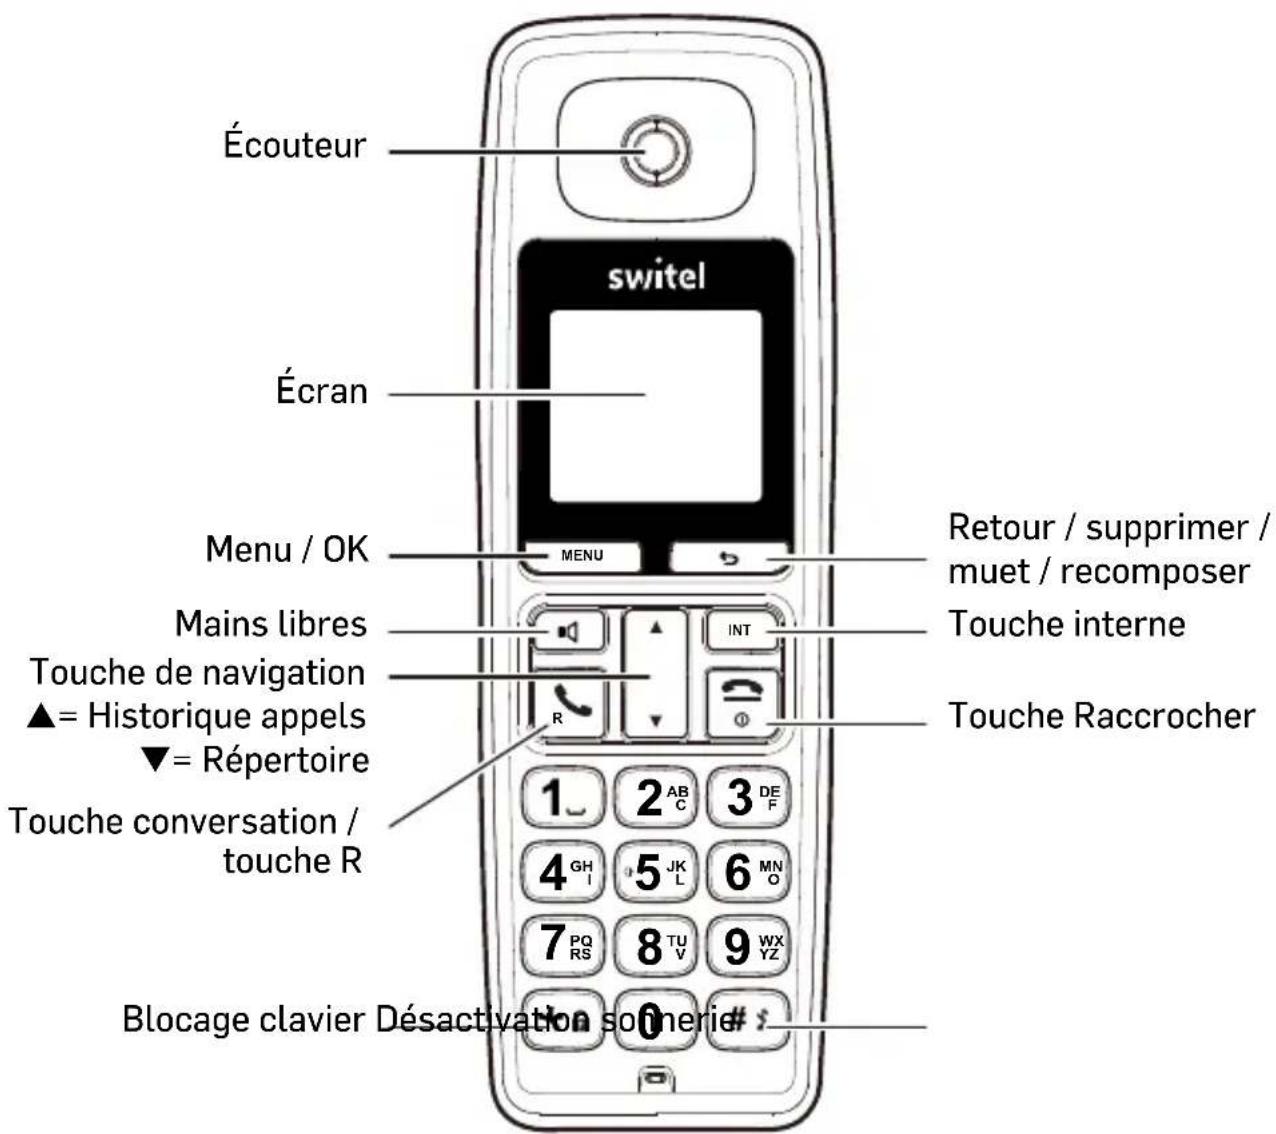
Speaker switel Display Menu/OK MENU Hands-free Navigation key ▲=Calls list ▼= Phonebook Talk key/Flash key 1 2 ABC 3 DEF 4 GH 5 JK L 6 MN O 7 PQ RS 8 TU V 9 WX YZ 0 # ? Keypad lock Ringer off Back/Delete/ Mute/Redial Internal End call key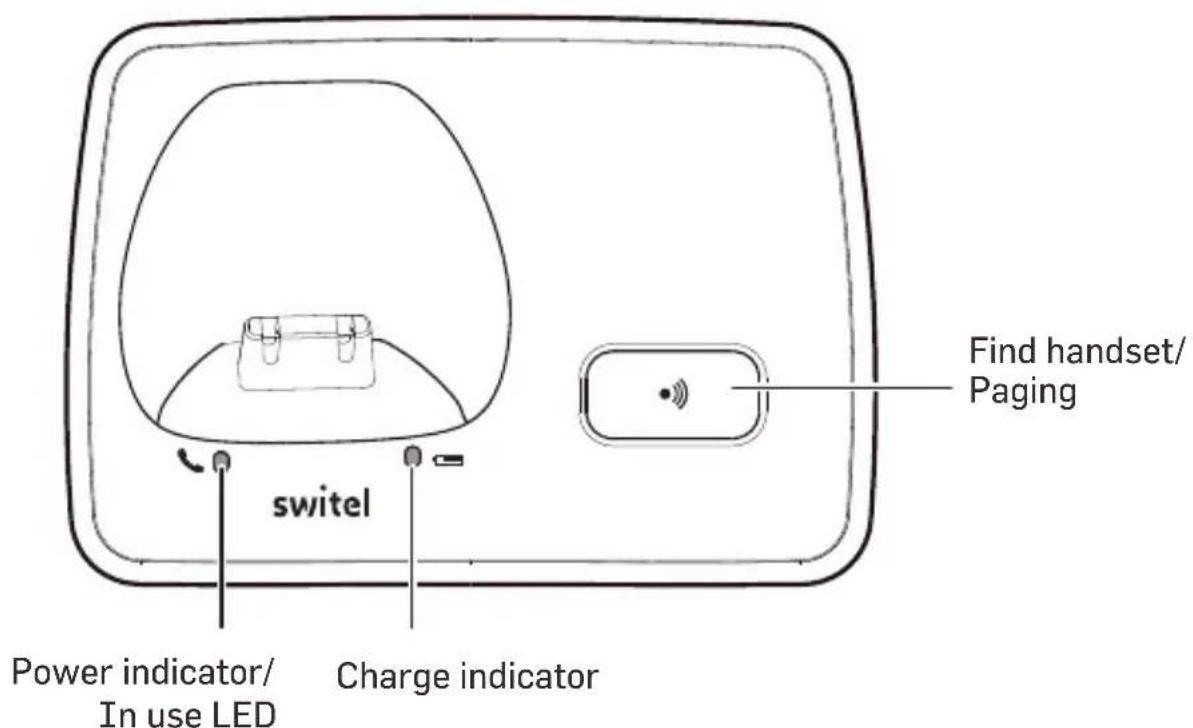
text_image
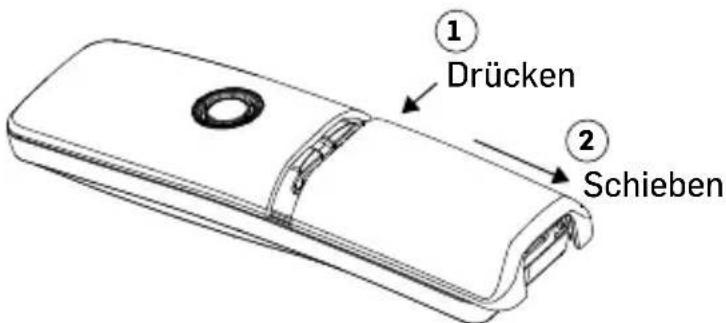
Find handset/ Paging switel Power indicator/ In use LED Charge indicatorSet up your phone system
Package contents
GB

1 Base station 1 Cordless handset
2 NiMH-Akkus, 1,2 V, 300 mAh 1 Adapter
1 Line cord 1 User's manual
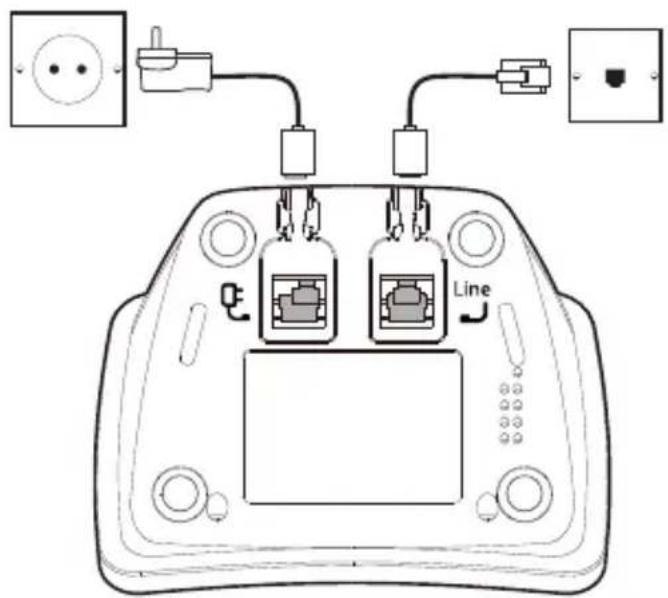
Connection the base station
text_image
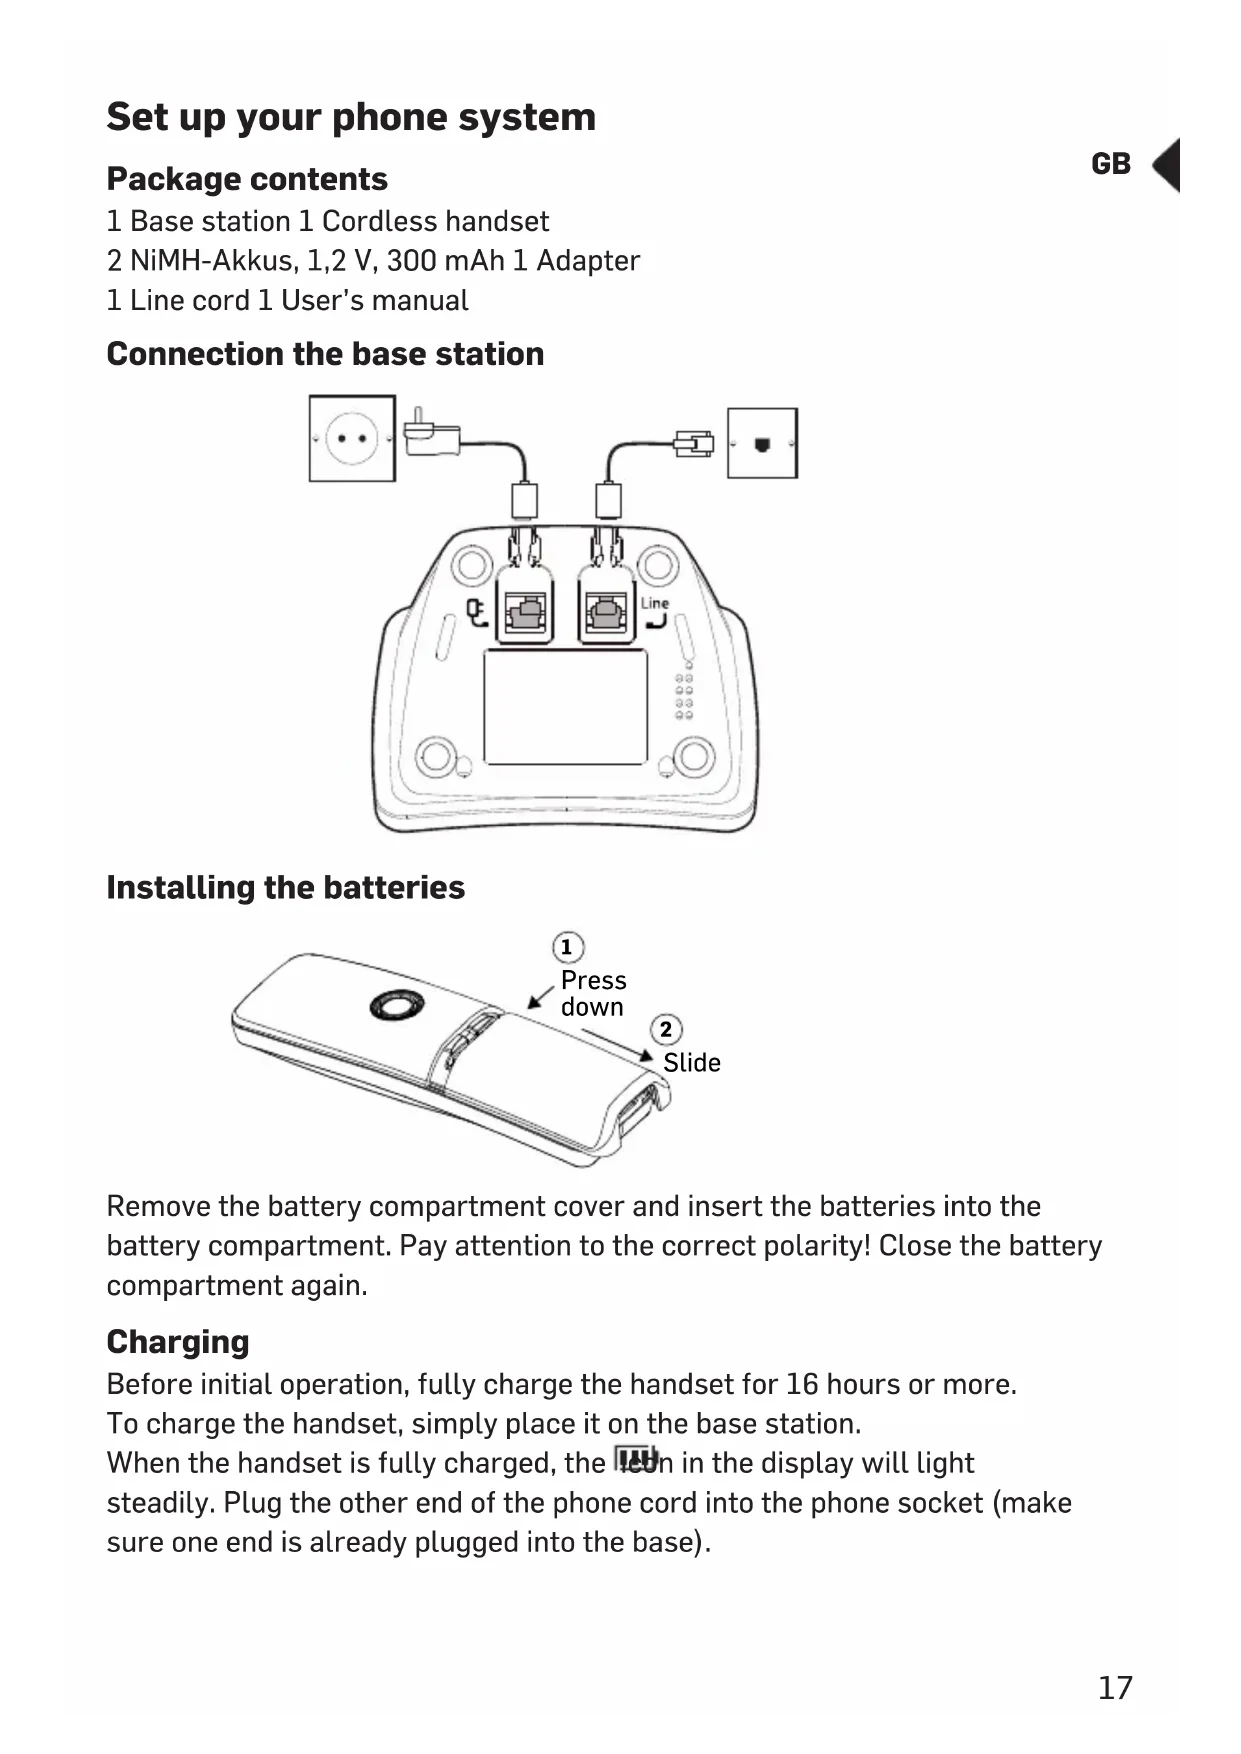
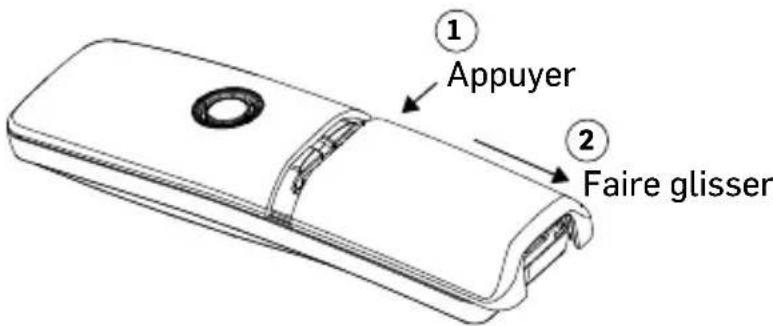
Diagram of a device with labeled components including power outlet, socket, and wiring connectionsInstalling the batteries
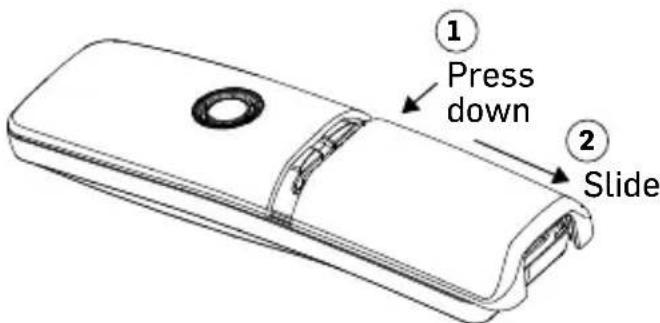
text_image
① Press down ② SlideRemove the battery compartment cover and insert the batteries into the battery compartment. Pay attention to the correct polarity! Close the battery compartment again.
Charging
Before initial operation, fully charge the handset for 16 hours or more. To charge the handset, simply place it on the base station.
When the handset is fully charged, the icon in the display will light steadily. Plug the other end of the phone cord into the phone socket (make sure one end is already plugged into the base).
Using the phone
Key functions
To enter *. Press and hold to turn on/off keypad lock function. During a call, press and hold to toggle between tone dialing and pulse dialing.
In standby mode, press and hold to turn the ringer on / off. When entering text, press and hold to toggle between "ABC" and "abc".

Open menu / OK

Back / Delete / Mute / Redial

End call key:
Press to turn the phone on. If held pressed, turns the phone off. In menu mode, briefly press it to cancel your input and return to standby mode. During a call, briefly press it to end the call.

Talk key:
Makes telephone calls and answers them. Press during a call to execute flash function.

Switch handsfree on / off.
Caution: Handsfree can suddenly increase the volume in the handset to a very high level. Make sure the handset is not too close to the ear.

Navigation key:
▲Up key / calls list:
Scroll up through lists and menu options. Enter the incoming calls list. Increases the earpiece volume during a call. Increases the ringing volume for an incoming call.
▼Down key / phonebook:
Scroll down through lists and menu options. Enter the phonebook. Decreases the earpiece volume during a call. Decreases the ringing volume for an incoming call.

Internal call / forward accepted call internally (only if several handsets are registered at the base).

Enter a space (for text input).
Display icons
| Y | Link indicator. Flashes when handset out of range. |
| Indicates the handsfree function is enabled. | |
| New entries in the calls list. | |
| Battery charge level: / = nearly empty. In addition, a warning tone every minute during a conversation. | |
| Alarms set to ring at a specified time. | |
| The line is engaged. Flashes on incoming calls. | |
| Ringer is switched off. | |
| One or more messages in your voice mailbox (depends on provider). | |
| The phonebook is open. |
Entering names/numbers
Use the alphanumeric keypad to enter names in the phonebook. For example, to enter the name Paul:
P Press 7 once
A Press 2 once
U Press 8 twice
L Press 5 three times
To enter a space, press 1.
Press to delete the last character, or press and hold down to delete all characters.

Entering a pause
If your phone is connected to a switchboard, you may need to enter a pause in a stored number. A pause is usually stored after the switchboard's access code (eg 9).
- When storing a number, press and hold the # key until "P" appears in the display. Then continue entering the phone number.
Menu structure map
PHONEBOOK NEW ENTRY
LIST ENTRY
DELETE ALL
DIRECT MEM
CLOCK/ALARM DATE & TIME
SET ALARM
ALARM TONE
PERSONAL SET HANDSET TONE
HANDSET NAME
AUTO PICK-UP
AUTO HANG-UP
LANGUAGE
ROOM MONITOR
BACKLIGHT
ADVANCED SET RECALL TIME
DIAL MODE
CALL BARRING
EASY CALL
REGISTRATION
UNREGISTER
PIN
RESET UNIT
PREFIX
SELECT COUNTRY
INTRUSION
ECO MODE
ECO PLUS
First commissioning
1 After inserting the batteries, the display shows "Welcome" in different languages.
2 Press MENU, use the navigation keys ▲/▼ to select your country and press MENU
3 Press again to confirm.
Setting date and time
1 Press, select CLOCK/ALARM and press.
2 Select DATE & TIME and press . MENU
3 Enter the current date and press . MENU
4 Enter the current time and press . MENU

Use
Turning the cordless handset on/off
To turn on the handset, press and hold the End call key until the display lights up, or place it in the base station.
To turn off the handset, press and hold the End call key until the display goes out.
Making a call
1 Press the Talk key.
2 Enter the telephone number.
3 To end the call, press the End call key or replace the handset on the base.
or
1 Enter the telephone number. If you make a mistake, correct it by using the key.
2 Press the Talk key.
3 To end the call, press the End call key or replace the handset on the base.
Taking a call
1 Press the Talk key.
2 To end the call, press the End call key or replace the handset on the base.
Hands-free
1 Press during a call.
2 To turn off the speakerphone, press again.
Redial
1 Press to open the redial list.
2 Select an entry and press the Talk key.
Setting the volume
1 Whilst in a call press the navigation keys ▲/▼.
Mute (microphone off)
1 Press to mote the microphone.
2 Press once again to switch on the microphone.
Locking the keypad
If the keypad is locked, all keys except the talk key are locked so that you can answer an incoming call. During this call, the key lock is released, but it is activated again after the call is ended.
1 In idle state press and hold the * key, until the notification appears, to lock the keypad.
2 For unlocking the keypad press and hold the * key until the notification disappears.
Paging
To find a mislaid handset, you can initiate a paging call on the base.
1 In idle state press the paging key .
2 To cancel the paging press the key once again or press any key on the handset.
Phonebook
Storing a new entry
1 Press, select PHONEBOOK and press.
2 Select NEW ENTRY and press . MENU
3 Enter the name and press . MENU
4 Enter the telephone number and press . MENU
5 Select a group for this entry and press . MENU
Note: You can assign individual entries to specific groups of your choice.
For example, Group A contains the phone numbers of your co-workers. You can also assign a specific ring melody to this group (see "Handset tone" on page 25). If the caller's phone number is available on your line, you will hear the set melody for that group every time someone in that group calls you.
Dialing from the phonebook
1 Press ▼.
2 Select an entry and press the Talk key.
Editing or deleting entries
1 Press ▼, select an entry and press . MENU
Press to toggle between name and phone number. If the phone number is more than 12 digits, press again to see the rest of the phone number.
2 Select EDIT ENTRY or DELETE ENTRY and press MENU.
Deleting all entries
1 Press, select PHONEBOOK and press.
2 Select DELETE ALL and press . MENU
3 Confirm the confirmation query with . MENU
Speed dial
You can store phonebook entries on the digit keys 1 ... 9, then select them with a long press on the key in standby status.
1 Press, select PHONEBOOK and press.
2 Select DIRECT MEM and press . MENU
3 Select a key and press . MENU
4 The current content is displayed. Press . MENU
5 Select ADD or DELETE and press. MENU
To add, select an entry and press MENU
To delete, confirm the confirmation query with MENU
MENU
MENU
MENU
GB

Call log
Viewing entries and calling
1 Press ▲.
2 Select an entry.
3 Press the Talk key to call the telephone number.
Editing entries
1 Press ▲.
2 Select an entry and press . MENU
You can edit, save to phonebook or delete the entry or delete the entire list.
Redial
Viewing entries and calling
1 Press .
2 Select an entry.
3 Press the Talk key to redial the telephone number.
Editing entries
1 Press .
2 Select an entry and press . MENU
You can save to phonebook or delete the entry or delete the entire list.
Internal call
(only with several suitable handsets at the same base)
1 Press . INT
2 Enter the number for the desired device. If only one other handset is registered, it will ring immediately.
Transferring a call / 3-party conference
(only with several suitable handsets at the same base)
1 You are conducting an external call and want to forward it internally or establish a 3-party conference.
2 Press . INT
3 Enter the number for the desired device. If only one other handset is registered, it will ring immediately.
4 If the internal partner had answered, press the End call key to forward the call, or to establish a 3-party conference.
5 If the internal partner does not answer, or if you want to cancel the transfer, press again.
Note:
- If one of the participants leaves the conference, the others remain connected.
Alarm
An active alarm is indicated in the display by the symbol.
Set alarm time
1 Press, select CLOCK/ALARM and press.

2 Select SET ALARM and press . MENU
3 Select ON ONCE or ON DAILY and press MENU.
4 Enter the time and press . MENU
5 When the alarm sounds, press any key to turn it off.
Set the alarm tone
1 Press, select CLOCK/ALARM and press.

2 Select ALARM TONE and press . MENU
3 Slect a melody and press. MENU
Personal settings
Personal settings are described below. You can access the corresponding function via the menu (see menu structure).
Ringer melody and volume (PERSONAL SET -> HANDSET TONE)
Select the ringtone and volume for calls (including group melody) and turn the keytone on or off.
HS Name (PERSONAL SET -> HANDSET NAME)
You can give the handset an individual name.
Auto Answer (PERSONAL SET -> AUTO PICK-UP)
If set to on, you can answer a call by simply picking up the handset from the base, without pressing any key.
Auto Hang-up (PERSONAL SET -> AUTO HANG-UP)
If set to on, you can end a call simply by placing the handset in the base station.
Display language (PERSONAL SET -> LANGUAGE)
Select the language for the display.
Room monitor (PERSONAL SET -> ROOM MONITOR)
(only with several suitable handsets at the same base)
If set to on, this handset can be brought into the room you want to monitor.
Only the microphone is switched on. Nobody in this room can hear you.
Press on a second handset and enter the number of the handset you are using for room surveillance. You can now hear sounds from the room.
Note: To stop the room monitoring at any time, press the hang up key.
IMPORTANT: This feature is not intended for use as a baby monitor and does not replace adult supervision.
Backlight (PERSONAL SET -> BACKLIGHT)
You can turn the display backlight on or off.
Advanced settings
Advanced settings are described below. You can access the corresponding function via the menu (see menu structure).
Recall time (ADVANCED SET -> RECALL TIME)
Select the length of the flash signal to use network features or to operate on a PBX. If necessary, contact your network operator for information.
Dialling mode (ADVANCED SET -> DIAL MODE)
Choose between tone dialing and pulse dialing. If necessary, contact your network operator for information.
Call barring (ADVANCED SET -> CALL BARRING)
Switch the function on and enter up to four 4-digit numbers that are to be blocked (eg international code or national prefixes, etc.). The required PIN is "0000" in the delivery state.
Easy Call (ADVANCED SET -> EASY CALL)
When this feature is enabled, only a specific stored number can be dialed by pressing any key on the handset (except the end call key).
The required PIN is "0000" in the delivery state.
Easy Call can only be switched on if a phone number has been programmed. To switch off the Easy Call, press the end call key and switch off the function.
Select base (ADVANCED SET -> REGISTRATION -> SELECT BASE)
If the handset is registered to several base stations, you can select the active base.
Change PIN (ADVANCED SET -> PIN)
The 4-digit PIN is used to register or deregister a handset and in some settings. On delivery, it is "0000". If you forget your PIN, you need to reset your device.
Reset (ADVANCED SET -> RESET UNIT)
Your phone will be reset to the factory settings. Entries stored in the phonebook are retained.
Prefix (ADVANCED SET -> PREFIX)
You can set the phone to detect a number and replace it with another number. The number to be recorded can be up to 5 digits long. It can be replaced by a number up to 10 digits.
Select country (ADVANCED SET -> SEL. COUNTRY)
Select a country from the list to set the network parameters of the phone to be compatible with that country. The display language is also adjusted.
Intrusion (ADVANCED SET -> INTRUSION)
During an external call, another handset registered to the base station can join in and make the call a three-way call by simply pressing the talk key.
ECO mode (ADVANCED SET -> ECO MODE)
Your phone has an ECO mode feature that reduces transmit power and energy consumption during a call. When the ECO mode is on, the range of the handset is reduced.
ECO plus (ADVANCED SET -> ECO PLUS)
If ECO PLUS is activated and the unit has not been used for one minute, the transmission power between the handset and the base station will be switched off. An incoming call or pressing any key activates the connection again.
Registering a new handset
You can register up to 5 suitable handsets to your base.
The supplied handset is already registered with the number 1.
1 Press the paging button on the base station for approx. 3 seconds.
2 Now perform the necessary steps for the registration of the new handset (see respective user manual).
Example DC2000:
1 Press, select MEND ADVANCED SET and press.
2 Select REGISTRATION and press MENU.
3 Select REGIST. BASE and press MENU.
4 Enter a number for the base on which you have the handset want to log in (the base on which the handset is currently registered, flashes).
5 Enter the base station's PIN code (in delivery state 0000) and press MENU

Removing a handset
Please note that the handset cannot be used anymore with the base.
1 Press, select ADVANCED SET and press.

2 Select UNREGISTER and press . MENU
3 Enter the current PIN (in delivery state = 0000) and press . MENU
4 Select the handset that you want to remove, and press . MENU
Appendix
Safety notes
- Read the instructions in this handbook carefully. Be sure to save it for future reference.
- Read and follow all warning and instruction labels on the equipment itself.
- Be sure to use only the power supply in the package, and ensure that your power source matches the rating listed for it. If you are not sure, check with your dealer or with your local power company.
- Avoid strong shocks. Don't use the power supply if it has received any hard knocks or looks damaged in any way; immediately contact an authorised service center.
- Hold your handset firmly. Otherwise it may fall and be damaged.
- Do not operate the phone in an explosive atmosphere.
- Do not use the phone near water, or spill liquid of any kind on it. If you think that liquid has penetrated the phone, immediately unplug it, dry it with a soft, clean cloth and contact your dealer.
- Respect the environmental conditions. All of the parts of this equipment are designed for indoor use only. Never expose them to extremely hot or cold temperatures. Don't expose the cordless telephone to excessive vibrations or dusty, rainy places.
- Never try to disassemble or service the equipment by yourself (aside from the routine maintenance described in this manual). Doing so immediately voids the warranty, and you can cause damage requiring extensive repair work. Always contact your local dealer for assistance.
- Handle the batteries properly. Particularly, strictly follow the directions stated in this manual.
- Never use the phone with non-suitable batteries, and charge them only with the supplied base and charger. The use of any non-genuine parts can create hazards, electric shocks and other risks, and voids the warranty.
- In case of problems, please refer to this user's manual or contact your dealer and/or the nearest official service center. Every service operation not provided by official service centers voids the warranty.
- Use always good sense! Don't go on with any operations if you are not sure what you are really doing. In case of doubts please contact your dealer.
- This phone cannot be used to place calls, including emergency calls, under these conditions: during power failure, if batteries are defective or depleted, or if the keypad is locked.
- Do not use this phone near emergency medical equipment or near people with implanted electrical devices, such as pacemakers. Additionally, radio signals between the handset and the base can interfere with hearing aids, causing strong noise.
Power adapter plug
The power adapter plug supplied fulfils the ecodesign requirements of the European Union (Directive 2009/125/EC). This means that, both in an operating state and in an idling state, the power consumption is considerably lower compared to power adapter plugs with an older design.
Disposal
In order to dispose of your device, take it to a collection point provided by your local public waste authorities (e.g. recycling centre). According to laws on the disposal of electronic and electrical devices, owners are obliged to dispose of old electronic and electrical devices in a separate waste container. The adjacent symbol indicates that the device must not be disposed of in normal domestic waste!

Batteries represent a hazard to health and the environment!
Never open, damage or swallow batteries or allow them to pollute the environment. They may contain toxic, ecologically hazardous heavy metals. You are legally obliged to dispose of power packs and batteries at the point of sale or in the corresponding containers provided at collection points provided by local public waste authorities. Disposal is free of charge. The adjacent symbols indicate that the batteries must not be disposed of in normal domestic waste and must be brought to collection points provided by local public waste authorities. Packaging materials must be disposed of according to local regulations.

Declaration of conformity

This device fulfils the requirements stipulated in the EU directive: 2014/53/EU.
Conformity with the above mentioned directive is confirmed by the CE symbol on the device. To view the complete Declaration of Conformity, please refer to the free download available on our website www.switel.com.
Telgo AG, Route D'Agy 16, 1763 Granges-Paccot, Switzerland
Technical data
| Standard | DECT |
| Power supply (base) | Input: 100-240V 50/60HzOutput: 7.5 VDC, 300 mA |
| Range | Outdoors approx. 300 m, indoors approx. 50 m |
| Standby | Up to 100 hrs |
| or | |
| Maximum Talk Time | Up to 6 hrs |
| Rechargeable batteries | 2 x 1.2 V, 300 mAh, NiMH |
| Dialling mode | Tone (DTMF) / Pulse |
| Recall time (Flash) | SHORT = 100 ms (FE/DE/IT/NL/A), 90 ms (CH)MEDIUM = 250 ms (DE/CH/A), 270 ms (FR/IT), 300 ms (NL) / LONG = 600 ms |
| Opt. ambient conditions | 0°C to 40°C / 80% rel. humidity |
Guarantee
SWITEL equipment is produced and tested according to the latest production methods. The implementation of carefully chosen materials and highly developed technologies ensure trouble free functioning and a long service life. The terms of guarantee do not apply where the cause of equipment malfunction is the fault of the telephone network operator or any interposed private branch extension system. The terms of the guarantee do not apply to the rechargeable batteries or power packs used in the products. The period of guarantee is 24 months from the date of purchase. All deficiencies resulting from material of production faults which occur during the period of guarantee will be eliminated free of charge. Rights to claims under the terms of guarantee are annulled following intervention by the purchaser or third parties. Damage caused as a result of improper handling or operation, incorrect positioning or storing, improper connection or installation, Acts of God or other external influence are not covered by the terms of guarantee. In the case of complaints, we reserve the right to repair or replace defect parts or provide a replacement device. Replacement parts or devices become our property. Rights to compensation in the case of damage are excluded where there is no evidence or intent or gross negligence by the manufacturer. If your equipment shows signs of defect during the period of guarantee, please return to the sales outlet in which you purchased the SWITEL equipment together with the purchase receipt. All rights to claims under the terms of guarantee in accordance with this agreement must be asserted exclusively with regard to your sales outlet.
Two years after the purchase of our products, claims under the terms of guarantee can no longer be asserted.
Aperçu
Raccorder la station de base
text_image
Diagram of a device with labeled components including power outlet, socket, and wiring connectionsInsérer les piles
text_image
① Appuyer ② Faire glisserTelgo AG, Route D'Agy 16, 1763 Granges-Paccot, Switzerland
text_image
Diagram of a device with labeled components including power outlet, socket, and wiring connectionsModifica PIN (IMP AVANZATE -> PIN)
Reset (IMP AVANZATE -> REIMPOSTA.)
Inclusione (IMP AVANZATE -> INTRUSIONE)
Telgo AG, Route D'Agy 16, 1763 Granges-Paccot, Switzerland
Dati tecnici
Standard
DECT
text_image
Diagram of a device with labeled components including power outlet, socket, and wiring connectionsES

Introducir baterías

text_image
① Presionar ② DeslizarModificar PIN (AJUSTE AVANZ -> PIN)
Telgo AG, Route D'Agy 16, 1763 Granges-Paccot, Switzerland
text_image
Diagram of a device with labeled components including power outlet, socket, and wiring connections
Batterijen plaatsen
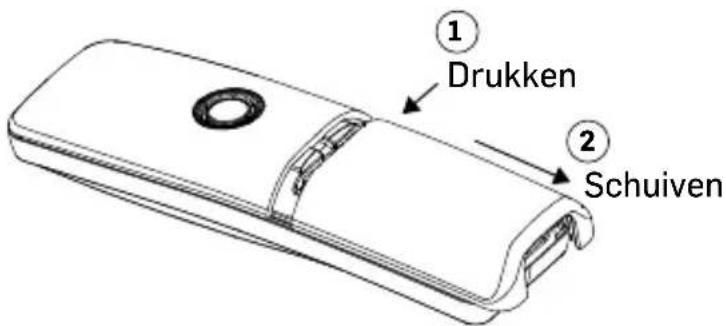
text_image
① Drukken ② SchuivenTelgo AG, Route D'Agy 16, 1763 Granges-Paccot, Switzerland
Technische specificaties
In the case of technical questions, please use the service form on our website: http://www.switel.com/en/product-information-technical-support/